Shoulder Joint Replacement And Rehabilitation
Introduction
Although shoulder joint replacement is less common than knee or hip replacement, it is just as successful in relieving joint pain.
Shoulder replacement surgery was first performed in the United States in the 1950s to treat severe shoulder fractures. Over the years, shoulder joint replacement has come to be used for many other painful conditions of the shoulder, such as different forms of arthritis.
If nonsurgical treatments like medications and activity changes are no longer helpful for relieving pain, you may want to consider shoulder joint replacement surgery. Joint replacement surgery is a safe and effective procedure to relieve pain and help you resume everyday activities.
Description
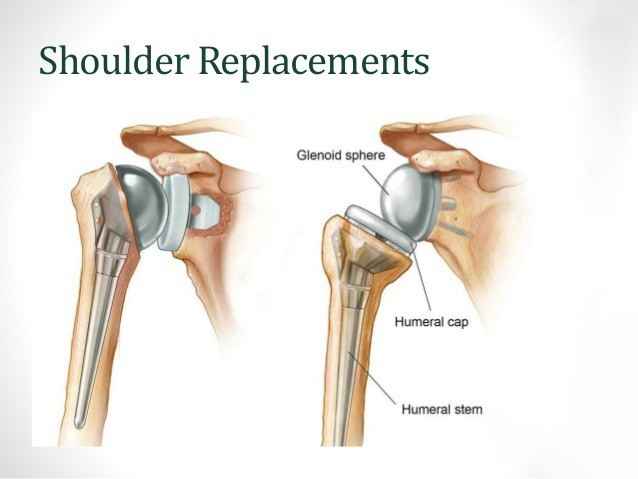
Shoulder joint replacement
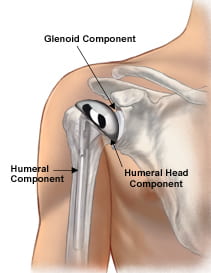
In shoulder replacement surgery, the damaged parts of the shoulder are removed and replaced with artificial components, called a prosthesis.
The treatment options are either replacement of just the head of the humerus bone (ball), or replacement of both the ball and the socket (glenoid).
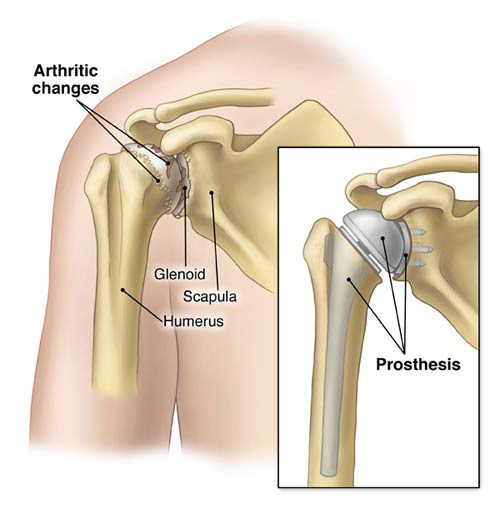
The shoulder anatomy
Similar to the hip joint, the shoulder is a large ball and socket joint. It is made up of bones, tendons, muscles, and ligaments, which hold the shoulder in place but also allow movement. Bones of the shoulder joint include: the clavicle (collar bone), scapula (shoulder blade), and humerus (arm bone). The clavicle attaches the shoulder to the rib cage and holds it out away from the body.
The clavicle connects with the large flat triangular bone, the scapula (shoulder blade) at the acromioclavicular joint (A.C. joint or the acromion). The rounded head of the humerus, or arm bone, rests against the socket in the shoulder blade.
In a total shoulder replacement, a metal ball is used to replace the humeral head while a polyethylene cup becomes the replacement of the glenoid socket.
The primary indication for a total shoulder replacement is pain which will not respond to non-operative treatment. Pain may be the result of abnormalities and changes in the joint surfaces as a result of arthritis or fractures.
The primary goal of total shoulder replacement surgery is to alleviate pain with secondary goals of improving motion, strength and function.
Some conditions that may require a shoulder replacement include:
- Osteoarthritis. This type of arthritis is common in older people. It occurs when the cartilage that pads bones wears away.
- Rheumatoid arthritis (RA). With RA, your immune system mistakenly attacks your joints, causing pain and inflammation.
- Avascular necrosis. (Osteonecrosis) :Avascular necrosis is a painful condition that occurs when the blood supply to the bone is disrupted. Because bone cells die without a blood supply, osteonecrosis can ultimately cause destruction of the shoulder joint and lead to arthritis. Chronic steroid use, deep sea diving, severe fracture of the shoulder, sickle cell disease, and heavy alcohol use are risk factors for avascular necrosis
- In some cases, a severe, acute injury triggers or contributes to this long-term damage, for example:
- torn rotator cuff
- Rotator Cuff Tear Arthropathy: A patient with a very large, long-standing rotator cuff tear may develop cuff tear arthropathy. In this condition, the changes in the shoulder joint due to the rotator cuff tear may lead to arthritis and destruction of the joint cartilage.
- shoulder fracture : A broken shoulder. If you badly break your shoulder bone, you might need a shoulder replacement to repair it.
- ankylosing spondylitis
- Failed previous Shoulder Replacement Surgery
People who have good results with shoulder surgery commonly have:
- weakness or loss of motion in the shoulder
- severe pain in the shoulder that interferes with everyday life
- pain while resting or during sleep
- little or no improvement after trying more conservative therapies, such as medications, injections, or physical therapy
This type of surgery is less successful in people with:
Diabetes
Depression
Obesity
Parkinson’s disease
who needs shoulder replacement surgery?
There are several reasons why your doctor may recommend shoulder replacement surgery. People who benefit from surgery often have:
- Severe shoulder pain that interferes with everyday activities, such as reaching into a cabinet, dressing, toileting, and washing.
- Moderate to severe pain while resting. This pain may be severe enough to prevent a good night’s sleep.
- Loss of motion and/or weakness in the shoulder.
- Failure to substantially improve with other treatments such as anti-inflammatory medications, cortisone injections, or physical therapy.
Diagnostic procedures:
To diagnose arthritis in the shoulder, a doctor will order a series of standard X-rays. A CT scan may also be necessary to evaluate a patient’s bone integrity, and magnetic resonance imaging (MRI) may be ordered to determine the condition of important surrounding soft tissues, such as the rotator cuff tendon.
If the doctor suspects there may be nerve damage, based discussions with the patient, an EMG test or nerve conduction study may be ordered to evaluate the nerves that feed the important muscles of the shoulder.
Orthopaedic Evaluation
An evaluation with an orthopaedic surgeon consists of several components:
A medical history. Your orthopaedic surgeon will gather information about your general health and ask you about the extent of your shoulder pain and your ability to function.
A physical examination. This will assess shoulder motion, stability, and strength.
X-rays. These images help to determine the extent of damage in your shoulder. They can show loss of the normal joint space between bones, flattening or irregularity in the shape of the bone, bone spurs, and loose pieces of cartilage or bone that may be floating inside the joint.
Other tests. Occasionally blood tests, a magnetic resonance imaging (MRI) scan, or a bone scan may be needed to determine the condition of the bone and soft tissues of your shoulder.
Shoulder Replacement Options
Total Shoulder Replacement
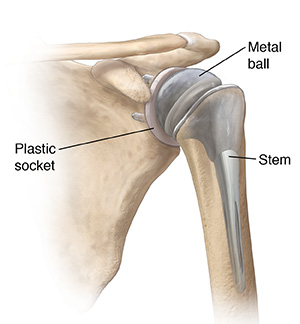
The typical total shoulder replacement involves replacing the arthritic joint surfaces with a highly polished metal ball attached to a stem, and a plastic socket.
These components come in various sizes. They may be either cemented or “press fit” into the bone. If the bone is of good quality, your surgeon may choose to use a non-cemented (press-fit) humeral component. If the bone is soft, the humeral component may be implanted with bone cement. In most cases, an all-plastic glenoid (socket) component is implanted with bone cement.
Implantation of a glenoid component is not advised if:
- The glenoid has good cartilage
- The glenoid bone is severely deficient
- The rotator cuff tendons are irreparably torn
Patients with bone-on-bone osteoarthritis and intact rotator cuff tendons are generally good candidates for conventional total shoulder replacement.
Stemmed Hemiarthroplasty
Depending on the condition of your shoulder, your surgeon may replace only the ball. This procedure is called a hemiarthroplasty. In a traditional hemiarthroplasty, the head of the humerus is replaced with a metal ball and stem, similar to the component used in a total shoulder replacement. This is called a stemmed hemiarthroplasty.
Some surgeons recommend hemiarthroplasty when the humeral head is severely fractured but the socket is normal. Other indications for a hemiarthroplasty include:
- Arthritis that only involves the head of the humerus with a glenoid that has a healthy and intact cartilage surface
- Shoulders with severely weakened bone in the glenoid
- Some shoulders with severely torn rotator cuff tendons and arthritis
Sometimes, surgeons make the decision between a total shoulder replacement and a hemiarthroplasty in the operating room at the time of the surgery.
Studies show that patients with osteoarthritis get better pain relief from total shoulder arthroplasty than from hemiarthroplasty.
Resurfacing Hemiarthroplasty
Resurfacing hemiarthroplasty involves replacing just the joint surface of the humeral head with a cap-like prosthesis without a stem. With its bone preserving advantage, it offers those with arthritis of the shoulder an alternative to the standard stemmed shoulder replacement.
Resurfacing hemiarthroplasty may be an option for you if:
- The glenoid still has an intact cartilage surface
- There has been no fresh fracture of the humeral neck or head
- There is a desire to preserve humeral bone
For patients who are young or very active, resurfacing hemiarthroplasty avoids the risks of component wear and loosening that may occur with conventional total shoulder replacements in this patient population. Due to its more conservative nature, resurfacing hemiarthroplasty may be easier to convert to total shoulder replacement, if necessary at a later time.
Reverse Total Shoulder Replacement
Another type of shoulder replacement is called reverse total shoulder replacement. Reverse total shoulder replacement is used for people who have:
- Completely torn rotator cuffs with severe arm weakness
- The effects of severe arthritis and rotator cuff tearing (cuff tear arthropathy)
- Had a previous shoulder replacement that failed
- For these individuals, a conventional total shoulder replacement can still leave them with pain. They may also be unable to lift their arm up past a 90-degree angle. Not being able to lift one’s arm away from the side can be severely debilitating.
In reverse total shoulder replacement, the socket and metal ball are switched. That means a metal ball is attached to the shoulder bone and a plastic socket is attached to the upper arm bone. This allows the patient to use the deltoid muscle instead of the torn rotator cuff to lift the arm.
Complications
Infection
Infection is a complication of any surgery. In shoulder joint replacement, infection may occur in the wound or deep around the prosthesis. It may happen while in the hospital or after you go home. It may even occur years later. Minor infections in the wound area are generally treated with antibiotics. Major or deep infections may require more surgery and removal of the prosthesis.
Any infection in your body can spread to your joint replacement.
Prosthesis Problems
Although prosthesis designs and materials, as well as surgical techniques, continue to advance, the prosthesis may wear down and the components may loosen. The components of a shoulder replacement may also dislocate. Excessive wear, loosening, or dislocation may require additional surgery (revision procedure).
Nerve Injury
Nerves in the vicinity of the joint replacement may be damaged during surgery, although this type of injury is infrequent. Over time, these nerve injuries often improve and may completely recover.
Other:
- A reaction to anesthesia
- blood vessel damage
- rotator cuff tear
- fracture
- loosening or dislocation of the replacement components
How long will shoulder replacement last?
It’s difficult to say just how long your shoulder replacement will last. Experts estimate that most modern shoulder replacements will last for at least 15 to 20 years.
Revision surgery for a shoulder replacement is rarely needed.
Do’s and Don’ts
The success of your surgery will depend largely on how well you follow your orthopaedic surgeon’s instructions at home during the first few weeks after surgery. Here are some common do’s and don’ts for when you return home:
- Don’t use the arm to push yourself up in bed or from a chair because this requires forceful contraction of muscles.
- Do follow the program of home exercises prescribed for you. You may need to do the exercises 2 to 3 times a day for a month or more.
- Don’t overdo it! If your shoulder pain was severe before the surgery, the experience of pain-free motion may lull you into thinking that you can do more than is prescribed. Early overuse of the shoulder may result in severe limitations in motion.
- Don’t lift anything heavier than a glass of water for the first 2 to 4 weeks after surgery.
- Do ask for assistance. Your physician may be able to recommend an agency or facility if you do not have home support.
- Don’t participate in contact sports or do any repetitive heavy lifting after your shoulder replacement.
- Do avoid placing your arm in any extreme position, such as straight out to the side or behind your body for the first 6 weeks after surgery.
Many thousands of patients have experienced an improved quality of life after shoulder joint replacement surgery. They experience less pain, improved motion and strength, and better function.
Physiotherapy before Shoulder Replacement Surgery
Physiotherapy prior to shoulder replacement is a useful and recommended intervention. It will help to reduce your current symptoms, provide a solid platform for post surgical rehabilitation and accelerate your rehab period. Treatments offered include:
- Cryotherapy (Ice) and heat therapy
- Pain management
- Protective taping and bracing
Acute management of symptoms
- Strengthening surrounding musculature
- Massage and stretching
- Advice on surgery and post-surgical management
Symptoms following Shoulder Replacement Surgery
Following shoulder replacement, your shoulder will be placed in a protective sling for 4-6 weeks to help protect the new shoulder, aid recovery and maximise rehab potential. Common symptoms following shoulder replacement surgery include:
- Pain
- Swelling
- Bruising
Physiotherapy after Shoulder Replacement Surgery
Treatment will initially focus on acute management following surgery and progress on to regaining strength and function.
Weeks 1-3
Initial treatment will concentrate on minimising post operative complication, reducing acute symptoms and the initiation of movement. Treatment will include:
- Cryotherapy
- Pain Management
- Sling use – advice and exercises while in sling
- Elbow, wrist and hand range of movement and strengthening exercises to prevent stiffness and muscle atrophy (wasting away of the muscles)
- Passive and active assisted range of movement
- Isometric strengthening
- Scapula stabilising
- Postural awareness
- Wound management
Weeks 4-6
Following week 4 your sling will be removed and you will be encouraged to commence increased active range of motion and strengthening exercises. Treatment will include:
- Increased passive range of movement to full range
- Begin active range of movement
- Scapular Stabilising
- Soft tissue massage
- Capsule stretching
- Strengthening
- Closed chain activities
- Proprioceptive training
- Scar management
Weeks 7-12
Rehabilitation will include specific exercises needed to perform functional activities and be directed to attaining full range of movement, improving muscular strength and endurance. Treatment will comprise of:
- Full active range of movement
- Stretching
- Soft tissue massage
- Shoulder and scapular strength through range
- Closed and open chain activities
- Muscular endurance
- Breakdown of functional activities into manageable components
- Increased Proprioceptive training
Weeks 12+
Following week 12, your movement and strength will be greatly improved and will be equal or close to your pre-operative state. Full recovery can take up to 12 months and so Physiotherapist will provide a comprehensive long term rehabilitation programme for you to follow with a clear focus on maximising functional use of your arm. Treatment will include:
- Attainment of full range of movement
- Advanced strengthening throughout range
- Advanced proprioceptive exercises
- Functional training
- Long term management
Shoulder Surgery Exercise
Regular exercises to restore motion and flexibility to your shoulder and a gradual return to your everyday activities are important for your full recovery after shoulder surgery.
Your orthopaedic surgeon and physical therapist may recommend that you exercise for 10 to 15 minutes, 2 or 3 times a day during your early recovery period. They may also recommend additional exercises to help prevent stiffness in your elbow and hand. In addition, remember to always use pain as your guide when exercising. Doing too much, too soon may delay healing.
Pendulum, Circular
Bend forward 90 degrees at the waist, placing your uninvolved hand on a table for support.
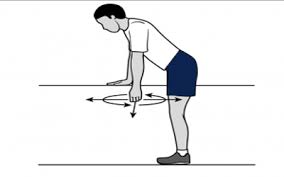
Rock body in a circular pattern to move arm clockwise 10 times, then counterclockwise 10 times. Keep your arm relaxed during the exercise. The circular pendular movement should occur through your shoulder joint.
Do 3 sessions a day.
Shoulder Forward Elevation (Assisted)
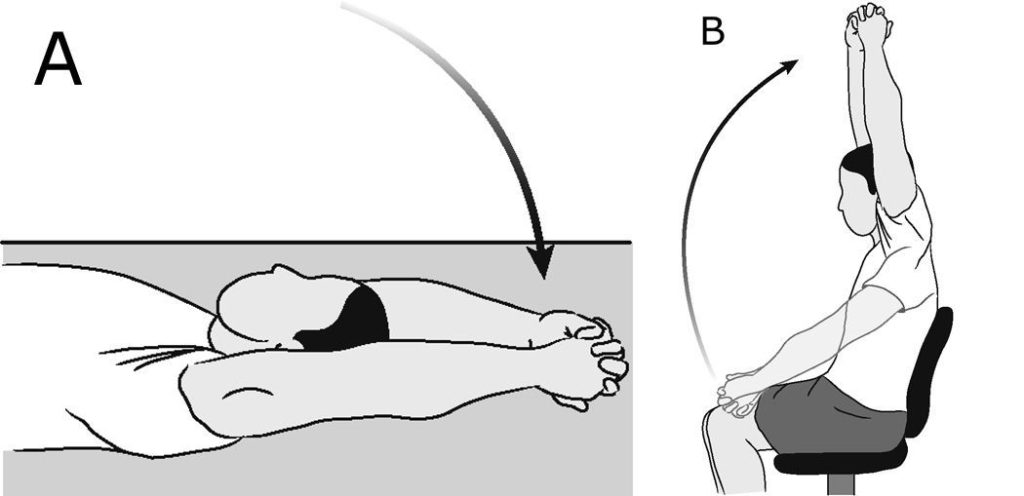
This exercise can be done either lying down (A) or sitting down (B). Clasp hands together and lift arms above head. Keep your elbows as straight as possible. Maintain the elevation for 10-20 seconds, then slowly lower your arms.
Slowly increase the elevation of your arms as the days progress, using pain as your guide.
Repeat 10-20 times per session.
Do 3 sessions a day.
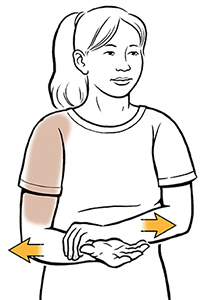
Supported Shoulder Rotation (Assisted)
Keep elbow in place and shoulder blades down and together. Slide forearm back and forth, as shown. You can also perform this exercise using a stick or cane to assist your arm outwards (keeping your elbow at your side).
Repeat 10 times per session.
Do 3 sessions a day.
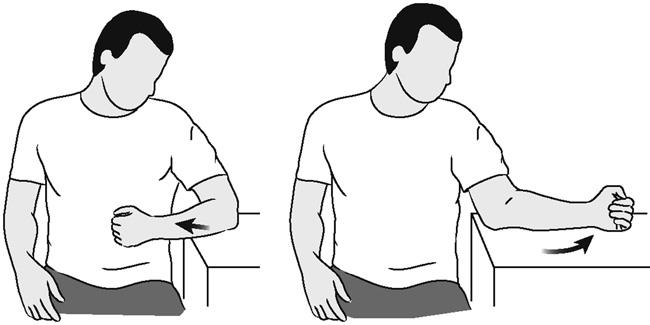
Note: Your surgeon may restrict the degree of outward movement (external rotation) of your operated shoulder after surgery. Before performing this exercise, check with your surgeon or physical therapist to determine if you have an external rotation limit.
Shoulder Internal Rotation (Assisted)
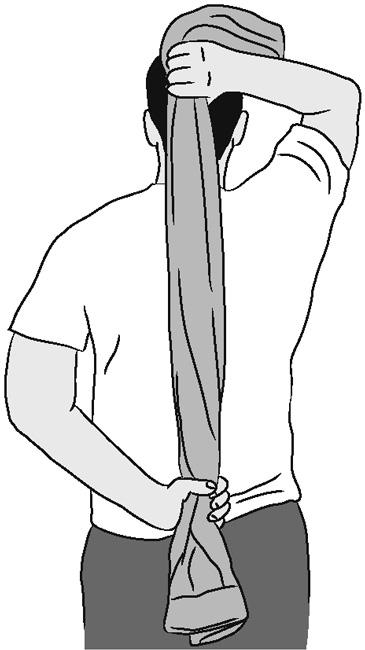
Use your other hand or a towel to help bring your involved hand behind your back and across to the opposite side.
Repeat 10 times per session.
Do 3 sessions a day.
Walk Up Exercise (Active)
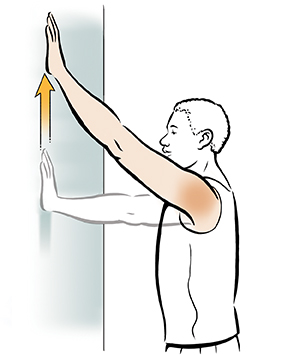
With elbow straight, use fingers to “crawl” up a wall or door frame as far as possible. Hold for 10-20 seconds.
Repeat 5-10 times per session.
Do 3 sessions a day.
Shoulder Forward Elevation (Active)
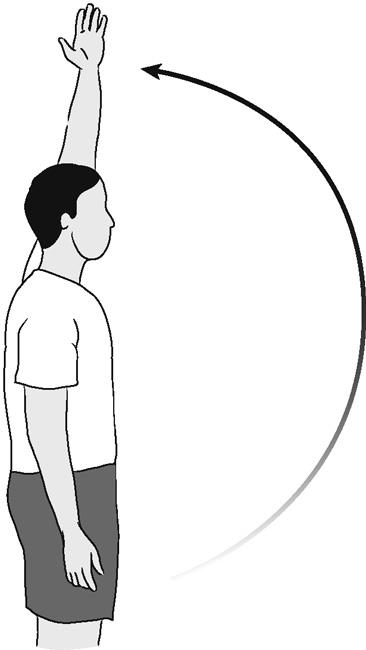
Raise arm upward to point to ceiling, keeping elbows straight and leading with your thumb, as shown. Hold for 10 seconds.
Repeat 5-10 times per session.
Do 3 sessions a day.
Tip: Avoid hiking or bringing up your shoulder blade. It may be beneficial to watch yourself do this exercise in front of a mirror.
Shoulder Abduction (Active)
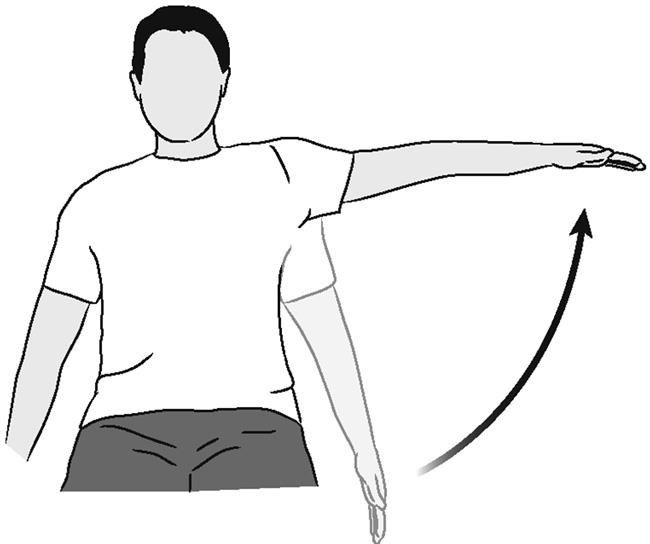
Raise arm out to side, with elbow straight and palm downward. Do not shrug your shoulder or tilt your trunk.
Repeat 3 times per session.
Do 3 sessions a day.
Note: This exercise may not be recommended after certain surgeries. Check with your surgeon or physical therapist to ensure that it is appropriate for you.
Shoulder Extension (Isometric)
Stand with your back against the wall and arms straight at your sides. Keeping your elbows straight, push your arms back into the wall. Hold for 5 seconds, and then relax.
Repeat 5-10 times per session.
Do 3 sessions a day.
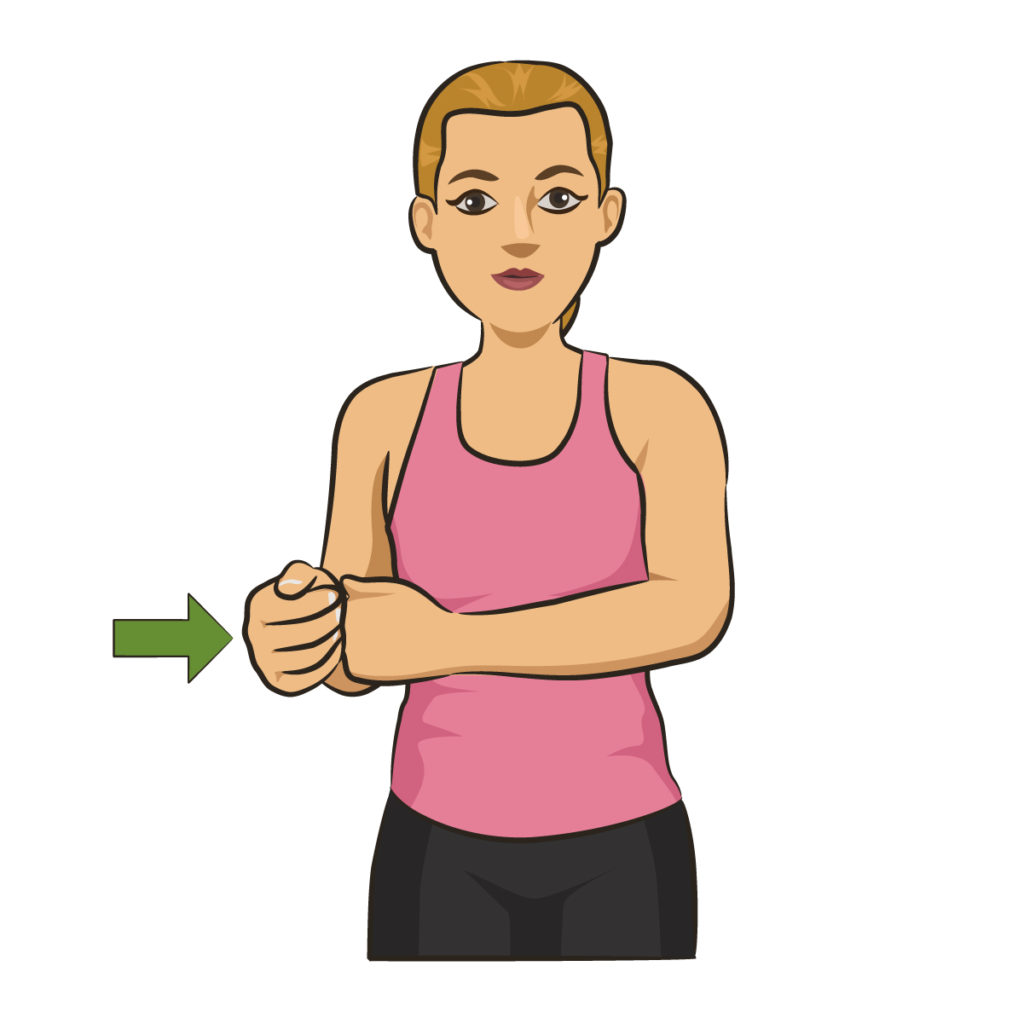
Shoulder External Rotation (Isometric)
Stand with the involved side of your body against a wall. Bend your elbow 90 degrees. Push the back of your hand slowly into the wall. Hold for 5 seconds, and then relax.
Repeat 10 times per session.
Do 3 sessions a day.
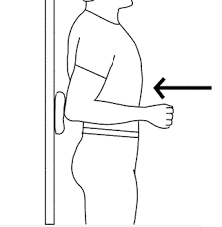
Shoulder Internal Rotation (Isometric)
Stand at a corner of a wall or in a door frame. Place your involved arm against the wall around the corner, bending your elbow 90 degrees. Push the palm of your hand into the wall. Hold for 5 seconds, and then relax.
Repeat 10 times per session.
Do 3 sessions a day.
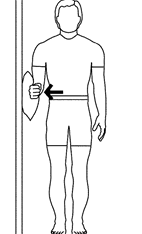
Shoulder Adduction (Isometric)

Shoulder Adduction (Isometric)
Place a small pillow between your inner arm and the side of your chest, as shown. With your arm, squeeze the pillow against the side of your chest. Hold for 5 seconds, and then relax.
Repeat 10 times per session.
Do 3 sessions a day.
Shoulder Abduction (Isometric)
Shoulder Abduction (Isometric)
Resisting upward motion to the side, slowly and gently push your arm against the back of chair. Hold for 5 seconds, and then relax.
Repeat 10 times per session.
Do 3 sessions a day.
Shoulder Internal Rotation (Strengthening)
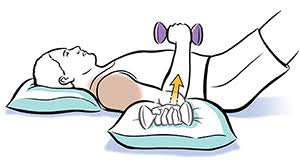
Shoulder Internal Rotation
Lie on your involved side. Keep your elbow bent at 90 degrees. Holding a light weight, raise hand toward stomach. Slowly return.
Repeat 10 times per session.
Do 3 sessions a day.
Shoulder External Rotation (Strengthening)
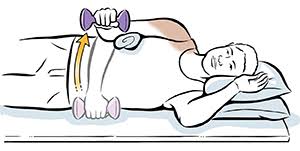
Shoulder External Rotation
Lie on your uninvolved side. Keep your elbow bent at 90 degrees. Holding a light weight, raise hand away from stomach. Slowly return.
Repeat 10 times per session.
Do 3 sessions a day.
Self Range of Motion With a Cane
Once your shoulder has healed enough, your doctor may want you to start gaining some range of motion. Your PT can show you do this with a cane or broomstick. To do cane range of motion:
- Lie on your back on your bed or another firm surface.
- Hold the cane in both hands at your waist.
- Raise the cane up in the air overhead. Use your strong arm to guide your surgical arm up overhead.
- Slowly return to the starting position.
- Repeat 10 repetitions.
You can also use a cane to improve the way your shoulder moves out to the side of your body, a direction called abduction. To do this:
- Stand with your cane or stick in your hands at your waist.
- Use your non-operated arm to push your total shoulder replacement arm out to the side.
- Move your arm as far as possible out to the side, and then slowly return to the starting position.
- Repeat 10 times.
Shoulder range of motion can also be used with a pulley system attached to the top of your door
Hand Grip Exercises
As you are healing from total shoulder replacement surgery, you may be required to keep your arm in a sling. During this time, the muscles of your forearm and hand may get weak. To combat this, your PT may prescribe hand grip exercises.
The simplest way to do hand grip exercises is with a towel. Simply roll up a hand towel, and squeeze it in your hand. Hold for a few seconds, and then relax. Repeat this for 10 to 15 repetitions.
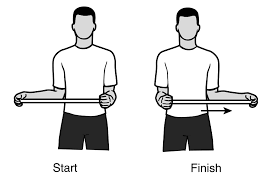
Rotator Cuff Strengthening
The rotator cuff is a group of four muscles that stabilize your shoulder and help with movement of your arm. Your physical therapist may prescribe rotator cuff strengthening exercises as part of your total shoulder replacement exercise program.
Modifications to avoid placing too much stress on the rotator cuff may be made if you have had a reverse total shoulder replacement.
To perform these exercises, obtain a resistance band from your physical therapist. Attach it to a secure item like a doorknob.
Use the band to provide resistance as you move your shoulder into internal rotation and external rotation. For strengthening the external rotators, keep your elbow tucked into your side, and slowly move your forearm out away from your belly button. For internal rotation, move your arm in towards your belly button while keeping your elbow tucked.
You can perform 10 to 15 repetitions of internal and external rotation exercises for your shoulder once a day.
Deltoid Strengthening
Deltoid strengthening exercises are important to perform if you have had a reverse total shoulder replacement. As your deltoid muscle contracts to lift your arm, it seats the shoulder prosthesis into the ball of the joint, keeping it together and allowing it to move. Strengthening the deltoid is essential for proper function of your reverse total shoulder replacement.
You can also perform deltoid strengthening if you have had a standard total shoulder replacement. To strengthen your deltoid:
- Stand with your arm at your side.
- Lift your arm up in front of you, keeping your palm facing down.
- Raise your arm until it is parallel with the floor, and then hold for a few seconds.
- Slowly lower your arm down.
- Repeat 10 to 15 repetitions.
To strengthen the side of your deltoid:
- Stand with your arm at your side.
- Lift your arm out to the side.
- Raise your arm until it is parallel to the floor.
- Lower your arm slowly.
- Repeat 10 to 15 repetitions.
As you get stronger, you can do things to make the exercise more challenging. First, you can use your resistance band (that you got from PT) and hold that while you raise your arm in front or to the side. Or you can choose to hold a small two or three-pound dumbbell while you lift your arm. (A soup can is a good alternative to a dumbbell as well.)
Biceps and Triceps Strengtheing
Your biceps muscle travels down the front of your arm from your shoulder to your elbow. To strengthen this muscle, simply stand with your arm at your side. Bend your elbow up as if you were trying to touch your shoulder. Slowly lower down, and repeat 10 to 15 times. You can make this more challenging by holding a two to three-pound dumbbell or by using a resistance band.
Your triceps muscle travels down the back of your arm from your shoulder to your elbow. To strengthen this muscle, lie on your back with your arm straight up in the air. Allow your elbow to bend slowly. Then, strengthen your arm up against the force of gravity. Repeat 10 to 15 times.
You can hold a two to three-pound dumbbell while you do this to make it more challenging. (Be sure you have a good grip on the weight; you don’t want to drop it on your head or face.)
Job and sport-specific training
As your strength and movement increases, your physical therapist will design a custom program to help get you back to your job tasks. These may include reaching, pushing, or carrying motions. You also may receive sport-specific training if you are planning to return to a sport. Your PT will create a home or fitness-center exercise program based on your personal needs.