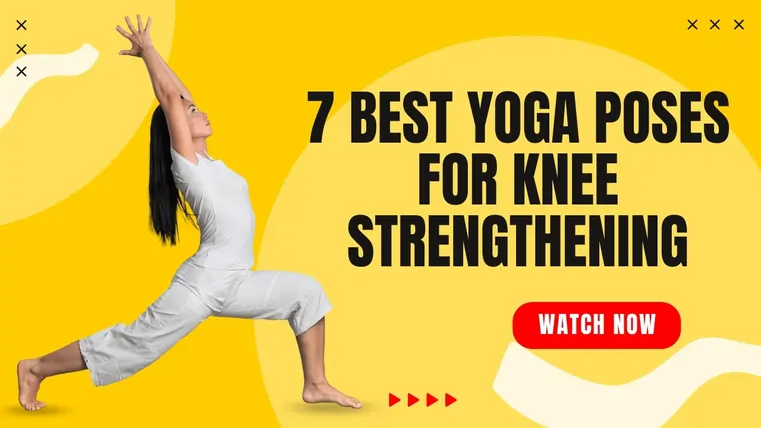
7 Yoga Poses To Improve Knee Strength & Flexibility
Introduction
Knee strength and flexibility are essential for maintaining balance, mobility, and overall lower-body stability. Practicing yoga regularly can help strengthen the muscles surrounding the knees, improve joint flexibility, and reduce the risk of injuries.
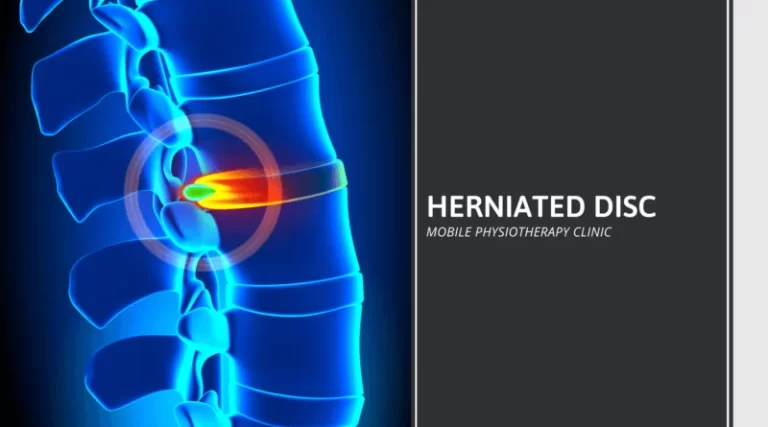
Knee pain affects even young individuals in their 40s. Injuries like sprains, ligament injuries, and repeated strain, as well as illnesses like arthritis, gout, and infections, can cause this. Swelling, stiffness, instability, or clicking are the results of all these problems. Some may require medication or surgery to increase knee strength. In addition to these, yoga can help your knees.
The main goals of knee yoga are to increase flexibility and balance, strengthen supporting muscles, and lower the chance of injury. Regular yoga practice can help strengthen your knees, which will gradually increase your range of motion. These are several knee-beneficial yoga poses.
Yoga Asanas To Improve Knee Strength & Flexibility
- Tree Pose (Vrikshasana)
- Bridge Pose (Setu Bandhasana)
- Low Lunge (Anjaneyasana)
- Warrior II (Virabhadrasana II)
- Chair Pose (Utkatasana)
- Hand-to-Big-Toe Pose (Padangusthasana)
- Warrior I (Virabhadrasana I)
Tree Pose (Vrikshasana)
How to do it:
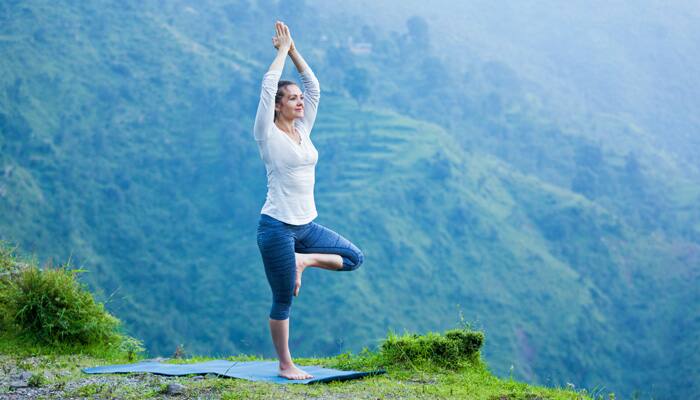
Vrikshasana (Tree Pose) Steps:
- Place your feet together and bend your knees slightly as you stand. In front of your heart, raise your hands to your hips or place your palms together in a prayer stance.
- Raise your left foot off the ground by shifting your weight into your right foot. Your left knee should be bent and opened to the left.
- Press the bottom of your left foot up on your right upper thigh, calf, or ankle. Keep your foot away from your knee at all times.
- Concentrate on only one thing or area in front of you. You can sustain your balance and extend the duration of Tree Pose by keeping your eyes motionless.
- Raise your arms to make the balance more difficult. Use your core muscles to center your weight if you feel like you’re going to fall. It’s OK, though, if you do lose your balance. Simply return to the position with ease.
- Before swapping sides, hold the posture for five breaths.
Benefits: Tree Pose strengthens the leg’s stabilizing muscles and enhances balance. It corrects muscle imbalances that frequently cause knee pain and encourages appropriate weight distribution.
Bridge Pose (Setu Bandhasana)
How to do it:
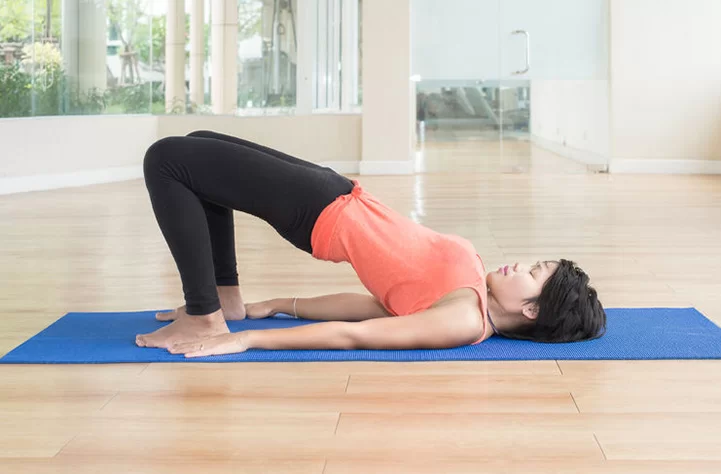
- Bend your knees and place your feet hip-distance apart on the mat while lying on your back. Try to get your feet as near to your glutes as you can.
- Put your arms beside your body, palms down.
- Press down firmly through your feet and raise your hips as you inhale, starting the action from your pubic bone instead of your navel.
- Apply pressure to your upper arms. You can push your pinkie fingers into the mat while clasping your hands behind your back. Roll your shoulders under you and widen your collarbones.
- Keep your thighs hip-distance apart by drawing them closer together while maintaining a tight grip through your heels.
- Finally, let out a breath, let go of your hands, and gently descend to the mat.
Benefits: The quadriceps, hamstrings, and glutes—muscles essential to knee stability—are strengthened by Bridge Pose. Additionally, it lessens joint strain and expands the chest and spine.
Low Lunge (Anjaneyasana)
How to do it:
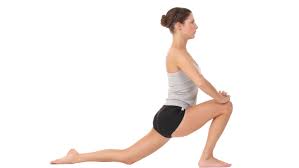
- By aligning the knee with the ankle and hips in an L shape, the front leg creates the proper angle. The foot is placed firmly. The toes are pointed forward and together.
- The knee and top of the foot are flat on the mat as the other leg is extended straight behind. The toes are pointed backward. Maintain the leg in line with the hips.
- With the elbows gently bent, the hands are positioned on the front leg, close to the knee. The fingers are kept together by placing the palms on top of each other.
- It lengthens the spine. The shoulders and chest are wide and open.
- The core is engaged and active.
- The chin is horizontal to the floor and in line with the chest.
- The eyes are fixated either forward or below.
- When combined with slow, deep breathing, these techniques support strong arms, legs, and a healthy spine as well as better posture.
Benefits: This position improves knee balance by simulating functional motions and testing the quadriceps and core.
Warrior II (Virabhadrasana II)
How to do it:
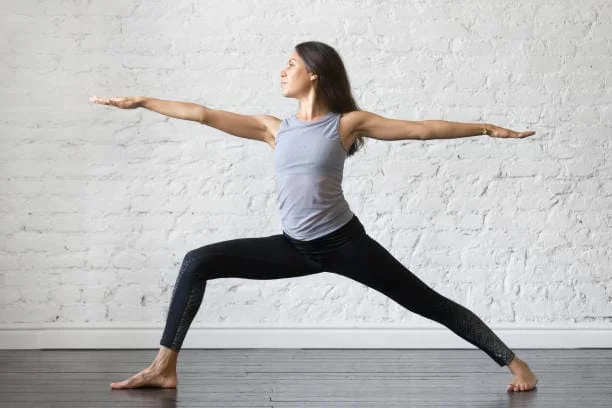
- Place your feet hip-width apart and begin standing at the top of the mat. Feel your feet firmly planted in the ground, tap into your breath, and bring your palms to the center of your heart. Bring your arms straight over your head, palms facing one another, while you take a breath.
- Bring your left arm back, open your hips, and step your left foot back about four feet. With your toes facing toward the front left edge of the mat, position your left foot at a 45-degree angle. With your toes pointed straight toward the front of your mat, your front foot is facing forward.
- Engage all of your arm muscles, particularly your triceps, while keeping your arms wide extended and perpendicular to the surface. Maintain the back and down position of your shoulder blades.
- Instead of looking forward like in Warrior I, make sure both sides of your hips are open to the side of your mat. Maintain a long spine and open up your upper body.
- With your knee exactly above your ankle, raise your front thigh to a 90-degree angle. If you extend your knee past your ankle, your lower leg will no longer support it. Imagine opening and gently retracting your right knee. To support your lower back, contract your abdominal muscles.
- Avoid glancing back and concentrate your attention on the horizon just above your right middle finger. Focus on a single, fixed location in front of you while lowering your eyebrows.
- Re-engage all of the muscles in your left arm and leg, expand up through your hips and chest, firmly ground through your feet, and take a few deep breaths at the peak of the posture.
- Return to position by stepping your back leg back to the top of the mat while keeping your front knee bent. Here, take a moment to recenter, place your hands on your heart, and breathe.
Benefits: In order to improve alignment and load-bearing capability, it prevents inward knee drift by supporting the quadriceps, inner thighs, and hips. The muscles are activated by these dynamic knee bends.
Chair Pose (Utkatasana)
Chair Pose (Utkatasana) How to do it:
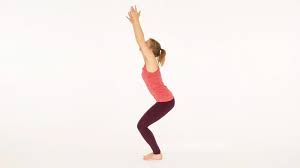
- Place your feet slightly apart and stand upright.
- With the palms facing down, extend your hands forward. Avoid bending your elbows.
- As though you were sitting in a chair, bend your knees and softly press your pelvis down.
- Be at ease, or at least make an effort! Imagine sitting while reading a newspaper or typing on a laptop to better understand the Chair Pose.
- Make sure your hands remain parallel to the floor.
- Sit upright and extend your spine with mindfulness. Unwind.
- Continue breathing.
- Make sure your knees don’t extend past your toes as you gently lower yourself further into the chair.
- Continue descending carefully, and then take a seat in the cross-legged position known as Sukhasana. You can lie on your back and unwind if you’d like.
Benefits: By transferring weight to the hips, this position can reduce knee strain while strengthening the quadriceps and glutes. With pauses in between, repeat this three times. You may become more stable as a result.
Hand-to-Big-Toe Pose (Padangusthasana)
How to do it:
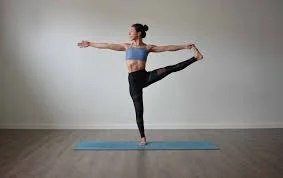
- With your arms by your sides, your feet together, and your weight evenly split between both feet, take a tall stance.
- Lift your kneecap and contract your thigh muscles as you firmly plant your left foot on the mat.
- While maintaining the strength and stability of your left leg, bend your right knee and raise it toward your chest.
- Use your thumb and the first two fingers of your right hand to reach down and hold the big toe of your right foot. Use a yoga strap around the ball of your foot if you find this difficult.
- While keeping a tight hold on the big toe or strap, slowly stretch your right leg forward and straighten it as far as you can. Maintain an open chest and a long spine.
- To assist you in staying balanced, center your attention on a fixed spot in front of you. To maintain your posture, contract your core muscles.
- If you feel steady, slowly extend your right leg to the side while maintaining a firm left leg and a planted left hip. Make sure your torso stays straight and doesn’t slant to the left.
- Keep your standing leg powerful and your core active as you hold the posture for a few breaths.
- Slowly bring your right leg back to the center while bending your knee and letting go of your toe.
- Return to Mountain Pose by gently lowering your right foot back onto the mat.
- Repeat with your left leg after shifting your weight to your right foot.
Benefits: This traditional yoga stance lengthens the spine and stretches the calves and hamstrings. It improves flexibility and relieves knee strain by distributing body weight equally.
Warrior I (Virabhadrasana I)
How to do it:

- Spread your feet widely on your mat so that they are nearly parallel to your wrists.
- With your shoulders relaxed and your hands facing down, extend your arms to either side while maintaining them level with the floor.
- Take a breath, point your right foot straight to the right at a 90-degree angle, and tilt your left foot slightly to the right, between 45 and 60 degrees. Verify that your left and right heels line up.
- Pro Tip: Maintain a 10–20 cm lateral space between your heels for added stability and comfort in the position.
- In order to square your hips with the front of your mat, exhale and rotate your upper body to the right.
- Take a breath, raise your arms over your head, line them up with your forehead, and extend them upward.
- Exhale and bend your right knee such that it is exactly above your right ankle while keeping your left heel grounded. Try to keep your right thigh level with the floor and your shin vertical.
- Keeping your breath calm, raise your eyes and concentrate on the little area created between your hands.
- As long as it seems comfortable, stay in this posture.
- Straighten your right knee, drop your arms, and turn your feet to face front to exit the posture. Next, switch to the other side and repeat the stance.
Benefits: As a Warrior, I open my hips while strengthening my calves, hamstrings, and quads. These exercises maintain knee stability and increase lower-body flexibility and endurance. Stress may be avoided by practicing with conscious alignment.
Safe Practice Tips
- Always pay attention to your body’s signals and avoid actions that result in pain.
- For those with knee issues, gentle yoga forms like Hatha, Iyengar, restorative, and Yin yoga are perfect.
- If you have severe or persistent knee issues, see a doctor before beginning.
Conclusion
Yoga is a comprehensive approach to wellbeing that goes beyond simple exercise. Regular practice of these seven postures can enhance flexibility, strengthen the muscles surrounding the knees, and support joint health. Yoga can be a long-term, natural solution for knee pain when practiced mindfully and under the right direction.
FAQS
What is the impact of yoga on flexibility?
Another important advantage is flexibility, as yoga increases the range of motion by stretching the ligaments and tendons in the foot. Exercises that promote flexibility in the lower legs and feet include the reclining big toe stance and the sitting forward fold, which stretch the calves and feet.
What does knee flexibility mean?
When actively bent, a healthy, typical knee may flex between 120 and 140 degrees. When someone else moves your leg, you can achieve up to 150 degrees of passive flexion. Various duties require varying degrees of flexion: Walking: around 60 degrees. About 90 degrees when climbing stairs.
Does yoga help with knee pain?
Yoga is a safe and efficient approach to improve joint function and lessen knee pain, according to a scientific study. You can protect and maintain your mobility by strengthening and stretching the muscles that support your knees.
Does yoga help people with tight knees?
Additionally, yoga can increase lymphatic and blood flow around the knee joint, improving the soft tissues’ ability to receive nutrients. It helps patients better manage muscular tension and reduce joint stiffness by enhancing body self-awareness and attentiveness.
What makes a knee stiff and tight?
Arthritis, injuries, inflammation, scar tissue, or muscular imbalances are frequently the causes of stiff knees. Morning stiffness, decreased range of motion, edema, and pain with movement are common symptoms.
Does yoga aid with knee strength?
According to research, yoga helps by focusing on important muscles, including the hamstrings (back thigh), quadriceps (front thigh), and calf muscles. The knee is stabilized, stress is absorbed, and joint strain is reduced by strengthening and extending these regions.
References:
- Admin. (2024, February 12). 10 yoga poses to relieve knee pain and improve flexibility. Atmabodh Wellness Center. https://atmabodhwellness.com/blog/10-yoga-poses-to-relieve-knee-pain
- Millard, E. (1970, January 1). A Step-By-Step guide on how to do tree pose (or one of its many variations). https://www.onepeloton.com/blog/tree-pose
- Yoga Journal. (2021, November 10). Bridge pose. https://www.yogajournal.com/poses/bridge-pose/
- The Art of Living. (2023, May 30). Chair pose – utkatasana. Art Of Living (United States). https://www.artofliving.org/us-en/yoga/yoga-poses/chair-pose-utkatasana
- Extended Hand-to-Big-Toe Pose: Ultimate Guide – Omstars. (n.d.). https://omstars.com/blog/pose-tutorials/extended-hand-to-big-toe-pose-ultimate-guide/
- One moment, please. . . (n.d.). https://www.arhantayoga.org/blog/yoga-warrior-pose-guide/