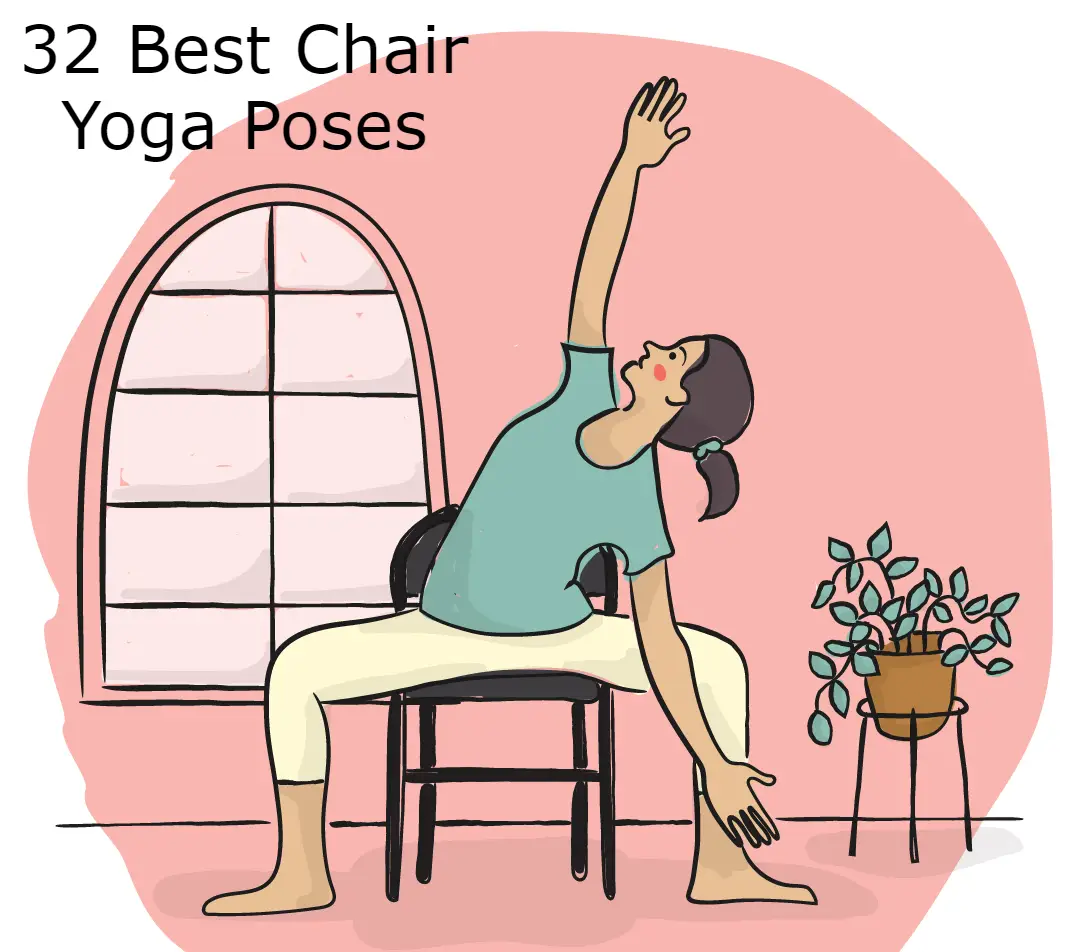
32 Best Chair Yoga Poses
Introduction
Chair yoga is a gentle type of yoga that is practiced you guessed it in a chair.
It’s ideal for older people, those with chronic pain, and those who have mobility issues.
It has been demonstrated that chair yoga increases the flexibility and mobility of people who have difficulty moving freely.
- It assists us in making use of the mind-body link, which, as we age, becomes increasingly significant.
- Yoga postures that are modified to be performed while seated on a chair are collectively referred to as chair yoga.
- Yoga is now accessible to those who are unable to stand, have limited mobility, and find it difficult to transition between standing, sitting, or supine positions, or just wish to take a short break from working in an office. The fundamental body mechanics of each position mostly stay the same. Students can perform variations of twists, hip stretches, forward bends, and minor backbends while seated in chairs.
- Chair yoga practitioners can benefit from enhanced muscular tone, better breathing techniques, less stress, better sleep, and an overall sense of well-being in addition to the physical advantages of yoga.
- A firm, supportive seat is necessary for chair yoga postures.
- In order to minimize slippage, yoga studios frequently provide folding chairs that are placed on sticky mats.
- A kitchen chair or any sturdy, armless chair will do if you’re at home.
- Choose one that enables you to sit with your thighs and shins at a 90-degree angle and your feet on the floor.
- Using blocks beneath your feet might be beneficial.
- When doing chair yoga, stay away from chairs with wheels unless you can lock them to prevent them from moving about for your safety. To be able to move freely in most chair yoga poses, you must sit with your back to the chair’s back.
- However, the back of the chair can also serve as a prop to increase your leverage and support, particularly when you’re twisting.
- To make some of the positions easier, you might also wish to have blocks or straps close by.
What Is Chair Yoga
Chair yoga is a modified form of yoga that lets you do postures with a concentration on sitting still.
Anyone who wants to benefit from yoga and may or may not have mobility issues can practice it.
Chair yoga, for instance, is excellent for people who seek a more therapeutic approach to the practice, require more assistance, or are treating an injury.
The Benefits of Chair Yoga
- For people who have trouble doing moves without stability and support, chair yoga might be beneficial.
- Since elderly citizens are the primary target market for chair yoga, these programs are frequently offered at senior centers and retirement complexes.
- Individuals who fit under obesity
- Among persons with metabolic syndrome who are centrally obese, a year of yoga instruction modifies the ghrelin axis.
- Front Physiol and those who suffer from neurological conditions are also excellent candidates for chair yoga.
- The modifications of chair yoga can also be used by office workers as a way to stretch while at work.
- In general, yoga helps reduce anxiety, regulate stress, and alleviate depressive symptoms.
- These are the benefits of yoga for depression and anxiety, with implications for healthcare providers.
- It can also improve the quality of your sleep and your mood.
- These advantages could be particularly significant for those who are confined to a chair or have little capacity for other forms of physical activity.
Chair Yoga Sequence
- It should come as no surprise that the specific chair you use is not necessary; you don’t need to hurry out and buy a specialty yoga chair
- because chair yoga is all about flexibility.
Nevertheless, unless you can lock the wheels to prevent the chair from rolling, chairs with wheels are not the best option.
To give yourself a solid base if your feet are not touching the floor, place blocks or a folded yoga mat underneath them. - The chair yoga postures below may be done in any order, or you can pick a couple to include in a flow that works for your time and skill level.
Who is Chair Yoga Really For?
- Everyone. We frequently hear that everyone can practice yoga.
- However, what about those with impairments or those who find it difficult to move in specific ways?
In actuality, chair yoga is suitable for anyone. You may do chair yoga whether you’re a young athlete or an elderly person!
Chair yoga is also beneficial for pregnant women, elderly people, children, and those with arthritis. - You will gain from this moderate yoga practice regardless of your age or physical condition, no matter who you are.
What Kind of Chair Should You Use?
- Simplifying is ideal when it comes to chair yoga.
- Using a chair with wheels is something you should absolutely avoid doing, and if you wish to move your arms or legs, armrests may also be problematic.
- Seek a foldable chair that is basic yet reliable.
- It’s best to use one with a firm seat and back; in this instance, less is more.
32 Chair Yoga Poses
Following are the 32 best chair Yoga poses
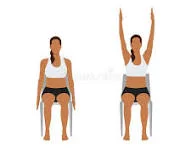
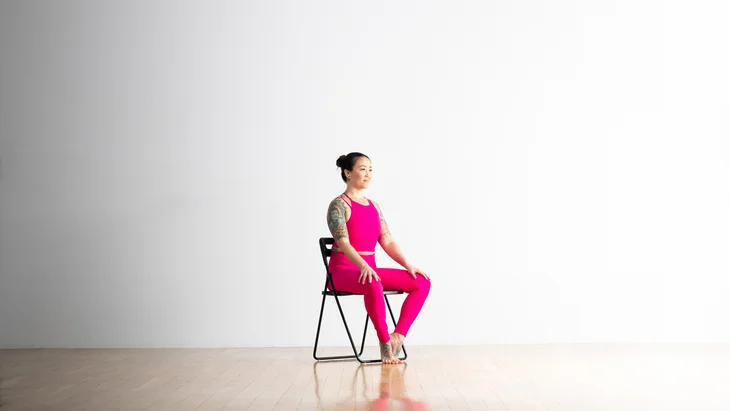
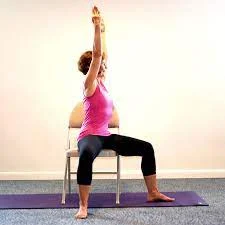
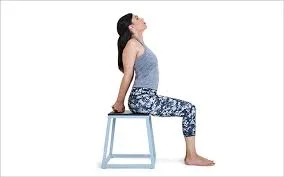
Chair Raised Hands Pose – Urdhva Hastasana
Steps To Follow:
- Place your back against the chair’s back a few inches.
- Stretch your back to the top of your head, then gently let go of your tailbone in the direction of your seat.
- Bring your chin up to face the floor.
- Lay your feet flat on the ground, allowing enough room between your heels and your big toes to contact.
- Practice with your feet hip-distance apart if you have lower back discomfort.
- If your feet aren’t reaching the floor, place them on blocks.
- Put pressure on your heels, the outer edges of your foot, and the bumps on your big toes.
- Breathe in, round your shoulders, relax your front ribs, and lift your arms aloft, palms facing each other and your hands shoulder-distance apart.
- Pull up and touch your palms while focusing your eyes on your thumbs if you are able to maintain your arms straight.
- Spread your arms wider than your shoulders if your shoulders are tense.
- Inhale and exhale many times.
- Lower your arms and let go.
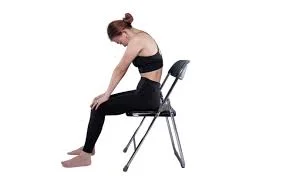
Marjaryasana (Cat Pose)
Steps To Follow:
- Place your feet hip-width apart while sitting in your chair.
- Allow your hands to lie over your knees.
- As you release your breath, turn your body to face the back of the chair.
- Draw your lower abdomen in and upward while lowering your chin into your chest.
- Inhale and exhale many times.
- Return to your starting sitting posture to release the pose.
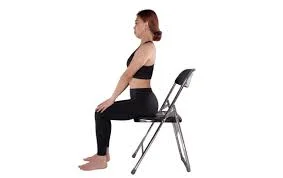
Bitilasana (Cow Pose)
Steps To Follow:
- Position your feet and knees hip-width apart while seated in your chair.
- Allow your hands to lie over your knees.
- Breathe in and raise your back.
- To make a long, even curve, lengthen around your lower back and the back of your neck.
- Expand your collarbones, raise your sternum and chin, and let your shoulders drop back and away from your ears.
Ustrasana (Camel Pose)
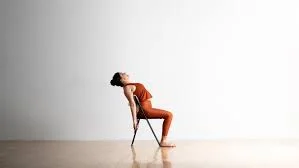
Steps To Follow:
- Place your feet hip-width apart while sitting in your chair.
- Breathe in and raise your back so that your shoulder blades rest against the back of the chair.
- Expand your collarbones, raise your sternum and chin, and let your shoulders drop back and away from your ears.
- Stretch your arms back and grab the chair’s legs.
- Turn your arms outward so that your elbows’ interiors are facing the outside world.
- Press your chest up and forward on the next breath to extend your rib cage and form a long, smooth curve that runs across your mid and upper back.
- Inhale and exhale many times.
- Release your hands, tuck your chin, and return to your starting sitting posture to exit the pose.
Happy Baby
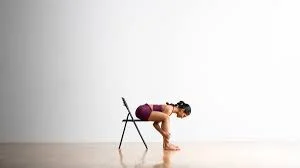
Steps To Follow:
- With your feet slightly wider than hip-width apart on the floor, take a seat close to the front edge of the chair.
- To locate the length of your back, reach up to the crown of your head and drag your tailbone down.
- Bring your tummy between your thighs and fold forward at the hips as you release the breath.
- To give your torso more room, you could decide to spread your legs apart.
- Breathe in and reach down between your legs to grab your ankles, feet, or outer shins.
- Lower your body toward the floor by gently drawing your torso between your thighs.
- Inhale and exhale many times.
- Release your hold and return to your starting sitting posture to release the pose.
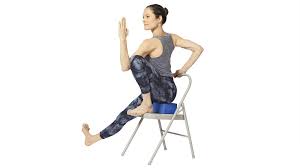
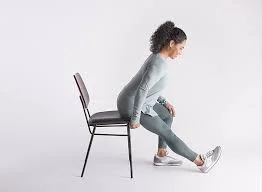
King Arthur’s Pose

Steps To Follow:
- Place your sit bones about halfway down on a chair.
- With your feet level on the ground and your knees hip-width apart, go to the right side of the seat.
- Bend your right knee, raise your foot off the floor, and point your toes toward the back of the chair while maintaining contact with your right thigh on the chair seat.
- Grasp your ankle with your right hand by reaching down.
- Lift it gently in the direction of your body until the front of your shin and quadriceps feel strongly stretched.
- (If you are unable to reach your ankle, encircle your foot with a strap or cloth.)
- Inhale and exhale many times.
- Resuming your initial sitting position, lower your foot.
- On the other side, repeat the posture.
Vrksasana (Tree Pose)
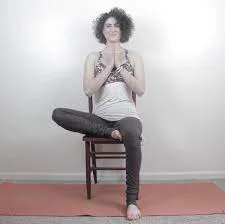
Steps To Follow:
- Aim to sit close to the chair’s front edge.
- Breathe in deeply while raising your chest, then release the breath as you push your shoulder blades down your back.
- Look at a stable point directly ahead.
- Straighten and extend your left leg in front of you.
- Point your toes toward the ground or flex your foot.
- With your knee bent and your foot or toes on the ground, extend your right leg out to the side.
- Stretch your arms over your head or do the Anjali Mudra with your hands at your heart.
- Inhale and exhale many times.
- Return to your starting sitting posture to release the pose.
- On the other side, repeat the posture.
Trikonasana (Extended Triangle Pose)
Steps To Follow:
- As you sit, position your left leg to clear the seat and your body to rest on the left side of the chair.
- Straighten and extend your left leg to the side.
- As much as you can, straighten your leg and firm your thigh.
- Taking a breath, extend your arms straight from your shoulders and keep them parallel to the ground.
- Maintain a broad shoulder girth and palms down.
- Breathe out, bend at the hips, and tilt your torso to the left.
- Placing your left hand on your thigh or shin, stretch your left arm outward and down toward your extended leg.
- Lift your right arm and extend it upwards.
- Maintain a neutral head posture or shift your gaze to your right hand or the ground.
- Inhale and exhale many times.
- Take a breath, raise your chest, and extend your right hand upward.
- After that, return your left leg to the middle.
- After shifting to the right side of your chair, go to the opposite stance.
Baddha Konasana (Bound Angle Pose)
Steps To Follow:
- To ensure that your knees clear the seat while your buttocks are supported, choose a seat close to the front edge of the chair.
- Spread your legs apart so that your knees are pointing in different directions.
- To raise through your sternum, sit up straight and press your shoulder blades on your upper back.
- Elevate your head so that it touches the ceiling.
- As you draw your feet together, maintain a wide knee stance.
- Keeping the outside borders of your feet together, open your feet as though you were opening a book’s pages.
- Press your hands against your thighs to gently separate them from one another.
- Inhale and exhale many times.
- Release gradually and return to your starting sitting posture.
High Lunge
Steps To Follow:
- Ensure your thighs are properly supported by sitting with your back to the left side of the chair.
- In order to allow your right thigh to clear the seat, go toward the front of the chair.
- Straighten your right leg and stretch it back, keeping both hips looking front.
- putting your foot’s ball down on the ground.
- To straighten your leg as much as possible, press your thigh up toward the ceiling while maintaining its firmness.
- With your shoulders open and your arms in line with your ears, take a breath and raise your arms toward the ceiling.
- Inhale and exhale many times.
- Release your arms and extend your right leg forward to exit the stance.
- As you face the right side of your chair, switch to the opposite stance.
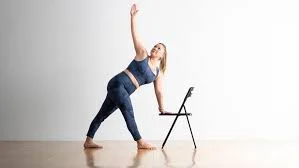
Uttita Parsvakonasana (Extended Side Angle Pose)
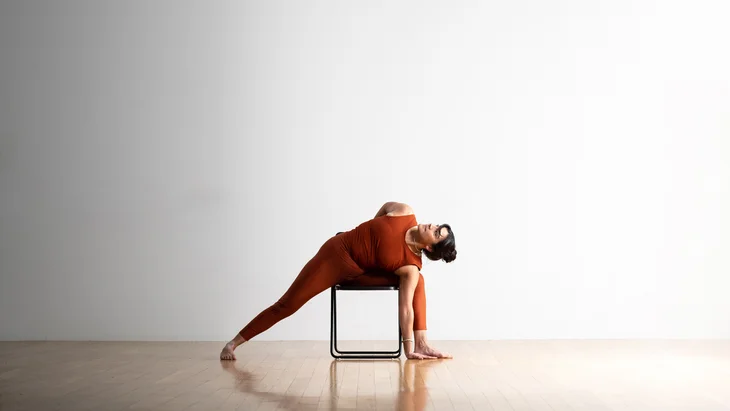
Steps To Follow:
- With your thighs completely supported by the seat, take a seat facing the left side of the chair.
- To ensure that your right thigh clears the seat, move to the right, close to the front side of the chair.
- Stretch back your right leg.
- In the direction of the chair’s front, spread your hips.
- With your toes pointing forward, plant the bottom of your right foot on the ground and straighten your right leg.
- With your left arm extended toward the floor, hinge at the hips and slant your chest toward your left knee.
- Hold your left arm and shin parallel to the ground by placing your fingers on a block or the ground.
- Lift your right arm and extend it upwards.
- Bend your right elbow and reach back to hold the back of the chair, or extend it across your right ear with your palm facing the floor.
- Turn your chest toward your upper arm by rotating your torso.
- Make a head turn to face the ceiling.
- Inhale and exhale many times.
- Press yourself up with your left hand to release the stance, then bring your right leg in to sit again.
- As you face the right side of your chair, switch to the opposite stance.
Ardha Matsyendrasana (Half Lord of the Fishes)
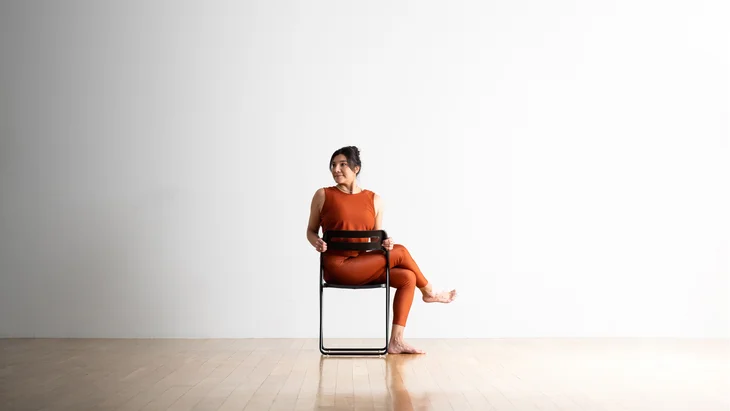
Steps To Follow:
- Make sure your thighs are properly supported on the seat by facing the right side of the chair.
- Put your left leg over your right.
- Take a breath, extend your back, and raise both arms up toward the ceiling.
- Breathe out, spin to the right, and reach down to grab the chair’s back with your hands.
- Look over your right shoulder and turn your head to the right.
- Ensure that your neck is not strained.
- Inhale and exhale many times.
- Inhale and raise your arms to release the pose; exhale and relax your body.
- Plant both of your feet firmly on the earth.
- Repeat the position while facing the left side of the chair.
Marichyasana 3
Steps To Follow:
- The back of the chair should support your spine while you sit.
- Stretch your back and let your tailbone drop slightly in the direction of the seat.
- Step your feet hip-width apart on the ground.
- Raise your right leg and get it close to your chest.
- As near to your right sitting bone as you can, pace your right foot across the chair’s seat.
- Take a breath and stretch your back.
- Breathe out and turn to the right.
- Take hold of your right knee with your left hand, or encircle it with your left elbow.
- Place your right arm over the rear of the chair and hold it there or bind your hands together.
- Inhale and exhale many times.
- With every breath, lengthen, and with every exhale, softly twist a little bit more.
- Lower your arms, relax your body, and put your right foot back on the floor to come out of the posture.
- Continue on the opposite side.
Chair Eagle Pose
This is a fantastic chair yoga stance variation based on a traditional yoga pose.
It’s a terrific approach to reduce sciatic pain when done daily.
Steps To Follow:
- To bring the knees close together, cross the left leg over the right.
- If your range of motion permits, step your right foot slightly forward and encircle your left leg with your left toes.
- With the fingers pointing up toward the sky, hold the arms at a 90-degree angle and cross the left elbow across the right elbow.
- Maintain this position or try stepping off the chair and finding your balance.
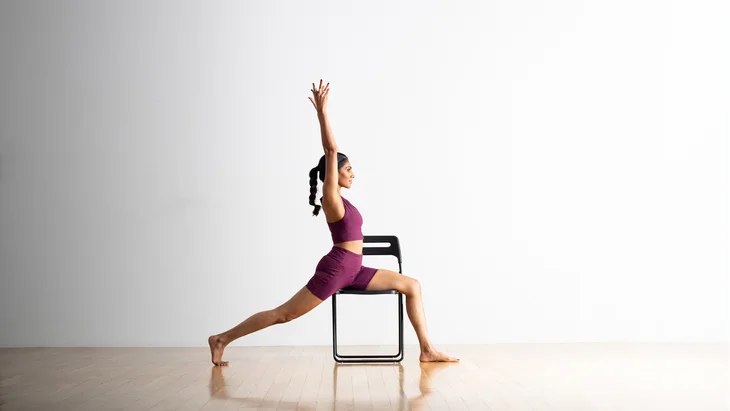
Chair Warrior One Pose
This is a terrific technique to utilize a chair to modify a traditional strength-building stance to something more approachable.
Steps To Follow:
- Place your right leg out at a 90-degree angle with respect to the front of the chair and take a seat toward the left side of it.
- With only a small bend in the knee, extend your left leg and reach it behind you.
- To the right, open the chest.
- Press the left foot’s balls into the ground while raising the heel.
- Try removing the chair’s weight by applying firm pressure to both feet.
- Raise your hands aloft and hold this stance if it seems comfortable for you.
- Continue on the other side.
Chair Yoga Warrior II Pose
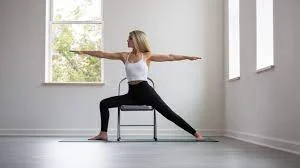
As with Warrior One, Warrior Two may also be made into a chair.
Steps To Follow:
- Place your right leg out at a 90-degree angle with respect to the front of the chair and take a seat toward the left side of it.
- With the knee only slightly bent, extend your left leg and reach it to the left.
- Hold your chest out in front of you.
- Try removing the chair’s weight by applying firm pressure to both feet.
- Stretch your arms to the opposite edges of the room and extend your hands away from one another if the stance seems comfortable.
- Do the same on the other side.
Chair Yoga Pigeon Pose

This traditional position is excellent for hip openings. For those with stiff hips, it might be much more accessible when using a chair as a support.
Steps To Follow:
- Place your right leg out at a 90-degree angle with respect to the front of the chair and take a seat toward the left side of it.
- Rotate the chest to the right, making it angle 45 degrees with respect to the chair’s front.
- Close the joint halfway by bringing the right leg onto the chair. With the heel raised, extend the left leg back and firmly plant the toes on the ground.
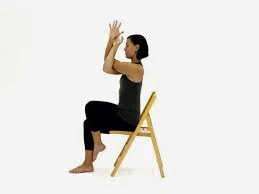
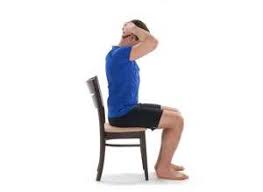
Elbow Rotation
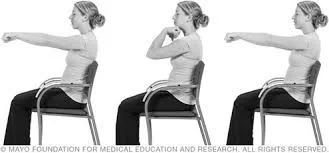
Long stretches like this one can help release tension in the upper back and shoulders caused by sitting for extended periods.
Steps To Follow:
- Take a seat and sit up straight. Put your fingertips on your shoulders while maintaining a relaxed elbow position.
- Bring your elbows forward until they nearly touch.
- With the head raised, raise them toward the ceiling to start the rotation.
- To finish the rotation, separate your elbows and rotate them back and forth.
- The shoulder blades should come together when the elbows separate.
- For best results, perform this movement as slowly as possible.
Hip Stretches
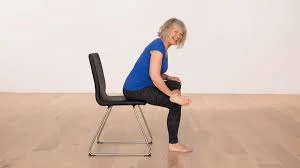
This is an excellent workout to release sciatic nerve discomfort and tension in the hips and lower back.
Steps To Follow:
- Sit forward near the chair’s edge to start.
- Using the left knee as support, place the right heel in a “figure four.”
- The right side will be where the knee falls out. Start bending forward gradually until your right hip joint feels stretched.
- Use your elbows to gently press the knee down to deepen.
- Take a little step back if the knee is under any pressure or strain.
- Before continuing, do the position twice for optimal benefits.
- Keep in mind to repeat the process on the opposite side.
- Adjust your seat such that your right hip is just barely protruding from the chair.
- Bring your right leg over your left till your knees nearly meet.
- Using your left hand, grasp the right foot.
- Lean forward, keeping this foot up, to lengthen the stretch.
- Before continuing, perform the stance twice more, being sure to repeat it on the other side.
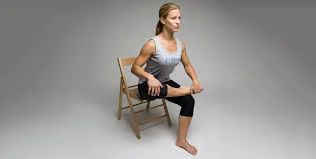
Ankle Rotations
Although we sometimes take for granted, keeping our feet’s strength and mobility as we age is crucial.
These activities may be beneficial.
Steps To Follow:
- Using the left knee as support, place the right heel in a “figure four.”
- The right side will be where the knee falls out.
- With the right hand, hold the right ankle to the left thigh, and insert each finger of the left hand between the right foot’s toes.
- Rotate the foot slowly over its whole range of motion using your left hand.
- Remember to move in both clockwise and counterclockwise directions when dancing.
- Do the same on the other side.
- Hold the foot in place and extend the right leg straight.
- Start by flexing your foot so that your toes point back toward your torso.
- Then, slowly rotate your ankle.
- You may go in both clockwise and counterclockwise directions using this maneuver.
- Do the same on the other side.
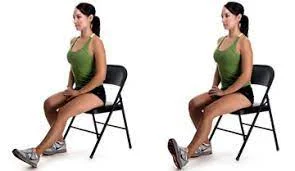
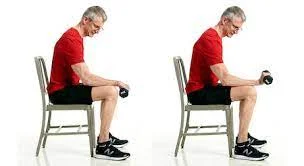
Knee Strengthening
Knee pain is a prevalent complaint among the elderly population.
It’s crucial to do exercises like these to strengthen the area surrounding the knee joint as we age.
Steps To Follow:
- Start by drawing the feet close together and inserting a small, firm cushion between the knees.
- Maintain a straight posture and a 90-degree angle with your legs.
- Squeeze the cushion by forcefully pressing the knees together.
- Repeat three to five times while holding for 15 to 20 seconds.
- The cushion should be placed beneath the thighs.
- Raise your right leg off the ground by straightening it.
- Flex the toes toward the torso and firmly press the thigh into the cushion.
- Take a few moments to hold, then repeat three to five times.
- Continue with the opposite leg.
- We mix the first two in this exercise.
- Squeeze the cushion in between your knees and gently raise your right leg until it is straight while continuing to hold the cushion there.
- Hold for ten seconds, then carefully descend.
- Continue on the opposite side.
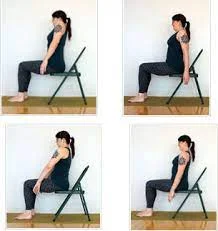
Chair Backward Bend
This exercise can assist in making up for back slouching brought on by extended durations of sitting.
Steps To Follow:
- Sit at the chair’s edge with your legs bent 90 degrees to start.
- With your arms straight, hold the chair’s backrest while opening and pulling your chest forward.
- Lift the chin without cocking the head back as you expand across the entire front of the body.
- Give your spine a gentle curvature.
- Keep an eye out; if you feel any pinching or spasming in your back, relax out of the position and try again later.
Chair Twist
Reviving the health of the spine and energizing the body may be achieved by back twisting.
Steps To Follow:
- Take the left side of the chair, and take a seat.
- Twisting to the left, pull the chest towards the chair back while holding either side of the chair back.
- To slowly ease yourself deeper into the twist, extend your arms.
- As you twist, be sure to bring the head’s crown forward by lengthening through the spine.
- Verify that the spine is not being compressed or squeezed.
- There should be no pain or discomfort throughout this movement.
- Remain calm and kind.
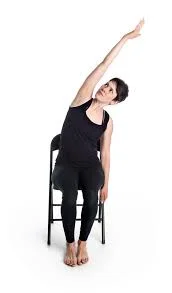
Chair Lateral Stretch
It’s crucial to do a lateral stretch in addition to twisting or bending the spine to access its whole range of motion.
Steps To Follow:
- Perched on the chair’s edge.
- As much as possible, spread your knees apart to form a 90-degree angle.
- Gently push the right forearm into the right thigh by placing it there.
- Stretching over the entire left side of the body, raise your left arm above your head and begin to extend toward the right side of the room.
- Repeat on the opposite side after three to five breaths of holding.
Forearm Stretches
Nowadays, with so many of us working at a computer or on a mobile device, wrist health is particularly crucial.
Steps To Follow:
- Stretches for the forearms are essential.
- With your knees apart and your back to the chair, take a seat.
- With the fingers pointed back towards the body and extending through the wrist, place the right palm down on the chair.
- If there’s no discomfort, you can apply little pressure.
- It can be simpler to slightly rotate the fingers out to the right if there is any pressure or pain.
- Once you have done both sides, it might be helpful to work on both hands at once, going a little deeper.
- With the fingers pointing upward, hold out your right arm in front of you and gradually draw them back with your left hand.
- For two to three breaths, hold.
- Repeat with the hand rotated so that the fingers are toward the floor.
- Do the same on the other side.
Breathing Exercises
In Yoga, one of the deepest components of the practice focuses on breathing.
Steps To Follow Part I :
- Fortunately, you can perform the majority of yoga breathing techniques comfortably while seated in a chair!
- These are but a handful.
- Take a slow, deep breath in.
- Spread your arms wide and let your chest expand as you inhale.
- Keep them in line.
- Control your exhalation.
- Pull your arms back together and join your palms in front of your body as you exhale.
- Five to ten times, repeat.
Steps To Follow Part II :
- Start with straightening and parallelizing your arms in front of your torso.
- Take a slow, deep breath in.
- Breathe in and raise your arms above your head.
- Control your exhalation.
- Return your hands to their initial posture as you exhale.
- Five to ten times, repeat.
Steps To Follow Part III :
- Arms should be straight down the sides of the body to start.
- Take a slow, deep breath in.
- Lift your hands aloft in a broad arc while taking a breath, stretching apart until they meet at the top.
- Control your exhalation.
- Maintaining their upright posture, carefully return the hands to their initial position.
- Five to ten times, repeat.
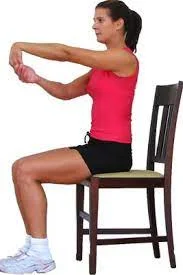
Vertical Spine Stretches
This position stretches the back muscles, lengthens the spine, and invigorates the body.
Steps To Follow:
- Sitting at the end of the chair, choose a tall seat to start.
- Stretching through the wrists, bring the hands together in a pose of prayer that is slightly off the chest.
- Interlock your palms with each other.
- As you take a breath in, raise your hands above your palms, extend your arms as high above your head, and stretch your spine as far as you can.
- With each breath, attempt to extend even further.
- For three to four breaths, hold.
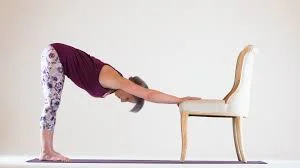
Hamstring Stretch
Hip and lower back discomfort are frequently caused by tight hamstrings.
Frequent hamstring elongation aids in the prevention of this discomfort as well as the preservation of leg mobility and balance.
Steps To Follow:
- With your right arm supporting you on the chair back and your legs off the right side of the chair, take a seat.
- Raise your left foot up onto the chair and grasp it with your left hand.
- Stretch the leg slowly until you begin to feel a stretch.
- Maintain a straight back.
- Continue on the other side.
- Straighten your left leg while maintaining your heel on the ground as you sit at the chair’s edge.
- As you begin to fold forward, maintain a tiny bend in your knee while keeping your back straight.
- When folding forward, take care not to circle the spine.
- Change to the other side after two or three repetitions.
Wrist Mobility Exercises
For those of you keyboard warriors out there, here are some more wrist mobility exercises!
Steps To Follow:
- Make sure your hands are in fists and hold your arms straight out in front of you.
- Remain calm down and avoid bending the elbow.
- Move the wrists as slowly as you can over their whole range of motion.
- Ten clockwise and ten counterclockwise repetitions are made.
- Hold your arms straight in front of you, palms toward the ground, and hands extended.
- Move the fingers as far to the left as you can while maintaining the palms facing the floor, without raising your arms or twisting your
Forearms
Steps To Follow:
- After that, shift them to the right before going back to the starting position.
- Ten times over, repeat.
- Hold your arms straight in front of you, palms toward the ground, and hands extended.
- Reach your fingertips up towards the ceiling without lifting your arms or turning your forearms.
- After that, extend your fingertips toward the ground before going back to your starting posture.
- Ten times over, repeat.
Scapular Movement
Long-term sitting-related hunches can be avoided by increasing shoulder blade flexibility.
This is a helpful exercise.
Steps To Follow:
- As you inhale, extend your arms while retaining a little bend in your elbows.
- Pull your shoulder blades together and your shoulders back.
- Pull your elbows together in front of your body to round your upper back as you exhale.
- Pull your shoulder blades apart and your shoulders forward.
- Ten times over, repeat.
Surya Namaskar in a Chair
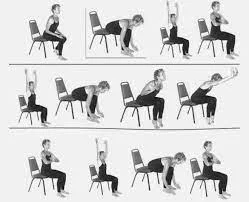
If you are unable to complete the Sun Salutation in its entirety due to limited movement, injuries, or other problems, you may still alter it by utilizing a chair.
Steps To Follow:
- Start with the chair’s back in the rear of you.
- Keeping a pillow behind your buttocks and using a lower back cushion to support your back may also be advantageous.
- Breathe in, raise your arms over your head, and then slowly lean back into the chair’s back, being cautious not to allow your neck to slump too far back.
- As you release your breath, carefully slide your hands down your shins and lay your trunk over your legs while maintaining a straight back.
- Sliding the hands back up and returning to a sitting posture, pull the right knee in toward the chest as you inhale.
- Open your chest and lean back on the chair.
- With a quick breath out, curve your back and lower your shoulders while bringing your head closer to your knee.
- Give your right leg a release.
- Continue on the opposite side.
- Once you’ve finished both sides, extend your arms overhead, rest on the chair’s back, bend forward once more, come back and do one
- last backbend, and then stand up straight with your hands in the prayer position.
Conclusion
Chair yoga is a fantastic method to reduce stress and enhance general physical well-being. You may work on it in the cozy confines of your house or in your neighborhood studio. There is definitely a yoga style for everyone comfort of your home.
FAQs
Does chair yoga suit your schedule?
The frequency of chair yoga practice is not officially regulated. Nonetheless, the CDC advises those 65 and over to engage in three days of balancing activities and two days of strengthening exercises per week. Therefore, it could be a good idea to begin chair yoga practice two or three times a week.
For what duration is the chair stance appropriate?
30 seconds to 1 minute
Maintaining your thighs and knees parallel, release the air as you bow your knees. To make a right angle with the tops of your thighs, tilt your body forward. Maintain alignment between your head and neck and your arms and torso. Hold for a duration of 30 to 1 minute.
Does chair yoga help with muscle building?
Increases strength
Our bodies naturally lose muscular mass as we age. Less muscle mass increases the risk of injury and results in decreased strength and mobility. Chair yoga is a fantastic choice for you whether you need to get back muscle mass or just want to keep your strength.
Does chair yoga suit all people?
Active living has several established and well-known advantages. As they say, “Exercise is the best medicine.” Fortunately, chair yoga is a safe, efficient form of exercise that everyone can do.
What advantages does a chair pose offer?
A potent yoga practice that may aid with balance and structural strengthening is utkatasana, often known as chair pose. Additionally, it could help with hand-eye coordination and enhance the quality of pregnancy outcomes. Other mild ailments including shoulder stiffness and slight foot and leg malformations could also benefit from it.
References
- Watts, M. (n.d.). Chair Yoga: Everything You Will Ever Need to Know with Video. Siddhi Yoga. https://www.siddhiyoga.com/yoga/benefits/chair-yoga
- Ryt, A. P. (2022, November 4). 10 Chair Yoga Poses You Can Do at Home. Verywell Fit. https://www.verywellfit.com/chair-yoga-poses-3567189
- Jeffries, T. Y., & Jeffries, T. Y. (2023, August 13). 13 Chair Yoga Poses Anyone Can Do. Yoga Journal. https://www.yogajournal.com/yoga-101/types-of-yoga/chair-yoga-poses/
- Chair Yoga Poses | How to get started with chair yoga. (n.d.). Chair Yoga Poses | How to Get Started With Chair Yoga. https://www.uaex.uada.edu/life-skills-wellness/health/physical-activity-resources/chair-yoga.aspx
- Varshey, V. (2023, July 6). Chair Yoga: Improve Flexibility and Strength. https://www.adityabirlacapital.com/healthinsurance/active-together/2021/01/18/simple-chair-yoga-to-make-you-healthy/