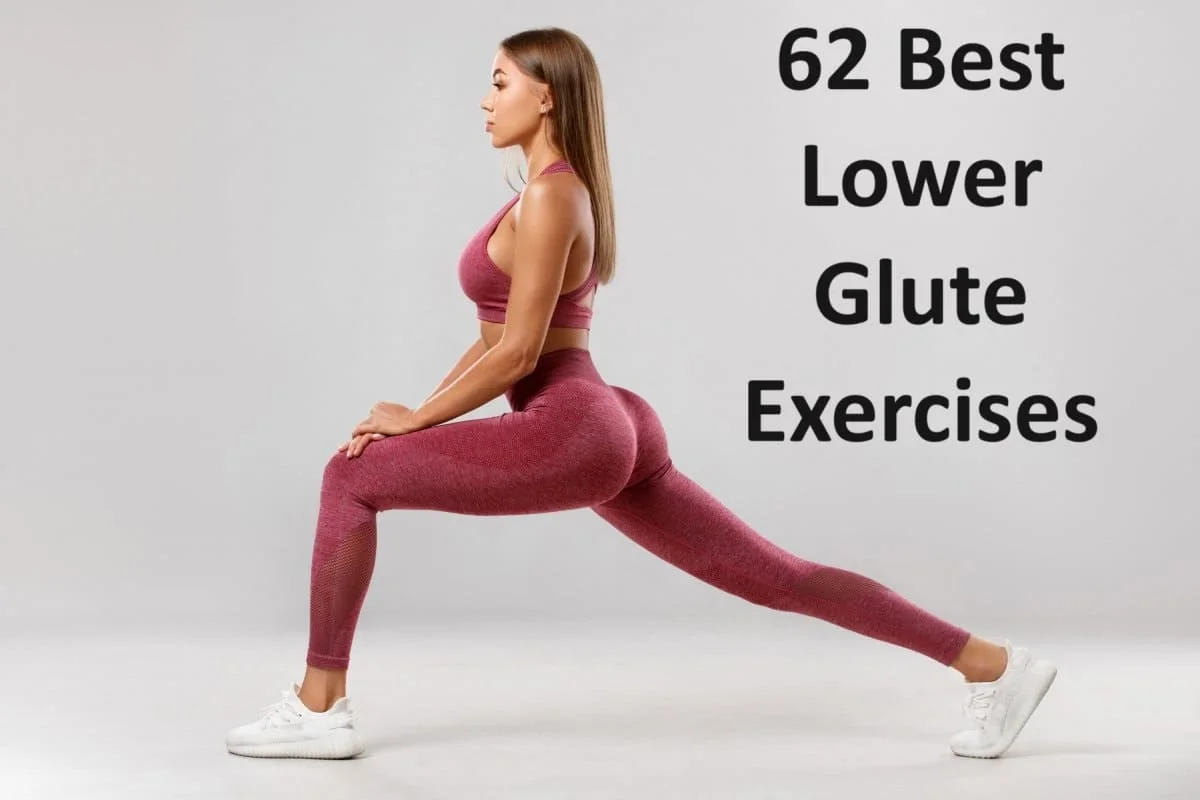
62 Best Lower Glute Exercises
Introduction
It’s reasonable to assume that the majority of individuals want to develop a round and firm buttock. Aside from looking good, it makes you more athletic and helps in a variety of activities such as squatting, jumping, and running.
But, as you’ve undoubtedly guessed, there’s more to glute training than meets the eye. The region is made up of several muscles, each of which plays an important part in how the butt appears and works.
Anatomically, there is no such thing as an “underbutt” muscle… We may, however, target the muscle fibers in the lower glutes and top of the hamstrings to truly strengthen, tone, and sculpt this area of the body.
Stronger lower glutes will give the glutes a rounder appearance while also providing more lower body strength, which may be useful in a variety of sports and daily tasks (as well as stabilizing the spine and hips).
What does “Lower Butt” mean?
The glute muscles and hamstrings combine at the lower butt, also referred to as the under butt, to form the desired crease. A more noticeable crease is usually the result of building the glutes, but this is easier said than done.
Taking advantage of the mind-muscle connection is one useful strategy for enhancing muscle activation and, ideally, experiencing better growth. For every repetition, actively visualize that you are engaging the lower butt area, regardless of the exercise you are performing.
Because genetics affect where body fat is distributed and where muscles are inserted, they also have an impact on your capacity to develop an underbutt.
The introduction states that there is no “underbutt” muscle. Essentially, the lower glutes are what are meant to be discussed when someone refers to the underbutt, also known as the “glute-ham tie-in.”
You can change the way your glutes look by strengthening the lower glutes (and losing extra fat). This will make your glutes appear more lifted and rounded.
This will also involve the upper hamstrings
Naturally, that is never a good reason to give up. Now let’s explore the anatomy of the glutes to discover more about the muscles we aim to strengthen. We’ll then go over 12 fantastic lower glute exercises after that.
The Glute Muscle’s Anatomy
Three muscles make up the region known as “the glutes”:
- Maximus Gluteus
- middle gluteus
- Gluteus minimus
The glute maximus is the biggest and strongest of these. It contains the majority of the buttocks and has multiple advantages when developed. With the assistance of the hamstrings, the glute max, the largest muscle in the body, is primarily responsible for producing hip extension.
A smaller muscle located above the glute max is called the glute medius. When viewed from the back, the area appears rounder due to the growth on the outer side of the butt. You can read more about the shelf butt here. The muscle is also required for it.
The main muscle involved in hip abduction, or lifting your leg laterally, is your glute medius.
The smallest of the three muscles, the gluteus minimus, comes last. Lying beneath the glute medius promotes stability and hip abduction.
Building a round, robust behind requires the development of all three muscles, but for the underbutt, you want to focus especially on the gluteus maximus.
Could you focus on the lower glutes?
The gluteus maximus is the only muscle that makes up the lower glutes, as the anatomy makes clear.
Since the glutes are a single, large muscle, you’re probably thinking that we should target them as a whole and that it’s impossible to target specific areas of them.
The superior and inferior gluteus maximums are the two main divisions of the muscle.
The terms inferior and superior describe the lower and upper glutes, respectively.
Lowe glute training tip
Here are some tips for your lower glute training, beyond the basics:
- Pay attention to the mind-muscle connection:
- As you perform each exercise, keep your glutes tight. Be more than a mere token participant. Make a real effort to feel your lower glutes contract and activate.
- A visual aid can be useful. When you perform each exercise, picture your glutes working hard.
- Variety is important.
- Don’t limit yourself to just a few workouts. Test your muscles with a variety of exercises and tools.
- Try these single-leg workouts: pistol squats, Romanian deadlifts, and Bulgarian split squats are excellent for activating your glutes and building unilateral strength.
- Include plyometric exercises in your routine. Jump squats, box jumps and jump lunges will raise your heart rate and give your exercise an explosive touch.
- Gradual overload is important.
- Increase the weight, repetitions, or sets progressively over time. Your muscles will continue to expand and adapt as a result.
2. Remember to use your other muscle groups:
- A solid base is necessary for strong glutes. For whole lower body strength and stability, make sure you’re also working your quads, hamstrings, and core.
- The form is really important. Never sacrifice form in favor of greater weight. Throughout each exercise, keep your posture straight and engage your core.
3. The recovery process is important to do so:
- Give your muscles enough time to recuperate. For best recuperation, take days off in between workouts and make sleep a priority.
- Regularly stretch and foam roll your glutes. This will lessen tense muscles and increase flexibility.
- Give your body the right kind of nourishment. Consume sufficient protein in a balanced diet to aid in the development and repair of muscle.
Extra advice:
- Use resistance bands: They can help you engage your glutes in new ways or provide an additional challenge to bodyweight workouts.
- Try these cable workouts: Targeting your glutes can be achieved with different angles and resistance patterns provided by cable pull-throughs and hip abductions.
- Train with a partner: You can get your best results when you have someone to encourage or spot you.
- Recall that consistency is essential. Maintain your lower glute exercise regimen and push yourself gradually, and you’ll notice improvements in your general fitness, strength, and definition.
Exercises for the Lower Glute at home
Building a strong and sculpted lower gluteus maximus, often referred to as the “underbutt,” can be achieved with effective exercises at home
Fire Hydrant exercise
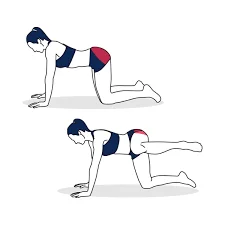
Bodyweight exercises such as fire hydrants, also known as quadruped hip abductions, are a sort of bodyweight exercise. They mostly target the gluteus maximus, although certain variants target the core as well.
When done regularly, fire hydrants may shape your glutes, alleviate back pain, and reduce your chance of injury.
Because the fire hydrant is a bodyweight workout, no specific equipment is required. All you’ll need is a mat.
- Your hands and knees down. Place your shoulders higher than your hands and your hips higher than your knees. Look down and tighten your core.
- Maintain a 90-degree bend in your knee.
To complete 1 rep, return your leg to the beginning position.
Perform three sets of ten repetitions. Rep with the opposite leg.
Tips
Maintain a solid core and pelvis. The only thing that should move is your hip. Otherwise, your hips and glutes will not function correctly.
Point your foot towards the opposite wall as you elevate your leg. This will aid in proper hip rotation.
Benefits
- The fire hydrant workout is great for developing your gluteus maximus. Some variants target the abdominal muscles as well, toning and strengthening your core.
- Your glutes, being the largest muscle in your pelvis and hip area, govern three primary hip motions. These are some examples:
- Extend your hips. Hip extension pulls your thigh away from your pelvis. It allows you to walk and climb stairs.
- External rotation of the hip. When your leg rotates outward, this happens. To get out of an automobile, you employ hip external rotation.
- Hip flexion. Hip abduction moves your leg away from the center of your body, allowing you to take a stride to the side.
Versions that have been modified
After you’ve mastered the basic fire hydrant, you may try customized variants to push yourself further
Resistance-banded fire hydrant
A resistance band loop around both legs may be used to make fire hydrants. Your hips and glutes will be forced to operate against resistance as a result of the band.
Wrap a resistance band loop above your knees to do this. Fire hydrants should be used as normal.
Frog Squats (froggers)
How to do it
- Step 1: Stand up straight with your feet wider than shoulder-width apart. Hold your hands at arm’s length in front of your body.
- Step 2: Begin the workout by pulling your hips back and bending your knees into a squat. Make sure your knees are always perpendicular to your feet, and don’t allow them to come forward.
- Step 3: Squat until your thighs are parallel to the ground and your fingers can contact the ground, inhaling as you do so. As you push yourself back up to standing, exhale.
The frog squat is a calisthenics and cardiovascular exercise that primarily targets the quadriceps but also targets the glutes and hamstrings to a lesser extent.
The step-by-step frog squat instructions, frog squat suggestions, and instructional frog squat method make learning the perfect frog squat form simple.
The following muscles are employed in the frog squat:
- Glutes
- Quads
- Hamstrings
- Core
The benefits of the frog squat and why it’s a wonderful exercise to add in your training program.
The following are the top seven advantages of frog squats:
- Increases glute strength
- Strengthens the core and improves posture.
- Easy to learn Improves mobility
- Versatility
- No equipment is required to add variety.
Glute Strengthening
Frog squats aid in the development of functional lower-body strength in the glutes, which are essential for hip extension as you drive the hips up and forward.
As a result, frog squats are an excellent auxiliary action for lifters who have difficulty locking down the back squat owing to glute weakness. Stronger glutes will allow you to lift more weight as you drive up from the squat.
Tips:
- Pulse squat: For an added burn, do little hip pulsing motions once you’ve reached the bottom of the squat.
- Jump squat: For an intense version, incorporate a jump at the peak of the squat.
- Weighted frog squat: For added difficulty, hold a kettlebell or dumbbell between your hands.
Security:
- When you sense any pain, pay attention to your body and stop.
- Before performing this workout, check with a physician or physical therapist if you have any past injuries.
Exercise With Household Items
Water Bottle Glute Bridges
Water bottle glute bridges are a fantastic way to activate your glutes and hamstrings at home using minimal equipment.
Advantages:
- Effective glute activation: The exercise specifically targets the gluteus maximus and medius, contributing to improved definition and strength development.
- Low-impact and adaptable: Using body weight and adjustable to accommodate limits, it is appropriate for people of all fitness levels.
- Improves hip mobility: By opening up your hips, the bridge exercise reduces tension and increases flexibility.
- Strengthens core: By keeping appropriate form, you work your core muscles, which improves your stability all around.
- No special tools are required—just a water bottle! Because of this, doing the exercise anytime or anywhere is simple.
How to carry it out:
- When standing, extend your toes slightly apart while extending your feet wider than shoulder-width apart.
- Maintain a straight back and drive your hips back as you squat down.
- Lower yourself until your thighs are parallel to the floor and your knees are bent ninety degrees.
- Place your elbows directly above your inner thighs, on the insides of your knees.
- Do lift your hips up a little, but don’t lock out your knees completely.
- Squeeze and hold your glutes for a brief period of time.
- To return to the beginning position, squat down.
- Do ten to twelve reps in two or three sets.
Changes:
- Put a cushion or blanket under your knees for support if you are experiencing knee pain.
- Start with smaller bridges and avoid arching your back if you have lower back problems.
- For a less strenuous variation, you can alternatively perform the exercise without the water bottle.
- Bonus: After you’ve mastered the fundamental glute bridge, try these variants to work your glutes from other perspectives:
- Single-leg glute bridge: While doing the bridge, raise one leg off the floor and concentrate on your working leg.
- Pulse bridge: To add more burn, hold the bridge in the highest position and give it brief up-and-down pulses.
- Banded glute bridge: For extra resistance, wrap a resistance band around your ankles and apply pressure while performing the bridge.
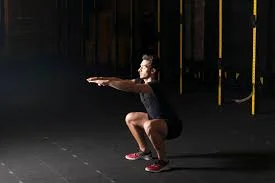
Squats
Squats are the ultimate glute exercise, and they’re well worth the effort. The best method to target your backside is to move slowly and deliberately while paying attention to proper form.
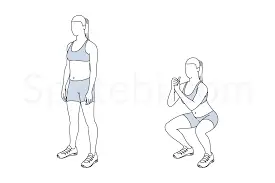
Instructions:
- With your arms by your sides and your feet shoulder-width apart, start.
- As you raise your arms in front of you and push your butt back, start bending your knees and assuming the position of a chair. Make sure your knees come out of your body rather than in, and stop when your thighs are parallel to the floor.
- Start with your weight in your heels and push up back once you reach parallel.
- Repeat 12 reps in 3 sets.
Leg lift in reverse
To perform a reverse leg lift effectively, you must isolate your glute and allow it to raise your leg toward the ceiling.
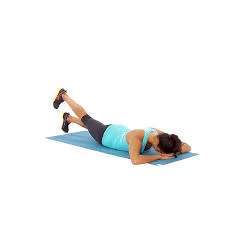
Instructions:
- With your arms bent in front of you, place your face down on the ground while you lie facedown.
- Raise your right leg as high as possible off the ground while maintaining your hips erect by using your glute. As you perform the movement, flex your ankle.
- Go back to the beginning.
- After 12 repetitions on this leg, switch.
- Finish all three sets.
Curtsy squat (Cross Leg squat)
Curtsy squats work the outer glute muscle, or gluteus medius, to give your body a well-rounded appearance and feel. You’ll feel it more the lower you squat.

Instructions:
- Place your arms at your hips and your feet shoulder-width apart to start.
- Start bending at the knees and make a curtsy motion with your right leg as you step it back and to the left.
- Start by pushing up through your left heel and back until your left thigh is parallel to the floor.
- After 12 repetitions on this side, swap legs.
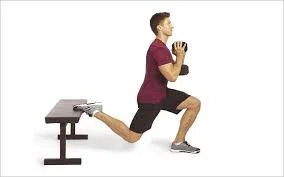
Split squat
Split squats have two benefits: they strengthen your glutes and test your balance.
Instructions:
- Step forward with your right foot and balance your weight equally between the two.
- Squat down with your knees bent, stopping when your right thigh is parallel to the floor.
- Push up through your right foot to finish three sets of twelve repetitions.
- Repeat with your left foot now.
Step-up
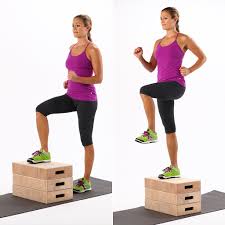
Step-ups are a great functional exercise that will improve your everyday movement. Additionally, they’ll strengthen your glutes.
Targeted muscles include your quadriceps and glutes, as well as your hamstrings, calves, and core.
- Stand erect with a set of dumbbells at your sides at arm’s length, and place your right foot on a bench with your hip, knee, and ankle all bent 90 degrees.
- Push your body up with your right leg till it’s straight (keep your left foot up) while keeping your chest up and shoulders back.
- After a little pause, return your body to the starting posture slowly. On each leg, do the same amount of repetitions.
How to Make the Transition Easier
Replace the dumbbells with your own body weight, or substitute the bench for a box or an aerobic step.
How to Make the Step-Up Difficult
- Replace two dumbbells with a single heavier one, held in the hand opposite the leg conducting the activity.
- Hold the weight in your right hand if you’re stepping up with your left leg, for example.
- Want an even greater challenge? At the top of the exercise, raise the knee of your ‘non-working’ leg (e.g., your right leg if you’re stepping up with your left) above hip level.
Bonus Suggestion
- Check that your working leg is performing all of the effort. Don’t push off the ground with your right leg if you’re stepping up with your left.
- And as you return your left foot to the ground, do so with control.
Superman Rows
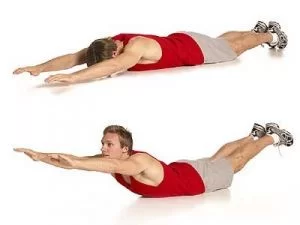
Your glutes and entire posterior chain are worked during this exercise. Maintaining pressure on them during the motion will guarantee strong involvement.
Instructions:
- Lay on your back with your legs and arms outstretched on the floor.
- As high as your legs and chest will go, raise them off the ground. Maintain a neutral neck posture.
- Go back to the beginning. Do three sets of twelve repetitions.
Clamshell
Another exercise that targets the gluteus medius, a crucial muscle involved in removing your leg from the midline. This one seems easy enough, but it works incredibly well.
Instructions:
- Lay on your right side with your legs stacked on top of each other and your knees bent. Raise your upper body, raise your hand to your head, and flex your right arm.
- Raise your right leg as high as it will go while maintaining your feet together and your knees bent.
- Reenter the beginning slowly. After ten repetitions, switch sides. Finish all three sets.
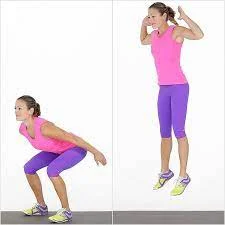
Squat jump
Plyometric exercises, such as the broad jump, call for a lot of force to be performed because you do not receive a running start. It’s a great workout to blow up upward with your glutes and quads.
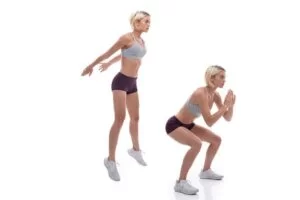
Instructions:
- Take a standing position with your arms by your sides and your feet shoulder-width apart.
- Lower yourself to a slight squat and leap as far as you can while using your arms to propel yourself forward.
- Softly land with your feet flat on the ground. Without delay, squat down a little and leap forward once more.
- Finish 3 sets of 8–10 repetitions.
Half squat
The plié squat, a dance-inspired exercise, works your inner thighs and glutes.
Instructions:
- Spread your feet wide and point your toes forward.
- Begin bending your knees and descend as low as you can.
- Utilizing your heels as a springboard, squeeze your inner thighs and glutes at the summit.
- Finish three sets of twelve reps.
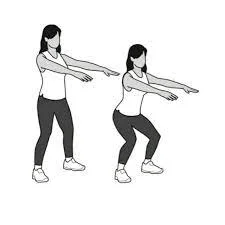
Jack squat

Squat jacks combine strength and cardio training to give you the best of both worlds. With every rep, set a goal for yourself to squat lower.
Instructions:
- Take a standing position with your feet together, hands clasped behind your head, and your arms bent.
- Leap with your feet out in front of you, landing softly, and instantly crouch down, maintaining your arms in place.
- Stretch out your legs, leap back to where you were before, and then leap out again right away.
- Finish three sets of twelve reps.
Side lunge
Utilizing your muscles in all planes of motion is crucial. The side lunge works your inner and outer thighs and the sides of your glutes.
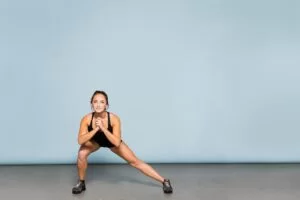
HOW TO PERFORM A SIDE LUNGE
- Maintain proper posture by keeping your feet together and your toes pointing forward.
- Push your left hip back while maintaining your right leg straight and toes pointing forward.
- A stretch should be felt in your right groin muscle.
- Return to the feet together posture by pushing your left foot through the floor.
- Alternate sides or perform all repetitions on one side and then the other.
SIDE LUNGE MUSCLES WERE EFFECTIVE.
Almost all lunge variants work the same muscles, but from various angles depending on the lunge variation. Because of the higher stability demands of stepping to the side, your lateral muscles are more involved in the side lunge. The side lunge works the following major muscles.
Quadriceps
Gluteus Maximus, medius, and minimus muscles
Calves (gastrocnemius and soleus)
Hamstrings Adductors
Benefit
Stronger Squats and Deadlifts: By strengthening the body in the lateral or frontal plane, you will strengthen your lateral stabilizers (such as the obliques, glute med, and mini). This results in less energy leaks (lateral flexion), which leads to improved performance and stronger squats and deadlifts.
Improved Lateral Movement: When training the side lunge, strengthening the adductors and the smaller glute muscles of the medius and minimus will condition your body for improved lateral movement. If your sport requires lateral mobility, training will only make it better. When you enhance your lateral mobility, you will improve your forward and backward stability.
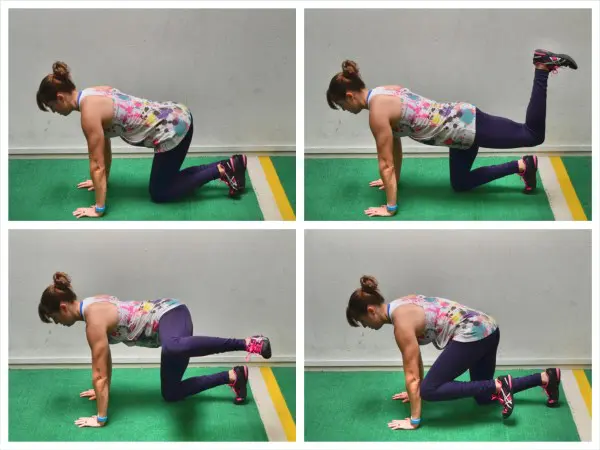
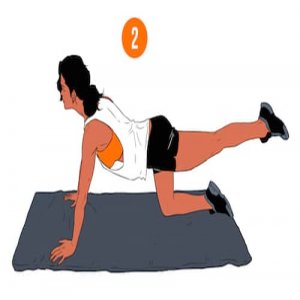
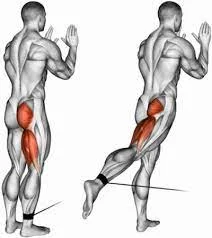
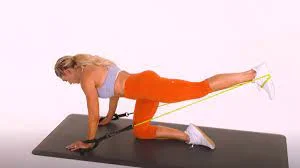
Donkey Kick
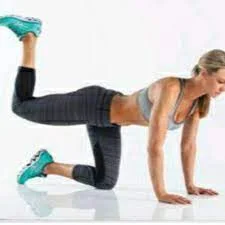
It’s a fantastic exercise for targeting your lower glutes and adding some definition to your backside. Here’s what you need to know about Donkey Kicks:
how to do it
How to Perform a Donkey Kick
Here’s a step-by-step tutorial for learning how to execute a donkey kick:
Get down on all fours, flatten your back, and tuck your chin slightly.
Lift your leg back and up, using your lower abdominals.
When you stop elevating your leg, your back begins to arch.
Return to your starting position and then switch legs.
For novices, two sets of 15-17 repetitions of donkey kicks are sufficient.
Donkey Kick Advantages
Here is a summary of some of the advantages of frequent donkey kick practice:
Muscle Strength: The original donkey kick and its modifications, such as dumbbell donkey kicks, increase physical strength and endurance. The workout targets the muscles listed below.
- Glutes and Hamstrings
- Lower Back Core
Extra direction
work resistance bands: They can help you discover new ways to work your glutes or add an added challenge to bodyweight exercises.
Try these cable exercises: Using hip abductions and cable pull-throughs, you can target your glutes with different angles and resistance patterns.
Train with a partner: You can get your greatest results if you have someone to encourage and support you.
Upward plank
Everyone is aware of the full-body benefits of planks, and the upward plank is no different. Your glutes are working hard in this exercise to keep your body weight off the ground.
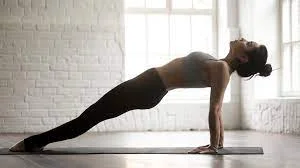
Instructions:
- Assume a sitting position with your legs spread, back slack, and arms straight, with your fingertips pointing toward your butt and your palms on the floor.
- Breathe in and raise yourself off the ground by using your core to make your body form a straight line from head to foot. Let your head drop back until your neck and spine are in alignment. Hold on a moment.
- Start with 10- to 15-second intervals and hold for as long as you can maintain good form.
Squat pulses
In a squat, pulsing lengthens the time under tension, which demands more of the muscle and yields greater results.
Instructions:
- Squat with your hands together in front of you and your feet shoulder-width apart.
- Squat down; rise less than halfway up and then lower yourself back down, as opposed to rising all the way back up.
- Finish the three sets of 20 pulses.
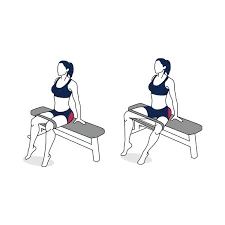
Chair Glute Raise

The chair glute raise is a fantastic bodyweight exercise you can do at home without needing any equipment except a sturdy chair! It’s a great way to target your lower glutes, hamstrings, and core, making it an effective choice for building strength and definition in your backside.
how to do it
Initial Position
To prevent a chair from moving, position it against a wall or on a rug.
Place your feet at the end of the seating area, bend your knees, open your legs to about hip width, and lie down in front of the chair.
Correct Execution:
As you slowly raise your pelvis to the final position, your body should be in a straight line from your head to your knees. Your feet and shoulders should support your weight, so don’t allow your hips drop.
For a targeted glute workout, perform the exercise multiple times.
Advice:
- Don’t just lift your hips; concentrate on using your glutes.
- To maintain stability during the workout, keep your core active.
- As you perform the activity, breathe normally.
If it’s too simple, you can increase the difficulty by performing single-leg rises, holding the position longer, or using ankle or dumbbell weights to add weight.
Changes:
- Put a cushion or blanket under your knees for support if you are experiencing knee pain.
- Start with modest lifts and avoid arching your back if you have lower back problems.
- For a milder version, you can also take a seat further back in the chair.
Squat Hops
With your arms by your sides and your feet hip to shoulder-width apart, take a proud stance. This is where things begin.
- Lower yourself into a half or full squat (thighs parallel to the floor) by pushing your hips back and driving your arms back while maintaining an engaged core and a flat back.
- Reverse the motion and leap off the ground while driving up quickly.
- Softly land and dive straight into your next rep.
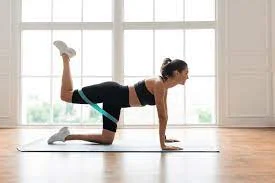
Leg Circles While Kneeling
how to do it
- Place your hands under your shoulders and your knees under your hips to go into a full 4×4 position. This is where things begin.
- Lift your left leg straight behind you while contracting your glute on the left.
- Make three circles with your left leg, one clockwise and one counterclockwise.
- To finish one rep, lower your leg back to the beginning position. Repeat with your right leg.
- For each repetition, keep switching up your legs.
Donkey Kick Advantages
Here is a summary of some of the advantages of frequent donkey kick practice:
Muscle Strength: The original donkey kick and its modifications, such as dumbbell donkey kicks, increase physical strength and endurance. The workout targets the muscles listed below.
- Glutes and Hamstrings
- Lower Back Core
Back Leg Raises
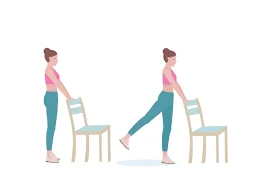
Leg raises with the legs extended while standing:
Equipment: To make this exercise easier to balance, you can use a chair, wall, or other support in addition to your body weight.
Guidelines:
- Place your hands by your sides or on your hips as you stand with your feet hip-width apart. Make a small forward lean and contract your core.
- With your foot flexed, extend one leg straight back behind you. To raise the extended leg as high as is comfortable for you, without arching your back, contract your glute and hamstring.
- Once you’ve held the pose for a little moment, carefully lower your leg back to the beginning position.
- Repeat ten to 15 times.
Supported Reverse Leg Lifts:
Equipment: A table or chair that is robust, a leg press machine, or a cable machine.
Guidelines:
- Place yourself near the selected apparatus and fasten the ankle strap around your foot. Put your hand on the chair or table if you’re using it for support.
- Turn your back on the machine or support and lie on your stomach or kneel. Maintain a straight back and a contracted core.
- Stretch one leg straight back, raising it off the ground with the help of the apparatus or support. To fully activate the muscles in the extended leg, squeeze your hamstring and glute.
- Once you’ve held the pose for a little moment, carefully lower your leg back to the beginning position.
- Perform ten to fifteen reps for every side.
Advice for every possible combination:
- During the lifting phase, concentrate on tightening your hamstrings and glutes rather than engaging your lower back.
- To maintain stability during the workout, keep your core active.
- Instead of kicking up your leg, make deliberate movements.
- If you’re new to the workout, start with lower weights or fewer repetitions.
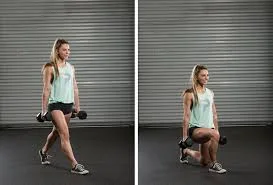
Romanian Deadlift on One Leg
One of the best exercises for simultaneously working the hamstrings and glutes—the two muscles that produce the underbutt—is the Romanian deadlift. This exercise does everything we need it to: it targets the glutes because of the hinging at the hip and the hamstrings because of the fixed knee position.

How to apply
- The Barbell setup should be similar to that of a conventional deadlift.
- Place your feet beneath the barbell and stand shoulder-width apart.
- Bend down, lift the bar, and then straighten your back to stand again holding the bar in your hands.
- Hinge from the hips, keeping your back flat and pushing your hips back. Your knees will automatically begin to bend as you do this.
- Once you feel a stretch in your hamstrings and glutes, lower the bar to just below your knees. Then, contract your muscles to raise yourself back to the starting position.
DonkeyKicks
How to Perform Donkey Kickbacks Correctly to Isolate the Glute
A common glute exercise that works well for bodyweight and resistance training is the donkey kick.
A donkey kick is a kick delivered from a quadruple stance that can be upward or backward.
Donkey kicks are an excellent way to target the lower glutes because they’re a very flexible exercise. The donkey kick can keep your glute exercises fresh and interesting, whether you use it as a straight leg variation or as resistance with varying gym weights.
Donkey kicks can be highly effective if you really concentrate on tightening your glutes during the exercise and lowering your leg back down gradually to maintain the tension in your muscles
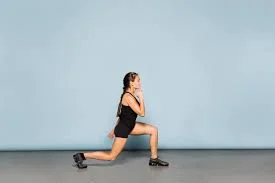
Reverse lunge
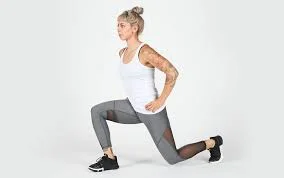
How to (bodyweight):
- Hands-on your hips, arms bent, toes pointed slightly out, and a tall stance with your feet shoulder-width apart.
- Draw your shoulder blades back, look forward a few feet, inhale deeply, and contract your stomach.
- Place your right foot flat on the ground as you bring it behind your body. Finding the perfect stride length will need some trial and error.
- Bend your front knee and immediately descend into a controlled lunge.
- Lower yourself till your rear knee nearly touches the ground, then take a little break. Your torso should be upright and your front knee should be over your ankle.
As you exhale, push through your front heel to straighten your knee and extend your right leg forward. Push your hips forward and contract your glutes at the summit at the same moment.
Inhale once again and lunge once more, bringing your right leg back.
Try to complete as many slow, deliberate repetitions as you can, and repeat the same amount of times on your left leg.
Pro tip: By maintaining your front foot on a platform, you may extend the range of motion. Increase your height from a few inches to five to seven inches off the ground.
You could sink into a deeper lunge and more effectively stretch your posterior chain if you elevated your front foot. When deep lunges become second nature to you, start using external weight, such as carrying a pair of dumbbells
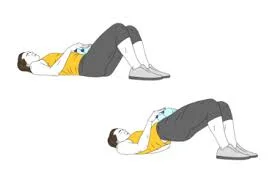
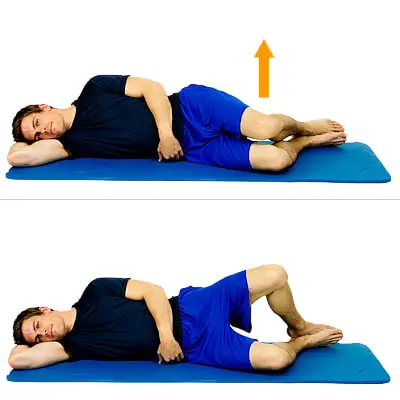
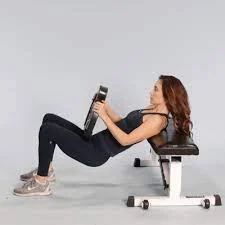
Single-Leg Glute Bridge
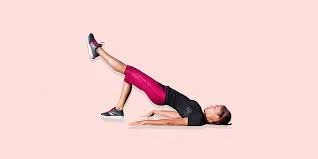
The glute bridge exercise is comparable to hip thrusts, with one exception: instead of pressing your upper back on a raised surface, such as a flat bench, you must lie flat on the floor.
Classic glute bridges can help beginners grow, but after a while, the exercise gets too simple. It’s a fantastic idea to continue stressing your body and advance by doing the single-leg variation.
Training one side at a time is not only more difficult but also a good method to develop both sides of your body equally, which improves symmetry.
How to:
- Place an exercise mat on the floor and lie on your back.
- For balance, keep your arms straight and at your sides.
- Take a deep breath and engage your abs.
- Raise your right foot off the ground and straighten the knee.
- Drive your hips toward the ceiling while applying pressure through your left heel. At the top, your hips, shoulders, and left knee should all be in a straight line.
- After a little pause, release your breath and slowly lower your buttocks to the ground.
- Inhale again and repeat.
- Once finished, switch the feet position and do the same number of reps for your right side.
Expert advice:
At the top position, try not to overextend your hips as this can cause stress and an excessive arch in your lower back.
Keep your repetitions regulated and abs engaged to maintain a strong and healthy lower back position.
Glute Bridge Hamstring Curl
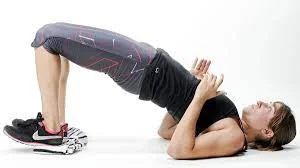
Glute bridge hamstring curls are a more advanced workout that leads to excellent glute activation. More importantly, the action targets the area where the hamstrings meet the buttocks muscles, leading to a noticeable crease
In addition, the lower glute workout develops the gluteus medius and minimus, which give pelvic stability.
How to apply
- Place an exercise mat on the floor and lie on your back.
- You should be able to glide your heels back and forth on the floor. Consider removing your shoes or placing slider discs underneath your heels to lessen friction.
- After assuming the beginning posture, tighten your upper body by contracting your glutes and abs.
- Drive your hips towards the ceiling and exert pressure through your heels. Your lower back should be neutral, and your shoulders, hips, and knees should all be straight.
- Take another deep inhale and slowly drive your heels away from your body, extending your knees.
Contracting your hamstrings will help you bend your knees and slowly bring your heels in.
Let out a breath.
Repeat after inhaling once more.
Expert advice:
A challenging exercise that frequently reveals weak abs and glutes is the glute bridge and curl. It is advisable to begin with a limited range of motion and increase it gradually as your strength and body awareness increase.
For starters, you could just stay at the top for a little while. After that, begin driving your heels a few inches away and then take a step back to your starting position.
Jumping Lunge
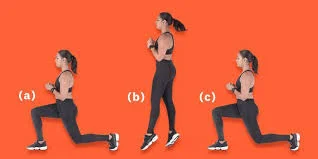
A dynamic lower-body workout that improves power and athleticism, as well as lean muscle mass, is the jumping lunge.
Lunges emphasize one side at a time, similar to Bulgarian split squats, which results in superior leg and glute activation. Moreover, you develop both sides more equally, which lowers the possibility of imbalances in strength or muscle.
How to apply
- With your shoulders back and your feet hip-width apart, take a tall stance.
- Put your hands on your hips, inhale deeply, and contract your abdominal muscles.
- As you simultaneously bring your left leg back and your right leg forward, hop into the air.
- Place the ball of your left foot on the ground and plant your right foot firmly on the earth.
- Drop into a lunge right away, then release the breath. At the bottom position, your right knee should be precisely over your foot.
- Take a deep breath, push with your front heel, and launch yourself into the air.
- As soon as possible, change your legs, place your left foot in front, and lower yourself into another lunge.
- Continue jumping in turns until you’re finished.
Expert advice:
Swing your arms in time with your legs, just like you would when running, for more stability:
Right arm forward and left arm back equals left foot forward.
Left arm forward and right arm back equals right foot forward
Step Up with Leg Raise

- Holding a pair of dumbbells at arm’s length by your sides, take a proud stance in front of a bench or step.
- With your hip, knee, and ankle all 90 degrees bent, plant your right foot on a bench. This is where things begin.
- Drive your left knee toward your chest and push through your right foot to step up onto the bench while maintaining an upright posture and back shoulders.
- To get back to where you were before, pause, then turn around.
- Complete each rep, then swap legs to continue.
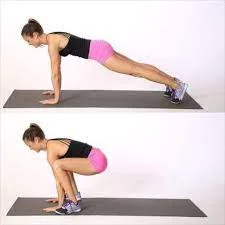
Glute Kickback on the Floor
Glute kickbacks are an easy, equipment-free, and beginner-friendly exercise that you can perform at home to build your underbutt.
The exercise has an excellent range of motion, is easy to learn, and can be performed with ankle weights for added resistance.
The exercise can also be done at the gym as a part of a lower-body workout. For example, incorporate these into your warm-up to enhance glute activation, or save them for last.
Lower Glute Exercise at the GYM
Hip presses
Hip presses are excellent for targeting your glutes, hamstrings, and core. There are two main variations: bodyweight hip presses and weighted hip presses, each with different benefits and modifications.
Hip press with weights:
Equipment: a weighted plate, dumbbells, resistance band, or barbell.
Guidelines:
- Use weight on your hips and follow the same instructions as for the bodyweight hip press. You can loop a resistance band around your thighs, hold dumbbells next to your hips, position a weighted plate on your lower abdomen, or place a barbell across your hips.
- Start with a weight that will make it difficult for you to continue exercising with proper technique, but yet manageable.
Advice:
- Select a weight that will enable you to keep the appropriate form. Don’t compromise shape in favor of greater weight.
- Take care to prevent the weight from rolling about. To assist in keeping it in place, you might use a towel or cushion.
- If you have any lower back pain, cease the activity and get medical advice from a physician or physical therapist.
Straight Leg Deadlift with Dumbbells
- Pose proudly, keeping your feet hip-width apart, and place two dumbbells in front of your thighs with your palms facing rearward. This is where things begin.
- Dumbbells should be lowered to mid-shin level while remaining close to your body. Push your hips back, as if you were closing a door with your butt while maintaining a flat back and an engaged core. Remember that this is a “straight leg” deadlift, so only slightly bend your knees.
- To get back to where you were before, pause, then turn around.
Weighted Lunges Forward
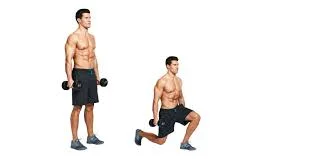
- With your feet hip-width apart, stand tall and hold a pair of dumbbells at arm’s length by your sides. This is where things begin.
- Step forward with your right foot while maintaining an uplifted chest, back flat, shoulders back, and engaged core.
- Lower yourself until your back knee bends to a 90-degree angle and is just inches above the floor, and your front thigh is parallel to the floor.
- To get back to where you were before, pause, then turn around.
- Repeat, moving forward with your left foot this time. For each repetition, keep switching up your legs.
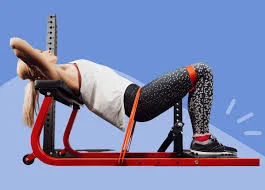
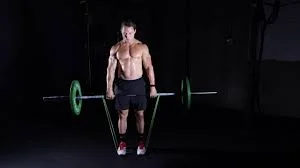
Hip Thrust (Barbell)
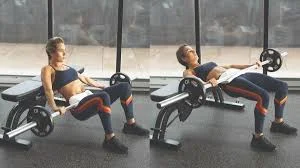
One of the most common exercises for building glutes nowadays is the barbell hip thrust. People enjoy participating in the movement because it is comparatively simple to set up and learn, which has contributed to its rise in popularity in recent years.
Hip thrusts, in contrast to a lot of glute exercises, let you put more weight on your posterior chain and increase mechanical tension, both of which are good for hypertrophy (5). Trainees frequently work up to 300, 400, or even 500+ lbs. as a result.
How to:
- Take a seat on the floor with a loaded barbell over your hips and a flat gym bench behind your back.
- Place your upper back up against the flat gym bench’s edge to make sure it’s sturdy enough to hold your body weight without slipping.
- Place the barbell against your hip crease at the same time. To improve comfort and reduce the risk of bruises, attach a pad to the bar.
- Breathe deeply, contract your abs, and retract your shoulder blades.
- To push your hips toward the ceiling, squeeze your glutes and apply pressure through your heels.
- Ascend until your hips align with your knees and shoulders. Ideally, your knees are 90 degrees away from your ankles and directly above them.
- Take a brief break at the top, then slowly descend your buttocks to the ground, exhaling as you get close to the bottom.
- Take another breath and repeat
Pro tip:
One of the best exercises for the under-booty is the hip thrust, but start out with a lighter weight.
This will facilitate the development of a mind-muscle connection with the lower buttocks region and facilitate the effective engagement of your glutes.
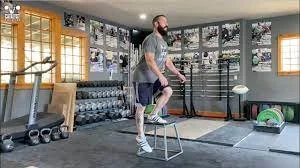
Step Up with Dumbbells

Step-ups are typically viewed as a quadriceps-dominant exercise due to the movement’s knee flexion. To get on top, you specifically need to flex your quadriceps while standing in front of an elevated object.
Step-ups seem to be even more advantageous for the gluteus maximus, though there is still a respectable quad activation. If executed properly, this exercise can provide a great under-the-belt workout.
activation of the gluteus maximus during a variety of popular strength training activities, such as lunges, step-ups and their variations, and hip thrusts.
It’s interesting to note that, above hip thrusts, the step-up produced the maximum activation of the glute max.
How to apply
- Pick up a set of dumbbells and take a position facing an elevated surface, such as a plyo box or a gym bench.
- Place your toes slightly out from your feet, shoulder-width apart. Remain with your arms by your sides.
- Breathe deeply, contract your abs, and retract your shoulder blades.
- Raise your right leg to the top of the gym bench or plyo box, plant your foot on the raised surface, and flex your quadriceps to straighten your leg.
- Breathe out and carefully step off.
- In the same manner, raise your left leg while taking a breath.
- Till you finish, keep switching between left and right.
Pro tip:
By doing the exercise with a taller object, you may change the focus to your glutes and hamstrings. Elevating your front foot increases the difficulty of the exercise and requires more work from the posterior chain.
Because plyometric boxes come in different sizes and let you modify the height to the right level, you can use one.
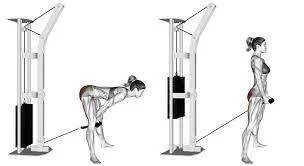
Pull-through cable
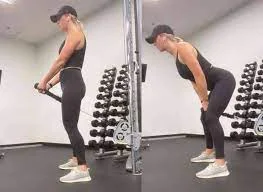
One of the best exercises for the underbutt is the cable pull-through. The hip hinge works your entire posterior chain, including your back, hamstrings, glutes, and calves. It is comparable to a deadlift.
The movement has several noteworthy advantages, one of which is that the wires maintain a steady tension independent of gravity. There is never a moment of relaxation for your muscles because every repetition is difficult from beginning to end.
Maintaining a state of tension can improve muscle activation and facilitate the development of a mind-muscle link with your underbutt. You may therefore be able to focus more growth there and grow a rounder posterior.
An additional advantage of this exercise is that it allows you to put a lot of weight on your posterior chain, which creates a great deal of mechanical stress that is necessary for strength and hypertrophy.
It also has a great range of motion. Extending your hips results in a powerful muscular contraction, and leaning forward greatly strains your posterior chain.
How to apply
- After choosing the right weight and lowering the pulley, fasten a rope to it.
- Place the attachment between your feet and turn your face away from the cable pulley.
- With your palms facing each other, bend over and grasp both ends of the rope attachment with an even neutral grip.
- Place a rope between your legs and stand up with your hands clasped.
- To ensure you have enough space for the exercise, move forward a few steps and place your feet shoulder-width apart.
- Draw your shoulder blades back, inhale deeply, and contract your abdominal muscles.
- Maintaining a straight back, push your buttocks back and lean your body forward.
- When your torso is about parallel to the floor, bend forward. It should feel like your rear muscles are stretched.
Squeeze your glutes at the highest position while exhaling, then drive your hips forward to stand up.
Pro tip: With each repetition, actively contract the muscles in your buttocks. As you bend forward and as you stand up, feel your muscles tense and expand. If you’re having trouble activating your muscles, decrease the weight. Perform sets of up to fifteen deliberate, sluggish repetitions.
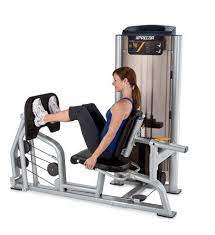
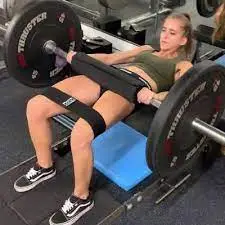
Lying Leg Curl (Machine)
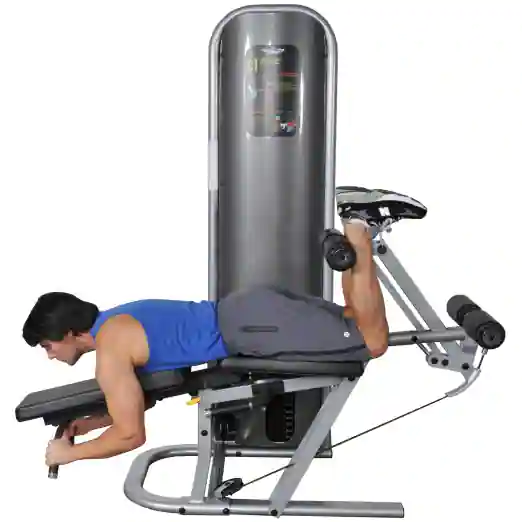
Leg curls performed while lying down are a common hamstring workout. Leg curls involve knee flexion, which is one of the hamstring muscles’ activities.
Apart from strengthening the hamstrings, one of the best workouts for the lower butt is the leg curl. The underbutt, or point where the hamstrings and glutes converge, is the specific target of this exercise.
How to apply
- Choose the machine’s proper load.
- As you lie down, adjust the pad so that it is against your Achilles heel.
- Place your lower legs back against the pad after settling into the machine and supporting yourself with the handles.
- Breathe deeply, contract your core, and flex your knees until your posterior muscles clench strongly.
- Take a moment to pause at the top position, then slowly stretch your legs while letting out a breath.
- Repeat taking another breath.
Pro tip: Try a different, less-known kind of leg curls if you have trouble feeling your glutes when performing them on a machine.
Specifically, you should place your knees on the floor and your hips on the edge of a flat gym bench while lying face down. Squeeze your glutes to raise your legs and straighten your knees and hips while holding onto the bench with both hands for support.
Once in place, flex and extend your knees while keeping your glutes taut. By doing this, you can strengthen your hamstrings and improve the glutes’ mind-muscle link.
your glutes with a few high-rep repetitions after completing your main workout of the day.
Kickback of Standing Cable Glute
An exercise a little bit more difficult than the last one is the standing cable glute kick. These are done using an ankle attachment and cable machine, not on the floor.
The ability to adjust the resistance to your strength level and progressively overload your muscles to promote further muscular growth is a great advantage of this workout.
Furthermore, a cable machine produces continuous stress, requiring your muscles to work hard all the way through. You may therefore find it simpler to engage the appropriate muscles.
How to apply
- After choosing the proper load and lowering the pulley, fasten an ankle cuff.
- To remove the weight from the cuff’s stack, step back after putting it around your right ankle.
- To keep your back neutral, slant forward by hingeing at your hips.
- For balance, use both hands to grasp the cable machine while keeping your left foot flat on the ground. Keep both knees slightly bent.
- In one fluid motion, contract your abs, inhale deeply, and kick back with your right leg.
- As you release the air, pause at the peak and bring your leg back to the starting position.
- Repeat taking another breath.
After you’re done, perform the same amount of reps while cuffing your other ankle.
Expert advice: Use a lightweight at first, then go carefully and gradually with each repetition. Squeeze your glute as much as you can and hold the pose for a brief period after you’ve kicked it back.
A common error made by athletes is to use excessive weight and yank their legs back during repetitions. Regretfully, this releases the glutes’ tightness, which significantly reduces the benefits of the exercise.
Bulgarian Split Squat
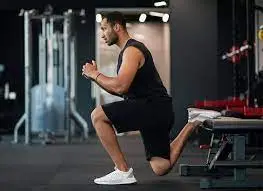
Another exercise that works your quadriceps is the Bulgarian split squat, which you may modify to work your posterior chain and develop your underbutt.
More specifically, the EMG data indicates that a longer stride causes the glutes and hamstrings to become more prominent.
A more vertical shin position, with the front knee above the ankle or slightly behind, is made possible in this position. Furthermore, you can more effectively stretch your posterior muscles with a longer stride.
Additionally, you work one leg at a time, much like with lunges, supporting more balanced development.
Women’s lower body dumbbell split squat
How to stand tall:
- With your feet shoulder-width apart, place your arms at your sides. Use a chair, plyo box, or other solid elevated item to support yourself as you perform.
- Raise your right foot on the platform of your choice and bring it behind your body.
- Pull your shoulder blades back, tense your abs, and take a breath.
- Bend your front knee to lower yourself into a squat. Lower yourself till your front thigh is nearly in line with the floor. Your knee should be slightly behind or over your ankle.
After a brief pause at the bottom, extend your knee by pressing through your front heel.
Inhale almost completely.
Inhale once more and descend once more.
Perform the same number of slow, deliberate repetitions on your right side after switching leg positions and completing as many reps as you can with your left.
Expert advice:
Try varying the length of your stance to see what suits you the best. To improve your ability to retain your balance, you may need to begin with a shorter stride.
As you become familiar with the exercise, gradually increase the distance between your feet to move the focus to your posterior chain.
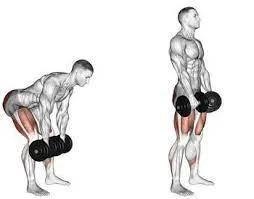
Romanian Deadlift (Barbell, Dumbbell)

Not only are Romanian deadlifts (RDLs) a fantastic hamstring exercise, but they are also a great glute exercise. More specifically, the activity tones the area where your hamstrings and glutes meet, resulting in a more prominent crease.
The range of motion of RDLs is a great advantage. Your posterior chain is significantly stretched when you lean your chest forward, and it contracts greatly when you stand up.
Furthermore, RDLs provide great loading, in contrast to several of the workouts on our list. To become comfortable with the exercise, you can begin with a lightweight dumbbell and work your way up to a loaded barbell or a pair of heavy dumbbells.
How to use a barbell:
- Place the barbell at your knees.
- Place your shins a few inches away from the bar as you stand in front of it.
- Retract your shoulder blades, bend forward, grasp the bar with a double overhand hold (palms facing your body), and inhale deeply.
- To raise the bar, thrust your hips forward and apply pressure via your heels. As an alternative, use a stiff-leg deadlift method to raise the barbell off the ground.
- Step back a few times, keeping your toes pointed slightly out and your feet hip-width apart.
- Keep your shoulders back and slightly bend your knees.
- Keep your shoulders back and slightly bend your knees.
- Lean your torso forward, take another deep breath, and push your buttocks back. Your posterior muscles should be stretched, and your back should be straight.
- As low as your flexibility will allow, descend, then push your hips forward to straighten your torso. Then release the tension in your glutes at the top.
- Repeat after inhaling once more.
Expert advice:
Some sources claim that maintaining your big toes firmly planted on the ground will improve glute activation, which is beneficial for lower-body workouts.
Romanian Single-Leg Deadlift
Romanian Deadlift with Dumbbells on One Leg – OPEX Exercise Collection
Almost any lower body workout would benefit from the single-leg Romanian deadlift. This unilateral exercise strengthens your body on each side independently and helps to address muscular imbalances.
Clinging at the waist, the lone limb Squeezing your hamstrings and glutes hard is necessary for the Romanian deadlift, which helps you bring your body back to an upright posture.
Deficit Reverse Lunge

The Deficit Reverse Lunge Method
Even though lunges are an excellent lower-body workout, most people will automatically lunge forward. Because of the way this movement works, the quadriceps are the main muscle used in the action. The hamstrings and glutes, on the other hand, are the primary muscles used when you lunge backward.
Thus, incorporate reverse lunges into your gluteal exercises.
Simply put, deficit reverse lunges expand your hip range of motion and let you maintain muscle tension for extended periods. Additionally, because of the angle the deficit creates, the lower gluteal fibers are activated.
Frog Squats: This exercise entails “pulsing” while squatting deeply. The glutes can be sculpted and toned with this kind of exercise.
Frog squats are incredibly difficult, even without any equipment, and after a few sets, your lower body will feel the strain.
Because it involves hinging at the knees rather than the hips, as so many glute exercises do, the movement is also a very novel way to engage the glutes.
The deep squat that is required for frog squats is a great way to increase hip mobility and flexibility, in addition to strengthening and toning your lower body and glutes.
Glute Kickbacks
Glute kickbacks, which require bringing one leg behind you, are an excellent way to strengthen your hamstrings and glutes. Although you can perform this exercise with just your body weight, you can increase the resistance to the point where the muscle is overworked by using resistance bands or a cable machine (see our guide on cable glute kickbacks).
To truly concentrate on shaping the lower glutes, you can use slower eccentric repetitions along with smaller “pulsing” repetitions, just like in frog squats.
Olympic Weightlifting Exercise Library: Step Ups Step-Up
Step-ups may appear straightforward, but they are a highly effective exercise for strengthening the glutes. Stepping up and down onto an elevated platform works the glutes, hamstrings, and quadriceps, and is a great exercise to do if you don’t have access to a gym or a lot of equipment.
You have a choice when it comes to unilateral exercises like step-ups: do you perform a single set on each leg independently or alternate legs? Both approaches are acceptable, but if the objective is to increase muscle, we advise performing a single set on each leg independently so that you can maintain tension on the muscles in that leg throughout the entire set.
Hip Thrust in B Stance
When performing hip thrusts in the B stance, one must assume a “staggered” stance. This exercise can also be thought of as a single-leg variation in which the other leg is used to support the movement. An effective way to conceptualize the exercise is as a kickstand hip thrust.
We typically use b-stance hip thrusts rather than standard hip thrusts because we want to make sure we’re getting plenty of movements that help address potential muscular imbalances and reap the benefits of unilateral training. One side shouldn’t overcompensate for the other.
Additionally, you are loading less weight when you perform hip thrusts in the B stance, which is advantageous when training at home.
However, if you prefer, you can use a standard hip thrust, which will yield the same results.
Placing your feet farther away from your glutes on the floor will help you customize any hip thrust exercise to target your lower glutes. Compared to placing your feet closer to your glutes, will cause your hamstrings and lower glutes to contract more.
Hit Thrust
We have to rank the hip thrust first because we now know that the best way to work the lower glutes is to perform exercises that involve hip extension.
Hip extension is the sole focus of the Hip Thrust exercise. It’s a fantastic workout that focuses precisely where we want to be.
How to apply
- Place your shoulders on the ground in front of a bench and press them against it.
- Roll a loaded barbell over your shins to the pelvic position while keeping your legs flat on the floor (a squad pad will be necessary).
- Place both hands on the bar to secure it in place, then bring your heels up to your buttocks (you’ll have to experiment to find the right distance; go for a position where your glutes are working the hardest).
- Push to raise the pelvis toward the ceiling while maintaining a driving force through the heels and the shoulder blades on the bench.
The movement is complete when your hamstrings and back are in a straight line. Reposition the weight to its initial position.
Cable Pull-Through Glance
Not everyone finds the hip thrust to be enjoyable. People often experience back pain, discomfort when the bar is placed across their hips, and trouble activating their glutes over other leg muscles. If that describes you, you should consider using the clever cable pull-through as an alternative to the hip thrust.
The movement is a lot like the hip thrust, but instead of doing the exercises on the floor, you’ll be standing up and using cables to strengthen your glutes instead of a barbell.
How to apply
- Make sure the machine is configured so that the cable comes from the lowest position.
- With your back to the machine, pass the cable between your legs and use a neutral grip to hold the rope attachment.
- Take a few steps forward and feel the rope tighten.
- Standing straight, with feet shoulder-width apart and pointed forward, is the starting position.
- With your back straight, slightly bend your knees. Hinge at the hips and drop your chest to the floor, allowing the cable to go between your legs.
- Once your glutes start to feel stretched, tighten the muscles and go back to where you were.
- Squeeze your glutes firmly at the peak of the exercise to feel the contraction.
Cable Single Leg Glute
An additional fantastic exercise to isolate the lower glutes is the single-leg cable glute kickback. Exercises using cables provide a different resistance profile than exercises using free weights, which may encourage the muscle to grow in new directions.
How to apply
- Make sure the cable machine is configured such that the cable comes from the bottom. The single-leg attachment was attached.
- Take a step backward while facing the machine and secure the strap around your ankle until you can feel the tension in the cable.
- Bend forward and grasp the device. Gently bend your knees.
- While maintaining your opposite foot flat on the ground, tighten your glutes and drive your leg back.
- When the back and hamstrings line up, the movement will be at its peak, and you can then go back to the beginning position.
Hip-Thrust Smith Machine Kneeling
This is the right exercise if you’re just getting started with glute training. The Smith machine offers a high degree of stability during the exercise, allowing you to concentrate on the glute-mind muscle connection rather than worrying about balance.
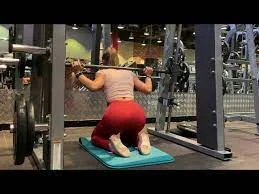
How to apply
- Lower the Smith machine bar to a suitable level so that you can rest it on your back while kneeling.
- To save your knees, place a mat on the ground underneath the bar.
- Place the bar on your upper back while kneeling on the mat.
- Lift the hips by releasing the bar and tensing your glutes
- When the hamstrings and back are in alignment, the position is at its peak.
- When your glutes touch your feet, slowly lower your hips. Act again.
Reverse Lunge Of Barbell
Although you would be correct to believe that the barbell lunge primarily works the quads, you would be thinking of the more conventional forward lunge. Reverse lunges have the advantage of emphasizing the glutes and hamstrings more than the quadriceps.
Because it’s unilateral, this fantastic compound exercise can help correct any imbalances in your muscles.
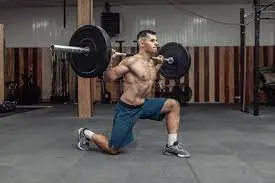
How to:
- Set up the barbell at shoulder height, just like you would for a squat.
- Lift the bar off the racks by positioning yourself beneath the barbell with a strong base, just like you would when performing squats.
- Follow your steps slowly away from the rack to give yourself enough space to complete the exercise without running into it.
- Step one foot off the ground and lunge backward as far as you can comfortably while keeping your feet shoulder-width apart.
- Lower the hips to the floor and flex the leading leg.
- You’ve completed the movement when your quads and glutes start to stretch.
- After pushing through the front leg’s heel, take a step back to the beginning. Continue with the opposite leg.
Bulgarian Split Squats
You should not attempt the Bulgarian split squats if you’re not fit. This advanced exercise works the hamstrings, calves, glutes, and quadriceps. It is a compound movement. The unilateral component of this exercise can help correct any muscle imbalances and engage additional muscles required for balance, much like the reverse barbell lunge does.
How to apply
- Place a bench in front of you and stand about two feet away (adjust the distance to suit your height).
- Place one foot on the bench behind you after picking it up. It may take some trial and error to find a comfortable foot position on the bench. Get your equilibrium back.
- Lower your hips gradually toward the floor, applying pressure with your front foot and maintaining your balance with your back foot.
- You have completed the movement when your quads and glutes start to stretch. To get back to where you were, contract your muscles.
- After you reach the desired number of repetitions, switch legs.
We all know that our lower glutes must be our main focus to develop the underbutt. However, the hamstrings should not be overlooked; for the perfect glute-ham tie-in, these should be toned and strong.
That’s why the exercises that follow concentrate on the hamstrings and glutes.
Glute Developer Of Ham
The Glute Ham Developer does exactly what its name implies: it develops the hamstrings and glutes
Because this exercise does not involve loading the spine like some of the other popular glute exercises, you will also be giving your lower back some well-earned rest.
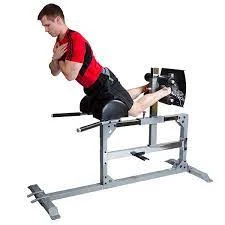
How to apply
- Set the machine up so that your feet are flat on the base and your quads are resting on the pad.
- Place your quads on the pad and your feet flat on the base to start. Lower your upper body to the ground.
- To raise your upper body toward the ceiling, tighten your hamstrings and glutes.
- At the top of the movement, when your hamstrings and back are in alignment, slowly lower yourself back to the starting position.
Given that many of the lower glute exercises also work the quadriceps, it makes sense to do our leg training and glute training in the same session.
Training your legs and glutes twice a week is advised. As a result, we created two distinct sessions to strengthen the lower glutes
Advice for Machine Workouts:
Pay attention to form: Throughout the movement, keep your alignment and control correct. Avoid letting the weight affect your form as this can result in harm.
Mind-muscle connection: Make sure your lower glutes, not just your hamstrings or lower back, are feeling the exercise. Focus on the working muscles.
Increase the intensity gradually. To begin, use a weight or resistance level that enables you to complete 10 to 15 repetitions with proper form. For further improvement, gradually increase the weight or reps as you gain strength.
Don’t overlook other muscle groups: Keep in mind the significance of a well-rounded exercise regimen while concentrating on your lower glutes.
Include exercises targeting your upper body, core, hamstrings, and quadriceps to strengthen your entire body and avoid muscle imbalances.
By incorporating these machine exercises into your gym routine, you can effectively target and strengthen your lower glutes, helping to achieve your desired shape and performance
Lower glute Exercise with theraband
Donkey Kicks with Bands
donkey kicks with bands are a great exercise for strengthening your glutes and hamstrings. Here’s how to do them:
Equipment:
Guidelines:
- Keep your hands under your shoulders while your knees under your hips start on all fours. Sustain a strong core and a flat back.
- Just above your ankle, loop the resistance band around one foot.
- With your knee slightly bent, kick your banded leg straight back. As you raise your leg, contract your hamstrings and glutes.
- With control, return your leg to its starting position.
- Perform ten to fifteen reps for every side.
Advice:
- Throughout the exercise, maintain a tight core to avoid arching your back.
- Avoid raising your leg excessively. The exercise should feel more like it’s targeting your hamstrings and glutes than your lower back.
- Try using a thicker band or increasing the number of reps if the band is too easy.
- Additionally, you can perform simultaneous donkey kicks with both legs.
Here are a few donkey kick variations using bands:
Fire hydrants: Wrap the band around both ankles as you begin on all fours. Step out to the side, then move your right leg forward, and finally raise it towards the ceiling. Continue on the opposite side.
Lateral donkey kicks: Place the band around both ankles as you begin on all fours. With your foot flexed, kick your right leg straight out to the side. Continue on the opposite side
Donkey kicks with bands are a great exercise to add to your workout routine. They’re simple to do, but they can be very effective for strengthening your glutes and hamstrings.
Banded clamshell
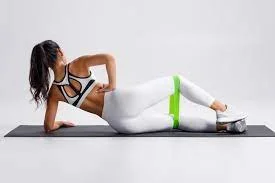
The banded clamshell is a great exercise for strengthening the gluteus medius, a small muscle on the side of your hip that helps to stabilize your pelvis and prevent hip pain. It’s a simple exercise to do, but it can be challenging to do with proper form.
These pointers can help you perform a banded clamshell:
- Bend your knees and stack them on top of each other while lying on your side.
- Just above your knees, wrap a resistance band around your thighs.
- Maintain a tight core and your feet together.
- Without moving your hips forward or backward, slowly extend your upper leg as far as possible.
- At the peak of the exercise, tighten your gluteus medius, and then gradually drop your knee back down.
- Continue on the opposite side.
Be sure to choose a band that is challenging enough for you, but not so heavy that you can’t maintain good form. You can gradually increase the reps and sets as you get stronger
Leg lifts on a knee with a band
Your hamstrings and glutes will get a lot stronger with the kneeling leg lift with band exercise. Although it’s an easy exercise, it might be not easy to perform with the correct technique.
To perform a kneeling leg raise using a band, follow these tips:
- Loop the band around your ankles and begin on your hands and knees.
- Maintain a straight back and a contracted core.
- Raise one leg off the ground while maintaining a 90-degree bend in your knee.
- To raise your leg as high as possible, contract your hamstrings and glutes.
- Return your leg to the beginning position slowly.
- Continue on the opposite side.
Be sure to choose a band that is challenging enough for you, but not so heavy that you can’t maintain good form. You can gradually increase the reps and sets as you get stronger.
Lower glute exercises with a kick band (Kickbacks with Quadrupled Bands)
How to apply
- Place a fitness mat on the ground and descend to your all fours. Maintain a straight arm salutation, hands flat on the ground, and a 90-degree bent knee. Your knees and hips should line up exactly.
- Pull your shoulder blades back, inhale deeply into your abdomen, and contract your stomach.
- Raise your right knee one inch off the ground and shift your weight slightly to the left.
- Once more taking a breath, kick your right leg back with ease, extending your knee gradually as you approach the peak of the repetition. You should have a straight line from your ankle to your knee to your hips.
- As you release the breath, slowly bend your knee and return the leg to its starting position.
- Repeat taking another breath.
Pro tip: Extending your leg while you kick back is the main technique to complete the workout. However, maintaining your leg bent if doing so makes it harder for you to feel your glutes.
Squeezing a small dumbbell between your calf and the back of your thigh is one way. By doing this, you would increase muscle resistance and improve muscle activation.
Try out different versions to determine which one works best for you. To target the underbutt, perform your reps slowly and carefully.
Banded Seated Hip Abduction
The hip abductors are a set of muscles that serve to stabilize your pelvis and prevent hip pain. One excellent exercise to train these muscles is the seated band abduction. Although it’s an easy exercise, it might be difficult to perform with the correct technique.
These pointers can help you do a sitting band abduction:
- With your feet hip-width apart and the band looped around your ankles, sit on the edge of a bench or chair.
- Maintain a straight back and a contracted core.
- Squeeze your hip abductors while raising both legs straight out to the sides.
- Do this ten to fifteen times.
Be sure to choose a band that is challenging enough for you, but not so heavy that you can’t maintain good form.
A group of muscles called the hip abductors work to keep your pelvis stable and shield your hips from pain. The seated band abduction is a great workout to strengthen these muscles. It’s a simple workout, but if you don’t use proper form, it could be challenging.
Banded Jump squat
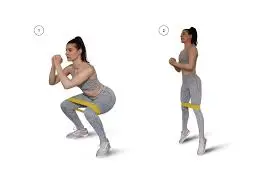
You can perform a seated band abduction with the use of these tips:
- Sit on the edge of a bench or chair with your feet hip-width apart and the band looped around your ankles.
- While elevating both legs straight out to the sides, contract your hip abductors.
- Slowly bring your legs back to the beginning position.
- Ten to fifteen times, repeat this.
Start with a light band and gradually increase the resistance as you get stronger. You can also make the exercise more challenging by doing it with one leg at a time
Banded knee barbell hip thrust
The banded hip thrust is a fantastic exercise for building strong and sculpted glutes! It’s also versatile and can be easily adjusted to your fitness level and equipment availability. Here’s a breakdown of the banded hip thrust:
Advantages:
- focuses on the glutes: mostly the gluteus maximus, although it also works the hamstrings and core.
- Boosts lower body strength: Excellent for developing your lower body’s strength and power.
- Enhances hip mobility: This may aid in enhancing your hips’ range of motion and flexibility.
- Low impact: For people with back or knee problems, a safer substitute for weighted hip thrusts.
- Scalable: The band resistance and setup can be changed to make the task easier or harder.
The setup:
- Select your band: Choose a band that will push you during ten to fifteen repetitions. If you’re not familiar with the activity or have any limitations, start off gently.
- Lay flat on your back with your knees bent and your feet resting on the floor. Seek out a bench or mat that will be comfortable.
- The band should be positioned around your ankles, calves, or slightly above your knees. Try a variety of positions to see what feels most comfortable for you.
- Rest your upper back: Place your shoulder blades on a bench or block to gently elevate your upper back. Hold a neutral head and neck position.
Execution of exercises:
- Squeeze your glutes at the top of the hip lift movement by using your hamstrings and glutes to force your hips off the ground. Press into your heels.
- Attain a straight line from your shoulders to your knees (a hip hinge) by reaching full extension; nevertheless, do not extend your back excessively.
- Controlled descent: While lowering your hips gradually back to the beginning position, keep your glutes taut throughout the motion.
- Repeat: Perform 2-3 sets of 10–15 repetitions, taking a 30- to 60-second break in between.
Banded deadlift
Setup:
- Maintaining your back straight and pulling yourself up with your hamstrings and glutes while keeping the band taut throughout the exercise will help you rise upright with control.
- At the summit, squeeze your glutes for a short while, hold the pose for a short while, and then slowly lower yourself back down.
- Repetition: Complete two or three sets of ten to fifteen repetitions, interspersed with 30- to 60-second rests.
Yoga for Lower Gluteal Exercises:
Strengthening Poses:
Bridge Pose (Setu Bandhasana):
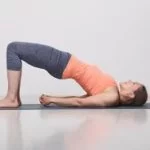
- Place your feet flat on the floor, hip-width apart, and lie on your back with your knees bent.
- To raise your hips off the mat and form a bridge, contract your core and firmly plant your feet and hips into the floor. For support, keep your arms folded across your body or crossed under your back.
- Squeeze your abdominal muscles and glutes while you lift, keeping your back straight. Hold while aiming your head upward for five to ten breaths.
- Variations include Bridge with leg circles (circle your raised leg gently in small circles), Bridge pulses (pulse your hips up and down slightly at the peak of the pose), and single-leg bridge (lift one leg straight up while holding the bridge).
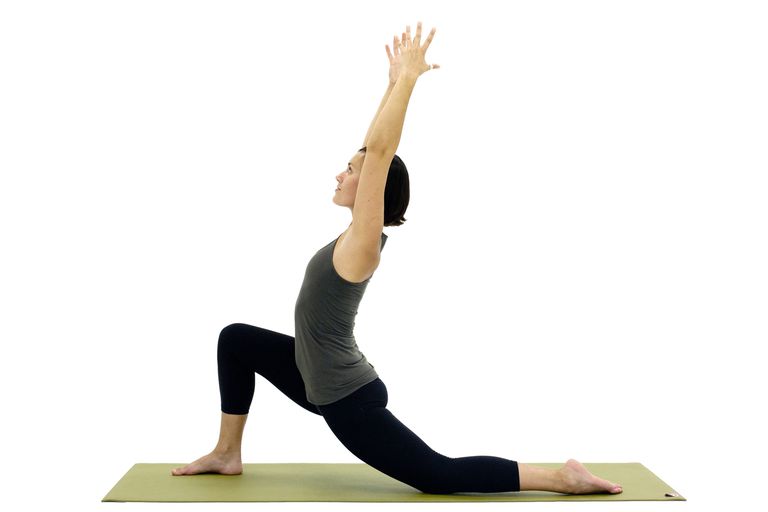
Warrior III Pose (Virabhadrasana III):
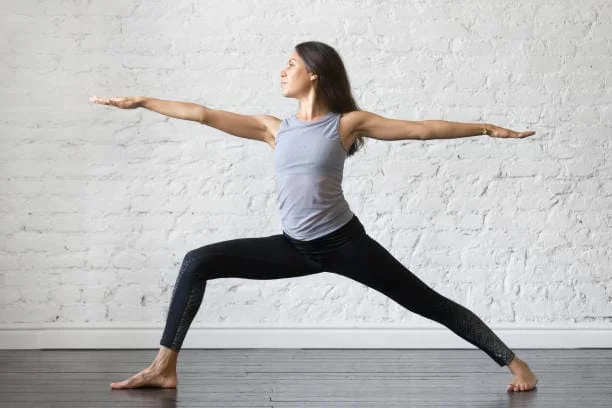
- With your back leg fully extended behind you and your front knee stacked over your ankle, begin in the lunge position.
- In order to maintain a straight spine, bend your torso forward and contract your core.For balance, extend your arms parallel to the ground.
- Maintain a straight body and legs by using your glutes and quadriceps.Hold while breathing steadily for five to ten breaths.
- Variations include Warrior III with raised foot (increase the intensity by slightly raising the toes of your back foot) and Warrior III with arms overhead (raise your arms toward the ceiling to add a core challenge).
Tree Pose (Vrksasana):
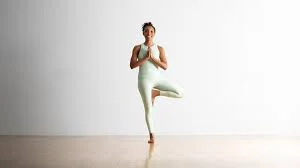
- Place your feet hip-width apart and stand tall. Turn your weight to one leg and elevate the other so that the sole of the foot rests on your calf or inner thigh rather than your knee.
- To maintain balance, keep your hips level and contract your glutes and core. For extra support, spread your arms out to the sides.
- Hold for five to ten breaths, rooting through your standing leg and paying attention to your breathing. Continue on the opposite side.
- Alternatives include Tree Pose with hand gestures (bring your hands together in prayer position or raise them overhead), and Tree Pose with closed eyes (improve focus and balance).
Chair Pose (Utkatasana):
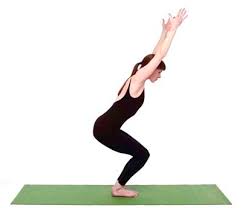
- Place your feet hip-width apart and incline your hips downward, mimicking the position of a chair. Maintain a straight back and knees that are in line with your ankles.
- To hold for five to ten breaths, contract your glutes and core. For an added challenge, you can raise your arms overhead or parallel to the floor.
- Options include a Chair Pose with Weights (hold light weights in your hands for increased intensity) and a Chair Pose with Pulses (pulse your hips up and down slightly at the bottom of the pose).
Stretching Poses:
Pigeon Pose (Eka Pada Rajakapotasana):
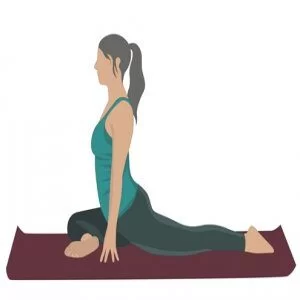
- With your back leg extended behind you and your front knee bent at a ninety-degree angle, begin in the lunge position.
- Place the sole of your foot close to your pubic bone as you fold your front leg forward. Place your forehead on your forearms or your torso on your front leg.
- Take five to ten deep breaths and relax your inner thigh and glutes of the forward leg. Continue on the opposite side.
- Variations include the reclining Pigeon Pose (lying on your back, extending your arms overhead, and maintaining the Pigeon Pose stretch) and supported Pigeon Pose (placing a block or blanket under your hips for additional support).
Downward-Facing Dog (Adho Mukha Svanasana):
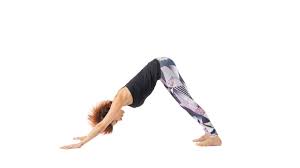
- Begin an inverted V position on all fours, then push your hips back and extend your legs. Maintain a flat or slightly elevated heel position on the mat.
- To keep your spine straight and your legs moving, contract your hamstrings and glutes. Keep your attention on your breathing and hold for five to ten breaths.
- There are two variations to the downward-facing dog pose: the leg lift (pulse one leg slightly off the mat at a time) and the hip circle (make small circles with your hips in both directions).
Lizard Pose (Anjaneyasana):
- Begin in a downward-facing dog, bending your front knee to a 90-degree angle and stepping one foot forward between your hands.
- Keep your heel flat on the mat or slightly elevated as you lengthen your back leg and sink your hips back.
- For five to ten breaths, contract your hamstrings and glutes while concentrating on the stretch in your groin and inner thigh. Continue on the opposite side.
- Options include: Lower lunge with hands on blocks (to achieve a deeper hip opening, place your hands on blocks or the ground in front of your front foot), Lizard Assume the strapped position (wrap a yoga strap around the backside of the body
How many repetitions of lower glute exercise
- The recommended quantity of repetitions for lower glute exercises varies depending on your fitness level, the nature of the exercise, and your objectives. As a general rule of thumb:
- Beginners should aim for two to three sets of ten to fifteen repetitions using a weight or bodyweight that feels difficult but still permits them to keep proper form the entire set.
- For exercisers who are intermediate, aim for three to four sets of eight to twelve repetitions, using a weight that challenges you during the final few reps of each set.
- For more experienced exercisers, try 4-5 sets of 6–8 repetitions using a very difficult weight. By the end of each set, you ought to be exhausted.
The following are some special illustrations of repetition ranges for popular lower glute exercises:
- Hip thrust: three sets of ten to fifteen reps
- Glute bridge: three sets of twelve to fifteen reps
- Squat: three sets of eight to twelve reps
- Lunge: three sets of ten to twelve lunges on each leg
- Deadlift: three sets of five to eight reps
It’s important to pay attention to your body and change the quantity of repetitions as necessary. You should stop exercising and take a break if you are in pain. Changing up the weight and the number of repetitions you perform on occasion will also help to keep your workouts effective and challenging.
Volume and Rep Range Procedures for lower glute exercise
Including precise volume and rep range procedures in your lower glute exercise routine design will maximize your gains and minimize your risk of injury. Below is a summary of various methods that you may want to think about:
- Hypertrophy-Centered (Muscle Development):
- Volume: 8–15 sets per muscle group per week, moderate–to–high
- Moderate-to-heavy repetition range: 6–12 reps per set
Method:
- Opt for compound exercises such as lunges, hip thrusts, deadlifts, and squats.
- Throughout the week, try to maintain controlled movements with increasing overload.
- In between sets, take a 60–90 second break.
- For more complex routines, think about using drop sets or supersets.
- Power-Oriented:
- Volume: Reduced (6–8 sets weekly for each muscle group)
- Heavy rep range (3-6 reps per set)
Method:
- Aim for compound movements using large weights.
- You can incorporate explosive exercises like box jumps and jump squats.
- Between sets, take a two to three-minute break to allow for adequate recovery.
- Give correct form more importance than bigger weights.
- Definition and Tone:
- Volume: Moderate (6–10 sets weekly for each muscle group)
- Rep range: Lesser, with 12–20 reps in each set
Method:
- Combine weighted exercises with bodyweight movements like glute bridges and lunges.
- Pick exercises that require controlled movements and a high level of muscle activation.
- Take a 30- to 60-second break in between sets.
- Contrasting muscle group supersets can increase variety and effectiveness.
- Tips for For Beginners:
- Start with lighter weights (15–20 reps per set) and a lower volume (3-5 sets per muscle group per week).
- Prior to adding weight or intensity, concentrate on using the correct form and technique.
- As you gain strength, gradually increase both volume and weight.
- Give recovery top priority and get enough rest in between sets.
- Gradual Overload
Whatever your objectives, try to progressively raise the difficulty over time.This can be accomplished by:
- Gaining weight
- Increased sets or repetitions
- Reduced time spent sleeping
- Attempting novel exercises or modifications
6. Customization:
Recall that these are only suggestions. The ideal volume and range of repetitions for you will be determined by your unique training background, rate of recuperation, and desired outcomes. Adapt your program to your body’s reaction.
- Looking for Expert Advice:
Speak with a qualified personal trainer for a customized plan that takes into account your particular needs and objectives. They can assist you in creating a lower glute training program that is safe, efficient, and has the right volume and rep ranges.
what is the equipment used in the gym for lower glute exercise
In order to accommodate a range of preferences and training styles, gyms provide an extensive selection of equipment that can be used for efficient lower-glute exercises. Below is a summary of a few well-liked choices:
Free Weights:
- Barbells: Great for compound exercises that target multiple muscle groups and increase overall strength, such as squats, hip thrusts, and Romanian deadlifts.
- Dumbbells: Offer flexibility for raises, rows, and lunges, enabling targeted glute activation and unilateral training.
- Kettlebells: Provide distinctive grip variations and swings for dynamic exercises that work the glutes and core at the same time.
Weighing Devices:
- Glute-ham developer: Ideal for targeted development, this exercise isolates the glutes through a particular hip extension movement.
- Leg press: This exercise simultaneously works the quads and glutes, enabling the progression of heavyweights.
- The hip abduction/adduction machine helps to create a well-rounded gluteus maximus shape by toning and shaping the inner and outer thighs.
Cardiovascular Equipment and Bodyweight:
- Plyometric box: Use step-ups and jumps to create explosive movements that strengthen your glutes and increase your power.
- A stability ball increases core engagement and glute activation by providing an unstable surface for exercises like crunches and bridges.
- While ellipticals and treadmills are primarily used for cardio, glutes can be worked while burning calories with interval training and inclined settings.
Specialized Tools:
- Resistance bands: These can be used alone or in conjunction with other tools to target particular glute angles and add variable resistance.
- Ankle weights: Provide a progressively harder challenge for glute activation during lunges, step-ups, and kicks.
- Although not specifically for exercise, foam rollers are crucial for muscle recovery and increased pliability, which will enhance performance in subsequent workouts.
Selecting Appropriate Equipment:
- Think about your objectives: While toning may favor body weight and lighter weights, hypertrophy may call for larger weights and compound exercises.
- Comply with your degree of experience: If you’re a beginner, start with body weight or smaller weights and work your way up to machines and free weights.
- Give diversity top priority: Utilize a variety of tools and workouts to target your glutes from different perspectives and avoid descending.
- Ask for assistance when you need it; trainers or gym employees can advise you on how to use equipment safely and efficiently.
Why is it important of lower glute exercise?
Beyond aesthetics, strengthening your lower glutes has many advantages for your general health, well-being, and performance. Here’s why it’s crucial to concentrate on those massive muscles:
Power and Output:
Movement powerhouse: Having strong glutes helps you perform better in sports and daily activities by enabling you to execute explosive movements like jumping, running, and changing directions.
- Better form and efficiency: Stronger glutes help with squats, deadlifts, and other exercises, which improves form lowers the risk of injury, and results in strength gains all around.
- Enhanced balance and stability: Strong glutes support the lower back and pelvis, preventing pain, enhancing posture, and lowering the chance of falls.
- Boost your movement: Firm glutes are essential for explosive leaps, sprints, and swift direction changes. Imagine being able to jump higher in basketball, run faster on the track, or change direction in a soccer match with ease. Your source of strength for explosive athleticism is your glutes.
- Elevate your deadlifts and squats: Proper form and efficiency in compound exercises like deadlifts and squats are largely dependent on glute strength. This means using greater weights, avoiding injuries, and optimizing your lower body’s overall gains.
- Increase balance and stability by visualizing your glutes as the lower back and pelvis’ anchors. By strengthening them, you can better maintain good posture, stabilize your core, and lower your chance of accidents and falls.
Beauty and Health:
- Reward suffering with a kiss Goodbye: Weak glutes put too much strain on the spine, which causes lower back pain. Developing strong glutes relieves pain, supports good alignment, and relieves pressure on your back.
- Embrace good posture for the rest of your life. You can avoid slouching and improve your posture by pulling your pelvis into proper alignment with your strong glutes. Better confidence, less shoulder and neck pain, and a more defined silhouette result from this.
- Form your ideal posterior: It’s not only about appearance when it comes to defining and sculpting your glutes. It’s about developing a proportionate, well-balanced body that showcases your diligence and hard work.
- Injury risk decreased: The lower back and hips are supported by strong glutes, which reduces the possibility of pain, tears, and strained muscles.
- Better alignment and pain relief: By relieving pressure on the spine and encouraging proper alignment, stronger glutes can help reduce pain in the lower back.
- Aesthetic definition and sculpting: Toning and reshaping your posterior with well-built glutes will help you have a more proportionate and attractive body.
Previous Muscles:
- Increased circulation and blood flow: Having strong glutes helps enhance blood flow throughout the lower body, which supports heart health in general and lowers the risk of circulatory problems.
- Improved mental health: Reaching fitness objectives and witnessing development in the form of stronger glutes can increase self-worth and confidence.
- Enhanced general fitness: Including lower glute exercises in your routine helps you achieve a well-rounded fitness regimen that works your entire body.
- Flowing with enhanced circulation: Robust glutes can enhance lower body blood flow, supporting general cardiac health and lowering the risk of circulatory problems.
- Boosting your confidence from the rear: Achieving your fitness objectives and noticing a change in the strength and definition of your glutes can have a significant effect on your confidence and sense of self.
- Complete fitness: Recall that having stronger glutes is only one aspect of overall physical health. Lower glute exercises are a great way to add variety to your routine, challenge various muscle groups, and create a well-rounded, effective fitness plan.
- Flowing with improved circulation: Strong glutes can improve blood flow throughout the lower body, promoting overall cardiac health and reducing the risk of circulatory issues.
- Increasing your self-confidence from the back: Reaching your fitness goals and observing a shift in the strength and definition of your glutes can have a big impact on the way you feel about yourself.
- Total fitness: Keep in mind that being physically fit is about more than just having stronger glutes. Lower glute exercises are a great way to mix things up, work different muscle groups, and develop a comprehensive, functional fitness program.
Remember, it’s not ideal to concentrate only on your lower glutes. Every muscle group should be worked out in a well-rounded program. But there are many advantages to strengthening these strong muscles that go well beyond the physical. You should anticipate gains in strength, performance, health, and even mental health if you include lower-glute exercises in your regimen.
Manual for building Underbutt
We have some underbutt workouts, know how to work the underbutt, and know which exercises work best for it, but how can we make sure we’re making the most progress possible?
advanced Overload
Progressive overload is a training principle that we must use if we want to advance in the lifting world—that is if we want to build muscle or become stronger.
Progressive overload refers to gradually increasing the stimulus applied to a muscle in order to continuously force it to adapt. The body would see no reason to change if we didn’t do this and the stimulus remained the same. As a result, the body would stay the same.
Progressive overload can be used in a variety of ways, including:
- Growing sets
- A rise in reps
- Cutting down on rest periods
- Increasing the amount each week
- But raising the resistance is the way that is used the most frequently. Given the strong correlation between size and strength, increasing our strength is probably a sign of muscle growth.
Diet
diet First, we need to determine if we want to lose fat first or if we’re in a position to gain muscle.
It could be worthwhile to lose weight before attempting to gain muscle if our body fat percentage is relatively high. This is to ensure that any muscle we do gain is visible and does not disappear beneath a layer of fat. Furthermore, gaining muscle will unavoidably result in fat gain, so if our current fat percentage is high, we don’t want to add more to it.
We must consume fewer calories each day than we burn off in order to lose fat. However, we must consume more calories each day than we expend if we want to gain muscle.
Performance
It takes time to gain muscle and lose fat, so we can’t expect results right away. Before we see results, we need to be consistent in the kitchen and the gym for a few months.
This can be aided by having a training partner, or by joining the communities on calorie-counting apps where you can connect with like-minded individuals and support one another on your fitness journeys.
Glute Activation
For most of us, sitting takes up a significant amount of our day. Being in this posture for extended periods of time, whether while working at a desk or unwinding at home, can cause weak and relaxed glutes.
Because of this, we must properly warm up our glutes before beginning any exercise to make sure they are engaged and firing correctly in order to withstand the resistance we use in our workouts.
Incorrect activation of the glutes increases the risk of injury because it may cause other muscles to overcompensate in an attempt to relieve the gluteal load.
Why stay focused on lower glute exercise
There are several compelling reasons to focus on lower glute exercises, which go beyond purely aesthetic considerations. Here are some key benefits:
- Improved Power and Efficiency:
- The energy needed for quick motions like jumping, running, and direction changes comes from a strong glute. For exercises like running, dancing, and different sports, this is essential.
- Improved hip extension results in improved form and efficiency during exercises like lunges, deadlifts, and squats, which increases total strength.
- Strong glutes enhance posture and lower back stability, lowering the chance of injury. This can help you avoid pain and be more useful in daily activities.
Benefits to Aesthetics:
- A well-rounded, toned body with developed lower glutes enhances the form and definition of your posterior.
- Increasing the strength of these muscles can help prevent “flatness” or sagging in the buttocks, giving the area a more lifted and attractive appearance.
Benefits to Health:
- Strong glutes increase stability and balance, which lowers the chance of accidents and falls. This is crucial as we age.
- They improve spinal alignment, relieve lower back pain, and help with posture.
- Strong glutes may enhance lower body blood flow and circulation, enhancing general health and well-being.
Remember to:
- It’s not ideal to concentrate just on your lower glutes. All major muscle groups, including the upper and lower bodies as well as the core, should be worked out in a well-rounded fitness program.
- Observe your body and refrain from overtraining. To avoid injuries and get the most out of your muscles, allow them enough time to rest and recover.
- If necessary, seek professional advice. A qualified personal trainer can assist you in developing a workout program that meets your individual goals and is both safe and efficient.
Risk Factors
Here are some risk factors to consider before starting a lower glute exercise routine:
- Prior injuries: It’s crucial to consult your doctor before beginning any new fitness regimen if you have a history of lower back, hip, or knee injuries. They can assist you in developing a workout program that is safe, efficient, and takes into consideration your limitations.
- Incorrect form: You run a higher risk of injury when performing lower glute exercises with incorrect form. Before increasing the weight or intensity of an exercise, it’s critical to master its proper form. Seek assistance from a qualified personal trainer if you need it when performing an exercise.
- Overtraining: Overuse injuries can result from doing too much too quickly. Make sure to begin slowly and build up the duration and intensity of your workouts over time.
- Medical conditions: You may be more vulnerable to injury if you have osteoporosis or arthritis, for example. Before beginning any new fitness regimen, find out from your doctor if you have any underlying medical conditions.
In addition to these general risk factors, there are also some specific risks to consider for certain lower glute exercises. hip thrusts can put a strain on your shoulders if you arch your back too much.
The following advice can help you avoid getting hurt when performing lower glute exercises:
- Before beginning any exercise, warm up. Warming up for five to ten minutes will help your muscles become more flexible and ready for exercise.
- After every workout, relax. Muscle soreness and stiffness can be avoided with a five to ten-minute cool-down.
- Pay attention to your body. Do not continue with the exercise if you experience any pain.
- Never hesitate to ask for assistance. Seek assistance from a qualified personal trainer if you need it when performing an exercise.
- You can safely and effectively perform lower glute exercises and reach your fitness goal if you prepare properly and pay attention to form.
Complication
Although, when performed correctly, lower glute exercises are generally safe and beneficial, there are potential complications to be aware of:
Acute wounds
- Strains and tears in the muscles: The glutes, hamstrings, or lower back can be caused by improper form or overuse of the muscles.
- Tendonitis: Inflammation and pain can result from repetitive strain on tendons, especially those in the knees and hips.
- Ligament sprains: When performing lunges or squats, overextending or twisting the knee or ankle can cause a sprain to the surrounding ligaments.
Long-term problems:
- Runner’s knee, also known as patellofemoral pain syndrome, is caused by repetitive strain on the kneecap from exercises like squats, which irritate the underlying bone and cartilage.
- Iliotibial band syndrome: Pain and inflammation can be brought on by friction between the iliotibial band, a tendon on the outside of the thigh, and the femur.
- Piriformis syndrome: This condition can resemble sciatica pain and is characterized by irritation of the piriformis muscle, which is deep in the buttocks.
Additional complications:
- Rhabdomyolysis: An uncommon but dangerous illness that results from the breakdown of muscles after prolonged, high-intensity exercise, causing electrolyte imbalances and renal damage.
- Cardiovascular complications: Excessive glute exercises may increase heart strain in people with pre-existing heart conditions.
Prevention
When doing lower glute exercises, bear the following in mind:
- Give form priority over weight. It is more crucial to perform the exercises with lighter weights correctly than it is to use heavy weights improperly.
- Get your glutes working! Verify that the burn is in your glutes rather than your lower back.
- Avoid overtraining. In between workouts, give your glutes a chance to rest and recover.
- Consume a balanced diet. To get results, you must feed your muscles.
Here are some other things to consider:
- Your objectives. With your lower glute exercises, what goals do you hope to accomplish? Are you aiming to get more defined, gain muscle, or just get fitter overall?
- Your degree of physical fitness. Select workouts that are suitable for your level of fitness right now.
- Your choices. While some people prefer working out at the gym, others prefer doing their workouts at home.
Avoiding difficulties:
- Warm-up and cool-down: To increase muscle elasticity and lower the risk of injury, properly warm up and cool down your muscles.
- Gradual progression: To prevent overstretching your muscles, start with lighter weights and progressively increase the volume and intensity.
- Pay attention to form: Perform each exercise with appropriate form and technique to target the targeted muscles and reduce strain on tendons and joints.
- Pay attention to your body. Any exercise that hurts should be stopped; if the pain doesn’t go away, see a doctor.
- Speak with a medical professional: Before beginning a new exercise regimen, see a physician or physiotherapist if you have any pre-existing conditions or concerns.
Recall that adding lower glute exercises to your fitness regimen can be beneficial, but you can minimize the risks and maximize the benefits by emphasizing proper form, and paying attention to your body.
How to Work on and Develop Your Lower Body
We’re primarily talking about glute exercises and workouts when it comes to targeting and training your underbutt. Developing stronger glutes will be a major factor.
Doing leg workouts in general does not help to emphasize the muscle fibers in the lower glutes as much as specific exercises and their variations do.
While high-rep, sculpting workouts have their place, you should also incorporate some form of progressive overload training into your routines to gain muscle. This is applying more resistance to the muscles (such as dumbbells, bands, cables, barbells, and kettlebells) to make them work harder and develop.
While bodyweight exercises and workouts can also help you gain muscle, using weights is a more effective way to add resistance and force your muscles to adapt.
Training the Underbutt Is Important
- The lower glutes, also known as the underbutt, aid in supporting and stabilizing the hips and spine. Back pain and bad posture are frequently caused by weak glutes.
- Beyond only being attractive, working out your glutes and underbutt can also help you move more functionally.
- But it’s crucial to remember not to overtrain your glutes at the expense of other body parts. To ensure you are following a balanced routine that prevents creating muscular imbalances, we would advise using a workout split similar to the PPL (push, pull, legs).
Summary
The future of your booty appears bright, as there are tons of amazing exercises that focus on the lower glutes! The following factors should be taken into account when selecting the ideal exercises for you:
particular muscles The gluteus maximus, gluteus medius, and gluteus minimus are the three muscles that make up the lower glutes. These muscles will be targeted differently by various exercises. For the gluteus maximus, for instance, hip thrusts work well, but cable pull-throughs work better for the gluteus medius and minimus.
Movement patterns: Hinges, squats, and lunges are the three primary movement patterns that work well for targeting the lower glutes. Hinges, like Romanian deadlifts, require hip flexion. Bending at the knees and hips is a requirement for squats, including standard squats. During a lunge, you take a single leg step forward, lower your hips, and then push yourself back up.
Equipment: While your body weight can be used for many lower glute exercises, other tools such as cables, stability balls, dumbbells, and barbells can be useful.
If you want to concentrate on your lower glutes, try these exercises during your next workout. Remember to maintain proper form and squeeze your glutes during the exercises.
To continue improving, try raising the weight you lift over time. You must also take into account your overall fat composition and diet to achieve aesthetic and visual changes.
FAQs
Does a sore glute indicate growth?
Any glute training should cause some soreness in the targeted area. Muscle soreness (DOMS) is not always a sign of impending growth, but it is also not a good thing if you don’t experience any. It can mean that you aren’t working the right muscles at the right time or that your training isn’t hard enough.
Do squats cause your bum to shrink?
Squats can tone you up. Squats will probably give the impression that your butt is smaller if you are following an exercise program that is helping you lose body fat. Conversely, your butt will probably get bigger if your diet and exercise routine result in you gaining weight in muscle.
Does walking reduce the size of your butt?
Does walking result in a smaller or larger bum? According to Saltos, walking is a fantastic kind of workout that only sometimes receives much attention because it’s so laid back in comparison to other types of physical activity. Walking, however, really has the opposite effect of making your butt bigger.
Do hips go broader as you sit?
Just sitting down can result in wider hips and a larger derriere. In a study that was published in the journal Cell Physiology X Research source, researchers found that prolonged sitting can significantly increase the amount of fat that accumulates in the buttocks and hips.
Which workout activates the glutes the most?
While various loaded exercises and their variations, including deadlifts, hip thrusts, lunges, and squats, provided a very high level of GMax activation (>60% of 1RM), the step-up exercise and its variations generally present the highest levels of GMax activation (>100% of MVIC).
Which glute muscle is the lowest?
The smallest muscle in the gluteus is the gluteus minimus. Its innervation, blood supply, and function are similar to those of the gluteus medius both anatomically and functionally. It can be found directly below the gluteus medius muscle. The gluteus minimus primarily serves as the hip’s abductor and stabilizer
How can I acquire well-defined glutes?
How to Get Your Butt in Shape. Well, don’t murder me, but my glutes’ roundness has never really affected me. Squats. You won’t find a butt workout that doesn’t contain squats, I believe.
Bridge, side leg lifts, forward and back lunges, and side lunges
How come I can’t focus on my glutes?
There could be multiple reasons why your glutes aren’t contracting hard enough. The absence of muscular activation is the primary cause. We frequently observe deep abdominal and gluteal muscle group deficits in conjunction with rigidity in the back extensor and hip flexor musculature at BIM.
Which foods are ideal for large posteriors?
Top 10 Foods for Bigger, More Shapely Booty Tomatoes. Tomatoes are a terrific addition to your diet to keep your butt toned because research has shown that they can stop age-associated muscle strength reduction. … eggs,… almond butter,… salmon,… avocados,… tofu,… mushrooms,… spinach.
References
- Dale, P. (2022, November 19). Build the Perfect Underbutt: The 8 Best Lower Glute Exercises. Fitness Volt. https://fitnessvolt.com/build-under-butt/
- Specialist, B. C. B. E. S. P. E. (2023, March 24). These Are The 15 Best Exercises To Target Your Underbutt. Struggles of a Fit Mom. https://www.strugglesofafitmom.com/here-are-the-15-best-exercises-to-target-your-underbutt/
- F. (2023, December 1). The Best Underbutt Workout To Target Lower Glutes. Fit as a Mama Bear. https://fitasamamabear.com/underbutt-workout-for-lower-glutes/
- Zielinski, L. (2023, August 8). 10 “Underbutt” Exercises for a Perkier Derriere. BODi. https://www.beachbodyondemand.com/blog/underbutt-exercises
- Turp, R. (2023, November 24). 7 Lower Glute Exercises for an Effective Underbutt Workout | Fitness Drum. Fitness Drum. https://fitnessdrum.com/lower-glute-exercises-underbutt-workout/
- Colletta, M. (2023, July 4). 7 Best Lower Glute Exercises for a Killer Underbutt Workout. Steel Supplements. https://steelsupplements.com/blogs/steel-blog/7-best-lower-glute-exercises-for-a-killer-underbutt-workout
- Stefanov, P. (2023, March 23). 12 Best Lower Glute Exercises for a Round Butt. Hevy – #1 Workout Tracker & Planner Gym Log App. https://www.hevyapp.com/lower-glute-exercises/