11 Best Mid-Back Exercises
Introduction
The mid-back, also known as the thoracic region, plays a crucial role in overall upper body strength, stability, and posture. Developing a strong mid-back not only enhances aesthetics but also contributes to functional fitness and reduces the risk of injuries. This area includes the muscles of the upper and middle trapezius, rhomboids, and the erector spinae along the spine.
Mid-back exercises target these muscles, promoting better posture, shoulder health, and overall upper-body performance. Whether you’re an athlete, fitness enthusiast, or someone looking to improve their daily activities, incorporating mid-back exercises into your routine is essential.
The middle back muscles are the most crucial ones. It is imperative that you possess a strong mid-back. For everyone, but especially lifters, it’s a game-changer.
In addition to helping your head and shoulders stay stable and safe during bench press exercises, a strong mid-back can also help you carry large loads with proper form during squats and deadlifts, and it can pull some major weight, which will increase the size and strength of all other back muscles.
A thick mid-back is also indicative of a serious lifter. It creates a striking appearance. But take some time to educate yourself about middle back exercises before getting too excited and go to the gym to strengthen your mid-back.
Major Contents We Will Cover
- Structure and functions of the middle back
- Benefits of middle back strengthening
- Typical causes of a weak middle back
- The top workouts for the middle back
- How to get the middle back warmed
Structure And Functions Of The Middle Back
- The muscles between your shoulder blades are what we mean when we talk about the middle back.
- These are the major and minor rhomboid muscles, as well as the middle and lower trapezius (traps!). Your shoulders and upper back will stay strong and healthy because of their flexibility and strength, which are engaged in scapular and shoulder movement.
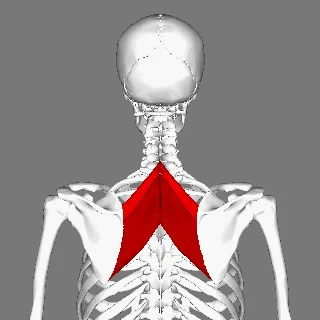
- The rhomboid minor and rhomboid major are the names of the two superficial muscles that are situated between the shoulder blades.
- The medial margin of the scapula is where the rhomboid major enters after emerging from the thoracic spine vertebrae T2-T5. The rhomboid minor inserts medially on the scapular spine, originating from the spinous processes of vertebrae (Cervical) C7-(Thoracic) T1.
The following are the main purposes of the rhomboid major and minor:
- Adduction of the scapula (shoulder blades coming together).
- rotation inward (spinning downward following an overhead press).
- Elevation of the scapula (as in a trap raise variation).
Middle and Lower Trapezius
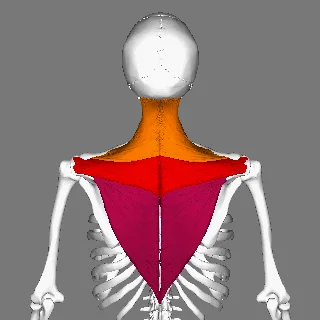
The traps, a broad, flat, triangle muscle with upper, middle, and lower fibers, are situated on both sides of the back. We are concentrating on the middle and lower muscle fibers for the middle back.
The spinous processes of the seventh cervical on both sides of the neck and the thoracic vertebrae T1–T3 are the sources of the middle fibers of the traps.
They attach to the scapula’s medial spine. The lower traps are inserted on the medial end of the scapular spine and are derived from the spinous processes and supraspinous ligaments of thoracic vertebrae T4-T12.
The middle and lower traps’ primary purposes are
- Adduction of the scapula.
- elevation of the scapula.
- Rotate the scapula outward.
- lower dip of the scapula.
The middle and lower traps provide comparable roles to the rhomboid muscles, as you have undoubtedly noticed.
Though the majority of the rhomboids are overlaid by the larger trapezius, this does not diminish the significance of the rhomboids. Fortunately, they have a lot of similar biomechanical duties, so the middle-back workouts we have for you will target both.
Benefits of middle back strengthening
Enhanced Big 3
- A strong, flexible, and engaged middle back helps to maintain a neutral spine during exercises like deadlifts and squats. It keeps the barbell near you when you pull and prevents the squat from becoming a good morning.
- To improve bar path and shoulder safety during the bench press, you must contact your middle back. If you have ever performed a bench press, you are familiar with the primary cue, which is to “keep your shoulders down and back.” Your middle back is responsible for this.
- Don’t try lifting anything heavy without a strong mid-back, and take extra care with your shoulder joint.
Improved Posture
- You spend more time staring down at displays, sitting down more often, and moving less these days. It’s evident that this is bad for your posture. It may result in a forward-leaning head, rounded shoulders, and a strained and weak middle back.
- If you don’t believe it’s a huge deal, think about this the weight of the head on the spine increases by 12 pounds for each inch that your ears are in front of your shoulders (1).
- If you do nothing about it, this might cause your middle back muscles to weaken more, increasing the risk of back and shoulder injuries.
More Strongerness
- Of course, the capacity to draw heavier loads is correlated with a robust mid-back. By using your arms less frequently as a compensatory mechanism, you’ll be able to maximize the hypertrophy of all your other back muscles.
- Consider lifts like dumbbell rows with a single arm, t-bar rows, and bent-over rows.
Typical causes of a weak middle back
The following four factors, aside from a total lack of exercise, are the most frequently cited causes of a weak middle back, or one that is not performing to its maximum ability:
Bad mind-muscle connection
- The mid-back has trouble with mind-muscle connection since it is not used during training. It’s not difficult to work on, though. Just concentrate on bringing your shoulder blades together and applying pressure.
Bad form
- Put simply, begin leading pulling workouts with scapula retraction and quit using just your arms. Give your shoulder blades something to do!
Bad posture when sitting or standing
- If you slouch all the time, your midback muscles become overstretched, which causes weakness and limited movement.
Too little diversity in the exercises
- Naturally, you won’t develop a strong back if you don’t perform rows. That seems apparent, but that’s not what this point is about.
- That is to say, you must vary the training variables and execute different kinds of horizontal pulls, or rows. – To correct muscular imbalances, switch up your grip (underhand, overhand, neutral), and your body position (sitting, bent over, chest supported, even upside down), and add some unilateral workouts.
The top 11 workouts for the middle back
Barbell Rows
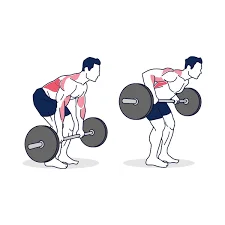
The lats, traps, and rhomboids are trained during the barbell row. One of the best exercises for strengthening the entire backside of the body is this one.
Having stated that you must permit your shoulder blades to separate and then reassemble during the rowing motion. Because they draw the bar to them with their arms but forget to squeeze their shoulder blades together, many lifters find it difficult to do these exercises correctly.
To more effectively target the mid back, concentrate on form and push your shoulder blades together at the top of each repeat.
Steps To Follow:
- Place a barbell over your toes and stand with your feet shoulder-width apart.
- Hold the barbell with a double overhand grip that is two to three inches wider than your shoulders, palms facing you.
- Bend over with your chest towards the floor, flattening your back and allowing your knees and hips to flex.
- Maintain a straight arm grip while holding the bar such that it hangs parallel to your shoulders. Imagine separating your shoulder blades and feeling the stretch in your midback.
- Pulling your shoulder blades together and your elbows up and towards your lower back will start the movement.
- For two to three seconds, squeeze your shoulder blades together at the top. Then, slowly drop the weight and repeat.
Reverse Grip Barbell Row
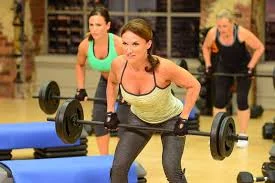
Although the reverse grip row is identical to the barbell row, it is executed with an underhand grip (palms facing front).
An underhand grip allows you to squeeze between your shoulder blades more effectively by keeping the elbows closer to your body. Some people feel that using a reverse grip instead of a typical (overhand) grip makes it simpler to keep the shoulders from rounding forward.
Steps To Follow:
- Place a barbell over your toes and stand with your feet shoulder-width apart.
- Using your hands shoulder-width apart, grasp the barbell with a double underhand grip (palms facing away).
- Maintaining a flat back and back, lean over while bending the knees and hips.
- Before rowing, let your shoulder blades extend apart.
- Pull the elbows back towards your hips while tensing your shoulder blades together.
- At the top, pause for two to three seconds and squeeze the muscles between your shoulder blades. Then, slowly descend the weights and repeat.
Incline Dumbbell Row
While needing to hold oneself bent over, you can train your middle back with the incline dumbbell row, a version that is supported by your chest. For greater rep training or for people who find it difficult to maintain proper form when bending over, this is perfect.
Because you can train a larger range of motion due to the modest elevation, this is one of my favorite techniques to target the mid-back. With the help of the dumbbells, you may also draw the weights back past your torso and provide an even more forceful squeeze between your shoulder blades.
Steps To Follow:
- A bench that can be adjusted should be inclined 30 degrees.
- Lay your chest on the bench with two dumbbells, ensuring that your shoulders and chest protrude beyond the end of the bench.
- Keep your head and chest up while you bring your elbows down towards your hips and push your shoulder blades together while keeping your arms straight beneath you.
- After two to three seconds of intense shoulder blade clenching, gradually return the weights to the beginning position.
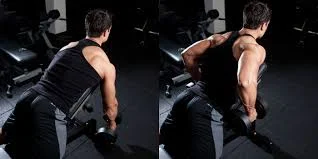
Dumbbell Row
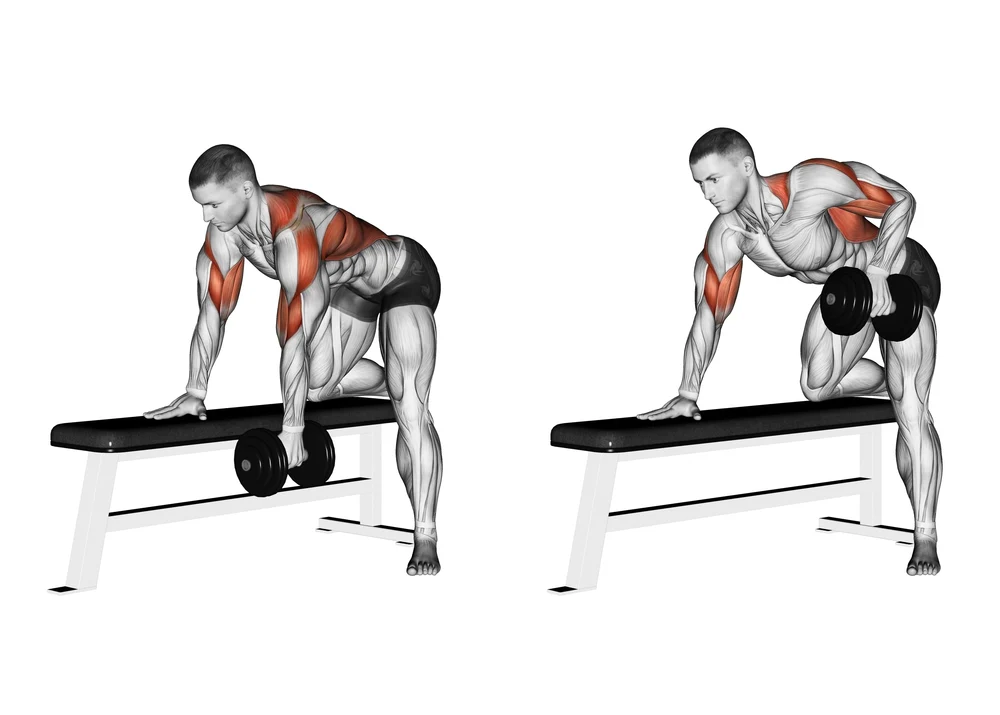
One arm can be trained at a time using the dumbbell row, an exercise that targets a single arm. One arm at a time exercise allows you to target the entire side of the middle back and correct any side-to-side imbalances in your muscles.
Keeping the shoulder blades together during each repetition is crucial when performing dumbbell rows that work the middle back. While it may be simple to simply swivel your hips or body to lift the weight, the mid-back will not be targeted in this way.
When performing these correctly, most individuals will be shocked by how weak their center back feels, so don’t be scared to reduce the weight and concentrate on technique.
Steps To Follow:
- Place your feet shoulder-width apart in front of a bench or box. Bend over and push your hip back, allowing your hips and knees to bend.
- With one hand on the bench or box and the other on a dumbbell, place one hand there.
- The bench should not be beneath your chest. Place your knees beneath your hips.
- To lift the weight, bring the elbow up to the side of the rib cage without allowing the hips to swivel.
- At the top, pause for two to three seconds and squeeze the muscles between your shoulder blades. Then, slowly descend the dumbbell for two to three seconds and repeat.
Hammer Iso Row
Muscle imbalances can be effectively addressed with the hammer iso row, a machine row that lets you exercise each arm separately. The machine requires you to row along a preset path, which makes it easier because you don’t have to coordinate the movement as you would with dumbbells.
For rookies who find it difficult to obtain the proper pulling angles to target the middle back, a hammer iso row is a great option. For experienced lifters who like to focus solely on their middle back and train at a higher level of intensity, it’s also fantastic.
Steps To Follow:
- Put your chest on the hammer iso row machine’s pad while seated. Make sure your shoulders and upper chest are higher than the top of the chest pad.
- Grip the handles with your forward arm and extend your middle and upper back (imagine pulling your shoulder blades apart).
- Make sure your elbows do not flare outward by pulling them back towards your hips.
- At the top, hold your shoulder blades together for two to three seconds.
- Repeat after lowering the weights once more to fully extend your middle back.
Meadow Landmine Row
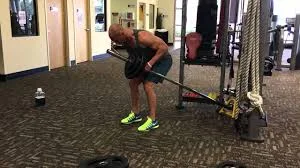
The Meadow landmine row is a fantastic variation on the barbell row because it allows you to work one arm at a time while maintaining a wide range of motion and a well-supported bent-over position.
Because you can drag the barbell beyond your torso during this exercise, which helps retract the shoulder blades deeper than a barbell bent row, it’s an excellent exercise for strengthening the mid-back.
A dumbbell row, on the other hand, allows more room for mistakes for novices who find it difficult to draw the weight up and back towards their hips. It also requires you to complete the row in a set course, for the most part.
Steps To Follow:
- Load weight onto the other end of the barbell after inserting one end into the landmine holder.
- Maintaining your chest in line with the end of the barbell, bend over while standing perpendicular to it, and maintain a flat back.
- Plant your feet apart so that the leg nearest the weight is two to three feet behind the other (the outside leg should be parallel to the barbell’s end).
- For support, rest your outside arm on your front thigh. Then, flatten your back so that the inside hip does not twist upward.
- Squeeze your shoulder blades together at the side of your ribcage with your elbows after reaching down and grabbing the barbell’s end with your inner arm.
TRX Inverted Row
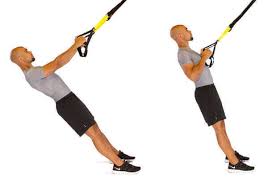
The barbell inverted row does not knock you down, but it does lock your grip in an overhand or underhand manner. If you don’t have any elbow problems, this is fine, but if you have, the TRX row is a fantastic alternative.
You can alter the angle at which you exercise the middle back by using an over, under, or neutral grip. Additionally, the instability of the TRX makes the muscles work even harder to maintain your posture, which further strengthens them.
Steps To Follow:
- Hang down directly under the TRX handles while holding the handles with an under, over, or neutral grip.
- To create a straight line, tighten your glutes and extend your upper back.
- Take a moment to stop once you’ve raised your body to the handles slightly below your chest.
- Return to standing slowly after your arms are straight.
- Repeat after resetting.
Seal Row
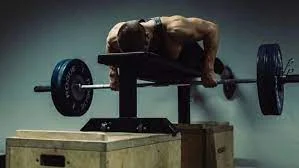
This is a parallel-to-the-ground seal row that is supported by your chest. You are pulling the weight straight up instead of at an angle like you would with an uphill row. This exercise is excellent for strengthening the middle back since it puts a greater strain on the back muscles.
When I want to train with large loads but don’t want to rely on my hamstrings or lower back’s flexibility like I would during a barbell row, I like to incorporate this exercise.
Steps To Follow:
- Set up a bench on little boxes and place a barbell underneath it so that it is perpendicular to the bench.
- The bench should be raised enough so that you may rest on it, arms fully extended beneath you, gripping the barbell, and lying prone (chest down).
- Grasp the barbell with a double overhead, shoulder-width grip, and take a deep breath to fill your stomach.
- Squeeze your shoulder blades together and lift your elbows back and forward towards your hips, keeping them inside your body.
- As high as you can manage, pull the barbell towards your chest (it might even come in contact with the bench’s bottom). Then, carefully drop the weight back down and repeat.
Cable Face Pull
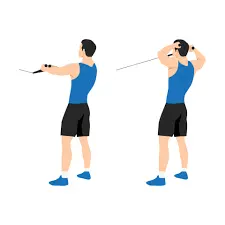
The face pull is a fantastic middle-back exercise that is perfect for people who need to work on their overhead stability since it works the shoulder joint, which is frequently a weak place for people with bad postures. It also incorporates external rotation, or turning up and back.
You can also use a range of angles (rope, neutral grip, etc.) when performing this. I’ve found that using a neutral grip helps you to maintain your elbows up and draw your shoulder blades together for optimal outcomes (see below).
Steps To Follow:
- Place the pulley on a cable machine at face level or just a little bit higher than where you are standing.
- Use a neutral grip handle or a rope handle attached. As you pull, make sure your palms are facing each other.
- While pulling the wire straight up to your forehead, maintain a 70–90 degree angle with your elbows.
- Squeeze your shoulder blades together and attempt to imagine drawing your arms apart as you pull the weights back.
- Lower the weight and repeat after pausing for two to three seconds, ensuring that the muscle between your shoulder blades is well squeezed.
Inverted Row
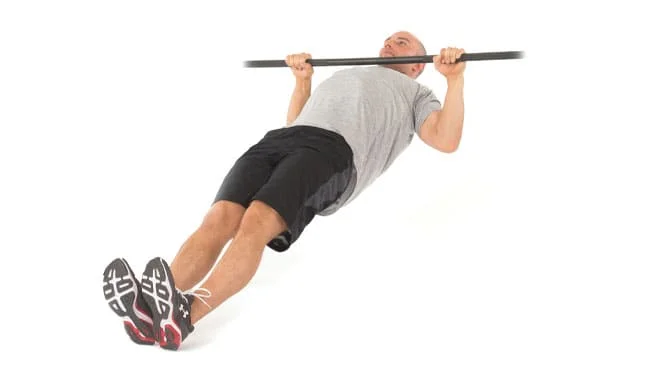
A bodyweight row variation that can be performed without the use of weights, the inverted row is perfect for mid-back workouts at home or in situations when a gym is not readily available.
This exercise can be made easier or harder depending on the angle at which you pull yourself up. It gets harder the closer you get to being parallel to the floor.
Steps To Follow:
- Place a barbell in a barbell rack so that it is waist-high. To prevent the barbel from coming out of the hooks while doing the movement, stand in the opposite direction of the j hooks.
- With your palms facing up, grasp the barbel with a shoulder-width hold (you can also perform these with your palms down, but I find a supinated grip is preferable).
- To keep your body in a straight line from your heels to your shoulders, extend your legs and bolster your core.
- Keep your elbows in as you extend your arms straight and draw your chest towards the bar. Just below the sternum should the barbell make contact.
- Make sure you are not stooped over the bar by pressing your shoulder blades together.
Cable Row
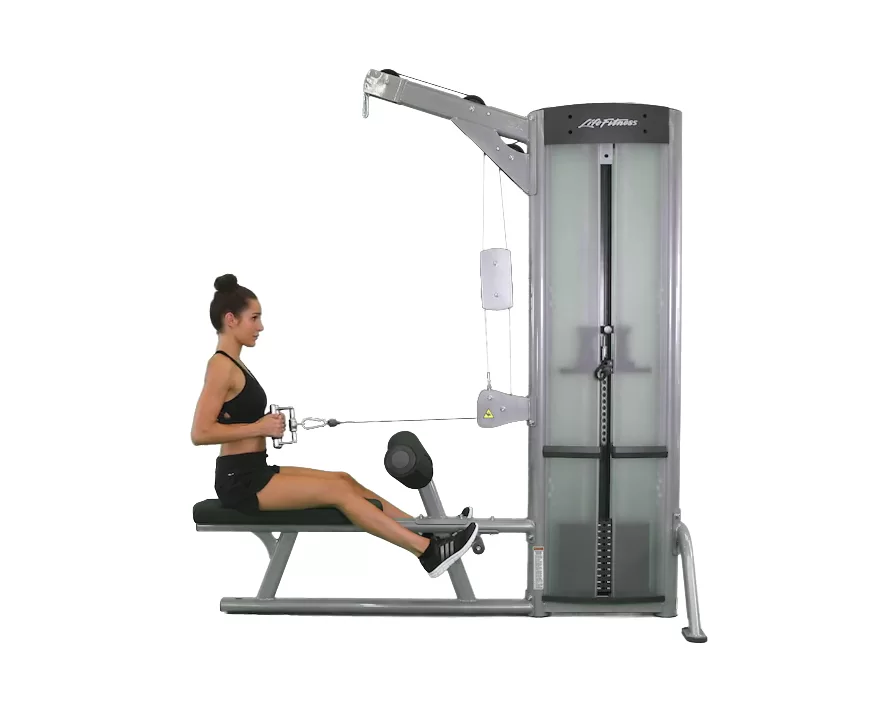
You can exercise your center back at different angles with the cable row, a machine row that eliminates the need to bend over. Although bent-over rows are fantastic, as your fatigue increases, they can become very taxing.
Maintaining an upright position and concentrating on tightly squeezing the shoulder blades together with each repetition despite the continuous pull from the wire makes the cable row an excellent isolation exercise for the middle back.
Steps To Follow:
- Before moving back two to three feet from the stack, get hold of the handle attachment (ideally an underhand grip handle or a neutral grip attachment).
- With your feet on the foot platform, take a seat on the bench. You can bend your knees somewhat.
- Breathe deeply into your stomach to brace your core. Then, with your arms out in front of you and your chest raised, bring your elbows back towards your rib cage.
- Do not lean; instead, keep your chest raised.
- Once you have your shoulder blades squeezed together, slowly extend your arms and repeat.
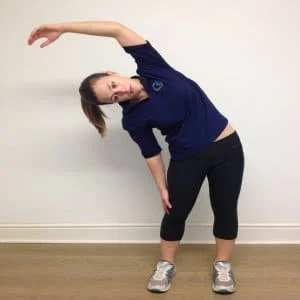
How to get the middle back warmed Before Exercise
- As with any other body region, the middle back should be warmed up before exercise.
- Your body will be prepared for the task at hand and improved workout positions and shoulder/scapula mobility will result from increasing blood flow to that area.
- To increase blood flow to the area and release tension in certain uncomfortable or tight spots, foam rolling is a fantastic place to start.
- Your middle back will then be prepared to roll after doing a few low-intensity scapula-based movements like wall slides, and face pulls.
Conclusion
incorporating mid-back exercises into your fitness routine is essential for building a strong and well-balanced upper body. These exercises target muscles like the latissimus dorsi and rhomboids, contributing to improved posture, increased upper body strength, and reduced risk of imbalances or injuries. Remember to perform these exercises with proper form, control, and weight that challenge you without sacrificing technique. Consistency and progressive overload are key factors in seeing improvements over time.
It’s advisable to include a variety of mid-back exercises in your routine to target the muscles from different angles and promote overall development. Additionally, a well-rounded fitness program should include exercises for other muscle groups and components such as cardiovascular training, flexibility, and core strength.
Always listen to your body, start with appropriate weights, and gradually progress as your strength improves. If you have any existing health concerns or conditions, it’s recommended to consult with a fitness professional or healthcare provider before starting a new exercise program to ensure it aligns with your individual needs and goals.
FAQs
What is the best workout for middle back?
Incline Dumbbell Row
Dumbbell Row
Hammer Iso Row
Meadow Landmine Row
Seal Row
Cable Face Pull
Inverted Row
Cable Row
What is the number 1 back exercise?
Row with Barbell Bent-Over
One of the best workouts you can do to develop your back is a bent-over row. Because you will be performing the exercise in a hinged position, you even gain lower body activation. Your upper and midback muscles become stronger and more massive with bent-over rows.
Do pull-ups work middle back?
Advice on Correct Form for Men
By using different muscles, pullup variations help prevent overuse problems while also strengthening your lats, mid-back, rear delts, biceps, forearms, and core.
Should you train mid-back?
Stretches that lengthen the spine and increase muscle can help strengthen your middle back. Tension can be released and posture can be improved with even little pauses throughout the day. Relief from the pain in your mid back caused by spending all day hunched over a desk is just a few stretches away.
What is your middle back called?
The 12 vertebrae that make up the thoracic spine, or middle back, are located between the cervical and lumbar spines.
Reference
- Set, S. F. (n.d.). 9 Best Middle Back Exercises for Strength & Mass. SET FOR SET. https://www.setforset.com/blogs/news/middle-back-exercises