
Halasana: Health Benefits, Steps, Types, and How to do?
What is Halasana?
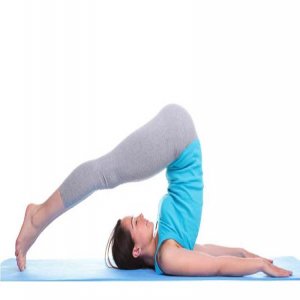
Halasana is a classic yoga position — or asana in Sanskrit — that’s involved in many types of yoga practices. It includes lying on your back and placing your feet on the ground behind your head. Typically you perform Halasana toward the end of a yoga session. However, it’s the third of 12 common asanas in the Sivananda sequence. Parsva Halasana is a modern variation of the Halasana.
This yoga posture gets its name from the plow – a famous farming tool commonly used in Indian agriculture to prepare the soil for sowing crops. Like its namesake, this pose makes ready the ‘field’ of the body and mind for deep rejuvenation. Halasana is pronounced as hah-LAHS-uh-nuh.?
Halasana (Plow Pose), a full-body stretch that poses your body upside down with your feet over your head, offers interesting new views. Perform it before settling into meditation, pranayama, Savasana (Corpse Pose), or before going to sleep.
Daily practice of Halasana stretches the cervical, thoracic, and lumbar regions of the spine, improving circulation and suppleness. This posture can reduce backache, stretch the shoulders, and lengthen the spine. It can also decrease phlegm or mucus in the sinuses and respiratory system, and gradually lengthens and regulates the breath. Carefully performed, Plow Pose can relieve tension in the neck and throat. But prep and practice with care to prevent neck strain or injury.
What are the Health Benefits of Halasana?
There are several Halasana Yoga benefits that aid promotes the mental and physical well-being of an individual.
Improves Digestive System :
The plow pose is an effective cure for various stomach disorders. Junk food and an inappropriate eating lifestyle lead to a digestive system upset that causes constipation, indigestion, and many more problems. The Halasana strengthens the colon and activates the digestive system through gentle massage. It results in actual digestion and absorption of the food ingested.
Reduces Back Pain :
The Halasana aids in relieving the issue of backaches by offering a proper posture massage. It aids in releasing the stress from back muscles and increases the strength of the spinal cord, thereby decreasing the pain. This asana is also helpful in boosting the flexibility of back muscles.
Reduces Stress :
The Halasana is a proven remedy to aid relieve anxiety and stress-related issues. When done with breathing exercises, the plow pose assists provide relaxation to the mind. This asana reduces the stress-induced mental barriers, thereby improving the overall well-being of an individual.
Aids To Manage Diabetes :
One of the key forms of Yogasana, Halasana, is a productive way to manage diabetes better. It activates the system to restrict too much production of blood sugar. It manages the sugar level and also keeps the condition of diabetes in check.
Activates Thyroid Glands :
The plow pose aids reverse the flow of your body’s blood. This permits blood to reach the extreme upper glands (Head – pituitary, neck – thyroid) from the lower extremes. Hence, it stimulates the endocrine system and aids in managing the functioning of the thyroid gland better.
Therapeutic for Leg Cramps :
For the condition of leg cramps, the Halasana is an easy, cost-effective cure. The plow pose stretches the various muscles joined that cause leg cramps. It aids in enhancing the flexibility of the calf, thigh, and leg muscles, reducing the condition of painful cramps.
Increases Blood Circulation :
As mentioned, the plow pose includes reverse circulating the blood, i.e., it transfers the blood flow from the lower extremities to the upper extremities of the body. This asana aids the blood to reach the tips of all glands and nerves, thereby improving blood circulation.
Aids during Menopause :
The plow poses benefits during menopause by reducing stress from major points. It massages the shoulder, neck, and spine in the correct posture. The asana is also known for decreasing symptoms of stomach disorders.
Strengthens Immune System :
The plow pose assists in circulating the blood to every tip of the nerve endings. It increases the immune system by strengthening the system and flexibility of each of the muscles.
Halasana Benefits for Hair :
The plow pose includes the individual lying down in a pose that transfers the flow of blood. This aids the blood to reach the tips and roots of the hair. Regular practice of the asana aids provides the necessary blood circulation.
Benefits of Halasana for Weight Loss:
The regular practice of Halasana aids in shredding the extra fat naturally. It burns the fat allowing a leaner waist shape, thereby helping in weight loss.
What are Preparatory poses for Halasana?
- Paschimottanasana (Seated Forward Bend)
- Bitilasana (Cow Pose)
- Marjaryasana (Cat Pose)
- Poorva Halasana or the preliminary plow pose is a preparatory asana before you perform the full Halasana pose. It is relatively easy to do.
- Shoulder Stand (Sarvangasana) is usually performed before the Plow Pose (Halasana) in the Padma Sadhana sequence. To perform Sarvangasana, when you raise your legs and hips off the ground, instead of taking your legs 180 degrees over your head, stretch them upwards in the air, so that you get up high on your shoulders, holding up your back with your hands. Halasana went hand-in-hand with Sarvangasana.
- Bridge Pose (Setu Bandhasana) is another asana that can be performed before Halasana.
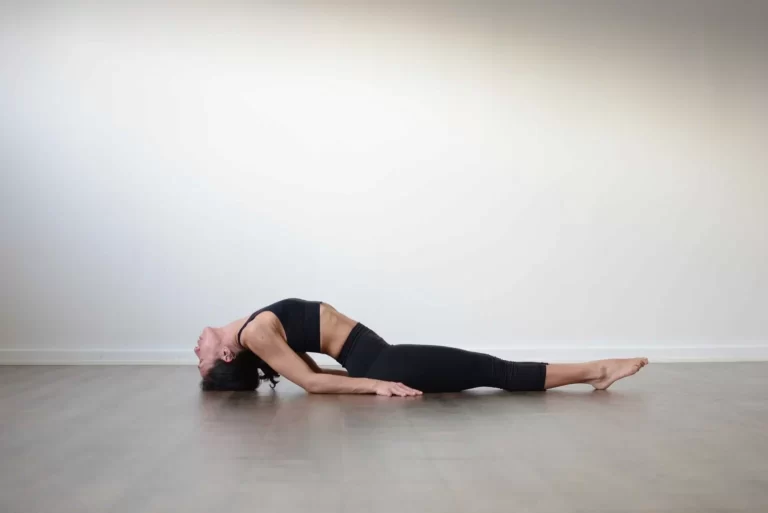
How to do Halasana?
Pile three blankets so that their edges line up. Place the pile near the front of your mat so that its edges line up near the middle of the mat.
Sit at the first end of your mat and lie back over the blankets so they support your upper body. Alter your position so that the tops of your shoulders are around an inch over the edge and the back of your head rests on the ground.
Lie face up so that the anterior of your neck is long and there’s space between the back of your neck and the ground.
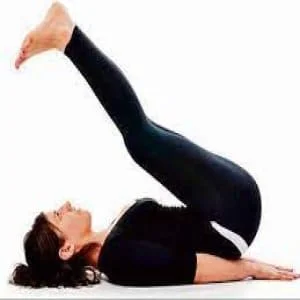
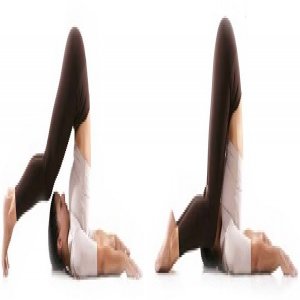
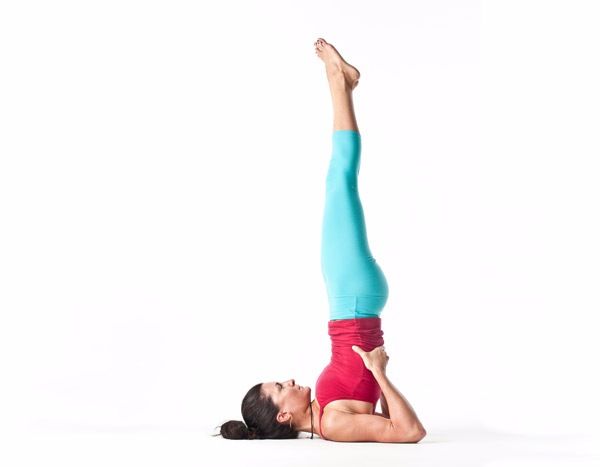
Draw your knees toward your chest, then straighten your legs toward the roof.
Utilizing the strength of your abs—and supporting yourself with both hands at your low or mid-back—raise your hips off the ground and roll up until you are supported by your shoulders. Mound your hips above your shoulders.
Gently lower your legs backward over your head until your toes reach the floor behind you. Rest your toes on the floor, feet flexed.
Release your hands and place your arms on the ground, palms down or with hands grasped. Press down with your outer upper arms and shoulders to make more lift along the spine.
Pause there for 5 breaths or more.
To finish, unclasp your hands, squeeze your arms and hands into the mat, and carefully roll down one vertebra at a time.
Take a few moments to permit the back to settle back into its normal curves.
How to do Halasana by watching a video?
What are the Counter poses for Halasana?
- Matsyasana (Fish Pose)
- Urdhva Mukha Svanasana (Upward-Facing Dog Pose)
- Setu Bandha Sarvangasana (Bridge Pose)
- Cobra Pose (Bhujangasana).
- It can also be followed by slowly rocking the body in a Wind-Relieving Pose (Pavanamuktasana).
What are Alignment tips for Halasana?
- Maintain your neck in line with your spine while looking upward.
- Try to let go of your weight on your upper shoulders, not your neck and head.
- Never move your neck from side to side or turn to look in another direction while your feet are overhead.
- If it’s not possible to put your hands on your spine, you may put them on the sides of your hips.
- For greater comfort and ease, flex your knees slightly.
- Tuck your chin into your chest, putting mild pressure on your chest.
- Notice if you’re transferring your weight onto one side more than the other and adjust accordingly.
- Stimulate your shoulder and arm muscles to keep from putting too much pressure on your neck.
- For spinal alignment, you have the option to press your toes into the ground to lengthen your spine or to purposely round your back.
- Stay your hands on your back for support if your toes don’t reach the ground.
What are the Types of Halasana?
There are so many types of Halasana. Some are below mentioned:
- Ardha Halasana
- Ardh Padma Halasana
- Reclined Legs Raised Pose with bolster
- Plough pose hands-on back /Halasana Hands On Back
- Ear Pressure Pose /Karnapidasana
- Easy Plough pose/Purva Halasana
- Legs raised with strap
- Snail Pose
Ardha Halasana
What is Ardha Halasana ?
Ardha refers to half and Hala represents plow. It is an intermediate posture to do Halasana hence it is named Ardha Halasana. Ardha Halasana activates and balances Manipura Chakra i.e. Solar Plexus.
Ardha Halasana, in this pose the practitioner supposes the shape of half a plow. There is a pose known as halasana i.e. plow pose wherein the practitioner supposes the shape of a plow. Ardha Halasana is half of that pose or rather pause midway of halasana. The midway of halasana is Ardha halasana and is also the point of ending of this pose. It is also known as Upward Stretched Legs Pose.
Preparation for Ardha Halasana :
Ardha Halasana i.e. ‘a half plow pose should be performed on empty stomach, ideally in the early morning.
If it is to be performed at any other part of the day as in the evening because of not being possible to perform it during the day, one needs to take food 3-4 hours before performing the asana.
A person needs to keep their bowel and bladder empty while performing the pose.
Health Benefits of Ardha Halasana:
- Strengthens and tightens the core muscles, making the abdomen muscles flexible, which further allows one to do the plow pose comfortably.
- Strengthens the abdomen.
- Tones the thigh and hip muscles and make them flexible.
- Enhances flexibility and elasticity of the spine, and decreases the stiffness of the spine.
- Strengthening legs and hips and muscles therein boosts blood circulation in this region.
- It is a nice exercise for the pelvic region.
- Aids prevent injuries to the spine, hips, and legs while performing exercises and workouts.
- Aids in curing lumbar spondylosis and arthritis.
- Reduces pain, irritation, and stiffness of low back region.
- Aids burning extra fat and excessive calories.
- Assists in removing excess fat that had collected around hips, thighs, and abdomen.
- It is the best exercise for physical fitness.
- Helps in increasing blood circulation to the whole body.
- Aids improvising the functioning of the abdominal organs, mainly the digestive system.
- Reducing swelling and pains associated with varicose veins.
- The pose activates sexual organs, boosts blood circulation to the sexual organs, and enhances sexual health and performance.
- The asana strengthens the reproductive system, tightens the pelvic muscles, and supports the uterus. Reduces issues related to PMS and advantageous for those women in stages of menopause.
- The pose enhances your digestive health and aids in the prevention of many diseases related to the digestion system such as constipation. It also improves bowel motions. It improves the production of digestive juices and enzymes that assists in the digestion of complex proteins and carbohydrates.
- Expels gathered gas from the stomach and intestines.
- Promotes cardiovascular health, avoids cardiovascular diseases such as heart attack, high cholesterol, etc.
- Promotes kidneys and liver functions.
- Restores indigestion, obesity, urinary disorders, and constipation.
- Cure for insomnia and sinusitis.
- Avoids hernias.
- Avoids prolapse of the uterus in women and rectum in men.
- Reduces anxiety.
- It uplifts body awareness to a great extent.
How to perform Ardha Halasana:
Lie down in a supine position. (Shavasana).
Connect both legs and keep your hand on the thighs.
Slowly breathe in and lift the leg perpendicular to the floor keeping the knee straight.
Pause in the breathe and hold in this position as long as possible.
Exhale and bring back your legs.
Return to the normal position and relax for a while.
Do it the same 3 to 5 times.
You can also do only with a single one after the other.
Modification of Ardha Halasana:
If you have your breathing under control and if you can raise your legs comfortably, the pose appears easier to perform. If the pose is difficult to perform, you can use blankets below the lower back and shoulders. This will give you the confidence of keeping your legs at 90 degrees to the floor. You can also utilize the wall for support until you gain the confidence of raising and balancing your legs without support.
What time should be spent in the pose while performing Ardha Halasana?
Hold in the end pose for 3-4 breaths if you are a beginner. You may pause in this pose for 8-10 breaths or as long as you can if you are comfortable being there for a long time. do the pose 4-5 or even 8-10 times for better results.
Contraindications and Precautions of Ardha Halasana :
Patients suffering from the below-mentioned problems should avoid performing Ardha Halasana –
- Sciatica pain
- Acute or chronic/severe low backache
- Recent surgery on the waist or back
- Spinal column illnesses on the lower vertebrae
- Hip and shoulder injury
- Pressure on the head or neck
- High or low blood pressure
- Severe headache
- Heart problems
- Detached retina
- Those recovering from any kind of stomach infection or surgery around the abdominal area
- A pregnant woman should not do this pose.
- Perform under expert guidance.
Ardh Padma Halasana
What is Ardh Padma Halasana/The half lotus plow pose?
‘Ardha’ defines Half, ‘Padma’ meaning lotus ‘Hala’ refers plow and ‘asana’ means pose. Ardha Padma Halasana is an inversion and gives the benefits of padmasana as well.
Benefit of Ardh Padma Halasana:
This pose strengthens the abdominal and back muscles, and stimulates the intestinal peristalsis, boosting digestion and removing constipation.
It facilitates the breakdown of fats by stimulating the liver and gall bladder and stretches the pelvic region.
How to do Ardh Padma Halasana?
- Sit with the legs extended and the feet together.
- Bend the right leg and place the foot on top of the left thigh in the half-lotus position.
- Place the arms near the body with the palms facing down.
- Compress down with the arms and roll backward, drawing the straight leg over the head till the toes reach the ground.
- Draw the arms over the head and hold the toes of the left foot with both hands. The left leg remains straight.
- Support the lower back with both palms and raise the extended leg, letting the body down slowly and releasing the left leg on the floor,
- Switch the legs and repeat on the opposite side. Perform a few rounds on both sides.
What are the dos and don’ts of Ardh Padma Halasana?
Dos:
- Do keep the body fully stretched before moving into the pose.
DONT’S:
- Don’t do this pose if you have a hernia, sciatica, or other back or neck ailments.
- People with high blood pressure, heart problems, and knee problems should avoid this pose.
Reclined Legs Raised Pose with bolster
Take a position in Dandasana resting against a bolster (long side) at the lower back.
Breathe out and gently lie down on your back resting the buttocks, hips, and sacrum on the bolster while you rest the shoulders, neck, and back of the head on the floor.
Plough pose hands-on back /Halasana Hands On Back
Take a pose of traditional halasana and place your hands on your back for support rather than keeping them on the floor stretched out.
Ear Pressure Pose /Karnapidasana
What is Ear Pressure Pose?
Ear Pressure Pose is a calming modern pose. In contemporary yoga classes, there is often talk about how to include the philosophical eight limbs of yoga into your asana practice and your life. Karnapidasana is a rare yoga position that does that, demonstrating the principle of pratyahara. Pratyahara is defined as the withdrawal of the senses, which refers to shutting out external stimuli so you can turn your attention inward.
Person can warm up to Ear Pressure Pose with Plow Pose (Halasana). It might be used in a modern hip-opening sequence or one focused on the hamstrings.
Benefits of Ear Pressure Pose (Karnapidasana)
- Once yogis pressure their ears with knees it aids them to treat ear problems like hearing issues, infections, tinnitus, and many more.
- The spine is the key support of our body. This position makes our spinal column flexible as it gives a full range of motion.
- It gives an ancient method to massage digestive organs inside our belly. With regular practice of Knee-to-Ear pose you can get rid of constipation, acidity, bloating, and indigestion issues.
- Ear Pressure Pose is considered to be the best yoga pose for allowing Thyroid Glands to work with full power.
- It provides many advantages to your lungs and improves your breathing.
- It makes your neck and shoulders pain-free and broadens them.
- It aids to get relief from stress, anxiety, fatigue, and sleeping disorders.
- Regular practice improves energy levels and controls negativities.
- It relaxes the muscle tissue from the knees to the ear.
- This pose is strongly preferable for insomnia, infertility, sinusitis, and backache.
- It activates three Chakras – Throat Chakra (Vishddha), Solar Plexus Chakra (Manipura), and Sacral Chakra (Svadisthana) which clean your mind, balance energy, endorse creativity and productivity.
How to do Ear Pressure Pose :
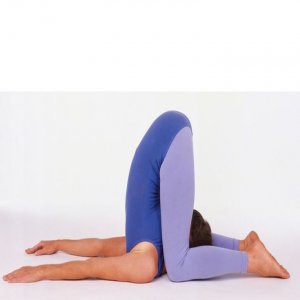
Start in Plow Pose with the shoulders tucked under. Your hands can be flat on the ground or interlaced behind your back.
Flex your knees and bring them to the ground on either side of your head.
Rest the tops of your feet on the ground.
Let your knees apply light pressure to the ears, momentarily cutting off aural distractions.
Take at least five breaths before letting go of your arms and carefully rolling out of the pose vertebra by vertebra.
Common Mistakes of Ear Pressure Pose:
- There’s some weight in the neck in this pose, so don’t turn your head from side to side.
- It’s okay to move your shoulders underneath you a bit more if you feel an exerts pressure on the neck.
- A blanket under your shoulders may help too.
- While in Karnipidasana, imagine raising the chest up towards the sky versus sinking towards the floor.
Safety and Precautions of Ear Pressure Pose :
- As this pose is an inversion, it should be prevented if you have high blood pressure or a heart condition.
- You should also not perform it if you are pregnant as it compresses the stomach.
- Don’t perform it if you have any injury to your neck.
- If you feel any pain, release this pose slowly.
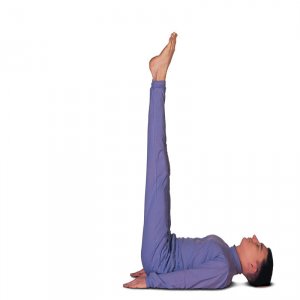
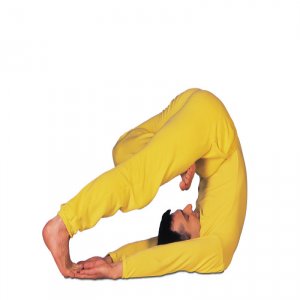
Easy Plough pose/Purva Halasana
What is Purva Halasana?
Poorva Halasana or the preliminary plow pose is a preparatory asana before one performs the full Halasana pose. In Sanskrit ‘Hala’ refers to a plow and ‘poorva’ represents ‘preliminary’ or ‘previous’. In Halasana, the body stimulates the plow in the final pose. Poorva Halasana is the initial pose of halasana where the legs don’t go back but pause at a 45 degrees angle to the ground.
Benefits of Poorva Halasana:
- Once Poorva halasana is done, it prepares the practitioner to do the full plow pose or Halasana.
- Poorva Halasana helps to decrease fat around the waist.
- It stretches the abdominal organs, especially the kidneys and intestines.
How to perform Poorva Halasana (Preliminary Plough Pose)?
Begin in the supine position, lying on your back.
Relax completely and breathe normally. remain the legs together and the hands should be kept close to the body.
Make a fist and slide it under the buttocks to slightly carry the weight of the buttocks.
Hold your breath and slowly lift the legs straight up. Keep moving the leg upward until it is roughly 45 degrees from the ground.
Stay in this position from a few seconds to one or two minutes, depending on the level of comfort.
Exhale slowly and let go of the position. The legs should return to the supine position.
Relax all the muscles and breathe normally.
Do this process up to 10 times, depending on time and need.
After this asana, one can perform any backward bending asana as a counter-pose.
Contraindications for Poorva Halasana:
Poorva Halasana is relatively easy to do but should be prevented by those suffering from sciatica or slipped disk.
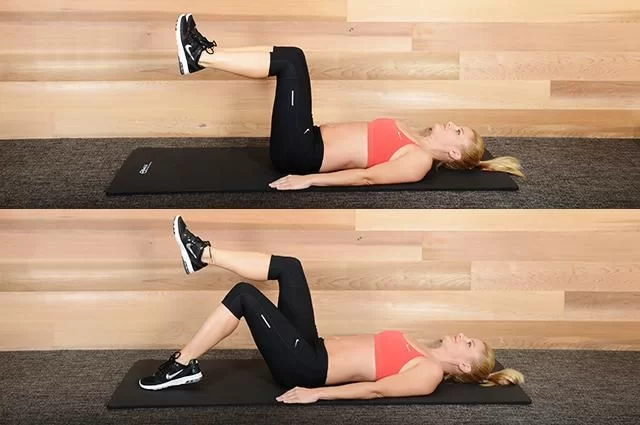
Legs raised with strap
How to do :
- Lie in a supine position.
- Now wrap a strap around your one-leg ankle.
- Hold both ends of the strap with your hands.
- Now pull the strap and lift your leg upward.
- Stay in this pose for a few seconds.
- Release the pose.
- Now do it on the other leg.
- You can perform it on both legs together or simultaneously.
Snail Pose
What is a snail pose?
Snail Pose is an alternative to the Halasana or the Plough Pose. It is a supine pose in which the body is rolled up backward and the final posture looks like a snail or a plow.
This asana influences the Crown Chakra (Sahasrara Chakra), Third Eye Chakra (Ajna Chakra), Throat Chakra (Vishuddha Chakra), and Solar Plexus (Manipura Chakra). These are the highest chakras of the body from the head.
Snail ‘Halasana’ Pose is a stretch asana performed with inversion of the body and it affects the full spine. All the internal organs are pressed and massaged which makes them function properly and gain strength. The meridian influenced by the Snail Pose is that of the Urinary Bladder.
Benefits of Snail Pose:
- Spine stretched- The first advantage is that the spine is stretched. It is a good exercise to increase flexibility in the spine. It also improves the intake of oxygen in the body which raises the flow of prana Vayu.
- Calms down mind- By entering and staying in the pose, there is deep breathing which unlocks the connecting tissues and blocked channels. This stimulates the parasympathetic nervous system which decreases stress levels and calms down the mind.
- Exercises for internal organs- Almost all organs of the body get stretched, pressed, and exercised with this position. This boosts the overall functions of these organs.
- Better blood circulation- There is a rise in blood flow from the legs to the pelvic floor and also to the head. For people who have to sit for long hours, this is the best counter-pose.
- Stimulates the Thyroid gland- One of the benefits of Snail Pose is that it activates the Thyroid gland.
How to do the Snail Pose?
Simply lie down on the back on flat ground and raise the legs. You can take the support of hands for raising these. Hands can be used to push the lower back to move back or these can be put down on the ground close to the hips.
If the legs and the spine are kept straight while raising, it becomes a Halasana or a Plough Pose. However, if the knees are flexed and the lower back is revolved during the asana, then this is the Snail Posture.
The hands can support the back from the hip region making the legs stay in this position.
From over the head, let the flex knees fall and be placed close to the shoulders. The hands would remain outstretched on the ground in opposite direction. If the legs are kept extended, as is the case with Halasana, these will be placed at some distance over the head in the inversion posture.
You have to make sure that after getting into the pose, your neck does not get too much weight. If it becomes unbearable, you should release the pose.
3 to 5 minutes is the time frame within which the position should be held before returning to the normal one.
Alternatives and Variations of Snail Pose:
Naman Pranamasana is one of its alternatives. In this asana, a person kneels and flexes forward to place the head close to the knees on the ground. your both hands touch the ankles or heels of the feet. This pose also looks like the snail pose and is relatively easier to perform than the inversion variant.
Instead of taking the legs over the head to rest on the ground, with knees either flexed or straight, you can simply have these extended up in the air or hanging in the air parallel to the floor. This is called the Half-plough pose.
You may not roll over fully to come on your shoulders. Rather, you may just raise the hips and the lower back a little to take legs behind over the head, with the upper spine still on the ground.
Contraindications for Snail Pose :
- During the inversion and in holding the pose for some time, there is a lot of pressure transferred to the neck. Therefore, for people with a neck issue, prevent this asana.
- Similarly, for people with high blood pressure, vertigo, upper body infections, or cold as well, it is not suggested to do this asana as blood circulation to the head rises in this asana.
- Since the asana involves raising the spine and then flexing the knees overhead, those people who have a bad back or any other issue with the back should not practice this asana.
- Women in their menstrual cycle or pregnancy period should not practice this pose.
What are the Contraindications and Precautions for Halasana?
There is a certain precaution you need to take while Halasana:
- Avoid doing Plow Pose (Halasana) if you have injured your neck or are suffering from diarrhea and high blood pressure.
- Ladies shouldn’t do Plow Pose (Halasana) during pregnancy and the first two days of their menstrual cycle.
- Consult a doctor before performing Plow Pose (Halasana) if you have suffered from chronic diseases or spinal disorders.
- Never hold inversions for long durations.
- Never force the pose if it hurts.
- In case of head issues such as sinus, neck issues, or digestive issues, never perform the plow pose.
- Decrease the time of inversions if experiencing headaches.
- Listen to your body always.
What are Common Mistakes of doing Halasana?
Plow Pose is not for newbies. You need to be habitual with the basics and understand proper body alignment. You will also need to have sufficient flexibility to perform it safely. If you cannot perform Shoulder-stand, you are not ready for Plow.
Prop Misuse
Plow Pose can put your neck in an unsafe position if you place too much weight on the upper part of the spinal column (your cervical spine). Using a blanket as a prop can assist protect the neck so the weight will be on your shoulders instead of your neck.
If you use a blanket, it must be placed correctly. The blanket should be bent into a rectangular shape that is about as wide as your yoga mat. You can pile several thinly folded blankets if you want more height.
Set the blanket at the very end of your mat or toward the middle of it. The main thing is that your shoulders are on the blanket and your head is off of it, resting on the bare ground. This is so your head can slide if required. Set yourself up this way and then raise the legs overhead.
If you don’t like the blanket, you can get a similar effect by making sure that your scapulae are firmly tucked, making a little floor for your back as is often done in Bridge Pose.
The bottom line
Halasana is a relaxing, strengthening position that provides a deep stretch to your back and spine muscles. You can perform it on its own, as part of a mini-sequence, or during a longer session.
While Halasana is commonly challenging, you can make adjustments so it works for you.
If Halasana isn’t for you but you still want to enjoy the advantages of an inversion, you can try Sarvangasana (Shoulder Stand) or Viparita Karani (Legs-Up-the-Wall Pose) or try out an inversion therapy or inversion sling.
Consult with your doctor before starting any new yoga program if you have any medical issues or take any medications.

5 Comments