
TAPPING FOR ROTATOR CUFF INJURY
Taping for Rotator cuff injury become popular which helps to stabilize the shoulder joint, and also improves shoulder function.
ANATOMY OF ROTATOR CUFF :
In the human body, the rotator cuff is a functional anatomical unit located in the upper extremity.
Its function is related to the glenohumeral joint, where the muscles of the cuff function both as the executors of the movement of the joint and the stabilization of the joint as well.
Injuries of the rotator cuff interfere with the function of the glenohumeral joint and correspond with inability to perform the movements associated with this joint.
Supra spinatus muscle :
- Origin: supra spinatous fossa of scapula
- Insertion: greater tubercle of humerus
- Innervation: supra scapular nerve (C4, C6)
- Function: initiation of abduction of arm to 15° at glenohumeral joint; stabilization of humeral head in glenoid cavity.
- Infra spinatus muscle :
- Origin: infra spinatous fossa of scapula
- Insertion:greater tubercle of humerus
- Innervation: suprascapular nerve (C5, C6)
- Function: external rotation of arm at glenohumeral joint; stabilization of the humeral head in glenoid cavity.
- Teres minor muscle :
- Origin: lateral border of scapula
- Insertion: greater tubercle of humerus
- Innervation: axillary nerve (C5, C6)
- Function: external rotation and adduction of arm at glenohumeral joint; stabilization of the humeral head in glenoid cavity.
- Sub scapular muscle :
- Origin: medial two-third of the sub scapular fossa
- Insertion: lesser tubercle of the humerus
- Innervation: upper and lower sub scapular nerves (C5, C7)
- Function internal rotation of arm; stabilization of humeral head in glenoid cavity.
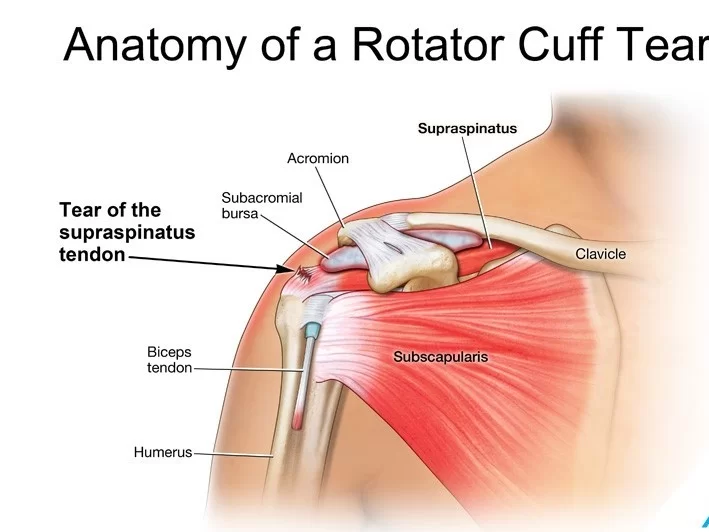
DEFINITION: A rotator cuff tear is an injury where one or more of the tendons or muscles of the rotator cuff of the shoulder get torn.
Symptoms may include shoulder pain, which is often worse with movement, or weakness.
This may limit people’s ability to brush their hair or put on clothing.
Many people who visit a doctor with shoulder
pain have a problem with their rotator cuff.
A rotator cuff injury can happen suddenly, such as falling on your outstretched arm. Or it can develop slowly, resulting from repetitive motions or age-related degeneration.
Here are some of the types of rotator cuff injuries:
- Tendinopathy This is pain in and around the tendons.
- Tendinitis and tendinosis are variations.
- Rotator cuff tendinitis is considered the mildest form of rotator cuff injury.
- It can develop from:
- age-related degeneration
- overuse;
- repetitive motion
- trauma
- Impingement: This occurs when the top of the shoulder (the acromion)
- rubs against the tendon and the bursa and irritates the rotator cuff.
- Between 44 and 64 percent of all shoulder pain is thought to come from
- subacromial impingement syndrome (SAIS): which is the most common shoulder disorder.
- Bursitis: The bursa around the rotator cuff can fill with fluid and swell.
- Partial tears of the rotator cuff tendons: The tendon is damaged or frayed but isn’t torn away from the bone.
- Full-thickness tears: The tendon is completely torn from the bone. Chronic degeneration is usually the reason.
- Bone spurs: These can form when rotator cuff tendons rub on the shoulder bones.
- Bone spurs don’t always cause a rotator cuff injury.
SYMPTOMS OF ROTATOR CUFF TENDINITIS
- The classic symptoms include a ‘toothache’ like pain radiating from
- the outer arm to several inches below the top of the shoulder.
- Pain may also occur in the front and top of the shoulder.
- It may interfere with sleeping comfortably. It may even awaken people from a sound sleep
- with a nagging pain in the upper arm.
- The symptoms are usually aggravated by raising
- the arms overhead or in activities that require reaching behind the body,
- such as retrieving an object from the back seat of a car. Furthermore,
- reaching behind the back to fasten underclothing or to pass a belt may aggravate the arm and shoulder pain.
- Clicking on the shoulder may occur when raising the arm above the head.
- pain and swelling in the front of your shoulder and the side of your arm.
- pain triggered by raising or lowering your arm.
- a clicking sound when raising your arm.
- stiffness.
- pain that causes you to wake from sleep.
- pain when reaching behind your back.
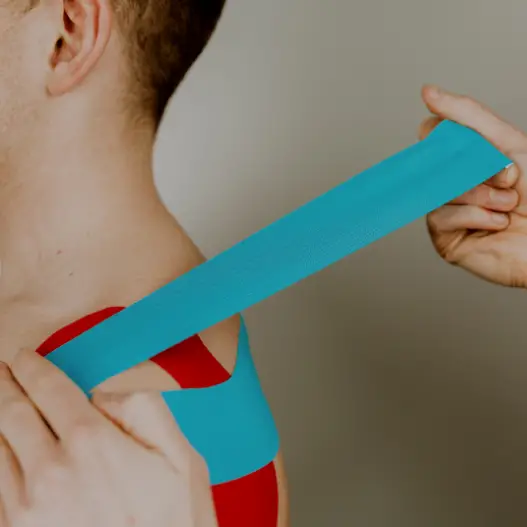
KINESIO TAPPING FOR ROTATOR CUFF INJURY
APPLICATION OVERVIEW
- The rotator cuff is the group of muscle and their tendons that act to stabilize the shoulder.
- these muscle start at the shoulder blade and connect to the upper arm to provide
- the needed stability and mechanics of the shoulder.
- cause of rotation cuff injury may included overuse, tear, motion beyond normal limits, or poor
throwing form. - KT Tape can help treat this condition by providing support and stability,
relieving pressure to reduce pain, and increasing circulation
WHAT YOU NEED
- 2 STRIPS of KT Tape
- 1 full 10” strip
- 1 full 10”strip cut in half
BEFORE YOU START
- Apply before activity
apply one hour before beginning the activity. - Clean skin
clear dirt, oils and lotion from the area. - Activate adhesive
after application rub tape vigorously
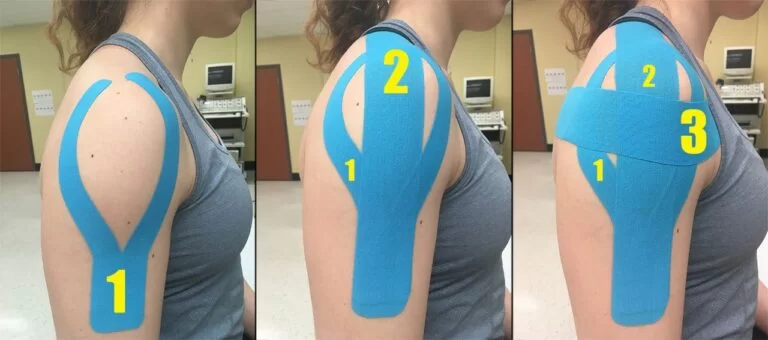
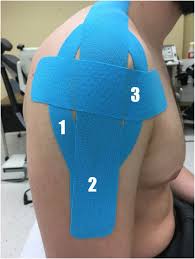
STRIP ONE :
- 0% STRETCH
ANCHOR: anchor a full strip slightly under the point of pain as shown without stretch. - 25 % STRETCH
APPLY: Apply the tape around the shoulder and under the shoulder blade with 25% stretch. - 0% STRETCH
FINISH: apply the last two inches of the tape without stretch.
STRIP TWO :
- 80% STRETCH
ANCHOR: Anchor the middle of a half strip of tape across the first strip and shown with 80% stretch. - 0% STRETCH
APPLY: lay ends down without stretch.
STRIP THREE
- 80% STRETCH
ANCHOR: anchor the middle of a second half strip across the first strip as shown with 80% stretch. - 0% STRETCH
APPLY: lay ends of tape down without stretch.
RIGID TAPPING FOR ROTATOR CUFF INJURY
- Anchors:
- Begin this taping technique in good posture with the hand positioned on the hip as demonstrated (figure 2).
- Place a strip of tape around the upper arm keeping the biceps tense and a strip of tape from the
- shoulder blade to the chest (figures 1 & 2). Begin by following the black arrows and
- conclude by following the white arrows (figures 1& 2). This should be applied gently to
- prevent circulatory problems and is used as a fixation point for the other shoulder taping techniques.
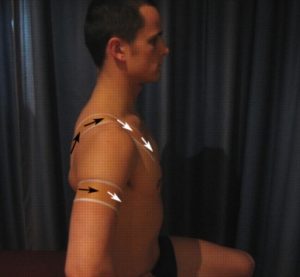

- Straight Lines
- Begin this taping technique in good posture with the hand positioned on the hip as demonstrated (figure 2).
- Start the tape at the level of the upper arm anchor at the side of the arm by following the black arrow (figure 3).
- Conclude this taping technique by firmly following the white arrow.
- Do 1 – 3 straight lines depending on the amount of support required, with each additional
- line partially overlapping the previous line.
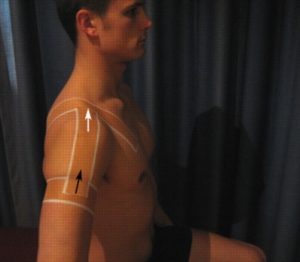
- Shoulder Crosses
- Begin this taping technique in good posture with the hand positioned on the hip as demonstrated (figure 2).
- Start the tape at the level of the upper arm anchor at the side of the arm by following the black arrows (figure 4).
- Conclude this taping technique by firmly following the white arrows.
- Two lines of tape should be used forming a cross (figure 4).
- Do 1 – 2 crosses depending on the amount of support required.

HOW TO REMOVE KINESIO TAPPING
- So now you’ve got your tape on and you’ve gotten that extra support during your chosen sporting activity, it’s time to take it off, so let us ease the process of removing kinesiology tape for you.
- The best tip we can offer when it comes to removing your kinesiology tape is to peel the skin from the tape, not the tape from the skin.
# But in terms of the actual process, firstly make sure you’re removing the tape in the same direction as the growth of the hair underneath it, and whatever you do don’t rip the tape off like a plaster!
# Start slowly, folding the corners of the edge back gradually, ensuring that you’re laying the removed tape on the back of the applied tape, as opposed to pulling the tape above and away from your arm.
# As you’re peeling off the tape, hold your skin down with your other hand and either tap it, or pull it gently in the opposite direction of the tape.
This helps the skin and the tape to separate more efficiently but with no discomfort.
If the tape has been applied over a particularly hairy part of the body, it helps to press down on the tape as you are peeling it off, as the pressure helps avoid further pain.
It’s wise to have shaved the area before applying the tape but, as this isn’t always practical, taking this precaution will be necessary to some.
Need a little extra assistance? Apply oil directly onto the tape, rub it in and wait around 10 to 20 minutes before removing it slowly.
This will help reduce the stickiness of the tape and make it easier to remove.

Taping: joining with adhesive tape
Tapping: repeated knocking on an object.