Neural Tissue Tension Techniques
Introduction
The Neural Tissue Tension Techniques are performed by the therapist placing progressively more additional tension on the component of the nervous system that is being tested and are divided into upper and lower limb tests. It is used to evaluate the length and mobility of the components of the nervous system. Neural tissue tension techniques are also used to release the tension, adhesions, or “stuck” nerves, restoring optimal function.
- Nerve gliding exercises attempt to isolate the nerve from the surrounding networks by sliding the nerve via joint movements that lengthen the nerve bed (Coppieters & Butler, 2008). Elongation of the nerve bed also stretches the nerve. This may also lead to increased neural tension and intraneural pressure. If this stretch is held statically, it may also decrease blood flow to the nerves, therefore leading to cell death. On the other side, dynamic movements could assist in pumping out some of the edematous fluid that compresses the nerve. That being said, any time the nerve bed is elongated, then there is a possibility for increasing symptoms. Due to the threat of increasing symptoms, these exercises are not as common as they once were.
- A similar technique usually confused with nerve gliding is nerve sliding. Nerve sliding performs by elongating the nerve bed at one joint, while simultaneously shortening it at another (Coppieters & Butler, 2008). The reasoning is that the nerve can also move without increasing strain. It was found that nerve sliding assembles the largest nerve excursions with the least amount of strain. Nerve gliding may potentially create even larger nerve excursions at proximal joints but it creates significant strain. Due to the possibility of symptom provocation, nerve gliding should only be considered in non-acute and non-surgical conditions. It is here that nerve sliding is the chosen intervention.
- A recent analysis found that the sequencing of nerve tensioning or gliding at each joint was irrelevant when looking at the net strain on the nerve (Boyd et al, 2013). Yet, it was also shown that variation in the sequencing of joint movements altered where the nerve strain occurred first. This has potential clinical implications as we may be able to target exact locations if we know where the restrictions lie. The real-world applicability is unknown at this point as there have not been any studies conducted in this area.
- When comparing education to education + neural tissue management (both nerve sliding or gliding were used with cervical manual therapy), it was found that the intervention group had superior results corresponded to the control with no significantly increased risk of exacerbations (Nee et al, 2012). Not only is it important to note the usefulness of these nerve gliding or sliding exercises, but it brings up the point that we should also be looking at the spine. Other than some form of direct trauma, another source of nerve irritation may also come from poor spinal mechanics that lead to neural irritation. Treating just the nerve may mean treating just the symptoms in a few cases. It is essential to look at the spine and restore normal mechanics if any abnormalities are found, especially because a manipulation may instantly show symptom relief as well.
Neurodynamic Testing
Straight Leg Raise Test, Median Nerve Traction Test, Radial Nerve Traction Test, Ulnar Nerve Traction Test, and Prone Knee Bend Test.
Neural Gliding
- Fixation of the proximal portion of the nerve
- A distal portion of nerve in controlled stretch
- Symptoms typically occur distal aspect of the nerve
Neural Mobilization Guidelines
- Combine neural mobilization with other interventions.
- Minimize the effects of inflammation and avoid any additive inflammation through excessive stress.
- Be cognizant that physiologic responses to nerve mobilization are generally much greater than with contractile and other noncontractile tissues.
- Ensure only the identical prescribed mobilization is being performed and that all extraneous joint movement is controlled.
- Introduce the patient to the prescribed frequency, repetition, duration, and intensity of the prescribed self-management techniques.
- Limit excursion to the onset of symptoms, hold for short period, and then release.
- Daily reexamination pre- and post-intervention are required in order to identify the stage of healing.
- Home self-management is often delayed until similar techniques are tolerated during standard therapy sessions and the patient’s ability to handle such stresses is established.
- Examination procedures become the intervention.
Nerve Mobilizations
NeuroMobilization or Nerve Mobilization is a technique that we use to treat nerves that might be adhered, irritated, or compressed. Multiple patients that have been unresponsive to other physical therapy and present with a chronic history of directed symptoms like pain, numbness, or tingling in the arms or legs may react to NeuroMobilization. Every patient that presents with guided symptoms or pain that has been unresponsive to localized treatment obtains a complete neural tension evaluation. Neural tension testing is a way for your therapist to decide the extent of nerve involvement. By mobilizing a nerve, we could also choose, in combination with manual traction and sensitizing maneuvers, whether your pain is originating from the spine or the periphery.
Non-pharmacological therapeutic interventions are being embraced by the medical community because they are easy to carry out, economical, and have relatively minor side effects.
One treatment approach that can be utilized as a part of an individualized multi-modal program to handle persistent pain is nerve mobilization. The newest meta-analysis on the topic was published in The Journal of Orthopaedic & Sports Physical Therapy. This study indicates that nerve mobilizations are useful for patients with back, neck, and foot pain
Therapists use a combination of movements to assess for sites of irritation. Occasionally patients may test negative, but this does still not rule out nerve irritation, in these circumstances, a more refined assessment along the entire path of the involved nerve may be needed.
Nerve Mobilizations Are Used To Assess for High Sensitivity of The Nervous System
Therapists use a combination of movements to assess for sites of irritation. Occasionally patients may test negative, but this does still not rule out nerve irritation, in these circumstances, a more refined assessment along the entire path of the involved nerve may be needed.
Nerve Mobilizations Are Used To Revive Homeostasis in and Around The Nervous System
- Neurovascular bundles may also be exposed to mechanical irritation at many different points. Long irritation may result in the release of inflammatory mediators, known as “inflammatory soup”.
- In a few cases, peripheral nerve inflammation can contribute to ongoing symptoms without overt nerve damage. In these possibilities, five minutes of passive mobilization might help to diminish intraneural edema and/or pressure (Boudier-Revéret et al. 2017). This would have a modulatory effect on peripheral and central processes.
- In more prolonged standing cases the development of fibrosis may contribute to peripheral nerve dysfunction. If performed early the application of manual therapy may also attenuate tissue fibrosis and restore the motility of peripheral nerves (Bove et al. 2016).
Neurodynamics Techniques Aims
- Improve or develop: manual skills, specifically the capability to feel abnormalities in movement related to the nervous system in the lower quarter
- abilities in diagnosis and interpretation of lower quarter neurodynamic testing and musculoskeletal relationships
- clinician’s repertoire of diagnosis and treatment of techniques
- safety in relation to clinical neurodynamics
Problems with ‘Tension’ – Makes us think of tightness in the nervous system Corollary is ‘stretch’ Stretch: can cause injury can increase pain often ineffective causing therapists to abandon the approach
Concept of Neurodynies
Although mechanical and physiological functions of the nervous system interact closely, there is no have been specific subject that includes both these aspects Thus, daily and their relationships. There is a need for such a field because both components ought to be changed in considered together when assessing and treating a patient via nervous system mobilization and manual therapy. This may be addressed by neurodynamics, which encompasses the interactions between the mechanics and physiology of the nervous system. The term “path dynamics could also be used to describe the combination of pathomechanics and pathophysiological events in disorders. In treating pain syndromes, clinicians will aim to improve the photodynamic changes which cause the symptoms and disability.
Normal Responses:
The following are the normal responses that appear during a neurodynamic test:
- A deep ache or stretch in the cubital fossa extending downwards to the anterior radial part of the forearm and hand.
- A definite tingling sensation in the first three fingers and thumb.
- A stretch in the anterior shoulder aspect.
- Cervical lateral flexion out from the tested side increases the test’s response.
- Cervical lateral flexion towards the tested side reduces the test’s response.
Physical Assessment ULTT Description
Normal (negative) Symptoms:
- Deep ache and stretch in cubital fossa (99%)
- Deep ache and stretch into the anterior and radial aspect of the forearm and radial aspect of the hand (80%)
- Tingling to the fingers provided by the appropriate nerve (nerve bias)
- Stretch in the anterior shoulder area
- Overhead responses increased with contralateral cervical side flexion (90%)
- Overhead responses decreased with ipsilateral cervical side flexion (70%)
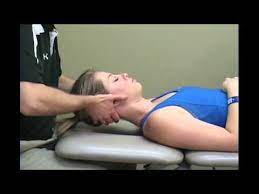
Importance of Test: As nerves run via the various tissues of our body, they can also become adherent to some of the structures they pass. This test looks to produce these symptoms by placing the spinal cord on tension via cervical flexion.
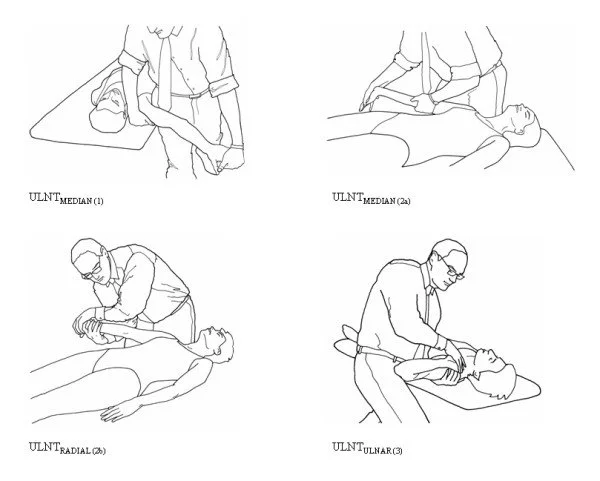
The ulnar, median, and radial nerve upper limb neurodynamic tests (ULNTs) are designed to assess the interplay between the mechanics and physiology of the 3 major nerves of the arm.1 The ulnar nerve bias ULNT (ULNT 3) is purported to discuss the ulnar nerve to specify its contribution to neuropathic symptoms of the upper limb or neck. The validity of the ULNT 3 is based on its ability to selectively increase the tension of the ulnar nerve without increasing the tension of adjacent tissue. It is generally accepted that this mechanical provocation is responsible for the reproduction of the patient’s symptoms. However, there is evidence from one previous human cadaveric study that the ULNT 3 may not selectively increase the tension of the ulnar nerve.
Upper Limb Nerve Tension Tests
The Upper Limb Tension Test (ULTT) is also known as Brachial Plexus Tension or Elvey Test. These tests are designed to put stress on a neurological network of the upper limb. These tests were first described by Elvey and hence are also known as the Elvey test but are most commonly called ULTT. The shoulder, elbow, forearm, wrist, and fingers are kept in a specific position to put stress on the particular nerve (nerve bias) and further modification in the position of each joint is done as a “sensitizer”. The ULTT is equivalent to the straight leg raise organized for the lumbar spine.
Purpose
These tension tests are performed to review the peripheral nerve compression or as a role of the neurodynamic assessment. The main reason for employing a ULTT is to check cervical radiculopathy. These tests are both diagnostic and therapeutic. Once the diagnosis of cervical radiculopathy is made the trials are done to mobilize the entrapped nerve.
Method And Techniques
Individually test is done on the normal or asymptomatic side first. Traditionally for the upper limb, the charge of joint positioning is the shoulder followed by the forearm, wrist, fingers, and lastly elbow. Every joint positioning element is added until the pain is provoked or signs are reproduced. To be further sensitive to the upper limb tests, side flexion of the cervical spine may be added. If pain is provoked in the very initial position, then there is no essential to add further sensitizers.
If pain or sensations of tingling or numbness are encountered at any stage during movement into the test position or during the addition of sensitization maneuvers, especially reproduction of neck, shoulder, or arm symptoms, the test is positive; this ensures a degree of mechanical interference affecting neural structures.
ULTTs aims at evoking the patient’s symptoms. This is done by keeping the shoulder, elbow, forearm, wrist, and fingers in specific positions to put stress on a particular nerve (nerve bias), which can also be done with mutations in the position of each joint as a “sensitizer” to the specific nerves.
General points that require to be kept in mind while performing the test.
- The therapist should briefly explain to the patient the procedure they are going to perform in layman’s terms. This decreases the feeling of anticipation among the patient and they are calmer and more relaxed. Inform the patient that it may or may not evoke the symptoms and communicate verbally when a patient feels any kind of discomfort.
- Care must be taken to just evoke the symptoms and not further aggravate the symptoms.
- Each examination is done on the normal or asymptomatic side first.
- The accuracy of the test is attributed to performance with an appropriate stabilizing hand and a slow, steady mobilizing hand.
- The final movement should not be held for more than 10 secs.
- Watch for undesirable movements which might alter the results. Traditionally for the upper limb, the order of joint positioning is shoulder observed by the forearm, wrist, fingers, and lastly elbow. Each joint positioning element is added until the pain is provoked or symptoms are reproduced. To further sensitize the upper limb tests, side flexion of the cervical spine could also be added. If pain is provoked in the very initial position, then there is no need to add additional sensitizers.
Positive Test
The test is favorable if one or more of the following occurs:
- Symptoms reproduced
- A side-to-side distinction in elbow extension greater than 10 degrees
- Contralateral cervical side bending improves symptoms, or ipsilateral side bending decreases symptoms
Upper Limb Tension Test 1 (ULTT 1, Median nerve bias, Magee – ULTT 1)
Indications-
- Radiating pain in the upper limb
- Tingling sensations in the first 3 fingers
Movements performed
- Shoulder depression
- Shoulder abduction 110 degree
- Shoulder external rotation with the elbow at 90 degree
- Forearm supination
- Wrist and finger extension
- Elbow extension
Structural differentiation
- Proximal symptoms- Relieve wrist and finger extension
- Distal symptoms (provocation) – Contralateral neck flexion.
Upper Limb Tension Test 2 A (ULTT2 A, Median nerve bias, Magee – ULTT 2)
Indications
- Radiating pain in the upper limb
- Recent shoulder arthroplasty surgery
- Tingling sensations in the first 3 fingers
- Recent Dislocation of shoulder and Instability
Movements performed
- Shoulder girdle depression
- Shoulder abduction 10 degree
- External rotation with the elbow at 90 degree
- Forearm supination
- Wrist and finger extension
- Elbow extension
Structural differentiation
- Proximal symptoms- Relieve wrist and finger extension
- Distal symptoms (provocation) – Contralateral neck flexion
Upper Limb Tension Test 2 B (ULTT2 B, Radial nerve bias, Magee – ULTT 3)
Indications-
- Radiating pain in the upper limb
- Supinator tunnel syndrome
- De Quervain`s disease
- Cervical Radiculopathy
Movements performed
- Shoulder girdle depression
- Shoulder abduction 20 to 30 degree
- Shoulder internal rotation
- Forearm pronation
- Wrist, finger, and thumb flexion
- Elbow extension
Structural differentiation
- Proximal symptoms- Relieve wrist and finger flexion
- Distal symptoms (provocation)- Contralateral neck flexion
Upper Limb Tension Test 3 (ULTT 3, Ulnar nerve bias, Magee ULTT 4)
Indications
- Pain radiating to the 4th and 5th digits
- Thoracic outlet syndrome
- Carpal tunnel syndrome
Movements performed
- Shoulder girdle depression
- Shoulder abduction 110 degree
- Shoulder external rotation
- Forearm pronation
- Wrist and Finger extension
- Elbow flexion
Structural Differentiation
- Proximal symptoms- Relieve wrist and finger extension
- Distal symptoms (provocation)- Contralateral neck flexion
Musculocutaneous Nerve Tension Test (ULTT musculocutaneous)
- Shoulder girdle depression
- Elbow extension
- Shoulder extension
- Ulnar deviation of the wrist within thumb flexion
- Either medial or lateral rotation of the arm could also sensitize this nerve
Lower Limb Nerve Tension Tests
Lower limb tension tests (LLTT), are also called neural tension tests. These tests are designed to put stress on a neurological network of the lower limb. The hip, knee, and ankle are kept in a specific position to put stress on the particular nerve (nerve bias) and further modification in the position of each joint is done as a “sensitizer”.
Femoral Nerve Tension Test
The Femoral Nerve Tension Test, also known as the Femoral Nerve StretchTest (FNST) is a test employed to screen for sensitivity to stretch soft tissue at the dorsal part of the leg, possibly related to nerve root impingements. It was first reported by Wasserman in 1919. Literature indicates that this test is not used as commonly as the Straight Leg Raise (SLR) test because of undersized frequent upper lumbar radiculopathies as compared to lower lumbar radiculopathies. It is believed an anterior corollary of SLR and considers the mobility of upper lumbar nerve segments.
Purpose
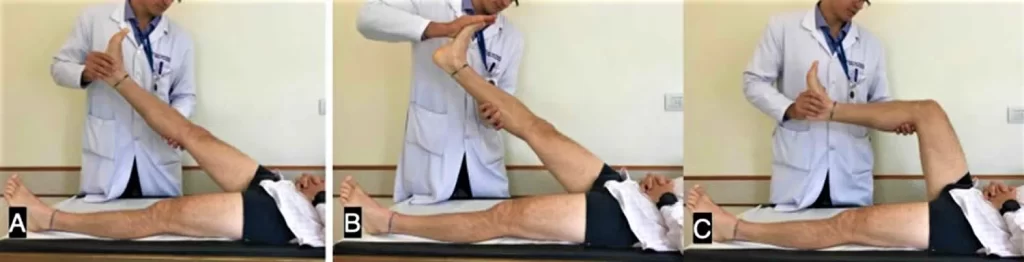
The prone knee bending test is a neural tension test used to stress the femoral nerve and/or the mid-lumbar (L2 to L4) nerve roots. The femoral nerve tension test is used to filter for sensitivity to stretch soft tissue at the dorsal part of the leg, possibly related to root impingements.
Technique
The patient lies prone, and the therapist stands on the affected side and stabilizes the pelvis to support anterior rotation with one hand. On the different hand, the therapist then maximum flexes the knee to the end range. If no positive signals are noted in this position, the therapist proceeds to extend the hip while keeping knee flexion. The therapist might also add a few alterations to the test position to identify the nerve involved. The Lateral Femoral Cutaneous Nerve bias test contains prone lying with passive hip extension adduction and knee flexion whereas the Saphenous Nerve bias test contains prone lying hip extension, abduction and external rotation within knee flexion, ankle dorsiflexion, and eversion.
Normal response: Knee flexion permits the heel to touch the buttocks. A tug or a stretch is felt in the quadriceps. If unilateral pain is produced in the lumbar region, buttocks, and posterior thigh, between the ranges of 80 to 100 degrees of knee flexion in a combination of these regions, the test is assumed positive. The dura is tensioned between 80 and 100 degrees and positive conclusions in this range could also be indicative of a disk herniation affecting the L2, L3, or L4 nerve root.
Positive findings: secondary to a disc herniation can be differentiated from quadriceps problems established on the range in which pain is reproduced. If pain is produced before 80 degrees of knee flexion, quadricep tightness and/or injury could be the cause. Besides, if tightness lives, the pelvis rises on that side as the hip flexes in response to passive knee flexion. As a tight rectus femoris could also construct pain in the anterior thigh, therefore it is important to perform the test on both sides and compare the symptoms.
Straight Leg Raise (Sciatic nerve)
The Straight Leg Raise (SLR) test is a typically used test to identify impairment in disc pathology or nerve root irritation. It have also precise significance in detecting disc herniation and neural compression. It could also classify as a neurodynamic evaluation test as it can detect excessive nerve root tension or compression
The position of the lower limb is as follows:
- Supine
- Medial hip rotation, then flexion, with the knee extended
- Ankle dorsiflexion (tibial nerve)
- Ankle plantarflexion and/or foot inversion (common peroneal nerve)
- Hip adduction (sciatic nerve)
- Increasing hip medial rotation (sciatic nerve)
- Neck flexion (SC, meninges, and sciatic nerve)
This test puts tensile stresses at the sciatic nerve and of traction at the lumbosacral nerve roots primarily from L4 to S2. During Straight leg raise these nerve roots are pushed anteriorly and inferiorly pulling the dura mater is pulled caudally, laterally, and anteriorly. Pressure in the sciatic nerve occurs in succession as it pulls the sciatic foramen, then the sacrum and then the nerves that cross over the pedicles, and finally the intervertebral foramen. The pain or tenderness is often localized in the vicinity of the more prominent sciatic notch.
Testing of the sciatic nerve could also be done via combinations of four different positions to incriminate the sciatic, tibial, sural, and common peroneal nerves. All sciatic nerve tests form in the supine position and a straight leg raise (SLR) is performed, i.e. hip flexion, and knee extension. A piece of the tests would be deemed positive if the neurological symptoms are reproduced.
Technique
The traditional straight leg raise is a passive test. Each leg is tested separately with the unaffected leg being tested first. When performing the SLR test, the patient is positioned supine without a pillow under his or her head, the clinician stands at the tested side with the distal hand around the patient’s heel and proximal hand on the patient’s distal thigh(anterior) to preserve knee extension. The clinician raises the patient’s leg by the posterior ankle while maintaining the knee in a fully extended position. The clinician continues to lift the patient’s leg by flexing at the hip until the patient grumbles with pain or tightness in the back or back of the leg.
Crossed Straight Leg Test:
- The test is the same as the straight leg test, the difference being that it is performed on the leg and not influenced by pain
Results
- Positive: While executing the straight leg test on the unaffected leg the symptoms or pain are reproduced on the opposite (affected leg)
- Negative: no symptoms or pain is felt on the opposite leg
Note: the test has a sensitivity of 28% to 29% and a specificity of 88% to 90% for nerve root impingement
Seated Straight Leg Raise Test:
- The patient is seated on the exam table with knees bent to 90° and legs hanging freely
- The examiner gradually extends one knee from the 90° starting position
- Continue passively lengthening the knee until pain or reproduction of symptoms is achieved in the tested leg or full extension reached
Results
- Positive: reproduction of symptoms before reaching full extension
- Negative: no discomfort is felt by the patient upon maximal extension of the leg
Interpretation
- If symptoms are primarily back pain, it is considered likely the result of a disc herniation involving pressure on the anterior theca of the spinal cord, or the pathology causing the pressure to be more central. “Back pain only” patients who have a disc prolapse have more diminutive, more central prolapses.
- If pain is mostly in the leg, it is more likely that the pathology causing the pressure on neurological tissue(s) is more lateral.
- Disc herniations or pathology pushing pressure between the two extremes are more likely to cause pain in both areas
Slump Test (entire nervous system)
Although the slump test is used as an assessment process, it is also used as a treatment technique also. Physiotherapists employ tensioning and sliding techniques in the slump position and this is well worth trying if the slump test is favorable for tension in the nerve.
In a nerve-sliding position, two joints work simultaneously to counterbalance the forces involved in one joint. A nerve slide exercise could also involve actions at the head and neck and at the opposite end of the involved extremities. Nerve slides are commonly performed over 30 repetitions, and regularly throughout the day – as often as every hour if required.
purpose – The Slump Test is a neural tension test employed to detect altered neurodynamics or neural tissue sensitivity
Technique
position of the lower limb are as follows:
- Hands behind back
- Thoracic flexion
- Extend one knee
- Dorsiflex foot of the extended knee
- Cervical flexion
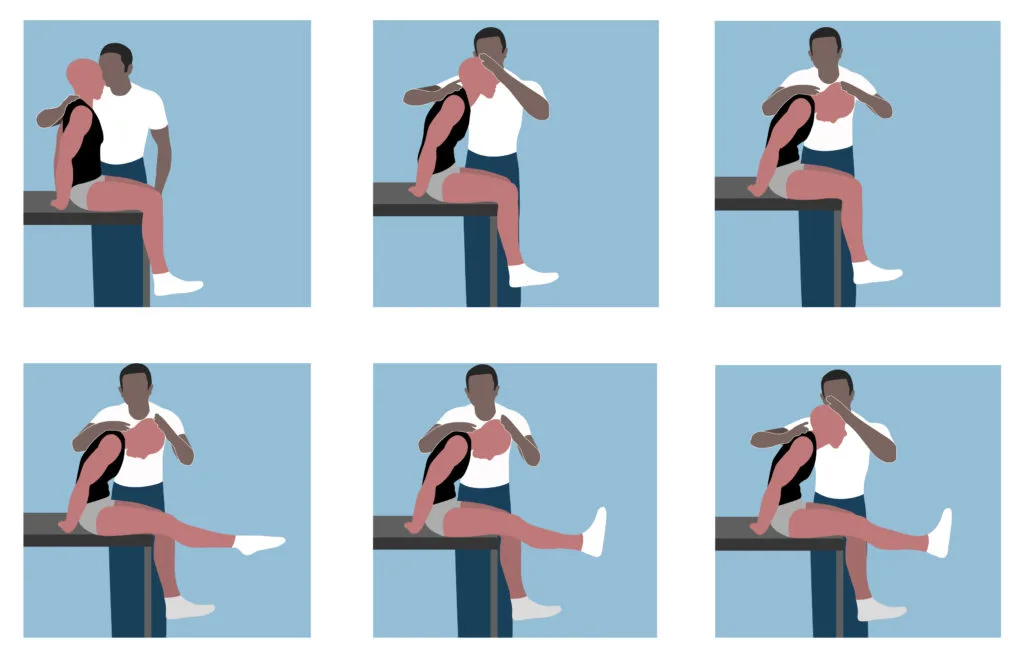
To start the test, have the patient seated with hands after the back to achieve a neutral spine. The foremost step is to have the patient slump forward at the thoracic and lumbar spine. If this position does not cause pain, have the patient flex the neck by putting the chin on the chest and then extending one knee as much as possible.
If raising the knee causes pain, have the patient extend the neck into neutral. If the patient is still unable to extend the knee due to pain, the test is assumed positive. If expanding the knee does not cause pain, ask the patient to actively dorsiflex the ankle. If dorsiflexion causes pain, have the patient barely flex the knee while still dorsiflexing. If the pain is reproduced, the test is regarded as positive. Repeat the test on the opposite side. Over-pressure can also be applied during any of the test positions.
For improved tension, the nerve may be held in one position by moving a single joint to produce a stretch. In this instance, the patient flexes their neck with their knees fully extended and extra pressure is applied by the patient or the therapist to generate the onset of symptoms. This position is then kept for 30 seconds and repeated five times. Nevertheless, it is considered more uncontroversial to work on the nerve slides (also referred to as ‘flossing’ or ‘nerve glides’) first before involving extra loading. At present, the analysis is limited as to whether the effectiveness of one technique is superior to another. Regardless, in terms of load, the sliding movements are more delicate and must be performed before the sustained slump stretch.
Self-test for neural tension and treatment
The ‘slump test is a test often used in physiotherapy clinics to identify neural tension, and it may also expose a back-related condition. The purpose is to involve tension in the neural web in a stage-by-stage process.
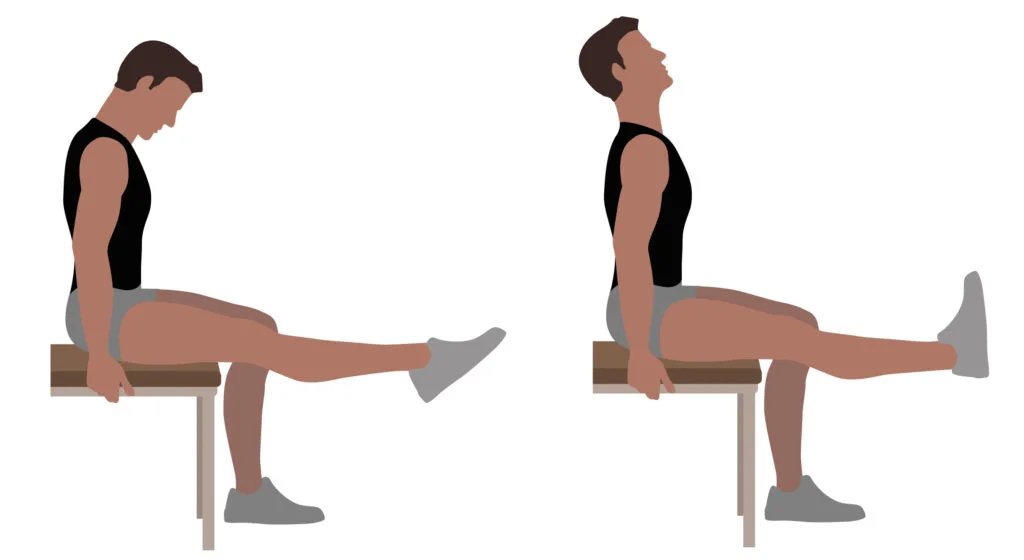
If back pain or associated leg symptoms happen at any point during the test, the stage of the test and associated knee or ankle joint inclinations are noted as well as the pain intensity. If tension is felt at any point during the test, the head may be raised to look forwards; if the tension-related symptoms decrease, this is a sign that there is some neural tension.
If, when the head is raised, the symptoms do not ease then this could be an indication that there is some muscle tightness present – possibly as a result of remote muscle shortening. The slump test is a sensitive test for determining intervertebral disc lesions but must not be used in isolation to determine whether a back injury is present.
Contraindications of Neural Tissue Tension Techniques
Neurodynamic testing is contraindicated when:
- Conducting a physical examination is inappropriate for either physical or psychosocial reasons.
- Intense pain in which the examination could unnecessarily provoke the patient’s symptoms.
- There is a weighty bias toward psychosocial issues.
- The pain is unstable, irritable, and hypersensitive.
Indications of Neural Tissue Tension Techniques
Neurodynamic testing is indicated when:
- The patient includes symptoms anywhere in the head, arms, neck, and thoracic spine.
- the symptoms are not painful and the problem is not easily provoked.
- Neurological symptoms are completely missing or only a minor part of the condition and those neurological symptoms are stable, not easily provoked, and intermittent.
- The problem is stable and not rapidly declining.
- The pain is not hurtful at the time of examination and there is no latency in terms of symptoms provoking.
Precautions
Unintentional aggravation of symptoms will be very rare if a comprehensive subjective examination was taken and the physiotherapist can link this information with knowledge of pathology. The following are the precautions:
- Physiotherapists should keep in mind that aggravating upper limb symptoms is much more comfortable than those in the lower limbs. This is because the nerves are weaker and have more complex courses in the upper limbs.
- The test is involving multiple joints and muscles. Hence, it is complex and it might be effortless to forget that one of these structures could get irritated during the test.
Progression
If neural tension is understood to be a problem, neural glides and slump stretches are used to reduce tension in the first instance. But while they can help produce significant improvements, for athletes such as runners and cyclists, nerve mobilizations that incorporate more ‘functionality’ are often needed to resolve symptoms during exercise completely. This involves exercise progression. For example, a neural stretch in a straight-leg position can be followed at a later date by ‘windmill stretches’ in a standing position.
Key Point
There is an acceptable bit of research to support the use of nerve mobilizations for musculoskeletal pain. Similarly, a biopsychosocial framework of manual therapy assists put into context the interconnected and multidirectional interaction between physiology, thoughts, emotions, behaviors, culture, and beliefs.
Conclusion
During body movement, there are inevitably relations between mechanical and physiological mechanisms of the nervous system. Mechanically, the nervous system acts in a non-uniform pattern which is determined by regional anatomical and mechanical characteristics as well as the combination and order of body movements. Mechanical effects exerted in neural tissues include sliding, elongation, tension, and alterations in pressure. Physiologically, the nervous system responds to mechanical stresses within variations in blood flow, axonal transport, and impulse traffic.
The term ‘neurodynamics’ may be employed to Charnley include the link between mechanical and protrusion physiological types of mechanisms. Neural tension tests should consequently be regarded as neurodynamic tests. This is because these procedures will evoke many mechanical and physiological responses in addition to tension so the word ‘tension” does 578-580. not encompass sufficiently enough the broad nature of responses produced by the tests. The term pathodynamics’ may be used in the presence of an abnormality, because pathomechanics may produce painful pathophysiological changes and both types of events must be included in clinical reasoning.
In the presence of neural dysfunction, a patient’s presentation will often reflect the nature of the path dynamics. Clinicians may attempt to link clinical presentation and treatment needs with hypotheses about the pathodynamics of a patient.
FAQ
What are Neurodynamic techniques?
A neurodynamic assessment considers the length and mobility of various components of the nervous system. They are conducted by the therapist placing progressively more tension on the component of the nervous system that is being tested and are divided into upper and lower limb tests.
What is Neurodynamic stretching?
Neurodynamics is a treatment that utilizes experimental stretching and positioning to treat “unhappy” nerve tissue with the stimulation of stretches. Neurodynamic stretching might not look like stretching at all. More precisely, it is possible to slide, glide, or floss the nerves in their sheaths to treat nerve pain
What is Neurodynamic?
Neurodynamics guides the communication between different parts of the nervous system and the relationship of the nervous system to the musculoskeletal system. It has been shown that the nerves move unaided by other tissues.
What is the Neurodynamic sliding technique?
The neurodynamic sciatic slider technique was performed by alternating hip flexion, knee flexion, and ankle dorsiflexion with hip extension, knee extension, and ankle plantarflexion while the subject’s cervical and thoracic spine were maintained in flexion. Movements were performed for 180 seconds on their predominant leg.
How long do nerve glides take to work?
Nerve tightness usually goes out gradually over six to eight weeks. After a few weeks, you should notice less pain or tingling, and you will probably have to extend your nerves more and further as you go. You must experience no tightness or soreness after six to eight weeks of constant and daily nerve glides.
How do you speed up nerve regeneration?
Electrical stimulation a week before surgery causes nerves to restore three to five times faster, leading to better outcomes.
What are Neurodynamic exercises?
Neurodynamic exercises use precise combinations of spine and limb movements that aim to relieve nerve mechanosensitivity and restore symptom-free limb movement and function.
How often should you do nerve glides?
Nerve gliding exercises can help reduce pain associated with cubital tunnel syndrome. Reprise these exercises once a day, three to five times per week, or as accepted.
How long does it take for nerve gliding to work?
After a few weeks, you should notice less pain or tingling, and you will probably have to extend your nerves more and further as you go. You should encounter no tightness or soreness after six to eight weeks of even and daily nerve glides.