Shoulder Calisthenic Exercises
What is Calisthenics exercise for the shoulder?
Shoulder strength is a gateway to performing harder, mastery-level skills in calisthenics for shoulders. If you don’t take the time to train the shoulders specifically, you won’t be able to successfully make progress. Whether you’re just getting started with body-weight training, or are a seasoned gymnast, you’re probably looking for more (or better) ways to target the shoulders.
This is why I’ve compiled a list of exercises that concentrate specifically on the shoulders. They’ll aid you to develop strength, become more conscious of how important a body part they are, and create a more muscular definition while you’re at it.
Here are some of the essential reasons why you should incorporate calisthenics shoulder exercises in your general workout regime.
To do calisthenics exercises for the shoulder, you need no tools. They are mostly body-weight exercises that need little to no equipment.
The calisthenics shoulder exercises are adaptable, you can perform them anywhere and anytime you like, even when you are on a vacation and have no tool with you. Some people add resistance bands to boost the intensity of the Calisthenics Exercise, however, it is optional and you can add resistance bands only if you want.
Calisthenics exercises do not only improve strength but also aid you to improve your posture.
So, all in all, you should perform the calisthenics shoulder workouts at home to tone muscles, and improve muscular endurance, balance, stability, and flexibility.
What are the Health Benefits of doing Shoulder Calisthenics?
Appearances aside, there are plenty of causes for you to consider putting your shoulders through a vigorous exercise program. These include, but are not limited to:
- More functional strength. It’s not only your biceps and forearms that perform the lifting, pushing, or pulling. Granted, today’s world is less physical than it used to be, but when something requires moving around the house, you’re going to need that strength. If your shoulders are needed, you’re going to feel it.
- Less neck and back pain. When the shoulders are weak, your body tries to compensate by putting your other muscles to use. This causes more strain than they are used to and is often the cause of chronic pain. By maintaining your shoulders strong, you’ll be cutting your back and neck muscles some well-needed slack.
- The ability to tackle more challenging exercises. Shoulders are the gatekeeper of calisthenics. A sure—or rather high in fact—level of shoulder strength is essential for a lot of calisthenics moves. If you want to boost your overall fitness, or perhaps master a calisthenics skill or two, you won’t be able to perform it for as long as you ignore your shoulders.
What are the Shoulder Calisthenics exercises?
Below is the list:
- Push-Ups exercise
- Shoulder Vertical Pulses Thumbs Up
- Static Handstand
- Bridge Push-ups
- Standing IYT Raises
- Pike Push up
- Handstand Push up
- Body-weight Lateral Raises
- Body-weight Rear Delt Row Or Incline Row
- Planche Push-up
- Feet Elevated Pike Push-up
- Wall Walks
- Isometric Handstand
- Shoulder Vertical Pulses Calisthenic Workout
- Incline push-up
- Crab walk
- Push-back push-up
- Plank to Down Dog
- Elevated pike push-up
- Plank-up
- Plank to alternate pike
- Diving push-up
- Kneeling table pullover
- Inverted row face pull
- Dips
- Shoulder taps
- Side plank twists
- Pseudo planche push-up
- Inverted row
- Walkouts
- Hindu push-up
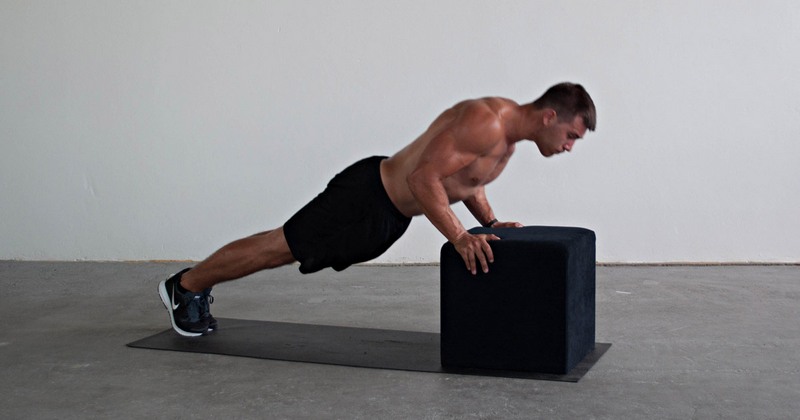
Push-Ups

To start, you need to come on all fours or hands and knees pose.
Make sure the hands are positioned shoulder-width apart and the arms are straight.
The torso should be slightly rounded and the abs are tight.
The legs are flexed slightly at the hips and knees with the knees and toes resting on the ground. Your hips are slightly in front of the knees and not directly above them.
Lower your body down by flexing your elbows to more than 90 degrees till your torso is around 1 inch above and parallel to the floor.
The knees and toes rest on the ground throughout and the low back and abs should be tight.
Come up by tensing the triceps and extending the elbows.
Shoulder Vertical Pulses Thumbs Up
Stand tall with your arms held wide open. Set your feet shoulder-width apart.
Do a fist with the thumbs pointing up.
Now draw your arms up and down through a small amplitude a few times.
Static Handstand
Come on your hands, body straight up in the air. Balance and maintain this cause. For assistance, utilize a wall and lean against it.
Pause for the desired amount of time, usually a range between 20 seconds and a full minute.
Bridge Push-ups
Start by laying on the floor, belly up. Get into bridge pose – hands and feet on the ground, back rounded in space.
Flare your elbows out for a comfortable motion. Bring your torso down to the ground by bending your elbows.
Your legs will move some but don’t permit your glutes and lower body to relax on the ground. Push back up.
Standing IYT Raises
Stand tall with your feet shoulder-width apart and arms straight at your sides, the palms facing the body.
Brace your core and keep your flat back. That’s the start.
Lift your arms straight over your head until your fingertips are facing the roof, pause and then lower your arms to the beginning. That’s “I” raise.
Now, keeping your arms straight, lift them slightly outward in a “Y” shape until your fingers face toward the roof. Hold for a moment and then lower your arms to the beginning. That’s “Y” raise.
To perform the “T” raise, lift your arms straight out to the sides until they are aligned to the ground. Pause for a moment, squeeze deltoids and then return your arms to the beginning. Now, you have done 1 repetition.
Perform three sets of 6 to 8 repetitions each with 1-2 minutes rest between a set.
You can also utilize a weight or resistance band to make this exercise more effective.
Pike Push up
Sit on your knees, place your hands on the ground shoulder-width apart and raise your knees off the floor and hips upward so your body creates an inverted V position.
Keep the abdominal muscles tight; hold up your hips and thighs. This is your beginning position.
Lower yourself toward the ground between your hands until your head nearly touches the floor. You’ll experience the contraction in your shoulders.
Pause for a couple of seconds, concentrate on your shoulders and then press your arms back to the starting position. That’s one rep!
Do as many reps and sets as possible.
Handstand Push up
With the support of the wall, stand on your hands (hip to shoulder-width apart and fingers pointing toward the wall) and keep your arms extended. That is your beginning position.
You are keeping your core tight and your feet on the floor, slowly lowering your head toward the floor as low as possible.
Hold for a moment, and then press back to return to the beginning. That’s one rep.
Do as many sets and reps as possible.
Practice each repetition in a slow and controlled motion.
Body weight Lateral Raises
First of all, grasp a soft towel and place it over your left elbow.
Stand straight with your left shoulder facing toward the wall.
Slightly lean on your left side, flex your elbow and place it on the wall at your stomach level, your entire left arm will be on the wall. That’s the start.
Engaging your lateral deltoid, slide the arms up to your shoulder height. You’ll experience the contraction of your deltoids.
Hold a moment at the top and slide reversely to return to the start. That’s one rep.
Perform three sets of 8 to 10 repetitions each.
Body weight Rear Delt Row Or Incline Row
Anchor the towel securely on top of the door (with the door closed).
Standing in the hip-width stance, grasp the ends of the towel with a neutral grip.
Keeping your back flat, slightly lean backward with the arms straight in front of you and palms facing each other. This is the beginning position.
Pull the towel as you row the body in the forward position. You’ll experience the contraction in your upper back and rear delt when pulling yourself in a rowing movement.
Pause for a couple of seconds, and then back your body to the start. That’s one rep!
Perform three sets of 8 to 10 reps each with as little rest as possible between sets.
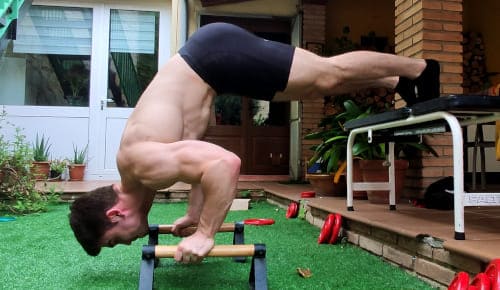
Planche Push up
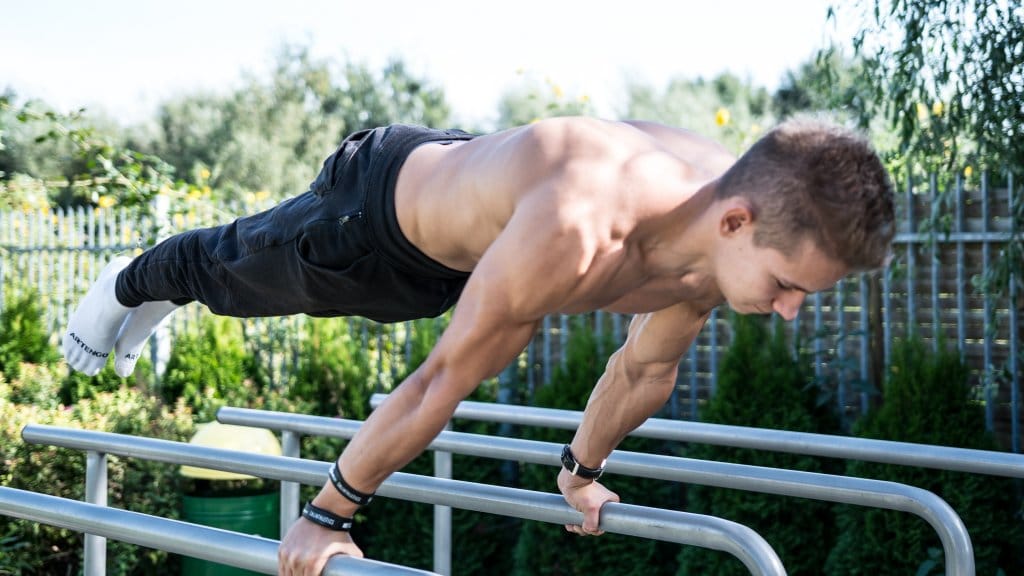
Lie prone on the ground with your arms straight at your sides, palms on the ground, and hands beside your hips.
Rotate your wrists so the fingers face slightly outward.
Press into the ground through your hands until your arms are extended and your body is in an “up” position of a pushup.
Brace your abdominal muscle, and pressing into the ground, raise your legs off the floor. Now, you’re in planche pose.
Flex your elbows, and lower your torso toward the floor as low as possible.
Hold for two seconds, feel the contraction and then press back until your arms are straight. That is your one repetition.
Practice as many sets and reps as possible.
Do each repetition in a slow and controlled fashion.
Feet Elevated Pike Push up
Put your feet on an elevated surface and arms on the floor, and lift your hips high so your body forms an inverted V position.
Lower yourself towards the ground (feeling the tension in your shoulders) until your face nearly touches the ground.
Pause for a moment and rise back up, and repeat this motion for the desired number of sets and reps.
Do each rep in a controlled manner and focus on your deltoids during the entire motion.
Wall Walks
Come into the high plank position with your feet against the wall (soles touching the wall surface).
Begin walking up on the wall as you bring the body closer to the wall.
Walk until you’re in the handstand pose if possible.
Reverse the steps to return to the beginning. That’s one rep!
Practice as many sets and reps as you like.
Keep your whole body engaged, back straight, and do each rep slowly and efficiently.
Isometric Handstand
All you need to do is raise your body weight on your hands. You might not struggle with hand motion but you will struggle to hold your balance.
The best way to master a perfect handstand is by utilizing the support. Some people begin with wall support or support from an individual while others can do it without support.
For better results, ensure to hold your position for at least 10 to 20 seconds.
Shoulder Vertical Pulses Calisthenic Workout
Stand tall with your feet hip to shoulder-width apart and keep the arms straight out to the sides, parallel to the floor.
Do a fist with your thumbs should be out and pointing upside.
Keeping the shoulder engaged, move your arms down several times.
Once you complete the downward motion, perform upward.
Perform as many times as possible.
Incline push-up
Begin in a plank position with hands shoulder-width apart and elevated on a bench or box. Lower your chest toward the box, then utilize your chest and triceps to push back up to the starting position.
You should experience more activation in the lower fibers of your chest muscles with an incline push-up than with a traditional push-up on a flat surface.
Perform 3 sets of 10–12 reps.
Crab walk
Sit on the ground with knees bent, feet shoulder-width apart, and palms on the ground behind you with fingers pointing forward. Engage glutes and raise hips off the ground, making a table shape with your body.
Walk forward with the right foot and left hand, then with the left foot and right hand. Walk forward for the specified number of steps, then reverse the motion and crab walk backward to the beginning position.
Do 2–3 sets of 15–20 steps.
Push-back push-up
Begin in a push-up position but with feet a bit wider than shoulder-width. Brace your core and lower your body toward the ground, leading with your chest. Instead of pushing straight up from the ground as you would in a regular push-up, push your torso back toward heels. As the upper body goes back, flex legs and let hips rise as the upper body comes back to meet them.
Your last position will look like an elevated Child’s Pose. Keep your spine elongated. Drive through your legs back to the starting position.
Do 3 sets of 12–15 reps.
Plank to Down Dog
Begin in a plank position with arms straight, core braced, and shoulders, neck, hips, and ankles in line.
Exhale and you raise your hips, transferring your weight back and aiming to form a straight line from wrists to hips, before lowering back into the beginning position.
Do 5 sets of 20 reps
Elevated pike push-up
Elevate your feet on a chair, table, bench, or box and begin in Downward Dog, with hands wider than shoulder-width and fingers facing forward.
Flex elbows and inhale as you slowly lower your head until it nearly touches the ground. Arms should take the form of a goal post, and elbows shouldn’t track out past wrists.
Exhale as you push back up, extending arms but not locking elbows.
Do 2 sets of 10 reps.
Plank-up
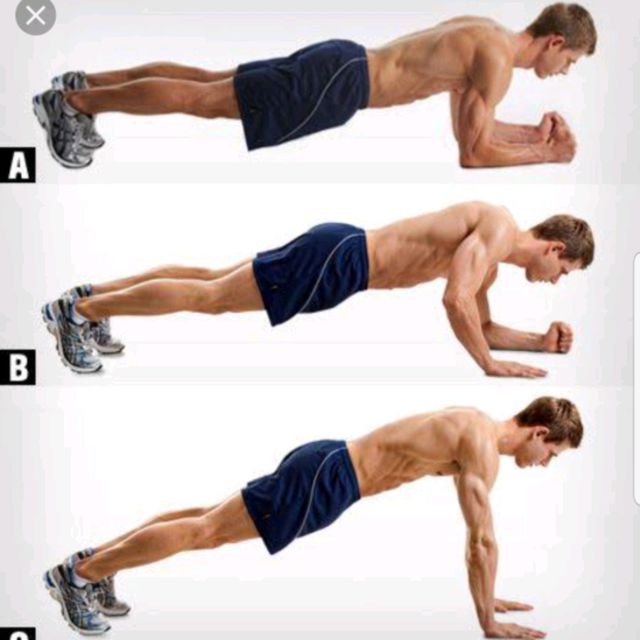
Begin in a plank position on your elbows (straight line from heels to shoulders).
Keeping core tight, place the palm of one hand on the ground and push up, following with the other arm until you’re in a push-up position.
Lower yourself back to the elbow plank pose, one arm at a time.
Upward with both arms and downward with both arms is 1 rep.
Do 3 sets of 10 per side
Plank to alternate pike
Begin in a plank position.
Transfer your weight to your right hand while lifting your hips to the roof and reaching for your right toe with your left hand.
Inhale while dropping hips and back to plank position.
Repeat on the opposite side. That’s 1 rep.
Do 3 sets of 10 reps.
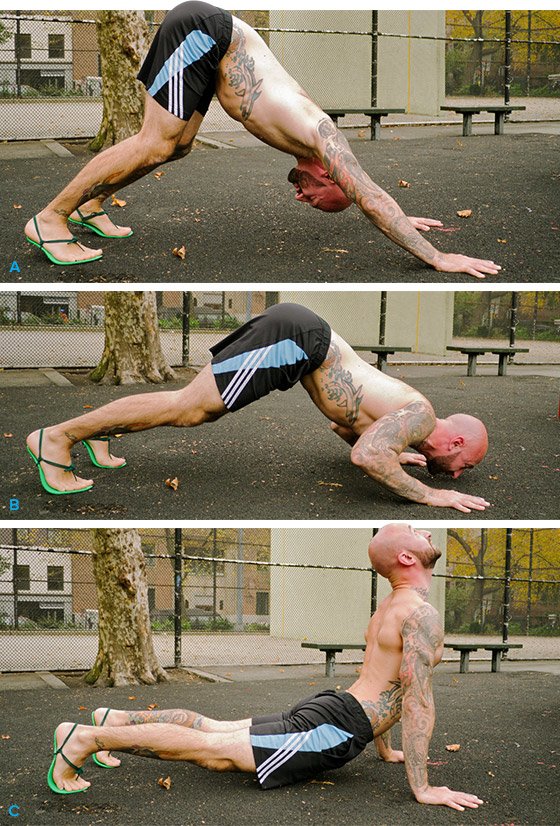
Diving push-up
Begin in Downward Dog, with hands and feet on the ground and hips high.
Lower your chest toward the ground, bending at the elbows, then pull your chest up and straighten your arms as you bring your hips to the floor (similar to Upward Dog).
Lift hips back up while bringing chest back to the floor, extending arms to back to Down Dog.
Do 3 sets, 30 seconds each.
Kneeling table pullover
Kneel in front of a table, put your hands on the side of the table, and slide backward until you’re in a forward lean.
Arms should be slightly flexed and extended above your head, and your core should be tight, with the spine locked.
Press against the table to begin the pullover, moving the torso up until hands are at about eye level.
Slowly return to the beginning position in a slow, deliberate motion.
Do 2 sets of 7–10 reps.
Inverted row face pull
Lie below a table or another firm surface.
Grab the table with hands placed slightly more narrow than shoulder-width and in line with the eyes.
Pull up, bringing your face to the table and contracting deltoid muscles at the top before slowly back to the starting position.
Do 3 sets of 10–12 reps.
Dips
Standing between a set of dip bars with arms extended, grasp the dips using a neutral grip.
Slightly lean forward and with elbows tucked, flex elbows and lower yourself down until you reach 90 degrees.
From here, push up and back to the starting position.
Shoulder taps
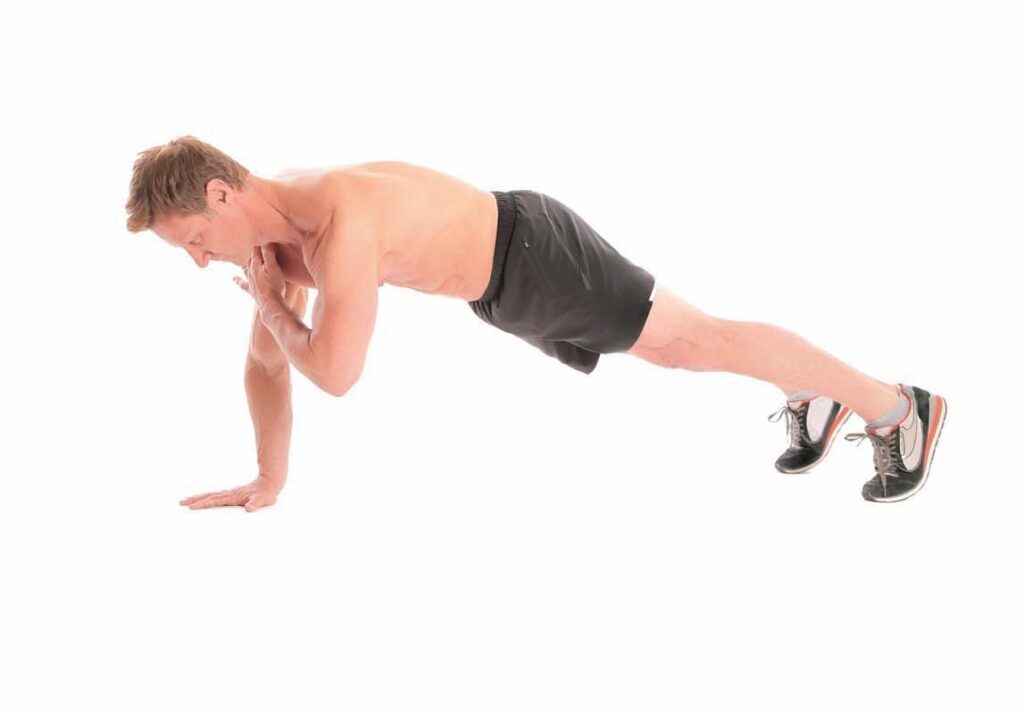
Set yourself up in the push-up pose with feet shoulder-width apart and hand under shoulders with arms straight.
To start, take a deep breath, engage your core, and raise one hand to tap the opposite shoulder.
Return your hand to the ground and repeat with the opposite hand.
Side plank twists
To start, position yourself on your side with one hand placed on the ground, feet together.
With the other hand, raise it out to the side and into the air.
To begin the motion, bring your top hand down underneath the body and twist the torso.
Once your hand reaches just behind the body, twist back up and return the arm to the upright position.
Do for both sides.
Pseudo planche push-up
Near a wall, assume the push-up pose, with the top of the head facing toward the wall.
Keep weight on toes and hands placed at the chest line just wider than shoulders, pushing through the shoulders, making a hollow body shape.
Lean forward toward the wall with the head gently making contact.
To begin the motion, bend your elbows and lower toward the ground.
Inverted row
Place up a bar barbell on a squat rack just below chest height.
Standing on the inside of the rack, grab the bar just outside shoulder-width.
Walk legs out underneath until the body is straight and your chest is at the bar line.
Arms should be extended, with the weight resting in heels.
To start, pull the chest toward the bar until it makes contact.
Squeeze scapulae together, lower. Repeat.
Walkouts
From the standing position, flex forward at the hips and place hands on the ground.
Walk your hands forward until your body is aligned with the floor.
Walk hands back toward feet and stand back up to the upright pose. Repeat.
Hindu push-up
To start, place hands and feet on the ground, angling hips into the air.
Lower your head toward the ground, scooping at the bottom.
Push up and lift your head to the ceiling.
Once the motion is completed, push yourself back to the starting pose. Repeat.