
Adho Mukha Svanasana (Downward-Facing Dog): Health Benefits, How to do ?- Variations
What is Adho Mukha Svanasana (downward-facing dog)?
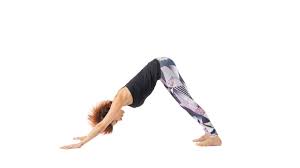
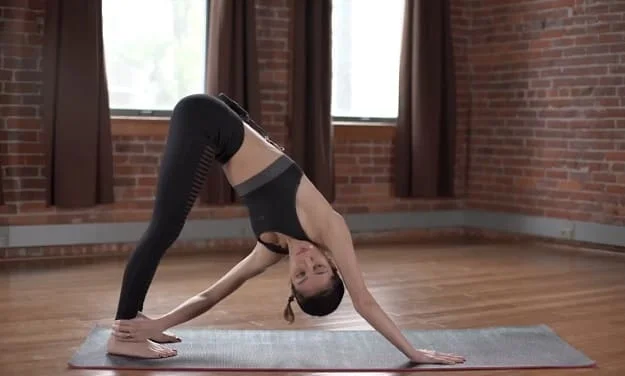
Adho mukha svanasana also called Downward Dog Pose or Downward-facing Dog Pose, is an inversion asana, often practiced as part of a flowing sequence of asanas, especially Surya Namaskar, the Salute to the Sun. The asana is commonly used in advanced yoga as exercise. The asana does not have formally named alternatives, but several playful variants are used to help beginning practitioners become comfortable in the pose.
Downward Dog stretches the calf and hamstring muscles in the backs of the legs and improves strength in the shoulders.
Downward Dog has been known as “deservedly one of yoga’s most widely recognized yoga poses” and the “quintessential yoga pose”. As such it is often the pose of choice when yoga is depicted in film, literature, and advertising. The posture has frequently seen in Western culture, involving in the titles of novels, a painting, and a television series, and it is mentioned in the commercial name, “YOG?”, of a fold able computer.
What are the Health Benefits of Adho Mukha Svanasana?
Like many popular yoga poses, a downward dog brings a multitude of benefits to the body, mind, and spirit. However, you won’t enjoy the full boons of these benefits if you are doing the pose improperly. We’ll get to that part in a minute, but let’s first see the reasons why the downward dog should be an important component of your practice:
- Reduces stiffness in the back and shoulders.
- Stretches the shoulders, hamstrings, calves, arches in the feet, and the heels.
- Strengthens the legs, arms, and wrists.
- Opens the abdomen and ribs.
- Gives energy to the body.
- Relieves stress and calms the mind.
- Fights feelings of depression.
- Soothes discomfort from headaches, menstrual cramps, back pain, and fatigue.
- Aids in the treatment of asthma, high blood pressure, and sciatica pain.
- Stimulates blood circulation.
- Downward Dog is a great posture to rest the spine between strong back bends and forward bends.
- With practice, Downward Dog can eventually become a rest pose to aid you in reconnecting with your breath during strong Vinyasa or Ashtanga yoga classes.
What are the Preparatory poses for Adho Mukha Svanasana?
- Cat Pose
- Cow Pose
- Tadasana (Mountain Pose)
- Dhanurasana
- Dhandasana
- Puppy Pose
- Plank Pose
- Uttanasana (Standing Forward Bend)
How to do Adho Mukha Svanasana (downward-facing dog)?
Come onto your hands and knees, with your hands a little bit in front of your shoulders and your knees directly under your hips. Spread your palms, touching down through all four corners of your hands, and turn your toes under.
Exhale and raise your knees from the floor, at first keeping your knees slightly flexed and your heels lifted off the ground.
Elongate your tailbone away from the back of your pelvis, raise the sitting bones toward the ceiling, and move your inner legs from your inner ankles up through your groins.
On exhale, push your upper thighs back and stretch your heels toward the ground.
Extend your knees without locking them.
Firm your outer arms and press the bases of your index fingers actively into the ground.
Raise your inner arms from the wrists to the tops of the shoulders.
Firm your scapulae against your back, then widen them and move them toward your tailbone.
Maintain your head between your upper arms.
Hold the pose for 10 or more breaths, then flex your knees on an exhalation and lower yourself into Child’s Pose.
How to do Adho Mukha Svanasana (Downward Dog Pose) by watching a video?
What are the Follow-up Asanas after the Adho Mukha Svanasana (Downward Dog Pose)?
- Ardha Pincha Mayurasana
- Chaturanga Dhandasana
- Urdva mukha svanasana
- Child’s Pose (Balasana)
What are the Beginners’ Tips for Performing Downward Dog?
Downward dog can take a bit of practice, but there are a few simple tips to aid make it easier for beginner yogis to perform, such as:
- Make small motions. You don’t have to spring up into a pose after getting on all fours. Smaller motions may be more accessible for beginners—for example, coming onto your forearms first like a modified plank before slowly straightening out your legs. You can also utilize yoga blocks to prop up your hands and make it easier to complete the stretch.
- Change your heel placement. If extending your legs while keeping your back erect is challenging, you can modify your heel position for relief. Rather than keeping your heels flat on the floor, allow them to rise off of the mat naturally. When you’re ready to deepen the stretch, you can try slowly drawing your heels down onto the mat.
- Use a chair. Downward dogs can be strenuous on the body if you have less flexibility. For a modified version, try a forward flex in front of a chair, utilizing the seat to leverage your arms and hold your body at a wide “V” angle. Slowly move your feet back until you feel the stretch.
- Keep your knees flexed. When you straighten your legs for this stretch, avoid overextending or locking your knees, which can put unnecessary strain on the joints or lead to injury. Keep your legs as straight as possible while maintaining a slight flex in the knee to ensure adequate stability.
- Avoid tucking your tailbone. Your back should be erect for the entirety of this stretch. Tilt your pelvis forward to keep your spine erect and prevent you from rounding your back.
- You can work on the posture by practicing against a wall. Stand facing the wall around a meter / 3 feet away with your legs hip-distance apart. Put your hands on the wall (use the same arm rotation as in the steps above). Walk your hands down the wall until your upper body and arms are parallel to the floor.
What are the Props and Modifications for Downward Dog Pose?
The pose can be varied by flexing the knees, allowing the heels to raise slightly; by supporting the heels, such as with a rolled-up yoga mat; by lowering one forearm to the ground, extending the other hand forward; and by combinations of these.
Modified Dog Pose: Performing downward dogs on the ground can be tricky. Since standing up is a more natural position, doing downward dog this way can be a big help in mastering the move.
Look for a wall and stand about 3 feet away from it (far enough that you can fully straighten your arms in front of you).
Position your hands on the wall at shoulder height with fingertips pointing upwards. Lean your body toward the wall at an angle while keeping your arms extended.
Keeping your hands where they are, draw your hips back while you start to lower your head and torso toward the floor. Continue to move down as far as you can and hold that pose while pulling in your stomach and breathing slowly.
Continue to do this exercise until you feel confident enough to take it to the ground.
- If you have very tight hamstrings, you cannot be able to keep your butt high and extend your legs at the same time. If that’s the case, it’s okay to keep a slight flex in your knees. Your hamstrings will lengthen over time with the daily practice of other poses.
- You can put a yoga block under your head to do a restorative version of the pose. For greater comfort, you can also utilize a block under your hands or a folded towel under your wrists.
- You can deepen the pose by raising your heels slightly from the floor and placing the weight on the balls of your feet. Draw in your pelvis and then return your heels to the ground.
- Anyone with sensitive wrists or Carpal Tunnel Syndrome, try holding onto a rolled towel beneath their palms in this posture.
- Other modifications include flexing one knee and lowering the hip on that side; alternately “pedaling” by flexing one knee and raising the ankle on that side, then the other, and then hooking each foot in turn behind the other ankle; lifting one leg, either stretching it straight out, or flexing the knee, and flexing and extending the foot; alternating between bending both knees and extending the legs while bringing the shoulders forward directly above the hands; and twisting the body, reaching back with one hand to grab the opposite ankle.
- A variety of props can be used to help in Downward Dog. For example, the posture can be supported with a strap from a secure waist-level wall anchor around the hips, or with a bolster under the forehead—combined if needed with a rolled blanket or towel under the feet.
- The posture can also be modified with the back horizontal and the hands on top of the back of a chair, giving less pressure on the shoulders; this is useful for people with an injury.
- For more concentration on the arms, loop a belt around your arms, just above the elbows, and press against the strap. Same for the legs. Position a belt on your upper legs above the knees and work on active legs drawing your thighs outwards.
What are the Variation of Adho Mukha Svanasana?
There is some variation of the Downward Facing Dog:
- Downward Facing Dog Walk-Out
- Three-Legged Downward Facing Dog to Plank
- Three-Legged Downward-Facing Dog Knee to Nose
- Downward Facing Dog Scorpion Kick
- Downward Dog with Transverse Twist
- One-arm Downward Dog
- Puppy Pose
- Figure Four Down Dog
- Dolphin Pose
- One-arm One-leg Downward Dog
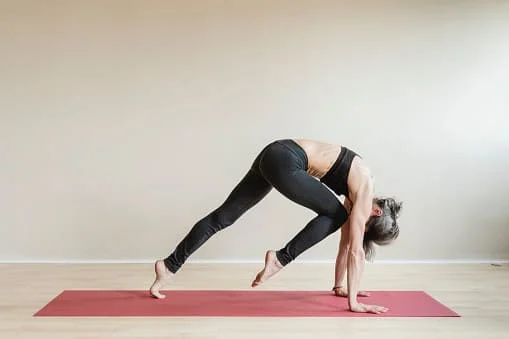
Downward Facing Dog Walk-Out
Walking out your hands from a forward fold position will aid deepen the stretch in your inner arms and opening up your shoulders. Take your time when you initiate to bring your hands back towards your toes, so you can feel the stretch in the backline of your legs.
How to: Stand in tadasana with your feet together, facing forward.
Slightly flex your knees and bend your torso over your legs into a forward fold position.
Place your hands on the floor in front of you and walk your left hand forward and then your right hand until you’re in a downward-facing dog position with your hips raised high towards the ceiling.
Compress your hands firmly on the mat and your shoulders against your back.
You should feel a stretch in your hamstrings and calves as your spine lengthens.
Walk your hands back out to a forward fold pose.
Three-Legged Downward Facing Dog to Plank
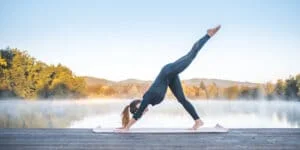
This variation on all fours will activate all 360 degrees of your core, as well as strengthen your hamstrings and glutes.
How to: From the downward dog position, raise your right leg off the ground, forming a 90-degree angle to the floor.
Keep your hips square as you raise your leg, and your right foot flexed.
While keeping your right leg raised, transfer your weight forward until your shoulders are directly stacked above your wrists in a plank position.
Take three breaths. Return to the downward dog position and put your right foot back to the ground before alternating sides.
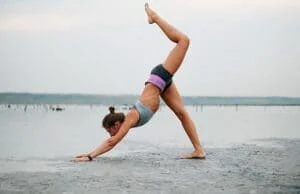
Three-Legged Downward-Facing Dog Knee to Nose
You’ll challenge your balance and improve your stability with this posture as you bring your knee in for a crunch. Your lower abs will get some lovin’, too, with the kick at the beginning of this motion.
How to: Get into a downward dog pose with your shoulders behind your ears, hands firmly pressed on the floor, and heels planted. Keeping your hips square, raise your right leg off the ground with your foot pointed, forming a 90-degree angle to the ground.
As you begin to shift your weight into a plank position, round your back and tuck your chin to draw your knee towards your nose. Take three to five breaths before releasing your right foot back down to the downward dog position.
Repeat the same motion on the left side.
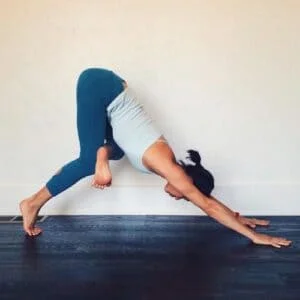
Downward Facing Dog Scorpion Kick
The key to nailing this challenging position is to move with control and engage your transverse abdominal muscles as you slightly twist your hips. This downward dog variation assists open up your quads and hip flexors, as well as lengthening the spine, Focus on your breathing with this pose.
Inhale as you straighten your leg high and exhale as you flex your knee.
How to: From the downward-facing dog position, raise your left leg with your left foot pointed to hip height.
Keeping your hips and shoulders square, flex your left knee and rotate it, stacking your left hip on top of your right.
Hold this position for three to five breaths before bringing your left foot back down to the ground.
Repeat on the right side.
Downward Dog with Transverse Twist
This downward dog is a special twist (pun intended) on your core, engaging your lower ab and oblique muscles. It opens up your shoulders and increases your arm flexibility. You’ll feel a stretch on your sides.
How to: Come into downward-facing dog position.
Start to shift some of your weight on your left side as you lift your right hand off the ground.
Draw your right hand over to your left side and reach for your left outer calf, thigh, or underneath your heel (depending on your level of flexibility).
Deepen the rotation by holding this posture for three to five breaths and relaxing your neck.
Return your right hand to the ground in a downward-facing dog position before switching sides.
Tips for Twisted Downward Dog Pose:
- Widen and shorten your stance.
- Root down through the index finger and thumb.
- Keep your knees flexed and use your legs.
- Transfer your hips center.
- Externally rotate your upper arm.
One-arm Downward Dog
This Single-Arm Down Dog pose will give you a killer workout for your arms and core.
How to: Begin in Tabletop Pose with your left arm outstretched in front of you, palms facing inward.
Tuck your toes, and raise your knees to come into Downward Dog.
Repeat on the opposite side.
Puppy Pose
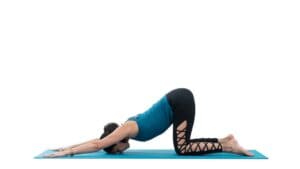
Also called Half Down Dog, Puppy Pose is an excellent variation to Down Dog when you’re looking for a more restorative rest pose. Puppy Pose will open up and stretch your spine, back, shoulders, and abs.
How to: Start in Tabletop Pose.
To begin, move your hands forward and draw your ribs in toward your back body instead of sinking your belly.
Let your forehead rest on the ground and keep your forearms rising off the mat.
Press the tops of your feet into the floor and keep your hips stacked on top of your knees.
To sink lower, let your chest melt toward the ground and let your arms rest down on the mat, palms facing inward.
Place on your chin if this is comfortable for your neck.
Figure Four Down Dog
This Down Dog variation is an awesome hip opener and core strengthener. It’s also a great way to expand your body in preparation for Eka Pada Galavasana, or Flying Pigeon Pose.
How to: Start in Downward Dog Pose.
Rest your left ankle on top of your right thigh and let your left knee wing out to the left side in a “figure 4” shape.
Keep your hips raised, spread your sitting bones high, and lift your right heel.
On an exhale, compress your heart toward your thighs.
Repeat on the other side.
Dolphin Pose
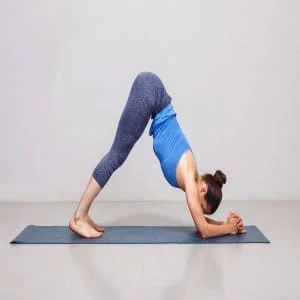
Dolphin Pose is a full-body opener and strengthener that is a perfect variation to Down Dog if you have sensitive or sore wrists, or want to prepare for more challenging poses such as Forearm Stand.
How to: Start in Tabletop Pose and lower your forearms to the ground, ensuring your arms are shoulder-distance apart.
Put your elbows a bit narrower than your shoulder’s distance and turn your palms out slightly.
Tuck your toes and lift your hips up and back.
Firm your forearms in as you spread your scapulae wide.
Press your inner wrists down into the mat.
One-arm One-leg Downward Dog
Also called Balancing Downward Dog, this Down Dog alternative with one arm and one leg balancing will test your core strength and stability while firing up your arm muscles.
How to: From Down Dog, step your feet together and reach your left leg back.
Come up onto your right fingertips, draw your belly in, and reach your right arm back alongside your body.
Stay strong in your midpart and breathe.
Repeat on the opposite side.
What are the Common Mistakes you make while performing Adho Mukha Svanasana?
There are certain common mistakes you shouldn’t make during Downward Dog Pose:
Not Releasing Your Heels
The most common issue with beginners’ Downward Facing Dog is that they don’t release their heels toward the ground. If you are up on the balls of your feet, it shifts the trajectory of the pose forward instead of back. It will never be a resting pose unless you take your weight back into your heels.
This doesn’t mean that the heels have to touch the ground; they just have to be drawing in that direction. If your teacher gives you an adjustment in this pose, it’s most often to gently pull or push your hips back. Keep that feeling in mind and utilize it to adjust yourself.
Butt Position
To get your butt in the right position, flex your knees, coming up onto the balls of your feet (just for a minute!). Draw your belly to rest on your thighs and your sit bones up high. Then sink your heels and extend your legs while keeping the high upward rotation of the sit bones.
Banana Back
If you are very flexible, try not to let your rib cage sink towards the ground, creating a sinking spine (also known as a banana back). Draw your ribs in to keep a flat back.
Foot Position
The toes should be pointing toward the front of your mat. It’s quite common for newcomers to want to turn their feet outward, especially if they’ve had dance training.
The distance between the feet can also be troublesome. Very often, newcomers take them too wide (near the edges of the mat) or too narrow (touching one another).
The feet should be hip-width apart, which leaves around 6 inches of space between them, give or take a bit depending on your size. Set up the feet correctly, let go of the heels, and keep your butt high, and you’ll have a good foundation for this pose.
What are the Safety and Precautions for Downward Dog Pose?
Proper form and technique are important to ensure the safety and effectiveness of a yoga practice.
- This pose isn’t suggested if you have a wrist injury or carpal tunnel syndrome.
- If you are in the last trimester of pregnancy, then avoid this pose.
- It should also be prevented if you have high blood pressure, heart disease, vertigo, or a slipped disc in your spine.
- If you have a previous or pre-existing health issue, consult your physician before practicing yoga.
- Yoga positions may be modified based on your individual needs.
- Those with weak or stiff back muscles, tight hamstrings, sciatica, or knee issues will want to practice Downward Facing Dog gently, easing in and out of the posture while keeping the knees flexed and back straight.
- Ensure the knuckle of the first finger is firmly pressed down, to protect your wrists.
- Transfer your weight back into the hips.
- If you are hyper-mobile, prevent locking your elbows by keeping a micro-bend in your arms.
- Check if you are hunching up your shoulders – try shaking and nodding your head to keep the base of your neck relaxed.
What are the Contraindications for Adho Mukha Svanasana?
There is some contraindications for Adho Mukha Svanasana:
- People suffering from uncontrolled high blood pressure, detached retinas, weak eye capillaries, or any other infection or inflammation of the eyes and ears should avoid practicing Downward Facing Dog.
- Also, those with recent or chronic inflammation/injury to the arms, shoulders, wrists, back, hips, legs, knees, or ankles will want to wait until returning to health before practicing the pose.
What are the Disadvantages of Downward Dog?
The main disadvantages of downward dogs come from improper positioning. Anyone who fails to perform this pose correctly will soon realize the error of their ways as they feel serious pain and discomfort in the neck, shoulders, back, legs, arms, and wrists. A silly mistake made by a beginner can often lead to injury, but even veterans can be guilty of a misstep here and there.
It’s about preventing tension in the arms and shoulders, keeping the head from hanging loose, and preventing pulling a muscle in your back or shoulder.
9 Comments