LOWER LIMB MUSCLE LIST:
MUSCLES LIST :
MUSCLE OF GLUTEAL REGION :
| Muscle Name | Origin | Insertion | Nerve Supply | Blood Supply | Action |
| Gluteus maximus | outer surface of ilium, sacrum, coccyx, sacrotuberous ligament | iliotibial tract and gluteal tuberosity of femur | inferior gluteal nerve | inferior gluteal artery | extends & laterally rotates thigh; through iliotibial tract, it extends knee joint |
| Gluteus minimus | outer surface of ilium | greater trochanter of femur | superior gluteal nerve | Superior gluteal artery, | abducts thigh.anterior fibers medially rotate thigh |
| Gluteus medius | outer surface of ilium | greater trochanter of femur | superior gluteal nerve | inferior gluteal artery | abduct thigh;Tilts pelvis when walking |
| tensor fasciae latea | iliac crest | iliotibial tract | superior gluteal nerve | superior gluteal artery , lateral circumflex femoral (LCF) artery | assists gluteus major in locking the knee into full extension |
| Piriformis | anterior surface of sacrum | greater trochanteric fossa | 1st & 2nd sacral nerves | Superior gluteal artery | lateral rotator of thigh |
| Superior gemellus | spine of ischium | greater trochanteric fossa | sacral plexus | Internal pudendal artery, inferior gluteal artery | lateral rotator of thigh |
| Obturator internus | inner surface of obturator membrane | greater trochanteric fossa | Nerve to obtur internus (L5, S1, S2) | inferior gluteal artery | abducts & laterally rotates the extended |
| Inferior gemellus | ischial tuberosity | greater trochanteric fossa | sacral plexus | Medial circumflex femoral artery | lateral rotator of thigh obturator externus |
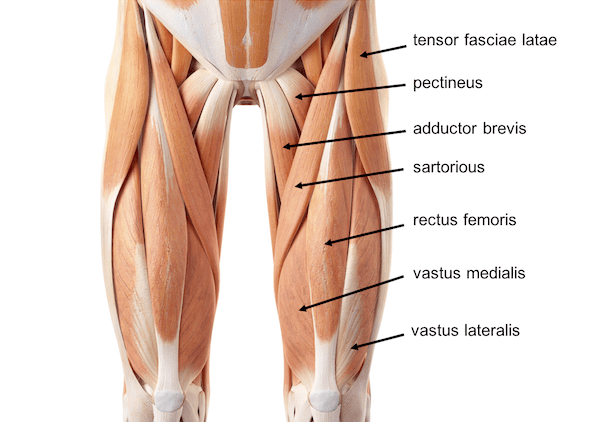
ANTERIOR COMPARTMENT OF THIGH :
| MUSCLE NAME | ORIGIN | INSERTION | NERVE SUPLLY | BLOOD SUPLLY | ACTION |
| Sartorius | anterior superior iliac spine | upper medial surface of tibia | femoral nerve | superficial circumflex iliac, lateral femoral, deep femoral, descending geniculate, and femoral arteries. | flexes, abducts, laterally rotates thigh; flexes & medially rotates leg |
| Iliacs | iliac fossa | with psoas into the lesser trochanter of femur | femoral nerve | internal iliac artery | flexes thigh on trunk; if thigh is fixed, it flexes the trunk onto the thigh as in sitting up |
| Psoas | 12th thoracic body; transverse process, bodies & intervertebral discs of the 5 lumbar vertebrae | lesser trochanter of femur along with iliacus | lumbar plexus | lumbar branch of iliolumbar artery | flexes thigh on trunk; if thigh fixed, it flexes trunk onto thigh as in sitting |
| Pectineus | superior ramus of pubis | upper end shaft of femur | femoral nerve | Obturator artery | flexes and adducts thigh |
| Rectus femoris | straight head from anterior inferior iliac spine; reflected head from ilium above acetabulum | quadriceps tendon into patella; into tibial tuberosity by patellar tendon | femoral nerve | Femoral, lateral femoral circumflex, superficial circumflex iliac arteries | extension of leg |
| Vastus lateralis | upper end and shaft of femur | -quadriceps tendon into patella; into tibial tuberosity by patellar tendon | femoral nerve | Lateral circumflex femoral artery | extension of leg |
| vastus medialis | upper end and shaft of femur | quadriceps tendon into patella; into tibial tuberosity by patellar tendon | femoral nerve | lateral circumference femoral artery | extension of leg |
| Vastus intermdius | shaft of femur | quadriceps tendon into patella; into tibial tuberosity by patellar tendon | femoral nerve | lateral circumference femoral artery | extension of leg |
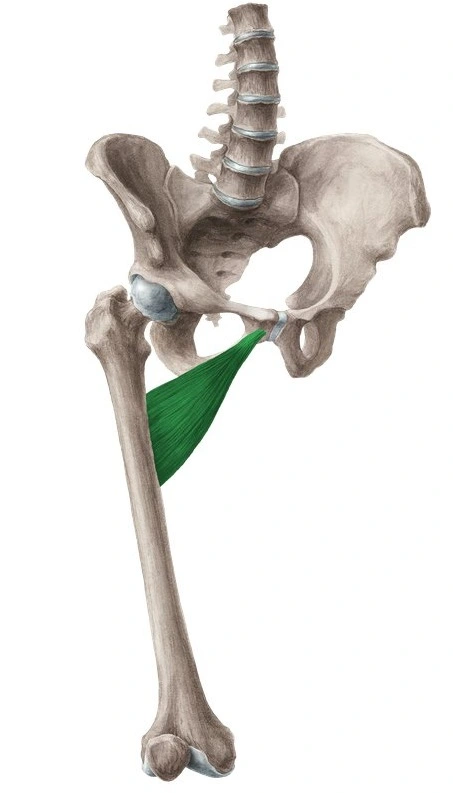
MEDIAL COMPARTEMENT MENT OF THIGH:
| MUSCLES NAME | ORIGIN | INSERTION | NERVE SUPLLY | BLOOD SUPPLY | ACTION |
| Gracilis | inferior ramus of pubis; ramus of ischium | upper part of shaft of tibia on medial surface | obturator nerve | medial circumflex femoral artery. | adducts thigh and flexes leg |
| Adductor longus | body of pubis | posterior surface of shaft of femur | obturator nerve | deep femoral artery | adducts thigh; assists in lateral rotation |
| Adductor brevis | inferior ramus of pubis | posterior surface of shaft of femur | obturator nerve | deep femoral artery | adducts thigh; assists in lateral rotation |
| Adductor mangus | inferior ramus of pubis; ramus of ischium, ischial tuberosity | posterior surface of shaft of femur near linea aspera; adductor tubercle of femur | obturator nerve; tibial nerve to hamstring part | Deep femoral artery; Femoral, popliteal and genicular arteries | adducts thigh and assists in lateral rotation; hamstring part extends thigh |
MUSCLE OF POSTERIOR COMPARTMENT OF LEG:
| MUSCLES NAME | ORIGIN | INSERTION | NERVE SUPPLY | BLOOD SUPPLY | ACTION |
| Biceps femoris | long head from ischia l tuberosity; short head from shaft of femur-head of fibula | long head:tibial; short head:common peroneal-flexes and laterally rotates leg; long head extends thigh | deep femoral artery | Inferior gluteal artery, perforating arteries, popliteal artery | Hip joint: thigh extension, thigh external rotation; Knee joint: leg flexion, leg external rotation; stabilizes pelvis |
| Semitendinosus | ischial tuberosity | upper part medial surface of shaft of tibia | tibial nerve | sciatic nerve L5, S1, S2) | flexes and medially rotates leg; extends thigh |
| Semimembranosus | ischial tuberosity | medial condyle of tibia; forms oblique popliteal ligament | tibial nerve | Profunda femoris and gluteal arteries | flexes and medially rotates leg; extends thigh |
| Adductor mangusAdductor mangus | ischial tuberosity | adductor tubercle of femur | tibial nerve | Deep femoral artery; Femoral, popliteal and genicular arteries | extends thigh |
MUSCLE OF ANTERIOR COMPARTMENT THIGH:
| MUSCLE NAME | ORIGIN | INSERTION | NERVE SUPPLY | BLOOD SUPPLY | ACTION |
| Tibialis anterior | shaft of tibia and interosseous membrane | medial cuneiform & base of first metatarsal | deep peroneal nerve | Anterior tibial artery | extends the foot; inverts foot at subtalar and transverse tarsal joints; supports medial longitudinal arch |
| Extensor digitorum | shaft of fibula and interosseous membrane | extensor expansion of lateral four toes | deep peroneal nerve | Posterior interosseous artery, radial recurrent artery, anterior interosseous artery | extends toes; dorsiflexes (extends) foot |
| Peroneus tertius | shaft of fibula & interosseous membrane | base of 5th metatarsal bone | deep peroneal nerve | anterior tibial artery | dorsiflexes (extends) foot; everts foot at subtalar and transverse tarsal joints |
| Extensor hallucis longus | shaft of fibula & interosseous membrane | base of distal phalanx of big toe | deep peroneal nerve | Anterior tibial artery | extends big toe; dorsiflexes (extends) foot; inverts foot at subtalar and transverse tarsal joints |
MUSCLE OF LATERAL COMPARTMENT OF LEG:
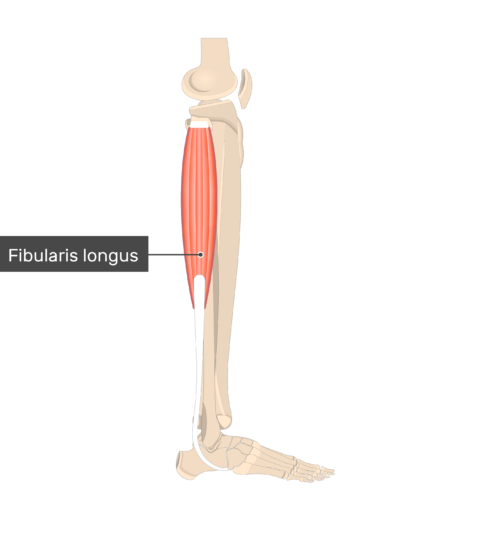
| MUSCLES NAME | ORIGIN | INSERTION | NERVE SUPPLY | BLOOD SUPPLY | ACTION |
| Peroneus longus | shaft of fibula | base of 1st metatarsal & medial cuneiform | superficial peroneal nerve | Fibular artery | plantar flexes foot; everts foot at subtalar & transverse tarsal joints; supports lateral longitudinal and transverse arches of foot |
| Peroneus brevis | shaft of fibula | base of 5th metatarsal bone | superficial peroneal nerve | Anterior tibial artery | plantar flexes foot; everts foot at subtalar & transverse tarsal joints; supports lateral longitudinal arch |
MUSCLE OF POSTERIOR COMPARTMENT OF LEG:
| Muscle name | Origin | Insertion | Nerve supply | Blood supply | Action |
| Gastronemius | medial and lateral condyles of femur | by way of Achilles tendon to calcaneum | tibial nerve | popliteal artery | plantar flexes foot; flexes leg |
| Plantaris | lateral supracondylar ridge of femur | calcaneum | tibial nerve | lateral sural and popliteal arteries D superior lateral genicular artery | plantar flexes foot; flexes leg |
| Soleus | shafts of tibia and fibula | by way of achilles tendon into calcaneum | tibial nerve | tibial and peroneal arteries | with gastrocnemius & plantaris is powerful plantar flexor of foot; provides main propulsive force in walking & running |
| Popliteus | lateral condyle of femur | shaft of tibia | tibial nerve | Popliteal Artery | flexes leg; unlocks full extension of knee by laterally rotating femur on tibia |
| Flexor digitorum longus | shaft of tibia | distal phalanges of lateral four toes | tibial nerve | popliteal artery | flexes distal phalanges of lateral four toes; plantar flexes foot; supports medial and lateral longitudinal arches of foot |
| Flexor hallucis longus | shaft of fibula | base of distal phalanx of big toe | tibial nerve | medial plantar artery | flexes distal phalanx of big toe; plantar flexes foot; supports medial longitudinal arch |
| tibialis posterior | shafts of tibia and fibula & interosseous membrane | tuberosity of navicular bone | Tibial nerve | posterior tibial artery | plantar flexes foot; inverts foot at subtalar and transverse tarsal joints; supports medial longitudinal arch of foot |
MUSCLE ON THE DORSUM OF THE FOOT:
| MUSCLE NAME | ORIGIN | INSERTION | NERVE SUPPLY | BLOOD SUPPLY | ACTION |
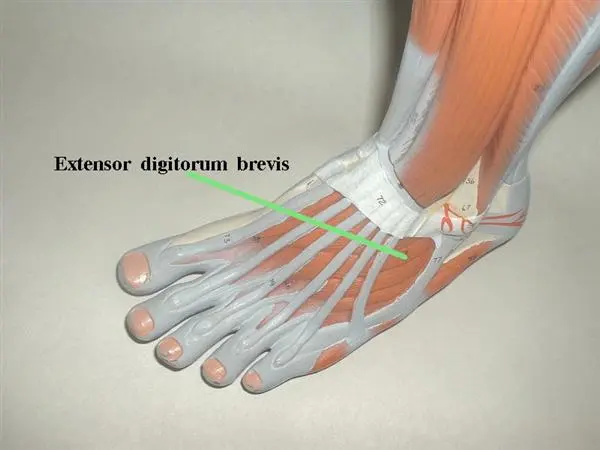
| Extensor digitorum brevis | calcaneum | by four tendons into the proximal phalanx of big toe and long extensor tendons to 2nd, 3rd, and 4th toes | deep peroneal nerve | Anterior tibial artery | extends toes |
MUSCLES OF THE SOLE OF THE FOOT(FIRST LAYER):
| MUSCLE NAME | ORIGIN | INSERTION | NERVE SUPPLY | BLOOD SUPPLY | ACTION |
| Abductor hallucis | medial tubercle of calcaneum; flexor retinaculum | medial side, base of proximal phalanx of big toe | medial plantar nerve | lateral plantar artery | flexes, abducts big toe; supports medial arch |
| Flexor digitorum brevis | medial tubercle of calcaneum | middle phalanx of four lateral toes | medial plantar nerve | Medial and lateral plantar arteries and plantar arch, plantar metatarsal and plantar digital arteries | flexes lateral four toes; supports medial & lateral longitudinal arches |
| Abductor digiti minimi | Calcaneal tuberosity, plantar aponeurosis | Base of proximal phalanx of digit 5, metatarsal bone 5 | Lateral plantar nerve (S1-S3) | Lateral plantar artery | Metatarsophalangeal joint 5: Toe abduction, toe flexion; Supports longitudinal arch of foot |
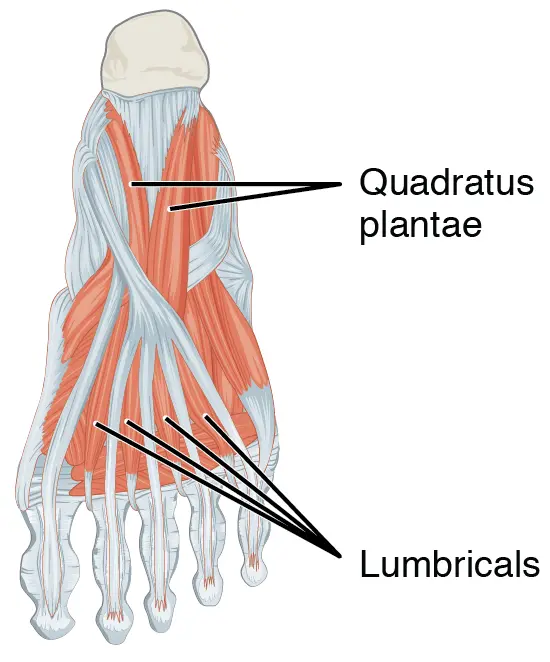
MUSCLES OF THE SOLE OF THE FOOT(SECOND LAYER):
| Muscle name | Origin | Insetion | Nerve supply | Blood supply | Action |
| Flexor accessorius | medial and lateral sides of calcaneum | tendons flexor digitorum longus | lateral plantar nerve | First metatarsal artery (plantar arch); superficial branch of the medial plantar artery (posterior tibial artery) | aids long flexor tendon to flex lateral four toes |
| Flexor digitorum longus tendon | shaft of tibia | base of distal phalanx of lateral four toes | tibial nerve | posterior tibial artery | flexes distal phalanges of lateral four toes; plantar flexes foot; supports longitudinal arch Lumbricals |
| lumbricals | tendons of flexor digitorum longus | dorsal extensor expansion of lateral four toes | 1st lumbrical from medial plantar; remainder lumbricals from deep branch of lateral plantar nerve | superficial palmar arch, the common palmar digital artery, the deep palmar arch, and the dorsal digital artery. | extends toes at interphalangeal joints |
| Flexor hallucis longus | shaft of fibula | base of distal phalanx of big toe | tibial nerve | Posterior tibial artery, fibular artery | flexes distal phalanx of big toe; plantar flexes foot; supports medial longitudinal arch |
MUSCLES OF THE SOLE OF THE FOOT(THIRD LAYER):
| Muscle name | origin | insertion | Nerve supply | Blood supply | Action |
| Flexor hallucis brevis | cuboid, lateral cuneiform bones; tibialis posterior | medial & lateral sides of base of proximal phalanx of big toe | medial plantar nerve | medial plantar artery | flexes metatarsophalangeal joint of big toe; supports medial longitudinal arch |
| Adductor hallucis(oblique head) | bases of 2nd, 3rd & 4th metatarsal bones lateral side base of proximal phalanx big toe | Lateral aspect of base of proximal phalanx of great toe | deep branch of lateral plantar | Lateral plantar artery | flexes big toe, supports transverse arch |
| Adductor hallucis(transverse head) | plantar ligaments | lateral side of base of proximal phalanx big toe | deep branch of lateral plantar nerve | Lateral plantar artery | flexes big toe; supports transverse arch |
| Flexor digiti minimi brevis | base of 5th metatarsal bone | lateral side of base of proximal phalanx of big toe | superior branch of lateral plantar nerve | Lateral plantar artery | flexes little toe |
MUSCLES OF THE SOLE OF THE FOOT(FOURTH LAYER):
| Muscle name | Origin | Insertion | Nerve supply | Blood supply | Action |
| Dorsal interossei(4) | adjacent sides of metatarsal bones | bases of phalanges and dorsal expansion of corresponding toes | lateral plantar nerve | Lateral plantar artery | abduct toes with 2nd toe as the reference; flex metatarsophalangeal joints; extend interphalangeal joint |
| Plantar interossei(3) | 3rd, 4th, and 5th metatarsal bones | bases of phalanges & dorsal expansion of corresponding toes | lateral plantar nerve | Lateral plantar artery | adduct toes with 2nd toe as reference; flex metatarsophalangeal joints; extend interphalangeal joints |
Strengthening exercise of muscles:
Gluteal muscle strengthening :
1.Donkey Kicks:

Donkey kicks are one of the best ways to strengthen and fire the “butt”. Get on all your fours and then lift one leg behind, keeping the knee bent at 90 degree angle. Do 8–10 repetitions from one leg and then change. You can do 2–3 sets.
This exercise can be done after your run as part of a strengthening session. Be sure to keep your back straight throughout the movement with minimal swaying around. Keep the abs engaged. Also make sure the kicks are generated from the glutes instead of any other muscle group.
2.Squats:
which targets a lot of muscle groups — abs, glutes, quads. It is one of the fantastic exercises to strengthen the glutes. According to Journal of Strength and Conditioning Research, squats may help runners in uphill running and with correct running form, thus minimizing injuries.
Do them with or without weights. Perform 2–3 sets of 10–15 squats. Important things to REMEMBER while performing squats, which most of us ignore is that –
a. Keep the back straight at all times.
b. Look straight.
c. Knees should not go ahead of toes at any point during the whole movement.
Try the following variations in squats –
a. With dumbells.
b. With barbell and weight plates.
c. With kettle bells.
d. With resistance bands.
e. Body weight squats.
3.Lunges:
Lunges is another great exercise to strengthen glutes. It is in fact part of my daily warm up routine. I borrowed this lunge routine from Coach Jay Johnson, who calls it the Lunge Matrix.
Lunge Matrix Video
Stand straight and then take a long step forward. Bend down in a lunge, keeping in mind that the knee doesn’t cross your toes. Do 8–10 repetitions and 2–3 sets. There are many varieties of lunges — front, side, back; all targeting different gluteal muscles.
4.Glute Bridge:
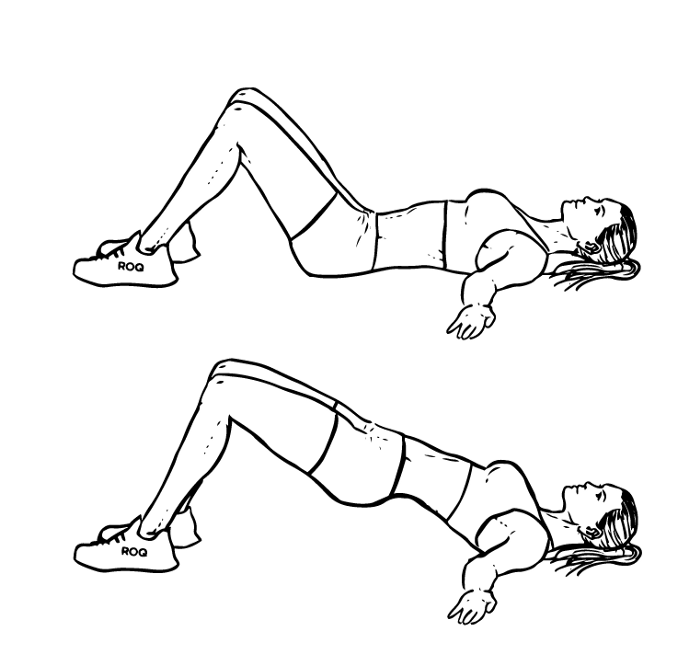
Glute Bridge
Another one of the amazing exercises to strengthen glutes. Apart from activating the glutes, it also strengthens the abs and the lower back. There are also a number of variations which includes dynamic movements to make this exercise harder.
Hold the pose as long as possible and gradually increase time. Remember to keep the spine straight and knees together for maximum benefit.
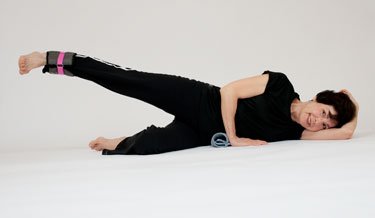
5.Clam Shells:
Clam shells activate and strengthen gluteus medius and minimus which are located at the outer hip. Lie down on your side with the knees
bent at 90 degree angle. Something like being in a glute bridge position but on your side.
Open your knees till about 45 degree and close again. Repeat it 8–10 times and then change sides.
QUADRICEPS STRENGTHENING EXERCISE:
- Straight Leg Raise:
Lying flat on your back, tighten your quadriceps muscles and lift your leg about a foot off the floor, keeping your knee locked. Hold for a second, and then lower the leg. Aim for two sets of 15 repetitions two to three days a week.
2.Quad Set:
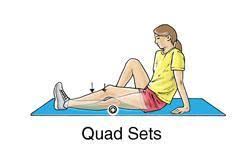
Sit with your legs outstretched and your arms slightly behind you. Push your knees down to the floor, tightening your quadriceps muscles, and hold for five seconds. Do two sets of 15 repetitions two to three days a week.
3.Lying Quad Stretch:
Lying on your back near the edge of a bed, bend your right leg, keeping your right foot flat on the bed. Hang your left leg over the edge, keeping the leg relaxed and your thigh resting against the bed. Hold for 10 to 15 seconds, and then repeat with the opposite leg. You can do this exercise daily. As a more advanced option, bend your knee back while keeping your thigh against the bed.
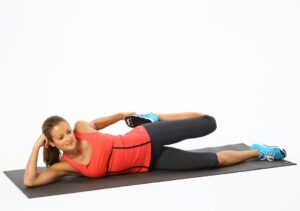
3.Side-Lying Leg Raise:
Lie on your side, with your hips, knees, and feet stacked in a straight line. Rest your top arm in front of you, and use your hand to maintain your balance. Keeping the top leg straight, lift it up to hip height and hold it there for a count of two to three seconds; then, slowly lower your leg. Aim for two sets of 15 repetitions at least two days a week.
4.Bridging:
While lying on your back, tighten your lower abdominal muscles, squeeze your buttocks, and raise your buttocks off the floor or bed. Hold for five seconds. Aim for two sets of 15 repetitions at least two days a week.
HAMSTRING STRENGTHENING EXERCISE:
1.Hamstring Sets:
Why Do This: This hamstring strengthening exercise is the perfect place to start, especially after an injury as it doesn’t require any knee movement. It is very easy to control how hard you work the hamstrings by changing how hard you push the heel down.
Hamstring Sets – a great way to strengthen the hamstrings without needing to move the leg
Starting Position: Lie flat on your back or propped up, with your knee slightly bent and your heel On the floor/mat.
Action: Press the back of your heel firmly down. You should feel the muscles in the back of your thigh tightening. Hold for 5-10 seconds and relax.
2.Knee Bends:
Why Do This: This exercise gets the hamstrings working as the knee bends, making it functional but without putting much force through the muscles or the knee Knee bends are a simple way to start strengthening the hamstrings. Perfect after an injury
Starting Position: Stand upright holding on to a chair or table for balance.
Action: Lift your foot back behind you bringing it up towards your glutes as high as you can. Hold for 3 seconds and slowly bring the foot back down to the floor.
3.Ball Squeezes:
Why Do This: Using a ball with hamstring strengthening exercises is a great way to activate the hamstrings, work them harder and gain more control around the knee.
Ball squeezes are a great way to activate the hamstrings and improve the control around the knee
Starting Position: Stand, holding onto a table or chair with a soft, inflated ball in the crook of your knee, leg bent behind you.
Action: Squeeze the ball by bringing your heel towards your glutes and hold for 3 seconds, then relax.
Progression: Start as above but as you hold the squeeze on the ball, bring your whole leg forwards until your hip is at a right angle (90) and then back behind you as far as you can without moving your upper body. Keep the squeeze on the ball throughout.
Theraband Hamstring Strengthening:
Theraband is a specially designed elastic band that provides graded resistance to exercise. It is available in a range of resistance levels (each a different colour) so it is very easy to gradually progress the hamstring strengthening exercises, so the same exercise can be done just with different resistance levels as you get progressively stronger.
Make sure you can happily do the beginners hamstring strengthening exercises before you try these, particularly if you are recovering from an injury, and start with a low resistance band, such as tan or yellow. Theraband is a really effective, yet simple and cheap tool to make hamstring strengthening exercises more challenging and fun.
1.Seated Theraband Hamstring Strengthening:
Theraband is a great tool to use with hamstring strengthening exercises
Starting Position: Tie one end of the theraband to something sturdy directly in front of you such as a table leg. Fasten the other end of the band around your ankle and sit in a chair with your leg out in front of you.
Action: Slowly slide your heel back, bending the knee. As the tension increases through the theraband, you should feel the hamstrings working harder. Hold for 3-5 seconds and slowly bring the foot forwards
2.Prone Theraband Knee Flexion:
Theraband is a great tool to use with hamstring strengthening exercises
Starting Position: Tie the theraband so it forms a loop and hook it round the foot of your good leg and the ankle of the leg you want to work. Lie on your stomach with your legs out straight
Action: Bring your heel towards your bottom pulling against the theraband as far as you can. Hold for 3-5 seconds and slowly lower the leg
Bridging Exercises:
Purpose: These bridging exercises are all great, progressive hamstring strengthening exercises that also work the glutes. The glutes and hamstrings work together with activities such as running and climbing stairs so it is really good to work them both together. These hamstring strengthening exercises get progressively more challenging so start at the beginning and work through as able.
1)Simple Bridge:
Bridging is a great way to strengthen the hamstrings and glutes
Starting Position: Lie flat on your back with your knees bent and feet flat on the floor. Your feet and knees should be hip distance apart – a good way to do this is to start with the feet together, turn the toes out making a “V” shape and then follow with your heels. To check the distance between your knees, you should just be able to fit your fist between your knees. Tighten your abdominal muscles slightly to engage your core and stabilise your lower back.
Action: Clench your glutes and slowly lift your buttocks up off the floor as high as you can without arching your back – you are aiming for there to be a diagonal line from your knees down to your hips. Hold for 3 seconds and slowly lower.
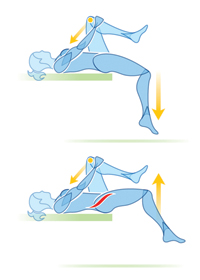
2)Single Leg Bridge:
Starting Position: As with the simple bridge.
Bridging stage 2 for the hamstrings
Action: Lift up into a bridge position as with the simple bridge but as you hold the bridge position, lift one foot off the floor and extend the knee as shown. Hold for 3-5 seconds, bring the foot back down, and then lower the buttocks to the floor.
Progressions: 1) Keep up in the bridge position throughout, alternating from side to side which leg you stretch out. Gradually build up the number of reps you do between each time you fully lower your buttocks down to the floor.
2) Change the starting position so one leg is extended out off the floor, then perform the bridging action using only one leg.
3.Roller Bridging:
Bridging exercises on a roller is a great strengthening exercise for the hamstrings and glutes
Having a foam or air roller underneath your feet as you do these hamstring strengthening exercises makes your hamstrings and core work much, much harder – beware of cramp – it’s a good idea to make sure you have stretched the muscles out before doing hamstring strengthening exercises on a roller.
Simple Bridge With Roller: Exactly the same as the simple bridge above but performed with the roller under your feet.
Single Leg Bridge With Roller: Again, as with the single leg bridge above but performed with the roller under your foot.
CALF STRENGTHENING EXERCISE:
1.Double-Leg Calf Raise:
Calf raises are the classic calf-strengthening exercise. They use your body weight to strengthen and tone the gastrocnemius and soleus.
Starting position: Stand near a wall for balance. Place your feet hip-width apart, and make sure your ankles, knees, and hips are in vertical alignment to protect your joints
Action: Press down into the balls of both feet to raise your body upward. Keep your abdominal muscles pulled in so that you move straight upward, rather than shifting your body forward or backward.
2.Single-Leg Calf Raise:
You can increase the intensity of the calf raise by doing it on one leg. That way you can strengthen your calf muscle even more.
Starting position: Stand on one leg near a wall for balance with the other leg bent behind you. Be sure the ankle, knee, and hip of the leg you’re working are in vertical alignment to protect the joints.
Action: Press down into the ball of your foot to raise your body upward. Keep your abdominal muscles pulled in so you avoid shifting forward or backward.
3.Seated Calf Raise.
You can do this exercise at home or at the gym on a calf exercise machine. The exercise works both the gastrocnemius and soleus.
Starting position: Sit on a firm, sturdy chair with your feet flat on the floor. Keep your knees aligned directly over your feet. Don’t let your knees turn in or out. Lean forward placing hands on thighs near knees pushing down to add resistance.
Action: Press slowly down into the balls of your feet to raise your heels as high as you can. Next, slowly lower your heels. Repeat.
4.Calf-Building Sports:
Taking part in the following sports will help you both strengthen and tone your calves.
Running, walking, and hiking are excellent calf-strengthening exercises, especially when you go uphill. The steeper the climb, the more your calves have to work.
Running sports such as soccer, basketball, and tennis demand that you run, jump, and push off your calf muscles to accelerate or change direction quickly. So they’re great for toning calves.
Step class and other kinds of dance will work your calves every time you step up and down or bend your knees and push off going from high to low positions.
Swimming works the calves along with the rest of the legs muscles. It also avoids the impact of running or jumping. Because it’s low-impact, it’s also a safe way to strengthen calves if you’re recovering from an injury.
If you’re overweight and want the look of toned calves, you may want to add a safe weight loss program that includes diet and exercise. You can’t spot-reduce any part of your body.
Sartorius Strengthening Exercise:
Bridge with Thera-band resistance:
Wrap Thera- band around the thighs just proximal to the knee.
Supine position + flexion of the knees and hip
Elevate the pelvis, with in the meantime abduction and external rotation of the hips.
It’s important to avoid adduction and internal rotation while lowering the hip.
3 sets of 15 repetitions
2) Clamshells with thera-band resistance
Sidelying, flexion of hip and knee in 45°, holding feet together
Raise knees up and back + hip abduction and external rotation
Use theraband as resistance if patient is able to perform 3 sets of 15 repetitions without resistance.
3 sets of 15 repetitions.
Squat with Thera-band resistance:
Wrap Thera-band around the thighs just proximal to the knee.
Execute a squat maneuver to a dept of 45° (later 75°) with back s
3 sets of 15 repetitions
2) Side-step with Thera-band resistance.
Wrap Thera-band around the thighs just proximal to the knee
Squat position, 45° hip and knee flexion.
Iliacs Strenghting exercise:
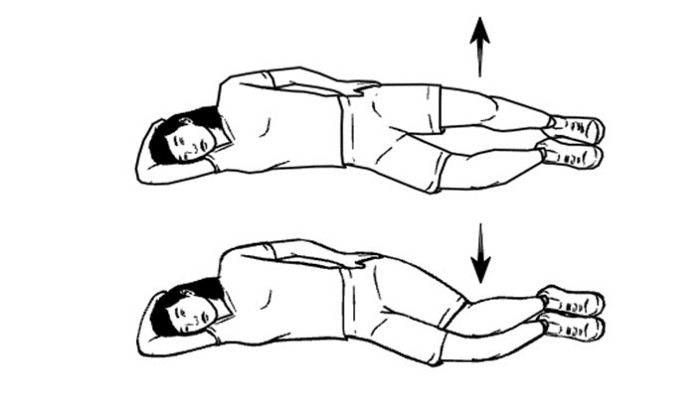
Straight Leg Raise: Lying on your back, lifting one leg up while keeping your knee straight, then slowly lower leg back done. Make sure you don’t arch your lower back during the exercise.
Leg Lifts/Straight leg raise: Lift your feet off the floor and bend your hips to 90°. Keep your knees slightly bent throughout. There are several different variations to this exercise – it can be done as a hold by keeping your feet hovering about 2cm off the ground for as long as possible, or add ankle weights to increase the difficulty. This exercise requires good core stability to perform it safely. If you haven’t got great core strength, or can’t do the exercise without arching you lower back then don’t perform the exercise.
Psoas Strenghting exercise:
Lunge Stretch Psoas Muscle:
Lunge Stretch: Start in a lunge position, with the hip you are stretching as the back leg. Move your hips and torso as far forward as you can and make sure your back knee doesn’t slide forwards. Keep your torso upright and chest forwards. You can add more of a stretch by incorporating an anterior pelvic tilt – by tucking your buttocks underneath you and moving your pelvic bone towards you.
Standing Hip Flexion Psoas Muscle Strengthening:
Standing Hip Flexion: Start in standing with your one leg slightly behind you and a theraband or pulley around your ankle while the other point fixed behind you. Lift your leg up so that your hip and knee are bent to 90°, then lower back down. Keep your hips level throughout the movement.
Pectineus Strenghting exercise:
Wide leg squat:
These squats targe:t your adductors, quadriceps, and glutes. Use a resistance band around your thighs to increase the resistance and keep your body in alignment.
Stand with your feet wider than your hips.
Slowly lower your hips down as far as you can.
Pause in this position, engaging your inner thighs.
Return to the starting position.
Do 2 to 3 sets of 8 to 12 repetitions.
Rectus femoris Strengthening Exercise:
Wall Slides:
The wall slide exercise works multiple muscle groups, including your quads, glutes, and hamstrings. Here is how you do it:
Stand upright with your back against a wall and feet shoulder-width apart.
Slowly bend your knees, sliding your back down the wall for a count of five until your knees are bent at a 45-degree angle. (Do not bend too much further than this, as it will cause increased strain on your knees.) Hold this position for five seconds.
Straighten your knees by slowly sliding up the wall until you are fully upright with your knees straight.
Repeat the above steps 10 more times.
Stretching exercise of muscles:
HAMSTRING STRETCHING EXERCISES:
Simple hamstring stretch:
- Sit on the floor with both legs out straight.
- Extend your arms and reach forward by bending at the waist as far as possible while keeping your knees straight.
- Hold this position for 15 to 30 seconds.
- Relax back into the starting position.
- Repeat three times.
- Be sure to stretch until a gentle pull is felt in the back of your thighs. If you feel any excessive pain, you should stop the exercise.
The Hurdler Hamstring Stretch:
The hurdler hamstring stretch is a simple exercise that can be done right on the floor.
- Sit on the floor with one leg out straight.
- Bend the other leg at the knee and position the sole of that foot against your opposite inner thigh.
- Extend your arms and reach forward over the one straight leg by bending at the waist as far as possible.
- Hold this position for 10 seconds.
- Relax.
- Repeat with the other leg.
Standing Hamstring Stretch (Both Legs at Once):
The next hamstring stretch is a simple one to do anywhere at all. It is done in the standing position and stretches both legs at once. Here is how you do the standing hamstring stretch:
- Stand and cross your right foot in front of your left.
- Slowly lower your forehead to your right knee by bending at the waist.
- Keep both knees straight.
- Hold this position for 15 to 30 seconds.
- Relax.
- Repeat for the other side by crossing your left foot in front of your right.
Standing Hamstring Stretch (One Leg at a Time):
The one-legged standing hamstring stretch is quite possibly the easiest hamstring stretch to do. It can be done anywhere—home, office, or outdoors—and it requires no special tools. Here is how you do it:
- Stand up straight with one heel resting on a small stack of books or stool. If you are outside, you can use the curb, but be sure to watch for cars.
- Keep your knee straight.
- Reach both arms up toward the place where the wall and ceiling meet. If you are outside and there is no wall or ceiling, simply reach up into the air so your arms are about even with your ears. Reaching your arms up, as opposed to reaching down toward your foot, will keep your back straight.
- Keep your back straight. You should be bending forward slightly from your hips.
- Reach forward and feel a stretch in your hamstring behind your thigh.
- Hold the stretch for 15 to 30 seconds, and repeat three times.
- Switch legs and repeat with the other leg.
The Towel Hamstring Stretch:
- Lie on the floor on your back.
- Loop a long bath towel around your toes and hold the ends of the towel in both hands.
- Slowly pull on the towel to lift your straight leg up. Be sure to keep your knee straight. The leg without the towel should remain flat on the ground.
- Bring your leg up until a stretch is felt behind your thigh. You may also feel a stretch in your calf. This is normal.
- Hold for 15 to 30 seconds, and then relax.
- Repeat three to five times on each leg.
QUDRICEPS STRECHING EXERCISE:
The Lying Quad Stretch:
The best quad stretches are those that address not just the quadriceps, but all aspects of your leg, from the hip to the thigh, to the foot. The lying quad stretch is great for people who suffer from knee pain, as well as those who prefer reclining to standing up.
- Lie in a face-down position, propping your head on your left hand. Alternatively, you can lie on your side to perform this stretch.
- After a couple of seconds, pull your right foot toward your butt and bend your left knee to stabilize yourself.
- Hold onto your ankle and maintain the position for 30 seconds before returning to the starting position.
- Switch sides, pulling your left foot toward your back and bending your right knee.
The Simple Quad Stretch:
This simple stretch exercise is great for fixing your muscles, anytime, anywhere.
- Stand on your left leg, one knee touching the other. You can hold a chair or the wall to keep you steady if needed.
- Grab your right foot, using your right hand, and pull it towards your butt. Be sure to push your chest up and hips forward. Try not to worry about pushing your foot too close to your backside; your focus should be on feeling the stretch in your quad muscle and pushing your hips forward to get a good hip flexor stretch.
- Hold the position for 20 to 30 seconds, then repeat, switching from your left leg to your right.
The Kneeling Quad Stretch:
- A slightly different form of quad stretch, this position will help to loosen the muscles just above the knee joint, increasing mobility and preventing knee pain.
- Carefully drop your right knee to the floor and take a moment to find your balance.
- Once you’re ready, reach back with your right arm, and grab your ankle, or toes, depending on what’s easiest.
Lying Pigeon Progression:
Some of the best quad stretches originate from yoga. This particular pose is an excellent way to stretch not only your quads but your quadratus lumborum (back) as well. It’s also a great hip flexor stretch and can help you progress to the pigeon and pigeon twist stretches.
- Place a mat on the floor and lie face down.
- Secure a resistance band around your left foot, with the excess band in a reachable area. If you don’t have a resistance band handy, you can use a towel instead.
- Grab the band with your left hand. While keeping your right leg extended, bend your left knee, keeping your toes pointed toward the ceiling.
- Use the resistance band to pull forward until you feel the stretch. Hold for twenty seconds then pull further.
- Return to starting position and repeat on the other side.
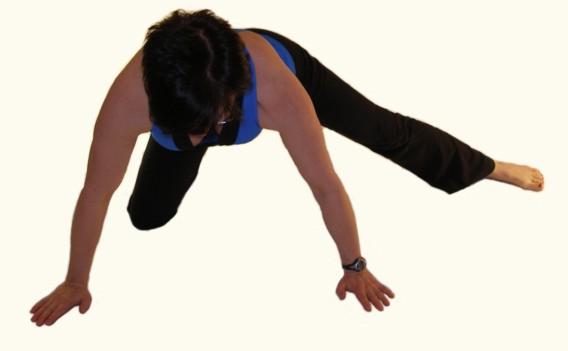
The Frog Pose:
If you’re looking to stretch out the gluteus maximus and the thighs, then this could be the great stretching pose for you. It will also help to stretch your arms, chest, and shoulder blades.
- Begin by lying on your stomach, propping your torso up on your elbows.
- Bend both of your knees, and reach back to hold onto your feet. You should already feel the stretching at this point. If you lack the mobility to do this now, use a towel to fill the gap.
- Adjust your fingers to point the same way as your toes, then carefully lift up your elbows to point to the ceiling.
- Push your chest up as high as you can.
- Stop the pose completely if you feel any pain in your hip or knee.
- Stay here for five breaths, then relax.
Stretching your Quadriceps:
Stretching out your quads might not be the most exciting part of your workout, but it is essential if you want to make sure you’re getting the best possible results. While dynamic stretching before a Gloveworx session will prepare your muscle groups for training, the static stretches that we’ve outlined above can help you to ensure that you recover from workouts faster, and maintain your mobility.
CALF STRETCHING EXERCISE:
Calf muscle stretch with or without a wall:
There are two general techniques for stretching the calf muscles. One requires a wall, and the other does not.
With a wall
- Step 1: Stand about an arm’s length in front of a wall. Place the right leg in front of the left. Reach both arms to the wall.
- Step 2: Press the back (left) heel into the floor and straighten the back leg while keeping the front leg bent. Hold this position for 15–20 seconds.
- Step 3: Repeat the stretch on the opposite side.
Without a wall
- Step 1: Place the right leg in front of the left leg.
- Step 2: Shift the body’s weight on to the front (right) leg, while keeping the back heel pressed into the floor. Hold this position for 15–20 seconds.
- Step 3: Repeat the stretch on the opposite side.
Tips
A person should feel the stretch down their calf muscle and into their heel. If this is not the case, slide the back leg further away until you feel the stretch.Avoid arching the back when performing this stretch.
Heel cord stretch with bent knee:
This stretch requires the use of a wall
Step 1: Stand with the right leg in front of the left leg.
Step 2: Lightly bend the back (left) knee and point the toes inward a little. Press both hands against the wall.
Step 3: Keeping both heels flat on the ground, press the hips toward the wall. Hold the position for 30 seconds.
Step 4: Repeat the stretch on the opposite side.
Tips
When performing this stretch, try to keep the hips centered over both feet and avoid leaning to one side.
Heel cord stretch with bent knee:
This stretch requires the use of a wall.
Step 1: Stand with the right leg in front of the left leg.
Step 2: Lightly bend the back (left) knee and point the toes inward a little. Press both hands against the wall.
Step 3: Keeping both heels flat on the ground, press the hips toward the wall. Hold the position for 30 seconds.
Step 4: Repeat the stretch on the opposite side.
Tips
When performing this stretch, try to keep the hips centered over both feet and avoid leaning to one side.
Towel Stretch:
This stretch requires a hand towel.
Step 1: Sit on the floor with both legs straight out in front.
Step 2: Loop the hand towel around the ball of one foot. Hold both ends of the towel.
Step 3: Keeping the legs straight, pull the towel toward the body, and hold the position for 30 seconds. Then, relax for 30 seconds.
Step 4: Repeat the stretch three times, then do the same on the other side.
Tips
Control the intensity of the stretch by pulling harder on the towel, if necessary.
Sartorius Streching Exercise:
Kneeling Stretch:
Step 1
Kneel with one knee on the ground, the other bent at a 90-degree angle in front of you, with that foot flat on the floor. Support yourself against a wall or sturdy piece of furniture, if necessary, to keep your balance.
Step 2
Keep your spine upright and think of your pelvis as a bucket full of water. Keeping your pelvis in neutral position–that is, neither tilting forward nor back–will keep the imaginary water from spilling out.
Step 3
Lean forward with your spine still completely upright. Think of pushing the bucket of water (your pelvis) forward while still keeping it level. Clenching your buttock muscles while you do this may help you get a feel for the right motion.
Step 4
Hold the stretch for between 10 and 30 seconds, breathing normally as you do so, then slowly release and repeat on the other side. Repeat the stretch between two and five times on each leg, so that you hold the stretch for one minute total on each side.
Standing Stretch:
Step 1
Stand on your right leg. Support yourself against a piece of solid exercise equipment, a wall, or a sturdy piece of furniture if necessary to keep your balance.
Step 2
Bring your left heel as close to your buttocks as possible. Grasp the left foot in both hands–if possible–or in the left hand to help keep it close to the body.
Step 3
Think of pushing the hips forward without arching your back. You should feel the stretch in the front of your hip and possibly down the inside of your thigh as well.
Step 4
Breathe normally. Hold the stretch for 10 to 30 seconds, then slowly release and repeat on the other side. Repeat the stretch until you’ve held it for one full minute on each leg.
Iliacs Stretching exercise:
Stretching:
The iliacus are shortened during activities that flex the hips, such as sitting. Because they increase the arch of the lower back, tight hip flexors are notorious for causing lower back pain.
Start: Lie on your back on a stable table with your legs hanging off the edge. Grab your left knee with both hands and pull it gently toward your chest.
Stretch: Stretch the hip flexors on the right side by letting the right leg hang for 10 seconds.
Contract: Resist by lifting your right leg toward the ceiling for six seconds.
Relax for five seconds.
Stretch: Hang your right leg off the table again. Hold for 10 to 20 seconds. For a more intense stretch, hang a heavy bag from your right foot. Switch sides.
Psoas Stretching exercise:
Start with a half-kneeling psoas stretch. Get in position for this stretch by kneeling on the floor on 1 leg with your knees at right angles. Keep your back straight and your tailbone tucked under as you squeeze your glutes and shift your hips forward until you feel a stretch.
Hold the stretch for 20 to 30 seconds, breathing deeply. Then switch legs and repeat.
To treat a tight psoas, do this stretch 2 to 3 times a day.
Try pressing your hands into a wall or down into a bench. That will help you keep your back straight and your tailbone tucked.
2.
Combine the psoas stretch with a quadriceps stretch. Your glutes and quads help support your psoas muscles and give them additional strength. To stretch these muscles as well, reach back and lift the foot of your back leg towards your buttocks when you are doing the half-kneeling psoas stretch.
3.
Use internal rotation to stretch the entire psoas. The simple act of internally rotating your back leg while doing the half-kneeling psoas stretch more effectively works your entire psoas muscle.
To use this modification, move the foot of your back leg over toward the other side of your body. Your back leg should be diagonal behind you rather than straight back. This will cause your leg to turn inward.
Hold the stretch for 30 seconds, then switch to the other side.
4.
Isolate your psoas with warrior I pose. Step up to an open doorway so that your right side is just behind the door jamb. Step through the doorway with your left leg and extend your right leg behind you, keeping your heel off the floor. Extend your arms overhead, pressing your palms against the wall. Press your hips forward until your front knee is bent at roughly a right angle.
Hold the pose for 20 to 30 seconds, breathing deeply, then switch and do the other side.
Modifying the warrior I pose by using a doorway for support makes this pose easier for beginners. Even if you’re an experienced yoga practitioner, this modification will still isolate your psoas to target your stretch.
5.
Fully extend your psoas muscles with bridge pose. Lie on your back on the floor with your knees bent and your feet flat on the floor about hip-width apart. Pull your heels close in toward your buttocks. Extend your arms along your sides, palms open up towards the sky. Lift your hips so that your body forms a bridge. Tighten your core and breathe deeply.
Hold the pose for 5 to 10 seconds, then slowly lower yourself to the floor. As you continue to practice, gradually add a few seconds to the time you hold the pose.
Back-bending poses such as the bridge require you to fully extend your hips. This pose also stretches both of your psoas muscles simultaneously.
6.
Include hip-extension exercise in your workout. Exercises such as cycling and running put a lot of strain on your hip flexors. Balance these activities with exercises such as skating or cross-country skiing, which also have a hip-extension effect.
Pectineus Streching exercise:
- Kneel onto your right knee and put your left foot in front of you such that your left knee is at 90 degrees.
- Inhale and slide your right knee out to the side and back.
- Exhale and left your chest up.
- Sitt on the floor with your knees apart and the bottom of your feet together.
- Keep your chest up and your back straight.
- Bend forward at the hips while accentuating your lumbar lordosis (keep pelvis tilted anteriorly)
- Apply gentle pressure to your knees pushing them toward the floor.
- Relax and hold this for the appropriate time.
- Kneel onto your left leg and place your right foot in front of you to assume the lunge position.
- Slide your right foot out to the side and place both hands on the floor in front of you.
- Try to straighten the right knee and lean your body forward while relaxing your hips.
- Rocking the hips forward and back will change the pull slightly to get all muscles.
Rectus femoris Stretching Exercise:
- Stand beside a chair or counter top so as to hold on with one hand if necessary to balance.
- Reach down and grab your right ankle. You can use the hand on the same side or the opposite side. Most people find using the opposite hand most comfortable because it allows the hip to stay in a comfortable position. If you are unable to reach your ankle you can loop a belt or towel around your right ankle and pull on that.
- Straighten your back, lift your chest up and pull your ankle back and up slowly.
- If you are able to bring your knee behind you as in the picture you can stretch rectus femoris as well.