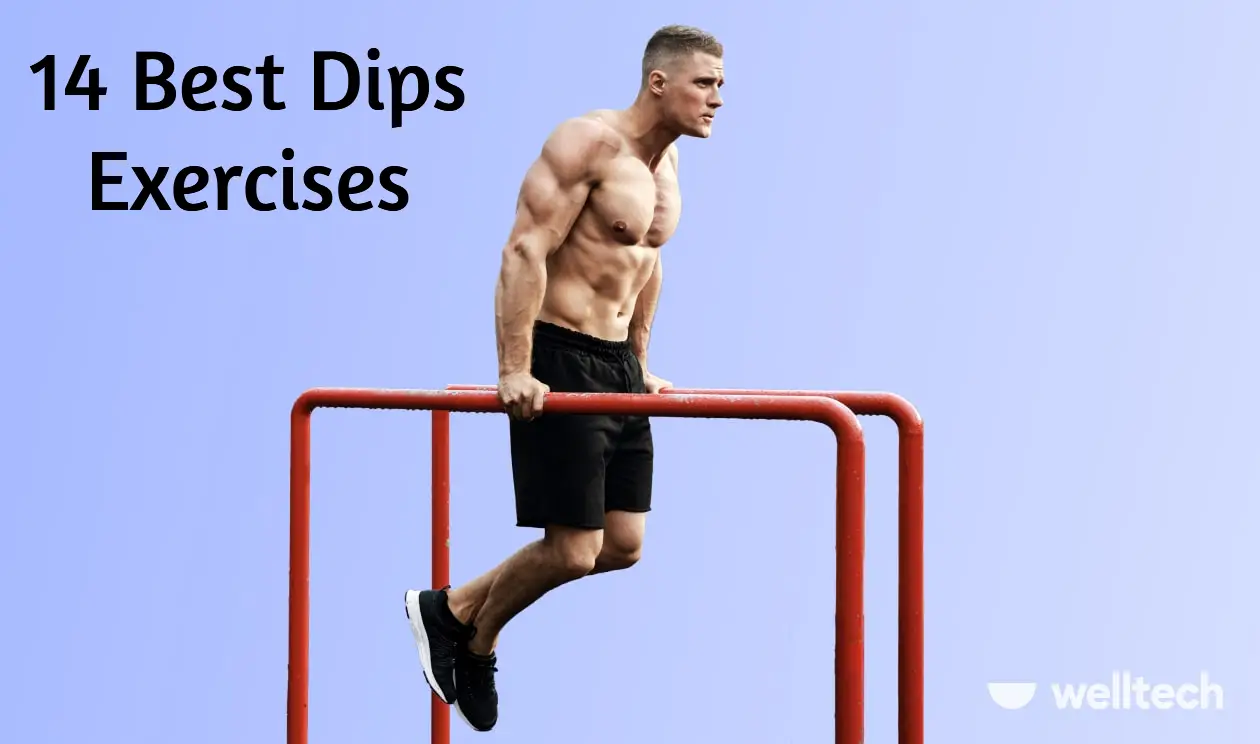
14 Best Dips Exercises
Introduction
How to Perform Dips
For Best Dips Exercises, you need two Dip bars. These bars Should be stable, parallel, and fixed. A dip station is a common feature in gyms, where you can perform pull-ups and hanging knee raises. If you have two dip handles that fit into the safety pins, you can also perform dips in the Power Rack.
Avoid performing dips between benches or on rings since these might cause shoulder pain. Instead, use parallel bars. Here are five easy steps to performing dips with perfect form.
Configuration
- Lean forward and grasp the bars. Keep your elbows locked to maintain balance.
Dip
- Bend your arms to bring your body down. Slightly bend your upper body forward.
Split the Parallel
- At the bottom, descend till your shoulders are below your elbows.
Get Up
- Raise your body back up to the starting position by extending your arms straight.
Lockdown
- Maintain equilibrium by placing your shoulders over your hands. Keep your elbows locked.
How to Perform Dips Exercises Correctly: The Complete Guide
Here’s how to perform dips correctly:
- Lean forward, grab the parallel bars, and extend your arms.
- Leaning forward, bend your arms to lower your body.
- Drop till your elbows are below your shoulders.
- Straightening your arms will help you raise your body.
- At the top, lock your elbows.
- One type of compound bodyweight exercise is the dip.
- Before performing a dip, raise yourself up on two dip bars using your arms straight.
- Once your shoulders are below your elbows, lower your body.
- Raise yourself till your arms are once more straight.
- Dips tone the muscles in your arms, shoulders, back, and chest.
- Avoiding shoulder and chest pain requires proper technique when doing the dip.
- Keep your shoulders from rolling forward.
- Also, don’t shrug them off. Maintain a back-and-down stance.
- Don’t go any lower; instead, lower yourself till your shoulders are below your elbows.
- Avoid Ring Dips and perform Dips on stationary parallel bars.
- StrongLifts 5×5 does not come with dips by default.
- To put on muscle and strength, you don’t need them.
- You can add Dips to Workout A if you have additional time and want to focus more on your arms.
- But continue to concentrate on raising your squat.
- The biggest benefit is in general strength and muscle growth.
- This is the official manual for perfect form when doing dips.
- It also includes modifications such as Weighted Dips.
Perform negatives if you are not strong enough to complete a single dip. For the time being, only attempt the route down that you are stronger at; skip the way up. Reach for the dip bars, leap to your feet, and extend your arms.
When your shoulders are below your elbows, steadily lower yourself. Then, with your arms straight, leap back onto the dip bars with your feet planted on the ground. You can perform one dip once you can perform ten negatives with the correct form.
Dips Number 101
Ideally, you should perform dips with your hands beneath your shoulders. By doing this, your arms stay near your torso. Therefore, broader shoulders require bigger grips. But to alter it, you’ll need angled bars. My grip width follows my equipment because my bars are parallel. If your build is average, this works well. However, it might be a problem for certain body types. Remember this and adhere to these instructions to perform Dips with the appropriate form.
Grip Depth
- Ideally, your hands should be slightly outside of your hips and under your shoulders.
Hold On
- Hold the bars near your wrists with a low hand. Squeeze the bars with your entire grip.
Forearms
- Maintain a vertical posture for your forearms while descending and ascending.
Elbows
- Secure them at the summit. Tuck the bottom 45 degrees. Don’t touch your torso or flare them.
Chest
- Chest Lift up your chest and then bring it down. At the top, lift your chest in between reps.
Arms
- Push them down and back. Keep them from moving forward. Also, don’t shrug them off.
Head
- Make sure your head and torso are in alignment. Keep your eyes off the ceiling.
Torso
- For equilibrium, your torso needs to be slightly inclined. Bend forward a little as you lower yourself.
Back of the Lower Back
- Avoid overly bending your lower back. Remain impartial. parallel from the shoulders to the knees.
Legs
- Legs Cross your feet and bend your knees. If your bar is high, you can maintain a straight leg position.
Top
- Straight upper arms. With locked elbows. Up in the chest. Shoulders lowered. Torso inclined slightly.
Way Lower
- Bend your arms, lift your chest, and inhale deeply. Bend forward a little bit.
Bottom
- Lower yourself till your shoulders are below your elbows to break parallel.
Very High
- Arms straightened, raise yourself up. Keep your head down. Maintain a lowered shoulder blade.
Lockdown
- Arms extended. With locked elbows. Up in the chest. Down on the shoulders. Head in a neutral position.
Inhaling
- At the peak, take a breath. Hold it while you descend. Once more, exhale at the top.
Muscles Worked During Dips
Dips engage muscles other than the triceps. To move your body, you bend and straighten your arms. However, the muscles in your back, chest, and shoulders support them. In addition, numerous other muscles support your equilibrium while your body moves.
Dips are a complex workout because they engage multiple muscles at once. You can lift more weight because more muscles equal greater strength. Muscles engaged in dip work.
Arms
- To raise your body, your triceps cause your arms to straighten.
- The greatest arm muscle on the rear of your upper arm is your triceps.
- Your arms will be larger and more muscular if your triceps are stronger.
- To keep the bars tight, your forearm muscles are also involved.
Shoulders and Chest
- Dips resemble a Bench Press done vertically.
- When performing dips, raise your body in the same manner as when pressing the bar off the bench.
- At the bottom, your upper arms are parallel to the floor; in order to lockout, you must raise them vertically.
- Your shoulder and chest muscles are worked by this.
Abs
- Your lower back remains neutral while your body goes up and down thanks to your ab muscles.
- They maintain your torso neutral and stop it from arching too much.
- This strengthens the rectus abdominus, the “six-pack” muscles that run across your abdomen.
- If you eat healthfully, they will show.
- Similar muscles are used in dips, bench presses, and pushups. The distinction is that you can use more weight on the bench than on dips or pushups. You simply place dishes on the bar of the Bench. Using a dip belt makes it simple to add weight to dips. Pushups with weights are challenging. Someone has to place a plate on your back, put shackles around your neck, or put an X-vest on you. It is simpler to perform the dips and bench press heavily.
Dips are a better arm-building exercise than skull crushers or triceps pushdowns. Dips are given more weight. You need to raise your body weight. A 75 kg person like me can perform body-weight dips with ease. With 20 kg added, for a total weight of 95 kg, I can accomplish them. Try using 95 kg for pushdowns or skull crushers. Because they work your triceps with greater weight, dips are more effective. More muscle equals more strength and weight.
Tricep Dips Video
Dip Method
Grip
- Complete Hold. Hold onto the dip bars with your thumbs.
- To prevent your hands from slipping while your body moves, firmly squeeze the bars.
- This keeps your wrists from straining during dips when you bend them back.
- Squeezing the bars causes the muscles in your arms, shoulders, and chest to contract more forcefully, which enhances strength.
- Avoid doing dips without using your thumb.
- To improve your form and strength, use your entire grasp.
Hold Low, Palm
- Place your palms’ heels on the dip bars.
- To allow them to press straight into the bars, your wrists and forearms must line up with them.
- This reduces wrist pain and strengthens the wrists.
- It’s incorrect to grasp the bars mid-palm since this prevents your forearms from being over the dip bars.
- Additionally, the pressure from your body will force your wrists to flex, stretch, and hurt.
- Like a bench press, hold the bars with a low palm grip.
Grip Depth
- Slim Handle. Shoulder-width apart, hold the dip bars.
- Ideally, your hands should be slightly outside of your hips and under your shoulders.
- This keeps your shoulders stiff and your arms close to your body.
- If your shoulders are broad and you have access to inclined dip bars, you can grab the bars broader.
- Your grip breadth will be determined by your equipment if, like me, you have fixed dip bars.
- Generally, this works well unless your shoulders are extremely little or large.
Forearms
vertical as viewed from the side.
- While your body is moving up and down, maintain a vertical forearm position.
- Your forearm bones can press directly into the dip bars, increasing strength in this way.
- Leaning slightly forward on the way down is the only method to maintain the vertical position of your forearms during a dip.
- It is useless to keep your torso vertical since it causes your forearms to slant back at the bottom.
- On the way down, slant slightly forward.
Straight Ahead
- It’s also necessary to have your forearms parallel to the floor when facing both front and back.
- Your grip is either too wide or too narrow if your forearms are angled.
- Too narrow resembles a bench press with a close grip.
- It’s bad for your shoulders to be too wide.
- Grip your hands such that they are slightly outside of your hips and beneath your shoulders.
- For this, you will require access to angled dip bars.
- However, it will make you stronger when you dip.
Elbows
Secure Top
- Every rep must begin and end with straight arms; otherwise, it is not counted. Before you fall, lock your elbows.
- At the peak of every rep, lock them once more.
- Your upper body muscles will be worked throughout their whole range of motion.
- You’ll get larger, stronger arms.
- Get half the gains if you only perform half the reps.
- Keep your elbows locked.
- Your joints will be OK as long as you don’t hyperextend and instead lock gently.
45° elbows
- Arms should be kept close to the torso.
- They shouldn’t come into contact with your upper body at all.
- However, they also shouldn’t flare out and finish straight.
- Hold the narrow dip bars with your hands beneath your shoulders.
- Next, tuck your elbows at a 45-degree angle while maintaining a vertical forearm position.
- If you’re used to flaring your elbows, you might find this more difficult at first.
- However, your shoulders will benefit from it and you’ll gain strength.
Chest
- Elevate Your Chest.
- Chest pain can be avoided by raising your chest to prevent your upper back from rounding.
- Maintaining your shoulders back also helps to prevent shoulder pain.
- At the peak of each repetition, enlarge your chest.
- Inhale deeply, hold it, and squat down.
- Dip till your shoulders are below your elbows to break parallel.
- Keeping your arms straight, stand back up.
- Raise your chest to the top one more to lock out your dips.
Shoulders
- Lower Your Shoulders. Your shoulders will hurt if you allow them to roll forward.
- Before lowering yourself, raise your chest to keep them back.
- As you complete a rep, raise your chest once more to keep your shoulders back.
- There’s no need to tense your shoulder blades. You can’t, however, shrug your shoulders or put them up to your ears.
- Should they do so, tuck your shoulders in as you perform dips.
- Additionally, remember to enlarge your chest.
Head
- Head in the neutral position. Avoid staring at the ceiling as this will cause neck pain and forward hunching of the shoulders.
- Your head and torso need to remain aligned.
- However, in order to maintain your forearms vertical, you must slant slightly forward as you descend.
- This indicates that your head will not remain in line with your torso and that you are unable to see forward.
- Instead, when performing dips, keep your eyes on the floor in front of you.
- Your neck remains safe and neutral as a result.
Torso
- Bend Forward. Maintaining an upright posture will not allow your forearms to remain vertical.
- They will have an inefficient inclination at the bottom that could throw you off balance.
- As you descend, you have to slant slightly forward.
- Avoid going overboard to avoid losing your balance.
- At the bottom, the goal is to have your forearms vertical.
- You’ll have greater strength and feel it more deeply in your chest if you perform it correctly.
Lower Back
- Organic Arch. Dips need you to maintain a neutral lower back.
- To be neutral is to maintain your natural arch like you would when standing.
- It is not ideal for your lower back to be overly curved or flat.
- Squeezing your spinal discs might cause back discomfort if you hyperextended.
- Squeeze your abs and hold your rib cage down to maintain a neutral lower back posture.
- When viewed from the side, perform dips in a straight line from the shoulders to the knees.
Legs
- Straight legs vs. bent knees
- It’s easier to maintain a neutral lower back posture when performing dips with straight legs.
- This is because you can avoid excessive lower back arching by squeezing your glutes harder.
- But if you try to do dips with straight legs without using high dip bars, your feet will reach the floor.
- I like to flex my legs. If you do this, make sure to squeeze your glutes and abs to maintain a neutral lower back.
Arms Straight
- Before lowering yourself, lock your elbows.
- Bent elbows at the beginning of a dip don’t count.
- Half reps in the squat don’t count.
- Because bent elbows reduce the range of motion, they facilitate Dips.
- To increase your strength and acquire as much muscle as possible, you need to strengthen your upper-body muscles throughout their whole range.
- Before lowering yourself, extend your arms straight.
- To complete your rep, lock your elbows once more.
Chest Up
- You can avoid rounding your upper back by bringing your chest up.
- Maintaining your shoulders relaxed and back helps prevent shoulder pain.
- Expand your chest before lowering yourself.
- Continue by breathing in through your ribs.
- Huge breath, hold it, and tuck it in. After that, descend till you cross parallel.
- Push your shoulders down if they aren’t staying back.
- Refrain from allowing them to roll over or rub against your ears.
Way Down
Bend Forward
- Bending your arms, dip down. Lean slightly forward to maintain the vertical position of your forearms.
- The precise torso angle varies based on your type of physique.
- But when you gaze at things from the side, you want to maintain your forearms vertical.
- Your forearms can press straight into the dip bars, which improves control and strength on the way up.
- Avoid lowering your body completely. Bend forward a little bit.
Split the Parallel
- To achieve a larger stretch, you don’t have to descend as low as you can.
- That can create shoulder pain, so you shouldn’t do that.
- However, anything higher than the upper arms parallel to the floor is insufficiently low.
- You have to descend till your shoulders are below your elbows in order to break parallel.
- Your upper-body muscles will only be fully worked in this manner when doing dips.
- It’s the best way to increase your muscular mass and strength.
Breathing
Inhale at the top
- With your feet raised and your elbows locked, maintain your balance on the dip bars.
- To keep your shoulders down, lift your chest.
- Next, inhale deeply, hold it, and lower yourself.
- As you descend and until you reach the bottom, hold your breath.
- Raise your chest, come back up, and lock your elbows.
- Let go, take a moment to collect yourself, and then repeat.
- Breathe nonstop during your dips to avoid losing your tension and having your chest collapse.
14 Best Dips Exercises
Following are the 14 best dip exercises for
Bench Dips
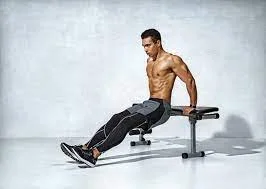
Steps to Follow:
- Hold the edge of the bench while standing with your back to it.
- Use your arm power to raise yourself up, placing your heel on the floor or—for a more difficult option—placing your legs on another bench at the same height.
- Your shoulders and triceps get stronger as a result.
Parallel Bar Dips
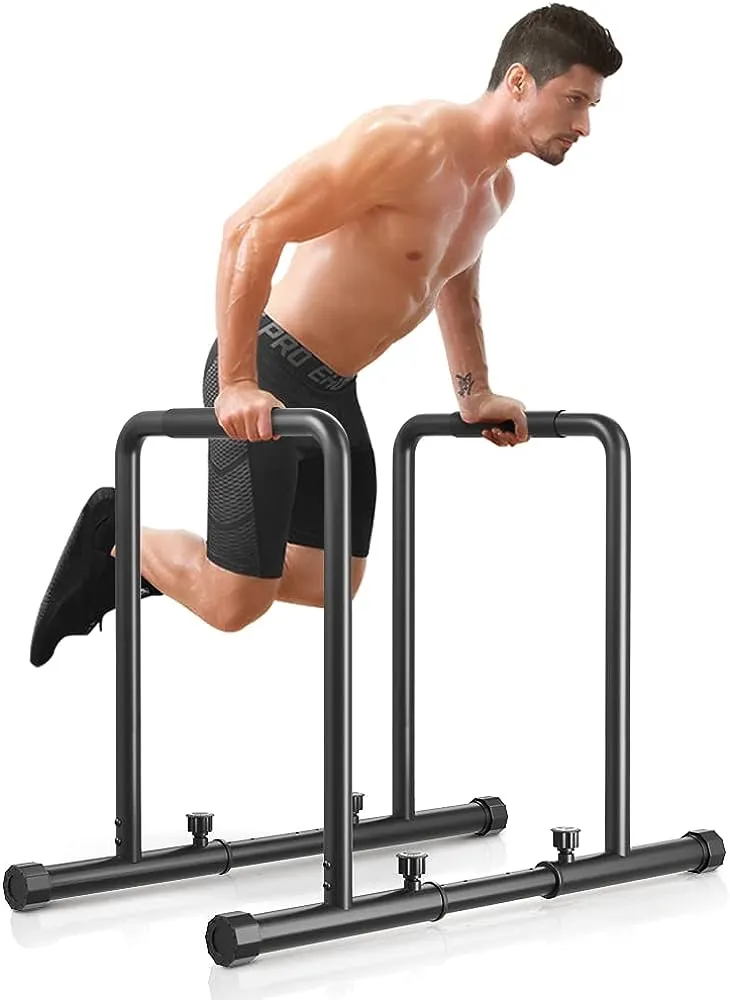
Steps To Follow:
- Place yourself between two parallel bars and grasp them.
- All of your body weight should be supported by your hands as you raise and lower yourself until your arms are at a 90-degree angle.
- These bodyweight exercises do a remarkable job of widening the shoulders and strengthening the triceps and chest.
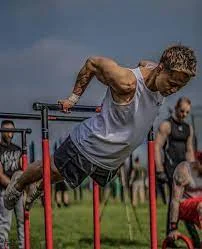
Straight Bar Dips

Steps To Follow:
- In addition to being more advantageous, it is also more challenging than parallel bars.
- Raise yourself up until your hands are fully extended by placing them on a single bar that is somewhat above your chest.
- These chest dips broaden your upper back and target your triceps as well.
Korean Dips
Steps to Follow:
- The bars in this form of the straight bar dip are behind your back.
- It needs strength from the entire body and is more difficult than the straight bars.
- To stop yourself from swinging, you also target your glutes, core, and lower back with this exercise.
- Without a doubt, the hardest dip exercise on this list is this one.
Plyometric Dips

Steps to Follow:
- You can add this variant to any dip that you execute.
- For instance, when performing bench dips, you just push yourself up by moving quickly, raising your hands and knees, and then lowering them back to the starting position.
- This gives your triceps muscles more strength and endurance.
Ring Dips
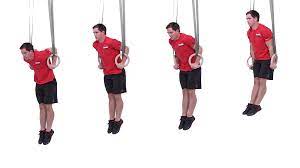
Steps to Follow:
- Instead of using a single bar, you raise yourself in this position by firmly placing your hands on rings.
- More work is required because it is very difficult to stabilize with the rings on.
- The arms, shoulders, and abdomen are particularly worked, although the entire body is affected.
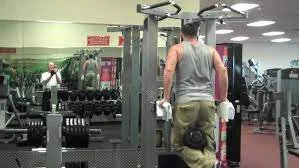
Rucksack Weighted Dips
Steps to Follow:
- You can supplement your dips with weights.
- Put plates in your bag and wear them.
- This results in an increase in body weight and puts extra strain on the chest, triceps, and shoulders.
- As a result, their results are better.
Belt + Chain Weighted Dips
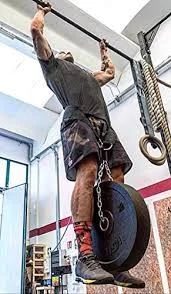
Steps to Follow:
- Weighted dips are best performed this way.
- Put on a dipping belt and fasten plates to it using the chain.
- This is most effective for the chest and abdomen and raises body weight from the center.
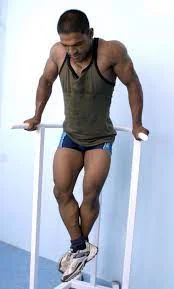
Dumbbell Between The Legs
Steps to Follow:
- A dumbbell weighing between 10 and 15 kg is held between the feet during this variation of weighted dips.
- This produces superior results by making it harder for the body to ascend.
V Bar Dips
Steps to Follow:
- Here, you can freely adjust the width of your grip and the orientation of your hands by turning them inward or outward.
- Like all other dips, they also help to strengthen your upper body.
Duo Dumbbell Curl into Tricep Extension Position While Seated
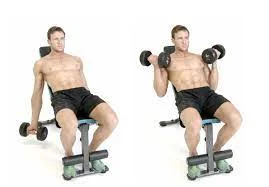
Curl Dumbbells
- Holding two dumbbells at arm’s length, place them by your sides while seated on a bench.
- Curl the dumbbells up to your shoulders with your bicep.
- Lower them back down to your side slowly, then do it again.
Dumbbell Tricep Extension
- Hold a dumbbell in each hand straight over your head while seated on a bench.
- Lower the weights behind your head slowly while maintaining the same upper arm flexion.
- Repeat with your arms extended.
A superset of seated dumbbell hammer curls into a bench dip
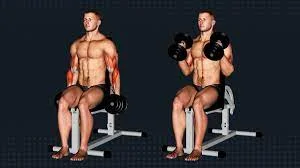
Dumbbell Hammer Curl while Seated
- With two dumbbells on your sides, take a seat on a chair or bench.
- Bend your elbows to raise the dumbbells to shoulder height while maintaining your upper arms steady and your palms facing inward.
- Repeat after lowering them back down.
Bench Dips
- Take a stand with your back to the bench and place both hands shoulder-width apart.
- Across your front, extend your legs.
- Flex your elbows to form a 90-degree angle with your forearm as you slowly descend your torso.
- Raise yourself back up to the beginning posture using your triceps.
Bodyweight or Weighted Tricep Dips Superset into EZ Bar Curl
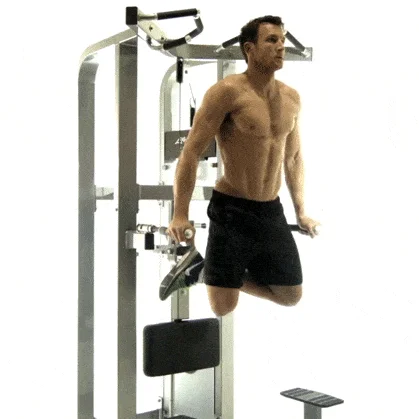
Dips of the Triceps
- With your arms straight and your palms facing inward, grab the bars of a dip station.
- Make sure your elbows remain tucked against your body and don’t flare out as you slowly lower them until they are at a straight angle.
- Return to the summit and repeat the process.
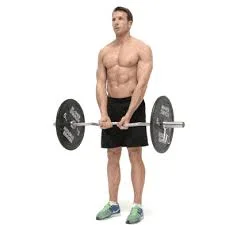
EZ Bar Curl
- With your palms facing away from you, hold the EZ bar in front of your thighs using the innermost grips.
- Curl the bar until your hands are at your shoulders as you inhale.
- Squeeze your bicep, then control the downward movement.
Tricep Rope Extensions Standing Superset into Cable Bicep Curl
Extension of the Triceps
- A cable station’s high pulley can be connected to a rope handle.
- Grip the grip while keeping your elbows tucked up at your sides.
- Once your arms are fully extended, tighten your core and bring your hands down. Then, go back to the beginning position. You should just move your forearms.
- To ensure that the weight is only being moved by your triceps, resist the impulse to move your elbows or hips.
Bicep curls with cable
- Using an underhand grip, place a cable bar shoulder-width apart.
- Raise the bar to your shoulders by flexing your elbows using your biceps.
- Repeat by lowering it back to your thighs.
Common Issues
Cheating
- When performing dips correctly, your shoulders should be lower than your elbows and your elbows should be locked.
- This engages the greatest number of muscles simultaneously.
- It exercises every range of motion in your arms, shoulders, and chest.
- However, because your body has to travel a longer distance, it also makes dips tougher.
- A common cheating technique is to merely dip halfway down. However, the strength and muscular increases are cut in half as a result.
- Elbow locks at the top. Straight arms are used to begin each rep. Once your shoulders are below your elbows, dip down.
- Next, stand up, extend your arms, and flex your elbows. Avoid attempting to increase the strain by leaving your elbows uncovered at the top.
- Thus, the range of motion is shortened. Finally, lock your elbows to complete each rep.
- If you gently lock your elbows instead of pushing them beyond their usual range of motion, your joints will be safe.
- At the bottom, break parallel. Once your shoulders are lower than your elbows, lower yourself.
- To obtain a greater stretch, you don’t need to descend as far as possible.
- Going too low can cause pain in your shoulders and chest, so avoid doing that.
- However, it is not low enough to have the upper arms parallel to the floor.
- You have to lower your shoulders below your elbows in order to break parallel.
- Have someone verify or record yourself performing dips on camera.
- Doing dips with your entire range of motion is more difficult.
- However, this is also the reason they work better for building muscle and strength in the upper body.
- Avoid being the person who performs dips with a 20 kg weight attached to his belt and barely descends halfway.
- That’s like the guy who says he can bench 300 pounds, but he never reaches his chest and his butt always pops up throughout a workout.
- It is ineffective and irrelevant. Perform your dips correctly.
Unable to Take Just One Dip
- Dips make you raise your body weight. For those who are new to strength training, this is frequently too hefty. That’s why I like barbells better—they’re simpler to scale. If you weigh 75 kg, like I do, you shouldn’t begin StrongLifts 5 by 5 with 75 kg on squats. With the 20 kg bar empty, you begin. However, Dips cannot be used to start lighter. Though it will take time and you won’t reach 20 kg, you could lose weight. Because you have to start heavy, dips are more difficult.
- Negatives are the best approach to make Dips simpler if you are unable to complete one rep. Concentrate solely on completing the negative steps. When your shoulders are below your elbows, steadily lower yourself. Then, with your arms straight, leap back onto the dip bars with your feet planted on the ground. You can accomplish this since you’re stronger going down than going up. You can perform one dip after you can perform ten negatives with perfect form.
- Another approach to asking for assistance is to have someone grip your sides with his hands and support you as you climb. It is not effective to use a resistance band to assist with dips. Don’t bother with the assisted Dip machine either. Your body is not moved; just the weight and your arms are. Though it doesn’t, it appears the same. You will improve your machine-dipping skills, but that is all. Doing dips is the best method to get stronger at them.
- Practice Dips every day to get stronger at them as quickly as feasible. By placing two chairs back to back, you may perform Dips at home with ease. Multiple times a day, take a dip between. Gently lower yourself till your legs make contact with the ground. Get up and do it again. You’ll gain the strength to do a full Dip in a few weeks. Pavel Tsatsouline refers to this method as “Greasing The Groove.” Dips are an exercise that you can gain stronger at if you perform them often.
Shoulder Pain
- Shoulder pain might result from dips if you don’t maintain proper form.
- Keep your shoulders from rolling forward. Keep them away from your ears.
- Recline and push your shoulders back.
- At the top, lift your chest before lowering yourself.
- Before dipping, inhale deeply and hold your breath the entire way down.
- Hold your breath to avoid losing the tightness.
- Drop, break the parallel, and rise again.
- Breathe out, raise your chest, and repeat.
Take care not to descend too far. For Dips to yield the most strength and muscle, you have to use the entire range of motion. To acquire a larger span, though, you don’t have to travel all the way down. Most folks aren’t adaptable enough to dive in. Usually, your shoulders move forward, endangering them. Using your entire range of motion, dip. However, cease when your shoulders are lower than your elbows. There’s no reason to descend.
Chest Pain
- Should your upper back round during a dip, you may have pain in your collarbone or chest.
- If you don’t keep your chest raised, your upper back will curve in.
- At the top, lift your chest before lowering yourself.
- Continue by breathing in through your ribs.
- Deep breath, hold it, then release it. At the bottom, break parallel without diving too low or holding your breath.
- After that, stand back up, lock your elbows, and lift your chest once again.
- Maintain a lowered shoulder blade.
Dips Variations
Weighted Dips
- Dips with added weight are called weighted dips.
- You put on a dip belt that has plates hanging around your waist from a chain.
- After that, you bend your arms to dip and then stand back up.
- Once you can perform ten Dips with good form, it’s time to add weight.
- While high-rep dips increase endurance, they don’t help with strength or muscular gain. Bench pressing 20 repetitions won’t give you a larger chest.
- You increase the weight. Apply weight on dips as well.
Keep the belt you use for deadlifts and squats chain-free. You’ll harm it. Instead, get a dip belt. These are a few that I suggest.
- Polypro Dip Belt
- Rogue Dip Belt
- Brute Belt
Alternatively, you can perform dumbbell dips by holding the weight between your feet. However, this is limited to light weights. Your feet will drop a hefty dumbbell out of them. Your legs must remain straight and not bent, even if you are able to support it. This means that in order to keep your feet off the ground while holding the dumbbell between your legs, your dip bars need to be taller. Just get the dip belt, please. It saves time and is simpler to use.
- Once you can perform ten dips with perfect form, move on to weighted dips.
- Start with two sets of five at 2.5 kg/5 lb, then increase the weight with each workout.
- Microloading is the best option. Similar to the Bench Press and Overhead Press, the Dip uses smaller muscles.
- If you increase by just 1 kg or 2 lbs every workout, you’ll see longer growth.
- After my workout, I like to perform one set of body-weight dips for as many repetitions as possible, followed by two sets of five weighted dips.
- Add Dips to StrongLifts 5×5 using the StrongLifts 5×5 app for iPhone and Android.
- The app calculates the number of repetitions for each exercise.
- It logs the number of repetitions you completed.
- When it determines you’re ready, it lets you know when to switch to weighted dips.
- Next, to add Dips or Weighted Dips to StrongLifts 5×5, upgrade to StrongLifts Pro.
Bench Dives
- Dips between two flat benches are called bench dips.
- You place your hands behind your back on the bench.
- Step onto the bench in front of you with your feet.
- Raise your butt off the ground and extend your arms straight.
- In order to relieve pressure on your knee joints, slightly bend your legs.
- Then, bend your arms until they break parallel to begin the dip.
- Get up and do it again. While performing Bench Dips, you can increase the weight by placing a plate on your lap or on your thighs.
- The shoulders suffer greatly from bench dips.
- Unlike when you perform dips on bars, your hands are not adjacent to your body here.
- Since the bench is there, they are behind you.
- It is impossible to maintain a back-and-down posture while this is present.
- They’re going to step up. Additionally, your shoulders will just forward more as you descend farther and carry more weight.
- Your shoulder joints may become injured as a result of this stress. Avoid doing bench dips. Take a dip off the bars.
Dips in Rings
- Gymnastic rings are used for ring dips in place of dip bars.
- Leap up to lift your legs off the ground while grabbing the two rings.
- Keep your hands close to your body as you bend and dip; do not allow them to stray.
- Split the parallel, rise again, and repeat.
- Since rings are unstable, doing dips on them is more difficult than on parallel bars. It gets harder since your muscles have to stabilize them.
- Ring dips, however, put your shoulders in jeopardy.
- Their biggest advantage is also their worst disadvantage.
- To maintain taut shoulders, keep your hands close to your torso. However, because the rings aren’t fixed, they work against you.
- They have the ability to displace from your body and weaken your shoulders.
- Your shoulder muscles, known as the rotator cuff, may become injured as a result of this.
- Put down the rings and practice dips on bars.
Dips Devices
- When you don’t have enough strength, you can use the Assisted Dip Machine to help you perform dips. You place your feet or knees on a platform to set up. Then you grab the bars, descend, and then rise again. By increasing the knee padding, the machine will assist you as you ascend. For this, counterbalance weight is used. The machine will help you ascend to finish your dips to a greater extent the heavier you set it.
- Another machine called the Dip Machine requires you to sit on a bench with your thighs restrained by supports. You reach for the dip bars next to you, bending then straightening your arms. The Lat Pulldown is to pullups what this machine is to dips. The Dip machine’s weight can be adjusted to be less than your own weight. Unlike with standard dips, you can perform them without lifting your entire body weight. It is consequently simpler to get started with the Dip machine.
- However, machines aren’t made equal. You’re resting on a platform or bench, so your muscles don’t need to balance your body. For the same reason, your lower back and abdominal muscles are not required to stabilize your torso. On the Dip Machine, your arms are the only parts of your body that move. Less muscle is used than on standard dips because of this. For this reason, using machines to build muscle and strength in the upper body is less successful.
- Maybe you’re unable to perform a single dip, thus you wish to employ machines. Alternatively, you want to utilize the machine to build strength in order to transition to regular dips in the future. However, this is rarely effective. It always takes longer than simply performing Dips when it does. Because practicing dips with a machine is like attempting to improve your tennis game by practicing ping pong. Though they don’t look the same, they do. You must play tennis if you want to get better. Dips work in the same way.
- Doing Dips is the quickest and most efficient way to improve your skills at the sport. Perform negative reps if you are unable to complete a single rep. Just go all the way down. Gradually descend till you reach the breaking point. After placing your feet on the ground, spring back up to your starting posture. Because you’re stronger going down than going up, this works. Try performing a full dip once you can perform ten negatives with perfect form. You’re capable of doing it.
The Benefits of Dips
- Tricep dips, which work the three ‘heads’ of the triceps (long, lateral, and medial), burn fat as you might assume, but they also do so much more and are a great exercise for your core, shoulders, and chest.
- Furthermore, tricep dips are a bodyweight exercise that can be performed anywhere. Typically, these exercises are done on pull-up stations, weight benches, gymnastic rings, parallel bars, or “dip stations,” but if you’re trapped at home without any of the equipment mentioned above, two solid chairs will work just as well.
- There are always methods to advance the exercise, even if (or when) you get to the point where doing basic tricep dips feels effortless. To increase difficulty, you might use a chain or a dip belt to add more weight. Alternatively, you can use a chair to support your lower body, or you can attach a resistance band to the dip station or gymnastic rings to make them simpler.
What’s the Injury Risk?
- Since tricep dips are a bodyweight workout, there aren’t many risks involved. However, there are a few ways to increase the activity’s level of safety.
- You may be weakening your pecs and shoulder muscles if you’re not controlling the movement and staying within your active range where you feel comfortable.
- I would advise everyone to concentrate on not “bouncing” out of the bottom of the action as the primary cue. Instead, picture yourself sliding down the slope, holding onto it for a split second, and then purposefully tensing up your muscles to get back up.
Conclusion
Including dips in your workout regimen is a great method to Develop upper body strength by focusing on your shoulders, triceps, and chest for a comprehensive exercise. Boost your level of functional fitness. Gain stability and pushing power that you may use in daily tasks. Improve muscle definition by toning and shaping your upper body to give your body a more defined shape. Recall that the secret to enjoying the benefits of dips is to practice consistently and with good form.
Begin with bodyweight dips, concentrate on deliberate motions, and pay attention to your body. You can experiment with variants and add weight as you get better for an even greater challenge. I hope this comprehensive guide empowers you to perform this exercise safely and effectively, paving the way for your fitness goals.
FAQs
Do dips outperform pushups?
When you want to work on very particular muscles, dips are a better option. They work the triceps, pectoralis major, anterior deltoids, and trapezius, which serve as a stabilizer. A dip practice may help you develop strong shoulders and a powerful chest more quickly than just push-ups.
Is doing dips every day okay?
Daily dips can put a lot of strain on your joints and muscles, increasing your risk of overuse issues. Giving your muscles at least 48 hours of recovery in between workouts that focus on the same muscle groups is typically advised.
Do dips help lose abdominal fat?
No. Dips are a low-range, compound push exercise that mostly targets the triceps but also works the shoulders, lower back, forearms, and chest.
Can you get abs with dips?
This workout works your chest mostly, but it also works your abs, triceps, and shoulders. You may intensify the workout by positioning your body to put more strain on your triceps or chest.
References
- M. (2018, November 11). How to Do Dips with Proper Form: The Definitive Guide | StrongLifts. StrongLifts. https://stronglifts.com/dips/
- Cooper, E., & Neudecker, K. (2023, October 23). How to Do Tricep Dips to Build Bigger, Stronger Arms. Men’s Health. https://www.menshealth.com/uk/how-tos/a33643012/tricep-dips/
- Top 10 Dips Exercises. (2023, November 17). STYLECRAZE. https://www.stylecraze.com/articles/dips-exercises/