Exercise for wrist sprain
Exercise is an important part of the overall treatment program of wrist sprain, However initially Rest is important but when your wrist sprain is fully healed, Exercise is crucial to improve the function of the wrist joint. Sprained wrist joint occurs when the ligaments in the wrist joint are stretched too far & tear slightly.
If you are suffering from a sprained wrist joint, you may be wondering what you can do to assist with the recovery process. While there are several treatment options, incorporating exercises into your regime may assist decreases pain & swelling as well as increase wrist joint mobility.
Introduction
A wrist sprain is an injury to the ligaments of the wrist joint region around, including the ligaments connecting the carpal bones & the ligaments connecting the proximal row of carpal bones with the radius & the ulna. By injury, we mean that the ligaments are partially or fully torn.
There are 3 grades:
- A mild overstretching or overextending of the ligaments, & without joint instability.
- A partial or incomplete rupture of the ligaments, & with no or mild joint instability.
- A complete or full rupture of a ligament & with severe joint instability.
When treating a sprained wrist joint, the first thing you will want to do is decrease swelling. You can do this by using a cold pack compress on the wrist joint for 10-15 minutes a few times a day. Other treatment options include:
Physical Therapy Management
Initial treatment Options for a Sprained Wrist
Mild wrist sprains should follow the RICE method & may experience better in 24-48 hours
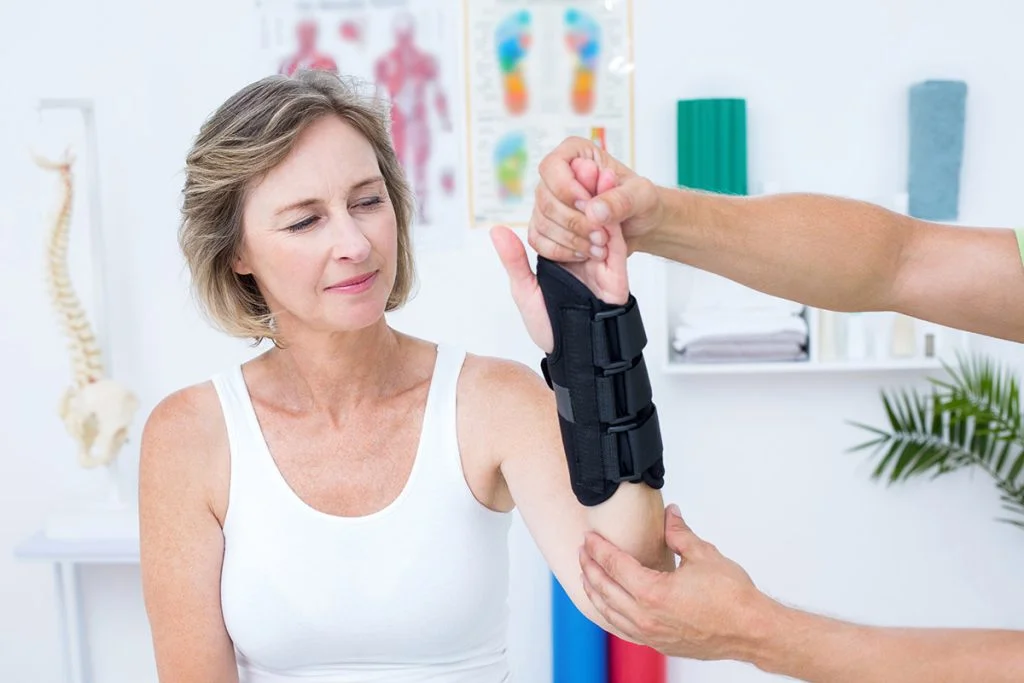
In Moderate to severe wrist sprains, Brace may assist to give protection & recovery of the part before, or while, developing through the stages discussed below
Phase 1
At first, you should follow or note the RICE method:
Rest
Stop the task & use the affected wrist joint for 48 hours or until the pain & swelling have subsided.
Ice therapy
Apply a cold pack envelope in a towel or a bag of squeeze ice to the sprained wrist joint, for about 15 minutes, two-three times for several days. Do not ice pack it for more than 10 minutes at a time
Cryotherapy
it will create superficial vasoconstriction so that the local blood flow and hemorrhage decrease. There is some suggestion regarding the effectiveness of cryotherapy, & most studies approve of the fact that cryotherapy has a pain-decreasing effect. There are also indications that cryotherapy would influence inflammation, but more & bigger studies are required to prove evidence.
Compression
Wrap the wrist joint with an elastic compression bandage & limit swelling. The bandage should push the edema fluid away from the affected tissue. Start wrapping at the base of the fingers & stop just below the elbow joint, so that you bandage in the direction of the heart. The wrap should be snug, but be aware not to cut off circulation.
Elevate
Try to keep the wrist joint above heart level as often as viable, for two days. This will assist drain fluid & decrease swelling around the wrist joint. Nonsteroidal anti-inflammatory drugs or NSAIDs are also suggestions.
In case of a severe wrist joint sprain, it can be a suggestion to immobilize the wrist joint. In some rare cases, surgery may be needed to repair a ligament that was torn completely or fully.
phase 2
In the second phase, the patient should do gentle retraining exercises, including active mobilizations, to accelerate flexibility & range of movement,
Exercises for the strengthening of the injured wrist joint. We have to start these exercises early in the rehabilitation, to prevent stiffness & weakness from developing & to ensure the wrist is functioning correctly. You can begin exercising as soon as pain allows. It is very important that the patient is guided by the treating physical therapist during the exercises.
You can combine mobilizations with some stretching exercises for the extensors & flexors muscles. Before you start to stretch, you should perform an isometric contraction & hold this for five seconds
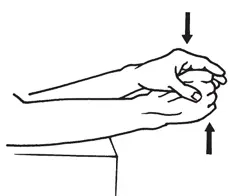
Isometric exercise
Isometric Adduction
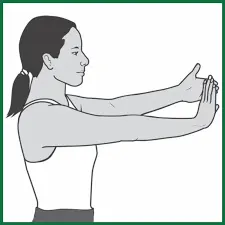
Keep your injured wrist joint straight with your hand in a fist. Place the unaffected hand underneath. Push down with your fist into the opposite hand, or a flat surface, so you are working against it. This tasks the muscles without moving the wrist joint.
Isometric Abduction
Now place your normal hand over the top of the fist. Again push your finger into the hand, so that you are working as opposed to it, but keeping the wrist joint straight.
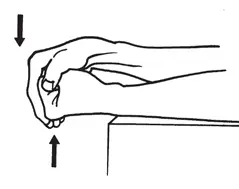
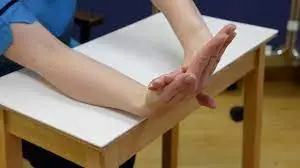
Isometric flexion
With your elbow joints relaxed by your sides, place your injured hand in a fist & get into the position in the photo. Push down into your palm or a flat surface, with your injured wrist joint, no movement allowed!
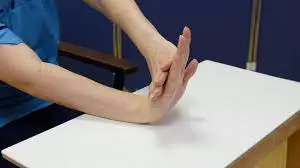
Isometric extension
In the same starting relaxed position, take your normal hand & place it on top of the injured wrist joint. Push up against it.
Isometric pronation
Relax your elbows joint lower by your side at 90 degrees. Your elbow should be straight with your little finger relaxing on a surface or arm of the chair. Use your normal hand for resistance & work as opposed to it, as if you were trying to turn your forearm & get your palm flat on the surface.
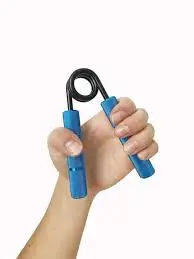
Grip strengthening
Keeping your wrist joint in a straight position, use a soft stress ball or a balled-up pair of socks, & pinch until your fingers are into your palm & slowly release.

stretching exercise
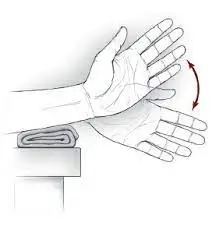
Wrist stretches
Press the back of the hand on your affected side with your other hand to assist bend or flexing your wrist joint. Hold for 15 to 30 seconds. Next, stretch the hand back by forcing the fingers in a backward opposite direction. Hold for 15 to 30 seconds. Keep the arm on your affected side straight during this exercise. Do 3 sets.

Wrist extension stretch
Stand at a table with your palms lower & start to relax position, fingers straight, & elbows joint straight and relaxed position. Lean your body weight forward. Hold this position for 15 seconds. Repeat 3 times.
Wrist flexion stretches: Stand on a table with your hands behind you and in a relaxed position, with palms pointing upwards, and fingers pointing in the direction of your body and elbow joints straight. Lean away from the table. Hold this position for thirty seconds. Repeat three times.
Range of motion exercise
There are many physiotherapy exercises that you can do to heal faster & prevent future sprains. Always talk to your orthopedic doctor before starting other supplemental, over-the-counter stretching or physical therapy.
wrist Flexion
Gently bend your wrist forward. Hold for 5 seconds. Do 2 sets of 15.
wrist extension
This exercise will help strengthen the muscles around the wrist joint & help prevent future sprains.
To do this exercise:
- Relax your arm flat on a table with your palm facing lower & your wrist joint hanging off the edge. Using a little small hand weight such as a water bottle or a soup can keep your forearm in place & lift your wrist joint as up as possible. Slowly lower the hand weight back down & repeat 5 times.
- Side to side
- Gently move your wrist joint from side to side in a handshake motion. Hold for 5 seconds in each direction. Do 2 sets of 15.
Forearm pronation and supination
- Bend the elbow joint of your affected arm 90 degrees, keeping your elbow joint at your side. Turn your palm up & hold for 5 seconds. Then slowly turn your palm lower & hold for 5 seconds. Make sure you keep your elbow joint at your side & bent or flex 90 degrees while you do the exercise. Do 2 sets of 15.

Grip Strengthening
Your grip is an integral part of your wrist function, so it is important to do exercises to improve grip strength. One easy way to do this is by using a rubber band.
To do this exercise:
- Put your fingers together & wrap a rubber band around them The wider the band, the more challenging it will be. Once your fingers are secured in the band, & spread them apart & hold for 3 to 5 seconds. Release & repeat.
- If you do not have a rubber band, & you can strengthen your grip by pinching a tennis ball. Try squeezing the ball as hard as you can for fifteen seconds, then release for 15 seconds. & Repeat this sequence3 times & do it several times a day.
Ulnar Deviation Exercise
To do this exercise:
- Stand up straight with your arms straight lower by your side. Holding a little weight, Bend or flex your wrist joint up towards your pinky finger & back up towards your thumb. Hold each position for 3 seconds & repeat the exercise 5 to 10 times.
Wrist Circles
This is a dynamic wrist joint stretch that will assist improve your range of movement.
To do this stretch:
- Stand with your feet shoulder-width apart. Put your hands together by interlocking your fingers & elevating your hands to shoulder level. Slowly & gently start to turn your wrists joint in a circular movement. Make sure to move in both directions clockwise & counter-clockwise. Do this five times and repeat.

A sprained wrist can be fragile. If you experience pain when performing an exercise, stop immediately & place ice on your wrist joint for 15-20 minutes. Putting too much strain on a sprained wrist joint may cause further damage & prolong the recovery process.
Restoring strength & stability with wrist joint sprain exercises is a surefire way to assist you to recover as quickly as possible. Once you have allowed enough time for initial rest & recovery from this common injury, it is time to get begin. Remain reading to learn more about stretches & exercises after a wrist joint sprain.
Wrist Strengthening exercise
If the wrist joint range of motion is well allowed, the next step will be to begin restoring muscle strength in the wrist joint. Generally, you will be adding weights or resistance to the range of movement exercises from above. Always start with small weights & progress from there. Grab a one-pound dumbbell, soup can, or water bottle to get begun.
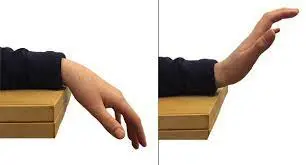
Wrist Flexion
- Sit or stand with the forearm supported & the wrist joint free to move. This can be done with a table, your knee joint, or the other hand. Hold the weight in your hand with the palm facing up on the way to the ceiling. Then, lift the palm of the hand up on the way to the ceiling as you bend or flex the wrist joint. Make sure the movement is controlled as you return to the starting relax position & repeat.
- Repeat up to 15 times for two sets each day.
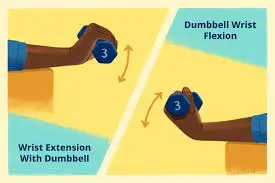
Wrist Extension
- Follow the same setup for carrying the arm as you did with wrist joint flexion. Now, hold your weight in your hand with your palm facing down on the way to the floor. Lift the back of the hand up on the way to the ceiling as you extend the wrist joint. Keep the range of movement comfortable. Move for a count of two in each direction.
- Repeat 10-15 times for up to two sets each day.
Wrist Radial Deviation
- Again, keep your wrist joint carry as you continue with your strength program like the 2 exercises above. This time you will turn your wrist joint so that your thumb is facing up on the way to the ceiling. The wrist joint motion is a small sideways bend or flex as you lift your thumb side of the wrist joint up on the way to the ceiling. Keep the wrist joint neutral not flexed or extended as you complete this little move.
- Repeat 10-15 times for up to two sets each day.
Wrist Pronation and Supination
- You will start in the exact same relaxed position as the wrist joint radial deviation above. This time you will be rotating the wrist joint from side to side while keeping the elbow joint & upper arm completely still. Easily rotate the hand until the palm is facing on the way to the ceiling before diverting directions so that the palm is now facing the floor. To add further resistance, & try using a hammer or holding your weight at the base so that most of it is above your fist.
- Repeat 10-15 times slowly for up to two sets a day.

Grip Exercises
- Restoring grip strength is always an important step in recovering wrist joint function. All of the muscles we use for gripping across the wrist joint & can cause increases if not properly addressed.
Power Squeeze
- Grab some therapy putty, a small ball, or rolled towel to address all the muscles in your hand & wrist joint at once with a powerful squeeze. Place your strengthening tool in your palm & wrap your fingers around it. Then, squeeze as hard as you can comfortably & hold for up to 5 seconds at a time.
- Repeat 10-15 times for up to two sets.
Full Finger Spread
- For this one, grab a rubber band, & therapy putty, or hand extension exerciser to work the back of the hand & fingers. Place the band around the fingers, keeping them as close together as possible to begin. Then, spread the fingers apart as far as possible while pushing as opposed to the resistance. Hold for two-three seconds before slowly returning to the starting relax position.
- Repeat 10-15 times for up to two sets each day.

After mobilizations, you can start exercises to increase muscle strength.
- These exercises will be very same as the mobilizations, & except for the fact that you should use some tools. By tools we mean weights, Theraband, pull machines, & many others. The goal of these tools is to put resistance into motion. You should start with a low resistance/weight & many repetitions to train the muscle endurance first, & then gently accelerate resistance/weight but reduce repetitions to train muscle strength, do this depending on the chance of the patient.
- It can also be useful to do some proprioceptive exercises, especially for practicing sports, like gymnastics, where the athletes regularly use their hands as weight carriers. These exercises are often shown in push-up positions.
- It is difficult to give information about the repetitions & the duration of the exercises because this is strongly related to the patient & his advancement. It is also main to know what the final goal of the patient will be, does he just have to go back to ADL activities or is he an athlete who has to go back to his sport & on which level? You will have to think about all these things when you set up a personal training program for a specific patient.
- When returning to sports activities, the therapist can prepare the patient by tapping the wrist or adjusting a brace.
conditioning program
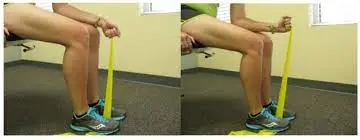
Resisted wrist extension
- Resisted wrist extension exercises with a band
- Sit leaning forward with your legs slightly spread. Then place your forearm on your thigh with your injured hand & wrist joint in front of your knee.
- Clasp one end of an exercise band with your palm lower. Step on the other end.
- Slowly bend or flex your wrist joint upward for a count of two. Then down your wrist slowly to a count of five.
- Repeat 8 to 12 times.

Resisted wrist flexion
- Resisted wrist flexion exercise with band
- Sit leaning forward with your legs slightly spread. Then place your forearm on your thigh with your injured hand & wrist joint in front of your knee.
- Clasp one end of an exercise band with your palm up. Step on the other end.
- Slowly bend or flex your wrist joint upward for a count of two. Then down your wrist joint slowly to a count of five.
- Repeat 8 to 12 times.
Resisted radial deviation
- Resisted radial deviation exercise with band
- Sit leaning forward with your legs slightly spread. Then place your forearm on your thigh with your injured hand & wrist joint in front of your knee.
- Grasp one end of an exercise band with your hand facing the way to your other thigh. Step on the other end.
- Slowly bend or flex your wrist joint upward for a count of two. Then down your wrist joint slowly to a count of five.
- Repeat 8 to 12 times.
Resisted ulnar deviation
- resisted ulnar deviation exercise
- Sit leaning forward with your legs slightly spread. Then place your forearm on your thigh with your injured hand & wrist joint by the inside of your knee.
- Clasp one end of an exercise band with your palm lower. Step on the other end with the foot as opposed to the hand holding the band.
- Slowly bend or flex your wrist joint outward & toward your knee joint for a count of two. Then slowly go your wrist joint back to the starting relax position to a count of five.
- Repeat 8 to 12 times.
Resisted forearm pronation
- Resisted forearm pronation exercise
- Sit leaning forward with your legs slightly spread. Then place your forearm on your thigh with your injured hand & wrist joint in front of your knee joint.
- Clasp one end of an exercise band with your palm up. Step on the other end.
- Keep your wrist joint straight, & roll your palm inward the way to your thigh for a count of two. Then slowly go your wrist joint back to the starting relax position to a count of five.
- Repeat 8 to 12 times.
Resisted forearm supination
- Sit leaning forward with your legs slightly spread. Then place your forearm on your thigh with your injured hand & wrist joint in front of your knee.
- Clasp one end of an exercise band with your palm lower. Step on the other end.
- Keeping your wrist joint straight, roll your palm outward & away from your thigh for a count of two. Then slowly go your wrist joint back to the starting relax position to a count of five.
- Repeat 8 to 12 times.
Exercising WithOut Wrist Pain (fitness releted)
We all know the well-being benefits of daily exercise. Many fitness workouts include putting pressure on your wrists joint. You may have noticed some discomfort while lifting weights or during yoga poses that need you to put weight on your hands. Here are some points to make sure you are not straining your wrist joint while waiting actively.
Tip 1: Keep your wrists flexible. Tight wrist joints put more strain on surrounding ligaments, muscles, & joints. Make sure your wrist joint can move comfortably in all the movements you will use during your workout. If an exercise needs the wrist joint to bend or flex 90 degrees, gradually stretch your wrist joints back so they can move into the relaxed starting position with the facility before adding your body weight.
Tip 2: Maintain your strength. Strong wrist joints are more stable during weight-lifting & weight-bearing tasks. A strong grip permit you to hold weights more securely during intense exercises. Stress balls & spring grippers can be used to strengthen your grip or clasp. To assist decreases wrist joint tearing & wrist joint pain or stiffness, strengthen the muscles in your forearms using small or light resistance bands or small or light weights to be resistant to wrist joint motions.
Tip 3: Use your wrists joint in the most stable relaxed position. Keep your hand & forearm in a straight alignment during exercises. Improper or irregular wrist joint position puts strain on the small ligaments. If your exercise program needs putting weight through an outstretched hand as in a plank pose, add stability at the base of your wrist joint by slightly arching your hand.
Tip 4: Support your wrists joint. Wrist joint straps can help with securing your grasp around heavy barbells. If wrist joint movement is intolerable during these types of tasks, braces or covers can minimize your wrist joint movement & keep away from awkward pulls. Exercise tools such as yoga or push-up blocks can assist you to change your wrist position for increased comfort as your weight bears through your hands.
Tip 5: Rest your wrists. Take rest breaks as required or alternate your exercise routine with the lower-impact tasks. Exercises should NOT cause more wrist pain. In inclusion, strengthening your back & core muscles will take a load of massive weights from your wrist joint.
Whether you are healing from a wrist joint injury, feeling slight discomfort, or experiencing great, listen to your body & make adjustments so your wrist joint stay comfortable, relaxed & protected during exercise. If your wrist pain increases or doesn’t go away, consult your doctor/surgeon or certified hand therapist.
FAQ
What is the rapid way to recover from a sprained wrist joint?
To speed up the recovery, you can:
Relax your wrist joint for at least 48 hours.
Ice your wrist joint to reduce pain & swelling.
Compress the wrist with a bandage.
Elevate your wrist above your heart, on a pillow, or on the back of a chair. …
Take anti-inflammatory painkillers. …
Use a cast or splint to keep your wrist joint immobile.
Should you rest or exercise a sprained wrist?
Continuing to use your wrist joint after it is sprained may prolong your injury & lead to more pain & discomfort. It may be difficult, but the best thing to do is rest & give your body the chance to recover on its own.
Should I massage my sprained wrist?
Chronic Stage – Wrist Sprain
However, massage can incidentally assist a ligamentous sprain by increasing the ability of a muscle to contract & stabilize the region by separating pain & dysfunction due to tightness & myofascial trigger points.
Can a sprain heal on its own?
Most sprains recover on their own, but rebuilding strength in your ankle joint can assist prevent future injuries. If you do not allow your ankle joint ligaments time to recover or heal, you may have long-lasting instability chronic ankle sprains or recurrent ankle joint sprains.
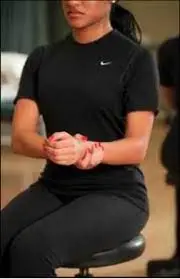
How can I make my wrist stronger?
To do this, simply relax position your forearm either palm up or palm down & hold your palm immobile with the opposite hand. Attempt to bend or flex your wrist joint but resist with the other hand. Do this ten times in each direction including side to side. Repeat several times daily.