
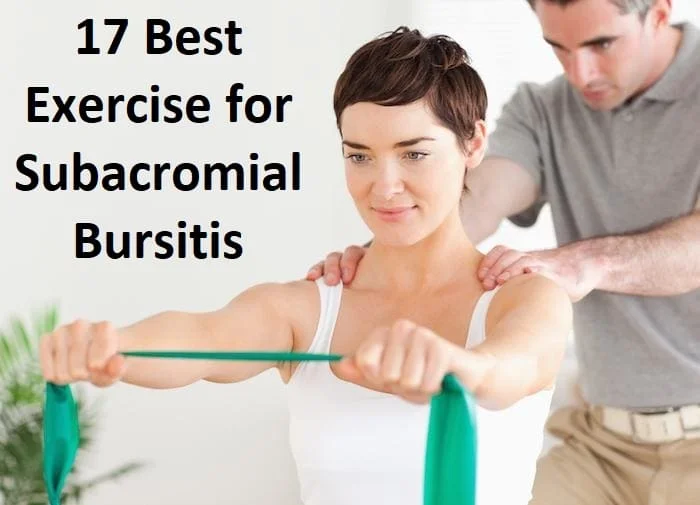
Best Physiotherapy Exercise for Rotator cuff injury
Exercise for Rotator cuff injury is an important part of treatment to improve the function of the shoulder blade and make your shoulder fully functional, flexible, and powerful enough to perform all day-to-day activities with ease.
What is a rotator cuff injury?
- After an injury or surgery, an exercise conditioning program will help you return to daily activities & enjoy a more active, & healthy lifestyle. Following a well-structured shoulder conditioning program will also help you return to sports & other recreational activities.
- This is a general conditioning program that provides a more range of exercises. To ensure that the program is safe & effective for you, it should be performed under your doctor’s supervision. Talk to your physical therapist about which exercises will best help you meet your rehabilitation goals.
- As sports fans & athletes alike know, shoulder injuries are an important business. They can be extremely limiting painful, & slow to heal. A rotator cuff is a group of 4 muscles that stabilize the shoulder & allow it to move. A physical therapist should visualize the head of the arm bone as a golf ball, & the area of the shoulder blade as a golf tee. She says The rotator cuff serves as a sleeve that enables the ball to spin & roll while remaining on the tee. The most common rotator cuff injuries are impingements & tears.
Impingement
- An impingement occurs when a rotator cuff muscle swells & cramps the space between the arm & shoulder bones, causing pinching. Muscle strain, other overuse injuries, & bone spurs are common causes of swelling.
Tear
- A less usual injury, a rotator cuff tear occurs when a rotator cuff tendon or muscle is pulled apart. Most tears will not require surgery.
- Repetitive, overhead movement can wear down the rotator cuff muscles & are thus a common cause of injury. A traumatic injury, such as falling down onto your arm, can also cause harm. Regardless of how it happens, the chances of rotator cuff tear rise as we age & the wear on our bodies accumulate.
How to Avoid a Rotator Cuff Injury
When to Be Concerned
At the first sign of shoulder pain or discomfort, see for help & a diagnosis.
Pain on the top of your shoulder or down the outside of your arm, a weak shoulder, loss of movement, weakness in your arm, & the inability to reach behind your back or ascend are all signs that something is not right. It could be a partial torn but speak to someone with expertise in order to find out the true cause of your shoulder joint pain.
Main Causes of Rotator Cuff Injuries
The usual causes for a rotator cuff injury include hyper use, such as with massive lifting, an injury, or traumatic events like repetitive movement, falls, and gradual degeneration of the muscles & tendons.
In truth, a rotator cuff injury can happen to an old or young, athlete or a couch potato. However, men over the age of 65 are among those most vulnerable to a torn rotator cuff.
Prevention
- The most common way to prevent a rotator cuff injury is to see as soon as you notice any discomfort. This can prevent the injury from becoming more chronic to prevent.
- Some of the best ways to prevent RCI(rotator cuff injury) include the following:
- Exercise & target both the small & large muscles of the shoulder to strengthen the rotator cuff.
- Keep good posture. Leaning forward with your head and shoulder can cause a shoulder blade problem and may lead to shoulder impingement syndrome.
- Avoid sleeping on your side with your arm lengthen overhead. Try not to lie on your shoulder joint while you sleep.
- Don’t smoke as it reduces blood flow to the rotator cuff.
- Avoid activities with repetitive overhead arm action. Speak to your physical therapist or assistant about alternate movements that might be less risky.
- Practice low-resistance exercises and introduce more repetitions to gradually strengthen the small muscles of the shoulder without the risk of injury. Keep movements slow and steady.
- Include arm elevate to the side with external rotation & rest the shoulder joint before a workout routine.
- Frequent massages with hot and cold compresses will be able to help reduce inflammation.
- Contact us if you think you may have injured your rotator cuff.
What to do after an injury?
RICE treatment
- Try using the RICE method immediately following an injury: Rest, ice, compression, & elevation work together to reduce pain & swelling. Once the swelling has gone down & your arm is no longer painful to move, certain exercises can help you heal & prevent issues such as a frozen shoulder or loss of range of movement.
- The RICE method is the most simple self-care technique that helps decrease swelling, reduce pain, & speed up recovery.
- You can treat small injuries with this method at home. You might try it if you have a painful elbow after playing sports. If you have pain or swelling that gets increases or does not go away, see a doctor.
The RICE method includes the following 4 steps:
Step 1: Rest
Pain in your body part is a signal that something is wrong in your body. As soon as you are hurt, stop your activity, & rest as much as possible for the first 2 days. Try to follow the no pain, no gain philosophy. Doing so with certain injuries, like a moderate to severe elbow sprain, can make the damage increase & delay your recovery. Doctors say you should avoid putting a weight lift on the affected area for 24 to 48 hours. Resting also helps prevent further damage
Step 2: Ice
Ice is a tried-and-true tool for decreasing pain & swelling. Apply an ice pack covered with a light, absorbent towel to help prevent frostbite for 15-20 minutes every 2 to 3 hours during the first 24 to 48 hours after your injury. Do not have an ice pack? A bag of frozen ice pieces or corn will work just fine.
Step 3: Compression
This means covering the affected area to prevent swelling. cover the injured area with an elastic medical bandage like an ACE bandage. You want it to be snug but not too tight — if it is too tight, it will interrupt blood flow. If the skin below the cover turns blue or feels cold, numb, or tingly & irritating, loosen the bandage. If these symptoms do not disappear right away, seek immediate medical help.
Step 4: Elevation
This means elevating the affected body part above the level of your heart. Doing so decreases pain, throbbing, & swelling. It is not as difficult to do as you might expect. For example, if you have an elbow sprain, you can prop your hand up on pillows while sitting on the sofa. The CDC recommends you keep the affected area elevated whenever possible, even when you are not icing it.
strapping or splinting
Strapping or taping the shoulder: Supporting the area can help realign the muscle fibers & relieve pressure on the area. A physician may recommend using a splint for two to three weeks to take the shoulder joint out of action. An arm sling & rest to give your shoulder joint time to heal. You may need to modify activities & stop certain work or sports for a period of time
Nonsurgical treatment
medical treatment
- Nonsteroidal anti-inflammatory drugs (NSAIDs) to minimize pain and swelling, and another drug combination of anabolic steroids and exercise has been shown to speed up and improve recovery of bioengineered rotator cuff tendons
- Steroid injections to ease pain and swelling.
- A steroid injection into the shoulder joint might be helpful, especially if the pain is interfering with sleep, & daily activities, or physical rehabilitation therapy. While such shots often provide temporary relief, they also can weaken the tendon and reduce the success of future shoulder surgery.
- Physical therapy to learn to strengthen and stretch
Rest and Activity Modification
Your doctor may recommend rest & activity modification to help decrease joint pain & swelling caused by a partial rotator cuff tear. You may be asked to adjust how you perform daily activities such as lifting items or reaching overhead, to decrease the stress placed on your shoulder joint. How long you need to rest the shoulder joint is based on the severity of the torn. You can gradually return to your usual activities as the shoulder joint heals & symptoms subside.
Physiotherapy treatment
Physiotherapy exercises can help you ease the pain and replace your rotator cuff. There are several physiotherapy exercises that can help replace strength & flexibility in your shoulder joint after a rotator cuff injury. Physiotherapy is the best possible treatment option if you want to keep away from surgery. Simple stretching, yoga, acupuncture, & other exercises can get you back to your normal routine.
electrical therapy
Heating Pad/Ultrasound
Heat can enhance the healing process. If you have a rotator cuff injury then you can simply cure it using a heating pad given that it is not a torn muscle. How does it work? When heat is put in an application to an injured cuff rotator, it rises the blood flow to the tissue. This, as a result, eases inflammation & speeds up the healing process. This is one of the most popular usual treatment procedures for many athletes. It not only relaxes & increases the flexibility of the muscles but also improves your shoulder’s range of movement.
Transcutaneous Electrical Nerve Stimulation (TENS)
TENS is another suitable usual treatment procedure for rotator cuff injury. It makes use of electrodes to transfer pulsed electric current to the injured rotator cuff. Imagine the sensation of pins & needles touching your skin. However, TENS stimulates nerve endings, therefore, your brain does not recognize or perceive the pain. Moreover, it can also help release endorphins, a pain-easing chemical that fails to quell swelling & inflammation.
Ice Therapy
Similar to heat, & cold can also reduce swelling, minimize inflammation, and decrease pain. The doctors & physiotherapists advise the patients to use ice packs on the injured area. It is an effective treatment procedure & should be practiced at least 3 times a day if you have a rotator cuff injury.
These initial exercises include:
isometric exercise
- Isometric exercises are performed by simply reducing your muscles without any other movement.
- Isometric exercise is favorable:
- In the beginning stages of therapy, & when inflammation may make shoulder movement painful When trying to improve muscular function in a specific shoulder range of movement. Shoulder isometrics can be achieved up to three times per day
Isometric Shoulder Abduction
To perform isometric shoulder abduction exercises:
- Stand nearly five to six inches from a wall, but turn your body perpendicular to the wall.
- The shoulder joint you wish to exercise should be close to the wall.
- Make a fist & push it into the wall to perform the exercise. You may wish to use a folded-up towel for a small extra rest.
- Gently push into the wall as if you are trying to elevate your arm out to the side, & hold it there for five seconds.
- Slowly release pressure on the wall.
- Again, no need to push the wall over; a gentle push will do to perform the exercise. Perform ten to fifteen repetitions, & then move on to the next isometric exercise.
Isometric Shoulder Flexion
To perform shoulder flexion:
- Stand facing a wall.
- Bend(flex) the elbow joint on the side of the shoulder joint you want to exercise & make a fist.
- Place a folded towel or small pillow between your fist & the wall, & gently press your hand into the wall.
- Hold on to it for 10 seconds, & then slowly release(relax).
- There is no need to try to press the wall above. Just push gently into the wall to operate your shoulder joint muscles. This is especially main if you start isometric exercise after shoulder surgery. If it reasons pain, take a break for two-three minutes.
- Do ten to fifteen repetitions, & then second on to the next exercise: isometric shoulder abduction.
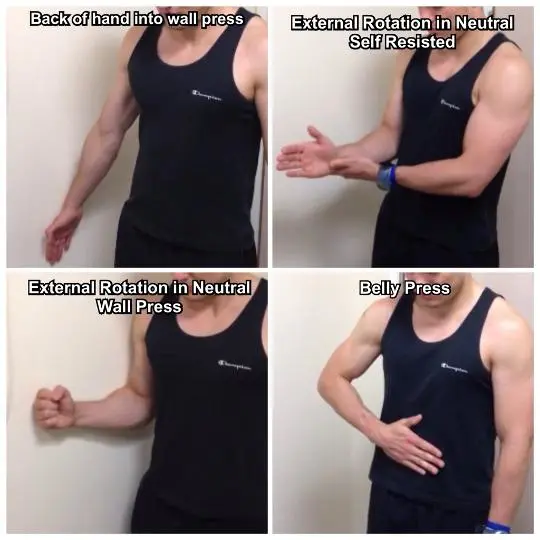
Isometric Shoulder External Rotation
- Isometric shoulder external rotation is an exercise that can help power your rotator cuff muscles, & specifically your teres minor & your infraspinatus. To achieve the exercise:
- Continue standing at a right angle to a wall about six inches from it.
- The shoulder you are exercising shoulder joint be closest to the wall.
- Bend(flex) your elbow 90 degrees, make a fist & press the back of your hand into the wall as if you were turning your arm outwards.
- Use a small towel or pillow for a little padding, if needed to perform the isometric exercise.
- Gently push into the wall for about five seconds.
- Slowly release pressure on the wall.
- Stop the exercise if you feel any increased pain and discomfort.
- Do ten to fifteen repetitions, & then start the next isometric exercise.
Isometric Shoulder Internal Rotation
To perform isometric shoulder internal rotation:
- Position your body so that you are facing a door frame or an out-to-door corner of a wall.
- The shoulder joint you are exercising should be near the door opening or corner.
- Bend(flex) your elbow 90 degrees, make a fist, & gently press into the corner wall or door jamb as if you were trying to turn your hand inward towards your belly button.
- Remember, no motion should occur in your shoulder joint during the exercise.
- Use a small folded towel for padding.
- Push and hold for 5 seconds, & then slowly release.
- Perform ten to fifteen repetitions, & then move on to the final performed shoulder joint isometric exercise: isometric extension.
Isometric Shoulder Extension
To perform isometric shoulder extension:
- Stand about six inches away from a wall with your back covering it.
- Keep your elbow joint straight so your hand is lower close to your hip.
- make a fist, & gently press it into the wall behind you.
- Remember, a very small motion should occur at your shoulder joint.
- Hold the pressure against the wall for five seconds, & then release slowly.
- Do 10 to 15 repetitions.
Range of motion exercise
- doorway stretch
- side-lying external rotation
- high-to-low rows
- reverse fly
- lawn mower pull
If you are comfortable adding weight to these exercises therapy, try using a light or low dumbbell or resistance band for repetitions(low-impact exercise). If you do not have a light(low-weight) dumbbell, try using a can of soup.
Doorway stretch
- Warm up your muscles by standing in an open doorway & open out your arms out to the side.
- Grip the sides of the doorway with each hand at or below shoulder height, & lean forward through the doorway until you feel a light stretch.
- Keep a straight back as you lean & shift your weight onto your toes. You should feel a stretch(lengthen) in the front of your shoulder. Do not overstretch.
Side-lying external rotation
- Lie down on the side-lying position opposite your injured arm.
- Bend(flex) the elbow of your injured arm to 90 degrees & rest the elbow on your side. Your forearm should resting position across your abdomen.
- Hold a light dumbbell in the injured side’s hand &, keeping your elbow against your side, & slowly elevate the dumbbell toward the ceiling. Stop rotating your arm if you feel the strain(stretch).
- Hold the dumbbell up for 5 seconds before returning to the start position with your arm down to the resting position.
- Repeat three sets of 10 up to three times per day. Increase reps to twenty when a set of ten becomes easy.
High-to-low rows
- Connect a resistance band or weight cuff to something sturdy at or above shoulder joint height. Be sure it is fixed so it doesn’t come to lose when you pull on it.
- Get down on one knee so the knee opposite your affected arm is elevated. Your body & lowered knee should be aligned straight. Resting your other hand on your elevated knee.
- Holding the band fixing with your arm outstretched, pull your elbow toward your body. Keep your back straight & squeeze your shoulder blades together & down as you pull. Your body should not be moving or twisting with your arm.
- Return to the start & repeat three sets of 10 repetitions.
Reverse fly
- Stand with your feet shoulder-width apart(extensive) & your knees slightly bent(flex). Keep your back straight & bend(flex) forward slightly at the waist.
- With a small weight in each hand, extend your arms & elevate them away from your body. Do not lock your elbow. pinch your shoulder blades together as you do so. Do not elevate your arms above shoulder height.
- Return to the start & repeat three sets of 10 repetitions.
Lawnmower pull
- Stand with your feet shoulder-width apart. Place one end of a resistance band under the foot opposite your affected arm. Hold the other end with the affected arm, so the band goes diagonally across your body.
- Keeping your other hand on your hip & without locking your knees, & bend slightly at the waist so the hand holding the band is parallel to the opposite knee.
- As if starting a lawn mower in a slow movement, straighten upright while pulling your elbow across the body to your outside ribs. Keep your shoulders relaxed & pinch your shoulder blades together as you stand.
- Repeat 3 sets of 10.
Stretch for rotator cuff injury
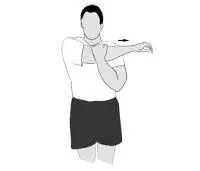
Crossover arm stretch
- Stand up straight and relax your shoulders. Take a deep breath if you need to rest.
- Stretch the injured arm across your chest, but below your chin; reach as far as possible.
- The normal arm helps by holding the elbow area of the injured arm.
- When performing this exercise, you should feel a stretch & not pain.
- Repeat the exercise with the other arm.
Posterior Stretch
- Stand up and relax the shoulders.
- The hand of the normal arm holds the elbow region of the affected one.
- The hand of the affected arm crosses the body & rests on the opposite shoulder.
- The hand of the normal arm lightly pushes the injured arm up and over the body, eliciting a stretch.
- Repeat the exercise with the other arm.
conditioning program
Rotator Cuff and Shoulder Conditioning Program
Strength: Strengthening the muscles that support your shoulder joint will help keep your shoulder joint stable and safe. Keeping these muscles strong can relieve shoulder pain & prevent further injury.
Flexibility: Stretching the muscles that you strengthen is important for restoring the range of movement & preventing injury. Gently stretching after strengthening exercises can help reduce muscle soreness & keep your muscles long & flexible.
Target Muscles: The muscle groups selected in this conditioning program include:
- Deltoids (front, back, and over the shoulder)
- Trapezius muscles (upper back)
- Rhomboid muscles (upper back)
- Teres muscles (supporting the shoulder joint)
- Supraspinatus (supporting the shoulder joint)
- Infraspinatus (supporting the shoulder joint)
- Subscapularis (front of shoulder)
- Biceps (front of the upper arm)
- Triceps (back of upper arm)
Length of program: This shoulder conditioning program should be continued for four to six weeks unless otherwise specified by your doctor or physiotherapist. After your recovery, these exercises can be continued as a maintenance program for lifelong protection & the health of your shoulders. Performing the exercises two to three days a week will maintain strength & range of movements in your shoulders.
Getting Started
Warmup
- Arm circles, & starting small & increasing the range of movement.
- Shoulder rolls: forward and backward.
- Shoulder retraction: pulling your shoulder blades together.
- Overhead movement, to the front & to the side.
- Small motions that mimic the exercise or activity you’ll be doing.
Stretching exercise
- After the warm-up, do the stretching exercises first & after moving on to the strengthening exercises. When you have finished the strengthening exercises, & repeat the stretching exercises to end the program.
- Do not ignore pain: You should not feel pain during stretching and strengthening exercises. Talk to your doctor or therapist if you have any pain while exercising.
- Ask questions: If you are not sure how to do an exercise & how long the exercise continues, or how often to do it, contact your physical therapist.
strengthening exercise
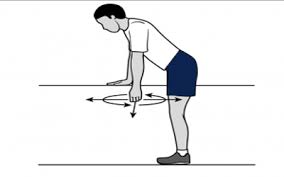
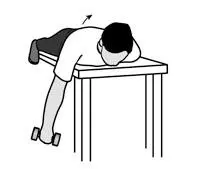
Pendulum
- Main muscles worked: Deltoids, supraspinatus, infraspinatus, subscapularis
- Equipment needed: None
- Repetitions: 2 sets of 10
- Days Per Week: 5 to 6
Step-by-step directions
- Lean forward & place one hand on a table for support. Let your other arm rest freely at your side.
- Gently swing your arm forward and back. Repeat the exercise by moving your arm side-to-side, & repeat again in a circular movement.
- Repeat the entire sequence with the second arm.
- Tip: Do not round your back & lock your knees.
Crossover Arm Stretch
- Main muscles worked: Posterior deltoid
- You should feel this stretch at the back of your shoulder joint
- Equipment needed: None
- Repetitions: 4 on each side
- Days Per Week: 5 to 6
Step-by-step directions
- Relax your shoulders & gently pull one arm across your chest as far as possible, assisting with your upper arm.
- Hold the stretch for 30 seconds & then relax the position for 10 seconds.
- Repeat with the other arm.
- Tip: Do not pull or put pressure on your elbow joint.
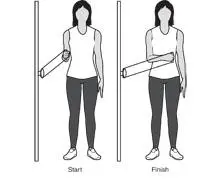
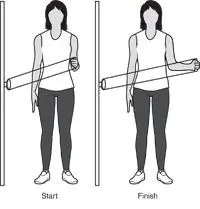
Passive Internal Rotation
- Main muscles worked: Subscapularis
- You should experience this stretch at the front of your shoulder joint
- Equipment needed: Light stick, same as a yardstick
- Repetitions: 4 on each side
- Days Per Week: 5 to 6
Step-by-step directions
- Hold a stick behind your back with one hand, & lightly pinch the other end of the stick with your other hand.
- Pull the stick horizontally as shown so that your shoulder joint is passively stretched to the point of feeling a pull without pain.
- grip(hold) for 30 seconds & then rest for 30 seconds.
- Repeat on the other side.
- Tip: Do not lean over or turn to the side while pulling the stick.
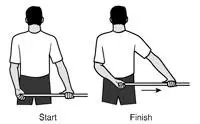
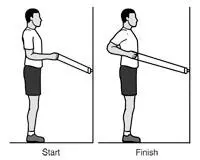
Passive External Rotation
- Main muscles worked: Infraspinatus, teres minor
- You should experience this stretch in the back of your shoulder joint
- Equipment needed: Light stick(cane), & such as a yardstick.
- Repetitions: 4 on each side
- Days Per Week: 5 to 6
Step-by-step directions
- Grasp the stick with one hand & cup the other end of the stick with the other hand.
- Keep the elbow of the shoulder you are stretching against the side of your body & press the stick horizontally, as shown, to the point of feeling a pull-in without pain.
- Hold on to it for 30 seconds & then relax for 30 seconds.
- Repeat on the other side.
- Tip: Keep your hip joints facing forward & do not turn.

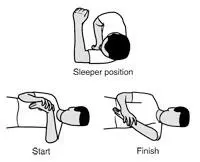
Sleeper Stretch
- Main muscles worked: Infraspinatus, teres minor
- You should feel this stretch in your outer upper back, & behind your shoulder joint.
- Equipment needed: None
- Repetitions: 4 reps, 3x a day
- Days Per Week: Daily
Step-by-step directions
- Lie on your side on a firm, flat surface with the injured shoulder under you & your arms bent(flex), as shown. You can place your head on a pillow or wedge for comfort if needed.
- Use your normal arm to press your other arm down. Stop pushing down when you feel a stretch in the back of your injured shoulder joint.
- Hold this position for 30 seconds, & then rest your arm for 30 seconds.
- Tip: Do not bend(flex) your wrist or push down on your wrist.
Standing Row
- Main muscles worked: Middle and lower trapezius
- You should feel this exercise at the back of your shoulder joint & into your upper back
- Equipment needed: Use an elastic stretch band of comfortable resistance to muscles. As the exercise becomes easier to perform, progress to three sets of 12 repetitions. If you have access to a fitness center, & this exercise can also be performed on a weight machine or weight cuff. A fitness trainer at your gym can instruct you on how to use the machines safely.
- Repetitions: 3 sets of 8
- Days Per Week: 3
Step-by-step directions
- Make a three-foot-long loop with the elastic band & tie the ends together. Connect the loop to a doorknob or other stable object.
- Stand grasping the band with your elbow bent & at your side, as shown in the start position.
- Keep your arm close to your side & slowly pull in your elbow straight back.
- Slowly return to the starting rest position & repeat.
- Tip: pinch your shoulder blades together as you pull
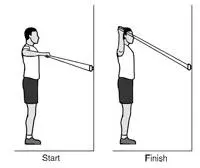
External Rotation With Arm Abducted 90°
- Main muscles worked: Infraspinatus and teres minor
- You should experience this exercise at the back of your shoulder joint & into your upper back
- Equipment needed: Use an elastic stretch band of comfortable or secure resistance. As the exercise becomes easier to perform, progress to three sets of 12 repetitions. If you have access to a fitness center, this exercise can also be represented on a weight machine or weight cuff. A fitness assistant or therapist at your gym can command you on how to use the machines safely.
- Repetitions: 3 sets of 8
- Days Per Week: 3
Step-by-step directions
- Make a three-foot-long loop with the elastic band & tie the ends together. Connect the loop to a doorknob or other stable object.
- Stand holding the band with your elbow bent (flex) 90° & elevated to shoulder height, as shown in the start position.
- Keeping your shoulder & elbow level, slowly elevate your hand until it is in line with your head.
- Slowly return to the rest position & repeat.
- Tip: Make sure your elbow joint stays in line with your shoulder joint.
Internal Rotation
- Main muscles worked: Pectoralis, subscapularis
- You should experience this exercise in your chest and shoulder joints.
- Equipment needed: Use an elastic stretch band of relaxable resistance. As the exercise becomes easier to perform, progress to three sets of 12 repetitions. If you have access to a fitness center, this exercise can also be represented on a weight machine or weight cuff. A fitness assistant or therapist at your gym can command you on how to use the machines safely.
- Repetitions: 3 sets of 8
- Days Per Week: 3
Step-by-step directions
- Make a three-foot-long loop with the elastic band and tie the ends together. Connect the loop to a doorknob or other stable object.
- Stand holding the band with your elbow bent(flex) & at your side, as shown in the rest position.
- Keep your elbow joint close to your side & bring your arm across your body.
- Slowly return to the rest position & repeat.
- Tip: Keep your elbow joint pressed into your side.
External Rotation
- Prime muscles worked: Infraspinatus, teres minor, posterior deltoid
- You should experience this stretch in the back of your shoulder joint & upper back
- Equipment needed: Use an elastic stretch band of relaxable resistance. As the exercise becomes easier to perform, progress to three sets of 12 repetitions. If you have access to a fitness center, this exercise can also be represented on a weight machine or weight cuff. A fitness assistant or therapist at your gym can command you on how to use the machines safely.
- Repetitions: 3 sets of 8
- Days Per Week: 3
Step-by-step directions
- Make a three-foot-long loop with the elastic band & tie the ends together.
- Connect the loop to a doorknob or other stable object.
- Stand holding the band with your elbow bent(flex) & at your side, as shown in the rest position.
- Keeping your elbow joint close to your side, slowly rotate your arm outward.
- Slowly return to the resting position & repeat.
- Tip: pinch your shoulder blades together when you pull your elbow joint back.
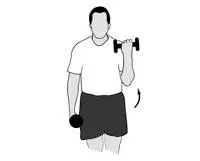
Elbow Flexion
- Main muscles worked: Biceps, brachialis
- You should experience this exercise at the front of your upper arm
- Equipment needed: Begin with a weight that allows three sets of 8 repetitions and progress to three sets of 12 repetitions. As the exercise becomes easier, add weight in one-pound increments to a maximum of 10 to 15 pounds. Each time you increase the weight, start again at three sets of 8 repetitions.
- Repetitions: 3 sets of 8
- Days Per Week: 3
Step-by-step directions
- Stand tall with your weight constantly distributed over both feet.
- Keep your elbow joint close to your side & slowly bring the weight up toward your shoulder joint as shown.
- Hold for 2 seconds.
- Slowly return to the resting position & repeat.
- Tip: Do not do the exercise too rapidly or swing your arm.
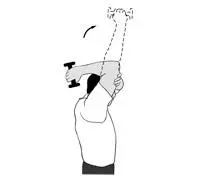
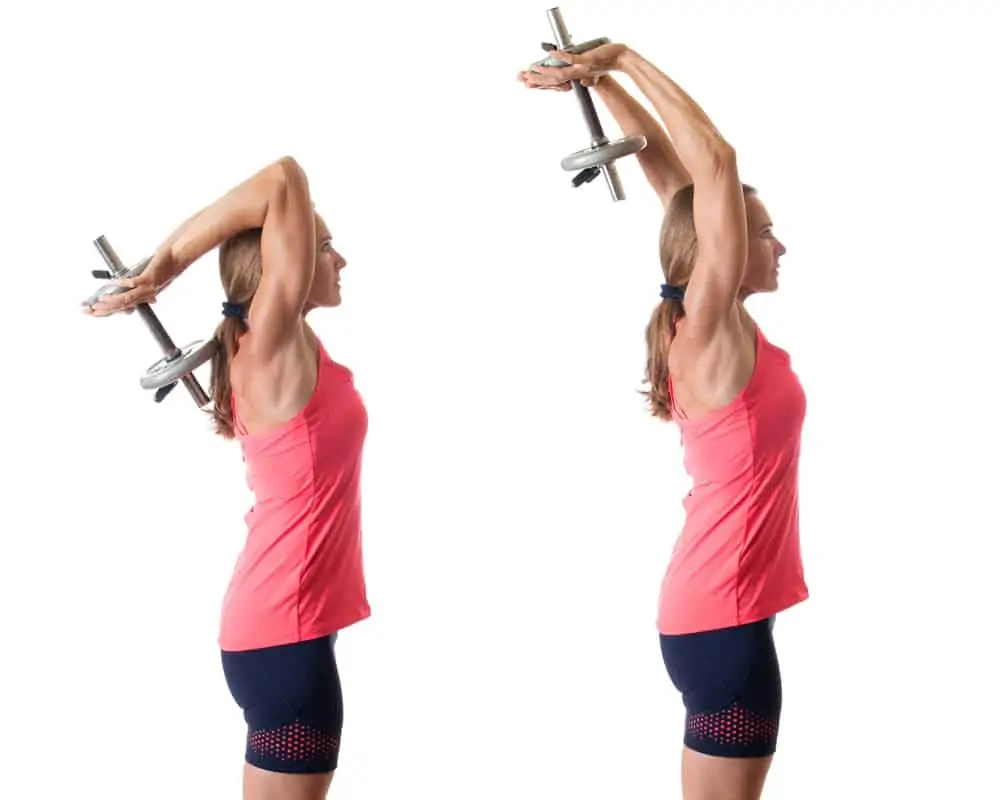
Elbow Extension
- Main muscles worked: Triceps
- You should experience this exercise at the back of your upper arm
- Equipment needed: Begin with a weight that allows three sets of 8 repetitions and progress to three sets of 12 repetitions. As the exercise becomes easier, add weight in one-pound increments to a maximum of 10 pounds. Each time you increase the weight, start again at three sets of 8 repetitions.
- Repetitions: 3 sets of 8
- Days Per Week: 3
Step-by-step directions
- Stand tall with your weight constantly distributed over both feet.
- Elevate your arm & bend your elbow joint with the weight behind your head.
- Assist your arm by placing your other hand on your upper arm.
- Slowly straighten your elbow joint & bring the weight overhead.
- Hold for 2 seconds.
- Slowly lower your arm back down behind your head & rest for 1-2 seconds & then repeat.
- Tip: Keep your abdominal muscles tight & don’t arch your back.
Trapezius Strengthening
- Main muscles worked: Middle & posterior deltoid, supraspinatus, & middle trapezius
- You should experience this exercise at the back of your shoulder & into your upper back
- Equipment needed: Begin with a light enough weight to allow three to 4 sets of 20 repetitions without pain. As the exercise becomes easier to perform, add two to three pounds of weight, but do fewer repetitions. Progress to three sets of 15 repetitions at each weight increment, with a maximum weight of approximately 5 to 7 pounds.
- Repetitions: 3 sets of 20
- Days Per Week: 3 to 5
Step-by-step directions
- Place your knee on a chair & lean forward so that your hand reaches the chair & helps assist your weight. Your opposite hand is at your side, & palm facing your body.
- Slowly elevate your arm, rotating your hand to the thumbs-up position & stopping when your hand is shoulder height, with your arms parallel to the floor.
- Slowly down your arm to the original position to a count of five.
- Tip: Use a weight that makes the last repetitions difficult, but pain-free.
Scapula Setting
- Main muscles worked: Middle trapezius, serratus
- You should experience this exercise in your upper back, & at your shoulder blade
- Equipment needed: None
- Repetitions: 10
- Days Per Week: 3
Step-by-step directions
- Lie on your tummy with your arms by her sides.
- Place a pillow or wedge under your forehead for comfort, if required.
- Gently draw your shoulder blades together & lower your back as far as possible.
- Ease about halfway off from this resting position & hold for ten seconds.
- Relax and repeat 10 times.
- Tip: Do not tense up your neck.
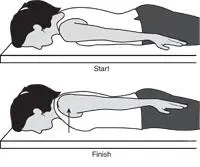
Scapular Retraction/Protraction
- Main muscles worked: Middle trapezius, serratus
- You should experience this exercise in your upper back at your shoulder blade
- Equipment needed: Begin with a weight that allows two sets of 8 to 10 repetitions and progress to three sets of 15 repetitions. As the exercise becomes easier, add weight in one-pound increments to a maximum of five pounds. Each time you increase the weight, start again at two sets of 8 to 10 repetitions.
- Repetitions: 2 sets of 10
- Days Per Week: 3
Step-by-step directions
- Lie on your tummy on a table or bed with your affected arm hanging over the side.
- Keep your elbow joint straight & lift the weight slowly by pinching your shoulder blade toward the other side as far as possible.
- Return slowly to the resting position & repeat.
- Tip: Do not elevate your shoulder toward your ear.
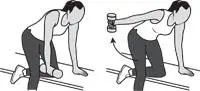
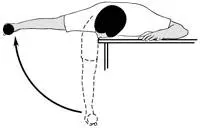
Bent-Over Horizontal Abduction
- Main muscles worked: Middle & lower trapezius, Infraspinatus, teres minor, posterior deltoid
- You should experience this exercise at the back of your shoulder & into your upper back
- Equipment needed: Begin with a weight that allows three sets of 8 repetitions and progress to three sets of 12 repetitions. As the exercise becomes easier, add weight in one-pound increments to a maximum of five pounds. Each time you increase the weight, start again at three sets of 8 repetitions.
- Repetitions: 3 sets of 8
- Days Per Week: 3
Step-by-step directions
- Lie on your tummy on a table or bed with your affected arm hanging over the side.
- Keep your arm straight & slowly elevate it up to eye level.
- Slowly down it back to the starting position & repeat.
- Tip: Control the motion as you down the weight.
horizontal abduction
Internal and External Rotation
- Prime muscles worked: Internal rotation: anterior deltoid, pectoralis, subscapularis, & latissimus
- External rotation: posterior deltoid, infraspinatus, teres minor
- You should experience this exercise in the front and back of your shoulder, your chest, and upper back
- Equipment needed: Begin with a light enough weight to allow three to 4 sets of 20 repetitions without pain. As the exercise becomes easier to perform, add two to three pounds of weight, but do fewer repetitions. Progress to three sets of 15 repetitions at each weight increment, with a maximum weight of approximately five to ten pounds.
- Repetitions: 3 to 4 sets of 20
- Days Per Week: 3 to 5
Step-by-step directions
- Lie on your back on a flat regular surface.
- Extend your arm straight out from the shoulder joint & bend(flex) the elbow 90° so that your fingers are pointed up.
- Keeping your elbow joint bent & on the floor, slowly move your arm in the arc shown. Bring your elbow lower to a 45° angle if you experience pain at 90°.
- Tip: Use a weight that makes the last repetitions difficult, but pain-free.

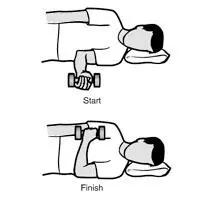
Internal Rotation
- Prime muscles worked: Infraspinatus, teres minor, posterior deltoid
- You should experience this stretch in the back of your shoulder & upper back
- Equipment needed: Begin with weights that allow three sets of 8 to 10 repetitions (approximately one to two pounds), and progress to three sets of 5 repetitions. As the exercise becomes easier, add weight in one-pound increments to a maximum of five to ten pounds. Each time you increase the weight, start again at two sets of 8 to 10 repetitions.
- Repetitions: 2 sets of 10
- Days Per Week: 3
Step-by-step directions
- Lie on your side on a firm, flat regular surface with your normal arm under you, cradling your head.
- Hold your affected arm against your side as shown, with your elbow bent(flex) at a 90° angle.
- Keep your elbow joint against your side & slowly rotate your arm at the shoulder, elevating the weight to a vertical position.
- Slowly down the weight to the resting position to a count of five.
- Tip: Do not let your body roll back as you elevate the weight.
Shoulder Tendonitis Exercises & Rotator Cuff Exercises To Avoid
If you or someone you know has felt a shoulder-related injury, you’ve probably read up on certain exercises like this one or this one that can help put you on the road to healing.
However, do you know which shoulder joint impingement exercises to avoid? In general, people need to give their shoulder joints rest so that the muscles have time to heal. Some of the exercises that people should continue include:
Throwing a ball in a raised fashion, particularly heavy balls
Avoid swimming, in particular, the strokes that involve a raised motion
Lifting or raising weights that place stress on the shoulder & rotator cuff
Over time, the inflammation in the shoulder joint will gradually calm down & people will make full healing. On the normal hand, there are also exercises that people can do to quicken the healing process.
Lifting Weights Above Your Head
- Those with shoulder joint injuries should initially steer clear of exercises that involve pressing motions or overhead motions. Forget activities like throwing a ball or specific weight training at the gym like overhead presses & pull-downs. These motions can cause more stress & even further injury & pain to the affected area.
Behind The Neck Pulldown
- Whether it’s a barbell or a bar connected to a cable, the behind-the-neck pulldown is one shoulder tendonitis exercise to avoid. Why? This motion puts undue strain on the rotator cuff, & putting you at risk of further shoulder joint problems & chronic pain.
- The problem with the behind-the-neck raze to the ground or pulldown lies in “external rotation.” The behind-the-neck pulldown or raze to the ground requires you to externally rotate your shoulder joint as much as possible, & which is a very delicate position for your shoulder joint. Doing these motions can make your joints unstable & over-stretch the tissues, leading to injury.
Upright Row
- While upright rows are one of the most usual regular exercises you’ll see at the gym, a quick look at the mechanics of this exercise & you’ll see why this is a poor exercise for rotator cuff & other shoulder injuries.
- The problem with the exercise lies in the placement your arms must be in. This position is called “internal rotation.” When you elevate your arms, a small tendon in your shoulder joint gets pinched by the bones in the shoulder joint. This can cause uncontrolled wear & tear over time.
- You may not experience it immediately, but the tendon will gradually become worn lower & damaged. The risk isn’t worth the reward. Here’s what you can do instead per Muscle and Fitness magazine or try the modified upright row.
Behind The Neck Presses
- A behind-the-neck shoulder joint press exercise, like Military Press, for example, can be a fast-track ticket to injury.
- To do the behind-the-neck press motions, you must maximally externally rotate the shoulder joints. This puts your shoulders in a vulnerable position for your shoulder girdle the bones connecting the skeleton to your arms & can leave your rotator cuffs under serious strain. Further, research shows that most males don’t possess the adequate mobility needed to perform behind-the-head shoulder push correctly. Yet another cause why this is a shoulder tendonitis exercise to avoid.
what exercises should you keep away from with a rotator cuff injury?
- Rotator cuff injuries can range from mildly irritating to full-blown pain.
- They go by the names of shoulder tendonitis, impingement syndrome, rotator cuff tendonitis, & even a rotator cuff tear.
- If your pain is on the milder side, & you may be able to continue working out using modifications, but it might be difficult to tell which exercises are making your pain increase. If you’re not sure, it’s always best to discuss it with your physiotherapist.
What exercises are bad for the rotator cuff?
- To be fair, almost any upper body exercise can be harmful if carried out incorrectly. Proper form is essential in keeping the rotator cuff all right.
- I did also like to preface this section by saying I am not a fan of labeling exercises as good or bad.
- Whether an exercise is suitable for you to be dependent on many factors such as your fitness level, current injuries, medical conditions, goals, job, or sport-specific requirements.
- Blindly labeling exercises as good or bad is damage & means nothing without context.
- Also, the rotator cuff is not just 1 muscle.
- It’s a group of 4 muscles, but the supraspinatus is the most frequently affected because of its location & actions. Therefore, this is typically what people are mentioning to when they say rotator cuff injury.
- If you want to read more about shoulder mechanics and why this area tends to be so vulnerable, check out How To Avoid Shoulder Pain While Working Out.
- If you are looking to improve your upper body muscle anatomy.
- Rotator cuff injuries can range from lightly annoying to complete pain.
- They go by the names of shoulder tendonitis, impingement syndrome, rotator cuff tendonitis, & even a rotator cuff strain.
- If your pain is on the lighter side, you may be able to resume working out using modifications, but it might be difficult to tell which exercises are making your pain worse or poor. If you are not sure, it is always best to discuss it with your physiotherapist.
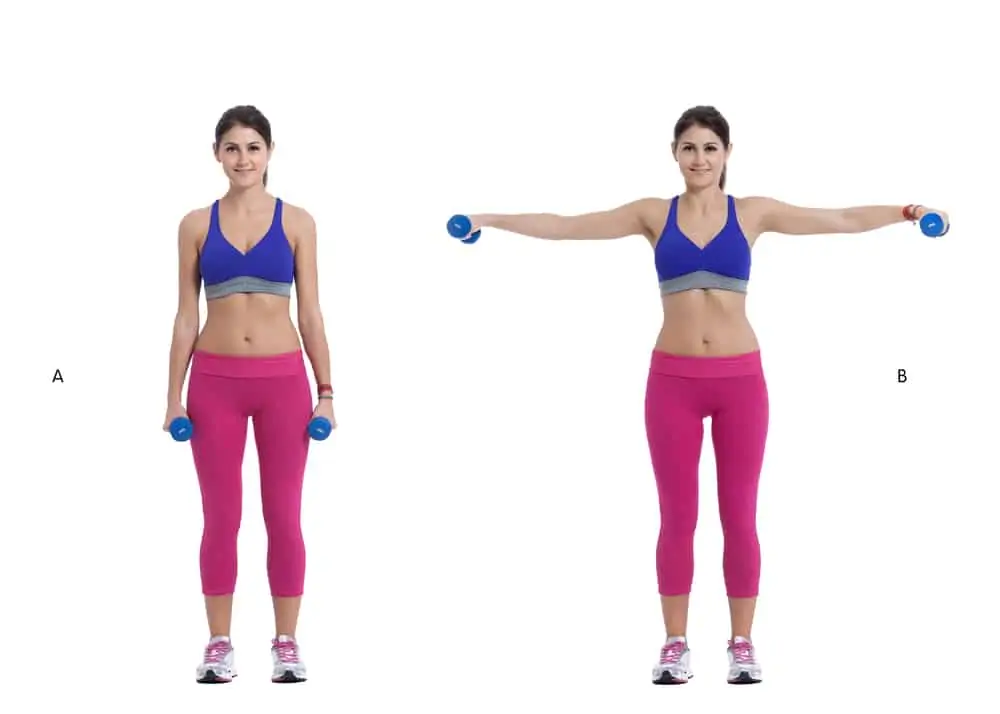
Lateral raises
- The lateral raise is popular to contract the middle deltoid as the arm moves into abduction away from the body.
- The supraspinatus muscle has a unique job that initiates the abduction movement in the first fifteen degrees of motion away from the body. It also helps depress & stabilize the humeral head upper arm bone or to avoid impingement.
- The medial deltoid then takes over the rest of the abduction movement, & other muscles are involved with overall stabilization.
- An affected supraspinatus might not perform its duties very well, & this moving could lead to extra impingement & poor or worsening of the rotator cuff injury. This looks like the shoulder performance hiking instead of a nice smooth motion.
Common mistakes during a lateral raise
- Using a weight that’s too heavy
- Rotating the palms down, & placing the shoulder in internal rotation, & further pressing the supraspinatus
- Elevating the elbows too high or above shoulder level, compressing the supraspinatus
- Hiking the shoulders up & substituting with the upper traps
- Swinging and using momentum
- Substitution ideas include flexion in the scapular plane below shoulder height to raise supraspinatus strength or a modified range of movement abduction with decreased weight.
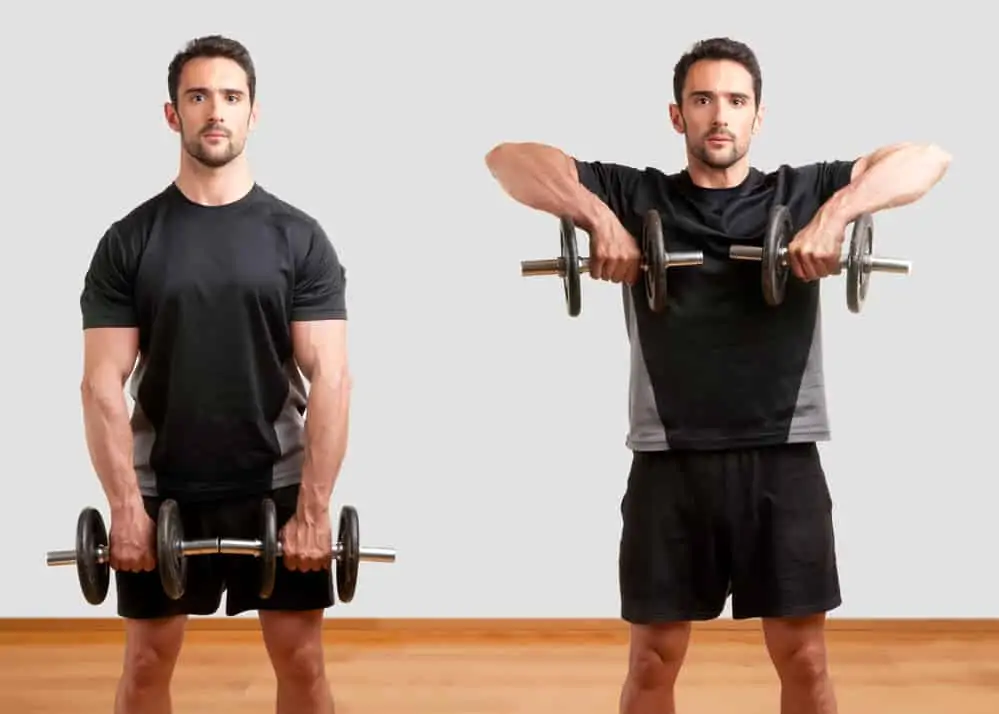
Upright rows
- The upright row is an exercise used to target shoulder & upper back strength.
- seem to love upright row.
- Let me explain.
- The upright row sets you up for pain from the start because the motion already places the shoulder in internal rotation, & reducing the space for the supraspinatus tendon.
- If using a barbell, the shoulders are even more limited to a somewhat dictated path of movement.
- As you raise the weight, the rotator cuff tendon can get pinched in between the head of the humerus & the acromion of the scapula especially if you’re rounding your upper back.
- It’s that combo of internal rotation & lifting of the arm that makes this so rough on the shoulder joint. The higher you elevate, the worse it gets.
- if you insist on doing upright rows, at least limit your range of movement or switch to free weights so you can adjust the angle & reduced some of the internal rotation on the shoulder joint.
- Even at its best, & the upright row is not great. If you are a die-forceful upright row fan, & keep these tips in mind.
Common upright row mistakes
- Pulling too high
- Breaking at the wrist & more on this below
- Using momentum
- Hiking the shoulders
- Rounding the upper back
- Breaking at the wrist allowing the wrist to flex during motions is a common usual problem with many upper-body exercises. This satisfaction causes some of the effort to be transferred away from the conscious muscle group. As a result, the wrist extensors end up active more than they should. Not only does this create poor overall motion patterns, but it’s a great way to develop a tennis elbow. Keep your wrist joint neutral as much as possible to avoid injury. It’s not just a coincidence. Dysfunction keeps moving lower the chain,& overusing other areas.
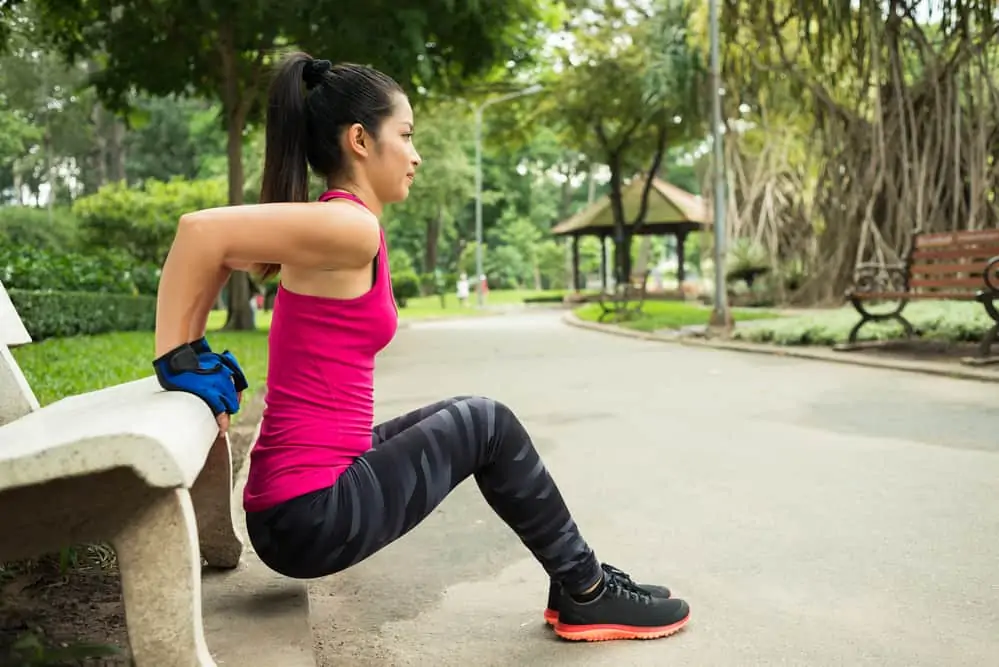
Triceps dips
Triceps dips are one of the many ways to target the triceps & can be tricky if presented incorrectly.
Common triceps dips mistakes include
- Keeping your bottom COG (center of gravity) too far away from your hands
- Rocking the body forward & back instead of actually flexing or bending the elbows
- Move too low, & placing additional stress on the front of the shoulder joint
- Rounding the shoulder joints & hunching the upper back rotates the scapula shoulder blade & reduced space in the shoulder joint
- Many people do triceps dips on a bench or chair with their fingertips indicating forward.
- A lesser-known tip is to point the fingers slightly outward, & giving some external rotation to the shoulder joint & thus providing a little more space for the rotator cuff.
- Substitute with triceps raze to the ground at a cable machine or kickbacks to work the triceps but place less stress on your affected shoulder until you’re ready to progress.
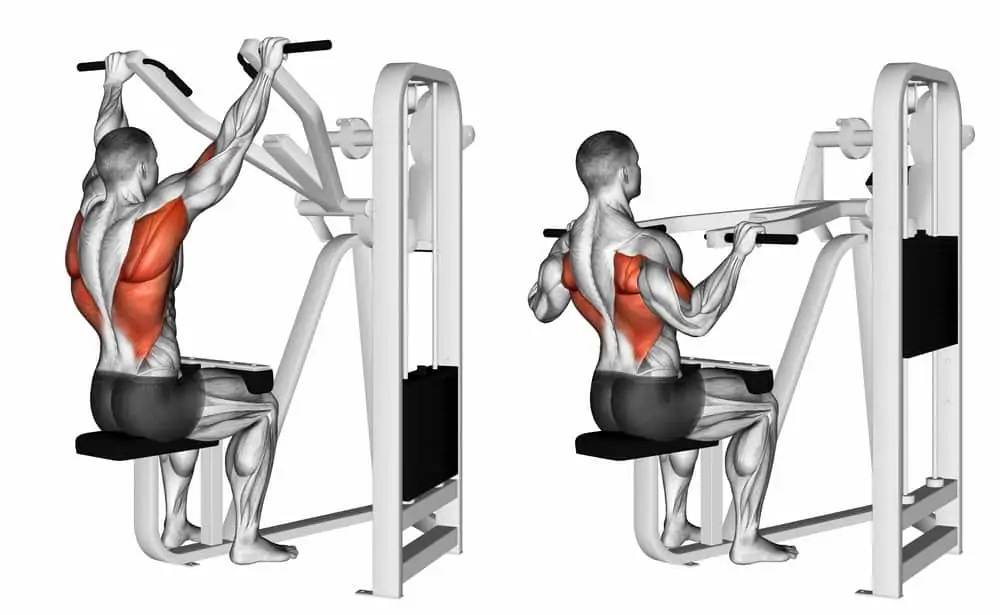
Lateral pulldowns behind the head
- To be fair, &you should not be doing this with healthy shoulder joints either.
- The behind-the-head lateral pulldown increases the chances of developing anterior shoulder instability. Anterior instability is associated with other soft tissue injuries (rotator cuff injuries) or other ligament or cartilage injured over time.
- If you don’t have enough shoulder range of movement (ROM), this might cause you to awkwardly pitch your head forward & substitute with other muscles, & creating more issues.
- Switching to a front raze to the ground decreases wear & tear on the shoulder joint & provides a more functional motion which will benefit you in real life.
- You can also try different grip positions to see what feels best for your shoulder joint. A neutral grip might experience the best if you’re nursing a shoulder joint injury.
Other common lateral pulldown mistakes include
- Leaning back too far
- Rounding the upper back
- Pulling the bar behind the head or too low down
- Using momentum
- Hiking the shoulders
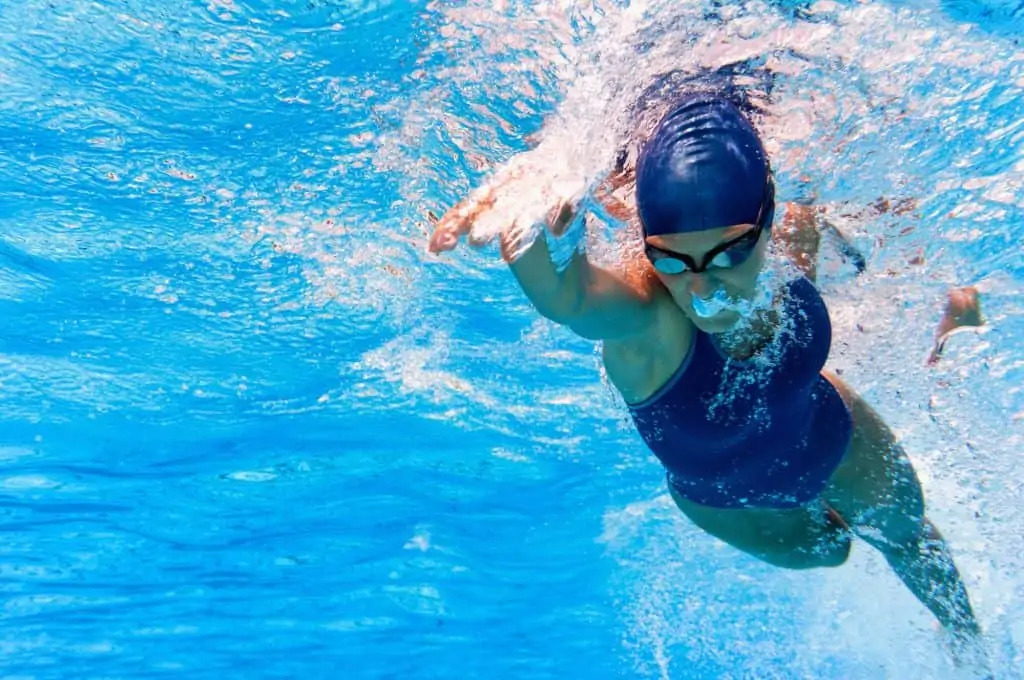
Lap swimming
- Many turn to swimming rather than weights because they think the pool will in some way be more kind to their shoulder joints.
- I am sorry to say that rotator cuff injury are one of the most usual regular swimming injuries.
- The chance also rises for novice swimmers without refined stroke mechanics or seasoned swimmers who are overtraining.
- If you have never had any formal stroke training, & the risk is that swimming may do more harm than good as it’s still a resistance exercise with plenty of repetitive overhead motion.
- Freestyle & backstroke are likely to worsen an injured rotator cuff due to repetitive overhead movement. As does butterfly, but most casual usual swimmers never go near this stroke, so it goes without saying that it’s irregular on the shoulder joints
- Breaststroke may be ok, but it depends on the quality of your stroke & the severity of your pain. There is still an on-high-reaching component, but it doesn’t follow the same arc as freestyle & backstroke.
- Also, be cautious with kickboards.
- They sound easy on the shoulder joints since you are just kicking, but do not hold the kickboard out in front of you; otherwise, it will stress the affected rotator cuff. Instead, try holding the kickboard at your chest to give your shoulder joints a break.
- If swimming is part of your routine, be careful of overtraining, not varying your strokes, or using pull buoys or paddles for too long.
- The same precautions apply to water aerobics. Unfortunately, you are not free from injury possibility just because you are in a pool.
- Here are some more points to avoid injury while lap swimming.
Overhead movements with weights
- Painful overhead reaching is the most common complaint with rotator cuff injuries.
- Overhead motions, especially with weight reaching behind the neck, & are likely to provoke a cranky rotator cuff.
- Examples are overhead press or triceps press, especially anything where the center of gravity(COG) goes behind the neck.
- Now you can not really train overhead strength without reaching overhead, so there is not quite an exact substitute. But, you may be able to train shoulder flexion in a range below the shoulder that does not provoke your symptoms until you can safely progress back.
Overhead throwing or serving sports
- Whether you are an athlete or just like to throw the football around at half-time, & sports involving throwing or serving can provoke cranky shoulders.
- So if you already have a painful shoulder, & it’s probably not going to “loosen up” after a few throws.
- It may be best to take a break or work on other fundamentals of your sport until your shoulder joint feels better.

Yoga poses to modify or avoid a rotator cuff injury
- Yoga is often seen as a gentle exercise. While sometimes this is true, it depends on the yoga style & the poses you are doing.
- Yoga is not free from injury.
Here are some ideas to improve your practice when dealing with a rotator cuff injury. Your tolerance to these will be conditional on what type of injury.
Weight-bearing through the arms
- Poses such as downward facing dog, plank, & side plank, or other arm balances can be tough on the shoulder joint.
- For a downward-facing dog, be sure to hold on to the shoulders away from the ears. Also, rotate the front of the elbow joints toward the top of the mat. This slight adjustment externally rotates the shoulder joint & gives more space for the supraspinatus tendon.
Overhead movements
- Sometimes just elevating your arms overhead is enough to anger a cranky rotator cuff.
- Select different arm variations in Warrior pose or any other pose with an overhead stretch-out component.
Binds
- Binds involve folding the arms around the back or legs & require a fair amount of shoulder joint internal rotation movement to be performed correctly.
- Internal rotation tends to be a tough motion for a rotator cuff injury.
- Use blocks & straps to shorten the distance & take some demand off of your shoulder joints.
- It might also be wise to miss out on binds for a while.
Bonus
- Anything that worsens your pain
- Almost any upper body or core exercise can worsen rotator cuff pain if performed improperly.
- Modify the range of movement & weights to ensure no pain while working around an affected rotator cuff.
- Always check in with your form & ensure you can perform exercises without substituting with momentum or other muscle groups.
- Performing exercises with good form & without pain is more important than how much weight you can lift.
Activities to avoid a rotator cuff injury
Everyone always needs to know how they can get better quicker. The secret is, it is not just what you are doing or not doing at the gym. Regular everyday tasks function can maintain rotator cuff pain too. Give your injured arm a chance to cure by modifying or skipping non-essential tasks. Your bathroom will still be there to clean when your shoulder joint cures.
It’s important not to presser through the pain with things like:
- Overhead reaching
- Chores or yard work
- Reaching behind your back
- Reaching out to the side
- Lifting and carrying
- Sleeping on the affected shoulder
- Wrapping up
- Strengthening exercises are an essential component of a good health fitness routine.
Shoulder motion is complex. Good form & motion awareness are essential for preventing & healing rotator cuff issues. Modifying motion & moving smartly will help your shoulder joint heal more quickly.
Ignoring shoulder joint pain can lead to a frozen shoulder or even a tear rotator cuff. If you suspect a rotator cuff problem, get physical rehabilitation therapy early to keep away from chronic pain.
Is Your Sleeping Position Harming Your Rotator Cuff?
You get into a relaxed position & drift off to sleep, only to wake up with a sharp pain in your shoulder joint. So you change positions & go back to sleep, but wake up in the morning with a dull soreness or ache & stiffness in the same shoulder joint. Whether it is in the morning or not, an achy, stiff, or firm shoulder can signal a rotator cuff problem. You did be wise to get it checked out because if left untreated, rotator cuff issues can lead to weakness & loss of movement in the injured shoulder.
What exactly is the rotator cuff?
A rotator cuff is a group of muscles & tendons that wrap around the head of your upper arm bone & connect it to the shoulder blade. It is appropriately named because together these connective tissues not only form a cuff-like structure to hold your shoulder joint in place, but they allow your arm to turn in different directions.
Acute injuries to degeneration resulting from overuse. But one thing shoulder patients to keep in mind is that the way you sleep — your “sleep posture” — can affect the rotator cuff.
Sleep & your shoulders
Poor sleeping posture can put pressure on the rotator cuff & even cause further damage to the tendons & shoulder joint. Here is a breakdown of sleeping positions that may hurt the rotator cuff & better alternatives that are more shoulder-friendly.
Side sleepers
On your side, you are putting all the weight of your upper body on the shoulder. As your body relaxes, the pressure on your shoulder stresses the rotator cuff, & which can lead to inflammation & the formation of tiny tears.
One possible solution is to try changing which side you sleep on each night. This would not be a totally successful fix, of course, because most people change positions during the course of the night.
A better side-sleeping position is lying on the other shoulder with the painful shoulder toward the ceiling. Then place the pillow in the armpit of the affected shoulder to hold it up slightly & take pressure off the rotator cuff.
Front sleepers
When you sleep on your tummy, your arms have to go somewhere. Bending them & tucking them under your pillow may feel cozy, but it puts pressure on the shoulder capsule from the weight of your head & neck. Lying on your tummy with your arms at your sides against your body is better, but may not be as relaxable.
Back sleepers
Lying on your back is probably the best position for your rotator cuff. While you have more places to put your arms without being injured, keeping them at your sides is preferable. If you put your arms up over your head, you may stretch the muscles & tendons of your rotator cuff.
If you have an adjustable bed, & you can elevate the head while still keeping your shoulders in a safe position. Reclining with a couple of pillows behind your back may be more relaxing for some patients.
How Do You Relief Rotator Cuff Pain At Night?
There’s no one-size-fits-all approach to diminishing rotator cuff pain at night. But there are some tactics that work for most people feeling shoulder pain at night. However, if your rotator cuff pain gets worse or increases over time, or it is keeping you from sleeping more than a few hours a night, you should consider seeing a chiropractor or physiotherapist for treatment. An untreated rotator cuff issue can cause long-term problems, so it is best to seek help if the home remedies below do not seem to help.
Home treatment for Rotator Cuff Pain at Night
These first tips are all about things you can do at home to treat your rotator cuff pain at night. It is important to try home treatment before moving on to other options unless you are feeling severe pain or other worrying symptoms.
Heat & Ice Therapy
- You may be surprised to find that heat works better than ice for your shoulder joint pain at night. Applying a heating pad to your shoulder for ten minutes on and 15 minutes off until you experience relief can help you get to sleep with little to no pain. Reading or listening to a book while you do this can get you ready for sleep, & just be careful to not fall asleep(bed down) with the heating pad on.
- If you do not feel relief with heat alone, you can try ice for 10 minutes on and 15 minutes off, as well. Most people find it more soothing to relieve heat, but you may respond well to ice. You can also try alternating heat & ice packs for the best of both worlds.
Pain Cream or Pain Medication
- Applying pain cream to the shoulder joint before sleep can help you rest through the night despite a rotator cuff problem. The same can be said for pain medications such as ibuprofen & other over-the-counter medications use for home treatment.
- But if you find yourself wanting to take more than the recommended dose, or you think you need to put in pain cream more than the instructions advise, it is probably time to see a medical professional, such as a chiropractor for shoulder joint pain relief.
Shoulder Stretches
Those who do not feel much pain during the day may benefit from shoulder stretches throughout the day & before bed. Certain stretches & movements can help strengthen the rotator cuff & promote healing. If you feel pain at any time during the stretches, & stop them at once. You should not feel pain, but you may experience a mild strain on the muscles you are stretching.
Here are some good shoulder joint stretches to try:
- Across the chest stretch.
- Chest expanding stretch.
- Shoulder rolls.
- Doorway shoulder stretch.
- Yoga can also be beneficial for shoulder pain. Even ten to twenty minutes of yoga a day can help your shoulders joint at night.
How to Sleep or rest With Rotator Cuff Pain at Night?
These next points are all about sleeping positions that may work for you. If one does not work, try the next until you find a way you can get some rest.
Sleep in a Reclined Position
Instead of sleeping parallel, many people find relief from rotator cuff pain when they sleep in a reclined position. This can be done in a recliner or in a bed with pillows to prop you up at just about a 45-degree angle. Whether you are dealing or acting with posterior or anterior shoulder joint pain, sleeping this way should help.
Sleep on Your Opposite Shoulder
If you find it hard to sleep on your back in a reclined position, you may want to attempt sleeping on your side. Of course, this means sleeping on the shoulder that is not causing you pain. To avoid rotating over onto your other shoulder, you can place a pillow behind your back & in front of you. This should keep you from rolling onto the affected shoulder.
Sleep with a Propped Up Shoulder
If the two tips above do not seem to work for you, there is one more sleeping position that may be beneficial for your rotator cuff pain. While sleeping flat on your back will often cause pain in the affected shoulder, you may find success by propping the arm & shoulder up on a pillow as you sleep.
For some people, just putting the arm up & helps them to a comfortable position. For others, putting the pillow under the shoulder joint may work better. It is best to do what you are relaxable with & what helps you sleep.
FAQ
Is it ok to exercise therapy with a rotator cuff injury?
If you have a rotator cuff injury, get ready to let those weights relax a bit at the gym. You should avoid raising weights above your head or out from the sides of your body. These motions can reason more stress & even further injury to the area.
What are two warning signs of a rotator cuff tear?
The pain connected to a rotator cuff injury may:
Be described as a dull ache or pain deep in the shoulder.
Disturb sleep.
Make it difficult to comb your hair or outreach behind your back.
Be accompanied by arm weakness.
What exercises can worsen the rotator cuff?
People with shoulder joint injuries should initially refrain from exercises that encourage any motion or movement overhead. Forget about activities like throwing a ball or specific weight training at the gym like overhead pressure & pull-ups
What Exercises Can I Do With a tear Rotator Cuff?
Standing Row. A simple exercise to help out strengthen your rotator cuff muscles is the standing row.
Internal Rotation.
Crossover Arm Stretch.
Posterior Stretch.
Pendulum swing.
Chest Exercises.
Dip Movements.
Other Shoulder Exercises.

One Comment