
Iliopsoas Tendonitis
Definition:
Iliopsoas tendonitis is an inflammation of the tendon or area surrounding the tendon.
Major causes of iliopsoas tendinitis are acute trauma and overuse resulting from repetitive hip flexion.
Introduction:
This painful hip condition can affect athletes who participate in sports like cycling, running, swimming, hockey and baseball. Spin classes, high-intensity interval training (HIIT) workouts and activities involving kicking, squatting and jumping can also leave you at risk for this type of injury.
Iliopsoas tendonitis, sometimes called iliopsoas syndrome, is an under reported and under diagnosed clinical problem.
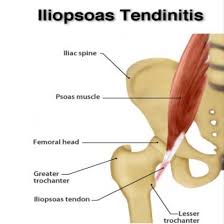
Anatomy of iliopsoas muscle
First let’s take a look at this muscle. The iliopsoas is compsosed of two separately identifiable parts the psoas and the iliacus.
The deep fibers of the psoas muscle originate on the transverse processes of L1- L5, while the superficial fibers arise from the lateral surfaces of the lumbar vertebra and adjacent intervertebral discs. The iliacus muscle arises from the iliac fossa then converges with the psoas to form the iliopsoas tendon before inserting onto the lesser trochanter of the femur.
The iliopsoas tendon travels across the anterior aspect of the acetabulum in a groove between the anterior inferior iliac spine (laterally) and the iliopectineal eminence (medially). The largest bursa in the body, the iliopsoas bursa, is positioned between the iliopsoas musculotendinous junction and the underlying bony pelvis. This bursa communicates with the hip joint in approximately 15% of adults.
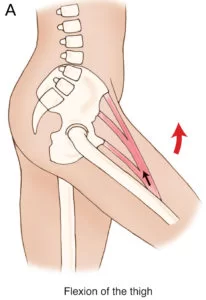
Function of Iliopsoas muscle:
Hip flexion.
Some turning/rotation of the spine.
In gait the iliopsoas becomes active during the terminal portion of stance phase and limits the rate of extension of the hip. During early swing phase the iliopsoas aids in flexion of the hip. In running leaning back while running downhill will aggravate iliopsoas tendonitis, and it will be difficult to take a full stride and also difficult to run uphill.
When Hip Tendonitis is A Pain
The iliopsoas muscle flexes your hip, bends your trunk towards your thigh and rotates your thigh bone. It’s made up of two muscles — the psoas and iliacus. These muscles run from the lower spine and pelvis, join together, then attach by a tendon to the upper thigh. This tendon can get irritated from overuse, muscle weakness and muscle tightness, causing tenderness and pain.
Athletes with iliopsoas tendonitis often complain of “clicking” in the hip and pain while running, walking or kicking. Even putting on socks can be painful!
The iliopsoas is a workaholic muscle. Throughout the day it’s constantly called into play with forward motions like walking, running and lifting your legs. It also picks up the slack when weaker muscles can’t perform their movements effectively, which can overwork this muscle.
Let’s look at moving your leg out to the side where the glute medius muscle (on the side of your hip) is the primary mover. If the glute is weak, it can be sluggish, leaving the hip flexor to initiate the motion instead. The side-to-side movement in sports like hockey or tennis can irritate the hip flexor as it does extra work initiating that “leg out” movement — work its coworker, the glute, should be doing.
Diagnosis:
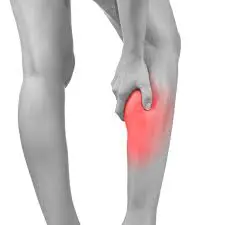
The symptoms most often reported are pain when running or walking in the groin area. Occasionally this is correleated with lower back pain. There is also pain in this area when walking up and down stairs.
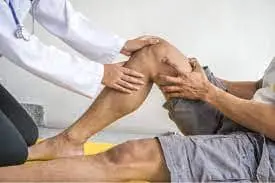
With the patient lying down, flex the knee to 10 – 20 degrees.Then have the patient attempt to lift the leg against resistance. Pain occurs with iliopsoas tendonitis. The motion of hip flexion will also be weak and may cause pain even without resistance in severe cases. Tenderness may be present along the course of the tendon and at the insertion.
Treatment:
Rest is usually recommended. A two to three week break from the sports and activities that cause pain can be very helpful. Relative rest, meaning less intense workouts, and fewer miles is also helpful, and should be used during your return to activity. This can be a very difficult problem to get rid of and like achilles tendonitis, can linger for many months. “This can be a very difficult problem to get rid of and like achilles tendonitis, can linger for many months.”
Two important components to use in treating this problem are stretching the muscle, tendon, and other structures in this region and strengthening muscles that assist the iliopsoas in its work.
Stretching:
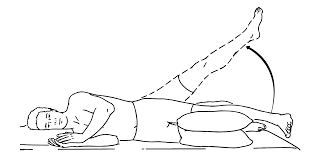
The “quad stretch” with your leg held backwards like a bow offers some stretch to the iliopsoas muscle. Another more specific stretch would be lying on your bed, and allow your leg to dangle off the side of the bed from the hip on down. This is uncomfortable, but it does stretch the area. You can do 3 sets of 20 second stretches on each side.
Alternatively you can move down towards the bottom of the bed and allow both legs to dangle off the bottom of the bed. To lessen some of the pain you are having you’ll also find that when you get up from a lying (supine) position you may want to roll over onto your side first or use your elbows and hands to assist in lifting yourself up. When you are almost completely recoverd. Gentle lunges can help you regain more flexibiltiy and your ability to take a full stride without pain. Don’t do this if it causes pain – focus on the other stretches in that case.
Strengthening:
The abdominal muscles need to be strengthened to aid the hip flexors. This must be approached cautiously or you will aggravate the tendonitis. While ordinarily I believe that no pain equals lots of gain, unfortunately, with this problem, there is some discomfort during the rehabilitation. The abdominals can be strengthened with crunches done on the floor or with an “ab machine” in the gym. If you are doing the ab machine, make sure you use very light weights and perform 2 sets of 25. This should cause a minimum of discomfort. Do not rush to increase the number of sets or the resistance. You will probably find you can not perform the knee up exercise until further in your rehab program.
Alternatively you may do a 5 minute core workout:
Planks
Select a place where you can extend your whole body length. Using an exercise mat will give you enough padding to be comfortable on all fours.
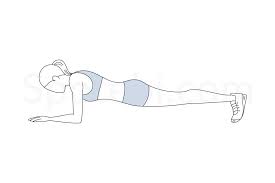
- Begin in the plank position, face down with your forearms and toes on the floor. Your elbows are directly under your shoulders and your forearms are facing forward. Your head is relaxed and you should be looking at the floor.
- Engage your abdominal muscles, drawing your navel toward your spine. Keep your torso straight and rigid and your body in a straight line from ears to toes with no sagging or bending. This is the neutral spine position. Ensure your shoulders are down, not creeping up toward your ears. Your heels should be over the balls of your feet.
- Hold this position for 10 seconds. Release to floor.
- Over time work up to 30, 45, or 60 seconds.
Bridges:

- Lie on your back with your hands at your sides, knees bent, and feet flat on the floor under your knees.
- Tighten your abdominal and buttock muscles by pushing your low back into the ground before you push up.
- Raise your hips to create a straight line from your knees to shoulders.
- Squeeze your core and pull your belly button back toward your spine.
- Hold for 20 to 30 seconds, and then return to your starting position.
- Complete at least 10-15 reps.
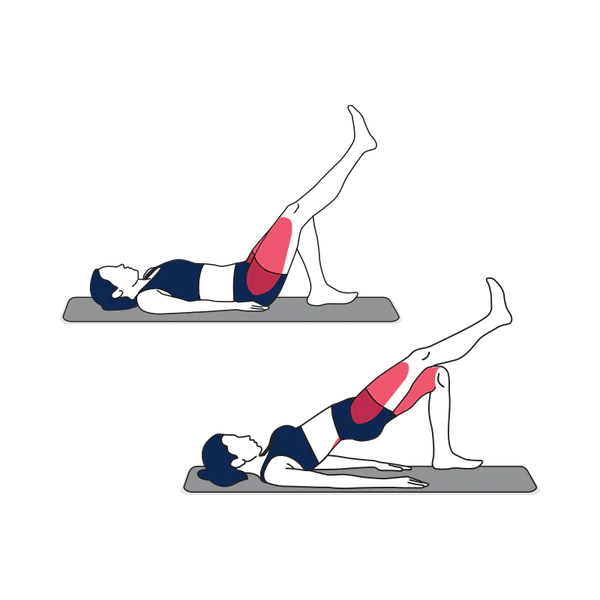
Single-Legged Bridges – 8-12
Single leg bridge: To perform the single leg bridge lie flat on the floor, with your knees bent and your arms by your side. Lift the opposite foot towards the ceiling, whilst holding your knee directly above your hip. To begin, lift your bottom up from the floor by pushing through your weight-bearing heel
Side Planks – 10 to 30 seconds each side
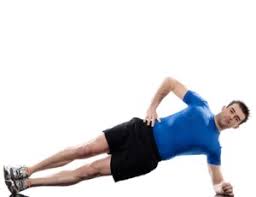
- Lie on your right side, legs extended and stacked from hip to feet. The elbow of your right arm is directly under your shoulder. Ensure your head is directly in line with your spine. Your left arm can be aligned along the left side of your body.
- Engage your abdominal muscles, drawing your navel toward your spine.
- Lift your hips and knees from the mat while exhaling. Your torso is straight in line with no sagging or bending. Hold the position.
- After several breaths, inhale and return to the starting position. The goal should be to hold for 60 seconds. Change sides and repeat.
In running, avoid hills. Uphills will be somewhat painful when lifting the leg, and downhills may also aggravate the condition. Curtail your speedwork, and shorten your stride. Also, try a brief rest of a few weeks, while continuuing your stretching and strenghtening exercises. There are a variety of other possible causes of groin pain in athletes which must be taken into consideration when making this presumptive diagnosis.
Exercises:
Hip Flexor Stretch :
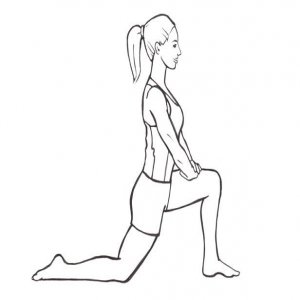
Kneel on one knee, hip behind knee
Tuck tailbone underneath you
Keep back straight as you move your body forward
Stop when a stretch is felt in the upper thigh
Hold 30 seconds. Do two repetitions.
Hip Flexion All-Fours:
Tie resistive tubing to a pole and the other end to ankle
On all fours, bring knee into chest
Keep back straight
Then return foot slowly to start position
Feel resistance both ways
Do 2 sets of 10 repetitions on each leg
Hip Extension:
Lie with a fitness ball under your stomach
Squeeze buttock and lift leg up to trunk
Hold 3 seconds
Do 2 sets of 10 repetitions on each leg
Side-Lying Hip Abduction:
Lie on side, stacking hips, back to a wall
Keep foot against wall while lifting leg up
Hold 3 seconds, then lower
Do 2 sets of 10 repetitions on each leg
Remember: You may be sidelined… but not for long!
Prevention:
The following tips and exercies may help keep hip flexor tendonitis from sidelining you:
- Adjust your seat height so hips sit higher than knees to avoid “hip pinching”
- Maintain a flexible, strong core and hips
- Discuss proper form with your trainer to prevent muscle compensation
- Strengthen the muscle in its lengthened and shortened state
2 Comments