Mayurasana: Health Benefits, Variations and How to do?
What Is Mayurasana?
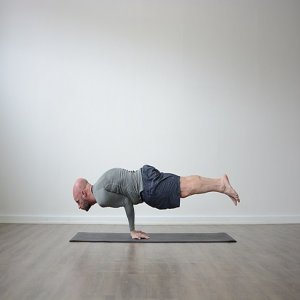
Popularly known as a Peacock Pose, Mayurasana is a Hatha yoga posture that has been performed for thousands of years. It is arrived from two Sanskrit words: “Mayur” refers to peacock and “Asana” defines posture. It is a non-seated pose that draws inspiration from how it makes you seem like a peacock sliding gracefully with its feathers downwards.
Peacock Pose (Mayurasana) is an advanced hand-balancing yoga posture. By balancing on your hands, wrists, and forearms are stretched and your back and core are engaged. This pose is a great way to release tension in the body, lengthen your limbs and challenge your balancing skills.
Due to its advanced nature, this yoga pose is best integrated near the middle or end of a sequence of postures, such as a sun salutation or sequence of seated postures. Prepare for this modern yoga pose by opening up the body parts that are targeted. The wrists are especially vulnerable to straining, so wrist stretches are encouraged. Very little equipment is needed to master this pose — just a yoga mat and you. Beginners may need to ease into the pose with a yoga block or other foundational prop for support.
What are the Health Benefits Of Mayurasana?
There are some benefits of Mayursana:
- Better Posture: Mayurasana is known for its capacity to improve posture and is an excellent cure for posture-related health issues, particularly those affecting the spine, limbs, and joints.
- Strengthening Muscles: It is well-known for strengthening the chest, back (spine), forearms, elbows, thighs, and wrist joints by providing a good stretch to the arms and back.
- Detoxification: Mayurasana detoxifies the body and is claimed to be an excellent treatment for piles and diabetes.
- Energize Organs: It strengthens the digestive organs such as the spleen, liver, stomach, intestines, pancreas, and kidneys and is believed to boost and enhance blood circulation in the abdominal area. It also activates and aids in the correct functioning of the lungs.
- Helps Reproductive System: It aids the reproductive system by regulating and boosting it. Additionally, it helps in increasing sexual interest and activity.
- Improves Mental Health: It helps in the relaxation of the mind. As a result, Mayurasana is an awesome treatment for people suffering from a variety of anxiety and stress problems.
What are the Preparatory Poses for Peacock Pose?
- Chaturanga
- Dandasana
- Plank
- Forearm plank
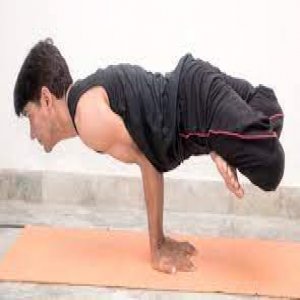
How To Do Mayurasana Or Peacock Pose?
Mayurasana can be done on a yoga mat, a carpeted floor, or any soft surface. Here is a step-by-step process for Mayurasana:
Sit on your heels with your knees spread apart.
Place both hands on the ground in front of your chest, with your little fingers inwards, and slowly press your elbows into your abdomen.
Lay your head on the ground. Even though your belly and chest push into your arms, your core muscles stay completely engaged as you move forward.
Stretch your legs, keeping your knees extended and the toe of your feet towards the ground.
Do not place weight on your head against the floor; instead, put weight on your knees and arms.
Keep a strong grip on your thigh and shoulder muscles.
Now try to raise your head off the ground and look at the floor in front of you while pressing your shoulder blades back. More weight will now be shifted to your arms.
Take a breath, then exhale and lean forward a bit more, raising your knees entirely up to move all your weight forward onto your wrists and hands.
Tighten your thighs, stimulate your core muscles, and raise your straightened legs off the ground.
Hold the pose for 10 to 30 seconds. Release the pose by lowering your feet and then your knees to the floor.
Raise your hands off the ground and sit back on your knees and heels to relieve strain on your wrists.
How to do Mayurasana by watching a video?
What is the Follow-up for Peacock Pose?
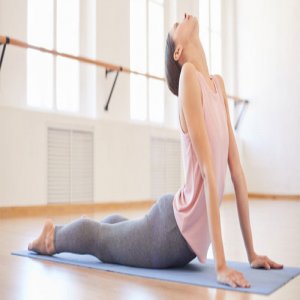
- Adho Mukha Svanasana (Downward-Facing Dog)
- Balasana (Child’s Pose)
What are the Tips For Beginners?
- Before you start, make sure that your stomach and bowels are empty and clear.
- It is vital to pose your elbows appropriately in order to improve your balance. It should be positioned on either side of your navel because that is where your body’s centre of gravity resides.
- Stimulate your wrists before doing this asana since it puts a lot of tension on them.
- You can use a yoga block under your head or ankles while performing to acquire the strength to lift your whole body off the floor.
What are the Modification and Props for Mayurasana?
There are some modifications and props you can use for Mayurasana:
- To keep your elbows together in Mayurasna, use a yoga strap to tie them together by positioning them above your elbows. Your elbows may also be slightly apart in this posture, especially if you have a large chest and broad shoulders, or depending on how much flexibility you have through your shoulder girdle. Know what feels comfortable to you.
- To find stability in this posture, you can opt to put a yoga block under your pelvis.
- Place your forehead on a yoga bolster or block while you find your centre of gravity in this posture.
- Put a twist on Mayurasana by bringing your legs to a Lotus pose.
- In case of difficulty keeping legs raised during the final pose, practitioners can use chair support under their feet. They can also take assistance from another person to find a balance in the pose.
- Practitioners can put blocks under their palms. This gives a slight lift to the pose, which keeps it in balance for a longer period.
- Peacock Pose with Feet on a Floor – Follow the primary pose instructions but simply do not raise the feet.
- Half Peacock Pose – Try raising one leg at a time.
- Peacock Pose with Blocks – Place your mat perpendicular to the wall. Place one block at one of the lower heights against the wall and one block toward the front of the mat. Step on the block against the wall and draw the soles of your feet against the wall.
- Set your arms up in pose (elbows bent and fingers pointed toward your toes) and put the other block under your chin or forehead. Stay in the pose for several breaths to get used to the positioning. Then, put your knees down and come out of the pose.
What are the Types of Mayurasana?
There are some types you need to know about Mayurasana:
- Padma Mayurasana (Lotus in Peacock Poses)
- Pincha Mayurasana
- Dolphin Pose (Ardha Pincha Mayurasana)
- Pungu Mayurasana (Wounded Peacock Pose)
Padma Mayurasana
What is Padma Mayurasana?
It is pronounciate as a pahd-mah my-yur-AHS-anna.
The Padma means lotus, and Mayura means peacock.
Also called Lotus in Peacock Posture, is done by first entering the Lotus pose (Padmasana) and then executing Mayurasana. It requires arm and abdominal muscle power, as well as an excellent sense of balance. It is also known to be a boon for all digestive disorders, since it relieves constipation, boost pancreatic function, and eliminates toxins from the blood.
One more thing before getting into the pose of Padma Mayurasana you have to come into the position of Padmasana (Lotus Pose). It means if you’re comfy with Padmasana along with you have strong arms then definitely Lotus In peacock pose is a little bit easy for you.
Benefits of Lotus in Peacock Pose (Padma Mayurasana):
- Lotus in Peacock pose, relieve constipation as well as boosts your digestion process.
- Padma Mayurasana makes your knees along with your ankles more flexible.
- Lotus in Peacock Pose strengthens your elbows, wrists, and forearms.
- It gives you mental and physical balance. Also, it enhances your sense of balance.
- Balance your Tridoshas and keep your mind calm.
- It massages and tones your abdomen organs.
- Lotus in Peacock aids in the problem of spleen enlargement.
- Very helpful for diabetic patients. Enhances the function of your pancreas.
- Purifies your blood by releasing toxins from the blood.
- Many Yogic experts believe that Lotus in peacock pose solves your skin-related issues.
Preparatory poses for Padma Mayurasana:
- Shalabhasana
- Chaturanga Dandasana
- Dandasana, Gomukhasana
- Phalakasana
- Dolphin Plank Pose
- Vajrasana
Steps of Padma Mayurasana (Lotus in Peacock Pose):
First, come into the pose of Padmasana (Lotus Pose) with properly folded legs that cross each other. Before performing this, do some light body warm-up exercises.
Once you’re comfortable getting into the position of Padmasana, try to flex forward with palms placed on the floor (keep your palms pointing backward).
Then, bend your both elbow and keep them close to each other.
After that, incline in a forward direction and place your elbows against your abdomen (middle part of the Abdomen).
After that, try to more incline forward and transfer your trunk weight to your upper arms.
The next step is, to take a deep breath and hold on for a few seconds.
Then, lift your legs without breaking the Padmasana above from the ground (raise your legs in the Padmasana parallel to the ground).
At this point, you’ve to keep your balance as much as you can.
Now, this is the last pose of the Padma Mayurasana. Retain your breath & stay in the position.
If you easily remain in the posture for a long duration then breathe slowly in the final stage.
To release the pose, first gently lower down your legs on the ground & come into the initial position (Lotus Pose). Remember that, breathe out while you’re lowering your legs.
Follow-up for Padma Mayurasana:
- Adho Mukha Svanasana
- Balasana
- Shoulder Pressing Pose
Modifications for Padma Mayurasana:
- Rest your head on the floor and lift only the legs, until you feel ready to raise both the head and legs.
Contraindication for Padma Mayurasana:
- Sciatica patients strictly don’t try to perform Padma Mayurasana.
- Pregnant women should not practice Lotus in Peacock pose.
- In case of surgery that affects your chest or abdomen also prevents this Pose.
- Hernia
- Peptic or duodenal ulcer
- Prevent Lotus in Peacock Pose in elbows, wrist, or knee injuries.
- Prevent Lotus in Peacock pose Heart-related issues as well as High blood pressure.
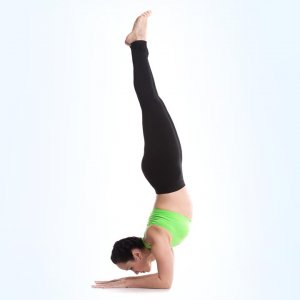
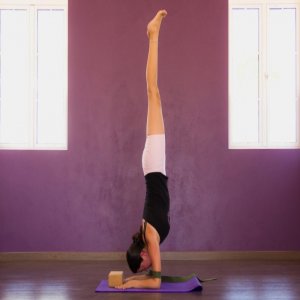
Pincha Mayurasana
What is Pincha Mayurasana?
Also known as a Feathered Peacock or Forearm Balance Pose. The Forearm Stand is a balancing inversion. It is an advanced posture and is the best preparation for even more challenging back bends and arm balances. Getting a feel for rising up can take sometimes, especially if you’re new to inversions. With practice, you will increase your confidence.
Benefits of Forearm Stand:
- The Forearm Stand strengthens the arms, shoulders, back, and core.
- Practicing it increases your balance and aids you overcome your fear of falling.
- As an inversion, you will get raised blood flow to the brain, which may help reduce stress.
- In the yoga tradition, inversions open the third eye chakra to enhance your mental abilities.
- Inversions like the forearm stand are thought to advantage the cardiovascular, lymphatic, nervous, and endocrine systems.
- The forearm stand can also provide musculoskeletal advantages, including strengthened spinal muscles and enhanced spine alignment.
Preparatory poses for Pincha Mayurasana:
- Adho Mukha Svanasana (Downward-Facing Dog Pose)
- Tadasana (Mountain Pose)
- Dolphin Pose
- Adho Mukha Vrksasana (Handstand)
- Forearm Plank
How to perform Forearm Stand (Pincha Mayurasana):
Bring your mat near to a wall.
Arrive on your hands and knees facing the wall. Your fingertips should be close to the wall. (An inch or two away is good. This is so when you rise up and your heels are on the wall, your spine is as straight as possible).
Flex your elbows to bring your forearms and palms flat against the floor.
Your upper arms should be vertical to the forearms. Your look should be forward and down.
Curl your toes under and raise your hips to come into a Downward Facing Dog (Adho Mukha Svanasana) pose with your legs.
This position is sometimes known as Dolphin (Ardha Pincha Mayurasana) or Puppy pose.
Move your feet toward your elbows as much as possible. Ideally, your hips will come over the shoulders.
Raise your dominant leg (the one you like to lead with) to a Down-Dog Split (Eka Pada Adho Mukha Svanasana) pose.
Exhale and flex the knee of the leg that is still on the floor. Kick the raised leg with the foot flexed as your bottom leg hops up.
Try to settle both heels softly on the wall. Note that the head stays up off the ground. Keep your gaze on the ground between your hands.
Engaging the core and “hug” the ribs inward.
If you are able to get both legs up and invert completely, continue to work on engaging your core so you can release your feet from the wall one at a time and balance independently.
Stay in the pose for one to five minutes, breathing slowly and deeply.
Release the pose and rest in Child’s Pose (Balasana).
When you can perform the pose on the wall very consistently begin to attempt to move into the center of the room.
The procedure is essentially the same but you must have a lot of strength to control your ascent.
Variations of Forearm Stand:
You can do this exercise in different ways to meet your skill level and goals.
- Forearm Stand with Block-
A block (used between the hands) can be very helpful in this position.
Place a block on the ground at the wall.
Make an “L” figure with the thumbs of each hand (the right hand will be a backward “L”).
Position your hands around the block so that your thumbs are on the front of the block and the forefingers are on the sides with the palms flat on the ground.
Press your hands firmly into the block and the ground as you kick up.
Straps are also beneficial. Alter the strap so that the loop is as wide as your shoulders.
Slide the loop onto your arms just above the elbow to keep the arms from spreading out to the sides.
Once you feel comfortable kicking up using the block and the strap, start to wean yourself from these props.
- Dolphin Pose-
To aid build up strength and stamina for Feathered Peacock, perform Dolphin Pose. On your hands and knees, bring your forearms to the floor with your fingers optionally interlaced. Raise your hips up and back. Relax your head and neck as you press your forearms into the ground. Hold for several breaths. Your heels may or may not reach the ground.
Common Mistakes while Pincha Mayurasana:
Avoid these errors in this posture.
Splayed Elbows
Ensuring that the elbows stay in line with the shoulders and do not splay out to the sides is often hard for beginners. If you have one available, utilize a block. Put the block horizontally on the mat and place hands on the mat shoulder-width apart. Splay your fingers wide and align the thumb and pointer finger to frame the block. Adduct your arms with the assistance of the block to keep your shoulders parallel.
Sinking Into Shoulders
When coming down from the position, try to keep your should blades raised rather than sinking into them.
Banana Shape
Balancing on your forearms limits how much you can flex your shoulder joints. As a result, your back and core may compensate too much and you can extend too much into a backbend. As a result, your body is then shaped like a banana in this posture. A good warm up with boat pose crunches (or another core warm up) can assist prepare your shoulders.
Safety and Precautions for Pincha Mayurasana:
- Prevent this pose if you have high blood pressure, heart conditions, headache, and any injury to your back, shoulder, or neck.
- Traditionally, inversions are prevented during menstruation, but this is not medically-based advice. Inversions do not have to be prevented for medical reasons during menstruation.
- During pregnancy, it may be best to prevent inversions like the forearm stand due to fall risks. Consult your doctor before attempting forearm stands while pregnant.
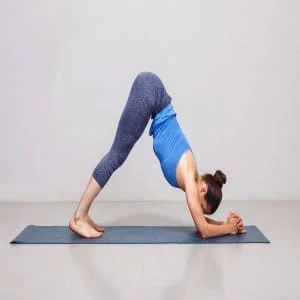
Dolphin Pose (Ardha Pincha Mayurasana)
What is Dolphin Pose?
Dolphin Pose is a great beginning yoga position for many reasons. It strengthens the shoulder joint, which is weak for most students just beginning yoga. Dolphin Posture (Ardha Pincha Mayurasana) also engages the core muscles we require for forearm stand, headstand, and more.
In this way, Dolphin Pose is an excellent position for preparing beginning yoga students for being upside down in any kind of inversion that relies on shoulder stability.
Benefits of Dolphin Pose:
- Dolphin Pose strengthens the shoulder girdle and gives stability to this notoriously unstable area of the body.
- Ardha Pincha Mayurasana will also give support and preparation for both the forearm stand and headstand.
- Your core muscles also gain stability and strength from practicing this yoga posture (all without crunches!)
- Another added benefit of practicing Dolphin Pose is achieving confidence in an inverted position.
- It is a safe way to practice having your head facing the floor (as you would in a headstand, handstand, or forearm stand).
- It stretches your hamstrings, calves, and arches.
- Dolphin Pose opens your chest, shoulders, and inner armpits, while also strengthening your legs and arms.
- Among the benefits often listed are also improved digestion, although this benefit is less well documented.
How to do Dolphin Pose (Ardha Pincha Mayurasana)?
Begin on all fours with the wrists right under your shoulders and knees directly under the hips.
Interlace your fingers fully (feel the webbing of your fingers connect).
Place your elbows on the floor slightly narrower than shoulder distance apart.
The elbows have a tendency to spread from one another, so it’s important to set that distance up correctly.
Now compress down into the forearms. Press into the elbows to raise your shoulders away from your ears.
On an exhale, press your hips back and upward, extend the legs, and enter the position. Allow your head to hang freely.
Press your scapulae into your chest. This will open your thoracic spine.
If your hamstrings are tight, flex your knees so you’re able to maintain length in the spine.
If you have mobility in your legs, begin to walk your feet towards your elbows.
Make sure you continue pressing the chest back as you perform this.
Drop your knees to the floor, and bring your big toes to touch.
Send your hips back to place on your heels.
Bring your arms on either side of your hips, resting with your palms up.
Hold in Child’s Pose for a few rounds of breath.
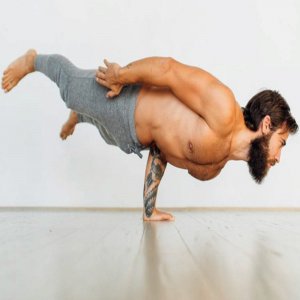
Pungu Mayurasana (Wounded Peacock Pose)
What is Pungu Mayurasana?
It is also known as Wounded Peacock Posture or One arm balancing Yoga.
The Pungu Mayurasana is another alternative for the Mayurasana. Here, the body is placed upon a single hand where the elbow rest beside the naval area. The feet stay straight and another hand remains in the air in the forwarding direction.
Pungu means wounded and Mayur defines peacock. This is one arm balancing Yoga posture so needs a lot of wrist and core strength. This is a very advanced pose and requires a lot of practice. Breath is very important in any pose. People generally forget to breathe while doing hard posture, once you teach your body to breathe, it becomes easy.
Benefits of Pungu Mayurasana:
- Increases digestion.
- It cures dyspepsia and diseases of the stomach like Gulma (chronic gastritis) and decreases splenic and liver-enlargement by increasing the intra-abdominal pressure.
- The lungs and whole abdominal Viscera (organs) are properly stimulated and toned by the increase in intra-abdominal pressure.
- Sluggishness of liver or hepatic torpidity vanishes.
- It tones the bowels and stops constipation (ordinary, chronic, and habitual).
- Strengthens the forearms and wrists, tones the abdomen, and strengthens the back, torso, and leg.
Steps for Pungu Mayurasana:
Begin with Vajrasana.
Separate your knees and put the right hand in between the knees, the fingers should be pointing outwards.
Bring your knees back and put the left hand forward on the floor.
Flex your right elbow and rotate the elbow inside and put it near the naval, the closer the better.
Pressing your elbow against your stomach extends your knees point your toes back, join both feet and stretch your hands forwards. (If your back gets rounded then it will be hard to get into the posture)
Keeping your body straight and tight try to transfer your weight forward, as you lean forward your feet will come up (avoid jumping into the pose, because of the momentum you might lose the balance).
Try to stay in the posture for as long as possible.
Come back to start, relax in Shashankasana for a few breaths and then try with the other hand.
Beginners Tips for Pungu Mayurasana:
- You can keep your feet separated in the pose, balancing will be easier but slowly work on bringing the feet close together.
Contraindications for Pungu Mayurasana:
- Problems with the wrists or elbows
- After any abdominal surgery
- High blood pressure, glaucoma
- During menstruation and pregnancy
What are the Common Mistakes you should avoid while in Mayurasana?
It’s important to avoid these common errors to maintain proper form and prevent injury or sprain. Extra caution is required to avoid straining the wrists.
Don’t start your sequence with this pose
This pose should be performed near the middle or end of your sequence. Warm up to this pose with beginner poses that increase strength and balance. Use other arm-balancing poses to ease your wrists into this advanced stretch. If needed, do wrist stretches to avoid strain.
Rocking back and forth at the top of the pose
As you try to balance the weight of your lower body on your arms and hands, you may feel like a seesaw or teeter-totter. Maintain your elbows narrowed in. Your arms should not be shoulder-length apart, but rather near together. This will create a strong foundation for the posture. Additionally, you may just need more practice in enhancing balance.
Leaning too far forward
This is called a balancing posture for a reason. Though most of the body weight is supported by the upper body, you should prevent leaning all the way forward. With your fingers pointing towards your pelvis and your wrists in a risk position, leaning the head toward the floor may cause harm to your bones. Remain in a straight position as you find a balance between leaning forward and backward.
Don’t lift your legs dramatically
When transferring your body weight to your arms, it’s tempting to raise up quickly and all at once. However, this raises the risk that you will lose balance and practically injure your wrists. Instead, raise one foot at a time. Make small shifts that permit your upper body to adjust before entering into the last pose.
Release the pose safely
Like take off, you’ll want to return to the ground gently instead of eagerly. letting go the pose all at once may cause you to fall onto the ground. Release the pose gracefully and safely by lowering one foot at a time and transferring the weight off of your wrists and onto your lower body.
What are the Contraindications and Cautions of Peacock Pose?
There are some contraindications and cautions you need to take care of in Mayurasana:
- Do not perform the Mayurasana if you have an injury to your shoulders, wrists, elbows, lower back, hips, neck, or rib cage.
- A person who has high blood pressure or has a cardiac condition, avoid practicing this asana.
- Prevent or modify if you have wrist arthritis, wrist pain, or carpal tunnel syndrome.
- Don’t perform if you are pregnant.
- Prevent if you have a shoulder injury, including a rotator cuff injury.
- Don’t perform if you have any abdominal pain, concerns, or a hernia.
- Prevent or modify if you have back pain or concerns.
- Don’t force your body into the position; instead, move slowly and mindfully in and out of the pose.
- If you have any pain with the posture or other limitations, try pose variations and modifications or visualize performing the full expression of the pose in any position. Always consult your health care team if you are unsure of what you can and cannot do with your particular health concerns. Also, seek a qualified yoga instructor or yoga therapist to assist you individually adapt the pose for safety.
Conclusion
Mayurasana is a challenging but productive asana that tones up abdominal organs, activates the digestive system, and strengthens the reproductive system. Hence, it is an overall health and wellness gift in the form of the yogic posture in today’s world.
Through daily practice, one can gain mastery of this pose and can get various benefits associated with it.