Oligoarthritis
What is Oligoarthritis?
Oligoarthritis is joint stiffness and swelling which most often affects large joints, such as the knees, elbows, and ankles. It’s diagnosed in children and teens who are less than sixteen years old. Oligoarthritis also called oligoarticular juvenile idiopathic arthritis, is the most common type of JIA (juvenile idiopathic arthritis).
What are the types of oligoarthritis?
There are two types of oligoarthritis based on how many junctions are affected over some time:
- Persistent oligoarthritis: Four or fewer junctions affected with arthritis after six months.
- Extended oligoarthritis: More than four junctions are affected with arthritis after six months.
What are the symptoms of oligoarthritis?
Symptoms of oligoarthritis vary in severity for each person with their condition. Symptoms affect four junctions or fewer and could involve:
- Blurry vision or blurred vision.
- Fatigue ( weakness ).
- Joint pain, and discomfort.
- Joint stiffness.
- Tender or swollen junctions.
Other problems that can happen involve:
- Uveitis (inflammation inside the eye)
- Problems with jaw growth if arthritis is in the jaw junction
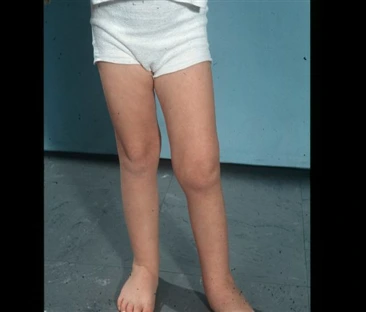
- If arthritis is in the knee, leg length discrepancy is seen (one leg is longer than the other leg )
- short stature (being shorter than other kids who has the same age)
What causes oligoarthritis?
Oligoarticular JIA (juvenile idiopathic arthritis) is an autoimmune illness. This means that the body’s immune system, which normally attacks germs, mistakenly attacks the junction. This causes inflammation (swelling and irritation) in the junctions and other problems. The condition usually begging when a child is 2–three years old. It is more general in girls. Doctors don’t know exactly why kids and teens have JIA. Idiopathic means from an unknown cause. It can run in families but often does not. It’s mostly due to a combination of:
- Genetic (inherited causes) causes
- The way the protective system responds to infection and sickness
- A trigger by an infection
How Is Oligoarticular Arthritis Diagnosed?
To diagnose oligoarticular Arthritis, doctors examine :
- ask about your symptoms
- do an examine
- ask whether other family members have had similar problems or conditions
- do X-rays or other imaging studies to look inside the junctions
- advise blood tests to check for:
- anemia or other blood conditions
- inflammation in the whole body
- markers for particular types of arthritis or autoimmune illnesses
- Sometimes, an orthopedic surgeon (bone doctor) takes samples of junction fluid or synovium (the lining of the junctions). The collection is sent to a lab for testing.
How is oligoarthritis treated?
Medication
Treatment for oligoarthritis addresses symptoms to decrease inflammation, prevent junction damage, and increase junction mobility. Treatment could involve:
- Nonsteroidal anti-inflammatory drugs (NSAIDs): NSAIDs provide ache relief and decrease joint swelling.
- Corticosteroid (steroids) injection: Your doctor may give your child a shot of corticosteroid into the affected junction. Your doctor might also prescribe corticosteroid tablets, which they can take orally as directed.
- Disease-modifying anti-rheumatic drugs (DMARDs): DMARDs prevent bone and junction damage by stopping the protective system from attacking your child’s junctions. DMARDs are a secondary line of protection if injections don’t work or maybe help in treatment induction (initial treatment).
- Biologics: Biologic medications may be used for junctions not responding to therapy.
Physiotherapy Treatment
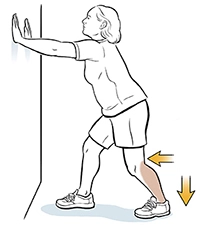
Heel and calf stretch
This stretch targets the muscles in your lower leg, especially your calf muscles.
- Stand and look at the wall.
- Place your both hands on the wall and move one foot back as far as you can comfortably. The toes of the foot should be facing forward, the heels flat, and a slight bend of your knees.
- When you feel some stretch and hold for 30 seconds.
- You should feel the stretch in your back leg (posterior thigh ).
- Change legs and repeat it.
- Do this stretch 3 times with a 30-second hold for both legs.
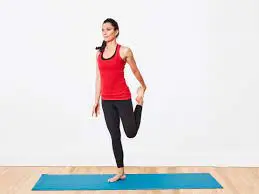
This stretch mainly targets your quadriceps, the muscles situated at the front of your thighs. Performing this move can assist to improve the flexibility in your hip flexors and quadricep muscles.
- Stand next to a wall or use a chair for assistance. Your foot should be shoulder-width apart.
- Bend one knee and try to touch the glute with your foot.
- Grab your ankle and gently pull it toward your glutes as far as possible.
- Hold it for 30 seconds.
- Return to the begging position and change the legs.
- Repeat 2 times on both sides.
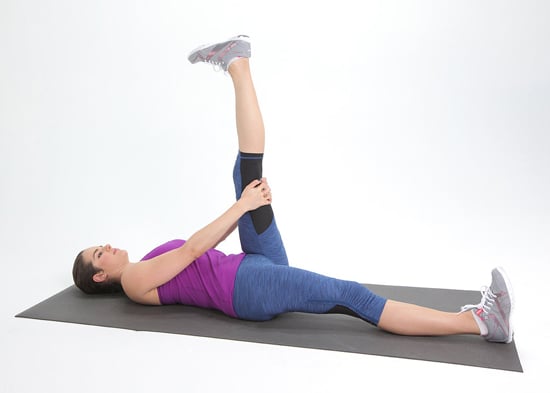
Hamstring stretch
This stretch mainly targets your hamstrings and the muscles situated in the back of your thigh. You should feel this stretch in the backward side of your leg and up to the base of your glutes. If you flex your feet, you may also feel the stretch in your calf.
- For this stretch, you can use a mat to make cushioning under your back.
- Lie down on the floor in a supine position or mat and straighten both legs. Or, if it’s more comfortable, you can bend both knees with your foot flat on the floor.
- Lift one leg up opposite the floor.
- Place your both hands behind your thigh, but below the knee, and gently pull your knee toward your side until you feel a slight stretch. This shouldn’t be acheful.
- Hold it for 30 seconds.
- Do the same for another leg.
- Repeat 2 times on both sides.
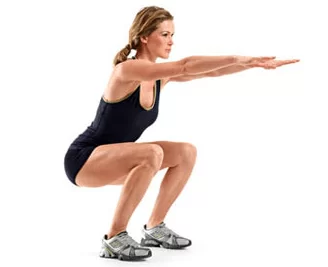
Half squat
Half squats are an amazing way to strengthen your quadriceps, glutes, and hamstrings without straining your knees and joints.
Get into a standing squat position with your foot shoulder-width apart.
- Place your both hands on your hips or out in front of you for balance.
- Looking straight forward, slowly squat down as you can do, or about 10 inches. This is half of the full squat.
- Achieve this position for a few seconds, then stand up by pushing through your heels.
- Do 2 to 3 sets of 10 repetitions with rest if necessary.
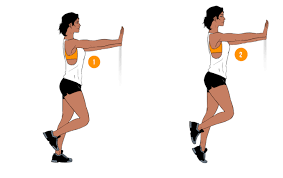
Calf raises
This exercise strengthens the back side of your lower legs, which involve your calf muscles.
- Stand with your foot shoulder-width apart.
- Position yourself next to a wall or hold on to the back of a chair for assistance.
- Lift both your heels off the floor so that you’re standing on the balls of your foot.
- Slowly down your heels to the starting position.
- Control is important for this exercise it helps to strengthen your calf muscles.
- Do 2 to 3 sets of 10 repetitions in a proper manner.
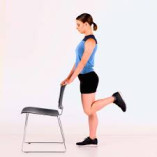
Hamstring curl
The standing hamstring curl mainly targets your hamstrings and glutes. It also requires good core strength to keep your upper body and hips more stable.
- Stand facing a wall or use a chair for assistance. Your foot should be hip-width apart.
- Lift one foot, bend your knee, and raise your heel toward the ceiling opposite the floor. Go as far as you can, while keeping your upper body still and hips pointing forward side.
- Hold it for 5 to 10 seconds.
- Lower to the starting position and take some rest.
- Do 2 to 3 sets of 10 repetitions for both legs.
Leg extensions
Using your own body weight, rather than a weighted machine or instrument, strengthens your quadriceps and it helps to keep added pressure off your knees.
- Sit in the chair.
- Put your feet on the floor in a flat manner, hip-width apart.
- Look straight forward, contract your thigh muscles as you can, and extend one leg as high as possible without raising your glutes off the chair.
- Pause, then lower to the begging position.
- Do 2 to 3 sets of 10 repetitions for both legs.
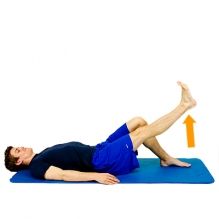
Straight leg raises
The straight leg raise strengthens your quadriceps muscle as well as your hip flexor muscles. If you flex your feet at the end of the move, you should also feel your shins tighten. Shins are located on the anterior leg. As this exercise gets easier to do, you can add a 5-pound weight on the ankle and gradually work up to a heavier weight as you build strength in your both legs.
- For this exercise, you can use a mat to make cushioning under your back.
- Lie down on the mat with one leg bent and one leg straight out in front of you.
- Contract the quadricep muscle of your straight leg and slowly raise it up off the ground until it’s the same height as your bent knee.
- Pause at the top for 5 seconds, then lower to the beginning position
- Do 2 to 3 sets of 10 repetitions for both legs.
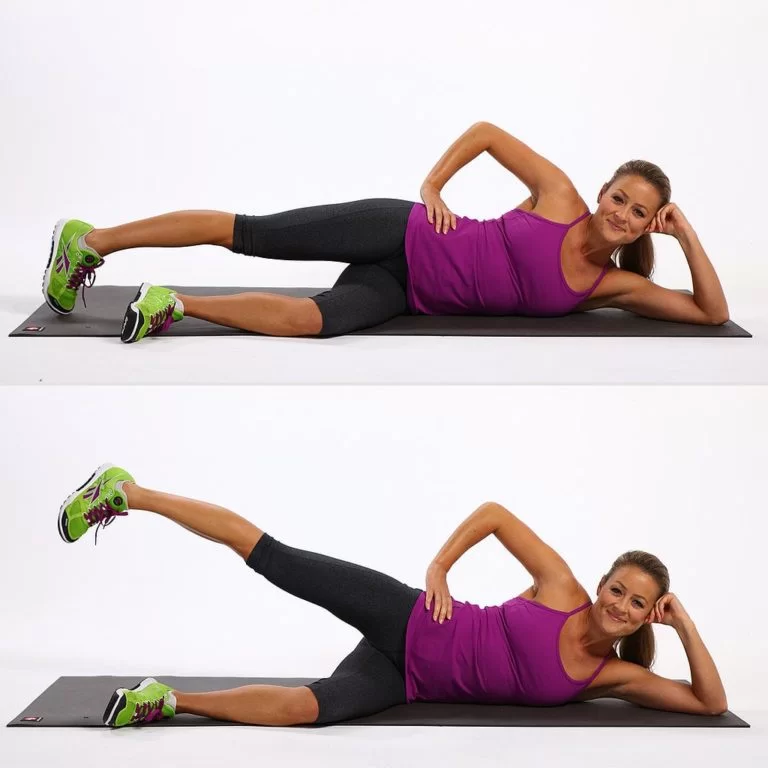
Side leg raises
This exercise mainly works on your hip abductor muscles as well as your glutes. Your hip abductor muscles, situated on the outside of your hips, assist you to stand, walk, and rotate your legs with ease. Strengthening these muscles can assist to prevent and treat aches in the hips and knees. As this exercise gets easier to do, you can add a 5-pound weight on the ankle and gradually work up to a heavier weight as you build strength in your both leg muscles.
- Lie on your side in a side-lying position with your legs stacked on top of each other. Put your head in your hand, and place your other hand on the ground in front of you.
- Raise your top leg opposite the floor as high as you comfortably can. You should also feel some stretch on the side of your hips.
- Pause briefly at the top, then down your leg.
- Do 2 to 3 sets of 10 repetitions for both legs.
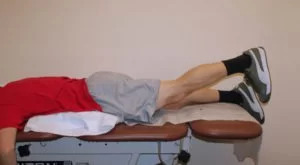
Prone leg raises
This exercise works your hamstrings as well as your glutes muscle. As this exercise gets easier to do, you can add a 5-pound weight on the ankle and gradually work up to a heavier weight as you build strength in your both leg muscles.
- For this exercise, you can use a mat to make cushioning beneath you.
- Lie on your stomach in a prone position with your legs straight out behind you. You can let your head rest on your arms or surface.
- Engage your glute muscle and hamstring muscles in your left leg and lift your leg as high as you comfortably can without causing ache.
- Be sure to keep your pelvic bones on the ground throughout this exercise.
- Hold your leg in the lifted position or upward position for 5 seconds.
- Down your leg, rest for 2 seconds, then repeat.
- Do 2 to 3 sets of 10 repetitions for both legs.
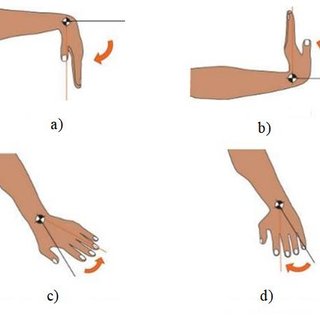
Wrist extension
- To do this exercise you have to Sit in a chair and achieve a sitting position and hold a two-pound dumbbell vertically in your hand, with your elbow resting on your thigh muscle.
- Palm should be facing the floor, straighten your wrist by curling it away from the floor.
- If this is too challenging, do the movement with no weight or minimum weight.
- Return to the starting position and repeat ten times on both sides.
Wrist flexion
- The wrist flexors are a group of muscles that use for the wrist bending of the wrist joint.
- These small muscles that connect to the elbow are also subject to overuse, which can lead to aches and inflammation over the elbow.
- To do this exercise you have to Sit in a chair in sitting and hold a 2-pound dumbbell vertically in your hand, with your elbow joint resting on your thigh muscles.
- Your palm should be facing toward the ceiling, flex your wrist joint by curling it toward your body. Return to the starting position and repeat ten times on each side.
Wrist turn
- To perform this exercise you have to Flexed the elbow joint up to 90 degrees with the palm facing upwards.
- Turn the hand slowly manner until the palm is facing the floor.
- Hold this position for five seconds and try to repeat 10 repetitions on both sides.
Wrist turn with weight
- This is similar to a wrist turn but it performs with a dumbbell.
- Flexed the elbow joint at a right angle with the palm facing toward the ceilings.
- Turn the hand slowly manner until the palm is facing the floor.
- Hold this position for 4 to 5 seconds and try to repeat 10 to 12 repetitions for both sides.
Wrist lift, palm up
- To perform this exercise you have to take a lightweight thing, such as a small dumbbell or a tin of food flexed the elbow joint at a right angle then straighten the hand outwards, palm facing the sky flexed the wrist up towards the sky.
- Hold this position for five seconds, then release slowly repeat these 9 more times and do 2 to 3 sets of 10 repetitions on both sides.
Elbow bend
- To perform this exercise you have to stand straight in a standing position and lower the arm to any one side slowly flexing the arm upwards until the hand touches the shoulder.
- Hold this position for 20 to 30 seconds and do it 10 times on both sides.
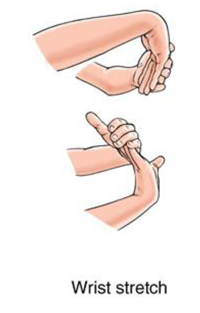
Wrist extensor stretch
- To perform this stretch you have to lose your elbow joint, straighten the arm, and flex the wrist joint back as if signaling stop.
- It is okay to use the opposite hand to assist and extend the hand gently.
- Hold this position for about thirty seconds and repeat it 5 times on both sides.
wrist flexor stretch
- To do this stretch take a position like a wrist extension stretch, except the wrist joint is flexed down (opposite of “stop”).
- Use the opposite hand to assist.
- Hold this position for 20 to 30 seconds and repeat it 5 times on both sides.
Fist squeeze
- You can use different things such as a rolled-up towel, sock, or tennis ball and place it in the palm. Then grip the ball or towel with the fingers to form a fist and squeeze tightly for 10 seconds
- Repeat nine more times on both sides.
Towel Twist
- To perform this exercise you have to Sit in a chair or achieve a sitting position, grab a towel with both hands, and your both shoulders relaxed.
- Roll the towel with each hand in opposite directions as you can do in comfortably as if you are wringing out the water of washed clothes.
- Repeat 10 to 12 times in one direction, then repeat another ten times in the opposite direction.
Biceps Curl
- To perform this exercise you have to stand or sit on a bench or chair and achieve a comfortable position.
- With the palm facing forward side. hold a 2-pound weighted dumbbell in both hands and the elbow joint against your side, and raise the elevate up toward the shoulder.
- Your elbow joint should be firmly against your side and lower the weight back to the beginning position.
Triceps
- To perform this exercise you have to Lie on your back in a supine position on a weight bench. Hold a dumbbell starting with the elbow joint straight.
- Keep your upper arm vertical while slowly bending the elbow joint toward the forehead. Slowly return to the beginning position
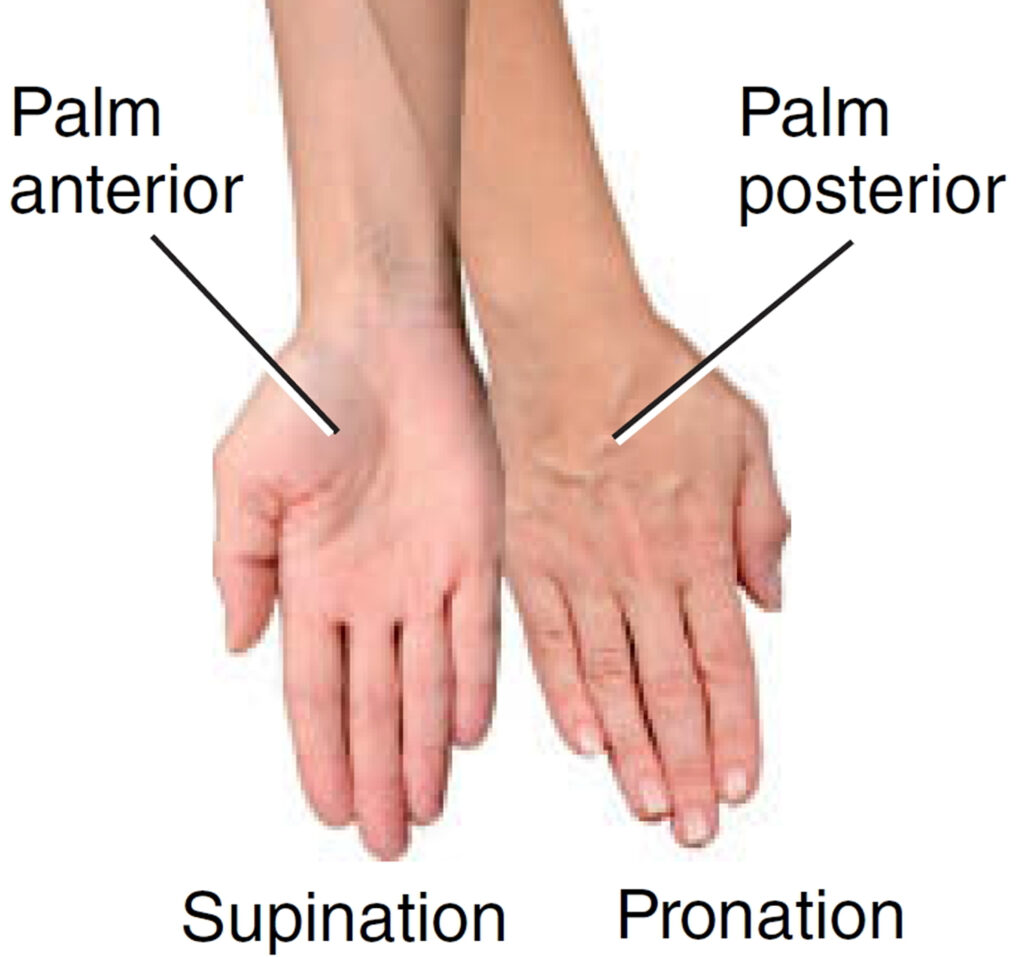
Supination and Pronation
- Supination and pronation is the action of turning your wrist joint over to have your palm up or palm down.
- This simple exercise aims to improve and strengthen the rotational capacity of the elbow joint and forearm muscles.
- For this supination and pronation exercise, you will need some things like a washcloth or washcloth-sized piece of material.
- To perform this exercise you have to Stand up straight, holding a washcloth in your hands for performing the movement. Pretend to wring the cloth dry for 6 seconds by hand.
- Pause and repeat this motion ten times by hand.
- Switch the direction in which your hands are wringing the cloth or do it in the opposite direction.
- Repeat this ten times for both sides.
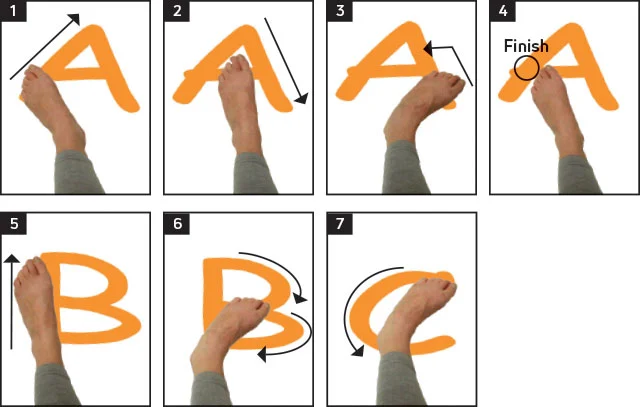
Ankle Alphabet
- Exercise is done in a sitting position so that your feet don’t touch the floor.
- Use your foot to write each letter of the alphabet in the air or pretend it, leading with your big toe. Keep the motions small, using just your foot and ankle joints.
Ankle out
- Make a loop out of a piece of an elastic fitness band or thera band, and hold it in that place, either with the leg of a maze or chair or with your other feet.
- First place one foot in the loop.
- Keeping your heel fixed on the floor, turn your toes outwards opposite to the resistance of the thera band.
- Bring your foot back to the starting position slowly.
- Build up to repeating this 10 times, and doing the set three times a day for both sides.
Basic balance
- Using a static object such as a kitchen counter for assistance, balance on one foot.
- Build up how long you do this for, the goal is one minute.
- Try to do this three times, and repeat the set twice a day for both sides.
- Practice standing on one leg – building it into your daily activities will help you improve definitely.
- When you feel confident with this basic balance exercise, you can do harder exercises standing on a cushion or pillow.
- Build up the amount of repetition or holding time you do slowly.
- When you can easily balance on a pillow, and if you’re feeling confident, go back to standing on the ground and repeat the basic balance exercise with both your eyes closed.
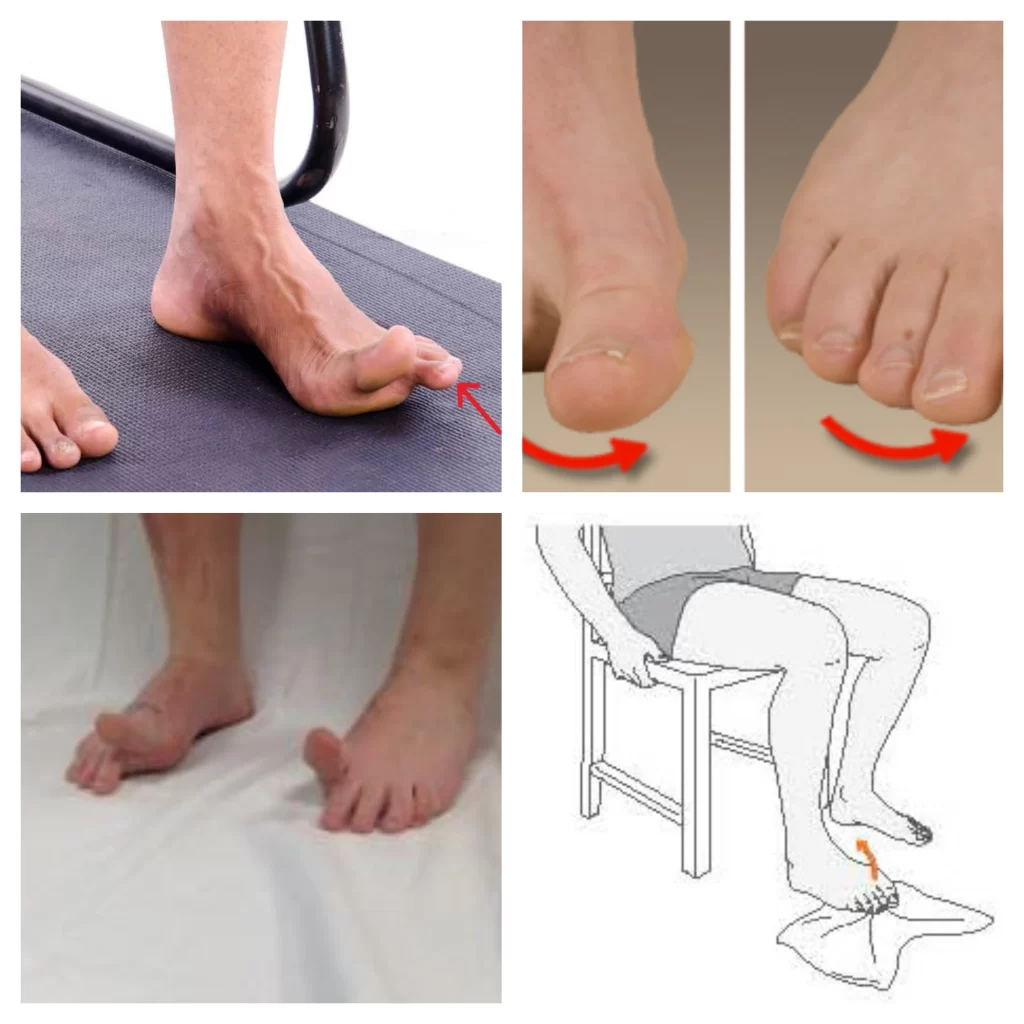
Toe Salutes
- The exercise starts with a sitting position in a chair with your feet resting on the floor.
- Raise your big toe, while keeping the other four toes on the surface. Hold for a few seconds; then relax and repeat on both sides.
- Raise your four toes together, while keeping the big toe on the surface. Hold for a few seconds; then relax and repeat on both sides.
Toe Splaying
- The exercise starts with a sitting position in a chair with your feet resting on the floor.
- Spread all your toes apart as far as possible. Hold for a few seconds; then relax and repeat on both sides.
Toe Squeezing
- Place foam toe dividers between your toes (like pedicure toe dividers).
- Squeeze your toes together for a few seconds; then relax and repeat on both sides.
Towel Curls
- The exercise starts with a sitting position in a chair with both feet resting flat on the floor.
- Place a small towel on the ground or floor in front of you.
- Grab the center point of the towel with your toes and bend your toes, curling the towel toward your sides.
- Relax, then repeat it on both sides.
Towel pickup
- Sit down with a towel on the floor or ground in front of you.
- Keeping your heel on the surface, pick up the towel by catching it between your toes.
- Repeat 10 to 20 times for both sides.
- As you feel some improvement, add a little weight, for example, a tin of beans, to the towel.
Toe Extension
- The exercise starts with a sitting position in a chair with your feet resting on the floor.
- Then pick one foot up and place it on the opposite thigh.
- Hold on to your heel with one hand.
- Snatch your toes with the other hand and bend them toward your ankle sides and hold for a few seconds;
- Then back toward your heel sides and hold for a few seconds.
- Keep your motion gentle and smooth.
- Repeat it for both sides.
Hot and cold packs
- Hot packs stimulate blood flow to the harmed area, soothing the ache, while cold packs decrease inflammation and swelling.
- In case no heat packs or ice packs are available, you can take a flannel cloth and soak it in warm water or cold water.
Transcutaneous Electrical Nerve Stimulation (TENS)
- It blocks your nerves from sending ache messages to the head. It uses a small electronic instrument that sends pulses to the nerve endings by creating a tingling sensation to soothe the ache.
Hydrotherapy
- It uses water to decrease the symptoms of arthritis.
- Patients perform specific exercises in water with temperatures ranging from 33 to 36 degrees Celsius with the guidance of a licensed physiotherapist or doctor.
Use of braces or taping
- If you have a higher stage of spine arthritis, doctors might recommend taping or using special braces to support your junctions.
Role of Alternative Therapies
- Diet Supplements: The well-known forms of diet supplements that claim to provide relief for arthritis can provide moderate relief only for adults suffering from osteoarthritis. This however is also associated with side effects. No observed clinical benefit has so far been documented in the treatment of childhood arthritis with any of the dietary supplements.
- Fish Oil: Fish oil contains a rich source of Omega-3 fatty acids and this substance can decrease inflammation. However, in order to observe real advantages, many capsules have to be consumed. It has now been found that this protective effect may only be temporary, not exceeding 6 months.
FAQ
What can I expect if I have a child with oligoarthritis?
Oligoarthritis affects the junctions in your child’s body, which could make it difficult for them to be active like other children their age, specifically without treatment. Most children outgrow the condition as they enter adulthood. Some children will experience more junction discomfort as they age in other parts of their bodies. Treatment decrease joint ache and stiffness and physical therapy improve your child’s mobility to allow them to move and play without restriction.
Is oligoarthritis an autoimmune disease?
Oligoarticular juvenile idiopathic arthritis (JIA) is an autoimmune illness. This means that the body’s protective system, which generally attacks germs, mistakenly attacks the junctions. This causes inflammation (swelling and irritation) in the junctions and other problems.
What is asymmetrical oligoarthritis?
Asymmetric oligoarticular: Asymmetric oligoarticular PsA includes only a few junctions on one side of your body. It affects about 60% of people with PSA. Symmetric polyarthritis: Symmetric polyarthritis affects more junctions than asymmetric oligoarticular PsA. It also affects the junctions on both sides of your body.
Can you have arthritis without inflammation?
Osteoarthritis. This is the most general form of arthritis and it is considered a non-inflammatory form of arthritis. Most of the population over the age of 50 either have or will go on to get osteoarthritis. Osteoarthritis is commonly associated with aging, obesity, and prior joint injury or damage.
Can oligoarthritis be cured?
Although no cure exists for oligoarticular juvenile idiopathic arthritis, many therapies can be used to ease disease symptoms and improve quality of life. Doctors may prescribe steroids, or non-steroidal anti-inflammatory drugs (NSAIDs) like ibuprofen, to limit aches and inflammation.

