30 Best Hip-Strengthening Exercises for a Better Butt, Knees, and Back
Hip strengthening exercises are crucial for maintaining stability, flexibility, and overall functionality of the hip joint. Strong hip muscles not only support the body during various physical activities, such as walking, running, and jumping but also contribute to improved posture and reduced risk of injuries.
A comprehensive hip strengthening exercise regimen targets the muscles surrounding the hip joint, including the glutes, hip flexors, and abductors, promoting enhanced balance, mobility, and overall lower body strength. Incorporating these exercises into a regular workout routine can lead to better athletic performance, increased joint stability, and reduced discomfort associated with various hip-related conditions.
What are Hip Muscles?
Hip muscles refer to the group of muscles that surround and support the hip joint, which is the joint connecting the thigh bone (femur) to the pelvis. These muscles play a vital role in stabilizing and moving the hip joint, as well as aiding in various movements of the lower body.
There are several major hip muscles, each with its own specific functions:
- Gluteus Maximus: This is the largest and most superficial muscle of the buttocks. It extends the hip joint, allowing for movements like standing up from a sitting position, climbing stairs, and running.
- Gluteus Medius and Gluteus Minimus: These muscles lie underneath the gluteus maximus and are responsible for abduction (moving the leg away from the midline of the body) and internal and external rotation of the hip joint. They also help to stabilize the pelvis during activities like walking or balancing on one leg.
- Iliopsoas: This muscle is basically a mixture of two muscles, one is the psoas major and the other is the iliacus. It is located deep within the abdomen, passing in front of the hip joint. The iliopsoas are responsible for flexing the hip joint, allowing for movements like lifting the knee towards the chest or bending forward at the waist.
- Tensor Fasciae Latae (TFL): This muscle is located on the outer side of the hip and works in conjunction with the gluteus medius to abduct and internally rotate the hip joint. It also helps to stabilize the pelvis during activities like walking or running.
- Piriformis: This small muscle is located deep within the buttocks, underneath the gluteus maximus. It plays a crucial role in the external rotation of the hip joint and helps to stabilize it during activities like walking or running.
- Adductor Muscles: These muscles include the adductor longus, adductor brevis, adductor magnus, pectineus, and gracilis. They are located on the inner side of the thigh and are responsible for adduction (moving the leg towards the midline of the body) of the hip joint. They also assist in stabilizing the pelvis during movements like walking or standing.
These are just a few of the major hip muscles, but there are many other smaller muscles that contribute to the overall stability and movement of the hip joint. It is important to keep these muscles strong and flexible through regular exercise and stretching to maintain proper hip function and prevent injuries.
Exercise for Hip strengthening
Side Leg Raise
The side leg raise helps in strengthening the hip adductors. If you are healing after hip replacement surgery, a labrum rupture, or a groin strain, the exercise is beneficial. Athletes who must quickly change directions, like those who play soccer, football, basketball, or tennis, would also benefit greatly from it.
To perform this exercise:

- Start with lying on the ground on your right side.
- You should bend your right leg, and rest your left foot on the floor.
- Lift your left leg as high as you can gradually without sagging at the waist.
- This helps in keeping the stable spine.
- Maintain your leg parallel to your trunk rather than in front of it.
- Maintain it for five seconds, and then gradually drop the leg.
- Do it again five times.
- Change sides, Perform by lying on your left side and raising your right leg.
Isometric Gluteus Medius Exercise
The gluteus medius muscle, which attaches the upper thigh bone to the pelvis, is the focus of the isometric gluteus medius exercise. It is one of the primary stabilizing muscles that aids in regulating the hip and thigh bone rotation.
This is a crucial exercise because it keeps the pelvis on the opposite side from sinking whether jogging, walking, or standing on one leg. For seniors who wish to increase their stability and balance, it is quite beneficial.
Exercises that use one muscle against another are called isometric. For this one, a strap or belt is needed.
To perform this exercise:

- Start with lying on one side.
- Make sure your ankles are somewhat broader than your hips by wearing a belt around both of them.
- raise your top leg upward, pressing your opposite leg in the direction of the floor.
- Make sure your knees should be straight.
- Maintain this position for five seconds, and keep tension on both sides.
- There would not be high motion, but you should experience your thigh muscles tightening.
- Release, take a moment, then do it ten times.
- Perform on the other side.
Hip Flexion Exercise
For anyone healing from an iliopsoas muscle injury, this is a fairly basic hip exercise. This covers pressures on the muscles resulting from kicking, sprinting, or abrupt direction changes during a run.
People with lower back problems or those who have trouble climbing stairs are also likely to benefit from this workout.
To perform this exercise:

- Start with standing up straight.
- If you feel you are unbalanced, make sure you stabilize yourself by holding the wall or the back of a chair with one hand.
- Raise your right leg off the ground in a smooth but steady motion.
- In order to form a 90-degree angle at the hip, bend your knees.
- Keep this pose for five seconds.
- Gradually drop the leg.
- Do it again five times.
- Then change the sides.
The Wall Slide
This is an amazing workout that strengthens the thigh and gluteal muscles as well as the iliopsoas muscles.
The wall slide can be carried out as a warm-up before a workout session or as an individual exercise for runners, bikers, or persons whose jobs involve heavy lifting.
To perform this exercise:

- Start with standing upright and your back should be against a wall.
- Put your feet shoulder-width distance.
- Gradually bend your knees, lowering your back down the wall.
- Perform this for a count of five until your knees and hips are halfway to ninety degrees.
- Make sure you do not bend more than this as it can create high strain on the knees.
- Maintain it for five seconds.
- Gradually straighten your knees for a count of five, sliding up the wall.
- Finish in an upright position with your knees straight.
- Do it again five times.
Anyone with severe knee difficulties or older folks may find the wall slide difficult. It may also be challenging for those who are overweight or have weakness in their lower bodies.
Standing Hip Flexor (SHF)
The front hip flexors are exercised with the Standing Hip Flexor. It is an excellent workout for strengthening hip flexors and is particularly helpful for seniors experiencing lower back pain.
To perform this exercise:
- Start with standing and your feet should be apart and your hands should be placed on your hip.
- Take a step of your left foot in the forward direction about a foot and a half.
- Gradually bend your left knee, and raise your right heel off the ground.
- Tilt forward and compress your right glute in this position.
- Maintain it for 30 to 90 seconds.
- Do it again on the other side.
- Now, take your right foot forward.
Holding onto a chair or wall to help with balance will make it easier. If this position causes you any discomfort, get out of it and straighten your back.
Butterfly Pose
The butterfly pose strengthens your adductors and flexors. It increases your lower back’s flexibility and relaxes the muscles in your inner thighs, hips, and groin, drawing your legs together. This promotes blood flow and helps to keep things stable and balanced.
To perform this exercise:

- Sit upright on the ground to begin.
- Close your eyes and picture a string linked to your back, which will help you sit with excellent posture.
- Bend your knees and make sure the soles of your feet are connected at the center in the butterfly position.
- keep your back straight and place your hands on each foot.
- Do the inhalation while preparing, and do exhalation while dropping your torso forward.
- maintain it when you experience the stretch.
- keep this pose for 60 seconds.
To further extend your hip muscles, move your feet closer to your torso if you find that this stretch is too simple.
Standing Hip Extension
This exercise works the gluteus muscles, keeps the pelvis aligned, and supports the lower back. It increases glute strength and stability, making balancing more challenging.
To perform this exercise:

- Begin standing and your shoulders wide distance, and maintain your back straight.
- Ensure your knees are straight and locked.
- Maintain your hands on your hips for balance, do the extension of your right leg backward, and maintain your toes on the floor.
- Your legs will form the shape of a triangle.
- Slowly extend your right hip backward without creating an arch of your back.
- Get back your foot to the beginning position and do it again 10 times.
- Switch the side and perform the same movement.
Use a tension band or attach a little weight around your ankle if you find this standing exercise to be too simple.
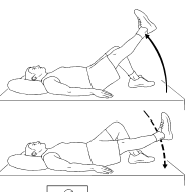
Prone Straight Leg Raise
As safe and efficient movement at the hip, knee, and ankle is ensured by strong core stability, core strength and balance are closely linked. In addition to relieving hip discomfort, this hip extension exercise strengthens core muscles.
To perform this exercise:

- Begin by lying down on a mat or bench, your face should be down.
- Next, compress your stomach to tighten your core muscles.
- Gradually raise one leg upward, maintain your stomach on the floor and your buttocks should be tight.
- Three seconds later, lower your leg slightly.
- Do again this exercise ten times.
- Switch the leg and do it again.
One of the best workouts for hip strengthening after surgery is this one.
Standing Hip Abductors
When walking or running, this exercise strengthens and stabilizes the hip abductors. It can help you walk more easily, develops your core muscles, and is a great hip mobility exercise for seniors.
To perform this exercise:

- Take a stance and grasp a chair or the wall.
- One leg should be raised slowly off the ground and away from your body in the shape of a half circle, as if you were going to kick the wall, and then lowered down to the ground.
- Return to the center after three seconds of holding this position.
- Perform this exercise five times.
- Repetitions are repeated on the other side after switching legs.
- As with any balancing exercise, keep your posture straight. Steer clear of slanting one way.
Hip Marches
Hip marches work the hamstrings and glutes. It is perfect for strengthening the core and improves gait by preventing shuffling. It also helps in relieving knee and hip discomfort.
To perform this exercise:

- Put your feet flat on the surface of the floor and take a seat.
- Make sure your back is supported by the chair this will help you keep good posture and prevent slouching.
- You can put your hands down anywhere that seems most comfortable, such as the edges of your chair.
- Raise your right knee as high as it is comfortable, then bring it back down.
- For ten repetitions in total, alternate raising your knees.
- Breathe consistently while performing the activity.
- Do again this exercise ten to fifteen times on each side.
- It is vital that you take rests between sets when performing balance exercises.
Hip Circles
Almost all of your hip muscles are worked out in hip circles. It works wonders to improve overall leg mobility and especially to strengthen the glute, which supports the hip. Stable hips are the result of having strong glutes, which also reduce stress and tension and improve hip flexion.
To perform this exercise:
- Place your feet slightly wider apart than shoulder-width apart and stand straight.
- Your hands should be on your hips, and little bend your knees.
- With your toes firmly planted, slowly spin your hips in large circles.
- Work through a set in a clockwise manner.
- Turn around counterclockwise.
- Every direction should be given a minimum of thirty seconds. This technique can be performed from a chair as well.
If you find this exercise difficult to balance, try reducing the size of the circles or grasping onto something strong for support.
Knee-to-Chest Pose
The following exercise targets the flexors and extensors of your hips. This is a well-liked senior yoga pose since it opens up the thighs, hips, and lower back. Additionally, it supports healthy blood circulation in the hip area.
To perform this exercise:

- On a mat, lie on your back, and bend your knees till they touch your chest, or as near as feels comfortable.
- Fold your knees and wrap your arms around them.
- Till your lower back stretches, slowly bring your knees and chin up to your chest.
- Hold this position for twenty seconds.
- Laying on the mat with your legs up and extended can help you to decompress.
- Unfold your knees and neck.
- Do the stretch again.
Keep your legs raised while performing the exercise during pauses. You are not allowed to put your feet on the surface of the floor.
Frankenstein walk
This workout targets your hamstrings, quadriceps, and hips. Moreover, it extends the range of motion. Keep your posture straight as you advance, prevent bending at the waist, and quicken your pace.
To perform this exercise:

- Start with standing your arms in extension in front of you, palms should be facing down.
- Make a 90-degree angle with your body by swinging your right leg up and out straight as you advance.
- Swing your left leg up in the same manner after lowering your right leg to the floor.
- If you run out of space, keep going for a minute and switch directions.
- Once you are comfortable, perform the exercise by extending your other arm behind you and reaching out to touch your opposite foot.
Double Banded Pull Through
To perform this exercise:

- A lengthy resistance band should be fastened low to the ground behind you.
- Yet another choice is to use a cable.
- A looped small resistance band should be placed just above your knees as you stand in front of the band with your feet shoulder-width distance.
- To actively maintain band tension and keep your knees from buckling, slightly spread your legs.
- Reach down and grip the long band between your legs by bending your knees, pushing your butt back, and hinging forward at the hips.
- Your glutes and hamstrings need to feel stretched.
- As you stand back up, push your hips forward and tense your glutes at the top.
- Maintain your chest raised and your back flat.
- It is one rep.
- Perform 12–15 repetitions.
Side Plank With Knee Drive
The constantly changing action of the moving leg makes it significantly more difficult for the bottom glute to isometrically sustain the body weight in that rigid position.
To perform this exercise:

- Begin with a side plank position and your left elbow should be beneath your shoulder, legs must be extended, and hips, knees, and ankles should be stacked.
- Engage your core muscles, tuck your butt, and make sure your lower back has to be flat.
- Gradually move your right knee up in the direction of your chest.
- Hold this pose for a second, and then gradually do the extension of the leg back out to the initiate position.
- That is 1 repetition.
- perform 5-8 repetitions on each leg.
Banded Hip March
To perform this exercise:

- Start with standing upright and your feet should be hip-width distance, your core must be engaged, and your chest elevated.
- Tie a looped mini resistance band around the balls of both feet.
- Gradually move your right knee upward and out in front of you, and do the stopping when it reaches hip height.
- You may not be able to elevate that high relay on your current mobility.
- You should experience your hip flexors muscles in the elevated leg working, and your glutes muscles on the stabilizing leg working.
- Focus on maintaining your foot directly beneath your knee, your pelvis should be at level, and your standing-leg knee, hip, and ankle are supposed to be in line.
- Gradually drop your leg back downward.
- That is 1 repetition.
- Perform 5-8 repetitions on each leg, switching sides.
Bulgarian Split Squat
To perform this exercise:

- Start with standing back on a bench or similar elevated surface.
- Your left foot should be on the ground and a few feet in front of the bench, put the top of your right foot on the court, shoelaces down.
- keep a dumbbell in each hand by your sides.
- Brace your core muscles and bend your knees to drop down into a split squat position.
- Your left knee should ideally create a 90-degree angle so that your thigh comes in parallel to the floor, and your right knee remains over the ground.
- Moving through your left heel, stand back up to the initiate position.
- That is 1 repetition.
- Perform 12-15 repetitions on each leg.
Step Up to Reverse Lunge
To perform this exercise:

- Start with standing facing a box, step, bench, or chair.
- Step onto the box with your right foot and move with your right heel and glute to take your left leg up to closer to the right. Let your left foot hover, and keep most of the weight on your right foot.
- Move back down with your left foot, then bring your right foot back approximately two feet behind the left and go down into a reverse lunge.
- Push up with your left foot to stand back up (which is one repetition) and move on to your next step-up.
- Do 12-15 reps on each leg.
Dumbbell Sumo Squat
To perform this exercise:

- Select a dumbbell that makes it possible for you to squat properly yet also leaves you exhausted at the completion of each set.
- Start with standing your feet should be wider than shoulder-width distance, and your toes should be slightly turned out.
- Keep the dumbbell with both hands at the level of your chest.
- To lower down into a squat bend your knees.
- Push through your heels to go back to standing and compress your glutes at the top of the movement.
- That is 1 repetition.
- Perform up to 8 to 10 repetitions.
Kickstand Romanian Deadlift
To perform this exercise:

- Start with standing with feet hip-width distance, one foot should be about six inches in front of the other.
- Keep a dumbbell or kettlebell next to your both feet.
- The major portion of your weight should be on your front leg.
- Rise onto the back of your foot’s toes, utilizing it as a kickstand to keep your balance but only putting a little weight on it.
- Tilt forward at the hips, push your glutes back, and lower the weights in the direction of the ground.
- Maintain your back flat and shoulders retracted do not round forward or arch your lower back.
- Push with your front foot to go back to the beginning position.
- That is 1 repetition.
- Perform 5 to 8 repetitions on each leg.
Explosive Sprinters Lunge
To perform this exercise:

- Start with standing tall with your feet hip-width distance.
- Place your right foot back a few feet into a lunge position.
- Press with your left foot to explosively jump into the air, moving your right knee in the direction of your chest.
- Land with a soft knee (that is 1 repetition) and step back immediately into another lunge.
- Do 5 to 8 repetitions on each leg.
Banded Jump Squat
To perform this exercise:

- Put a looped mini resistance band on just over your knees.
- Make sure you stand with your feet about shoulder-width distance.
- Tilt in the forward direction at your hips and sit your butt back into a squat.
- Squat as deep as your mobility will permit, but not more than parallel to the surface of the floor.
- Do the jump into the air as high as you can and straighten out your legs.
- Swing your arms down by your sides in order to take momentum, and hold your back straight and your chest elevated.
- go back to the ground with soft knees.
- That is 1 repetition.
- Perform 8 to 10 repetitions.
Kettlebell Swing
To perform this exercise:

- Start with standing with your feet shoulder-width distance, a kettlebell on the floor in between your legs.
- Hinge forward and bend your knees to squat down and take the kettlebell handle with both hands.
- Swing the kettlebell in between your knees, and then stand back up and swing the weight to chest level utilizing the force generated from your hips.
- compress your butt at the top of the motion.
- At the time lower your back down as you swing the kettlebell between your legs do it again to start the next repetition.
- Do 10 to 12 repetitions.
Lateral Lunge
To perform this exercise:

- Start with standing and your feet should be together, keeping a dumbbell in each hand, arms must be by your sides.
- Take a large step to the right approximately 2 feet.
- When your foot touches the ground, lean in the forward direction at the hips, push your buttocks back, and bend your right knee into a lunge.
- Your right knee should be framed by the weights, and your left leg should be straight.
- Hold for a second, and then push off your right leg to go back to the initiate position.
- Do it again on the other leg.
- That is 1 repetition.
- Perform 10 to 12 repetitions.
Banded Marching Hip Bridge
To perform this exercise:

- Create a loop of a mini resistance band over the balls of your feet and lie face up in front of a bench, chair, or step.
- Put your heels on the bench.
- Push with your heels and compress your glute muscles to elevate your hips off the surface of the floor.
- Maintain your back flat and core muscles should be engaged.
- Gradually move your right knee in the direction of your chest, Hold for a second, and then place your foot back on the bench.
- do it again with your left leg.
- That is 1 repetition.
- Do 10 to 12 repetitions.
Fire hydrant
This workout engages your core muscles while targeting your glutes and hips. If you have knee problems, you may need to do this exercise on a mat.
To perform this exercise:

- Start with banding down onto your hands and knees and make sure your hands should be over your hands and hips should be above your knees
- Tighten your core muscles and look straight down.
- Raise one of your legs away from your body at a forty-five-degree angle while maintaining your knees at a 90-degree angle.
- Gradually drop your leg down to the initiate position.
- Perform 3 sets of 10 repetitions.
- Do it again with the other leg.
Clamshell
Clamshell exercises are highly effective for building the gluteus medius and the outer thighs.
To perform this exercise:

- Start with lying down on the right side of your body and form one long line from your head to your toes.
- Raise your right hand to support your head, lay your left hand on your left hip, and bend your legs to 90 degrees.
- Elevate and open your left knee while maintaining your toes together when you’re all set. Maintain your upper body steady as your knee opens.
- Your feet should be in line with your glutes and your knees should be in front of your body.
- Compress your glutes at the same time with your knee open, then gradually release and descend your left knee back to the initiate position.
- Do it again.
- Perform ten to twelve repetitions, then change to the other side.
Donkey kicks
This exercise is a well-known Pilates lower-body workout. Donkey kicks, as a hip extension exercise, mainly target the gluteus maximus and tensor fasciae latae.
To perform this exercise:

- Initiate with standing by getting on your hands and knees on a soft surface.
- Your hands should be directly beneath your shoulders, knees should be under your hips, and back should be in a neutral position.
- When you are all set, strike your right foot straight back and into the air while maintaining your right knee bent to an angle of 90 degrees.
- Your hip joint is supposed to be the source of all leg movement.
- Kick up your right foot till your right quad and sole are parallel with the surface of the ground.
- Compress your right glute at the top of the kick, then gradually lower the right knee back to initiate position.
- Do it again.
- Perform ten to twelve repetitions with your right leg, then change to the opposite side.
Banded Glute Bridge
To perform this exercise:

- Tie a resistance band around your thighs just over your knees.
- You should lie on your back your knees should be bent and your feet should be flat on the surface of the floor, around six inches in front of your glute muscle and your feet at hip width distance.
- Engage your core and glutes as you push with your heels to bring your hips in the direction of the ceiling, without allowing your knees to drop inward.
- Gradually drop back down. to the starting position.
- Do again this gradual and steady stretch for 15 repetitions.
Dynamic Banded Glute Bridge
To perform this exercise:
- Put a looped band around your thighs, just over your knees.
- Start with lying on your back your knees should be bent and your feet should be flat on the surface of the floor, around six inches in front of your glutes, and hip distance apart.
- Engage your core and glutes as you push with your heels to bring your hips in the direction of the ceiling, without allowing your knees to drop inward.
- Gradually walk your feet about three small steps in the forward direction, At a distance from your bottom.
- Then, walk them back under your knees.
- Keep your hips elevated the during whole exercise.
- Do again this movement for five repetitions.
Benefits of the hip strengthening exercise
Hip strengthening exercises offer numerous benefits for overall health and physical performance. Here are some of the key benefits of hip-strengthening exercises:
- Improved Stability and Balance: Strong hip muscles help to stabilize the pelvis and provide a solid foundation for movement. This increased stability can enhance balance and reduce the risk of falls or injuries, especially in older adults.
- Injury Prevention: Strengthening the hip muscles can help prevent common injuries such as hip strains, hip bursitis, and IT band syndrome. Strong hip muscles provide better support and protection to the hip joint, reducing the risk of overuse or traumatic injuries.
- Enhanced Performance in Sports and Physical Activities: Strong hip muscles are essential for optimal performance in various sports and physical activities. They provide power and stability for movements like jumping, running, cutting, and changing direction. Strengthening the hip muscles can improve athletic performance and reduce the risk of sports-related injuries.
- Alleviation of Hip and Lower Back Pain: Weak hip muscles can contribute to hip and lower back pain. Strengthening these muscles can help alleviate pain by providing better support to the hip joint and improving overall hip mechanics. Strong hip muscles also help to distribute forces more evenly throughout the body, reducing stress on the lower back.
- Improved Posture: Weak hip muscles can lead to poor posture, including anterior pelvic tilt (excessive arching of the lower back) or lateral pelvic tilt (uneven hips). Strengthening the hip muscles can help correct these imbalances, leading to improved posture and alignment.
- Enhanced Core Stability: The hip muscles are interconnected with the core muscles, including the abdominals and lower back muscles. Strengthening the hips can improve core stability and overall functional strength, benefiting activities of daily living and reducing the risk of back pain.
- Increased Flexibility and Range of Motion: Hip strengthening exercises often involve movements that promote flexibility and improve the range of motion in the hip joint. This increased flexibility can enhance overall mobility and reduce stiffness or tightness in the hips.
- Improved Overall Function and Quality of Life: Strong hip muscles contribute to overall functional strength and mobility, allowing individuals to perform daily activities with greater ease and efficiency. This can lead to an improved quality of life, as individuals can maintain independence and engage in activities they enjoy.
To reap these benefits, it is important to incorporate a variety of hip-strengthening exercises into your fitness routine. This can include exercises such as squats, lunges, hip thrusts, lateral band walks, clamshells, and hip bridges. It is recommended to consult with a healthcare professional or a qualified fitness trainer to ensure proper form and technique when performing these exercises.
FAQ
How often should I do hip strengthening exercises?
It is recommended to perform hip strengthening exercises at least 2-3 times per week. However, the frequency can vary depending on your fitness level and goals. It is important to listen to your body and give yourself adequate rest and recovery between workouts.
Can I do hip strengthening exercises if I have a hip injury?
If you have a hip injury, it is important to consult with a healthcare provider before starting any exercise program. They can advise you on which workouts are safe and suited for your particular condition. Modifications or alternative workouts may be required in some circumstances to avoid worsening the injury.
How long does it take for hip strengthening exercises to produce outcomes?
The time it takes to see results from hip strengthening exercises can vary depending on various factors such as your starting fitness level, consistency with exercise, and individual differences. With regular practice, you may start to notice improvements in stability, balance, and overall strength within a few weeks. But it’s crucial to keep in mind that outcomes might differ and that persistence is essential.
Can I do hip strengthening exercises if I have hip osteoarthritis?
If you have hip osteoarthritis, it is important to consult with a healthcare provider before starting any exercise program. They can advise you on which workouts are safe and suited for your specific medical condition. In some cases, low-impact exercises or modifications may be recommended to minimize stress on the hip joint.
Can I do hip strengthening exercises if I am pregnant?
If you are pregnant, it is important to consult with a healthcare professional before starting any exercise program. They can give you correct guidance on which exercises are safe and appropriate for your specific medical condition. In many cases, hip strengthening exercises can be beneficial during pregnancy, but modifications or adjustments may be necessary to accommodate the changes in your body.
Are there any precautions I should take when performing hip-strengthening exercises?
When performing hip strengthening exercises, it is important to maintain proper form and technique to avoid injury. Begin with lesser weights or resistance and progressively increase as your strength increases. It’s also critical to pay attention to your body and refrain from ignoring pain or discomfort. If you have any underlying medical conditions or concerns, it is recommended to consult with a healthcare professional before starting any exercise program.
Reference
- CPT, A. M. W. (2018, October 19). 12 of the Best Hip-Strengthening Exercises. SELF. https://www.self.com/gallery/best-hip-strengthening-exercises
- Hip Strengthening Exercises For Seniors. (n.d.). One Medical. https://www.onemedical.com/blog/exercise-fitness/hip-strengthening-exercises-for-seniors/
- Colletta, M. (2021, October 13). 10 Best Hip Strengthening Exercises for Home Workouts. Steel Supplements. https://steelsupplements.com/blogs/steel-blog/10-best-hip-strengthening-exercises-for-home-workouts
- Image: Dumbbell kickstand deadlift | Exercise Videos & Guides | Bodybuilding.com. (n.d.). Bodybuilding.com. https://www.bodybuilding.com/exercises/total-fitness-dumbbell-kickstand-deadlift
- Image: Pt, B. S. (2023, October 17). Isometric Gluteus Medius Strengthening Exercise. Verywell Health. https://www.verywellhealth.com/isometric-gluteus-medius-training-2696594
- Image: Banded Marching Hip Bridge. (n.d.). skimble.com. https://www.skimble.com/exercises/48288-banded-marching-hip-bridge-how-to-do-exercise
- Image: Butt-Squat Jump with Short Resistance Band – FIT CARROTS | Premium Fitness Tools For Functional and Regeneration Training. (2019, November 23). FIT CARROTS | Premium Fitness Tools for Functional and Regeneration Training. https://fitcarrots.com/exercise/short-resistance-bands/butt-squat-jump-with-short-resistance-band/
- Image: Sparacino, A., Mazzo, L., & Smith, J. (2023, March 6). The Best Exercises for Sculpting Your Glutes. Shape. https://www.shape.com/fitness/workouts/trainers-reveal-best-butt-exercises-all-time
- Image: Resistance Band Pull Throughs: A Safe Exercise To Build Glutes And Posterior Chain Without Weights. (n.d.). Member Login Area | Tom Venuto’s Burn the Fat Inner Circle – Weight Loss – Fat Loss – Support Community – Home of the Burn the Fat Challenge – Fat Burning Tips Workouts Recipes. https://www.burnthefatinnercircle.com/members/login.cfm?hpage=Band%2DPull%2DThroughs%2Ecfm&loggedout=y
- Image: Vaghela, D. (2023, June 22). Frankenstein Walk. Mobile Physiotherapy Clinic. https://mobilephysiotherapyclinic.in/frankenstein-walk/
- Image: Hip Strengthening Exercises For Seniors. (n.d.). One Medical. https://www.onemedical.com/blog/exercise-fitness/hip-strengthening-exercises-for-seniors/
- Image: Kelli, J. (2019, May 23). Butterfly Pose — Kelli Taylor | Elements of Natural Wellness. Kelli Taylor | Elements of Natural Wellness. https://www.lifeaskellitaylor.com/yin-yoga-poses/butterfly-pose
- Image: Jacobson, M. (2017, August 9). Step-Up to Reverse Lunge – Washington Athletic Club. Washington Athletic Club. https://www.wac.net/service/step-up-to-reverse-lunge/
- Image: Side Plank Knee Drives. (n.d.). skimble.com. https://www.skimble.com/exercises/59367-side-plank-knee-drives-how-to-do-exercise