

Range of Motion (ROM)
What is a Range of Motion (ROM)?
Range of Motion (ROM) refers to the measurement of movement around a specific joint or body part. It is a critical component of assessing and evaluating an individual’s flexibility, mobility, and functional abilities. ROM measurements are commonly used in various fields, including physical therapy, rehabilitation, sports medicine, and fitness training.
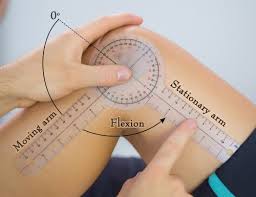
Goniometers
A goniometer is a device used in physical therapy to measure a joint’s range of motion (ROM). There are two “arms”—one that is stationary and one that is movable—that are hinged together. Each is positioned at specific points on the body with the center of the goniometer aligned at the joint of interest. Hash marks on the hinge allow the therapist to precisely measure ROM in degrees.
Though you can easily purchase one yourself, a goniometer is meant for properly trained health professionals who know how to use it for the best results. For example, a therapist may use the tool to obtain a baseline range of motion measurement of a specific joint after an injury. After an intervention, they may measure again to ensure that the treatment is effective.
Types of Goniometers
A traditional goniometer is pretty basic. It is usually made of clear plastic, sometimes metal, and some cost just a few dollars.
They come in different sizes: Small goniometers are meant to measure a range of motion around the joints of your fingers, thumbs, and hands. Large goniometers are used to measure your hips or knees.
While the most basic form of a goniometer is a physical piece of equipment, new forms have been developed. Most notably:
- Goniometers that strap to a body part to measure a range of motion while you move
- Digital goniometers: Studies have shown that they’re as accurate or better than the basic versions.
- Goniometer apps on portable devices like smartphones: These use your device’s accelerometer and gyroscopic technology to measure changes in the position of the phone. You simply open the app, place your phone in the correct position on your body part, and move your body through its available range of motion. One study found this method to be equally effective as basic goniometers in terms of measuring the range of motion.
Why Goniometers Matter?
While strength receives a lot of attention, range of motion is an often-ignored measurement of its fitness. It is an indicator of flexibility as one age.
If your therapist uses a goniometer to measure your range of motion and notes a decreased motion from your baseline, they can help you improve your joint’s mobility with stretching and other interventions. Repeat use of a goniometer can help measure your improvement.
Techniques for using Goniometer
- It is necessary that a single notation system is used in goniometry. The neutral zero method (0 to the 180-degree system) is the most widely used method.
- The same goniometer should always be used to reduce the chances of instrumental error.
- The part of the body to be measured using a goniometer should be reasonably exposed and free.
- The range of motion of each joint should be measured in isolation, to avoid trick movement (simultaneous movement of another joint) and muscle insufficiency which may alter the reading.
- Both active and passive range of motion should be measured and recorded respectively.
Range of Motion (ROM)

UPPER LIMB
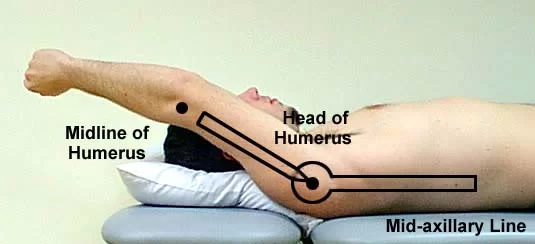
SHOULDER FLEXION
Motion occurs in the sagittal plane around a medial–lateral axis.
Testing Position
Place the individual supine with the knees flexed to flatten the lumbar spine. Position the shoulder in 0 degrees of abduction, adduction, and rotation. Place the elbow in extension so that tension in the long head of the triceps muscle does not limit the motion. Position the forearm in 0 degrees of supination and pronation so that the palm of the hand faces the body.
Stabilization
Glenohumeral Flexion Stabilize the scapula to prevent posterior tilting, upward rotation, and elevation of the scapula.
Shoulder Complex Flexion
Stabilize the thorax to prevent extension of the spine and movement of the ribs. The weight of the trunk may assist stabilization
Goniometer Alignment
| Center fulcrum | over the lateral aspect of the greater tubercle. |
| Stationary arm | parallel to the midaxillary line of the thorax. |
| Moving arm | the lateral midline of the humerus |
Anatomical Movement
Shoulder flexion
Expected Findings
The expected range of motion is 0- 180 degrees
SHOULDER EXTENSION
Testing position: Prone
Goniometer Alignment
| Center fulcrum | over the lateral aspect of the greater tubercle |
| Stationary arm | parallel to the midaxillary line of the thorax |
| Moving arm | the lateral midline of the humerus, using the lateral epicondyle of the humerus for reference. |
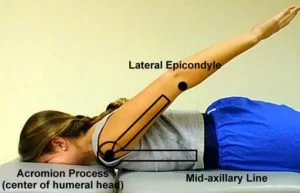
Expected Findings
Normal shoulder complex extension ROM values for adults vary from about 50 to 60 degrees. Normal glenohumeral extension ROM values for adults vary from about 20 to 25 degrees.
SHOULDER ABDUCTION
Motion occurs in the frontal plane around an anterior– posterior axis
Testing position: Supine
Goniometer Alignment
| Center fulcrum | close to the anterior aspect of the acromial process |
| Stationary arm | parallel to the mid-line of the anterior aspect of the sternum |
| Moving arm | the anterior midline of the humerus |
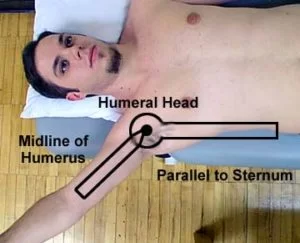
Expected findings
Normal shoulder complex abduction ROM values for adults vary from about 170 to 180 degrees. Normal glenohumeral abduction ROM values for adults vary from about 90 to 125 degrees.
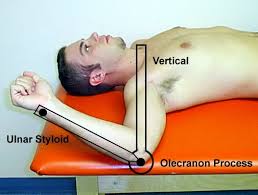
MEDIAL (INTERNAL) ROTATION
When the individual is in an anatomical position, the motion occurs in the transverse plane around a vertical axis. When the individual is in the resting position, the motion occurs in the sagittal plane around a medial–lateral (coronal) axis.
Testing Position: supine, with the arm being tested in 90 degrees of shoulder abduction
| Center fulcrum | Olecranon process of ulna. |
| Stationary arm | Perpendicular to floor. |
| Moving arm | Ulnar border of forearm toward ulnar styloid process. |
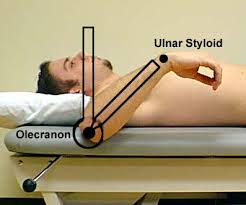
Expected findings
Normal shoulder complex medial rotation ROM values for adults vary from about 70 to 90 degrees.
LATERAL (EXTERNAL) ROTATION
When the individual is in an anatomical position, the motion occurs in the transverse plane around a vertical axis.
Testing position: Same as above.
Goniometer alignment
| Center fulcrum | Olecranon process of ulna. |
| Stationary arm | Perpendicular to floor. |
| Moving arm | Ulnar border of forearm toward ulnar styloid process. |
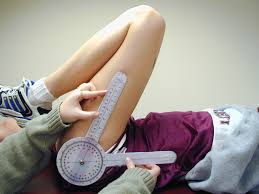
Elbow Flexion/Extension
Motion occurs in the sagittal plane around a medial– lateral axis.
Testing Position: Position the individual supine with the shoulder in 0 degrees of flexion, extension, and abduction so that the arm is close to the side of the body.
Goniometer alignment
| Center fulcrum | over the lateral epicondyle of the humerus |
| Stationary arm | the lateral midline of the humerus, using the center of the acromion process for reference. |
| Moving arm | the lateral midline of the radius, using the radial head and radial styloid process for reference |
Expected findings
Normal flexion ROM values for adults range from about 140 to 150 degrees.
FORARM SUPINATION/PRONATION
The motion occurs in the frontal plane around an anterior– posterior axis
Goniometer alignment
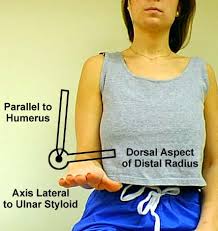
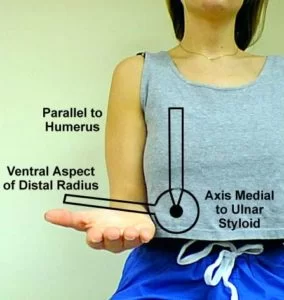
| FOREARM PRONATION | On volar surface of wrist, in line with styloid process of ulna. | |
| Center fulcrum | On volar surface of wrist, in line with styloid process of ulna. | In line with, and just proximal to, styloid process of ulna. |
| Stationary arm | Parallel with anterior midline of humerus. | Parallel with anterior midline of humerus. |
| Moving arm | Volar surface of wrist, at level of ulnar styloid process. | Dorsum of forearm, just proximal to ulnar styloid process. |
Expected findings
Range of motion of forearm supination and pronation is 0 to 90 degrees
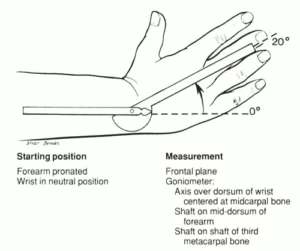
WRIST FLEXION/EXTENSION
This motion occurs in the sagittal plane around a medial–lateral axis. Wrist flexion is sometimes referred to as volar or palmar flexion.
Goniometer alignment
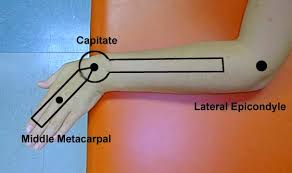
| Goniometer alignment for wrist flexion/extension | Alternative goniometer alignment for wrist flexion/extension | |
| Center fulcrum | on the lateral aspect of the wrist over the triquetrum. | Center fulcrum dorsal to the wrist joint near the capitate. |
| Stationary arm | Align proximal arm with the lateral midline of the ulna, using the olecranon and ulnar styloid processes for reference. | Align proximal arm with the dorsal midline of the forearm. |
| Moving arm | Align distal arm with the lateral midline of the fifth metacarpal. Do not use the soft tissue of the hypothenar eminence for reference | Align distal arm with the dorsal aspect of the third metacarpal. |
Expected findings
WRIST FLEXION: 60 to 80 degrees
WRIST EXTENSION: 60 to 75 degrees.
WRIST RADIAL DEVIATION/ULNAR DEVIATION
Motion occurs in the frontal plane around an anterior–
posterior axis.
Expected findings
Radial deviation is sometimes referred to as radial flexion or abduction. Normal ROM values for adults vary from about 20 to 25 degrees.
Ulnar deviation is sometimes referred to as ulnar flexion or adduction. Normal ROM values for adults vary from about 30 to 40 degrees.
Goniometer Alignment
| Center fulcrum | on the dorsal aspect of the wrist over the capitate. |
| Stationary arm | Align the distal arm with the dorsal midline of the third metacarpal. Do not use the third phalanx for reference. |
| Moving arm | Align distal arm with the dorsal midline of the third metacarpal. Do not use the third phalanx for reference. |
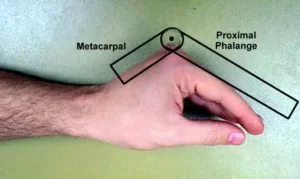
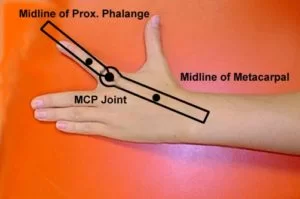
FINGERS: METACARPOPHALANGEAL (MCP) FLEXION
Motion occurs in the sagittal plane around a medial–lateral axis.
Expected findings
Normal ROM values for adults vary from 90 to 100 degrees. Metacarpophalangeal flexion appears to increase slightly in an ulnar direction from the index finger to the little finger. This pattern of increasing flexion ROM from the radial to the ulnar side of the hand at the MCP joints allows for a smaller diameter grip on the ulnar side of the hand and facilitates contact between the thumb and more ulnarly placed fingers during opposition.
Goniometer Alignment
| Center fulcrum | over the dorsal aspect of the MCP joint. |
| Stationary arm | Align the distal arm over the dorsal midline of the proximal phalanx. |
| Moving arm | Align distal arm over the dorsal midline of the proximal phalanx. |
FINGERS: METACARPOPHALANGEAL EXTENSION
Motion occurs in the sagittal plane around a medial– lateral axis.
Goniometer Alignment
| Dorsal Aspect | Alternative Goniometer Alignment: Palmar Aspect | |
| Center fulcrum | over the dorsal aspect of the MCP joint. | over the palmar aspect of the MCP joint. |
| Stationary arm | Align proximal arm over the dorsal midline of the metacarpal. | Align proximal arm over the palmar midline of the metacarpal. |
| Moving arm | Align distal arm over the dorsal midline of the proximal phalanx. | Align distal arm over the palmar midline of the proximal phalanx |
Expected findings
Normal passive ROM value is 20 to 45 degrees. Passive MCP extension ROM is greater than active extension. The little finger is reported to have the greatest amount of MCP extension, whereas others report that extension ROM at the MCP joints is equal across all fingers.
FINGERS: METACARPOPHALANGEAL ABDUCTION/ADDUCTION
Motion occurs in the frontal plane around an anterior– posterior axis.
Metacarpophalangeal adduction is not usually measured and recorded separately from MCP abduction, because it is the return from full abduction to the 0 starting position. There is very little adduction ROM beyond the 0 starting position.
Expected findings
the maximal range of abduction–adduction is 25 degrees
Goniometer Alignment
| Center fulcrum | over the dorsal aspect of the MCP joint. |
| Stationary arm | Align proximal arm over the dorsal midline of the metacarpal. |
| Moving arm | Align distal arm over the dorsal midline of the proximal phalanx. |
FINGERS: PROXIMAL INTERPHALANGEAL FLEXION/EXTENSION
Motion occurs in the sagittal plane around a medial– lateral axis.
Goniometer alignment
| PIP FLEXION/EXTENSION | |
| Center fulcrum | over the dorsal aspect of the PIP joint. |
| Stationary arm | Align proximal arm over the dorsal midline of the proximal phalanx. |
| Moving arm | Align distal arm over the dorsal midline of the middle phalanx. |
Expected findings
Normal ROM values for PIP flexion is from 100 to 110 degrees. Proximal interphalangeal flexion ROM is similar for all the fingers.
Proximal interphalangeal extension is usually recorded as the starting position for PIP flexion ROM. Normal ROM values for adults are generally considered to be about 0 degrees.
FINGERS: DISTAL INTERPHALANGEAL FLEXION/EXTENSION
Motion occurs in the sagittal plane around a medial–lateral axis.
Goniometer Alignment
| Center fulcrum | over the dorsal aspect of the DIP joint. |
| Statinary arm | Align proximal arm over the dorsal midline of the middle phalanx |
| Moving arm | Align distal arm over the dorsal midline of the distal phalanx. |
Expected findings
Normal DIP flexion ROM values for adults vary from 70 to 90 degrees. Distal interphalangeal flexion ROM is generally equal for all fingers. The distal interphalangeal extension is usually recorded as the starting position for DIP flexion ROM. Normal ROM values for adults are generally considered to be about 0 degrees
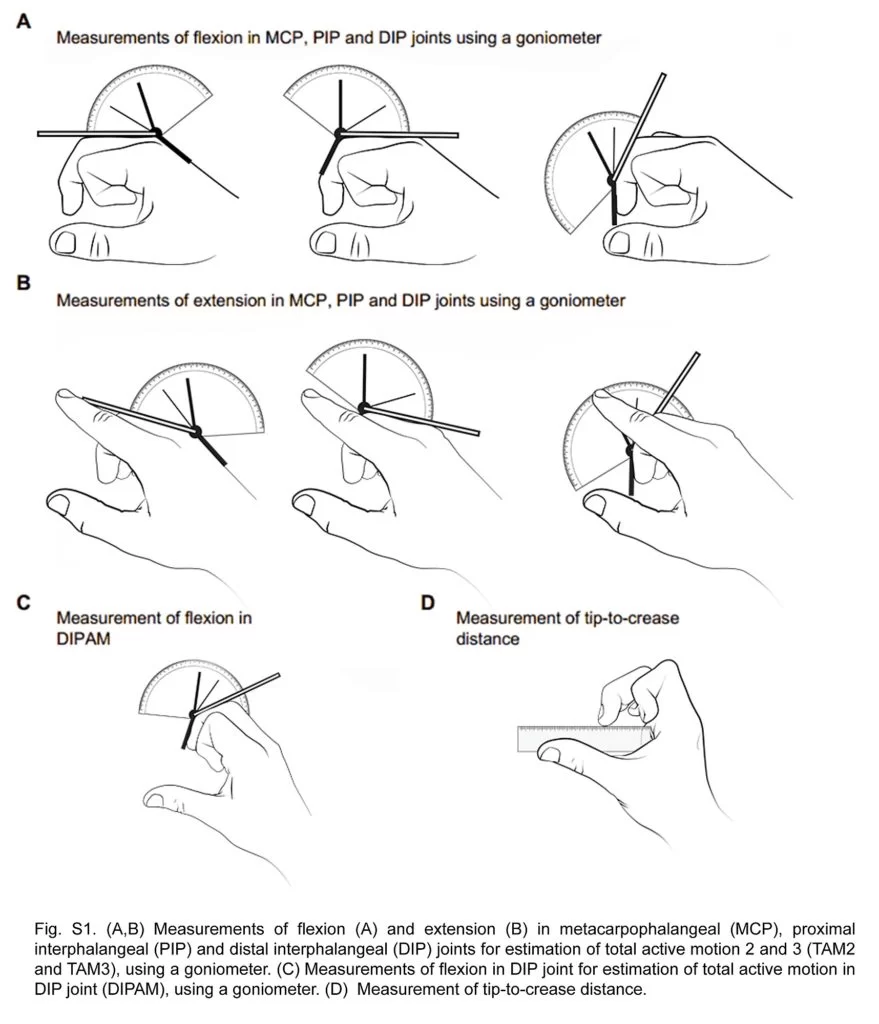
FINGERS: COMPOSITE FLEXION OF THE MCP, PIP, AND DIP JOINTS
Composite finger flexion (CFF) is a simple method of quickly assessing multiple joints in a finger to indicate the functional ability to make a fist. However, a disadvantage of CFF is the inability to localize an impairment or response to treatment in a specific joint.
Normally, when the MCP, PIP, and DIP joints are maximally flexed, the distance between the fingertip and the distal palmar crease of the hand is zero.
Testing Position
Place the individual sitting, with the forearm and hand resting on a supporting surface. Position the forearm in neutral supination and pronation and the wrist in 0 degrees of flexion, extension, and radial and ulnar deviation. Alternatively, the forearm could be positioned in full supination
Stabilization
Stabilize the metacarpals to prevent motion of the wrist.
Measurement Method
Measure the perpendicular distance between the distal palmar crease and the tip of the finger. Alternatively, the distance between the distal palmar crease and the distal corner of the nail-bed on the radial border of the finger can be measured.
THUMB: CARPOMETACARPAL FLEXION/EXTENSION
Motion occurs in the plane of the hand. When the individual is in the anatomical position, the motion occurs in the frontal plane around an anterior– posterior axis.
Goniometer Alignment
| GONIOMETER ALIGNMENT | ALTERNATIVE GONIOMETER ALIGNMENT | |
| Center fulcrum | over the palmar aspect of the first CMC joint. | over the palmar aspect of the first CMC joint. |
| stationary arm | Align proximal arm with the ventral midline of the radius using the ventral surface of the radial head and radial styloid process for reference. | Align proximal arm with an imaginary line between the palmar surfaces of the trapezium and pisiform. This line is often parallel to the distal wrist crease |
| Moving arm | Align distal arm with the ventral midline of the first metacarpal. | Align distal arm with the ventral midline of the first metacarpal. |
In the beginning position for flexion and extension, the goniometer will indicate an angle of approximately 30 to 50 degrees rather than 0 degrees, depending on the shape of the hand and wrist position. The difference between the beginning-position degrees and the end-position degrees is the ROM. For example, a measurement that begins at 35 degrees and ends at 15 degrees should be recorded as a ROM of 0 to 20 degrees.
Expected finding
Thumb flexion: This motion is sometimes called radial adduction. Normal ROM values in adults vary from about 15 to 25 degrees.
Thumb extension: This motion is sometimes called radial abduction. Reported ROM values for adults usually vary from 15 to 35 degrees depending on the measurement methods.
THUMB: CARPOMETACARPAL ABDUCTION
Motion occurs at a right angle to the palm of the hand. When the individual is in the anatomical position, the motion occurs in the sagittal plane around a medial– lateral axis.
Goniometer Alignment
| Center fulcrum | over the lateral aspect of the scaphoid or radial styloid process, so that the proximal and distal arms of the goniometer can be properly positioned over the long axes of the first and second metacarpals. |
| Stationary arm | Align proximal arm with the lateral midline of the second (index) metacarpal, using the center of the second MCP joint for reference. |
| Moving arm | Align distal arm with the dorsal midline of the first (thumb) metacarpal, using the center of the first MCP joint for reference. |
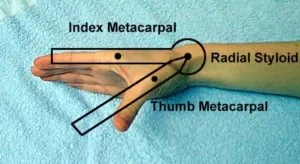
Expected findings
This motion is sometimes called palmar abduction or anteposition. Normal ROM values for adults using the measurement methods presented in this book range from about 40 to 50 degrees
THUMB: CARPOMETACARPAL ADDUCTION
Motion occurs at a right angle to the palm of the hand. When the individual is in the anatomical position, the motion occurs in the sagittal plane around a medial–lateral axis. Adduction of the CMC joint of the thumb is not often measured and recorded separately because it is the return to the 0 starting position from full abduction.
THUMB: CARPOMETACARPAL OPPOSITION
This motion is a combination of abduction, flexion, medial axial rotation (pronation), and adduction at the CMC joints of the thumb. Contact between the tip of the thumb and the base of the little finger (proximal digital crease) is usually possible at the end of opposition ROM, providing that some flexion at the MCP and IP joints of the thumb is allowed. If no flexion of the MCP and IP joints of the thumb is allowed, there will be a distance of several centimeters between the thumb and the base of the little finger at the end of the opposition.
Measurement Method: Linear Distance
The goniometer is not commonly used to measure the angular range of opposition. Instead, a linear ruler is often used to measure the shortest distance between the tip of the thumb and the center of the proximal
digital crease of the little finger at the end of opposition. Alternately, the shortest distance between the center of the proximal digital crease of the thumb and the distal palmar crease directly over the fifth MCP joint can be measured. In this manner, motion at the MCP and IP joints of the thumb will not affect the measurement of opposition. In both methods, the smaller the distance is between the landmarks, the greater the ROM will be in opposition.
THUMB: METACARPOPHALANGEAL FLEXION/EXTENSION
Motion occurs in the frontal plane around an anterior– posterior axis when the individual is in the anatomical position. Normal ROM values for adults vary from about 50 to 60 degrees.
Thumb MCP extension is usually recorded as the starting position for MCP flexion ROM. Normal MCP extension ROM for the thumb is usually considered to be 0 degrees
Goniometer Alignment
| Center fulcrum | over the dorsal aspect of the MCP joint. |
| Stationary arm | Align proximal arm over the dorsal midline of the metacarpal. |
| Moving arm | Align distal arm with the dorsal midline of the proximal phalanx. |
THUMB: INTERPHALANGEAL FLEXION/EXTENSION
Motion occurs in the frontal plane around an anterior– posterior axis when the individual is in the anatomical position.
Goniometer Alignment
| Center fulcrum | over the dorsal surface of the IP joint. |
| Stationary arm | Align proximal arm with the dorsal midline of the proximal phalanx. |
| Moving arm | Align distal arm with the dorsal midline of the distal phalanx. |
Expected findings
FLEXION: Normal ROM values for adults are reported to be about 80 degrees.
EXTENSION: Normal active extension ROM at the IP joint of the thumb varies from about 20 to 30 degrees
LOWER LIMB
HIP FLEXION
Motion occurs in the sagittal plane around a medial– lateral axis.
Expected findings
Hip flexion range of motion (ROM) values for adults generally vary from 120 to 140 degrees. Hip flexion ROM tends to decrease from toddler to senior age although differences are generally small, ranging from about 4 degrees (males) to 10 degrees (females).
Testing Position
Place the individual in the supine position, with the pelvis in neutral, knees extended, and both hips in 0 degrees of abduction, adduction, and rotation.
Goniometer Alignment
| Center fulcrum | over the lateral aspect of the hip joint, using the greater trochanter of the femur for reference. |
| Stationary arm | Align proximal arm with the lateral midline of the pelvis. |
| Moving arm | Align distal arm with the lateral midline of the femur, using the lateral epicondyle as a reference |
HIP EXTENSION
Motion occurs in a sagittal plane around a medial– lateral axis.
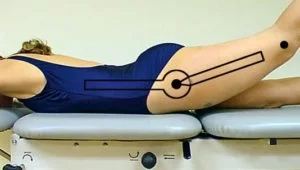
Testing Position
Place the individual in the prone position, with both knees extended and the hip to be tested in 0 degrees of abduction, adduction, and rotation.
Alternative Testing Position: Side-Lying
If the individual is unable to assume a comfortable prone position, the testing position may be altered to side-lying with the leg being tested in the upper position. In the side-lying position, the bottom limb should be in slight hip and knee flexion for comfort and stability. The stabilization, testing motion, end-feel, and goniometer alignment are the same as for the prone testing position procedure.
Goniometer Alignment
| Center fulcrum | over the lateral aspect of the hip joint, using the greater trochanter of the femur for reference. |
| Stationary arm | Align proximal arm with the lateral midline of the pelvis. |
| Moving arm | Align distal arm with the lateral midline of the femur, using the lateral epicondyle as a reference. |
Expected findings
Normal hip extension ROM values for adults vary from about 18 to 30 degrees.
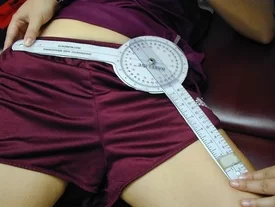
HIP ABDUCTION
Motion occurs in the frontal plane around an anterior–posterior axis.
Expected findings
Normal abduction ROM values for adults vary from about 40 to 55 degrees.
Goniometer Alignment
| Center fulcrum | over the anterior superior iliac spine (ASIS) of the extremity being measured. |
| Stationary arm | Align proximal arm with an imaginary horizontal line extending from one ASIS to the other. |
| Moving arm | Align distal arm with the anterior midline of the femur, using the midline of the patella for reference. Palpate the midpoint between the femoral epicondyles to confirm that the midline of the patella is not displaced medially or laterally. |
HIP ADDUCTION
Motion occurs in a frontal plane around an anterior– posterior axis.
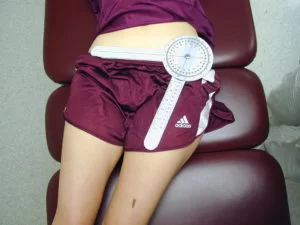
Goniometer Alignment
| Goniometer Alignment for hip abduction and addction | |
| Center fulcrum | over the ASIS of the extremity being measured. |
| Stationary arm | Align proximal arm with an imaginary horizontal line extending from one ASIS to the other. |
| Moving arm | Align distal arm with the anterior midline of the femur, using the midline of the patella for reference. Palpate the midpoint between the femoral epicondyles to confirm that the midline of the patella is not displaced medially or laterally. |
Expected findings
Normal adduction ROM for adults is generally 20 to 25 degrees.
HIP MEDIAL (INTERNAL) ROTATION
Motion occurs in a transverse plane around a vertical axis when the individual is in anatomical position.
HIP LATERAL (EXTERNAL) ROTATION
Motion occurs in a transverse plane around a longitudinal axis when the individual is in anatomical position.
Testing Position
Seat the individual on a firm surface, with the knees flexed to 90 degrees over the edge of the surface. Place the hip in 0 degrees of abduction and adduction and in 90 degrees of flexion. If the femur is not in 90 degrees of flexion, then place a towel roll under the distal end of the femur to maintain the femur in a horizontal plane.
Alternative Testing Position: Prone
Position the individual prone with both legs extended. Place a strap across the pelvis for stabilization. Flex the knee to 90 degrees in the leg to be tested. (The other leg should remain flat on the table with the knee extended.) Goniometer alignment is the same as in the sitting position.
NOTE: This position should only be used if the rectus femoris is of normal length; if it isn’t, then the sitting position should be used.
Stabilization
Stabilize the distal end of the femur to prevent abduction, adduction, or further flexion of the hip. Instruct the individual to use proper sitting posture as weight-bearing through the ischial tuberosities assists with stabilization and helps to avoid rotations and lateral tilting of the pelvis.
Goniometer Alignment
| Center fulcrum | over the anterior aspect of the patella. |
| Stationary arm | Align proximal arm so that it is perpendicular to the floor or parallel to the supporting surface. Goniometers with a level attached to the proximal arm are helpful for novices. |
| Moving arm | Align distal arm with the anterior midline of the lower leg, using the crest of the tibia and a point midway between the two malleoli for reference. |
Expected findings
- MEDIAL ROTATION: Normal medial rotation ROM values for adults vary from about 30 to 45 degrees, with greater ranges noted in the prone position.
- LATERAL ROTATION: Normal lateral rotation ROM values for adults vary from about 32 to 50.
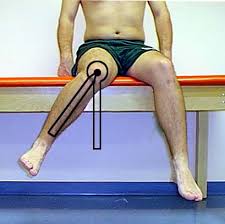
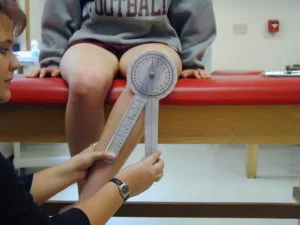
KNEE FLEXION/EXTENSION
Motion occurs in the sagittal plane around a medial–lateral axis.
Goniometer Alignment
| Center fulcrum | over the lateral epicondyle of the femur. |
| Stationary arm | Align proximal arm with the lateral midline of the femur, using the greater trochanter for reference. |
| Moving arm | Align distal arm with the lateral midline of the fibula, using the lateral malleolus and fibular head for reference. |
Expected findings
The normal range of flexion for adults varies from 130 to 140 degrees.
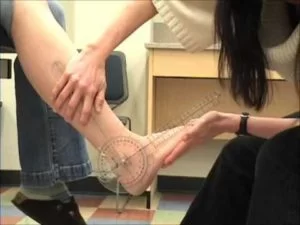
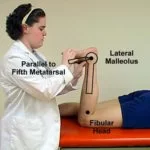
TALOCRURAL JOINT: DORSIFLEXION
Motion occurs in the sagittal plane around a medial– lateral axis.
Testing Position
Place the individual sitting, with the knee flexed to 90 degrees. The foot should be in 0 degrees of inversion and eversion.
Stabilization
Stabilize the tibia and fibula to prevent knee motion and hip rotation.
Testing Motion
Use one hand to move the foot into dorsiflexion by pushing on the bottom of the foot. Avoid pressure on the lateral border of the foot under the
fifth metatarsal and the toes. A considerable amount of force is necessary to overcome the passive tension in the soleus and Achilles musculotendinous unit.
| Center fulcrum | over the lateral aspect of the lateral malleolus. |
| Stationary arm | Align proximal arm with the lateral midline of the fibula, using the head of the fibula for reference. |
| Moving arm | Align distal arm parallel to the lateral aspect of the fifth metatarsal. Although it is usually easier to palpate and align the distal arm parallel to the fifth metatarsal, alternative methods have been proposed including the alignment of the distal arm parallel to the inferior aspect of the foot or parallel to the calcaneus |
Alternative Testing Positions
Supine Non-Weight-Bearing
Place the individual supine with the knee flexed to 45 degrees and supported by a pillow. The foot should be in 0 degrees of inversion and eversion. Stabilization, Testing Motion, Normal End-Feel, and Goniometer Alignment are the same as that for the seated position.
Prone Non-Weight-Bearing
Position the individual prone with the knee flexed to 90 degrees The foot should be in 0 degrees of inversion and eversion. Stabilization, Testing Motion, Normal End-feel, and Goniometer Alignment are the same as that for the seated position.
Standing Weight-Bearing

Usually, ROM measurements taken in the standing position are larger than measurements taken in non-weight-bearing positions; therefore, the two positions should not be used interchangeably.
Weight-bearing measurements may be able to provide the examiner with information that is relevant to the performance of functional activities such as walking. However, it may be difficult to control substitute motions of the hindfoot and forefoot in the weight-bearing position.
Expected findings
Normal dorsiflexion ROM values for adults vary from about 15 to 20 degrees in non-weight-bearing positions.
TALOCRURAL JOINT: PLANTAR FLEXION
Motion occurs in the sagittal plane around a medial– lateral axis.

Testing Position
Place the individual sitting with the knee flexed to 90 degrees. Position the foot in 0 degrees of inversion and eversion. Alternatively, it is possible to place the individual in the supine position.
Stabilization
Stabilize the tibia and fibula to prevent knee flexion and hip rotation.
Goniometer Alignment
| Center fulcrum | over the lateral aspect of the lateral malleolus. |
| Stationary arm | Align proximal arm with the lateral midline of the fibula, using the head of the fibula for reference. |
| Moving arm | Align distal arm parallel to the lateral aspect of the fifth metatarsal. Although it is more common and usually easier to palpate and align the distal arm parallel to the fifth metatarsal, as an alternative the distal arm can be aligned parallel to the inferior aspect of the foot of the calcaneus. |
Expected findings
Normal plantarflexion ROM values for adults vary from about 45 to 55 degrees.
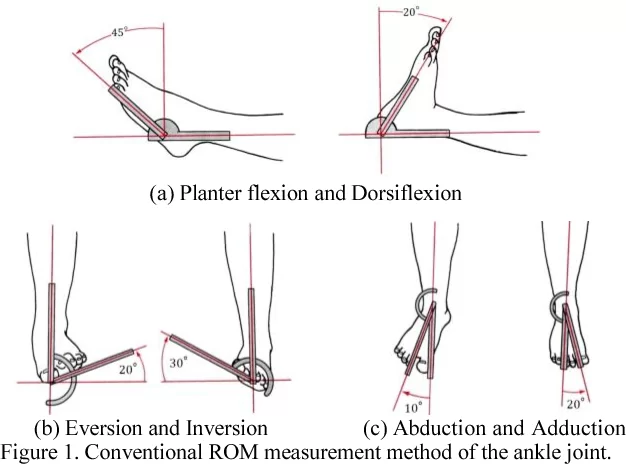
TARSAL JOINTS: INVERSION
Inversion is a combination of supination, adduction, and plantarflexion occurring in varying degrees at the subtalar, transverse tarsal (talocalcaneonavicular and calcaneocuboid), cuboideonavicular, cuneonavicular, intercuneiform, cuneocuboid, tarsometatarsal (TMT),
and intermetatarsal joints. Because of the uniaxial limitations of the goniometer, the inversion of the foot is measured in the frontal plane around an anterior– posterior axis.
Goniometer alignment
| Center fulcrum | over the anterior aspect of the ankle midway between the malleoli. (The flexibility of a plastic goniometer makes this instrument easier to use for measuring inversion than a metal goniometer.) |
| Stationary arm | Align proximal arm of the goniometer with the anterior midline of the lower leg, using the tibial tuberosity for reference. |
| Moving arm | Align distal arm with the anterior midline of the second metatarsal. |
Expected findings
Normal tarsal inversion ROM values for adults vary from about 30 to 35 degrees.
TARSAL JOINTS: EVERSION
Eversion is a combination of pronation, abduction, and dorsiflexion occurring in varying degrees at the subtalar, transverse tarsal (talocalcaneonavicular and calcaneocuboid), cuboideonavicular, cuneonavicular, intercuneiform, cuneocuboid, TMT, and intermetatarsal joints. Because of the uniaxial limitations of the goniometer, the eversion of the foot is measured in the frontal plane around an anterior–posterior axis.
Goniometer alignment
| Center fulcrum | over the anterior aspect of the ankle midway between the malleoli. (The flexibility of a plastic goniometer makes this instrument easier to use than a metal goniometer for measuring inversion.) |
| Stationary arm | Align proximal arm of the goniometer with the anterior midline of the lower leg, using the tibial tuberosity for reference. |
| Moving arm | Align distal arm with the anterior midline of the second metatarsal. |
Expected findings
Normal tarsal eversion ROM values for adults vary from about 15 to 20 degrees.
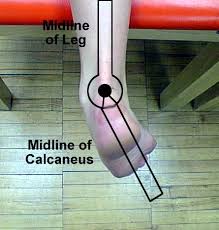
SUBTALAR JOINT (REARFOOT): INVERSION
Inversion is a combination of supination, adduction, and plantarflexion. Because of the uniaxial limitations of the goniometer, inversion of the subtalar joint is measured in the frontal plane around an anterior–
posterior axis. Normal subtalar inversion ROM values for adults vary widely, including 5 degrees according to the American Academy of Orthopaedic Surgeons (AAOS).
Testing Position
Place the individual in the prone position, with the hip in 0 degrees of flexion, extension, abduction, adduction, and rotation. Position the knee in 0 degrees of flexion and extension. Position the foot over the edge of the supporting surface.
Stabilization
Stabilize the tibia and fibula to prevent lateral hip and knee rotation and hip adduction.
Testing Motion
Hold the individual’s lower leg with one hand and use the other hand to pull the calcaneus medially into adduction and to rotate it into supination, thereby producing rearfoot subtalar inversion.
Avoid pushing on the forefoot. The end of the ROM is reached when resistance to further motion is felt and attempts at overcoming the resistance produce lateral rotation at the hip or knee.
Goniometer Alignment
| Center fulcrum | over the posterior aspect of the ankle midway between the malleoli. |
| Stationary arm | Align proximal arm with the posterior midline of the lower leg. |
| Moving arm | Align the proximal arm with the posterior midline of the lower leg. |
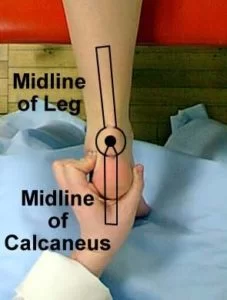
SUBTALAR JOINT (REARFOOT): EVERSION
Eversion is a combination of pronation, abduction, and dorsiflexion. Because of the uniaxial limitations of the goniometer, eversion of the subtalar joint is measured in the frontal plane around an anterior–posterior axis.
Normal subtalar eversion ROM values for adults vary from about 5 to 12 degrees. Values of between 8 and 9 degrees were reported during active ROM, whereas slightly greater values of 12 degrees were noted during passive ROM
Testing Position
Place the individual prone, with the hip in 0 degrees of flexion, extension, abduction, adduction, and rotation. Position the knee in 0 degrees of flexion and extension. Place the foot over the edge of the supporting surface.
Stabilization
Stabilize the tibia and fibula to prevent medial hip and knee rotation and hip abduction.
Testing Motion
Pull the calcaneus laterally into abduction and rotate it into pronation to produce subtalar eversion. The end of the ROM occurs when resistance to further movement is felt and additional attempts to move the calcaneus result in medial hip or knee rotation.
Goniometer Alignment
| Center fulcrum | over the posterior aspect of the ankle midway between the malleoli. |
| Stationary arm | Align the distal arm with the posterior midline of the calcaneus. |
| Moving arm | Align distal arm with the posterior midline of the calcaneus. |
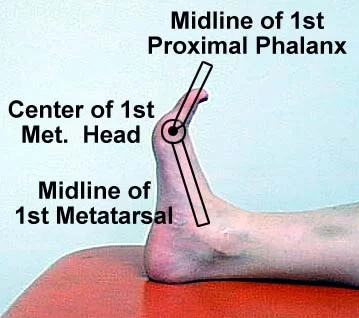
METATARSOPHALANGEAL JOINT: FLEXION
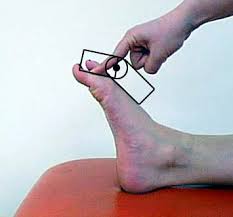
Motion occurs in the sagittal plane around a medial– lateral axis.
Expected finding
Normal flexion ROM values at the first MTP joint vary from about 30 to 45 degrees.
Goniometer Alignment
| Gonimeter Alignment | Alternative Goniometer Alignment | |
| Center fulcrum | over the dorsal aspect of the MTP joint. | over the medial aspect of the first MTP joint. |
| Stationary arm | Align proximal arm over the dorsal midline of the metatarsal. | Align proximal arm with the medial midline of the first metatarsal. |
| Moving arm | Align distal arm over the dorsal midline of the proximal phalanx. | Align distal arm with the medial midline of the proximal phalanx of the first toe. |
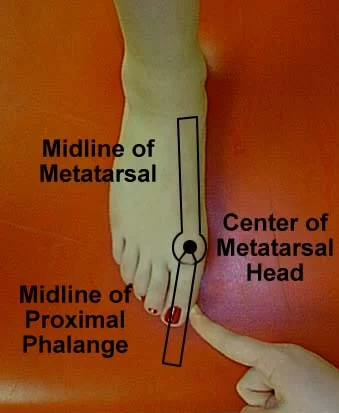
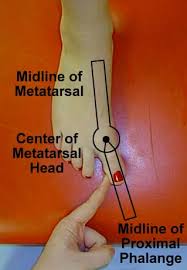
METATARSOPHALANGEAL JOINT: EXTENSION
Motion occurs in the sagittal plane around a medial– lateral axis.
| Goniometer Alignment | Alternative Goniometer Alignment | |
| Center fulcrum | over the dorsal aspect of the MTP joint. | over the medial aspect of the first MTP joint. |
| Stationary arm | Align proximal arm over the dorsal midline of the metatarsal. | Align proximal arm with the medial midline of the first metatarsal. |
| Moving arm | Align distal arm over the dorsal midline of the proximal phalanx. | Align distal arm with the medial midline of the proximal phalanx of the first toe. |
Expected findings
Normal extension ROM values at the first MTP joint in adults vary from about 70 to 80 degrees.
METATARSOPHALANGEAL JOINT: ABDUCTION
Motion occurs in the transverse plane around a vertical axis when the individual is in anatomical position.
METATARSOPHALANGEAL JOINT: ADDUCTION
Motion occurs in the transverse plane around a vertical axis when the individual is in anatomical position. Adduction is the return from abduction to the 0 starting position and is not usually measured.
Goniometer Alignment
| Center fulcrum | over the dorsal aspect of the MTP joint. |
| Stationary arm | Align proximal arm with the dorsal midline of the metatarsal. |
| Moving arm | Align distal arm with the dorsal midline of the proximal phalanx. |
INTERPHALANGEAL JOINT OF THE FIRST TOE AND PROXIMAL INTERPHALANGEAL JOINTS OF THE FOUR LESSER TOES: FLEXION/EXTENSION
Motion occurs in the sagittal plane around a medial– lateral axis.
Expected findings
- normal IP flexion ROM values for the first toe vary widely from 30 degrees12 to 90 degrees.
- Usually, this motion is not measured because it is a return from flexion to the 0 starting position.
Goniometer Alignment
| Center fulcrum | over the dorsal aspect of the interphalangeal joint being tested. |
| Stationary arm | Align proximal arm over the dorsal midline of the proximal phalanx. |
| Moving arm | Align distal arm over the dorsal midline of the phalanx distal to the joint being tested. |
DISTAL INTERPHALANGEAL JOINTS OF THE FOUR LESSER TOES: FLEXION
Motion occurs in the sagittal plane around a medial– lateral axis.
Goniometer Alignment
| Center fulcrum | over the dorsal aspect of the distal interphalangeal (DIP) joint. |
| Stationary arm | Align proximal arm over the dorsal midline of the middle phalanx. |
| Moving arm | Align distal arm over the dorsal midline of the distal phalanx |
Expected findings
Normal flexion ROM in adults is reported to be about 50 to 60 degrees.
DISTAL INTERPHALANGEAL JOINTS OF THE FOUR LESSER TOES: EXTENSION
Motion occurs in the sagittal plane around a medial– lateral axis. Usually, this motion is not measured because it is a return from flexion to the 0 starting position.
CERVICAL REGION
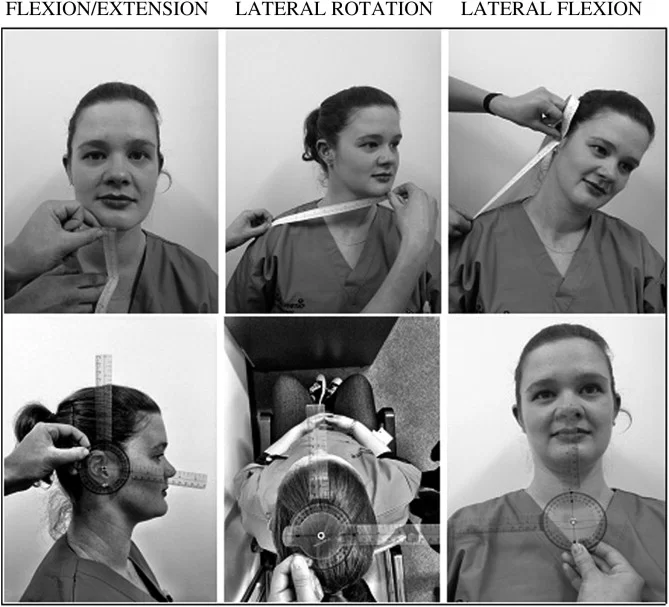
CERVICAL FLEXION: UNIVERSAL GONIOMETER
Motion occurs in the sagittal plane around a medial– lateral axis.
Testing Position
Place the individual in the sitting position, with the thoracic and lumbar spine well supported against the back of a chair. Feet should be flat on the floor and shoulders should be relaxed with hands resting on the thighs. Position the head in 0 degrees of rotation and lateral flexion.
Stabilization
The testing position helps to provide stabilization. During active ROM the examiner may be able to use a free hand to stabilize the shoulder girdle or sternum to prevent forward flexion of the thoracic spine. During passive ROM the examiner’s hands are involved with the measurement, so if additional stabilization is needed a strap can be placed around the chest and the back of the chair.
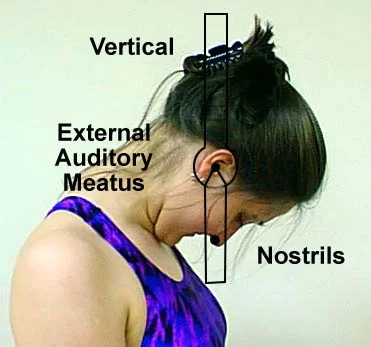
Goniometer Alignment
| Center fulcrum | over the external auditory meatus. |
| Stationary arm | Align proximal arm so that it is either perpendicular or parallel to the ground. |
| Moving arm | Align distal arm with the base of the nostrils. |
Expected findings
The cervical flexion ROM measured with a universal goniometer is about 40 degrees in adults.
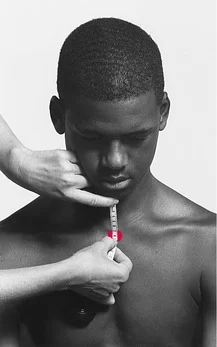
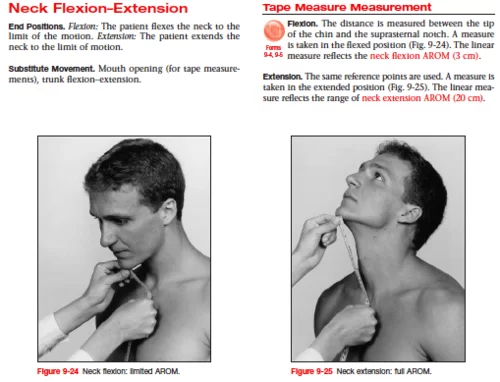
CERVICAL FLEXION: TAPE MEASURE
The mean cervical flexion ROM obtained with a tape measure ranges from 1.0 to 4.3 centimeters for those aged 14 to 31 years.
Testing Position
Place the individual in the sitting position, with the thoracic and lumbar spine well supported against the back of a chair. Feet should be flat on the floor and shoulders should be relaxed with hands resting on the thighs. Position the head in 0 degrees of rotation and lateral flexion.
Stabilization
The testing position helps provide stabilization. During active ROM the examiner may be able to use a free hand to stabilize the shoulder girdle or sternum to prevent forward flexion of the thoracic spine. During passive ROM the examiner’s hands are involved with the measurement, so if additional stabilization is needed, a strap placed around the chest and the back of the chair may be used.
Testing Motion: Passive ROM
Put one hand on the back of the individual’s head and with the other hand hold the individual’s chin. Push gently but firmly on the back of the individual’s head to move the head anteriorly. Pull the individual’s chin in toward the chest to move the head through flexion ROM. The end of the ROM
occurs when resistance to further motion is felt and further attempts at flexion cause forward flexion of the trunk.
Testing Motion: Active ROM
Ask the individual to tuck the chin in toward the chest and bend the head forward until resistance to further motion is felt or the trunk begins to flex forward.
Tape Measure Alignment
- In the starting testing position, use a skin marking pencil to place marks on the following landmarks: the lower edge of the sternal notch and the middle of the tip of the chin.
- At the end of the ROM measure the distance between the mark on the tip of the chin and the mark at the lower edge of the sternal notch. Make sure that the individual’s mouth remains closed during the motion

CERVICAL EXTENSION: UNIVERSAL GONIOMETER
Motion occurs in the sagittal plane around a medial– lateral axis.
Testing Position
Place the individual in the sitting position, with the thoracic and lumbar spine well supported by the back of a chair. Position the cervical spine in 0 degrees of rotation and lateral flexion.
Stabilization
Stabilize the shoulder girdle and chest to prevent extension of the thoracic and lumbar spine. Usually, stabilization is achieved through the cooperation of the individual and support from the back of the chair. A strap placed around the chest and the back of the chair also may be used.
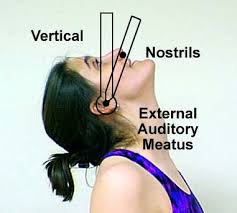
Goniometer Alignment
| Center fulcrum | over the external auditory meatus. |
| Stationary arm | Align proximal arm so that it is either perpendicular or parallel to the ground. |
| Moving arm | Align distal arm with the base of the nostrils |
Expected findings
Cervical extension ROM measured with a universal goniometer is about 50 degrees
CERVICAL EXTENSION: TAPE MEASURE
The mean cervical extension ROM measured with a tape measure ranges from 18.5 to 22.4 centimeters in adults.
Testing Position
Place the individual in the sitting position, with the thoracic and lumbar spine well supported by the back of a chair. Feet should be flat on the floor, shoulders should be relaxed and hands should rest on the thighs. Position the cervical spine in 0 degrees of rotation and lateral flexion.
Stabilization
Stabilize the shoulder girdle and chest to prevent extension of the thoracic and lumbar spine. Usually, stabilization is achieved through the cooperation of the individual and support from the back of the chair. A strap may be placed around the chest and the back of the chair.
Testing Motion: Active ROM
Start in the neutral head position and ask the individual to tuck in the chin and then look up and back as far as possible without moving the trunk. The individual should not move their shoulders or change the amount of pressure being exerted on the back of the chair.
Tape Measure Alignment
- In the starting testing position, use a skin marking pencil to place marks on the following landmarks: the lower edge of the sternal notch and the middle of the tip of the chin.
- At the end of the ROM measure the distance between the mark on the tip of the chin and the mark at the lower edge of the sternal notch. Make sure that the individual’s mouth remains closed during the motion.
CERVICAL LATERAL FLEXION: UNIVERSAL GONIOMETER
Motion occurs in the frontal plane around an anterior– posterior axis.
Expected findings
The cervical lateral flexion ROM to one side, measured with a universal goniometer, is about 22 degrees in adults
Testing Position
The individual also should be carefully positioned by being seated in a straight-back chair with the midback region in contact with the back of the chair. Feet should be flat on the floor and shoulders should be relaxed with hands on thighs. The cervical spine should be in 0 degrees of flexion, extension, and rotation.
Stabilization
Stabilize the shoulder girdle and chest to prevent lateral flexion of the thoracic and lumbar spine.
Testing Motion: Passive ROM
Hold the individual’s head at the top and side (opposite to the direction of the motion). Move the head toward the shoulder. Do not allow the head to rotate, forward flex, or extend during the motion. The end of the motion occurs when resistance to motion is felt and attempts to produce additional
motion cause lateral trunk flexion.
Testing Motion: Active ROM
Direct the individual to try to touch the ear to the shoulder without moving the head forward, rotating, or extending it during the motion.
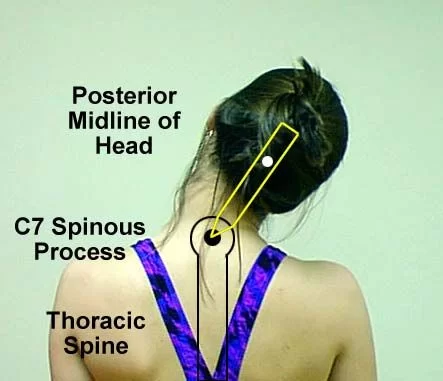
Goniometer Alignment
| Center fulcrum | over the spinous process of the C7 vertebra. |
| Stationary arm | Align proximal arm with the spinous processes of the thoracic vertebrae so that the arm is perpendicular to the ground. |
| Moving arm | Align distal arm with the dorsal midline of the head, using the occipital protuberance for reference. |
CERVICAL LATERAL FLEXION: TAPE MEASURE
The mean cervical lateral flexion ROM measured with a tape measure ranges from about 11 to 13 centimeters for subjects 14 to 31 years of age
Testing Position
Place the individual in the sitting position, with the thoracic and lumbar spine well supported by the back of a chair. Feet should be flat on the floor, shoulders should be relaxed, and hands should rest on the thighs. Position the cervical spine in 0 degrees of rotation and lateral flexion.
Stabilization
Stabilize the shoulder girdle and chest to prevent extension of the thoracic and lumbar spine. Usually, stabilization is achieved through the cooperation of the individual and support from the back of the chair. A strap placed around the chest and the back of the chair also may be used.
Tape Measure Alignment
Use a skin marking pencil to place marks on the individual’s mastoid process and on the lateral tip of the acromial process. Measure the distance between the two marks at the end of cervical lateral flexion ROM
CERVICAL ROTATION: UNIVERSAL GONIOMETER
Motion occurs in the transverse plane around a vertical axis. The cervical ROM in rotation measured with a universal goniometer is about 50 degrees in adults
Testing Position
Place the individual sitting, with the thoracic and lumbar spine well supported by the back of the chair. Position the cervical spine in 0 degrees of flexion, extension, and lateral flexion.
Stabilization
Stabilize the shoulder girdle and chest to prevent rotation of the thoracic and lumbar spine. A strap across the chest may be used to keep the trunk from rotating.
Testing Motion: Passive ROM
Grasp the individual’s chin and rotate the head by turning the chin toward the shoulder. The end of the ROM occurs when resistance to movement is felt and further movement causes rotation of the trunk.
Testing Motion: Active ROM
Ask the individual to rotate the head by turning the chin toward the shoulder without moving the trunk. Stabilize as directed above.
Goniometer Alignment
| Center fulcrum | over the center of the cranial aspect of the head. |
| Stationary arm | Align proximal arm parallel to an imaginary line between the left and right acromial processes. |
| Moving arm | Align distal arm with the tip of the nose. |
CERVICAL ROTATION: TAPE MEASURE
The mean cervical rotation ROM to the left measure with a tape measure ranges from 11.0 to 13.2 centimeters in 14- to 31-year-olds. Use a skin marking pencil to place marks on the tip of the chin and the acromial process. Have the individual look straight ahead and then turn the head to the right as far as possible without rotating the trunk. Measure the distance between the two marks at the end of the motion. Have the individual return the head to the neutral starting position and then turn the head as far to the left as possible without rotating the trunk.
THORACOLUMBAR REGION
THORACOLUMBAR FLEXION
Motion occurs in the sagittal plane around a medial–lateral axis.
Testing Position
Ask the individual to assume a standing position with feet shoulder-width apart and with the cervical, thoracic, and lumbar spine in 0 degrees of lateral flexion and rotation.
Stabilization
The examiner should stabilize the pelvis to prevent anterior tilting.
Testing Motion
Direct the individual to bend forward gradually while keeping the arms relaxed and the knees straight. The end of the motion occurs when resistance to additional flexion is experienced by the individual and the examiner feels the pelvis start to tilt anteriorly.
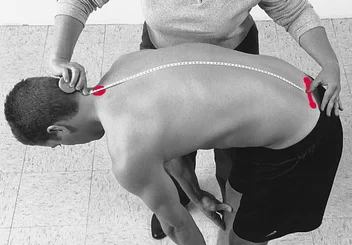
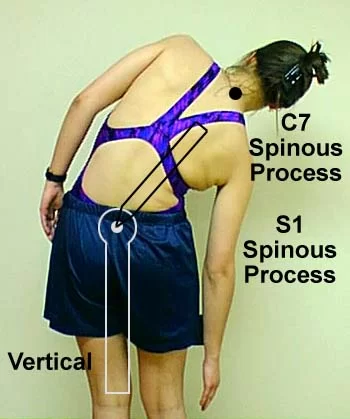
THORACOLUMBAR FLEXION: TAPE MEASURE
Four inches (10 centimeters) between T1 and S1 is considered to be an average measurement for healthy adults.
The following procedure for this measurement uses T1 and S2 instead of S1. The S2 vertebra can be identified more easily than the S1 vertebra and therefore may improve the reliability of the measurement.
The spinous process of S2 is on a horizontal line with the posterior superior iliac spine (PSIS) and there is no motion between S1 and S2.
Procedure
- With the individual in the standing position, mark the spinous processes of the T1 and S2 vertebrae using a skin marking pencil.
- Align the tape measure between the two spinous processes (T1 and S2) and record the distance at the beginning of the ROM.
- Hold the tape measure in place as the individual performs flexion ROM. (Allow the tape measure to unwind and accommodate the motion.)
- Record the distance at the end of the ROM. The difference between the first and the second measurements indicates the amount of thoracolumbar flexion ROM.
THORACOLUMBAR FLEXION: FINGERTIP-TO-FLOOR
Procedure
- Ask the individual to assume a standing position and then slowly bend forward as far as possible in an attempt to touch the floor while keeping the knees extended and feet together. No stabilization on the pelvis is provided by the examiner, thus allowing hip motions to occur.
At the end of the motion, measure the perpendicular distance between the tip of the individual’s middle finger and the floor either with a tape measure or ruler
THORACOLUMBAR EXTENSION: TAPE MEASURE
Procedure
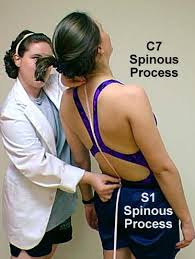
- Ask the individual to assume a standing position with feet shoulder-width apart and knees extended. Mark the spinous processes of the T1 and S2 vertebrae using a skin marking pencil.
- Align the tape measure between the two spinous processes and record the measurement.
- Ask the individual to bend backward. Keep the tape measure aligned during the motion and record the measurement at the end of the ROM.
The difference between the measurement taken at the beginning of the motion and that taken at the end indicates the amount of thoracolumbar extension.
THORACOLUMBAR EXTENSION: PRONE PUSH-UP
Procedure
- Ask the individual to lie on the stomach on a table or plinth with the palms of hands positioned at shoulder level.
- Place a strap or belt over the pelvis to prevent it from lifting up off the support surface.
- Direct the individual to extend elbows to raise the trunk up off the table and extend the thoracolumbar spine.
- Locate the individual’s sternal notch and use the tape measure to measure the distance from the sternal notch to the supporting surface. Check to make sure the tape measure is vertical and record the measurement. This test can be used only in individuals who have good upper extremity strength and who can comfortably assume a prone lying position. If individuals have any muscle weakness in their upper extremities the test should not be attempted.
THORACOLUMBAR LATERAL FLEXION/SIDE BENDING: UNIVERSAL GONIOMETER
According to the American Academy of Orthopaedic Surgeons (AAOS) the ROM is 35 degrees to each side for a young adult female and 38 degrees for a young adult male
Procedure
- Ask the individual to assume a standing position. Mark the spinous processes of T1 and S2 vertebrae using a skin marking pencil.
- Center the fulcrum of the goniometer over the posterior aspect of the spinous process of S2.
- Align the proximal arm so that it is perpendicular to the ground.
- Align the distal arm with the posterior aspect of the spinous process of T1.
- Read the goniometer, remove, and record the measurement.
THORACOLUMBAR LATERAL FLEXION/SIDE BENDING: FINGERTIP-TO-FLOOR
The average normal values for 21.6 (5.6) centimeters.
Procedure
- Ask the individual to assume a standing position with the back flat against the wall, feet shoulder-width apart, and arms hanging freely at the sides of the body.
- Direct the individual to bend to the side as far as possible while keeping back and shoulders against the wall and both feet flat on the ground with knees extended.
- At the end of the ROM, make a mark on the leg level with the tip of the middle finger and use a tape measure or ruler to measure the distance between the mark on the leg and the floor. Alternately, the distance between the tip of the middle finger and the floor can be measured
THORACOLUMBAR LATERAL FLEXION/SIDE BENDING: FINGERTIP-TO-THIGH
This method is a variation of the fingertip-to-floor method, designed to account for differences in body size. The normal ROM values for children aged 11 to 16 years were 21.0 centimeters for both right and left lateral flexion.
Procedure
- Ask the individual to assume a standing position with the back against the wall, feet shoulder-width apart, and arms hanging freely at the sides.
- Place a mark on the thigh where the tip of the individual’s third finger rests.
- Direct the individual to bend to the side as far as possible while keeping the back and shoulders against the wall and both feet flat on the ground with knees extended.
- At the end of the ROM, make a second mark on the leg level with the tip of the middle finger.
- Use a tape measure or ruler to measure the distance between the first mark on the leg and the second mark on the leg. The distance between the two marks is the value for thoracolumbar lateral flexion ROM.
THE TEMPOROMANDIBULAR JOINT
RANGE OF MOTION TESTING PROCEDURES: Temporomandibular Joint
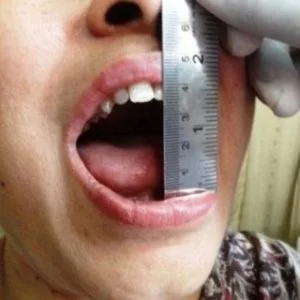
DEPRESSION OF THE MANDIBLE (MOUTH OPENING)
Motion occurs in the sagittal plane around a medial– lateral axis. Functionally the mandible is able to depress approximately 35 to 50 millimeters so that the individual’s three fingers or two knuckles can be placed between the upper and lower central incisor teeth, although an opening of only 25 to 35 millimeters is needed for normal activities
Testing Position
Place the individual sitting, with the cervical spine in 0 degrees of flexion, extension, lateral flexion, and rotation.
Stabilization
Stabilize the posterior aspect of the head and neck to prevent flexion, extension, lateral flexion, and rotation of the cervical spine.
Testing Motions
Active Pain-Free Mouth Opening
Ask the individual to open the mouth slowly and as far as possible without pain. Observe the motion for any lateral excursion of the mandible. In normal active movement, no lateral mandibular motion occurs during the mandibular depression. If lateral excursion does occur, it may take the form of either a C-shaped or an S-shaped curve. With a C-shaped curve, the lateral excursion is to one side and should be noted on the recording form. With an S-shaped curve, the lateral excursion occurs first to one side and then to the opposite side; the deviation should be described in the recording form.
Active Mouth Opening
Ask the individual to make an effort to open the mouth as wide as possible even if the pain is present
Testing Motions
Passive Mouth Opening
Grasp the mandible so that it fits between the thumb and the index finger, and pull the mandible inferiorly. The individual may assist with the motion by opening the mouth as far as possible. The end of the motion occurs when resistance is felt and attempts to produce additional motion cause the head to nod forward (cervical flexion)
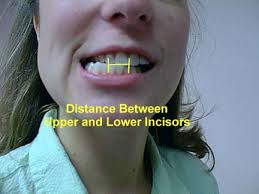
Measurement Method
Use a millimeter ruler to measure the vertical distance between the edge of the upper central incisor and the corresponding edge of the lower central incisor.
OVERBITE
Overbite, which is the amount that the upper teeth extend over the lower teeth when the mouth is closed, is usually added to the mouth opening measurements. This addition provides a more accurate measurement of mouth-opening ROM, especially in persons with a large overbite
Measurement Method
When the individual’s mouth is closed, use a nontoxic marking pencil to make a horizontal line on the lower central incisors at the bottom edge of the overlapping upper central incisors. After the line is drawn and the person’s mouth is opened, measure the amount of overbite between the horizontal line and the upper edge of the mandibular central incisors.
PROTRUSION OF THE MANDIBLE
Protrusion of the mandible is a translatory motion that occurs in the transverse plane. Normally, the lower central incisor teeth are able to protrude 6 to 9 millimeters beyond the upper central incisor teeth.
Testing Position
Place the individual sitting, with the cervical spine in 0 degrees of flexion, extension, lateral flexion, and rotation. The TMJ is opened slightly.
Stabilization
Stabilize the posterior aspect of the head and neck to prevent flexion, extension, lateral flexion, and rotation of the cervical spine.
Testing Motions
Active Protrusion
Have the individual push the lower jaw as far forward as possible without moving the head forward.
Passive Protrusion
Grasp the mandible between the thumb and the fingers from underneath the chin. The individual may assist with the movement by pushing the chin anteriorly as far as possible. The end of the motion occurs when resistance is felt and attempts at additional motion cause anterior motion of the head.
Measurement Method
Measure the distance between the lower central incisor and the upper central incisor teeth with a tape measure or ruler. Alternatively, two
vertical lines drawn on the upper and lower canines or lateral incisors may be used as landmarks for measurement.
LATERAL EXCURSION OF THE MANDIBLE
This translatory motion occurs in the transverse plane. The amount of lateral movement to the right and left sides is not usually symmetrical, and there is some evidence that movement to the left is greater than to the right. The normal ROM for adults is between 10 and 12 millimeters.
Testing Position
Place the individual sitting, with the cervical spine in 0 degrees of flexion, extension, lateral flexion, and rotation. The TMJ is opened slightly so that the upper and lower teeth are not touching prior to the start of the motion.
Stabilization
Stabilize the posterior aspect of the head and neck to prevent flexion, extension, lateral flexion, and rotation of the cervical spine.
Testing Motions
Active Lateral Excursion
Have the individual slide the lower jaw as far to the right as possible. Have the individual move the lower jaw as far to the left as possible.
Passive Lateral Excursion
Grasp the mandible between the fingers and the thumb and move it to the side. The end of the motion occurs when resistance is felt and attempts to produce additional motion cause lateral cervical flexion (be careful to avoid depression, elevation, and protrusion and retrusion during the movement)
Measurement Method
Measure the lateral distance between the center of the lower incisors and the center of the upper central incisors with a millimeter ruler. The distance that the mandible has moved laterally in relation to the maxilla is evident by comparing the position of the upper and lower central incisors.


117 Comments