Exercise for De Quervain’s tenosynovitis
Exercise for De Quervain’s tenosynovitis is a very important part of your overall treatment program.
De Quervain’s tenosynovitis stretches & exercises can be a lifesaver when addressing strength & flexibility in the hand. Exercises are planned in such as way to speed up your healing process, they are one of the best ways to get you back to normal activities & keep your wrist joint & thumb muscles strong. Continue reading to learn more about De Quervain’s tenosynovitis stretches & exercise.
What is de quervain’s tenosynovitis?
De Quervain’s tenosynovitis is swelling of the tendons that run along the thumb side of the wrist joint & attach to the bottom of the thumb. This occurs when the tendons are narrowed by the sheath that they run through to get from the wrist joint to the hand.
This condition can cause pain & tenderness along the thumb side of the wrist joint. This is particularly observable when you are:
- Moving the thumb
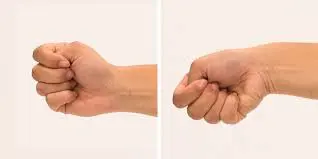
- Forming a fist
- Grasping or gripping something
- Turning the wrist
- Elevating something with your arms in front of you & thumbs pointed on the way to the ceiling (e.g., elevating a child)
What to do after an injury?
Non-surgical options
Non-surgical treatment options can include:
- Having a corticosteroid injection may assist to reduce inflammation & pain.
- Taking anti-inflammatory medication NSAIDs: Medication such as ibuprofen can also assist to reduce inflammation & relieve pain.
- Keep away from certain activities: Stopping tasks that may aggravate a person’s thumb & wrist joint can assist relieve symptoms.
- Rest: Patients should have minimum wrist joint & thumb little movement in the injured hand. This may include pinching & gripping or any repetitive hand tasks. Resting the hand on a pillow or elevated surface can also assist.
- Activity modification: Avoiding the activity that may have triggered the condition, such as a sport, hobby, or employment, will give the inflammation a chance to subside.
- Splint/brace: This may help immobilize the wrist, allowing a person to rest their thumb and wrist. Doctors recommends that patients wear a splint called a thumb spica splint, which immobilizes the thumb. Patients are typically instructed to wear it 24 hours a day for four to six weeks. Aim to keep your wrist neutral – keeping it straight with your arm while completing tasks. Your physiotherapist may be recommended that you wear a thumb splint called a thumb-spica splint. We recommend a thermoplastic splint called a ‘thermoform. This splint keeps the wrist joint & lower joints of the thumb from moving – particularly restricting ulna & radial deviation. The splint permits the abductor polices longus & extensor polices brevis tendons to relax, giving them a chance to begin to recover. Strapping tape can also assist as a temporary splint.
- Ice: Ice therapy can decrease inflammation & numb pain signals, so it is useful for treating De Quervain’s tenosynovitis. The injured area can be iced for 10 to 15 minutes several times a day. Ice becomes not be applied directly to the skin, as this can cause burns. Icing the affected area can be an effective way of soothing irritated tendons.
- Rest or Reduce Hand Movements: After talking to your physiotherapist, it may become apparent that certain activities or movements are irritating your thumb tendons.
Exercises for De Quervains tenosynovitis
These exercises are designed to slowly accelerate your motion & strength. The exercises should be done slowly, & with controlled movement, to get nice results. Start with the Isometric exercises several times a day, & gradually build up, working through the sheet. You should feel like the muscles are working and stretching, but they should not be painful. Some discomfort or irritation after the exercises is expected, but this should wear off within twenty minutes.
How Exercises Help
A well-balanced exercise routine promotes good overall health. This is not separate for the thumb & wrist joints. Here are one or two of the many advantages of regular daily activities stretching & exercise:
- Optimized muscle balance for biomechanically sound movement
- Better patience for regular or general daily activities like typing, gripping, cutting, & texting
- Swelling management to decrease inflammation of the injured wrist synovium (connective tissue)
- Accelerate circulation to increase recovery & tendon health
- Decreased pain
- Accelerate tolerance for hand & wrist joint range of movement
- Overall improved quality of life
- Stretching and Exercise Tips
- To accelerate the best results of your exercise rehabilitation therapy program, & keep these points in mind:
- Initially, try to decrease time doing any daily activities that irritate or aggravate the thumb (especially texting) to allow healing. You may also consider weary a splint.
- Pair your exercise program with home remedies to optimize recovery, such as ice, heat, ibuprofen, and massage.
- If you are having a problem with patience exercise, & you can try releasing up the hand first with your home treatments as well.
- Absolute your home program every day at first & then at least three times per week for maintenance on your thumb & wrist joint are feeling better or recovered.
- Always pay awareness to your symptoms with exercise so that you can modify them as tolerated.
- Keep the good form in the wrist joint & thumb when performing any easy exercises. Do not force a move especially if you can not control hyperextension of the thumb.
- Exercising Safely
- Having a good exercise program can greatly increase your quality of life & prevent issues related to wrist joint & thumb overuse. If you experience unconfident about where to start you can consult your physiotherapist or physician for more guidance & the proper Finkelstein Test. With a schedule that addresses wrist joint & thumb strength & flexibility, you should feel recovered in no time.
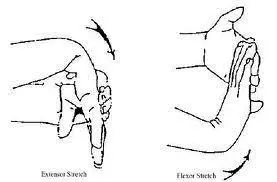
Stretching exercises
Inscribing flexibility is always important for replacing the function of the thumb & wrist joints. If you are having trouble tolerating these simple stretches, & a physical therapy assessment can assist & guide you.
Thumb Stretch

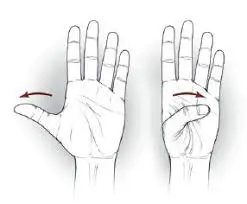
- Bring the thumb across the palm & relax it on the fingernail of your bent or flex the little finger. It will make an O shape with your palm, and thumb. To advance the stretch, & you can extend farther down the little finger toward the knuckles.
- Hold 30 seconds for up to three sets.
Ulnar Deviation Stretch

- Hold your arm out in front of you with the thumb side facing up on the way to the ceiling. Then, use your opposite hand to press the entire wrist in a sideways motion down toward the floor until a stretch is felt on the inside of the forearm. Having the elbow joint straight can accelerate the intensity, so decide what elbow position is best for you to start & build from there.
- Hold 20-30 seconds for up to three sets.
Isometric Exercises
Contracting the Affected Muscles, Without Movement
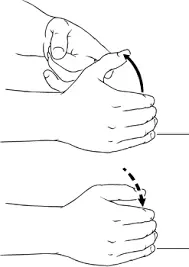
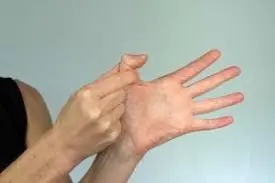
Isometric thumb extension (pushing up)

- With your hand relaxing on the little finger side, & place your thumb in the position in the picture.
- Use your other hand to resist(or block) your thumb from trying to push up toward the ceiling. Press against this resistance three times, at about 10% of your full force, for five seconds to start with.
- Gradually build up the force of the contraction, & the time you hold it, & the repetitions when able.
Isometric abduction (pushing out)
- Staying in the same position, moving your thumb outwards, and using your other hand to resist or block the movement Push against this resistance 3 times, at about 10 % of your full force, & for five seconds to start with.
- Gradually build up the force of the contraction, & the time you hold it, & the repetitions when able.
Isometric adduction (pulling in)

- This time resists the movement of the thumb pulling in towards the fingers. Push against this resistance three times, at about ten % of your full force, for five seconds to start with.
- Gradually build up the force of the contraction, & the time you hold it, & the repetitions when able.
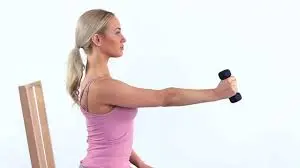
Isometric wrist strengthening
- With your elbow at 90 degrees & your wrist joint straight, & hold a bottle of water filled to the right weight for you or a dumbbell. Start with a five-second hold, for five repetitions, & again build up weight & time as you are able
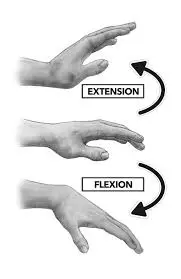
Range of motion exercise
Thumb Abduction Range of Motion
- Initiate the thumb across the hand to touch the tip of the finger. Hold for two-three seconds before returning to the starting relax position & repeating. Alternate initiating the thumb to each finger before returning back to the little finger. Remain the motion slow & controlled & do not force it if it becomes painful.
- Repeat 5-10 rounds alternating through each finger.
Wrist Exercises
General wrist joint strengthening exercises are ideal for trusting local tissue is healthy & flexible. These all have the added bonus of addressing the wrist joint range of movement at the same time. Try these without weights if you need to focus on flexibility more than strength.
Wrist Extension
- Assist your forearm on a table, & your knee, or with your unaffected arm. Hold a small or little weight in your hand with the palm facing down. Simply extend the wrist joint up on the way to the ceiling & shoulder as far as you can before switching directions & letting it fall with control down on the way to the floor.
- Repeat up to 15 times for two-three sets total. Keep the motion slow and controlled.
Wrist Flexion
- Start with the same setup as the above exercise, but this time have your palm facing up on the way to the ceiling. Then, bend or flex the wrist joint as you bring your palm up on the way to the ceiling. Go as far as you can patience before switching directions & letting the wrist joint move with control on the way to the floor.
- Repeat up to 15 times for two-three total sets.
Wrist Pronation and Supination
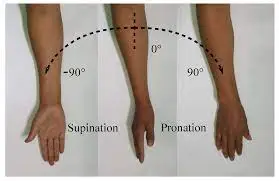
- Support your forearm again, & this time with the thumb facing up on the way to the ceiling. If you have a dumbbell or a hammer, hold it so that most of the weight is above the hand for more support with this move. Then, turn the wrist joint as you alternate between the palm facing the ceiling & then the floor. Make sure the movement is coming from the wrist joint only, rather than the shoulder joint.
- Repeat up to 15 times in each direction for two or three total sets.
Radial Deviation
- Be cautious with this one since it is directly labeling sore tissues in the thumb. Start again with the thumb side of your wrist joint facing up on the way to the ceiling. Then bring the thumb up on the way to the ceiling as you bend or flex the wrist sideways, this movement is meant to be small so do not force it.
- Repeat 15 times for up to 3 sets.
Conditioning program
How to get started
For some of these exercises you will need this equipment:
putty ball
elastic resistance band
rubber band
small weight
If you do not have a weight or load, you can make use of a can of food or a hammer. & You can also fill up a water bottle with water, sand, or rocks.
You can do these exercises one or two times throughout the day. Make sure you do not cause any additional stress or strain by overdoing it. If this does happen, you may need to do one or two repetitions or take a break for one or two days.
Safety Tips
Only stretch as far as your own border.
Don’t force yourself into any relaxed position.
Make sure you abstain from doing any jerky motions.
Keep your movements even, slow, and smooth.
Exercise 1: Thumb lifts
- Place your hand on a horizontal surface with your palm facing or fronting up.
- Relax the tip of your thumb at the bottom of your fourth finger.
- Elevate your thumb away from your palm so it is nearly perpendicular to the forefinger side of your hand. You will experience a stretch at the back of your thumb & across your palm.
- Repeat 8 to 12 times.
Exercise 2: Opposition stretch
- Place your hand on a table with your palm facing or fronting up.
- Lift your thumb and your pinky.
- Gently push the top of your thumb & finger together. You will experience a stretch at the base of your thumb.
- Hold this position for 6 seconds.
- Release and repeat 10 times.
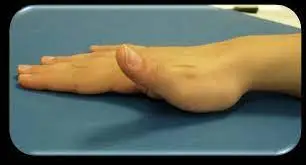
Exercise 3: Thumb flexion
- Grip your hand in front of you as though you were going to shake someone’s hand. You can relax it on a table for support & relaxed position.
- Use your other hand to bend or flex your thumb lower at the bottom of the thumb where it attaches to the palm. You will experience or feel a stretch at the bottom of your thumb & the inside of your wrist joint.
- Hold for at least fifteen to thirty seconds. Repeat 5 to 10 times.
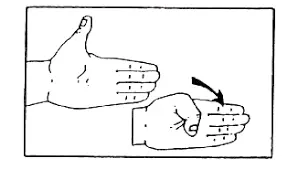
Exercise 4: Finkelstein stretch
- Straight your arm in front of you as though you are about to shake someone’s hand.
- Bend your thumb across your palm
- Use your opposite-side hand to gently stretch your thumb & wrist joint lower. You will experience a stretch on the thumb side of your wrist joint.
- Hold for at least fifteen to thirty seconds.
- Repeat 2 to 4 times.
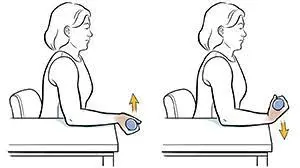
Exercise 5: Wrist flexion strengthening
- Extend your arm with your palm facing or fronting up.
- Keep a small or little weight in your hand & elevate or lift your wrist joint upward or to the top point. You will experience a stretch at the back of your hand.
- Slowly down your wrist joint lower to return the weight to its original relaxed position.
- Do 2 sets of 15.
Exercise 6: Wrist extension strengthening
- Extend your arm with your palm facing or fronting lower.
- Grip a little weight as you steadily step by step bend or flex your wrist joint up & back side. You will experience a stretch at the back of your hand & wrist joint.
- Slowly bring your wrist back to its original relaxed position.
- Do 2 sets of 15.
- You can gradually accelerate the weight as you gain or increase strength.
Exercise 7: Wrist radial deviation strengthening
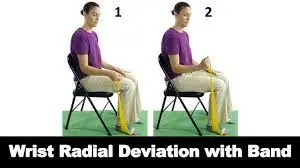
- Your thumb should be on top. Stability of your forearm on a table or chair & with your wrist joint placed over the border if you need extra little support & relaxed position.
- Keep your forearm still immobile, & gently bend or flex your wrist joint up & in a resting position, & with the thumb mobile up keep away from the roof. You will experience a stretch at the bottom of your thumb where it meets your wrist joint.
- Slowly down your arm back lower to the original relaxed position.
- Do 2 sets of 15.
Exercise 8: Eccentric radial deviation strengthening
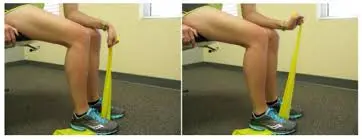
- Sit on a chair with your legs shaking out slightly open.
- Clasp one end of an elastic band with your right side hand.
- Lean onward, put your right side elbow joint on your right side thigh, and let your forearm release lower between your knees.
- Applying your left side foot, & step by step on the other side end of the elastic band.
- With your palm facing lower, & slowly step by step bend or flex your right side wrist joint to the side away from your left side knee joint. You will experience a stretch at the back and the inside of your hand.
- Repeat 8 to 12 times.
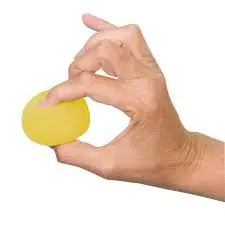
Exercise 9: Grip strengthening

- Repeat this exercise on your left hand.
- Squeeze a putty ball for five seconds at a time.
- Do 2 sets of 15.
Exercise 10: Finger spring
- Place a rubber band on all over your thumb & fingers. Make sure the band is tight or hard enough to offer some resistance.
- Wide open your thumb to stretch the rubber band as far as you can. You will experience a stretch along your thumb.
- Do 2 sets of 15.
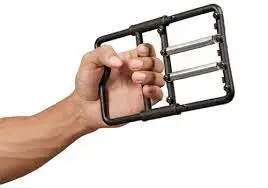
Grip Strength Exercises
Maintaining hands and fingers is always a key part of wrist and thumb wellness. You can use household items or try a tool specific to strengthening your grip.
Not sure where to begin when shopping for grip-strengthening tools?
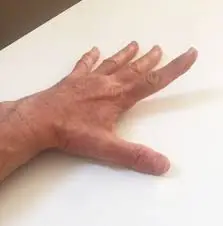
Full Finger Spread
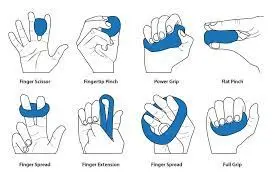
- For this exercise, you can use therapy putty, a hand extension exerciser, or even a plain old rubber band or hair tie for this exercise. Begin by guiding all of your fingers and toes together as you place your exercise equipment on the outside of all of your fingers. Then, expand the fingers apart as far as they will go before going back to the starting relaxed position. Focus on keeping the movement controlled in both directions.
- To accelerate the strength & focus more especially on the thumb, & expand the fingers as far apart as possible & hold for two-three seconds. Repeat ten times for three sets.
Finger pinch
- Use therapy putty or some other soft material, & place a little piece of it between the pointer finger & thumb. Pinch the 2 fingers together & hold for two-three seconds. Focus on keeping good positioning in the fingers. They should form an O shape with minimal extension of any joints and especially the toes. Pinching the fingers together can be aggravating at first so begin slowly with minimum pressure.
- Repeat ten times for up to three sets.
Power Squeeze
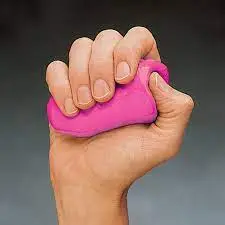
- Rotate your therapy putty into a ball or grab a little towel roll or a hand exercise ball. Place your strengthening equipment in the palm of your hand, & then pinch the item as firmly as is relaxable to tasks all the muscles in the fingers & hand. Hold five-ten seconds & repeat. Again, keep the fingers in a good position to keep away from aggravation.
- Complete ten repetitions for up to three sets total.
Thumb Knuckle Bending
- Adjust your hand out in front of you or relax it on a horizontal surface.
- Use your other hand to bend or flex your thumb lower at the point where your thumb attaches to your palm.
- Hold for at least fifteen to thirty seconds.
- Repeat 2 to 4 times.
FAQ
What is the rapid way to heal de Quervain’s tenosynovitis?
De Quervain’s tenosynovitis treatment
Put heat or ice on the injured area.
Taking a nonsteroidal anti-inflammatory drug (NSAID).
Keep away from tasks that cause pain & inflammation.
Try wearing a splint 24 hours a day for 4 to 6 weeks to rest your toe and wrist joints.
Does physiotherapy work for de Quervain?
Physiotherapists help people with de Quervain’s keep away from painful motions. They give therapy to reduce pain & swelling & advise exercises to accelerate strength & range of movement. They also suggest people about the condition & recommend ways to modify tasks & positions.
What is the most home remedy for tendonitis?
To treat tendinitis at home, make use of rest, ice, compression, & elevation.
This treatment can help speed healing & help prevent more problems.
Rest. Keep away from doing things that increase pain or swelling. …
Ice.
Compression.
Elevation.
How long does it take for De Quervain’s to heal?
Treatment for de Quervain tenosynovitis is aimed at decreasing inflammation, preserving motion in the thumb, & preventing recurrence. If you start treatment too soon, & your symptoms should accelerate within four to six weeks
How do you sleep with De Quervain’s tenosynovitis?
The topical anti-inflammatory gel can be helpful in de Quervains tenosynovitis or Mummy’s Thumb. Before bed, we recommend putting the gel liberally over the hurt area, & then wrapping the area in glad wrap to keep away from evaporation.