40 Best Exercises After C Section
Introduction
After a c-section exercises play a key role in helping you regain strength, improve mood, and boost energy levels all of which are essential for caring for your little one. A rapid and safe way to deliver a baby is by surgery called a cesarean delivery, which involves cutting through the abdominal wall.
Although they are occasionally required by medicine, cesarean deliveries require a little longer recuperation period than vaginal births. It is important to exercise warning as a consequence. Moms who want to resume regular exercise should first acquire their doctor’s approval.
Among the important muscles that need to be retrained after giving birth is the transverse abdominis. These include the pelvic floor muscles, the lower back and abdominal muscles, and the corset-like muscles that encircle the midline and connect to the spine. It’s critical to engage and strengthen these areas following a cesarean delivery for them to support you, lower your chance of damage, and aid in your entire recovery after giving birth.
After a cesarean delivery, attempt these easy workouts. They can be done from anywhere and don’t require any special equipment.
Many question what activities they may perform to improve their core after a C-section. Resuming activity after a C-section might be frightening, even if your doctor gives the all-clear. This is because exercise allows you to regain control over your body and helps your pelvic floor and core. Continue reading for tips on resume exercising following a C-section, including which exercises to attempt and which to avoid.
After C Section Exercises
Belly breathing
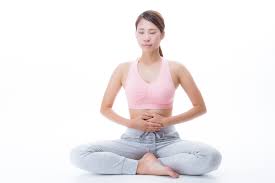
This is an effective relaxation technique. Additionally, it aids in retraining the core muscles to cooperate when performing regular tasks. Activated muscles: transverse abdominis
How to assist: On a cozy couch or bed, lie on your back.
Put your hands on your abdomen and let go of the tension.
Inhale deeply through your nose while feeling your stomach grow into your hands.
Exhale via your lips. Pull your belly button in toward your spine as you release the breath, tenseing your abdominal muscles. For three seconds, hold.
Three times a day, repeat five to ten times.
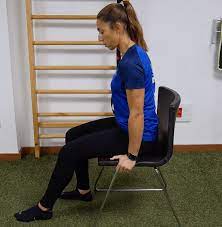
Kegels while seated
The abdomen and pelvic floor muscles are connected by a layer of connective tissue known as the fascia, which facilitates optimal coordination. Kegel exercises are a great way to engage and strengthen your pelvic floor. It has been demonstrated that they lessen stress-related postpartum incontinence. These exercises will help once your urinary catheter is removed, which may be necessary following a C-section. worked the pelvic floor muscles
How to assist: With your feet flat on the ground, sit on a chair’s edge.
Squeeze the pelvic floor muscles. It should feel like you’re attempting to stop the pee from flowing.
Consider that you are sealing up the urethra, anus, and vagina. Envision raising them up and away from the chair
For as long as you can, hold this contraction. Work your way up to a greater time starting at five seconds.
breathe in deeply, and then breathe out fully to release the contraction.
Attempt doing Kegel exercises while standing or while resting on your side.
With a 2-minute break in between each contraction, repeat 8–12 times. Do this twice a day.
Wall sit

This isometric full-body workout is a great method to train your muscles to cooperate. The muscles engaged were the quadriceps, hamstrings, pelvic floor muscles, core, and lower back.
How to assist: Place your feet between one and two feet from the wall.
Lean back gently against the wall to come to a sitting position. It would help if you had a 90-degree angle between your hips and knees. Put your core to use. Breathe deeply in, then as you release the breath, imagine pushing your belly button into the wall.
Hold this position and perform a Kegel to contract your pelvic floor as a bonus.
After a minute of rest, repeat five times.
Note: You should place your palms on the wall shoulder-width apart and at a height about equal to shoulder level. Ensure that your fingers are pointing upward.
Sliding legs
In general, you should wait six to eight weeks following surgery to begin exercising, and you should always consult your doctor before doing so. Starting with low-impact exercises like yoga, Pilates, or swimming is recommended. This simple but efficient beginner’s core workout helps to gently stimulate the core muscles.
Strengthening the transverse abdominis muscle is crucial because it supports the center of the body. Additionally, it maintains core stability and the linea alba, a fibrous tissue that runs from the xiphoid process to the pubic bone. Activated muscles: transverse abdominis
How to assist: With your feet flat on the floor and your knees bent, lie on your back on the floor. To make it easier for your feet to slide around the floor, put a towel under them or wear socks.
Inhale deeply. Pull your belly button to your spine to engage your abdominal muscles as you exhale, being careful not to alter the lower back’s natural curve.
Stretch your foot slowly away from your body until your leg is fully stretched while holding this contraction.
come back to the beginning position gradually.
On each side, repeat ten times. Execute once daily
Push-ups against the wall

How to assist: Beginning with your legs and feet together, take a position two feet away from a wall and extend your arms straight in front of you.
Note: You should place your palms on the wall shoulder-width apart and at a height about equal to shoulder level. Ensure that your fingers are pointing upward.
Lean your body toward the wall, bending your elbows until your nose nearly brushes it.
Return to the beginning position after holding this posture for three to five seconds.
Modified cobra
The yoga pose known as cobra extends the back. However, it also fortifies the lower abdomen and pelvis. Planking is the starting position for the typical cobra exercise, but after a C-section, you’ll want to adjust it to avoid overstretching your core.
How to do it: Place your flat palms close to your shoulders while lying on your stomach.
Press your elbows into your ribs.
Raise your head and neck off the ground, but don’t let your lower back get too strained.
As though you were attempting to raise your pelvis off the ground, tuck in your navel.
Go back to the initial position.
Perform four to eight times.
Kneeling squat

How to assist: With your feet straight behind your knees and your knees about shoulder width apart, begin in a kneeling position.
Note: Maintain your torso taut and erect by using your core muscles to maintain a neutral back and spine.
Sit back gently and deliberately toward your heels while using your glutes.
To push yourself up and stand back up, contract your glute muscles.
Modified side plank
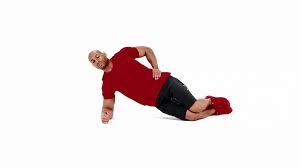
How to assist: With your wrists beneath your shoulders and your knees under your hips, start on your hands and knees.
Raise your left leg to the level of your left hip and extend it behind you. Exert your leg and turn your left knee and toes to the side by performing an external rotation.
Breathe in, stacking your shoulders and hips as you raise your left arm and press down through your right hand and knee.
Maintain the posture for five to ten seconds. To repeat this plank on the other side, lower yourself back down onto your hands and knees.
Twist triceps
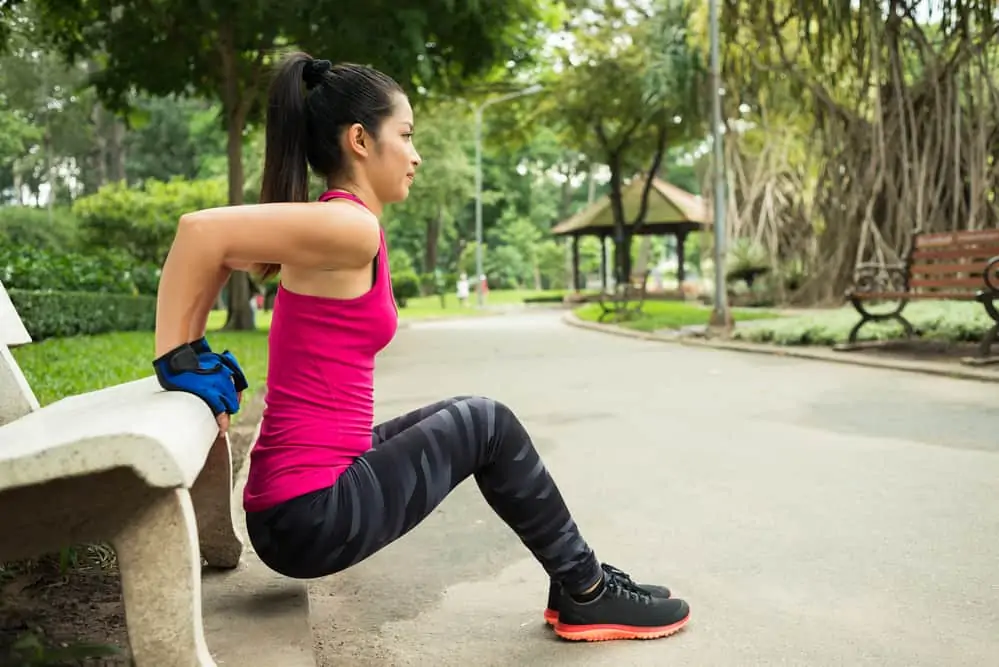
How to assist: Grip the edge next to your hips while sitting on a sturdy chair, weight bench, or step. Tricep dips can also be performed with certain pull-up bars. With your legs outstretched your feet hip-width apart and your heels on the floor, position your fingers at your feet. Keep your head straight and raise your chin.
Lift your body by pressing into your palms, then move forward just far enough so that your behind clears the chair’s edge.
When your elbows are curved between 45 and 90 degrees, fall yourself. Preserve control over the total range of motion.
Recount after carefully forcing yourself back up until your arms are straight.
Triceps twist’s advantages
One of the best exercises for working the triceps brachii, which is located at the back of your upper arm, is the triceps dip. Preserving your hips off the floor also demands you to employ your abdominals. To stretch our elbows, we contract our triceps. You utilize them for any daily chores that need pushing because they are also for that purpose. This involves pushing a shopping cart, a lawnmower, and other objects.
Maintaining the balance of your body is also crucial. For this reason, you should keep your triceps strong if you play sports that require a lot of pulling motions, which work the biceps, to avoid muscle imbalances and injury.
Typical Errors
Though it may appear simple, there are a few things to keep in mind when doing triceps dips. Steer clear of these mistakes to maximize the benefits of this workout and prevent harm.
clenching Shoulders: When doing triceps dips, keep your shoulders down and away from your ears. Make an effort to keep your neck long during the exercise.
Falling Too Low: During this exercise, be mindful of the strain on your shoulders. If you start to feel a lot of strain, don’t descend any further. If not, you run the danger of suffering a shoulder injury. Avoid locking your elbows at the peak of the exercise. Tension on the triceps is maintained by keeping them somewhat soft.
Bending Forward: If you lean forward, you’ll work your chest instead of your triceps. Keep your body in a straight line without bending forward.
Safety and Precautions
Be cautious if you have pain in the elbow or shoulder joints as this exercise may put them under stress. It’s also critical to cease performing triceps dips if they cause pain or exacerbate pre-existing problems. Should you experience joint pain, you might wish to do the push-up exercise to strengthen your shoulder and triceps instead. You might want to completely avoid this workout if you have shoulder issues.
As you develop muscle and strength in your triceps, start with three sets of ten repetitions and gradually increase the number of sets and reps over several weeks.
Bending over while seated

By slowing down the movement of the bowels, this yoga pose, also known as Paschimottanasana, helps to relieve the symptoms of constipation. By sitting forward, you can improve blood flow to the brain and reduce stress. Folding your legs over stimulates your kidneys and liver in addition to gently stimulating your stomach and intestines to aid with digestion.
To perform this yoga pose, do the following: In Staff Pose, take a deep breath, lift your arms above your head, and reach your arms between your fingers and your head.
Exhale, rotate your hips, and gradually lower your body to your legs. Place your palms on your toes, ankles, or feet.
To deepen the stretch, use your arms to gently draw your torso and head closer to your knees. Apply pressure with your heels and gently push your toes toward the person.
For three to eight breaths, hold your breath.
To release: A) Roll up your spine gently to return to staff posture. B) Inhale and extend your arms past your head to bring your body back up into the Staff posture in yoga.
benefits of bending over while seated
By bending forward while seated, one can effectively stretch the entire back side of the body, from the heels to the neck. The forward bend calms the nervous system and moods while stimulating the urinary and reproductive functions.
Newbie tip: If bending forward is difficult for you, bend your knees more. To support them, you may also use loosely rolled blankets. Just be careful to keep the kneecaps pointed skyward. Your body comes forward and your chest rises; resist the impulse to let your sitting bones and legs roll to the floor. The quadriceps, knees, and feet should all be facing upward.
Avoiding: New or persistent injuries to the arms, hips, ankles, or shoulders.
Modifications bending over while seated: If the person is unable to extend their arms to their feet: A) Using a yoga belt, round your feet and grasp the strap with both hands. B) Place the head on the knees and slightly bend them. just enough to arrive at the feet with the hands
Take a position on a bridge
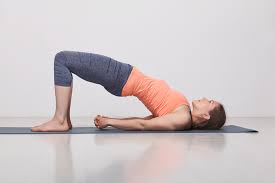
How to act: With your legs bent and your feet hip-distance apart on the mat, lie on your back. Attempt to position your feet as near to your glutes as you can.
Spread your arms out, palms down, at your sides.
Using your feet as a strong pressure point, raise your hips from the pubic bone instead of the navel as you inhale.
Put some muscle into your upper arms. You can place your pinkie fingers against the mat and clench your fists behind your back. Roll your shoulders under you and spread your collarbones.
Maintain a hip-distance posture by drawing your thighs closer together and applying strong pressure to your heels.
Reach the rear of the thighs and move toward the knees to elongate the spine.
Blow as you release your hands and firmly lower yourself to the mat to complete the workout. Ten reps, three times a week
The first piece of advice is to just keep your arms at your sides, palms down if you have stiff shoulders or hurting hands when attempting to tie your hands behind your back.
An essential part of this pose is keeping your neck in its natural bend. neglect squeezing your neck’s back into the mat.
Once your hands are interlocked, straighten your chest and tuck your upper arms under your shoulders. Try not to pull your shoulders too far to avoid straining your neck.
Avoid twisting your head to one side while in this posture to maintain a straight line from the floor to the ceiling.
Bending forward while standing
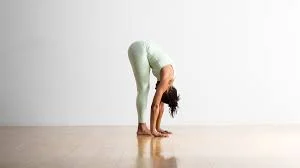
How to work: From a standing position, hinge at the hips and progressively bend forward.
Extend your back, maintain a slight bend in your legs, and let your head fall to the ground.
You can braid your hands behind your back, place your hands on the ground, or clasp your opposing elbows in front of or behind your thighs.
Stand for thirty seconds with your body leaning forward.
You can adjust this stretch if your hands are too high off the floor. Instead of your hands being on the floor, place them on a block or other heavy object. You will continue to receive the same advantages.
Heel slides
You can try a variety of heel slide exercises. Depending on your needs, you can perform one or more. Targeting somewhat different muscles is the goal of each version.
During this activity, have the following points in mind: As near your buttocks as possible, slide your heel.
You should only bend your knee as far as it feels comfortable.
It shouldn’t hurt if you experience any mild pressure or other sensations in or around your knee.
Perform one to three sets of ten repetitions for each exercise. In between sets, take a minute or so to rest. At least twice a day, perform these exercises.
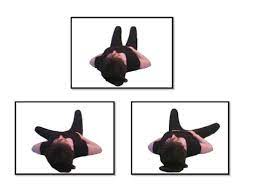
Heel slides in abduction and adduction
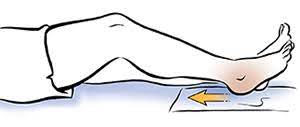
For this exercise, maintain your foot and knee pointed upward to preserve alignment in your leg and hip.
How to assist: With the feet a little separated and your legs extended, lie on the back.
Toes should be pointed or drawn back toward the shin.
Slide the leg that is afflicted out to the side slowly.
Return your leg to the beginning position by sliding it back without extending past your body’s midline.
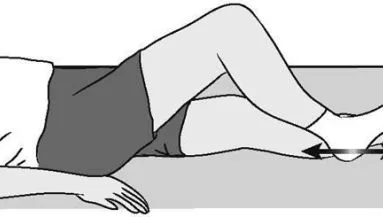
Heel slides while seated
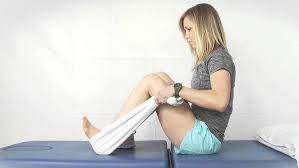
How to assist: With the legs out in front of you, carry a seat on the floor.
As you glide your afflicted heel along the floor toward your buttocks, maintain your foot flexed.
For five to ten seconds, hold.
Return your heel to the beginning position by sliding it.
Chair heel slide
How to assist: Use a chair with armrests if at all possible. Throughout the exercise, firmly press your thighs onto the chair. Stretch your leg out while seated in a chair.
Return your heel as near to the chair as you can.
Hold on for five seconds.
Return your foot to the initial position by sliding it.
Heel slides on walls
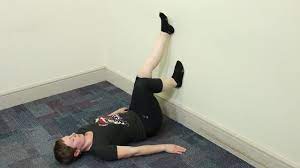
You can also hook your unaffected foot beneath your opposite foot as you slide your heel along the wall if you need more support for this exercise.
How to assist: Place your hips just a few inches from the wall while lying on your back.
The sole of your foot should be against the wall when you flex your unaffected leg.
Stretch the afflicted leg and press the heel against the wall.
As you slowly bend your knee, try to move your heel as far down as you can.
Keep your posture for five seconds.
Then, to help elevate your foot back to the starting position, place your unaffected foot beneath your opposite foot.
Return the unaffected foot to its beginning position.
Simple toe tapping while standing
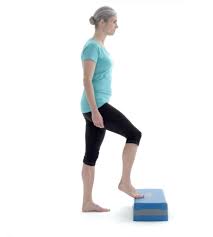
Any level of fitness may perform this variation of the toe tap. You will need a stable structure that is about 10 to 12 inches tall and unmoving, such as a Bosu ball, plyometric box, or the bottom step of a staircase.
How to assist: Place yourself in front of a box or other sturdy object.
Step one foot onto the platform’s top. Your foot’s ball will make contact with the ball or box. You’ll keep your arms by your sides and your other foot firmly planted on the ground.
Push off with the planted foot to raise it onto the platform and return the lead foot to the floor at the same time to begin the exercise. This will be a mid-air alteration.
Land with the edge of the planted foot on the platform and the lead foot on the ground.
Without pausing, keep switching feet for the specified amount of time. It will feel like running on stairs and change quickly. Spend 30 to 60 seconds tapping your toes while standing. After taking a 15–30 second break, repeat for two or three sets.
To add difficulty to this exercise, speed up the toe taps and pump your arms.
You can also do toe taps on the ground using the same motions without an elevated step to lessen the difficulty.
Supine tapping of the toes
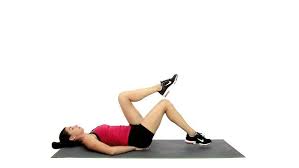
You return to the mat for an abdominal workout with the Pilates toe tap, also known as the supine toe tap. Even though it seems simple, a few proper reps will have your abs burning. Along with other core muscles like your obliques and hips, the rectus and transverse abdominis are the main muscles used in this exercise.
How to assist: Sit on an exercise mat with your knees bent and your arms by your sides.
One leg at a time, raise your legs to the tabletop with your thighs perpendicular to the floor and your knees bent. Refrain from forcing your back onto the floor or arching your spine; keep it neutral. With the left leg still in the tabletop position, start by lowering the right foot and tapping it on the ground.
Place the right leg back on the table, then switch to the left leg.
Do this ten times on each side. Increase the taps on each leg from one set to two sets of ten.
Tap both feet on the mat at the same time to increase the difficulty of this exercise. To facilitate the process, place the stationary toe on the mat instead of the tabletop and tap with the opposing foot.
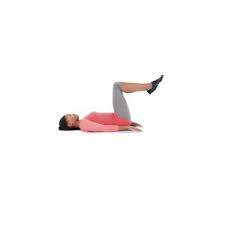
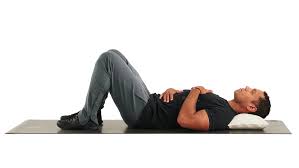
Extension of one leg alone
How to Perform a Lying Leg Extension for Beginner’s Supine: Place yourself on your back on a firm surface, ideally the ground. This allows the floor to support you and spare your muscles from having to work as hard to keep you in proper alignment. To prevent your feet from slipping, think about performing the workout barefoot on a wooden floor.
Set your feet level on the ground and flex your knees.
Breathe in and raise your lower body while maintaining the same angle of your bent knee.
Keep in mind that your hip joint is used throughout the lifting motion. Avoid letting your trunk position sway, waver, shift, or vary in any manner while you elevate the lower extremities. A hint: The abs are everything.
Take a breath out and put your foot back on the ground. Remind yourself to keep your trunk still. Additionally, keep in mind to maintain the lower leg to thigh angle.
Dead bug
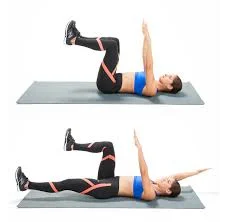
How to assist: Begin in the tabletop position, with your ankles aligned at a 90-degree angle and your knees stacked over your hips. Straight aloft and parallel to the shoulders are the arms. To prevent back pain, keep your core firm and your back flat on the ground.
Stretch your right leg forward while keeping it off the ground, and reach your left arm straight back over your head toward the wall behind you.
Return your right leg and left arm to the tabletop position gradually. Continue on the opposite side.
Regardless of how fit you are, you should always get your doctor’s approval before beginning a new training regimen. You can elevate your head slightly for a greater challenge or maintain it resting on the floor. If you experience any pain or have a neck or back issue, stay away from this dead insect exercise. This is not the same as the typical soreness that results from tense core muscles.
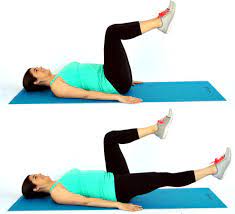
Deadbugs with modified bent legs
Reducing the range of motion as your arms and legs stretch from your core will help you modify dead bugs by requiring less core strength and stability to complete the exercise. Alternatively, you can perform the exercise with your knees bent, lowering each heel to the floor just a little bit before lifting it back to the center. Make cautious not to tuck your thighs into your chest, but only to bring them to a 90-degree angle.
How to assist: Begin in the tabletop position, with your ankles aligned at a 90-degree angle and your knees stacked over your hips. Straight aloft and parallel to the shoulders are the arms.
Lower your right leg to the floor and extend your left arm straight back above your head toward the wall behind you.
maintaining a 90-degree bend in the right knee. Use your right heel to tap the ground.
Return your right leg and left arm to the tabletop position gradually. Continue on the opposite side.
Dead Bugs with Bent Legs and Flat Arms
If this variation on the dead bug exercise is still too much for you, try the bent-knee variant, but instead of extending your arms, keep them bent. This modification further decreases the amount of work required, making it an ideal place to start if you’re new to core exercises or want to lessen lower back pain.
How to assist: Begin in the tabletop position, with your ankles aligned at a 90-degree angle and your knees stacked over your hips. Long arms with palms down rest against ribcages. Maintaining a 90-degree bend in the right knee, lower the right leg toward the floor. Use your right heel to tap the ground. Arms stay in place.
Return your right leg to the tabletop position slowly. Continue on the opposite side.
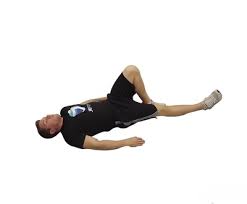
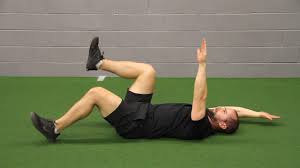
Transverse abdominis side bracing
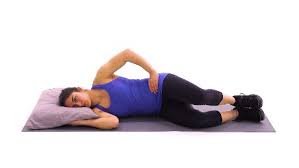
Set up: In a side-laying position, place your feet flat on the floor, bend your knees, and place your upper hand’s fingers on your stomach, right inside your hip bone.
Pull your belly button toward your spine while contracting your abs. Under your fingers, you should feel a contraction in your muscles. Maintain this stance, then let go and do it again. Inhale. For 30 to 60 seconds, perform.
Bending of the knee fallout
Setup: Rest your feet flat on the floor and bend your knees while lying on your back. clench your midsection. Gently extend one leg as far as possible toward the floor without allowing your hip bones to move; do not allow your pelvis to shift. Return to your starting location slowly. Repeat, alternating with the opposite leg. To keep your pelvis motionless, brace your core. For 30 to 60 seconds, perform.
Jump tuck
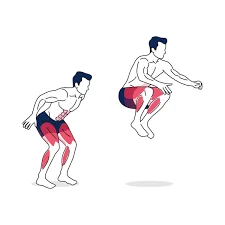
How to assist: When someone stands, their feet should be about hip-width apart. To maintain a straight forearm, bend the elbows while maintaining the arms at your sides and close to your body. This is where it all starts.
Bend at the knees, bring your rear end into a squat, then shift your weight back. Ensure that the hips do not descend below the knees.
To advance, he or she should try to give it their all. Lean your knees forward and your abs tight to assist you in jumping toward your forearms. Steer clear of bending forward and keep your back upright.
Step with your feet hip-width apart and land with your knees flexible. Do ten repetitions of one rep. Hurry back to the squat and continue.
session: twice daily
the rectus femoris, obliques, gluteus, semitendinosus, semi-membranous, lower back, hip flexor, and quadriceps femoris are the muscles involved.
Burpee
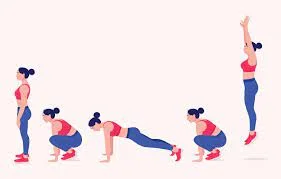
How to assist: Get to your feet.
To plant palms on the mat, squat down.
Jump feet back into plank position right away.
Do a push-up.
Leap from feet to hands.
To get up and jump into the air, push down with your heels and raise your hands above your head.
Softly return to the mat. That amounts to one rep. After 20 seconds of maximal exertion, perform as many reps as you can, then take 10 seconds to rest. Eight times over, repeat. After taking a minute to rest, move on to the next exercise.
Skater
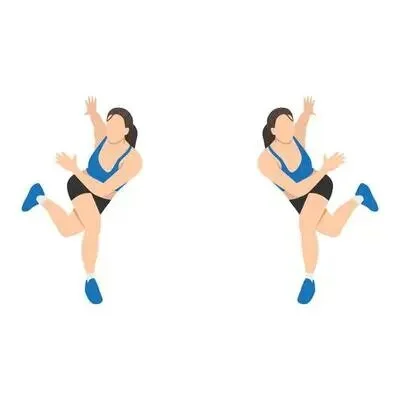
How to assist: Place your feet hip-distance apart as you stand up.
Leap to the right, bringing your left leg behind your torso and landing on your right foot.
Leap back to the left, putting your right foot behind your body and landing on your left foot. That amounts to one rep. After 20 seconds of maximal exertion, perform as many reps as you can, then take 10 seconds to rest. Eight times over, repeat. After taking a minute to rest, move on to the next exercise.
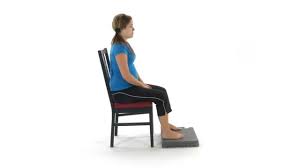
Compress a seated ball
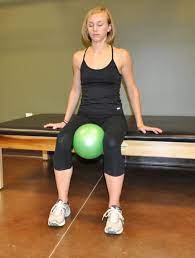
It’s critical to develop your ability to activate your pelvic floor muscles when moving. Your transverse abdominals and pelvic floor can both be activated by contracting the inner thigh muscle. One quick and efficient technique to begin engaging your core is to perform ball squeeze exercises. You can do it sitting with your feet on the floor or lying down on your back.
A woman uses a grey Pilates ball between her knees while she sits in a chair.
How to assist: With your knees flexed and your feet flat on the ground, rest flat on the back. Put a soft pillow, soccer ball, or yoga block in between your knees.
Take a breath to get ready.
Squeeze the block between your knees and let out a breath. Engage your core and gently draw in your pelvic floor and lower abdomen. Breathe in to do it again
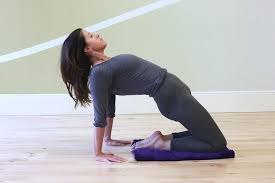
Hip thrust when kneeling
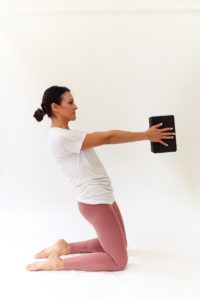
It is crucial to engage and fortify muscles in various postures to defy gravity. To get out of a chair, off the ground, and to bend over and lift a baby, we employ our core muscles. Your core muscles should be trained in the postures in which you will use them daily.
This exercise is an excellent method to test your core against gravity and is a progression of the bridge exercise mentioned before. The woman is standing on her knees with her back slightly tipped forward and a yoga block between her hands.
How to assist: As you sit back on your lower legs, begin in a tall kneeling stance with your upper body upright.
Take a breath to get ready. Release the air and get up to your knees. Squeeze your buttocks and gently draw in your lower abdomen and pelvic floor while in the top position.
Take another breath and repeat.
Perform one set of ten repetitions of each exercise every day to begin. Ascend to completing two or three sets of ten reps each day. For every exercise, extend the hold time to five seconds. If you experience any pain or discomfort, stop using the exercise and consult a pelvic floor physical therapist. Beginning eight weeks after giving birth, you can also incorporate yoga, lower and upper body strengthening, walking, cycling, or using an elliptical.
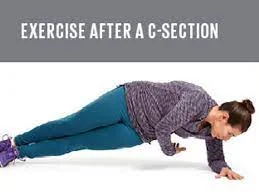
Plank
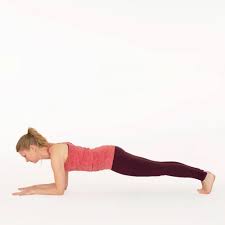
Therefore, planks are a must for any consistent bodybuilding and strength training program. They will improve your stability, injury resistance, strength for other lifts, and assistance with maintaining good posture. Select a position that lets you extend your torso to its maximum length. If you use an exercise mat, you can have enough padding to feel comfortable on all fours. You can do a plank on your palms or forearms, as seen in the video. A variety of wrist wraps are offered to provide joint support.
How to behave: start in the plank posture, face down, with your forearms and toes on the ground. The elbows are precisely beneath the shoulders, and the forearms are pointing forward. Even if your head is relaxed, you should be looking at the floor.
Using your abdominal muscles, pull your belly button toward your spine. Keep your body straight, from your ears to your toes, without sagging or bowing. Your torso should remain solid and upright. This is the stance of the neutral spine. Make sure your shoulders are relaxed and not hunched over your ears. Your heels should not be higher than the balls of your feet.
Hold this position for ten seconds. Give up and go to the floor.
Increase the time to thirty, forty, or sixty seconds gradually.
most frequent errors
Avoid these blunders to get the most out of this workout and to avoid strain or injury.
Having your back arched causes you to shift more weight to your arms and not fully contract your abdominal muscles. Make sure your shoulders stay downcast and wide.
Hanging hips: Your hips will start to droop when your abs are at their absolute maximum. That is a sign that you should abandon your idea. If it feels like your hips are sagging from the beginning, try spreading your feet a little wider and focus on utilizing your abs.
Benefits include: Because it uses a surprising amount of body muscles, this is one of the finest yoga poses for weight loss. In addition, this pose develops the muscles surrounding the spine and aids in balancing the entire body. Additionally, it is in charge of enhancing your body’s stability, posture, and core strength.
This yoga pose is a great way to lose fat around the abdomen. It tones the abdomen and strengthens the wrists and arms. It takes a lot of arm power to complete this asana, which makes it somewhat challenging.
Bhujangasana

How to assist: Starting on your stomach, place your hands next to your ribs and your feet hip-distance apart.
To function the quadriceps, expand your big toes straight back and use pressure with all ten toenails.
To widen your lower back, turn your inner thighs toward the ceiling.
As you begin to raise your head and chest and rotate your shoulders back and down, gently apply pressure with your hands.
Retain a long neck and concentrate on raising your sternum rather than your chin.
Raise your arms straight and keep your shoulders away from your ears. Maintain a minimal bending angle in your elbows.
Return to the mat after releasing the position.
Benefits: The yoga stance known as Bhujangasana, or Cobra pose, is a reclining backbend that strengthens the spine, butt, butt muscles, chest, belly, shoulders, and lungs. It also enhances blood circulation and relieves tension in the body. Since it extends the neck and throat area, it improves thyroid function and is beneficial for those with hypothyroidism.
To reduce the fat around your tummy, do this asana. This position gradually reduces the stiffness in the lower back, strengthens the arms and shoulders, and tones down the muscles in the shoulder, belly, and chest area.
The Mountain Pose
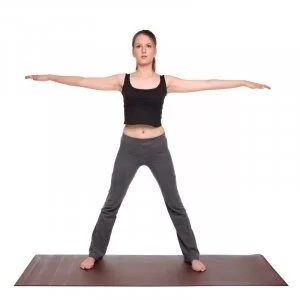
Method: While inhaling deeply and maintaining a firm position on the ground with a slight space between your feet, raise both of your arms upward by interlocking your fingers. Now notice the strain as you raise both of your heels to stand on your toes and feel the stretch from your toes to your fingers.
As long as you can, maintain this posture while taking slow, deep breaths. After you’ve had some time to relax, release and return to the starting position while exhaling deeply. Then, practice the same pose whenever it suits you best.
Benefits of Tadasana: This deep breathing practice strengthens and expands the lungs, may help with height gain, develops and stimulates all of the body’s nerves, and strengthens the vertebral column and heart. Additionally, it helps women regulate their menstrual cycles, treats gastrointestinal issues for all practitioners, strengthens the arms and legs, aids in the body’s removal of lethargy, and lessens the issue of flat feet.
It is particularly beneficial for weight loss following a cesarean delivery since it enhances blood flow, posture, strength, and body control.
Triangle Pose
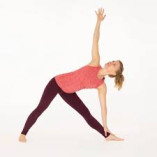
Why it works: Mobility is a key element once more. This sometimes disregarded stretch can significantly improve your mobility in your thoracic or mid-back. It is very easy to modify to your current degree of flexibility and is wonderful for stretching and opening up the hip flexors. This warm-up is generally done rapidly, so take your time and focus entirely on each action.
Process: Place your feet comfortably apart and stand upright on a level, level surface. Keep your right foot’s heel inward and turn it to face outside. A straight line should be formed by both heels. Breathe in, raise your left arm straight up, and bend your body from the hips to the right. Your right hand can rest on your shin, ankle, or, if it’s more comfortable, the mat in the interim. If it feels comfortable, look up at your left palm while keeping your head in line with your torso. Let the body become slightly more relaxed with each exhalation.
Advantages: This pose improves pelvic and spinal flexibility, making it a great stretching exercise. You’ll gain balance and strength from this stance.
Trikonasana is a full-body pose that has many health benefits, such as relieving neck sprains, improving blood flow throughout the body and veins, stimulating the digestive system, increasing spine flexibility, and realigning the shoulders. It also lowers the risk of a blockage or stroke. Along with strengthening the ankles and palms, it also eases gastritis, indigestion, acidity, and flatulence. It also relieves discomfort and builds up tension and anxiety.
Pregnant women can benefit greatly from it as it not only changes their center of gravity but also opens and expands their hips, which can greatly aid in childbirth. One of the most advised asanas for a lady who has had a C-section is trikonasana since it helps to reduce belly fat and thin the waist. By providing the spine, hamstrings, and calves with the greatest amount of stretch, this posture strengthens the arms, chest, and lower body. It helps with digestive issues and reduces tension and anxiety, both of which are prevalent in postpartum women.
Pose of the camel
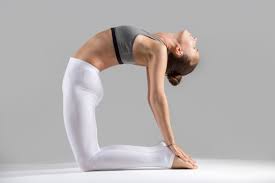
Method: Keep your feet and knees together while kneeling on the yoga mat. Push your hips forward to compensate for your slanting backward. bend your head and spine as far back as possible. Put your hands on your feet, ease your body and back muscles, and hold the pose briefly before letting go.
Benefits: Ustrasana opens up the chest, which promotes breathing, and expands the abdominal area, which improves digestion and evacuation. It also stretches and strengthens the shoulders, back, and deep hip flexors. It improves posture, eases lower back pain, loosens up the vertebrae, and burns fat around the thighs.
This pose is beneficial for massaging the kidney as well as all other organs, but it should only be done under the supervision of a professional. This pose aids in oxidizing and detoxifying the body’s organs by bringing in fresh blood. It helps reduce the amount of abdominal fat following cesarean delivery.
Boat posture
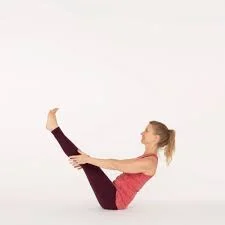
Method: Spread your legs out in front of you while sitting on the floor. Bend your knees and slant your back slightly while maintaining an upright posture and placing your hands next to your hips. Now take a breath, raise both legs and reach forward with your hands. Ensure that your toes are at eye level and extend your back. After holding the position for five to ten seconds, release it.
Benefits: In addition to relieving stress, yoga’s boat posture, or Naukasana, can help you resolve a variety of physical problems. It stimulates the stomach organs, enhances digestion, strengthens and increases flexibility in the hip joints and legs, and aids the core and hip flexors. It also increases the steadiness of the torso.
Naukasana improves the abdomen muscles and aids in controlling blood flow at the glycemic level. It strengthens the muscles in the arms, thighs, and shoulders and enhances the health of all the abdominal organs, including the liver, pancreas, and kidneys. After a C-section, this yoga pose is thought to be highly beneficial for weight loss. This stance is believed to strengthen the abdomen, heal several digestive disorders, and reduce stomach fat. Additionally, when you follow a regular schedule, you don’t get too much time for exercise. It then aids in toning the muscles in your thighs and stomach.
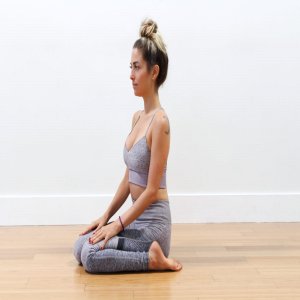
Pranayama
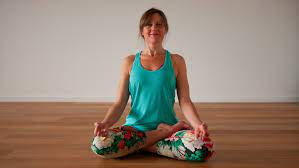
Method: Sit with your legs crossed at the beginning. Shut your eyes and place your hands on your knees. Close your right nostril while maintaining your right thumb on it. Take four deep breaths from your left nostril. Now, use your right ring finger to seal your left nostril and hold it there for two seconds. You are now closing both of your noses while holding your breath. Exhale deeply from your right nostril after removing your right thumb from it.
Keeping your ring finger in your left nostril, take four deep breaths through your right nostril before closing both of your noses for two seconds and exhaling deeply through your left. Continue doing this for five minutes. Pay attention to your breathing as you perform it.
Benefits: Pranayama, the ancient technique for regulating breathing, can heal physiologically by balancing the body and mind and by bringing oxygen to the body while expelling impurities. Pranayama can reduce stress improve quality of sleep, increase mindfulness, and lower blood pressure.
Bhramari Pranayama uses the vibrations of the humming sound, “Aum,” to assist in producing up to 15% more nitric oxide. This aids in the quicker healing process and promotes mental relaxation, stress reduction, enhanced focus, and anxiety relief.
Anulom Vilom Pranayam offers several advantages, including strengthening the immune system, enhancing memory, enhancing cardiovascular and respiratory health, and controlling blood pressure. Additionally, this yoga pose promotes better sleep and reduces stress. Pranayama is an easy breathing technique that reduces belly fat after a C-section by applying the right amount of pressure to the abdominal region. It also raises the degree of focus and is safe.
Exercises for the abdomen
The pelvic floor is the layer of muscles at the base of your pelvis that support your colon and bladder. By using these muscles, you can strengthen them and facilitate the passage of feces through your colon. This quick and easy exercise will help strengthen your muscles in your pelvic floor.
How to assist: Select a sitting, standing, or lying position that feels comfortable with your legs slightly apart. You have to first identify the muscles that are used. As if trying to stop yourself from breathing in, pull up and tense the muscles around your back channel. The muscular contraction in this area corresponds to the posterior part of the pelvic floor, and it should be palpable.
Imagine yourself about to pass water, and you try to stop the flow of pee. The muscles in the front of the pelvic floor tighten up when you try to stop passing water. Pull your pelvic floor muscles up from the back toward the front by firmly contracting and raising them gradually. Let go of the muscles after squeezing for as long as you can, up to ten seconds. After a brief rest of three or four seconds, attempt one more pull-up.
Start by doing them five times, and then increase the number of times you do them gradually up to 8–12 times.
Now pull up the muscles quickly and strongly, and then immediately release them.
These are rapid pull-ups. Again, start with five repetitions of this, and then progressively build to ten.
After each set of slow pull-ups, you could try to hold each one a little bit longer. After every set, try to increase the number of rapid pull-ups you can do.
repeat: You should work on your pelvic floor three times a day. You should be able to carry out the exercises in any position without bringing attention to yourself once you’ve mastered them and identified the appropriate muscles. Try to make it a habit to complete the exercises every time you carry out another routine, such as getting ready for work or brushing your teeth.
These exercises shouldn’t take long, but to finish them, especially the first few times you do them correctly you must be able to focus entirely. To complete them, try to set aside some peaceful time.
Walking gently
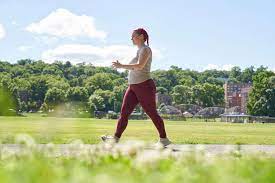
Many women consider walking as their first form of exercise following a cesarean section. In the beginning, your goal will be to move your body and regain your stamina rather than to work up a sweat. You might want to step up the pace after your doctor gives the all-clear to resume low-impact exercise.
Many women can tolerate a 25 to 35-minute walk a few times a week after a C-section, and the talk test is an excellent way to gauge intensity.
This entails having the ability to converse while working out.
You are moving a little too fast at this point if you are unable to carry on a conversation while you are walking.
Walking offers you the added advantage of being able to stroll with your infant. Put them in the stroller to get some vitamin D and fresh air.
Scar massage after cesarean delivery
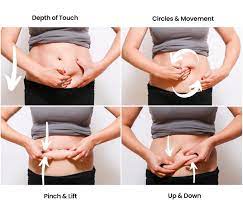
Your range of motion may be restricted while the layers of skin and fascia surrounding a cesarean delivery scar heal and cling to one another. Adhesions like these could cause difficulties later on, such as frequent urination or back or hip pain. A scar tissue massage sometimes called a scar tissue release, facilitates healthy tissue repair by breaking up adhesions. After your scar has healed and your doctor gives the all-clear, only start massaging your scar. Areas treated: connective tissue, fascia
procedure: Place your fingers above your scar while lying on your back. Using your hands, pull the skin surrounding the scar to see how it moves. Attempt rolling it side to side and upward and downward. Check to see if it moves easier in one way than the other.
Move the scar back and forth slowly while only moving in one direction. It is best to begin lightly and work your way up to a more vigorous massage.
Move the scar in all directions, including up, down, and side to side. Although little motions are preferable, tissue mobilization can be applied across the entire abdominal cavity.
Note: Before beginning postpartum exercise, make sure to speak with your doctor. Always begin modestly and work your way up to more difficult exercises. Steer clear of exercises that put a lot of strain on the hip and abdominal joints. See a physical therapist or postpartum exercise specialist if at all possible. Stop and get medical attention if you observe an increase in the scar area’s inflammation, exhaustion, or bleeding.
The advantages of physical activity after C-section
Exercise can strengthen you, lift your spirits, and aid in the healing process after giving birth. There are many things you should do to keep the body pushing, even if you’re sleepy and lack encouragement. However, no two pregnancies are the same. The timing of your fitness regimen relies on your unique situation.
If the scar hurts, give it up and try again later. Once you’re at ease, you can give yourself this massage once a day.
Always be sure to contact a medical professional first.
After having a baby, regular exercise will: bolster and tone your muscles, assist in recuperating after labor, if you gave birth naturally; increase your energy levels to reduce fatigue; assist in weight loss and fitness
Engaging in physical activity improves mental health. It can assist in preventing postpartum depression and reduce stress. Also, there’s a greater chance that you’ll go outside and socialize. So don’t worry if you don’t exercise enough. Taking care of a newborn demands a lot of work. As a result, you might not have as much time or energy to exercise as you’d want. Try your hardest; even ten minutes is better than none at all.
After C-section exercises: Do’s and Don’ts
Do’s
- Walking for the first 24 hours following your surgery. Walking, though initially unpleasant, is a terrific method to promote regular biological functions (such as getting the bowels moving) and reduce the chance of complications following surgery, such as blood clots.
- Seek assistance, particularly during the first two weeks when you’ll be at your most uncomfortable. This recuperation phase will be simpler if your partner, parent, or other support system member brings the baby to you.
- For a good while following delivery, refrain from lifting large things and from engaging in weighted activities. To improve your pelvic floor and core strength and support your back, concentrate on them.
- Be mindful of your posture; sit up straight and keep your shoulders back.
- Steer clear of sleeping on your back. To keep your body in a neutral position, lie on your side with a pillow between your legs.
- These are the things you should do.
Don’t’s
Let’s move on to the avoidance tips. Though this list may seem limited at times, keep in mind that it was created with your best healing in mind.
- For the first three to four weeks, avoid lifting weights greater than your baby’s.
- Three to six weeks without driving
- No intense exercise or running for six weeks. Later on, more on this!
- For six weeks or until your incision has healed, avoid taking baths or swimming (you might need to wait for your initial follow-up on this one).
- For the first six weeks, do light housekeeping (no vacuuming).
- No sexual activity or usage of tampons 6 weeks
Exercises to avoid after C Section
It takes several months for your body to heal before you may resume high-impact, strenuous exercise, and some stomach workouts. For several months following cesarean delivery, women who have diastasis recti a separation of the big abdominal muscles should not perform the following exercises.
Before beginning post-operative exercise, women with abdominal separation should speak with a physical therapist. If you have organ prolapse or incontinence, you should not run. A physical therapist can provide you with advice on whether and how to resume running if you’re experiencing one of these conditions.
- cautious of full planks (straight legs) immediately following birth. Attempt beginning with half planks instead, bending your knees first. workouts designed to strengthen the abdominal wall, such as front planks, leg raises, and cycling, as well as workouts that make the stomach protrude, such as sit-ups and crunches
- Jumping rope, squat thrusts, jumping jacks, and plyometric workouts are examples of jumping exercises.
- Running or sprinting
- classes that involve intense activity, like kickboxing, Zumba, body sculpting, etc.
- Any physical activity that tugs or presses against your scar from the C-section
- Any physical activity that hurts
Going back to the exercises after C section
You must continue your pelvic floor exercises, stepping up the repetitions as you gain strength, even if you’ll need to relax at home. Although the scar on your abdomen will heal rapidly, you must exercise consistently so that your deeper muscles have time to repair. For further exercises, please refer to the pamphlet “Improving your pelvic health and fitness after pregnancy.”
Your strength and fitness will build with daily walking of a modest distance; when you feel capable, you should aim to increase the pace and distance covered.
Try not to lift anything heavy until six weeks after giving birth. During the initial weeks, refrain from doing any strenuous activity, such as carrying kids, vacuuming, or standing for extended periods. A wound infection can happen to certain women occasionally, so please contact your midwife, health visitor, or general practitioner right away if your pain is not going away, the wound is red or hot, or you detect any discharge coming from it.
Additionally, while the scar heals, some women may experience increasing tightness around the scar or numbness. After your cesarean section, this numbness is normal at first. If it lasts longer, though, please see your health visitor.
It’s advisable to hold off on getting back to your pre-pregnancy fitness regimen until after your 6- to 8-week postnatal checkup with your doctor. This is an excellent time for you to start exercising if you weren’t particularly active before becoming pregnant. Try to increase gradually, and if you experience any pain, stop.
It’s normally safe to begin low-impact exercises like swimming, pilates, yoga, light jogging, and low-resistance gym activity once you’ve healed from your C-section and are pain-free. It might be advised by your doctor that you hold off on beginning any high-impact activities, like running, aerobics, and resistance or weight training, for at least 12 weeks. Start slowly because hormones might impair your joints for around six months after giving birth.
Extra therapeutic advice after C-section
Apply Heat to Your Abdomen: Following a C-section, heat therapy helps reduce soreness and pain. Periodically apply a heating pad to your abdomen for fifteen minutes. By improving blood circulation to the affected area, the heated compression is intended to hasten healing.
Get Enough Sleep: Your newborn will probably wake up multiple times at night in the first few months of life. When your infant naps, try to get some rest. Use a body pillow to support the abdomen and lower back for extra comfort. The cushion adapts to the curve of the body to release pressure points and promote deeper, more peaceful sleep.
Compression Garments: Use a compression garment to shield the healing scar from your C-section! Designed to support the lower back and stomach muscles, abdominal binders aid in improving blood flow throughout the healing process following surgery. The garment is lightweight, breathable, and discrete.
It gently compresses the chest and abdomen to limit their expansion. Wearing compression clothes can help shield the healing scar from your C-section. They can be found in the shape of corsets, tights, and shorts. As you recover after surgery, the pressure they apply supports your lower back and stomach muscles and improves blood flow.
The purpose of compression clothing is not to make you appear smaller or to hold you in. They exist solely for medical purposes. Wearing compression stockings during pregnancy can help prevent varicose veins or reduce their growth.
The value of postpartum exercise
Exercises for new mothers are essential to their postpartum recovery. When performed correctly, they strengthen and support your bones and muscles, hastening the healing process. While taking care of a baby all day and night may be the last thing on your list of things to do, going for a brisk walk could be just what you need to feel rejuvenated and reoriented. Regular exercise also helps increase energy.
Exercise after giving birth is also good for your mental health. Postpartum depression and the postpartum blues are common in new parents. Exercise can help fight off depression and improve sleep quality, which can help counteract depressive feelings.
Just be careful not to overdo it, as this can lead to major complications such as wound infection or damage following a cesarean delivery.
When should you allowed to work Out?
Once your doctor gives the go-ahead, which is usually after the six- or eight-week postpartum visit, you can start exercising again. It’s crucial to start stomach exercises gradually, even after you’ve been given the go-ahead.
During pregnancy, the muscles that support the bladder, colon, and uterus are subjected to a great deal of pressure and tension. To deliver the baby safely during surgery, the bladder is shifted. It’s crucial to concentrate on gradually strengthening those muscles and organs because this causes them a great deal of trauma.
Concentrate on strength training activities that strengthen the core without making it protrude. At first, refrain from performing crunches, sit-ups, full push-ups, and full planks. These activities can interfere with healing because they overstress your abdominal muscles. Additionally, refrain from using big weights. Work your way back up to heavy weights over at least three to four months.
Cardio is a terrific method to include fitness after pregnancy into your routine and help you gradually regain your shape! For the first four to six months following a cesarean section, make sure to begin with low-impact aerobic exercise. Walking, swimming, cycling, and elliptical training are some of these workouts. Gradually boost the intensity of your workouts as your strength and endurance improve.
When following a cesarean section should you begin low-impact exercise?
It’s normally acceptable to move lightly and low-impactly after your C-section, like walking. (Until your healthcare practitioner gives the all-clear, stay away from any strenuous exercise, such as pounding, leaping, running, or other similar activities.
Pay attention to your body’s limit; you might discover that, particularly initially, you don’t have as much energy as you usually have. Even though low-impact workouts like mild walks might not seem like much, they are aiding in your recovery and setting the groundwork for eventually returning to higher-impact activities. Furthermore, taking a stroll in the sunshine can instantly lift your spirits.
Your healthcare physician may advise against swimming even low-impact swimming until your wound heals completely. If you’re not sure, wait until your six-week postpartum checkup or give them a call and inquire directly.
After a C-section, when should you begin high-impact exercise?
When your doctor gives the all-clear to begin high-impact exercise—typically at your six-week appointment if you haven’t experienced any difficulties like urine incontinence or other pelvic floor problems—you can resume high-impact exercise.
It’s recommended to acquire a referral to a pelvic floor physical therapist who specializes in women’s health if you’re having pelvic floor dysfunction or other musculoskeletal difficulties before returning to high-impact exercise.
Don’t assume that just because you can now go back to your one-hour rigorous kickboxing session, you’re ready to go in there with an uppercut. Resuming your fitness regimen after giving birth can be a lengthy process that requires a lot of time and patience for many mothers, even after the six-week mark.
Call your healthcare practitioner immediately if you have any redness, warmth, swelling, or drainage at the site of your c-section incision while exercising after being cleared to do so, or if the wound bursts open. Furthermore, any unusual vaginal bleeding following exercise is another issue that has to be reported to your OB or midwife right away.
What Physical changes have resulted from C-Sections?
It’s crucial to exercise in moderation when you feel ready. Your body has undergone significant alteration. It will take time for you to heal, even if you feel fantastic right after giving birth. Your pelvic muscles may weaken during labor and delivery. Avoid vigorous exercise if you have bladder control issues, as some people may have them. The finest workout is mild.
Your ligaments and joints are impacted by pregnancy hormones. This effect may last for up to six months following delivery. This may increase your chance of getting hurt. Your abdominal muscles may separate while you are pregnant. After the birth, things normally return to normal, but occasionally they may not. Exercises to strengthen these muscles are necessary if you want to prevent back pain and injuries.
After pregnancy, the pelvic floor may become weaker, particularly if you had a large baby or were pushed during labor for an extended period. The muscles and ligaments in your pelvic floor support your: bowel, bladder, and uterus. Your pelvic floor will become stronger with regular exercise. However, you must use caution so as not to injure yourself further by working out too hard too quickly. Use caution when performing high-impact exercises or lifting large weights. These may make prolapse more likely for you. This is the result of an organ, like the uterus (womb), falling out of its natural position.
Can physical activity aid in a quicker recovery after a C-section?
Given how drastically your body changes throughout pregnancy and childbirth, it makes sense that so many new mothers want to return to their pre-pregnancy states as soon as possible.
First and foremost, we want you to know how fantastic what you just accomplished is.
You should have lots of time to relax and enjoy the wonders of being a new mother.
Second, though, there is some evidence that light activity following a cesarean section can help with healing.
Women who exercise after giving birth are more likely to feel happier, have less worry and depression, and have more energy.
This held regardless of how they gave birth by vaginal or cesarean. After a C-section, little exercise may aid with pain relief and mobility.
the breathing techniques help enhance circulation and calm the stomach region, both of which reduce pain.
While pelvic girdle pain was helped with physiotherapy exercises.
After a C-section, physical activity may shorten the hospital stay.
Additionally, there was modest alleviation of common gastrointestinal problems that many post-C-section women encounter, such as bloating and constipation.
Is it typical to have pain in the scar tissue from a C-section after exercising?
Some women continue to feel discomfort, aches, or numbness for months after their C-section scar has healed. This is typical and could also happen after working out. Even if it can be common, you don’t have to put up with it. Scar tissue problems can truly manifest in a variety of ways, such as inconvenient or painful sex, stomach problems, back or pelvic pain, and so on.
Massage treatment might be helpful if you’re having trouble with any of these. Your physician might be able to suggest a physical therapist or massage therapist who specializes in C-sections and can ease the discomfort associated with scar tissue. As an alternative, you can give yourself a self-massage in the style of a C-section.
Utilize our Nourishing Cream for this; it will not only facilitate the massage but also contain vitamin B5, which helps to repair skin, minimize the appearance of scars, and tighten postpartum skin. It’s quite acceptable if you find it difficult to touch your scar if you choose against having a C-section.
Seeking counseling or psychological support might help you start the process of recovering from the challenges of your experience. Everybody’s experience after a C-section is unique, but the recommended course of action is to get back into exercise gradually. You should now treat your body with kindness because it has endured a great deal.
Can you squat following a cesarean section?
After a C-section, squats are thought to be a safe workout, but you shouldn’t try them too soon. Additionally, remember that you should wait a bit to add weight to your squats. Because using weights on your abdomen might put excessive pressure on it, it may prevent a wound from healing or potentially cause a hernia.
Squats improve core stability and develop your pelvic floor and legs muscles. Squats are a terrific activity to start back up with after your doctor gives the all-clear, which is usually six to eight weeks after giving birth. Some pointers for postpartum squats are as follows:
In case you stumble, make sure you have something to grab onto for stability. Try to ease yourself into it rather than going all the way down at first.
A box squat is a low-impact exercise that entails sitting on a chair and rising back up with assistance if necessary.
After a cesarean delivery, when is it safe to continue exercise?
Wait to start your postpartum workout routine if you had a C-section delivery until at least six weeks after the procedure after you’ve seen your doctor. You must reach these two benchmarks before starting an exercise regimen to guarantee a seamless recovery.
Even those with easy deliveries should exercise caution after giving birth. The body experiences trauma during childbirth and cesarean section births, and complications can arise from overexertion. Before your 4- to 6-week postnatal checkup, begin with a mild, low-impact activity like walking to get your body moving.
After giving birth, if your doctor gives the all-clear, you can gradually resume your usual exercise regimen over a few weeks or months. It’s normal for your postpartum fitness routine to alter significantly from your prenatal one following a C-section.
The takeaway
Exercises for the abdomen and pelvic floor are helpful after a cesarean delivery. Try breathing exercises, transverse abdominis-focused workouts, and isometric contractions to build strength and stability in your core muscles. Gradually regaining your strength will make it easier for you to resume your favorite activities.
Exercise after giving birth is beneficial to your physical and emotional well-being, but it’s more crucial to wait to start an exercise program until after you’ve fully healed from your pregnancy. If walking hurts where your C-section scar is or was previously there, Schedule a visit with your physician, and don’t start exercising until they give the all-clear.
FAQs
How soon after a cesarean section can you work out?
If there have been no difficulties, most people are cleared by their physician to resume exercising 6–8 weeks after giving birth. Remember to adhere to your post-operative instructions, even though by week four you might be feeling more like yourself. This will guarantee appropriate healing.
How should you lose weight after having a C-section?
You may strengthen your abdominal muscles and lose excess fat with a balanced diet and frequent exercise. Following your doctor’s approval, include a range of core-focused strength training routines and cardiovascular exercises in your regimen.
Six months after the C-section, should You still perform sit-ups?
Give yourself at least nine months to return to your regular schedule after giving birth. You should be able to start activities that strengthen your core abdominal muscles after four to six months.
Can you bend after a C-section?
For the first four to six weeks after giving birth, refrain from bending, stretching, or lifting, and don’t carry anything heavier than your infant. Hold your tummy to support your stomach if you need to cough or sneeze. An abdominal binder is useful, according to certain patients. Limit your use of the stairs if they hurt or are challenging.
How should you lose weight a year after a C-section?
In addition, walking, light exercise, and focused core workouts might help you regain the strength in your stomach after surgery. Before utilizing a belly band or beginning a new diet and fitness regimen, it’s crucial to speak with your doctor to be sure you’re taking care of yourself and making the right decisions for your health.
After a C-section, should You sit on the floor?
First, you must learn how to sit following a cesarean section. It is not as easy as before to just slouch on the ground. You can try sitting on the floor after you can stand up and bend without assistance.
Why does the post-C-section belly still look so big?
An accumulation of fat around your waist and a bulging abdomen might result from low muscular tone. Another name for this is a C-section shelf. This ‘ shelf’ of scar tissue thus results in a protruding belly bulge composed of scar tissue, extra fat, and hanging skin.
Would your post-C-section belly diminish?
Your C-section dog may only require patience and frequent scar massages. If the C-section shelf is still there after six to twelve months, there’s a good likelihood it won’t go away unless we treat it. The following non-surgical methods aim to reduce and potentially eliminate the dog after a C-section: reducing body weight.
After a C-section, which foods should one avoid eating?
Steer clear of items that cause gas, such as pickles, urad dals, Chola, rajma, Chawla, channa, besan, and dried peas. It is best to stay away from vegetables like onions, cauliflower, cabbage, bhindi, and broccoli during the first 40 days. They can then be gradually added to the mother’s diet in the future.
After a C-section, should You use an Indian toilet?
After a C-section, a doctor will typically advise using a Western toilet for at least one week. However, you are welcome to use an Indian toilet if you feel at ease doing so.
How will You be able to tell when the C-section heals?
Your C-section scar should be healed, or entirely closed, after roughly six weeks, at which point you should be free to resume all normal activities without worrying about bothering the scar.
What cleaning tasks should you postpone following a C-section?
Walking is a gentle kind of exercise that will aid in your recovery from your c-section. However, hold off on doing anything more strenuous until you are pain-free and feel ready. For instance, wait until you feel well enough to drive, move anything heavy, engage in sexual activity, or perform strenuous household tasks like vacuuming.
What dish tastes the best after delivery?
Consume largely fruit juice, milk, and water. Consume protein-rich foods including beans, meat, fish, cheese, yogurt, and milk. Foods high in protein are essential for maintaining your body’s strength and assisting in your postpartum recovery.
After a C-section, when should You wear an abdominal belt?
According to the specialist, these belts can be worn as soon as the baby is delivered, up to three months after a cesarean section, and six weeks after a vaginal delivery.
What kind of activity is most recommended following a cesarean section?
What you were doing a few days ago isn’t the ideal fit for you anymore because your body has undergone a lot of changes in the last few weeks.
It’s critical to keep in mind that an abdominal operation is what a C-section is. Following any surgery, your workout regimen should prioritize your recuperation and then progressively increase your level of fitness.
References
- Freutel, N. (2018, October 5). 5 Exercises to Help with Your C-Section Recovery. Healthline. https://www.healthline.com/health/pregnancy/c-section-recovery-exercises
- Fox, I. (2023, June 24). 5 Exercises to Try After a C-Section. Parents. https://www.parents.com/pregnancy/giving-birth/cesarean/post-c-section-strengthening-exercises/
- When and how to exercise after a c-section. (n.d.). Tommy’s. https://www.tommys.org/pregnancy-information/giving-birth/caesarean-section/when-and-how-exercise-after-c-section
- 7 Postpartum Exercises for C-Section Recovery | Performance Health. (n.d.). https://www.performancehealth.com/articles/7-postpartum-exercises-for-c-section-recovery
- Frost, A. (2023, October 13). When can I start working out after a c-section? BabyCenter. https://www.babycenter.com/baby/postpartum-health/i-had-a-cesarean-when-can-i-start-exercising_1960
- Physio, C. (2022, October 4). Recovery and Exercise After a C-Section. Cornerstone Physiotherapy. https://cornerstonephysio.com/resources/c-section-recovery-and-exercise/
- Advice and exercises following Caesarean Section – Milton Keynes University Hospital. (2023, August 31). Milton Keynes University Hospital. https://www.mkuh.nhs.uk/patient-information-leaflet/advice-and-exercises-following-caesarean-section
- Walano, R. (2020, March 18). Exercise After C-Section: Everything You Want to Know. https://www.thebump.com/a/exercise-after-cesarean
- Exercise After Cesarean Delivery: What Is and Isn’t Safe. (2021, November 26). Flo.health – #1 Mobile Product For Women’s Health. https://flo.health/being-a-mom/recovering-from-birth/postpartum-problems/exercises-after-cesarean-delivery
- Safe return to exercise after pregnancy. (n.d.)(september,2022). https://www.pregnancybirthbaby.org.au/safe-return-to-exercise-after-pregnancy
- Exercise After C-Section Delivery: How To Safely Do It | Kin Fertility. (n.d.). https://kinfertility.com.au/blog/exercise-after-c-section
- How to Safely Exercise After a C-Section – Moms Into Fitness. (2023, July 30). Moms Into Fitness. https://www.momsintofitness.com/c-section-recovery/
- How to Safely Exercise After a C-Section – Moms Into Fitness. (2023, July 30). Moms Into Fitness. https://www.momsintofitness.com/c-section-recovery/
- Reardon, S. (2023, March 9). 5 Pelvic Floor and Core Workouts for After a C-Section. The Vagina Whisperer. https://thevagwhisperer.com/2022/03/20/5-exercises-to-strengthen-your-core-after-c-section/
- Shiraz, Z. (2022, March 25). Yoga for post pregnancy: 7 exercises to strengthen core after C-section delivery. Hindustan Times. https://www.hindustantimes.com/lifestyle/health/yoga-for-post-pregnancy-7-exercises-to-strengthen-core-after-c-section-delivery-101648192253190.html