Kaltenborn Manual Mobilization Technique
What is the Kaltenborn Manual Mobilization Technique?
The Kaltenborn Manual Mobilization Technique is a specialized physiotherapy approach used to assess and treat musculoskeletal conditions. This hands-on method involves skilled joint manipulation and mobilization to alleviate pain, improve joint function, and enhance mobility.
Kaltenborn Techniques utilize a blend of traction and mobilization to alleviate pain and enhance the movement of hypo-mobile joints. According to Kaltenborn, the proper execution of all joint mobilizations should occur either parallel to the plane of motion or at right angles to it.
Contrasting Maitland’s grades of joint mobilization, Kaltenborn’s techniques involve sustained movements rather than oscillations.
Two types of bone movements are important:
| Bone Movement | Corresponding Joint Movements |
| Rotatoric (angular) movement -Standard (anatomical, uniaxial) -Combined (functional, multiaxial) | Roll-gliding |
| Translator (linear) movement -Longitudinal bone split away from the remedy protocol -Longitudinal bone approximation towards the remedy protocol -Transverse bone movement parallel to the treatment plane | Translator joint play -Traction -Compression -Gliding |
An inherent objective within Kaltenborn manual mobilization is the restoration of the gliding element in roll-gliding, thereby reinstating normal movement mechanics. Executing joint rolling movements without incorporating gliding has the potential to concentrate damaging forces within the joint.
2 Kaltenborn Hypothesis
The capsule attaches closely to the concave side near the joint line, whereas on the convex side, the attachment is situated farther from the joint line.
Furthermore, the width of the convex side exceeds that of the concave side.
What is the Treatment Plan for the Kaltenborn Technique?
The Kaltenborn treatment plan assumes paramount significance in delineating the directions of tractions and glides. This plan is anchored on the concave articular surface and maintains its alignment with the concave joint surface, regardless of whether the mobile joint partner is concave or convex.
It extends through the joint, forming a perpendicular intersection with a line that originates from the axis of rotation in the convex osseous partner and extends to the deepest point of the articulating concave surface.
This orientation consistently corresponds to the concave joint surface, irrespective of the nature of the moving joint partner be it concave or convex. It is imperative to assess joint play through this method, mobilizing the joint by guiding the bone parallel or perpendicular to the Kaltenborn Treatment Plane.
Determining the direction of restricted gliding:
Two distinct approaches exist for ascertaining the direction of impeded joint gliding:
- The Glide Test
- The Kaltenborn Convex-Concave Rule
Glide Test:
This method embodies a direct approach. It involves the application of passive translator movements, facilitating gliding, in all conceivable directions. The goal is to identify the specific directions in which joint gliding encounters restriction.
The Glide Test stands as the favored technique due to its capacity to yield precise insights into the extent and character of gliding limitations, encompassing the assessment of end-feel phenomena.
The Kaltenborn Convex-concave Rule:
When the surface of a convex joint is in motion, the roll and glide take place in opposing directions. To address restricted movement, the therapist maneuvers the convex joint surface in the direction opposite to the restriction, thereby stimulating the capsule to move harmoniously with the glide.
Conversely, when a concave joint surface is in motion, both the roll and glide transpire in the same direction. In this scenario, the therapist guides the concave joint surface in alignment with the restricted movement, thereby eliciting a response from the opposing capsule.
What are the various Grades in the Kaltenborn mobilization technique?
Kaltenborn’s Capsule Stretch Grading:
In circumstances of reduced urgency, a mobilizing force is relevant, typically applied in the advanced phases of Grade II or Grade III mobilizations.
On the contrary, situations requiring immediate attention demand a gentle force, generally employed at Grade I or the initial stages of Grade II mobilizations.
Grades of Translatory Movement:
The translatory movements of traction and gliding are classified into three distinct grades. These gradations are established based on the degree of joint slack, encompassing both laxity and resistance, present within the joint.
Throughout the evaluation and management of joints involving gliding or traction, this joint slack is gradually eliminated. When employing gliding techniques, the slack is systematically addressed in accordance with the direction of joint gliding.
In contrast, during the execution of traction methods, the joint slack is effectively addressed in harmony with the direction of the applied traction force.
Normal Progression of Translatory Movement:
Within the Grade I and II range of joint mobilization, the therapist encounters minimal to negligible resistance from the surrounding tissues.
As the therapist advances into the Grade II transitional zone, there is a gradual escalation in resistance.
Upon reaching the “First Stop” position, a significant increase in resistance is perceived as the previously taken slack is fully eliminated, causing the surrounding tissues to become tense.
Beyond this pivotal point, tissue stretching commences.
Utilizing Translatory Grades:

- Grade I (Loosening): Aimed at Pain Alleviation
- Grade II (Tightening): Initial Treatment Phase, Preserving Joint Play
- Grade III (Stretching): Focused on Joint Stretching and Enhancing Joint Play
Tests of function
Functional assessments are a pivotal component of the OMT evaluation, encompassing:
- Evaluation of Movement Quantity
- Evaluation of Movement Quality
Quantity of Movement:
| Hypomobility | 0: No movement (ankylosis) 1: Considered decreased movement 2: Slight decreased movement |
| Normal | 3: Normal |
| Hypermobility | 4: Slightly increased movement 5: Considered increased movement 6: Complete instability |
Quality of movement:
Normal End Feel:
- Soft: Characteristic of soft tissue approximation, akin to compressing two balloons together (e.g., knee flexion).
- Firm: Indicates that joint capsules or ligaments limit ROM due to stretching, akin to pulling a leather belt (with normal ligamentous end-feel > capsular end-feel).
- Hard: Indicates bone-on-bone limitation, akin to pressing two wooden surfaces together (e.g., elbow extension).
Pathological End Feel:
- Boggy: Soft resistance due to intra-articular swelling.
- Springy: Observed in cases like a displaced meniscus.
- Empty: Reflects pain as the limiting factor.
- Firmer, Less Elastic: Suggests scar tissue or shortened connective tissue.
- More Elastic, Less Soft: Points to muscle spasm.
Components of Functional Testing:
Standard (Anatomical) Movements
Combined (Functional) Movements
Painful Arc Assessment
Capsular Pattern Analysis
Differentiating Contractile Lesions from Noncontractile Lesions
| Contractile | Noncontractile |
| Muscle with its tendons & devotions | Bones, joint capsules, ligaments, bursae, fasciae, nerve roots |
| Active & passive motions are limited in opposing directions. | Active & passive activities are limited in the same path. |
| Construct/boost Resisted activities are symptom-free. | Passive joint play activities construct/boost symptoms & are limited. |
| Resisted activity sign and symptoms. | Resisted activity signs and symptoms. |
Distinguishing muscle shortening from muscle spasm
- Determined through end-feel testing.
- A shortened, tense muscle yields a firmer, less elastic end feel.
- Muscle spasm results in a more elastic and less soft end feel.
Translatory Joint Play Assessment
These evaluations encompass the measurement of both quantity and quality of joint play, inclusive of end-feel responses, through the application of:
- Traction
- Compression
- Gliding
All are executed within the various translatory directions that a joint can undergo.
Traction and Compression test:
| Traction | Compression |
| Relive joint pain | Aggravating joint pain |
| If traction tests are positive in the normal resting place, discover a position of more significant comfort & reevaluate the response of a patient to traction. | If compression tests are negative, the tests should even be accomplished in different 3-dimensional parts. |
Gliding Tests:
Translatory gliding inspections mainly focus on anatomical joint elements.
Additionally, they play a pivotal role in identifying the precise directions of joint movement constraints.
These evaluations appraise gliding motion in both the joint’s resting and non-resting configurations.
Resisted Movements:
If compression tests incite pain, the utility of resisted tests is constrained.
Resisted assessments serve to evaluate:
- Neuromuscular integrity
- Contractile elements
- Status of related Joints, nerves, & blood supplies
Cyriax’s interpretation of resisted tests is as follows:
- Painful and Strong: Indicates a minor muscle or tendon lesion
- Painful and Weak: Suggests a significant muscle or tendon lesion
- Painless and Weak: Implies a neurological ailment or complete muscle/tendon rupture
- Painless and Strong: Reflects normal physiological conditions
Differential Diagnosis for Muscle Synergy-Related Pain
In pinpointing the precise muscle responsible for a patient’s pain, the examiner employs selective techniques to either induce or prevent the contraction of an individual muscle or a muscle group. The following three methods elucidate this approach.
- Testing a secondary function of muscles within the same joint:
- If a muscle within a joint’s synergy possesses a secondary function distinct from other muscles within the synergy, it can be singled out for testing. For instance,
- When resisted knee flexion elicits pain, a more thorough evaluation involving resisted lateral and medial leg rotation might unveil the specific muscle causing the discomfort. If lateral rotation induces pain while medial rotation doesn’t, it’s likely that the biceps femoris is afflicted, as opposed to other knee flexors that medially rotate the leg.
- Testing a secondary function of muscles at an adjacent joint:
- By stressing a muscle or tendon uniquely engaged in another joint’s function, specific assessments can be conducted. For instance,
- Pain during resisted shoulder flexion can originate from various muscles within the synergy responsible for this movement. If the same pain emerges during resisted elbow flexion, it points to the biceps as the culprit, as it’s the sole muscle capable of inducing both shoulder and elbow flexion.
- Testing using reciprocal inhibition:
- This technique negates a muscle’s involvement in synergy with other muscles during a movement by resisting the antagonist’s muscle.
- For instance, to isolate the finger extensors and nullify the wrist extensors, the examiner simultaneously resists palmar flexion at the wrist and finger extension. This approach curtails the contraction of the wrist extensors effectively.
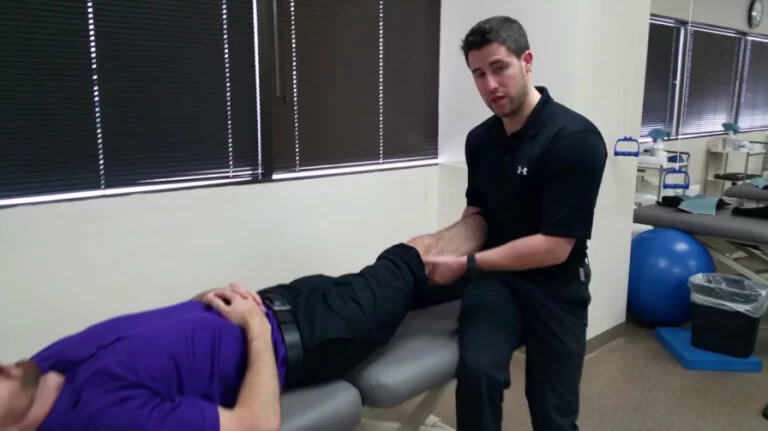
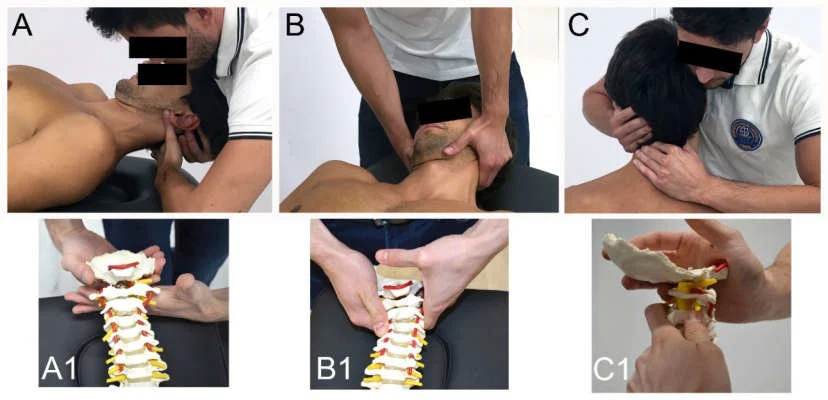
Arthrokinematic Techniques
General Guidelines:
- Position the patient appropriately on a chair or treatment bench.
- Ensure therapists maintain proper posture and foot placement.
- Be mindful of the skin, avoiding stretching during techniques.
- Stabilize the fixed bone effectively.
- Stabilize the moving bone securely.
- Keep clear communication with the individual throughout the procedure.
Assessment Phase:
- Palpate the joint line where movement is expected.
- Initiate traction in the mid-lower pressure point (MLPP).
- Observe and sense the movement, detecting hypo or hypermobility.
- Inquire about the pain, its nature, location, and relevance to the patient’s complaint.
- Proceed with lower pressure point (LPP) traction.
- Engage in low-intensity MLPP gliding.
- Perform low-intensity LPP gliding.
- Conduct low-intensity LPP gliding with minor angulation.
Mobilization Phase:
- Administer MLPP Traction.
- Deliver LPP Traction.
- Perform MLPP Direct gliding.
- Execute LPP Direct gliding.
- Incorporate low-frequency, high-intensity techniques (leveraging body mechanics and gravity).
- Implement direct gliding with angulation directed toward a restricted range.
Pain Relief Strategies:
- Deviate the joint away from the painful range (opposite direction).
- Utilize indirect gliding or traction maneuvers.
- Apply high-frequency, low-intensity oscillations toward an unaffected capsule.
- Rotate the oscillation direction (approximately 10° shift) every 30 seconds.
Most joints are innervated by the same sclerotome. By stimulating mechanoreceptors within a joint capsule, it’s possible to inhibit nociceptive stimuli originating from the same capsule (in alignment with Melzack and Wall’s pain-gate control theory). Kaltenborn leverages this pain-inhibiting mechanism via low-intensity, high-velocity oscillations directed toward the non-affected capsule. Changing the oscillation direction prevents adaptation and ensures various areas of the non-affected capsule receive stimulation.
Note that pain relief effects are transient, lasting slightly less than an hour. The intent is to employ these techniques to facilitate pain-free exercises and functional training immediately afterward.
What are the Indications for the Kaltenborn mobilization Technique?
- Limitation in joint mobility (hypomobility)
- Presence of an atypical end-feel
What are the Contraindications for the Kaltenborn mobilization Technique?
Absolute Contraindications:
- Presence of malignancy in the treatment area
- Infectious arthritis
- Metabolic bone disease
- Neoplastic disease
- Fusion or ankylosis of the joint
- Osteomyelitis
- Fracture or ligament rupture
- Excessive joint play (hypermobility) when considering grade III mobilization
Relative Contraindications:
- Experiencing excessive pain or swelling
- History of arthroplasty
- Pregnancy
- Pre-existing joint hypermobility
- Spondylolisthesis
- Rheumatoid arthritis
- Vertebrobasilar insufficiency
FAQ
What is the contrast between Maitland & Kaltenborn mobilization?
The Maitland mobilization (MM) & Kaltenborn mobilization (KM) methods are both passive therapies, but they conflict in that Maitland mobilization utilizes oscillation while Kaltenborn mobilization utilizes maintained elongation.
What are Kaltenborn’s contributions?
He was the 1st to combine the theory & method of orthopedic cure with the practice of osteopathy & chiropractic. Over many years, he taught countless physiotherapists, medical doctors, & many osteopaths & chiropractors manipulative remedy strategies.
What is Kaltenborn’s rule?
The concave-convex rule by Kaltenborn tells us which domain of the joint capsule is emphasized when we drag an adjoining joint partner: When a convex joint surface is driving, the roll & glide arise in the opposite direction. When a concave joint surface is driving, the roll & the glide appear in the same direction.
What is the Mulligan technique?
Mulligan’s approach incorporates the maintained application of manual gliding pressure to a joint, with the drive of transferring bone positional faults while allowing simultaneous physiological (osteo-kinematic) movement of the joint.
What is manual mobilization?
Manual therapy is a general term utilized to represent approvingly skilled approaches that are utilized to enhance the action of joints & soft tissue such as muscles & fascia. They are carefully used to these tissues to perform one/more of the subsequent purposes: For pain comfort.