
Makarasana (Crocodile Pose): Benefits, How to do?- Variations
What is Makarasana?
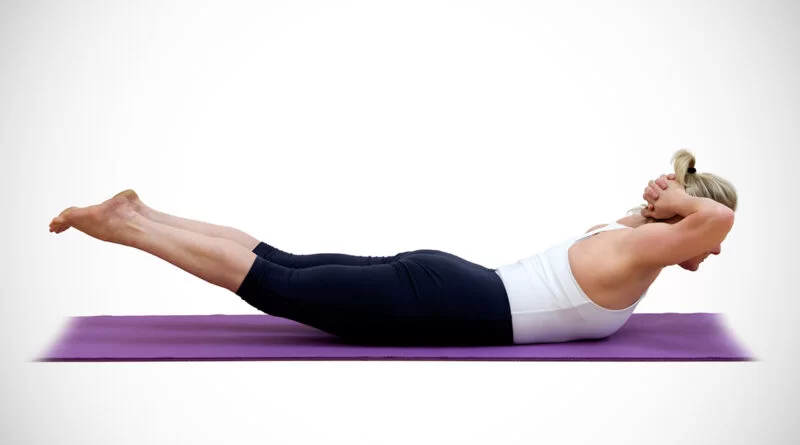
Makarasana (MAH-Kuhr-AWS-ah-nuh) is a yoga pose commonly called the crocodile pose. While makar represents crocodile, asana refers to pose.
The makarasana yoga pose is the best way to address your back and shoulder problems. It resembles the resting position of a crocodile, with its neck and face raised above the surface of the water. This asana is usually done to ease the strain caused by performing other poses. So, finishing your yoga session with makarasana is the best practice.
After your body is stretched and warmed from other postures, perform Crocodile Pose to return to a state of relaxation. All you require to get started is a yoga mat or soft surface to lie on. Even more advanced versions of Crocodile Pose do not need any yoga straps or yoga blocks. A yoga towel is optional.
What are the Health Benefits Of Makarasana?
There are some collective benefits of makarasana:
- Makarasana offers deep relaxation for your spine and shoulders.
- It can cure asthma, knee pain, and any lung-related problems.
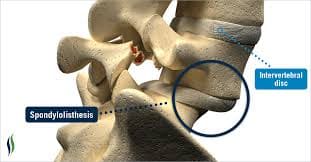
- It aids in curing slipped disc, spondylitis, and sciatica.
- The pose stretches the hip muscles.
- It relaxes your body fully and keeps you rejuvenated.
- It alleviates the body and the mind’s tension.
- Makarasana treats heart diseases, hypertension, and mental disorders.
- It stretches the muscles of the chest, abdomen, and neck, reducing fatigue and aches in those areas.
- The pose keeps backache at bay.
- Makarasana helps you to breathe slowly, deeply, and efficiently.
- It keeps you alert.
- The pose turns your mind inward, calming it and preventing anxiety.
- Makarasana releases all the tight bonds in your body and makes it flexible.
What are Preparatory Poses for Makarasana?
- Bhujangasana
- Gomukhasana
- Sethu Bandhasana
- Shalbhasana (Locust Pose)
How to do Makarasana?
To do Crocodile Pose, you need a soft surface to lie on. A carpeted floor, yoga mat, or other comfortable surface is nice. You also won’t need any props, but you can use a yoga towel at any time during your sequence.
Start by sitting on your knees, taking the form of Thunderbolt Pose (Vajrasana).
Straighten your arms in front of you so your hands touch the yoga mat.
Safely straighten your legs behind you so the balls of your feet touch the yoga mat.
Lower your body to the floor. First, lower your legs to the floor so the tops of your feet are on the ground.
Then, lower your hips, chest, stomach, and shoulders to the mat.
You should be facing down with the elbows tucked in at your sides, palms facing down.
Draw your hands to the front of the mat. Slowly cross your arms in front of you, forming support to rest your forehead.
In the alternative, you can bring your arms to your side and press your forehead into the floor. Put the toes on the mat to stretch the legs and straighten the spine.
To challenge yourself and stretch your lower back, raise your upper body similar to Upward Facing Dog (Urdhva Mukha Svanasana). This will expand the chest and release tension in the shoulders and back. It will also improve flexibility in the lower back.
Release the pose by returning to the initial position. If raised, lower the chest slowly. Roll your arms safely to avoid causing discomfort in the shoulders.
How to do Makarasana (crocodile pose) by watching a video?
What are the Follow-Up Poses for Makarasana?
- Dhanurasana
- Ustrasana
- Salamba Sarvangasana
- Dharadwajasana
- Balasana (Child’s Pose)
- Savasana
- Padmasana (Lotus Pose)
What are the Tips For Beginners ?
There are certain tips you need to follow during Makarasana:
- Initially, it might be hard to balance yourself in the pose. You might stumble a bit due to imbalance. To avoid this, use your hands for support and lift them to complete the asana. With practice, your balance will enhance, and you can assume the pose in the correct manner.
- As Makarasana is a relaxing position assumed at the end of a yoga session, it is very easy to fall asleep in it. Keep yourself awake and let your body relax.
What You Should Know Before Practicing Makarasana?
Makarasana is performed at the end of a yoga session to cool down the body and give it the necessary rest. So, it is best to perform Makarasana early in the morning on an empty stomach and with clean bowels. In case you are not able to perform it in the morning, you can do it in the evenings after a three to four-hour gap from your last meal. If you want to perform only Makarasana, you can perform without an empty stomach.
What are the Variations of Makarasana?
There are some Variations for Makarasana:
- Reverse Corpse Pose
- Resting Half Frog Pose Hands Under Head
- Criss Cross Shoulder Stretch
- Prone Windshield Wiper Pose
Reverse Corpse Pose
What is Reverse Corpse Pose?
Advasana is the Sanskrit name that can be interpreted as ‘Adva’ refers to ‘prone’ and ‘asana’ meaning ‘seat or posture’. The position of the practitioner’s body in this pose depicts the opposite of the Corpse Pose (Shavasana) therefore it’s also known as the Reverse corpse Pose.
Biologically, the Absence of respiration, neural activity, and pulse defines the body as dead or a Corpse. This state of the body looks like Advasana if observe from a distance. Therefore, The reverse corpse pose is the asana of a stillness where the practitioner is in a state of profound relaxation. Any physical motion might disconnect the one from hearing the sound of the emptiness that is being filled with the help of Advasana.
Advasana Benefits:
The restorative mechanism of Advasana activates the parasympathetic nervous system. You can get the following advantages from Advasana;
- Tackle stress and anxiety
- Loosen up the whole back
- Promotes Digestion
- Activates Manipura Chakra
- Detoxify Abdominal Organs
- Relaxes whole body
Preparatory Pose for Reverse Corpse Pose:
- Balasana (Child Pose)
- Shavasana (Corpse Pose)
- Adho Mukha Svanasana (Downward facing dog face)
- Eka Pada Adho Mukha Svanasana (One-legged downward facing dog)
How To Do Advasana?

Start Advasana by sitting in Vajrasana (thunderbolt pose).
From vajrasana, stretch your hands up overhead and initiate bending forward dragging your torso forward on the mat.
Inhale and slowly lift your hips from heels (in vajrasana) and straighten your legs back. Here you’re in the fully prone position lying on your stomach on the ground. Legs extended and feet joining together.
Extend your arms overhead, palms facing downward and shoulder relaxed.
Rest your forehead and chin flat on the ground. It can also be turned towards either side to absorb the relaxation from the asana.
Now, the toes should be together and the heels are separated so that your calf remains relaxed. However, it also gives ease to the back of the knees and the thighs, respectively.
After closing your eyes, imagine your body parts facing upside down. The sole of the feet, back of the knees, thighs, buttocks, lower back, upper back, back of the neck, and posterior portion of the head.
From here, turn your awareness on to the breath and feel the contraction and relaxation of the abdominal part.
After a few minutes into the Advasana, flex the elbows and place your palms beside the chest. Turn the head, forehead, and chin on the ground.
Afterward, raise the upper torso slowly and come into the Shashank asana and then in the standing position, and relax.
Follow-Up Pose for Advasana:
- Vajrasana (Thunderbolt Pose)
- Sukhasana (Easy Pose)
- Tadasana (Mountain Pose)
Beginner’s Tips for Advasana:
- Beginners should focus on the breath while in the posture because disturbed inhalation and exhalation might loss of awareness from the breath. Finally, no relaxation in the body.
- Those who are unable to keep their head straight can turn their face to either of the sides they feel comfortable with! The main goal is to dive into deep relaxation.
- A practitioner with stiffened shoulder might find it difficult to place their hands parallel above the head. A person should not strain there and listen to the body here.
Props and Modifications for Advasana:
If a practitioner is having difficulty in positioning their forehead flat then, one place a piece of cloth to decrease the discomfort.
Individuals with the issue of knock knees can place a set of blocks on the outside. This will protect the separation of the knees towards either side.
Difficulty in breathing while performing Advasana is common in some practitioners, which can be assisted by placing a blanket or pillow under the chest. It allows less pressure on the thoracic part.
Precautions for Advasana:
By keeping the following points in mind one can perform Advasana in the right manner. However, Practitioners doing this asana on their own are more prone to errors than the ones who are learning under a yoga teacher.
- The heel of the feet should be split to free the body. Otherwise, heels touching each other cause calf and back of the thigh muscles to contract to keep a balance in that position.
- The hands over the head should be relaxed. Prevent controlling them by leaving them as they are along with the natural curve in the palms.
- While returning from the Advasana avoid hurry raising the trunk. Go slow and steady here to gain the remaining awareness.
- Conscious breathing should be done while lying prone in the pose. One must permit the abdomen to contract and relax freely.
Contraindications for Reverse Corpse Pose:
- Due to the prone nature of Advasana, it should be prevented by pregnant women.
- Patients with the condition of an Inguinal hernia should also refrain from performing this asana as it might worsen the protrusion.
- A practitioner with stiffened neck or any kind of issue in the neck should avoid doing this asana.
- In conditions of acidity and acid reflux, it would be injurious to lie in the prone position. therefore, one should avoid doing Advasana at that time.
Resting Half Frog Pose Hands Under Head
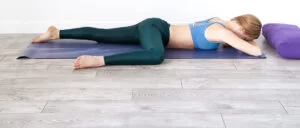
How to: Start lying on your belly and rest the right side of your face on your hands.
Slide your left knee up and bend while placing it on the ground close to the belly, gently rolling your torso to the left.
Stretch the right leg out behind you, while placing the face on the elbow in front of you.
Relax and return to the normal pose.
Resting Half Frog Pose Hands Under Head Contraindications:
While the practice of Resting Half Frog Pose Hands Under the Head is a relaxing and resting position, yoga teachers should keep the precautions in mind while at it. These are:
- Students injured or recovering from an injury of the hips, pelvic girdle, knees, neck, spine, or rib cage should avoid this practice unless they have recovered fully.
- Students who are recovering from any abdominal surgery, post-delivery, and having problems with diastasis recti, or from slipped disc surgery, etc., should play it safe and avoid this practice.
- Women in their third trimester should also take extra precautions during the performance of this Resting Half Frog Pose Hands Under Head, due to the pressure on the abdominal region. Even breathing can be constricted if students are unaware of their bodies.
- Neck and shoulder-related problems are also contraindications since the positioning of the neck in this posture can cause discomfort.
- Any other problems like shoulder tendinitis, cervical-related issues, breathing, heart, carpal tunnel, stiffness of the neck and shoulders, arthritis of the hips, knees, or shoulders, etc., should be considered and assessed before performing Resting Half Frog
- Pose Hands Under the Head.
Criss Cross Shoulder Stretch
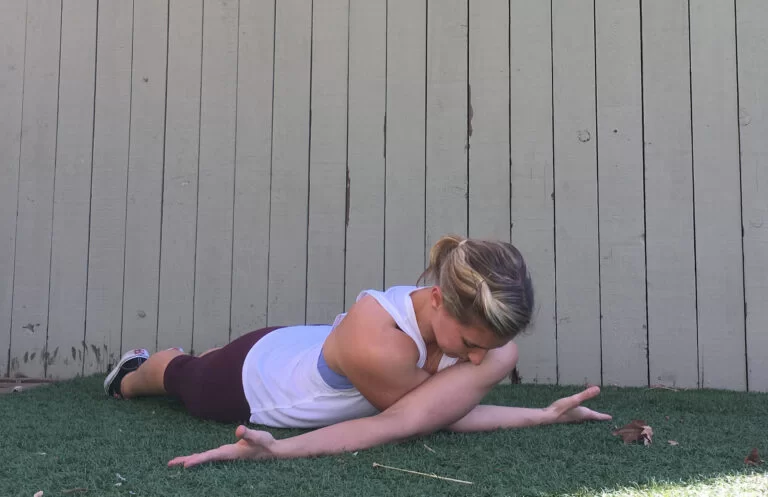
This relaxing shoulder opener is a gentle, passive way to stretch out tight shoulders, and is great to perform at the end of the day.
How to: To do the criss-cross shoulder opener pose, put your face down on a supportive surface, such as a yoga mat.
Cross your arms under your chin, so that you can rest your head on them.
Try to pile your elbows on top of each other. It may take a while for your shoulders to become flexible enough to perform it.
Try to relax fully into the position, using the weight of your body to gently pull your scapulae apart. Breathe deeply and try to hold the position for 30 seconds, then switch so the opposite arm is on top.
Prone Windshield Wiper Pose
Prone Windshield Wiper Pose Benefits:
Though the practice of Prone Windshield Wiper Position is an easy dynamic movement, yet to get the benefits of this practice the awareness of the hips, abdomen, lower back, and pelvis is essential. Once this awareness is there, the many advantages derived are explained below:
- The motion of the hips in internal (IR) and external (ER), aids to know and sense the current range of motion of the hips. With this awareness, increasing the range of motion can be gained with this practice.
- The eccentric motion of the hips in the Prone Windshield Wipe Pose aids in strengthening the muscles of the hips by lengthening them. With the lengthening of these muscles, the hips are prepared for challenging postures like Dhanurasana (Bow Pose), or Bhekasana (Frog Pose II), and the likes which the hips require to be strong.
- The dynamic motion of the legs helps with the knee joints, hence can be practiced as part of senior yoga to aid stimulate the ligaments and tissues around the knees, and for better flexibility. The practice is also useful to keep the hips stable and mobile since with age degeneration of the joints appears.
- As part of the recovery and rehabilitation, Prone Windshield Wiper Pose can aid students through hip replacement surgery.
- The practice of Prone Windshield Wiper Pose with the reverse flexing of the legs and with the gentle movements of the same can benefit students postpartum if suffering from water retention, heaviness in legs, cramps, lack of stability of the hips, etc.
- As either part of warm-up or recovery, runners, athletes, or those in sports that require hip motions can gain from Prone Windshield Wiper Pose. It aids warm up the hips, increasing the range of motion, and as part of recovery, it guides students to be aware of any injury if the range of motion is decreased. Also, aids to cool down keeping the rest of the leg muscles relaxed, with better blood circulation.
Prone Windshield Wiper Pose Steps:
Begin to lie down on your belly in Reverse Corpse Pose (Advasana). Stretch the legs and take a few breaths, relaxing the shoulders and chest.
Draw the feet hip-width distance apart, moving from the thighs. Place the forehead on the elbows allowing some space to breathe comfortably.
Now, inhale and gently lift one leg up bending at the knees, and then the other, keeping the legs at 90 degrees. While performing this makes sure the hips, buttocks, and back are stable since we don’t want to misplace the alignment of the hips and knees.
From here, the different variations that can be performed are explained. You can place the hands below the tummy at the hips to feel the motions:
First Variation: With the legs are 90 degrees, exhale and draw the legs moving towards the left side and then towards the right side, going in a swing without moving the hips, buttocks, and lower back. Keep swinging the legs moving gently towards the sides trying to maintain the same distance between the knees. Repeat this dynamic motion about 12 times (6 on each side).
Second Variation: With the legs at 90 degrees, draw the legs out, away from the center in an external rotation (ER). Here, the knees will hover grounded, with the hips moving outwards with the ankles slowly dropping outward. Stay here for around 20 seconds, and return to keeping the legs at 90 degrees. Repeat this about 6 times holding the hips externally each time longer.
Third Variation: With the legs at 90 degrees, draw the legs in, towards the center in an internal rotation (IR). Here the ankles will cross each other, and the thighs will press against each other. This is performed without moving the buttocks and lower back. Stay here for around 20 seconds, and come back to keep the legs at 90 degrees. Repeat this about 5 times holding the hips internally each time longer.
Fourth Variation: With the legs at 90 degrees, you could work on internal and external rotation of the hips individually with the legs.
Hold each pose for about 20 seconds repeating about 6 times with both motions and with both legs. This will aid a person know the imbalance in the hips, and they can work towards the weaker hip, improving stability with the lengthening of the hip muscles.
Prone Windshield Wiper Pose Contraindications:
While the practice of Prone Windshield Wiper Posture is simple and easy, yet few precautions to keep in mind people are as follows:
- A person with an injury to the joints of the hips, knees, pelvic girdle, or ankles should prevent this practice. Injury or wear and tear of muscles of the legs, gluteus, hips, pelvis, abdomen, etc., should avoid this practice even if there is no active use of these muscles.
- Women in their pregnancy should prevent this practice due to the prone position. Though the same can be performed while seated on a chair, or the chest and head are lifted with the support of a bolster.
- Senior Citizens or any person suffering from arthritis of the hips, spine, or knees should avoid this practice, completely.
What are the Common Mistakes you shouldn’t make while Makarasana?
Though Crocodile Pose is a beginner posture with a low risk of injury, it’s important to prioritize safety by maintaining proper form. Although Makarasana is very easy to perform, there is still room for error, which can lead to a risk of injury. So, here are some common mistakes you should try to prevent while doing Makarasana steps:
Don’t strain your neck
If you enter the raised version of the position, it’s tempting to look upward. However, your look should be forward. If you enter the lowered version of the pose, your gaze should be down. Prevent looking upward as this may strain your neck. Sending your head back can also strain your neck as well as give pressure on your lower back.
Don’t enter a plank position
The plank exercise has many advantages, but this is not the same as the Crocodile Pose. The plank position has both the lower body and upper body lifted and pushed away from the ground. In Crocodile Posture, your lower body should press into the mat. Entering the plank pose also puts beginners at risk of losing their balance and falling to the floor. A plank also puts pressure on the forearms and wrists, which is not the goal of Crocodile Pose.
Rotate your arms and shoulders carefully
As you lower your body to the floor and find a comfortable position for your arms and hands, you may need to rotate your scapulae carefully. Do so slowly to prevent causing an injury to your shoulders. Whether you choose to lower your head to the floor with your arms beside you or lift your arms, control the movements of your arms so that the motions are seamless.
Lifting quickly may strain your back
Crocodile Pose is meant to relieve stress in your back. However, entering the position too quickly can do the opposite and cause more tension in that area. If you choose to raise your upper body, do so slowly and with total control. This will improve the flexibility in your lower back without putting you in fear of a back-related injury.
What are the Safety and Precautions you take care of while in Makarasana?
There are certain precautions you should take care of during Makarasana:
- Crocodile Pose is a safe yoga pose for all beginners. It should give relief, but if you experience pain while doing this pose, release the posture safely, slowly, and with control.
- Pregnant women should not practice this pose as it requires them to lie on their stomachs. Advanced versions of Crocodile Pose also need balancing on your core.
- If you have pre-existing pain or conditions related to the neck, spine, back, or shoulders, check with your doctor to see if it’s safe for you to perform this pose. Similarly, if you have had surgery newly, consult with a health professional before returning to your yoga practice.
- Make sure that your body is comfortable while performing the asana. For those with neck injuries, prevent any pressure or support for the neck and allow it to stand neutral. Otherwise, put a folded blanket around the neck as support during the asana.
- If you are suffering from serious injuries and deep psychological problems, it is best to avoid the asana.
- Avoid moving the body in this pose as it may disturb the practice.
- Don’t put stress on the body during this pose as it is all about peacefully relaxing the body.
- Avoid performing this asana in a disturbing atmosphere as it may disturb the peace of mind.
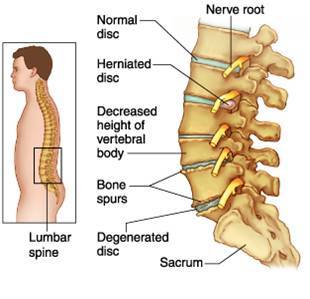
- Those who have exaggerated lumbar curves should not perform Makarasana.
What are the Contraindications for Crocodile Pose?
The most essential part of the practice of Makarasana is that this pose is more for recovery and relaxing of the muscles and hence performed between various other postures or purely from the point of therapy. But a few conditions should be kept in mind while going into Makarasana, they are:
- Pregnant women should prevent this pose: The pressure on the abdomen may not be safe and hence women who are deep into their pregnancy should prevent this pose.
- Someone suffering from issues related to stomach: Stomach problems that are severe can bring more discomfort with the practice of Makarasan as the abdomen gets pushed towards the ground while breathing, leading to over-contraction of the muscles.
- Avoid if blood pressure is too high: For the person who is new to yoga practice and is suffering from high blood pressure, may find it hard to follow the instructions related to Makarasana or Crocodile Pose, as breathing plays an essential role. If the breathing is not smooth, pressure increases causing more pressure on the arteries.
Conclusion
Makarasana is undoubtedly one of the easiest yet most effective yoga asanas. From the circulatory and respiratory systems to back and abdominal organs, it advantages several parts of your body. So, take benefit of this easy yet effective yoga and add it to your daily yoga routine.
2 Comments