Finger Exercise: Health Benefits, How to do? -Variations
What is Finger exercise?
Finger exercise is an important exercise that helps to make your daily task easy and also reduce the risk of injury.
If you find daily tasks hard to do because you suffer from stiffness, swelling, or pain in your hands, the right exercises can aid get you back in motion. Therapists usually suggest specific finger exercises depending on the condition. Some aid increases a joint’s range of motion or loosens tight muscles and tendons via stretching. Other exercises strengthen muscles around a joint to generate more power or to improve greater endurance.
If your finger condition is painful or debilitating, it’s best to get exercise advice from a physical therapist. All exercises should be done slowly and deliberately, to prevent pain and injury.
Anatomy of Hand
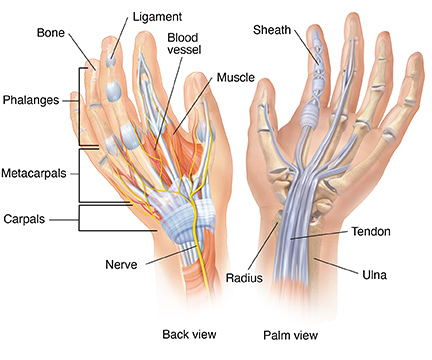
The thumb (connected to the trapezium) is situated on one of the sides, parallel to the arm. The palm has five bones called metacarpal bones, one to each of the five digits. Human hands carry fourteen digital bones, also known as phalanges, or phalanx bones: two in the thumb (the thumb has no middle phalanx) and three in each of the four fingers. These are the distal phalanx, containing the nail, the middle phalanx, and the proximal phalanx. Joints are made wherever two or more of these bones meet. Each of the fingers has three joints:
Metacarpophalangeal joint (MCP) – the joint at the base of the finger
Proximal interphalangeal joint (PIP) – the joint in the middle of the finger
Distal interphalangeal joint (DIP) – the joint closest to the fingertip.
Each finger may abduct and adduct, extend and flex, and so also circumduct. Flexion is by far the strongest motion. In humans, two large muscles make flexion each finger, and additional muscles augment the motion. Fingers do not carry muscles (other than arrector pili). The muscles that move the finger joints are in the forearm and palm.
Muscles of the fingers can be subdivided into intrinsic and extrinsic muscles. The extrinsic muscles are the long flexors and extensors. They are known as extrinsic because the muscle belly is located on the forearm.
The fingers have two long flexors, situated on the underside of the forearm. They end by tendons to the phalanges of the fingers.
The extensors are situated on the back of the forearm and are connected in a more complex way than the flexors to the dorsum of the fingers. The tendons connect with the interosseous and lumbrical muscles to form the extensor hood mechanism. The extensors are located within six separate compartments. The first compartment carries abductor pollicis longus and extensor pollicis Brevis.
The second compartment includes extensors carpi radialis longus and brevis. The third compartment contains extensor pollicis longus. The extensor digitorum indicis and extensor digitorum communis are in the fourth compartment. Extensor digiti minimi is in the fifth compartment, and extensor carpi ulnaris is in the sixth compartment. The intrinsic muscle groups are the thenar and hypothenar muscles (thenar refers to the thumb, hypothenar to the small finger), the palmar and dorsal interossei muscles (between the metacarpal bones), and the lumbrical muscles.
What are the Health Benefits of Finger exercise?
Finger Stretches Exercise a basic beginner warm-up practice comes with many advantages when done regularly. These benefits are explained below:
- Mobility and Control: With the daily practice of Finger Stretch Exercises, the mobility, and control over the fingers increase. With better mobility and control, common asanas like Eka Pada Adho Mukha Svanasana (One-Legged Downward Dog) or challenging poses like Bakasana, or Adho Mukha Vrkasana can be smooth with the increased grip strength in the fingers.
- Flexibility and ROM (Range of Motion): Strength in each finger has a great effect on the range of motion of the wrists and elbows. It also plays an essential role in equally distributing the body weight on the fingers, palms, and wrists. Improved flexibility with muscular endurance with each finger aids to build a strong wrist joint.
- Chores and Work: With the simple Finger Stretches Exercise, the basic day-to-day chores and activities can be smoothly done. For students who spend hours in front of a keyboard typing or any activity that includes the overuse of the fingers and hands, then, this simple stretch can act as a cooling and relaxing practice.
- Arthritis and Osteoporosis: This Finger Stretches Exercise aids one deal with the problems caused by joint-related diseases like Osteoporosis and Arthritis. It can also be extremely advantageous for someone suffering from Rheumatoid Arthritis of the hands and fingers. It can aid regain mobility, and reduce pain.
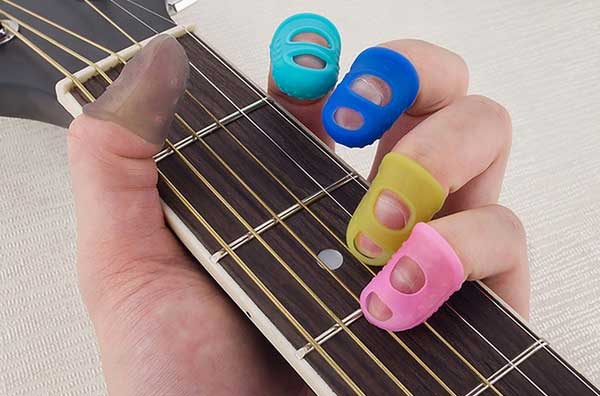
- Guitarists, Pianists, Painters, etc: The Finger Stretches Exercise can be extremely advantageous for students playing musical instruments that include the stretching of the fingers like a guitar or piano, which could lead to cramping of the fingers and wrists. The practice of this exercise promotes blood circulation, aids the release of stiffness, and decreases the frequency of cramps when done as part of both warm-ups and cool down.
- Athletes and Others: Acting both as a warm-up and cool down, the practice of Fingers Stretches Exercise will advantage athletes who are weight lifters, boxers, archers, etc. When certain sports or activities include the strength of the wrists and elbows, then this stretching will aid If one can properly distribute the weight across the palm and fingers, it engages the muscles of the forearms such that they are strengthened.
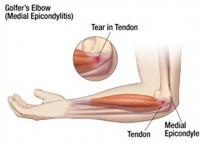
- Tennis Elbow and Carpal Tunnel: When there is an overuse injury at the elbows, wrists, and fingers, it leads to pain and aches followed by swelling in the joints of the hand and forearm. This can lead to tennis elbow or even carpal tunnel syndrome. Thus, with the practice of Finger Stretches Exercise, the muscles that move the elbows and wrists can activate the proper supply of blood, controlling the symptoms leading to overuse of the joints.
- Pain relief through exercise: Exercise can do a lot for your whole body, so it should come as no surprise that daily stretching and exercise for the hands can lead to pain relief. Giving the muscles, tendons, and joints of your hands and wrists a chance to move freely can go a long way toward decreasing soreness.
- Better grip strength: Grip strength is key for long-term health and a sense of independence. Whether it’s opening jars or grasping objects, a firm grip is important. Hand exercises can enhance your grip strength, which can make a big difference while you’re at work or home.
- Increased hand endurance: When your hands are strong, you’ll be able to lift objects with greater ease, and perform routine tasks without experiencing too much strain. This can be especially essential for people whose work is dependent on having healthy hands, such as mechanics, plumbers, carpenters, visual artists, writers, and musicians.
- Enhanced hand dexterity: Certain tasks call for strong yet nimble fingers, which is particularly true of people in the arts or whose jobs involve fine manipulation of objects. Hand exercises can improve the overall dexterity of the hands and fingers, which is crucial for performing so many different kinds of tasks.
Some Finger Exercises related to specific conditions
This exercise includes:
- Finger Exercise for Guitar
- Finger Exercises for Piano
- Finger Exercises for Slim Fingers
- Finger Strengthening Exercise
- Finger Exercise For Pain Relief
- Finger Opposition Exercise
Finger Exercise for Guitar
Here are some guitar finger exercises that you must practice daily:
- Don’t lift your fingers until needed
- Angular Chromatics
- Single String Sequence
- Spider Exercise
- Two Finger Exercise
- 6 Notes per string Exercise
- String Skipping – 1
- String Skipping – 2
- Finger Stretching Exercises for Guitar
Don’t lift your fingers until needed
This is a vivid exercise that is very simple yet tricky yet powerful. This exercise is perfect to enhance the synchronisation between your picking and fretting hand.
To play the exercise correctly, begin by picking the 5th fret of the 6th string with your 1st finger, then the 6th fret with your 2nd finger, the 7th fret with your 3rd finger, and the 8th fret with your 4th finger.
Here the essential part is when you complete all the notes on the 6th string and when you jump to the 5th string, play the 5th fret of the 5th string with your 1st finger while maintaining the rest three fingers, i.e, 2nd, 3rd, and 4th on the 6th string itself.
Now raise your 2nd finger to play the 6th fret of the 5th string while maintaining the rest 2 fingers on the 6th string itself and so on. You have to repeat this on each string and make sure to play as slow and clear as you can.
This is a very common exercise among guitarists but if this is new to you, you may experience string buzz in the starting. As you practice it for some time, you will notice a huge difference in the synchronisation between your fretting and picking hand.
In the starting, make sure to begin as slow as you can because this exercise won’t work if not played correctly.
Angular Chromatics
This is again a chromatic exercise that is angular in movement. As we already know that the arpeggios are angular in shape, this exercise is going to enhance your arpeggio’s playing ability and smoothen your chord plucking skills.
The first note is initiating from the 1st fret of the D string and travelling to the 2nd fret on the G string, 3rd fret on the B string, and 4th fret of the 1st string. You can also see that the notes are descending back from the 1st fret of the 1st string to the 2nd fret B string to the 3rd fret of the G string and stopping in the 4th fret of the D string.
Here you have to utilize 1 st finger for 1st fret, 2nd finger for 2nd fret, 3rd finger for 3rd fret, and 4th finger for 4th fret.
Make sure to begin slow and utilize alternate picking to play this exercise. By practicing this exercise every day for 10 mins I can guarantee that it will enhance overall techniques like hand synchronization, picking ability, and strong judgement.
Single String Sequence
This exercise is like a tongue twister for fingers which you have to perform on a single string at once. As you know that a guitar solo or a melody includes many twisted notes at different positions of the neck, this exercise will assist in freeing your fingers so that it will be easy for you to tackle all the finger motions needed while playing them.
The notes are not in order because they are designed to trick your fingers. Here you have to utilize 1st finger for the first fret, the second finger for the second fret, the third finger for the third fret, and the fourth finger for the fourth fret.
Begin by playing the 1st fret with your first finger, then instead of playing the second fret, play the third fret with your third finger, then now you have to play the 2nd fret with your second finger and 4th fret with the pinky finger.
In the next bar, play the second fret with the first finger, the fourth fret with the third finger, the third fret with the second finger, and 5th fret with your pinky finger. Similarly, utilize the same principle to play all the bars.
Begin this exercise from the 1st fret of the 1st string and travel to the 12 fret the make sure to descend. Repeat this same sequence on every string involving ascending and descending. This exercise will surely aid you in freeing your fingers and give your fingers more independence.
Spider Exercise
The notes are ascending from the 1st fret of the 6th string to the 2nd fret of the first string and are descending from the 1st fret of the 1st string to the 1st fret of the 6th string. This is the only motion on this list that covers all the 6 strings.
Here you have to use 1st finger for the first fret, 2nd finger for the 2nd fret, 3rd finger for the 3rd fret, and 4th finger for the fourth fret.
For the ascending part, begin by playing the 1st fret of the 6th string with your 1st finger, 2nd fret of the 5th string with the 2nd finger, 3rd fret of the 4th string with the 3rd finger, 4th fret of 3rd string with the 4th finger. Now you have to play the 3rd fret of the 2nd string with your 3rd finger and 2 frets of the 1st string with your 2nd finger. Now, let’s see the descending part.
To descend, play the 1st fret of the 1st string with 1st finger, the second fret of the second string with the second finger, the third fret of the third string with the third finger, and the fourth fret of the fourth string with your pinky finger. Now utilize your third finger to play the third fret of the 5th string, second finger for the second fret of the 6th string, and 1st finger for the 1st fret of the 6th string.
This exercise may seem confusing at first but utilize the fingers as I have mentioned above. Make sure to begin at a tempo you are comfortable with and gradually increase the speed.
Two Finger Exercise
This is a two-finger exercise that you can use to enhance your overall technique. First, you can perform this exercise using your first 2 fingers, then 2nd and 3rd finger, and then 3rd and your pinky finger.
Here you have to utilize your first finger for the first fret and second finger for the second fret. So, let’s begin with the ascending pattern.
Begin by playing the first fret of the 6th string with your first finger and the second fret of the 6th string with your second finger. Utilizing the same principle ascend to the high E string. Now comes the descending part.
To descend, do the 1st fret of the 2nd string with the first finger and the second fret of the second string with the second finger.
Using the same principle descend to the 6th string. After you are done with the first 2 frets, again perform it on the second and third fret using your second and third fingers. Similarly utilizing your third and pinky finger repeats the same pattern on the 3rd and 4th fret.
We often miss out on working on our third and 4th fingers, so, by performing this exercise with all the fingers you will make sure that all your four fingers are getting the equal amount of pressure and workout. Start slow and use alternate picking to ascend and descend.
6 Notes per string Exercise
It is actually in a triplet form and will surely aid your fingers to build dexterity and independence.
Here the 2nd fret and 3rd fret notes are being repeated once.
For this exercise, we will be utilizing our 1st finger for 1st fret, 2nd finger for 2nd fret, 3rd finger for 3rd fret, and 4th finger for 4th fret.
Begin by playing the 1st fret of the 6th string with your 1st finger, 2nd fret with your 2nd finger, and 3rd fret with your 3rd finger. Now you can see that the 2nd fret and 3rd fret are repeating, so again use your 2nd and 3rd finger to do it and lastly, you have to play the 4th fret with the pinky finger.
Repeat the same thing on all the strings to ascend and descend. Make sure to begin slowly and gradually increase the speed.
String Skipping – 1
If you feel hard to jump to the next string while playing a scale or a solo then this exercise will assist you to improve in that area.
The notes are beginning from the 1st of the 6th string then goes to the 2nd fret of the 5th string, again the 3rd fret of the 5th string, and end in the 4th fret of the 5th string. Likewise, it continues to the 1st string.
Here you have to utilize your first finger for the first fret, the second finger for the second fret, the third finger for the third fret, and the fourth finger for the fourth fret.
You have to make sure that you ascend and descend utilizing alternate picking and one note per click. As you feel comfortable at a slower tempo, you can gradually raise the speed.
String Skipping – 2
This string skipping exercise is similar to the above one but here you have to ignore the second string and directly jump to the third string.
Using this same principle you have to ascend and descend utilizing up and down picking and playing one note per click.
At first, this exercise will confuse you but as you practice with a metronome or a beat it will feel much easier to do. After practicing this exercise for 1 week regularly for 10 mins I can guarantee that there will be visible results.
Finger Stretching Exercises for Guitar
Before you even place a finger on the guitar fret board, it’s beneficial (and important) to spend five or so minutes performing some simple finger stretching exercises.
Just as you would warm up and stretch before working out at the gym or playing a sport, the same applies to utilizing your fingers.
A lot of guitarists neglect the warm-up and then can’t believe how much better they play once they begin adding these exercises to their routine. They do loosen up your fingers and allow you to make more awkward, quicker motions on the neck.
Finger Stretching Exercises Without the Guitar
First, we need to stretch the joints in each finger.
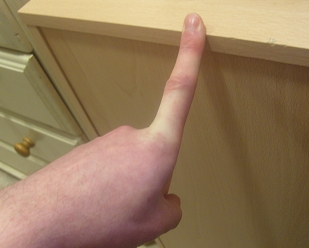
You can utilize the edge of a table or desk to stretch each finger. Simply put the tip of each finger on the edge of the table/desk, keeping your finger straight and in line with the top surface. Slowly push downward so your finger bends back and you can feel it pulling.
Do this slowly and carefully.
Thumb stretching exercise:
Let’s not forget the thumb, which has to experience a fair bit of pressure on the back of the guitar neck. You’ll also need to stretch your thumb if you’re playing finger style.
This time I’m simply giving the “thumbs up” and slowly pulling the thumb to the side with my other hand. It might aid to open and close your other fingers while the thumb is held in this position.
You can also utilize a similar method against a wall (or just use the flat palm of your other hand as the “wall”).
Point to the wall utilizing each of your fingers, again keeping the other fingers clenched against your palm. Gently push your hand towards the wall, keeping the finger straight.
Finger Stretching Exercises Using the Guitar
Before we use our fingers on the fret board to warm up, we can utilize the neck of the guitar for one final stretching exercise.
Finger stretches using the guitar neck:
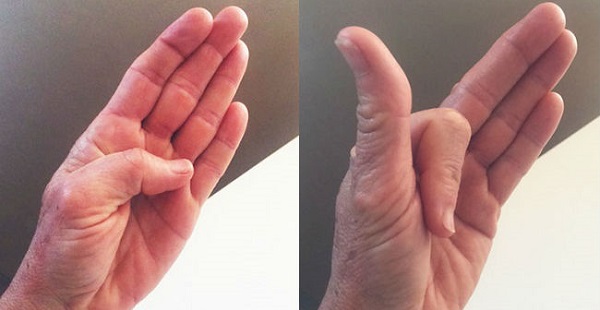
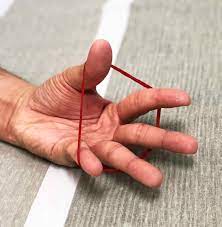
Simply form a V shape between two fingers at a time and lodge the neck between them, pushing them apart.
You might want to hold the top of the neck as you perform this (close to where the neck meets the guitar’s body) so you don’t give too much pressure on the neck.
Push slowly against the neck to stretch out your fingers. Do this for every finger pairing for a total of 2 minutes. If you prefer, you could simply part your fingers into the V form using your other hand, but I find utilizing the guitar neck gives you a more solid pressure point.
Again, wiggle the fingers.
Your fingers should now be loose and ready to do and it should have only taken you about five minutes in total.
Finger Exercises for Piano
Below is some exercises list:
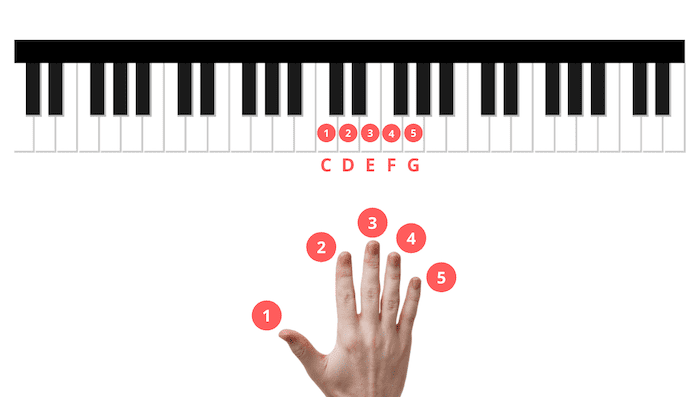
- Focus on 5 note pentacles using one finger per note (C D E F G)
- Practice ascending and descending pentacles
- Play in thirds (skip notes) between each note
- Play with a firm finger position
- Go for over-legato
- Practice full (1 or 2 octaves) scales
- Play two notes at a time in one hand
- Press down on all five keys
Focus on 5 note pentacles using one finger per note (C D E F G)
In this piano finger exercise, the person will play down one finger at a time and listen to the result.
Change dynamic ranges only utilizing your hand muscles rather than your whole arms or shoulders. This is an easy exercise, but also surprisingly hard for those who may not have strong hand muscles yet. This basic piano finger exercise can aid build up your finger strength.
Practice ascending and descending pentacles
After you master the first piano finger warm-up exercise, it’s time to do an ascending and descending pentascale from the lowest to highest finger with both hands.
For example, the left-hand pinky will play with the right-hand thumb and so on.
Play in thirds (skip notes) between each note
For this next piano finger exercise, you’ll work on ignoring notes. Using a pentascale, play in thirds between each note. Train your fingers to play every note legato–connected.
This is another one of those piano finger exercises that sounds simple and easy but takes practice to master. Take it slow at first and incorporate this exercise into your regular practice until you get the hang of it.
Play with a firm finger position
Learning to play with a firm finger position is essential to excelling at this instrument. While having your hands at playing level though not actually on the keys, prepare (flex) the knuckle closest to the fingertip as though it were playing.
Raise your hand while keeping the finger position, then let it fall onto the key. If the knuckle collapses, practice again from a lower height.
In essence, this finger exercise prepares you for the sensation of playing with a firm finger position without including any arm weight or tension in the scenario.
By dropping your hands and arm on the keys, it allows you to concentrate fully on getting a solid finger position.
Go for over-legato
Play the notes in such a way that every note overlaps with the subsequent note.
For example, if you were playing a C major pentascale, you would pause down your thumb until you played your index finger, after which you would raise your thumb and play your middle finger, etc.
This piano finger exercise is best for developing awareness of your fingers and learning to control each one individually. It’s surprisingly tough for beginner students to do this exercise well. Although it can be hard, be patient and don’t give up. This key piano finger exercise can do wonders for your playing skills.
Practice full (1 or 2 octaves) scales
Practice full (1 or 2 octaves) scales while preparing the thumb before it’s played.
For example, in a C major scale, after you have played the first D with your right-hand index finger, instantly prepare the thumb so that it is ready on or near the note F. Practice all scales in this manner.
If performed properly, this exercise will remove bumps in your scales and passage work and allows you to play with greater speed and accuracy.
Play two notes at a time in one hand
For example, the right-hand thumb and middle finger play at same time while the other fingers relax.
It’s essential to verify that the other fingers are, in fact relaxing, as they will often try to interact when they don’t need to.
The pinky finger is especially notorious for wanting to be a part of everything the other fingers are performing, even when unnecessary.
Press down on all five keys
Similar to the above exercise, this warm-up challenges you to concentrate on finger independence.
Start by pressing down with all five fingers on five piano keys at once. Now, one by one, raise one finger while keeping the other four fingers engaged and pressing down on the keys.
At first, it might seem easy when picking up your thumb or index finger, but your ring and pinky fingers will likely pose a great challenge. You may not even be able to raise those fingers just yet.
Finger Exercises for Slim Fingers
These are some list of exercises:
- Do Finger Stretch
- Grip Exercise
- Claw Exercise
- Finger Lifting
- Thumb Extension
- Flex the Thumb
- Try Finger Push Up
- Work on Dexterity
- Play with Plasticine Clay
- Do Household Chores
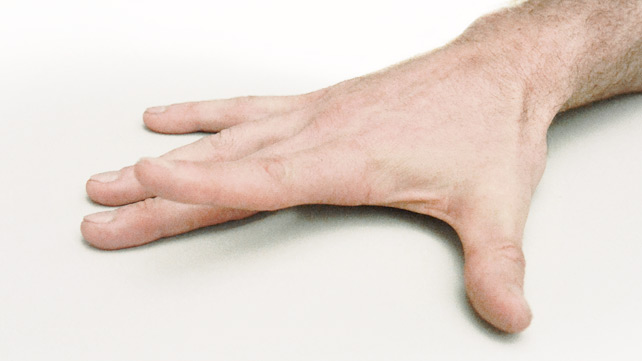
Do Finger Stretch
This is a very basic exercise that you can perform at any time of the day. You will have to put your hand palm-down on a table and then extend your fingers as flat as you can against the surface without forcing your joint. You can release the hold after 40 to 60 seconds and repeat it at least four times with each hand.
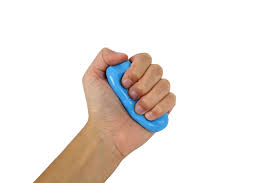
Grip Exercise

This makes your fingers better and stronger. You will need a squeezy ball for this exercise. You can also utilize a tennis ball instead. Squeeze the ball in your palm and pause for 2-3 seconds each time before releasing. Do 10-20 times with each hand and repeat the set 3-4 times. You can perform this 2-3 times a week giving a rest of around 48 hours between each day of exercise.
Claw Exercise
This makes the fingers more flexible and slim. You should stretch out the fingers and then try to touch the base of the fingers with the tips. Hold this claw pose for 40-50 seconds and then release.
Finger Lifting

You will have to put your hand palm-down on a table and then straighten your fingers as flat as you can as you did for the first time. Raise one finger at a time and put it down after a 1-2 second hold. You may try raising them all at once. Do this 12-15 times on each hand.
Thumb Extension
You may need a rubber band for this exercise. Place your hand flat on a surface and wrap a rubber band at the finger joint area. Now stretch your thumb outward, at a ninety-degree angle maintaining the hand flat on the surface. Hold this for 30-60 seconds and bring it back to starting position. Do this 10-15 times on each hand.
Flex the Thumb
Stretch away the thumb from your other fingers as much as possible. Now try to touch the top of your thumb at the base of your small finger. Pause it for 30-60 seconds and go back to the first position. This makes your thumb very flexible and it looks slender and slimmer.
Try Finger Push Up
This sounds very hard but you can try. Instead of performing a push-up on your palm, try to lift your weight on the fingertips. This is hard, but you will be able to do it if you keep working on your push-ups.
Work on Dexterity
Use your fingers to perform complex, quick activities. Try to type as many words as possible within 4 minutes, try playing piano or flute or even a guitar. These will make your fingers stronger, decrease the risks of fat deposition, and will improve your motor skills.
Play with Plasticine Clay
Molding the clay in dough and giving shapes permits you to use your finger to create pressure. The fun activity aids you to keep your fingers active and burn some calories from that area.
Do Household Chores
If you do not want to play with artificial clay, form dough with real flour. Squeezing the excess water out of your wet clothes, cooking, and potting plants aid you to get flexible, slim, and slender fingers.
Along with practicing these exercises, try to opt for a low-sodium diet to decrease fluid retention in the finger area. A balanced diet, a healthy lifestyle, and these exercises together can aid you to get the much desirable beautiful fingers.
Finger Strengthening Exercise
Some finger exercises give them strength:
- Make a Fist
- Grip Strengthener
- Pinch Strengthener
- Thumb Touch
- Thumb Stretches
- Finger Walking
- Finger Bends
- Fingers Extension/Abduction With an Elastic
- MCP Flexion (Table Top)
- Finger Extension Elastic
- Try Finger Push Up
Make a Fist
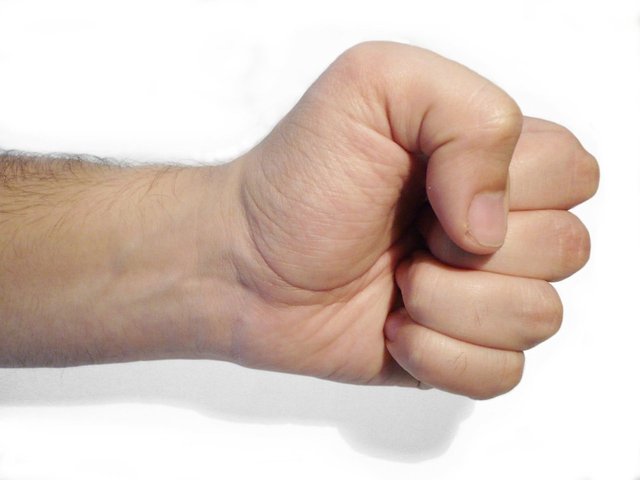
Hand and finger exercises can aid strengthen your hands and fingers, increase your range of motion, and give you pain relief. Stretch only until you feel tightness. You shouldn’t experience pain. Begin with this simple stretch:
Make a fist, wrapping your thumb across your fingers.
Pause for 30 to 60 seconds. Release and spread your fingers wide.
Repeat with both hands at least 4-5 times.
Grip Strengthener
This exercise can make it effortless to open door knobs and grab things without dropping them.
Grab a soft ball in your palm and squeeze it as hard as you can.
Pause for a few seconds and release.
Do 10 to 15 times on each hand. Perform this exercise two to three times a week, but rest your hands for 48 hours in between sessions. Don’t perform this exercise if your thumb joint is damaged. You can also use a finger gripper for this exercise.
Pinch Strengthener

This exercise aids strengthen the muscles of your fingers and thumb. It can aid you to turn keys, opening food packages, and use the gas pump more easily.
Pinch a soft foam ball or some putty between the tips of your thumb and your fingers.
Pause for 30 to 60 seconds.
Do it 10 to 15 times on both hands. Perform this exercise two to three times a week, but rest your hands for 48 hours in between sessions. Don’t perform this exercise if your thumb joint is damaged.
Thumb Touch
This exercise aids improves the range of motion in your thumbs, which assists with activities like picking up your toothbrush, spoon, fork, and pens when you write.
Hold your hand out in front of you, with your wrist extended.
Slowly touch your thumb to each of your four fingertips, one at a time, making the shape of an “O.”
Hold every stretch for 30 to 60 seconds. Repeat at least 4-5 times on each hand.
Thumb Stretches
Try these two stretches for your thumb joints:
Hold your hand out, palm facing you. Gently flex the tip of your thumb down toward the base of your index finger. Hold for 40 to 60 seconds. Release and repeat five times.
Hold your hand out, palm facing you. Gently stretch your thumb across your palm utilizing just your lower thumb joint. Hold for 40 to 60 seconds. Release and repeat five times.
Finger Walking
Place one hand on a table with your palm facing downward.
Slowly raise the index finger and try to move it toward the thumb. Then put the finger down.
Raise the middle finger and move it toward the index finger.
Raise the ring finger and move it toward the middle finger.
Raise the pinky finger and move it toward the ring finger.
Repeat this exercise 3–47 times on each hand.
Finger Bends
This exercise is very similar to the finger raise exercise. All you need to do is flex your fingers inward instead of lifting them.
Put your hand out and slowly flex the thumb down underneath your palm.
Hold the pose for about 5 seconds and then straighten your thumb back up.
Do the same with every finger of the left hand.
Repeat the sequence with your right hand.
Repeat this exercise 8–10 times with each hand.
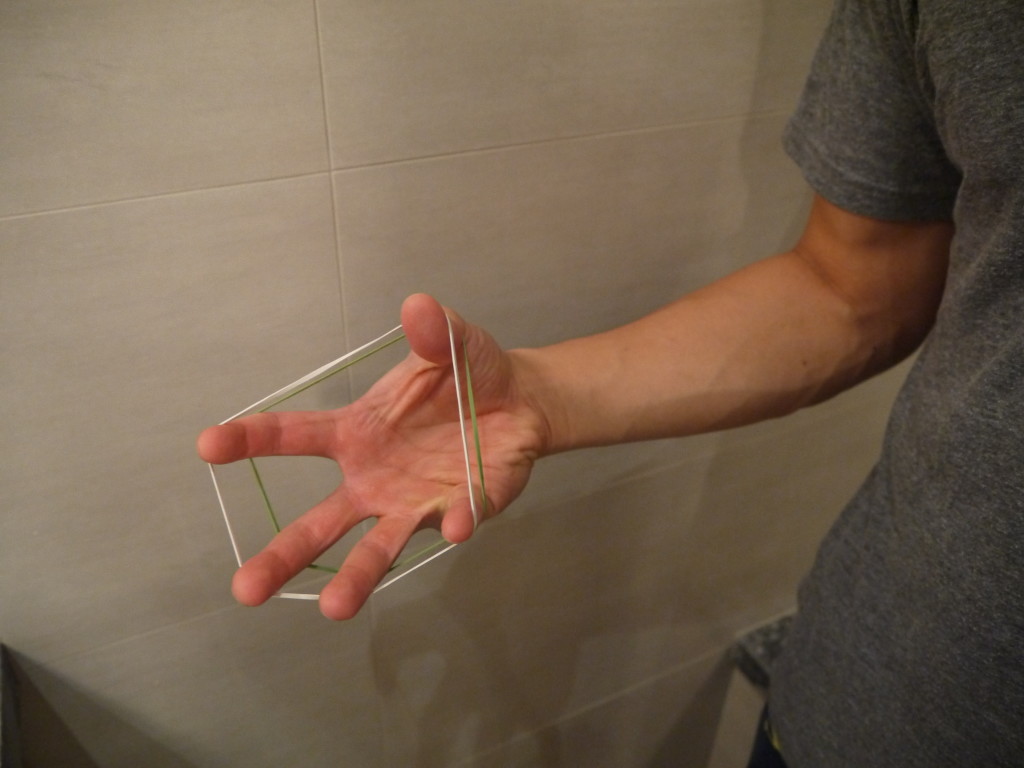
Fingers Extension/Abduction With an Elastic
Split your fingers and thumb apart against the elastic without flexing them.
Perform this exercise 10–20 times twice a day.
MCP Flexion (Table Top)
Begin with your hand and fingers straight and in line with your forearm.
Without moving your wrist or your interphalangeal joints, bend you’re metacarpophalangeal joint only to form a 90° angle between your fingers and your hand.
Straighten your hand and fingers back to the beginning position.
Do this exercise 10–20 times twice a day.
Finger Extension Elastic
Put a small elastic around the outside of your thumb and index finger.
Move these two fingers away from each other.
Do it with your thumb and other fingers.
Perform this exercise 15–20 times twice a day.
Try Finger Push Up
This sounds very hard but you can try. Instead of performing a push-up on your palm, try to lift your weight on the fingertips. This is hard, but you will be able to do it if you keep working on your push-ups.
Finger Exercise For Pain Relief
There is some exercise that relieves pain in your fingers:
- Finger Stretch
- Make a fist
- Finger bends
- Thumb bend
- Make an ‘O’
- Table bend
- Finger lift
- Roll back and forth
- Finger abduction 1
- Finger abduction 2
- Finger spread
- Palm presses
- Object pickups
- Paper or towel grasp
- Finger and hand openers
- Tendon gliding
- Finger curl
- The ball squeeze
Finger Stretch
Try this stretch to aid with pain relief and to improve the range of motion in your hands:
Put your hand palm-down on a table or other flat surface.
Gently extend your fingers as flat as you can against the surface without forcing your joints.
Hold for 40 to 60 seconds and then release.
Repeat at least five times with each hand.
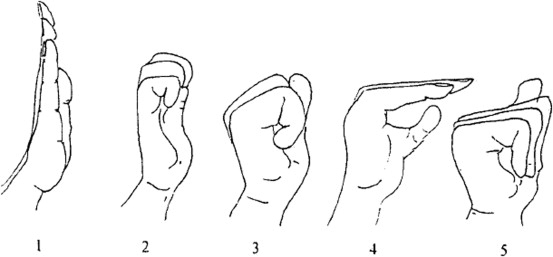
Make a fist

You can perform this exercise anywhere and anytime your hand feels stiff.
Start by holding your right hand out, with all of your fingers straight.
Then slowly flex your hand into a fist, placing your thumb on the outside of your hand. Be gentle and don’t press your hand.
Open your hand back up until your fingers are extended once again.
Do the exercise 10 times with your right hand.
Repeat the whole sequence with your left hand.
Finger bends
Begin in the same position as in the last exercise, with your right hand held up straight.
Flex your thumb down toward your palm. Hold it for some seconds, then straighten it.
Flex your index finger down toward your palm. Hold it for some seconds, then straighten it.
Repeat with the remaining fingers on your right hand, one at a time.
Repeat the whole sequence on your right hand.
Thumb bend
First, hold your right hand out, with all of your fingers straight.
Flex your thumb inward toward your palm.
Flex toward the bottom of your pinky finger with your thumb. If you can’t touch your pinky, don’t worry. Just stretch the thumb as far as you can.
Hold the position for 2 or 3 seconds, then return your thumb to the beginning position.
Repeat 10 times.
Do the exercise with your left hand.
Make an ‘O’
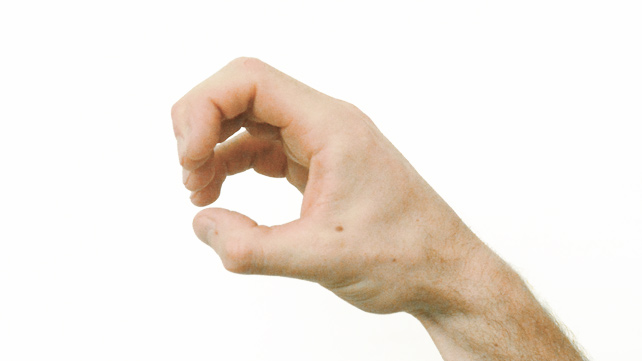
Perform this exercise a few times a day on each hand. You can practice this stretch whenever your hands feel achy or stiff.
Start with your right hand out and fingers straight.
Bend all of your fingers inward until they touch. Your fingers should create the shape of an “O.”
Hold this pose for a few seconds. Then, extend your fingers again.
Repeat on the opposite hand.
Table bend
Put the pinky-side edge of your left hand on a table, with your hand straight out and your thumb pointed upward.
Holding your thumb in the same pose, flex the other four fingers inward until your hand makes an “L” shape.
Hold it for a couple of seconds, then straighten your fingers to move them back into the beginning position.
Repeat 8-10 times.
Do the same sequence on your right hand.
Finger lift
Place your right-hand flat on a table, palm down.
Starting with your thumb, raise each finger slowly off the table one at a time.
Hold every finger for 1 or 2 seconds, then lower it.
Repeat the entire sequence with the left hand.
Roll back and forth
Perform this exercise with a small ball, such as a tennis ball or stress ball.
Put the ball on a flat surface such as a table.
Using your left hand, roll the ball from your palm to the tips of your fingers to stretch out each digit.
Roll the ball back to its beginning position.
Repeat this exercise with your right hand.
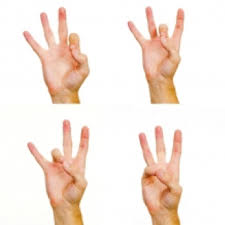
Finger abduction 1
Put your hand in front of you.
Straighten your affected finger and a normal finger next to it.
Use your thumb and index finger from the opposite hand to slowly press your extended fingers together.
Use your index finger and thumb to give a bit of resistance to your two fingers as you separate them.
Hold here for a few seconds and then return to the beginning position.
Perform 1 set of 5 repetitions.
Do it 3 times throughout the day.
Finger abduction 2
Move your affected finger as far away as possible from your closest normal finger so that they form a V position.
Use your index finger and thumb from your opposite hand to compress these two fingers against the other fingers.
Then press the two fingers to draw them closer together.
Perform 1 set of 5 repetitions.
Do 3 times throughout the day.
Finger spread
Start by pinching the tips of your fingers and thumbs.
Place an elastic band around your fingers.
Draw your fingers away from your thumb so that the band becomes tight.
Straighten your fingers and thumb away and close to each other 10 times.
You should be able to feel the slight tension of the elastic while you’re performing this.
Then flex your fingers and thumb towards your palm.
Hook the band in the middle.
Use your opposite hand to pull the end of the band to form slight tension.
Keep the tension as you straighten and flex your fingers 10 times.
Do it at least 3 times throughout the day.
Palm presses
Pick up a small item and place it in your palm.
Press tightly for a few seconds.
Then release by extending your fingers wide.
Repeat a few times.
Perform it at least two more times during the day using different objects.
Object pickups
Put a large assortment of small objects such as coins, buttons, and tweezers on a table.
Pick up one object at a time by grabbing it with your affected finger and thumb.
Move the object to the other side of the table.
Repeat with each object.
Continue for 5 minutes and perform this twice a day.
Paper or towel grasp
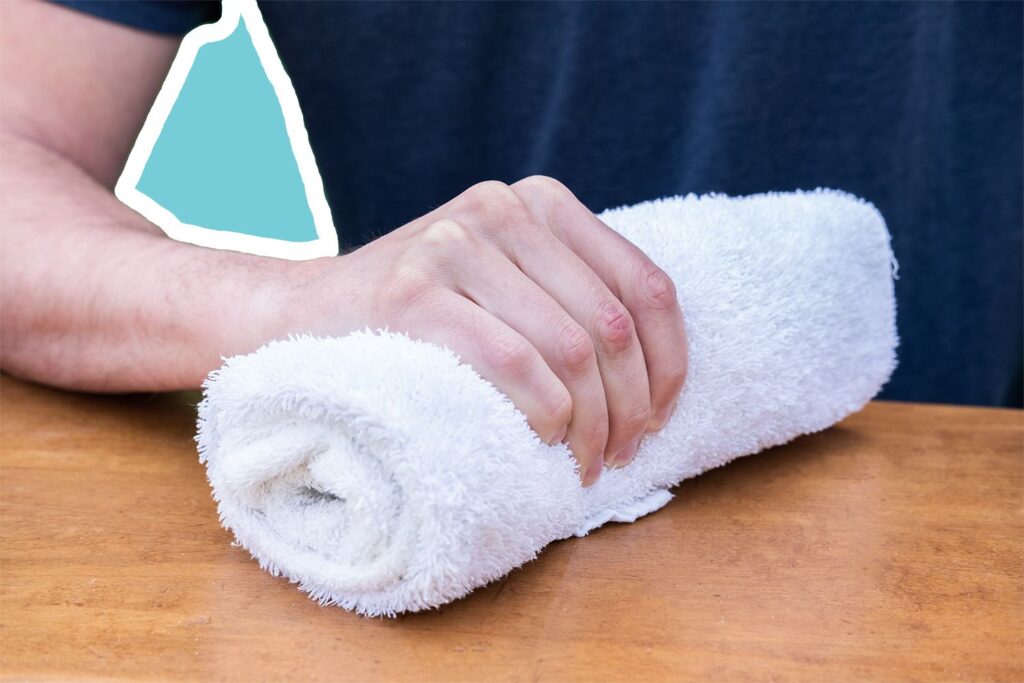
Put a sheet of paper or small towel in the palm of your hand.
Use your fingers to compress and scrunch the paper or towel into as small of a ball as possible.
Give pressure to your fist while you’re squeezing and hold this pose for a few seconds.
Then slowly extend your fingers and release the paper or towel.
Repeat 10 times.
Perform this exercise twice a day.
Finger and hand openers
Begin by lightly massaging the area at the base of the affected finger.
Then make a fist as you move all of your fingers together.
Open and close your fist for 15-30 seconds.
Then extend the affected finger and bring it back down to touch your palm.
Continue this motion for 30 seconds.
Alternate between these two exercises for 1 minute.
Perform this exercise 3 times per day.
Tendon gliding
Spread your fingers as wide as possible.
Flex your fingers so that your fingertips touch the top of your palm.
Extend your fingers again and spend them wide.
Then flex your fingers to touch the middle of your palm.
Open your fingers wide.
Now move your fingertips to touch the bottom of your palm.
Then draw your thumb to touch each fingertip.
Draw your thumb to touch different places on your palm.
Do 3 sets twice a day.
Finger curl
When doing the finger curl exercise, a person may find it easier to rest their elbow on a table.
Start with the palm facing toward the body.
Clench the hand into a loose fist.
Gently uncurl the thumb and fingers until they are all fully extended.
Hold for 2 seconds.
Curl the fingers and thumb return into a loose fist.
Curl and uncurl the thumb and fingers 8-10 times.
The ball squeeze

The ball squeeze exercise can aid alleviate tendonitis of the thumb.
To do the exercise, hold a small ball in the palm and gently give pressure on the ball with the fingertips. A person can strengthen the thumb muscle further by giving extra force.
People should do the exercise three to four times per day.
Finger Opposition Exercise
Finger Opposition
With one hand, point your fingers and thumb straight upward. Your wrist should be relaxed, following the line of the fingers and thumb.
Press your thumb to each finger, one finger at a time.
Do it 8 to 12 times.
Switch hands, and repeat each step.