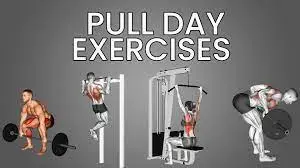
Pull Day Workout: Build a Stronger Back and Biceps with These Exercises
You may increase the size and strength of several of the main upper-body muscles with a pull-day workout.
It targets your pulling muscles, which include your lats, traps, rear delts, lower back, biceps, and grip, as the name suggests.
We’ll look at a pull-training regimen that works well for building muscle and strength in this post. We’ll go through sets and repetitions, the best pull exercises, and other key elements to help you make progress.
What are pull-day exercises?
A pull day is, as the name suggests, a workout in which you concentrate on pull exercises and the muscles used in them. This usually entails isolation workouts for your pull muscles, like bicep curls and face pulls, in addition to complex pulling movements like deadlifts, lat pulldowns, and bent-over rows.
On the other hand, a leg workout targets your lower body, while a push workout targets your chest, shoulders, and triceps with pushing movements.
Push-pull legs is one of those workouts that combines leg, push, and pull exercises all in one.
Worked Muscles in Pull Exercises
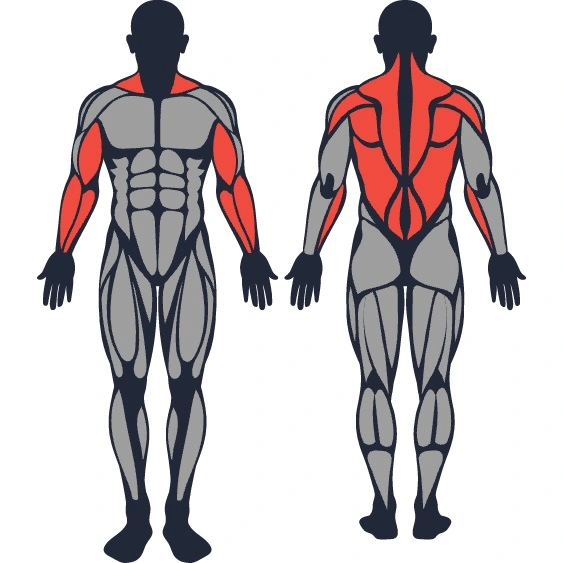
On a pull day, the primary muscle groups and your primary pull muscles are:
- In pull-ups and inverted rows, for example, you use these muscles to draw an object into your body or, conversely, to pull yourself towards an object.
- Workout muscles used on pull-day
Pulling Muscles:
- Lats
- Trapezius
- Lower back
- Rear delts
- Biceps
- Grip and forearms
Let’s examine each of these muscle groups in more detail, along with some training tips.
Las:
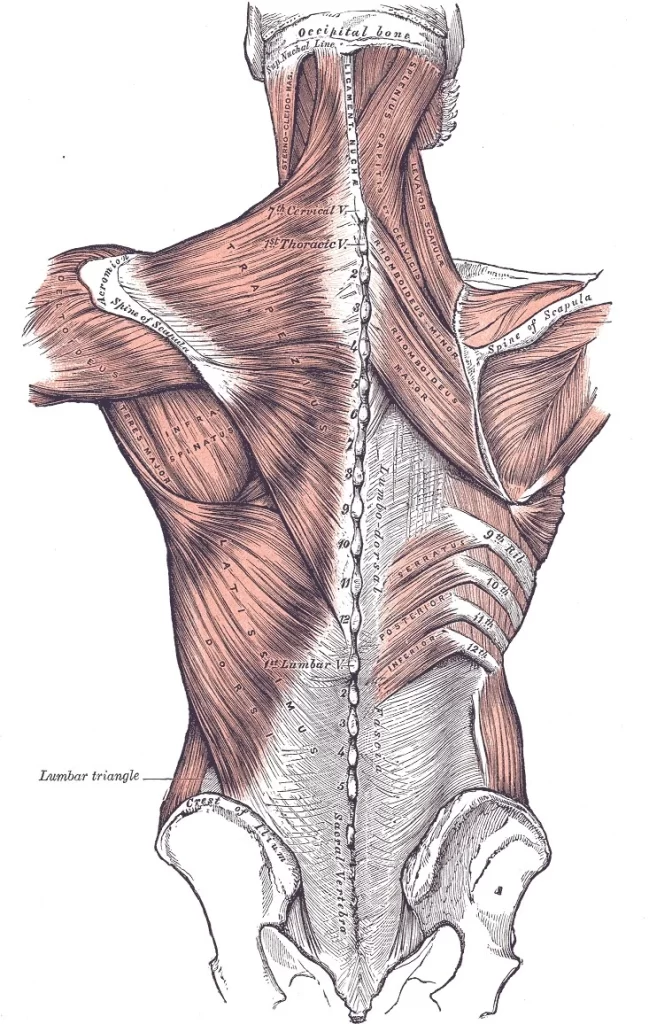
The latissimus dorsi, or lats, originate widely from the top of your hip bone, the iliac crest, your lower ribs, your thoracic and lumbar spine, and the thick fascia of your lower back.
The muscle attaches on the inside of your humerus, or upper arm bone, nearly to the front after running up your rib cage.
Exercises like lat pulldowns and barbell rows target the lat muscles, which are primarily responsible for drawing your arms closer to your torso.
The lats have a wide range of pull due to their vast origin. This implies that by mixing pulling exercises that are horizontal (like the row) and vertical (like the pull-up), you may target different areas of the lats.
Traps:
Despite what you may notice when you look in the mirror, your trapezius is much larger than what is visible above your shoulders.
It attaches to your scapula and collarbones after extending over half of your back from the back of your skull.
There are three common divisions of the trapezius muscle fibres: upper, middle, and lower.
Each of the trapezius’s several components has a unique origin, insertion, and function.
The base of your skull and the cervical spine are the starting points for the higher fibres. The outside portion of your collarbone is where they are inserted. Exercises like dumbbell shrugs and deadlifts target these muscles, which are primarily responsible for supporting and raising your shoulders and collarbones.
The middle fibres enter your shoulder blades after emerging from your cervical and upper thoracic spines. Their primary job in rowing activities is to rotate and retract (draw back and together) their shoulder blades.
The lower fibres insert on the bottom side of your shoulder blades after emerging from your lower thoracic spine. Exercises like the lat pulldown and pull-up target them primarily for rotating and pulling your shoulder blades down.
Lower back:
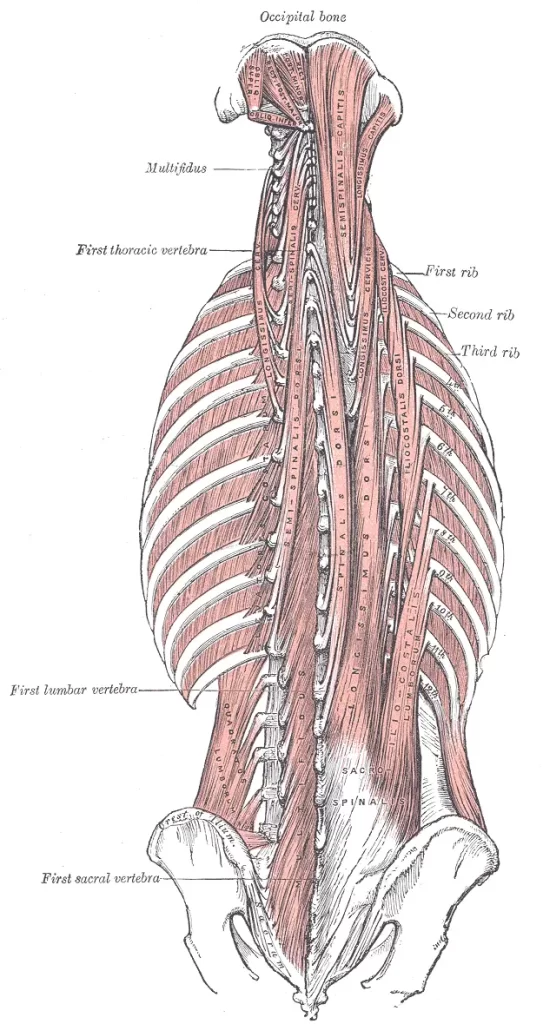
The erector spinae and multifidus are two of the biggest muscles in your lower back. Although these muscles extend the full length of your spine, the lumbar area is where they are thickest.
The lumbar region’s muscles function in concert to stabilise, extend, and rotate your spine. Exercises like deadlifts and back extensions work them, and you use them a lot in daily life.
Rear delts:
One of the three sets of muscle fibres in your deltoids are your posterior (or back) deltoids; the other two are your front and lateral deltoids.
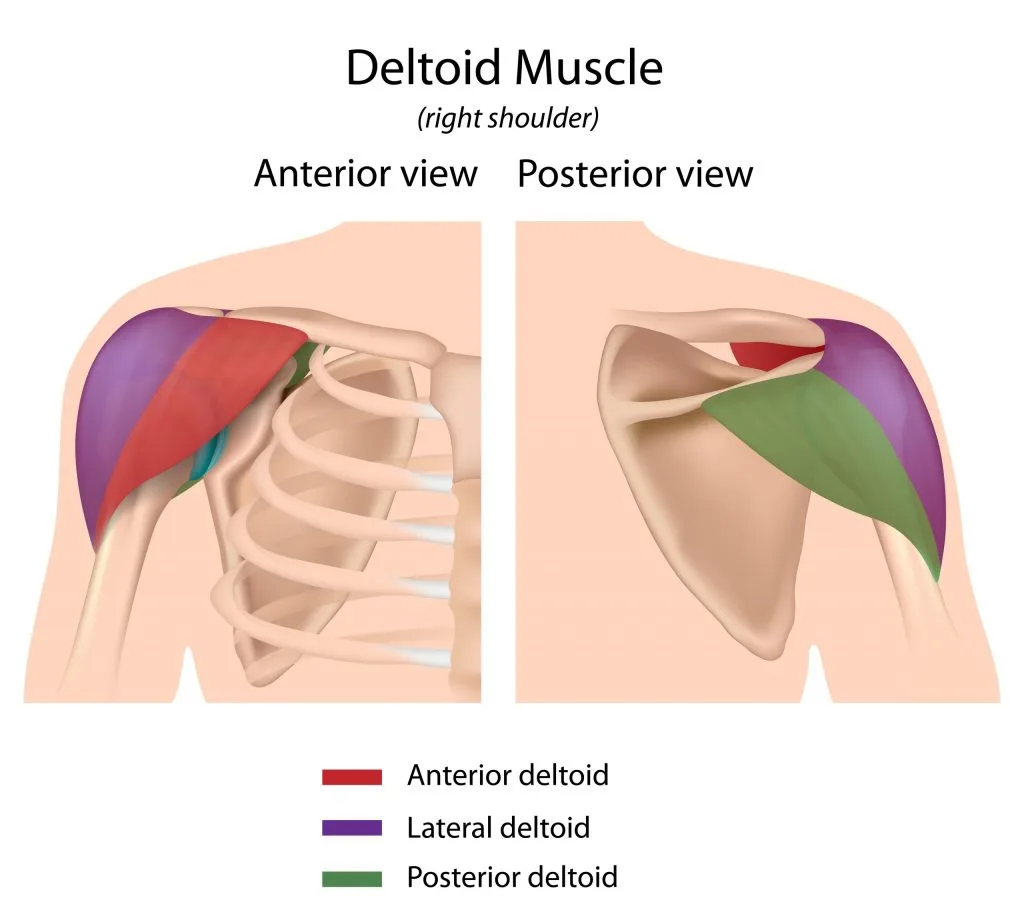
The muscles of your rotator cuff that your infraspinatus and teres minor partially cover are your rear delts, which start at the spine of your shoulder blade. It attaches to the outside of your upper arm, allowing it to externally rotate and extend your shoulder (i.e., bring your arm back, like in a row).
Exercises like face pulls and barbell rows target your back delts.
Biceps:
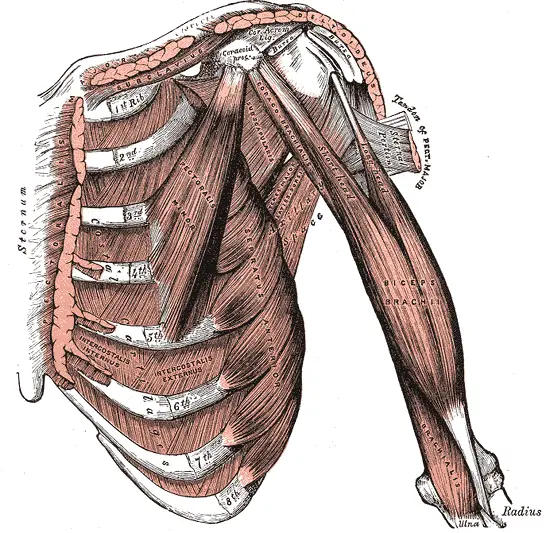
In ordinary conversation, when we talk about the biceps muscle, we typically mean the front of your upper arm. To be more precise, though, the brachialis and the biceps brachii are the two (equally massive) muscles that comprise that bulk.
Since it is the more visible of the two, Biceps brachii has received the most attention. It comes from your shoulder blade and has two heads (bi = two, ceps = head), as the name suggests. The long head originates at the top of your shoulder blade and crosses over the head of the humerus, which is your upper arm bone. The short head begins at the front of your shoulder blade.
The radius and forearm fascia are where the two heads come together to form a single muscular belly that enters your forearm. The elbow and shoulder are thus the two joints that the biceps traverse.
Positioned behind the biceps brachii and closest to the bone, the brachialis has the same muscle volume as the latter. It enters the ulna after emerging from the second part of your humerus. The brachialis is a stronger elbow flexor than the biceps brachii, and its purpose is to flex (bend) your elbow.
Forearms and grip:
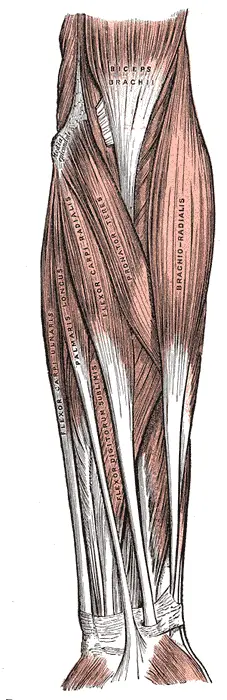
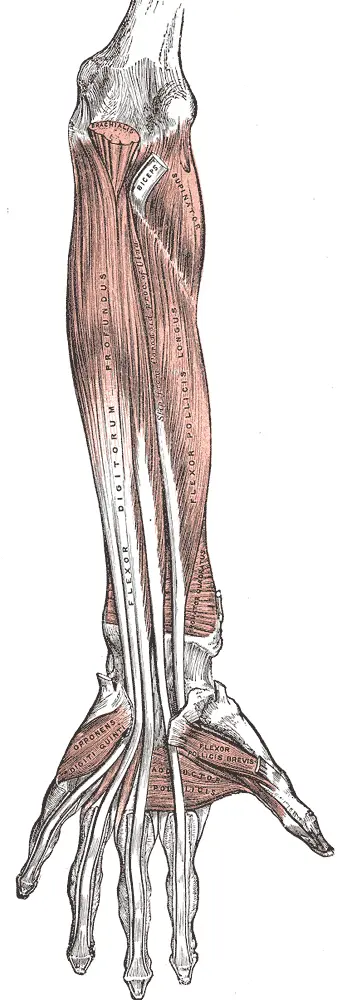
Many of the muscles in your hands and forearms are used to grasp and bend your wrists.
Near the elbow is where the majority of the flesh, or the muscular belly, originates in your forearm’s massive muscles. The muscles cross your wrist at the tendinous line as they extend downward towards your hand and fingers.
A portion of these forearm muscles merely pass through the wrist before inserting into the hand’s base. These can only move your wrist in certain ways, including bending or flexing it.
Other muscles reach your fingertips or the middle bones of your fingers, depending on which direction they go. These are strong gripping muscles, which may be even more significant than their ability to bend your wrist.
Any pulling exercise that requires you to hold onto a weight will challenge your grip strength.
Four Advantages of Including a Pull Day in Your Daily Schedule
You gain from the greatest pull-day workout in four primary ways:
- It’s a natural method of training.
- It strengthens important muscle groups.
- It is applicable to many objectives.
- It’s a component of a bigger training divide.
It’s a Natural Method of Training:
Even novice lifters who are unable to distinguish between lats and traps or triceps and biceps may recognise a push or pull workout by looking at it. With this knowledge, you won’t need to know too much to put up a simple pull day.
As part of the training split, you automatically check the box for exercising these pulling muscles in your upper body when you include a pull day into your exercises.
It strengthens important muscle groups:
Workouts on pull days are not the same as bro splits, where each session targets a different muscle region. All you have to do is concentrate on doing quality, high-intensity pulling exercises, and you’ll simultaneously train your back and biceps, two important muscle groups.
As part of the training split, you automatically check the box for working these muscles when you include a pull day in your exercise regimen.
It is adaptable to many objectives:
Because pull workouts help achieve goals related to strength, size, or weight loss, I adore them!
A pull-day will train a massive amount of your muscles if your goal is to lose weight because the back is home to multiple major muscle groups. You’ll raise your metabolism and burn more calories even after your workout as they repair themselves.
A pull-day is essential if your goal is to increase the size and look of your back muscles. It keeps your biceps and back muscles taut for the best possible muscular growth.
Pull days are a great way to develop your back for exercises like deadlifts and bench presses if you’re training for strength.
It’s Part of a Larger Training Split:
The pull day is great by itself.
However, if you include it in a PPL split, you have two more days to dedicate to working out the rest of your body (lower body and push).
Such splits work well because they help you maintain attention during each session, target a certain area of your body with intense training, and then allow that area to recover before moving on to another area of the gym. Together with the intensity and attention, you obtain a fantastic combination of recuperation and relaxation.
As I previously said, two exercises every PPL day equals six workouts per week for most PPL splits. You and the other two groups will receive two days of intense training and five days of rest for the pull-day muscles.
The Top 12 Pull-Day Workouts
You’re nearly ready to go to the gym and crush a solid workout now that you know which muscles are engaged and how to recognise routines for a pull workout. But in order to help you get the most out of it, I’ve included the top 12 workouts for any pull-day regimen below:
- Pull-ups
- Lat pulldowns
- Straight-arm lat pulldowns
- Seated cable rows
- Bent-over barbell rows
- Pendlay rows
- Bent-over dumbbell flies
- Inverted barbell rows
- Single-arm dumbbell rows
- Seal rows
- Shrugs
- Biceps curls
Now keep in mind that 12 exercises is way more than you would require for a single session. Choose three or four of these to complete in one workout. I’ll go into more depth about combining these pull-day movements into a whole regimen down below.
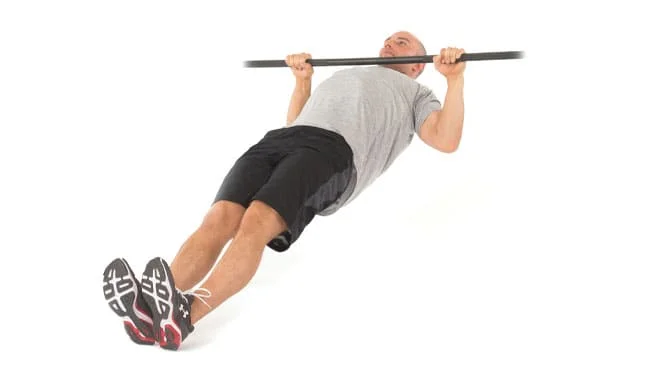
- Pull-Ups:
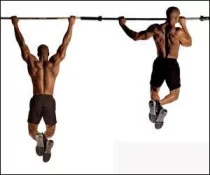
- As a powerlifter, I have to admit that pull-ups are some of the finest pull exercises, even if they are underappreciated.
- They are fantastic, despite the fact that many people shun them because “they are challenging.” Yes, you might need to start with a modified version, such as a counterweight substitute, or seek support from a resistance band. However, it will be well worth your while to master a traditional pull-up and incorporate this exercise into your pull-day regimen.
- Pull-ups require a warm-up to ensure your body is prepared to employ the right form and mechanics.
- With a pull-up bar, you can also perform these exercises with ease in your home gym.
- How to do:
- With your hands roughly shoulder-width apart, grasp an overhead bar.
- Make sure your head is over the bar by pulling your body up to it.
- Return to your lower position.
- For repetitions, repeat.
- Common Mistakes to Avoid:
- Getting strong enough to complete your first set of several reps or pull-ups might require some assistance. Elastic bands, counterweights, a spotter or buddy pulling your legs up, or “kipping” to generate momentum from your legs rather than using your arms and back are a few examples of help.
- But don’t depend on help of any type for an extended period of time! You may build and strengthen your back by forcing your body to learn how to perform slow, controlled pull-up repetitions on your own.
- Although they have a role, kipping pull-ups don’t develop muscle or strengthen it as much as slow, deliberate repetitions do.
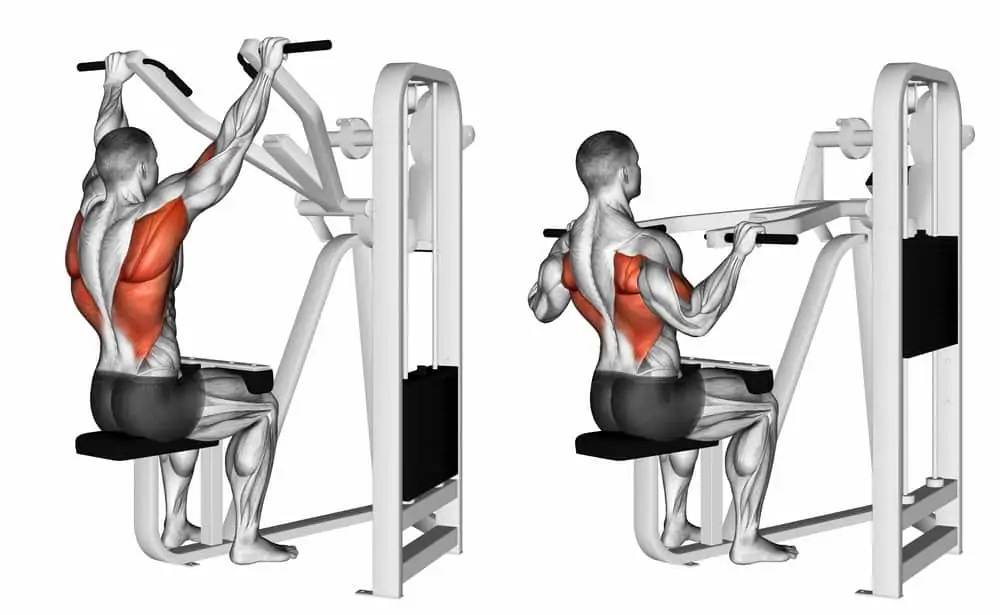
- Lat pulldowns:
- Another excellent pull training routine is the lat pulldown. They follow the same pattern of action as pull-ups, but instead of pulling the cable attachment down towards your body, you must anchor your body to a bench.
- They target the same muscles as pull-ups, which are the lats, biceps, and traps, but they allow you to regulate the weight much better, allowing you to start out lighter and gradually gain the strength required to perform pull-ups. To advance beyond simple pull-ups, you may even add weight beyond your body weight.
- How to do:
- Lie down on a lat pulldown apparatus.
- Aim for the required load using the weight pin.
- Hold the upper lat pulldown bar firmly.
- Put your knees under the pad securely.
- Remaining erect, pull the bar until it touches the top of your chest.
- Raise the bar back until your arms are in their extended positions.
- For repetitions, repeat.
- Common Mistakes to Avoid:
- Leaning the torso back during the pull is a typical mistake I see a lot, especially when lifters thrust their bodies back to gain momentum.
- You remove the work your lats need to perform to truly grow and develop from this activity, even if you don’t hurt yourself doing it. Never compromise technique in favour of more weight.
- As you lean back, you shift the angle of your torso, which emphasises your rhomboids and traps more than your lats. A poorly performed lat pulldown is not the best way to exercise your rhomboids and traps; there are alternative versions that work those muscles far more efficiently.
- Straight-Arm Lat Pulldowns:
- A lat pull-down performed with a stiff or straight arm is an excellent method for strengthening your lats. In this version, you primarily “swing” your arms from high to low while holding the bar in your hands rather than pulling the bar down from above.
- It hits the lats differently than a typical pulldown or pull-up by aiming at them from a different angle.
- How to do:
- Place yourself in front of a high-pulley cable machine that has an attachment for a straight bar.
- Position your hands shoulder-width apart or slightly wider on top of the bar, with your back facing the cable.
- You have two options: either stand up straight or slant your hips slightly forward (the latter will become more important as the load increases).
- Pull or swing the wire down to your hips till it hits your legs while maintaining a straight elbow position.
- Return the bar to the top position while maintaining a straight elbow posture.
- For repetitions, repeat.
- Common Mistakes to Avoid:
- For someone who has never done it before, this might be a challenging one to learn. Still, both novice and expert lifters should heed my advice: don’t go too heavy and concentrate more on proper form with them! It doesn’t follow that you need them to compete pound for pound just because you can lift more weight with the standard lat pulldown.
- You don’t require as much weight in this form since your lats are more isolated and your legs are unanchored. It’s okay since, quite honestly, you probably can’t even manage the same amount of load.
- As your arms drag the bar down to your hips and back, keep your torso solid and your elbows locked. Concentrate on doing quality, sweeping repetitions. The burden will increase gradually, so don’t compromise in order to reach your destination faster.
- Seated Cable Rows:
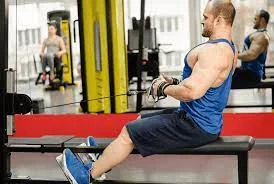
- Pulling a load up and down from your chest is known as a vertical row. Pulling a load perpendicular to your body into your chest is known as a horizontal row. A fantastic horizontal row for your pull training is the sitting cable row.
- Sitting on a bench with your feet fixed on the footplate lets you isolate your back and rear shoulder muscles so they can work without compromising stability or balance.
- How to Do:
- To get the required weight, adjust the pin on the weight stack.
- Choose your favourite grip attachment and secure it.
- Place your feet on the footplate while seated on a cable-row bench.
- Lock your knees (they can be bent, but they should stay in the same spot).
- Throughout the exercise, keep your upper body erect and refrain from bending forward or backward.
- Insert the cable connector into your torso.
- Return your arms to their initial position.
- For repetitions, repeat.
- Common Mistakes to Avoid:
- Let your arms and back do all the heavy lifting! Throughout the set, resist the need to adjust your torso or leg positions!
- This is sound advice for practically every lift; however, be sure the muscles you wish to train are the ones that move the weight by fixing your body posture and maintaining it there. Momentum and other muscles not meant for usage will assist you if you bend your torso forward and backward or push through your knees and alter their position.
- With all that assistance, your back and biceps will receive less attention, and you will see fewer results.
- Bent-Over Barbell Rows:
- Bend-over barbell rows are a great addition to your pull day that just require a barbell! Bent-over barbell rows are among the greatest pull-day workouts, although they aren’t as stable as sitting with your feet on a footplate.
- How to Do:
- With your feet slightly narrower than shoulder-width apart, approach a barbell that is resting on the floor.
- Your torso should be parallel to the floor, or nearly so, when you bend 90 degrees at the hips.
- Hold the barbell somewhat wider than shoulder-width apart. Both underhand and overhand grips are acceptable; however, an underhand grip will strengthen your biceps more.
- Row the barbell down to the base of your rib cage, and back up if you’re using an overhand grip.
- Row the barbell to your belly button and back down if you are using an underhand grip.
- For repetition, repeat. Between each rep, keep the weight off the floor.
- Common Mistakes to Avoid:
- The barbell row and the so-called Pendlay row are not the same thing. Pendlay rows are rapid and explosive, whereas barbell rows are regulated and gradual. Keep it slow and controlled to avoid making your bent-over barbell row into a Pendlay row.
- Choose a weight that will allow you to complete all of the necessary barbell row repetitions and complete the last few repetitions without heaving or jerking the bar upward.
- Putting in an aggressive effort during the last reps may feel nice, but unless you should have been performing a Pendlay row in the first place, it won’t provide you with the results you want.
- Pendlay Rows:
- As previously stated, a pendlay row is comparable to a barbell row; however, it requires quick, explosive repetitions rather than slow, deliberate repetitions. Olympic weightlifters, powerlifters, and other athletes who want to strengthen their backs employ it to build explosive strength.
- How to Do:
- With your feet slightly narrower than shoulder-width apart, approach a barbell that is resting on the floor.
- Your torso should be parallel to the floor, or nearly so, when you bend 90 degrees at the hips.
- Hold the barbell somewhat wider than shoulder-width apart. Your grasp ought to resemble the grip you use for a bench press.
- Set your back posture and tighten every muscle in order to execute a quick, explosive rep off the floor with the bar resting on the floor from the beginning.
- At approximately the same contact point as a bench press, row the bar to your chest.
- Before you repeat, let your muscles fully relax by returning the bar to the floor.
- For repetitions, repeat.
- Common Mistakes to Avoid:
- My advice is to do the reverse of what I mentioned above with bent-over rows since the Pendlay row differs from a barbell row that simply begins on the floor. To get the advantages of strength training, move quickly and explosively when performing these bad boys instead of going too slowly.
- Barbell rows are excellent for muscle growth because they give the muscle more time under strain with slow, consistent repetitions. The explosive repetitions of the Pendlay row push you to develop tension, create explosive force out of nothing, and move a barbell with tremendous force and acceleration.
- If your programme calls for Pendlay rows as part of the pull workout, perform them correctly to reap the advantages.
- Bent-Over Dumbbell Flies:
- Bent-over flies will show your rhomboids some extra love on pull day as they squeeze your shoulder blades together with every rep!
- Despite the fact that they utilise the back delta, some would refer to them as shoulder workouts. Actually, they work well for developing weak rear delts. They are, nonetheless, also readily integrated into a pull-day. You made the decision!
- How to Do:
- Raise a dumbbell with both hands.
- To have your chest parallel to the floor or almost parallel, bend your waist ninety degrees. For a chest-supported alternative, you may also perform these exercises against a bench.
- Raise your arms straight out to the sides until your shoulder blades are as close together as possible, without bending your elbows.
- Go back to where you were before.
- For repetitions, repeat.
- Common Mistakes to Avoid:
- Although they are similar to a row, bent-over dumbbell flies are not the same as bent-over dumbbell rows. By tightening our rhomboids, we fly our arms out to the sides instead of pulling the weights towards our chest and bending our elbows.
- Consider simply utilising your back muscles to bring your shoulder blades together while maintaining your elbows straight, or at the very least minimally bent. Imagine that your arms are just carrying out the motion that your back starts.
- To make sure you perform them correctly, pay close attention to how your arms move.
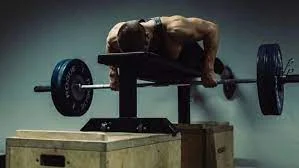
- Inverted Rows of Barbells:
- This is an inverted barbell row, as the name implies. You are beneath the barbell, and it is above your body! Like a pull-up but horizontal.
- I like how they let you reap the advantages of a barbell row without requiring you to maintain a hunched-over posture the entire time. Just get on a bench press, leave the barbell in the rack and row your body up to the bar and back down for a great back workout that can be done in a few sets.
- How to Do:
- With your back off the floor or a bench underneath you, lie beneath a locked barbell that is within arm’s reach but high enough for you to completely stretch your arms.
- Hold the bar with your hands shoulder-width apart, just like you would for a bench press.
- Raise the barbell up to your chest by rowing your upper body up to it.
- Go back to where you were before.
- For repetitions, repeat.
- Common Mistakes to Avoid:
- Just like you can change the difficulty of a push-up by positioning your feet differently, you can also change the weight of an inverted row!
- For instance, everyone has witnessed someone perform push-ups from the knee to facilitate the exercise. Here, too, the same idea holds true. You will need to row with a greater weight the farther your heels are from your torso. It will be easier to bend your knees if your feet are closer to your torso.
- However, try not to conduct simpler regressions for too long! Yes, you might need to begin with your feet closer to your torso and your knees bent 90 degrees, but you should proceed through this exercise just like any other lift. Bring your feet out more each time so you can place more. As you perform rows over a few weeks, gradually move your feet farther out to allow yourself to apply greater force to the exercise.
- When you reach a point when they are simple, add some flavour to them by holding static poses for a brief period of time while your chest hits the bar. Alternately, accelerate your fall by three seconds to emphasise the period of strain.
- Single-Arm Dumbbell Rows:
- Single-arm dumbbell rows are an excellent way to exercise your lats using just a dumbbell in the absence of a barbell.
- You may perform them horizontally by bending over a bench or by leaning against a dumbbell rack or other sturdy object with your body at a 45-degree angle. Use both gradually because the emphasis on each angle will differ significantly depending on the latitude.
- How to apply:
- With one foot firmly placed on the floor adjacent to the bench, kneel on a level bench.
- With the hand across from your kneeling leg, pick up a dumbbell.
- Place your empty hand on the bench to stabilise your posture while keeping your back parallel to the ground.
- Try to row the dumbbell to your hips or to the side of your body.
- Lower the dumbbell back down until your arm reaches its maximum length.
- For repetitions, repeat.
- Common Mistakes to Avoid:
- Select a weight that you can control for each rep in each set, much as in a barbell row. To move the dumbbell, don’t heave, twist, or jerk; instead, bring it all the way to your hip with each repetition.
- You’ll get better benefits from this exercise if you take your time and perform it carefully so that you maximise the amount of time your lats are under stress.
- The Seal Row:
- The seal row’s flawless stabilisation has earned it the moniker “ultimate horizontal row.” Your chest should be parallel to the floor and flat against a bench throughout this exercise. You may achieve a complete range of motion using a specially made barbell that fits the bench below you. Balance and stability never have to come at the expense of load.
- You may simply include seal row benches into your pull exercises at the gym because some facilities have them. If you don’t have access to a seal row bench, you can still perform seal rows using most gym equipment and a little ingenuity.
- How to Do:
- Lay down on a bench with flat dumbbells or a barbell below, face down.
- Make sure the bench is high enough for you to stretch your arms fully without the dumbbells or barbells coming to rest entirely on the ground.
- Hold the dumbbells or barbells firmly in your hands. Maintain a shoulder-width distance between your hands when using a barbell.
- Reach the weights up to your chest, roughly where the bench press touch point is.
- When you reach your arms’ maximum length, reduce the weights.
- For repetitions, repeat.
- Mistakes to avoid:
- The most common error I find when folks attempt to set up seal rows on their own in the gym is not raising the bench high enough to let the arms fully stretch.
- On a typical flat bench, most individuals run out of room before their arms touch the floor. You must place the bench on plates, crates, or another sturdy surface to prevent this.
- Even though leaning your chest on a bench provides excellent support, it is useless if you are unable to fully extend your arms. Instead of this awful effort at a seal row, you would be better off performing a bent-over row every day.
- Shrugs:
- To target your traps, shrugs are a fantastic addition to a pull-day exercise regimen!
- How to Do:
- You should stand straight up and hold a dumbbell in each hand.
- Shrug your arms as high as you can towards your ears, using only your shoulders.
- Reverse the dumbbells’ descent.
- For repetitions, repeat.
- Common Mistakes to Avoid:
- bob of the neck! People who mistake the shrugging action for moving their heads forward and backward while holding a dumbbell in each hand look ridiculous, and I see it happen frequently. All it’s accomplishing is making you appear ridiculous.
- This is typically a sign of carrying weights that you are unable to properly shrug off. As you shrug your shoulders up to your ears, go down multiple 5-pound increments on the dumbbells and choose a weight you can truly hold. You’ll be good to go if you concentrate more on your shoulders and less on your neck.
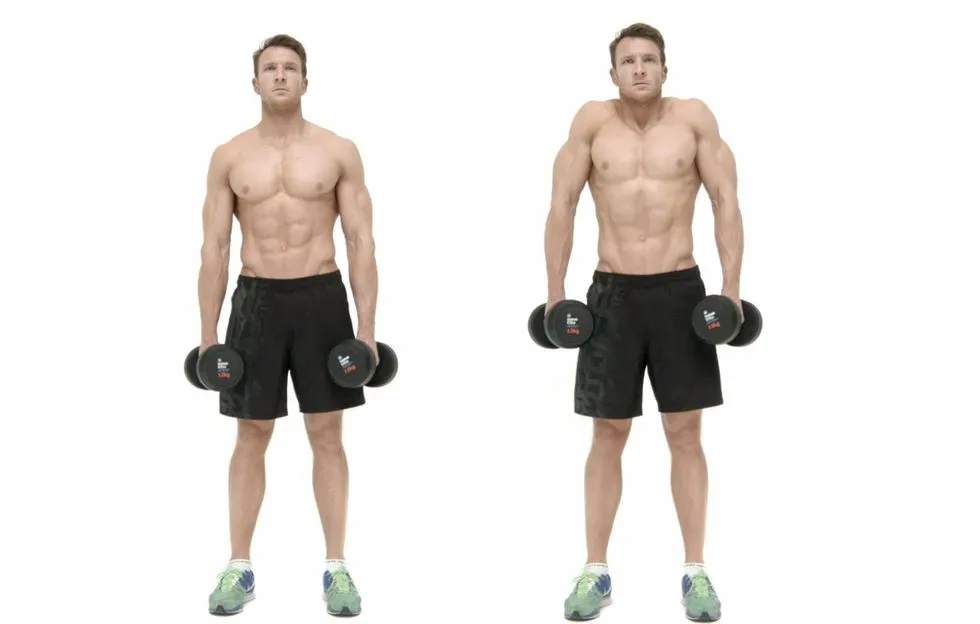
- Biceps Curls:
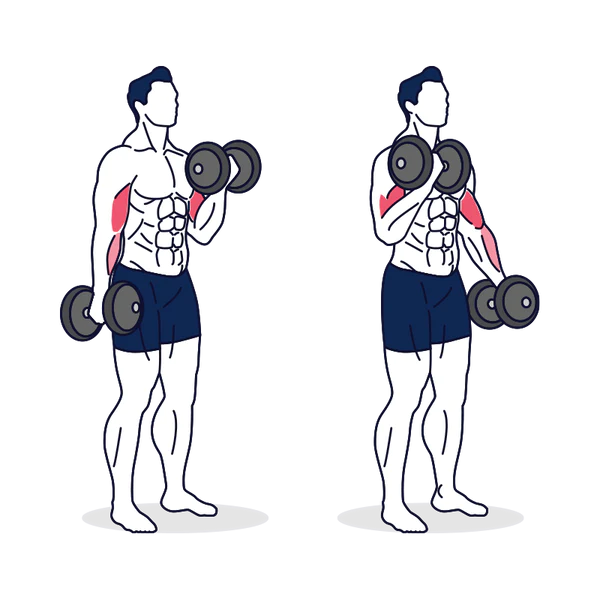
- Without bicep exercises, no list of the top pull-day workouts could be considered complete! Since I am unable to include every variety of biceps curls, I will just refer to them as biceps curls in general.
- However, in all honesty, there are the following exercises: concentration curls, cable rope hammer curls, d-grip cable hammer curls, preacher curls, preacher dumbbell curls, preacher curls, double-arm curls, single-arm curls, preacher curls, preacher dumbbell hammer curls, and so on. The list is never-ending.
- The finest pull workouts include biceps curls and all of their variants, no matter which ones you pick. It would not be a pull day if it weren’t for them.
- How To Do:
- In your hands, grasp a dumbbell or barbell.
- When you are able to no longer bend your elbow when standing or sitting erect, curl the weight upward.
- Return the weight to its lower position.
- For repetitions, repeat.
- Common Mistakes to Avoid:
- The biggest error to avoid, regardless of the variation, is allowing any other muscle to assist you.
- Avoid heaving, tipping your torso back, and doing a half-hop with your legs to gain momentum. Furthermore, avoid swaying your shoulders or allowing your arms to act as pendulums that swing the dumbbell far behind you before accelerating forward! All of it is detracting from your goal of developing large biceps.
- Since this is an isolated workout, you should focus just on your biceps. You should retain all of the tension in your biceps. Thus, set aside your ego, lighten your load, and accomplish these tasks successfully.
- Ultimately, having real large biceps is much more impressive than someone furiously swinging heavy dumbbells in an attempt to appear muscular.
Examples of Pull Day Exercise Programmes
You can basically choose three to six pulling movements, perform them for three to five sets of five to sixteen repetitions apiece, and call it a pull-day workout. To truly make the regimen successful, though, there are a few extra considerations.
A minimum of one vertical row, one horizontal row, and one version of the bicep curl can help you maintain a balanced and efficient pull exercise. You’ll probably have enough time to complete two of each, and you might even want to include some trap shrugs.
Start with the heavier, more challenging exercises (heavy barbell rows, for example) after warming up. These will be the hardest and most difficult things you undertake that day, so make the most of your renewed energy and concentration on them.
Your workout should progress from heavier weights as you grow tired to individual muscle movements like the trap shrugs and biceps curl.
The pull-day programmes shown here include three sample workouts: a strength-focused routine, a hypertrophy-focused routine, and an at-home routine.
Pull Day Workout for Strength:
- 5 × 5 Pendlay Row at 80% of 1 rep maximum (1RM)
- Barbell Row With Pause: 5×3, with a 2-second break at the peak at 75% of 1RM
- Lat 4×6 pulldown at 65% of 1RM
- Pull-ups: four times in the morning. Bodyweight RAP
- Seated dumbbell curls: 4 by 12. Standing barbell curls: 4 by 12
Pull Day Workout for Hypertrophy:
- skewed barbell row at 65% of 1 RM (4 x 10).
- Inverted Row with Negative Pace: 5×4, 5 seconds of decreasing pace
- 3×10 Straight-Arm Lat Pull-Ups Takedown: 3×10
- Preacher Barbell Curl: 3xAMRAP Dumbbell Hammer Curl: 3xAMRAP Trap Shrugs: 4xAM RAP
Home Pull Day Workout:
- Pull-ups: Four times per AMRAP
- Bent-Over Flies: 4 x 12 (each holding a jug of water or a can of food)
- Milk Jug Curls: 4 x 12 (handle a jug like a dumbbell in each hand)
- Milk Jug Bent Over Rows: 4 x 10 (handle a jug like a dumbbell in each hand)
If you’d like, repeat this workout twice.
Five Ideas to Make the Most of Your Pull-Day Exercise
advice to get the most of your pull-day exercise
I’ve got three suggestions to help you make the most of your pull day, regardless of your concentration or preferred setup:
- Observe your macros.
- Consume more protein.
- Adhere to a gradual overload.
- Maintaining consistency is essential.
Observe your Macros:
Whatever exercise you do, the outcomes will vary depending on your diet! Pull days might help you lose fat or gain muscle, depending on your diet.
To achieve your goals, you must, above all, identify your nutritional demands and follow a healthy diet.
Keep your protein intake high and consume an excess of calories if you want to gain muscle on these pull days. Consume a diet low in calories and high in protein if you want these pull days to burn fat. Keep your protein and glucose intake high so you have the energy to go through these pull days and build strength.
To get the desired outcomes, it all boils down to your eating habits.
Consume more protein:
After a pull-day exercise, protein supplements are a great way to help muscle repair and recovery. They are also convenient and simple to digest, and they may help boost muscle mass, strength, and performance.
Because protein is necessary for both constructing and maintaining muscle tissue, athletes and fitness enthusiasts who want to maximise their muscular growth frequently choose to take protein supplements.
After your pull-day workout, using protein supplements will hasten your recuperation and lessen pain in your muscles, getting you back into your training schedule sooner.
Adhere to a Gradual Overload:
Strength training works best when it is challenging for us. You must continually increase the repetitions, weight, intensity, and total sets to keep your body from becoming accustomed to a workout since your body will eventually adjust. This will allow your body to continue reacting to the stress.
Progressing your pull days is the only way to maintain making improvements since your body will only adapt if the stress it experiences is sufficient to cause a change.
Maintaining consistency is essential:
You will never notice benefits if you have a terrific pull day just once a month or if you only have one decent pull day every month. Allow yourself enough time and perseverance to reap the rewards.
It takes time to make these adjustments. Making significant progress becomes more difficult, especially for those who have been at it for a while. To get those desired results, stay consistent and play the long game.
Rest and Recovery:
After a strenuous pull-day exercise, your body needs time to recuperate via relaxation and sound sleep. You cannot expect to see improvements by training the same big muscle groups every day. Your body requires a day off. You may push yourself to muscle failure throughout your workouts and get the advantages since you will have time for muscle recovery.
Your muscles will have ample time to heal between 48 and 72 hours before you do another pull-day.
Your body will have time to relax and recuperate, which is why a PPL split is so effective.
FAQ
How many exercises are in a pull day?
Bryant often incorporates five to eight workouts into a pull-day regimen. According to her, this is the number of motions required to achieve a decent level of work in the lower and upper bodies. Remember that working out all the major body parts is more important than the quantity of workouts.
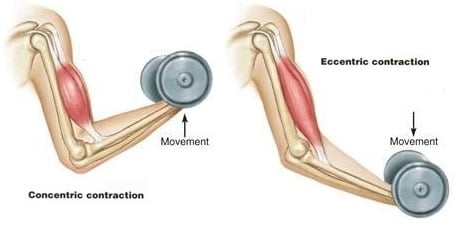
What is a pull-up exercise?
Pull exercises are strength training exercises that include shortening the muscle and concentrically contracting it to pull two connection points closer together. Pull workouts include the lat pull-down, hamstring curl, and biceps curl.
Is the biceps pushing or pulling?
The “pull” exercise works the back and biceps, as well as the other upper body pulling muscles. Additionally, you work out your whole lower body, including your quadriceps, hamstrings, calves, and abs, in the “legs” routine.
Is doing two bicep exercises enough?
It truly takes more than two simple bicep workouts to train the biceps and achieve significant arm growth. Incorporate three to four distinct curl variants within your dumbbell biceps exercise.
Is doing 12 exercises per workout too much?
You should only do one or two workouts per muscle group if you train your entire body three times a week. This equates to around six to twelve exercises with three sets of eight to ten repetitions per workout.
Is three chest exercises enough?
If your goal is to increase muscular hypertrophy and grow your chest, you should typically execute three to four chest exercises every workout; if your goal is to improve strength, you should only perform two to three exercises. Your fitness level, objectives, and personal preferences will ultimately determine how many chest exercises you should perform throughout a session.
Reference
- Richter, Daniel. “The Best Pull Day Workout Routine for Muscle & Strength.” StrengthLog, 13 Dec. 2023, www.strengthlog.com/pull-day-workout/#The_Pull_Day_Workout_Routine.
- “Best Pull Day Workout Routine + 11 Most Effective Exercises.” Huge Supplements, 10 Nov. 2023, hugesupplements.com/blogs/content/best-pull-day-workout.
- Matthews, Michael. “The Best Pull Day Workouts for Building Your Back and Biceps.” Legion Athletics, 19 Oct. 2022, legionathletics.com/pull-workout.
- Luna, Debbie. “8 Pull Day Exercises: Biceps, Back, and Posterior Deltoids.” Inspire US, 12 Apr. 2023, www.inspireusafoundation.org/pull-day-exercises.
- Gardner, Adam. “Best Pull Day Workout: 12 Exercises for Strength.” PowerliftingTechnique.com, 2 Nov. 2023, powerliftingtechnique.com/pull-day-workout.