
Setu Bandhasana (Bridge Pose): Benefits, How to do?- Variation
What is Setu bandhasana?
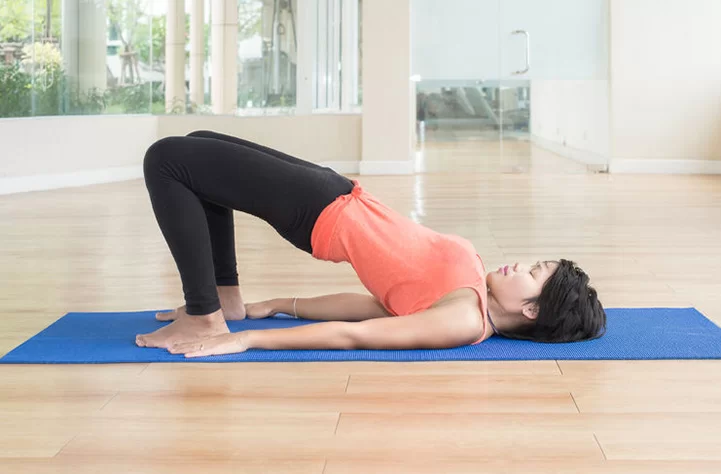
Setu Bandhasana arrives from the Sanskrit term “Setu,” which defines bridge; Bandha refers to lock or bound, and Asana signifies posture, stance, or seat. Setubandhasana is pronounced SAY-tuh-bun-DHAHS-ana. This Asana is named Setu Bandha because when we attempt the stance of this Asana, our bodies resemble a bridge. It is also known as a Bridge Pose.
You will become even more attentive among both mind and body as you perform Bridge Pose. This revitalizing backbend aids expand up your chest while keeping your spine supple. While it is safe for novices to practice, professional practitioners may still get its numerous boons. Setu Bandhasana would also help you prepare for more challenging back bends.
What are the Health Benefits of Setu Bandha Sarvangasana or Bridge Pose?
There are so many benefits of Setu Bandha Sarvangasana:
It Prepares Our Body for More Advanced Postures
The Bridge Pose is a basic backbend posture. It prepares your body to do more advanced yoga poses like the Urdhva Dhanurasana (Upward Bow or Wheel Pose). In fact, it can be known as an inverted version of Upward Bow or Wheel Pose because only the legs and pelvis rest on the floor while your head and arms are free in this pose.
It Stretches Our Chest Muscles
While stretching your chest muscles, it also opens them. This cures any asthma conditions due to the daily practice of Setu Bandha Sarvangasana or Bridge Pose.
You Feel Less Stressed after Practicing this Pose
It also reduces tension from around your neck area. As a result, you feel less stressed out after practicing this pose for quite some time.
It Massages your Internal Organs
The Bridge Pose massages all your abdominal organs including the pancreas, liver, and spleen. This aids in improving your digestion as well.
Your Heart Rate Slows Down after Practicing this Pose
Practicing the Bridge Pose increases blood circulation through the arteries and gives rest to your heart muscles. This avoids cardiac arrest or blockage from occurring in the future. Additionally, it tones up your whole cardiovascular system.
You Burn Extra Fat Around your Chest and Belly Areas
While performing this pose, you continuously use your abdominal muscles and suck in your belly. This burns any excess fat in both your chest and belly areas. Apart from that, it also increases our digestion system.
It can Prevent Cardiac Arrest
Performing Setu Bandha Sarvangasana or Bridge Pose on a daily basis can also prevent Cardiac arrest. This is because it strengthening your heart muscles and keeping them healthy.
It can also Relieve Migraines, Headaches, Insomnia, and Exhaustion
This asana also gives relief from migraines, insomnia, headaches, and exhaustion. So overall, it can be said that the Bridge Pose is a very beneficial posture with many health benefits.
It can Prevent Varicose Veins from Occurring
Along with that, it easily cures leg fatigue and can avoid varicose veins from occurring.
Develops Strong Shoulders and Cures Sagged Shoulders
This asana also aids to develop strong shoulders and curing sagged shoulders. It is a boon for athletes because it strengthens the calves and thigh muscles.
Mental Benefits of Setu Bandha Sarvangasana or Bridge Pose:
- Calms the mind.
- Gives comfort to the nervous system.
- Alleviates symptoms of stress, depression, and anxiety.
- Let go of all negative emotions from the body.
- Activates different chakras: Muladhara or Root Chakra, Visuddha or Throat Chakra.
What are the Preparatory Poses for Setubandhasana?
- Bhujangasana (Cobra Pose)
- Urdhva Mukha Svanasana (Upward-Facing Dog Pose)
- Virasana (Hero Pose)
- Chakrasana or Urdhwa Dhanurasana(Wheel Pose)
- Ustrasana (Camel Pose)
- Dwi Pada Viparita Dandasana (Upward Facing Two-Foot Staff Pose)
How to do Setu Bandhasana?
Lie on your back with your knees flex and the soles of your feet flat on the ground.
Extend your arms on the ground with your fingers reaching toward your heels.
You should be able to just slightly touch the backs of your heels with your fingertips.
Keep your feet aligned. Maintain that pose throughout the pose.
Press down into the soles of your feet to raise your hips off the floor.
Your arms can stay outstretched on the ground next to your body.
This should be a comfortable pose. You may want to hold here for several minutes as your body settles into the stretch and gets the advantages of a passive backbend.
If the pose causes your back to hurt, then release the pose.
How to do Setu Bandhasana ( Bridge Pose) by watching a video?
What are the Counter poses for Setubandhasana?
- Bhujangasana (Cobra Pose)
- Salamba Sarvangasana (Supported Shoulder stand)
- Urdhva Mukha Svanasana (Upward-Facing Dog Pose)
- Urdhva Dhanurasana (Upward Bow Pose)
What are the Beginner’s Tips for Setu Bandhasana?
- Make sure your torso and thighs are straight and parallel to the ground.
- Breathe deeply and hold the posture for at least 30 seconds.
- If you find it challenging to balance in this posture, focus on keeping your core engaged.
- Place your feet hip-width apart with your toes aligned to each other.
- Then, press down firmly into all four corners of both feet as you raise your hips up towards the ceiling.
- Activating your quadriceps will aid straighten your knees and lengthen your spine.
- Firmly press through your shoulders to raise your spine higher.
What are the Modifications for Setubandhasana?
Beginners can find a modification to make this posture easier while developing their skills. You can also make modifications to challenge yourself as you progress.
A standard yoga block can be set up at three various heights, depending on the side that is on the ground. When you first try For this pose, it’s a good idea, to begin with, the block on the lowest height, since this is its most stable and gentle pose.
If the lowest height feels cozy and you want a deeper stretch, you can try turning it. The highest height will provide you the deepest backbend, but it is also the least stable, so go carefully. Since this is a restorative pose, choose the level that provides you the most ease. If you feel any pain, exit the pose.
If you feel very stable, try raising one leg off the floor while keeping the block in place under your sacrum. Straighten your raised leg up to the ceiling, or try flexing it and placing your ankle on the thigh of the opposite leg (the one still on the ground) for a hip opener. Keep the foot of the lifted leg flexed in either position. After several breaths, return that foot to the ground and try the another side.
You may also raise both legs at the same time, which is a supported version of Shoulder Stand.
Roll your spine – you can come out of the posture by slowly coming down, vertebrae by vertebrae. Allow the spine to slowly rotate it’s way down. You can come up again into the posture the same way. This is a lovely ‘spine massage’.
What are the Variation for Setu Bandh Sarvangasana?
There are some variations of Setu Bandh Sarvangasana:
- Eka Pada Setu Bandhasana | One-Legged Bridge Pose
- Setu Bandh Sarvangasana with Legs Extended
- Supported Setu Bandha Sarvangasana
Eka Pada Setu Bandhasana | One-Legged Bridge Pose
What is Eka Pada Setu Bandhasana?
The word Eka Pada Setu Bandhasana derives from the Sanskrit word. In this, Eka refers to one, single, Pada stands for Foot;
Setu means Bridge and the meaning of Bandha is the lock, bind, or bond. Eka Pada Setu Bandhasana targets the Visuddhi chakra (Throat chakra) by making a Jalandhar Bandha (Chin lock) during the pose. Legged Bridge Pose is also advantageous in Throat related problems. So let’s start the pose.
Benefits of One-Legged Bridge Pose:
- Eka Pada Setu Bandhasana stretches and strengthens your Shoulders, Chest, Spine, Neck, Hips, Hamstrings, and Quads.
- This Yoga pose directly targets your Spine, Hamstrings, and Shoulders.
- Best for anxiety, fatigue, & stress.
- Legged Bridge Pose is advantageous for a headache, restless legs, and back pain.
- Eka Pada Setu Bandhasana can relieve the symptoms of Hypertension, Asthma, Menopause, and Osteoporosis also.
- This posture strengthens your core muscles as well as increases your digestion.
How to do One-Legged Bridge Pose (Eka Pada Setu Bandhasana):
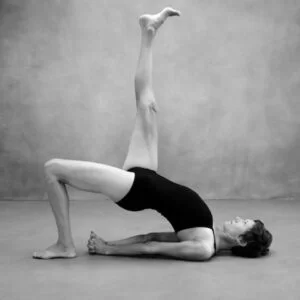
First, take the position of Savasana rest for a while, and then achieve the Bridge Pose. When you feel cozy in Bridge pose, with your right foot press firmly into the floor.
After that, breathe out, bend your left knee and place it towards the chest, and raise your left foot from the floor.
Remain in the pose to keep balance during this and keep a steady breath. (By your both hand provide support to your waist for raising up your body).
Breathe in and expand your left foot up towards the roof. Try to expand your left foot at an angle of 90 degrees (Perpendicular to the ground). Remember one thing; expand your left leg as much as you can. On the first attempt, it’s difficult to keep your leg perpendicular to the ground.
You have to maintain the firm base in your right foot & shoulders, and raise your pelvis to elevate your hips. During the pose elongate your spine and spread your shoulders to the floor. Your chin automatically touches your chest but make sure that doesn’t put too much load on your neck and head.
Maintain your weight evenly distributed on the right foot, note not to rotate your weight to the inside or outside of the foot.
Stay in this pose as much as you can hold for 30 to 60 seconds.
Breathe out; lower your left leg and remain in Bridge pose for a few seconds.
Then slowly down your back and then legs to the ground rest in Savasana.
After that, repeat the same step with your opposite leg.
(During each steep breath deeply. If you feel difficulties in keeping the balance then take help from your trainer or friend. Use a folded blanket under your shoulder for cushioning.)
Variation for One-Legged Bridge Pose:
Bridges Pose Ankle Variation-
- To deepen the opening of the back and the shoulders, this variation is perfect. Starting from the standard One-legged Bridge Pose, bring the raised leg back onto the ground, and place it analogically to the second leg. From there, grasp each ankle by one hand, rounding the upper body as needed and bringing it closer in the direction of the shins. Adjust the level of the back and shoulder opening to your own needs and comfort. Keep gazing up at the roof.
One-Legged Bridge Pose Foot On Knee Variation-
- This variation is for those who would like to elongate the leg muscles in a different way. Starting from the standard One-legged Bridge Pose, flex the knee of the extended leg so that the shin forms a 45-degree angle with the thigh of the second leg. Lightly and without pressure, put the foot of the leg above the knee of the second leg. Unclasp the hands and draw the arms to the sides of the trunk. Breathe and keep the balance and the stretch.
Contraindications and Cautions for One-Legged Bridge Pose:
- Neck/back/knee/leg injury
- Severe migraines
- Poorly controlled hypertension
- Pregnant women
Setu Bandh Sarvangasana with Legs Extended
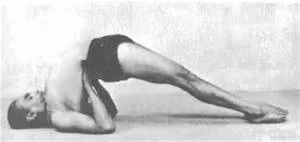
How to do: Come into Bridges Pose.
Place both hands on a waist level to support the body.
Now straighten or extend your leg with your foot resting on the ground.
Maintain this pose, if you can’t keep the pose then place a bock under your waist level.
Stay in a pose for 20 seconds.
Supported Setu Bandha Sarvangasana
Benefits of Supported Setu Bandha Sarvangasana:
Supported Setu Bandha aids to rest your heart but at the same time gives a feeling of exhilaration.
It widens the pelvic girdle, stretches the abdominal area, and opens your chest, which then forms space for the diaphragms of the body to relax and move freely.
Supported Setu Bandha promotes mental stability and aids in balancing hormones and mood as do most inversions.
How to do Supported Setu Bandha Sarvangasana?
Variation 1 – In this variation, the legs are in a line with the pelvis.
With the utilization of 3 blocs at the tallest height, 2 are used under the heels to support the legs and 1 beneath the mid-sacrum to support the pelvis.
The feet are put at the wall with the big toes touching and the inner heels slightly apart so that the little toes are level with the outer heels.
All 4 corners of the feet are pressing into the wall to aid with the action of fully extending the legs.
The belt around the mid-thighs aids keep the legs moving in from the outer thighs to the inner thighs (adduction) and also assists to keep the legs moving inward (internal rotation).
The blanket is put under the upper arms and shoulders (not under the neck and head) to support the shoulders and also to form space at the back of the neck and protect C7.
To deepen the pose, initiate turning the 2 blocks at the wall to reduce the height until the heels eventually rest on the ground.
Variation 2 – As in Variation 1, the legs art still in line with the pelvis, but the expansion of the chest is a bit more pronounced.
The yoga bench supports the legs, heels, and pelvis.
The 3 belts are wrapped around the legs and the bench to keep the legs turning inwards and towards one another (adduction and inner rotation) and primarily to help in grounding the femurs from the front of the thighs to the back of the thighs down into the bench.
The blankets have to be accumulated in the place where the shoulders and upper arms are supported.
The collarbones are positioned at the edge of the blankets and the back of the neck and head are out of the blankets; this forms space at the back of the neck and protects C7.
The belt tied around the wrist keeps the wrists at level with the shoulders which then aids with the action of opening the chest.
Variation 3 – If working with the yoga bench is too deep, or a yoga bench is not available, this variation with the chair and blocks is suitable.
With the feet at the wall and the calves on the chair, put two blocks, one high and one lower to lift the pelvis to the same height of the legs (pelvis higher, legs lower).
Creating the height at the pelvis and legs improves the chest opening, which is the purpose of this posture.
The belt is positioned at the mid-thighs to keep the legs moving inward and towards one another.
The blanket is put under the upper arms and shoulders (not under the neck and head) to support the shoulders and also to form space at the back of the neck and protect C7.
The back of the head is put on the mat.
The belt tied around the wrist keeps the wrists at level with the shoulders which then aids with the action of opening the chest.
Variation 4 – This variation is performed using a sling around the mid sacrum.
A belt is utilized to tighten the sling to draw the outer hips up and then inward towards one another to stabilize the pelvis.
Feet are against the wall and heels are on the ground to deepen the Setu Bandha to its fullest expression.
Blocks could be accumulated under the heels to the level of the pelvis, but no higher, to variate for different levels of ability.
A blanket is put under the shoulders and upper arms right to the edge of the collarbones to form space at the back of the neck and protect C7.
The back of the head is placed on the mat.
Variation 5 – For a more flexible, or gentle approach to Setu Bandha, try utilizing a bolster horizontally under the heels and one vertically under the pelvis and place your lower scapulae right on the edge of that bolster in order to get the shoulders and back of the head on the ground.
Put a belt at the mid-thighs to keep the thighs moving inward and towards one another.
And push your feet into the wall to elongate your legs.
What are the Common Mistakes you shouldn’t do while in Setubandhasana?
Beginners and those with backache should be sure that the block is under the sacrum, which is between the coccyx (tailbone)and the lower back. You don’t place the block centered too much on the tailbone or the lower back, but rather in that sweet spot in between.
What are the Safety and Precautions for Setu Bandhasana?
- If you feel any ache, release this pose. While some people use it to relieve chronic low back pain, it is best to prevent it if you have a new onset of back pain, a flare-up, or a recent back injury.
- Avoid it as well if you have any neck or knee issues.
- As your head will receive more blood flow, prevent this pose if you have any condition that could be worsened by it, such as glaucoma, recent dental bone grafts, detached retina, or uncontrolled high blood pressure.
- Do all of the Asanas with the assistance of a yoga teacher.
What are the Contraindications for Setu Bandhasana?
There is some contraindication for Setu Bandhasana:
The Bridge Pose comes with many advantages. However, person should still be aware of the contraindications.
- This pose places a lot of load on your neck which is why it is not appropriate for people who have a neck injury or are suffering from spondylitis.
- After entering this pose, you should not adjust your neck as it can harm your spinal cord. If you want to fix your neck’s position, then release your posture and properly position your neck. Once you are comfortable, only then resume the pose.
- People with an injured or sore back should avoid practicing the Setu Bandha Sarvangasana.
- It is also not appropriate for pregnant women because this posture places a lot of pressure on the lower abdomen and internal organs which can be harmful to the baby.
Bottom Line
If you want to stay healthy and fit, make sure you include this asana in your yoga routine. Setu Bandha Sarvangasana is boon for athletes as well because it strengthens the thigh and calves muscles. Along with that, it easily cures leg fatigue and can avoid varicose veins from occurring. This asana also gives relief from migraines, insomnia, headaches, and exhaustion. So overall, it can be said that the Bridge Pose is a very beneficial asana.

6 Comments