
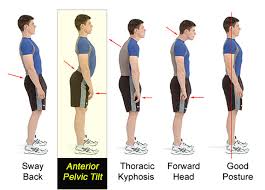
Anterior Pelvic Tilt
What is an Anterior Pelvic Tilt?
Anterior pelvic tilt is when the front of the pelvis drops in relationship to the back of the pelvis. For example, this happens when the hip flexors shorten and the hip extensors lengthen.
The posterior pelvic tilt is the opposite when the front of the pelvis rises and the back of the pelvis drops.
Your pelvis helps you walk, run, and lift a weight off the ground. It also contributes to proper posture.
An anterior pelvic tilt is when your pelvis is rotated forward, which forces your spine to curve.
It’s often caused by excessive sitting without enough exercise and stretching to counteract the effects of sitting all day.
If you have an anterior pelvic tilt you may notice that the muscles in the front of your pelvis and thighs are tight, while the ones in the back are weak. Your gluteus and abdominal muscles may also be weak.
This occurs due to a muscle imbalance in the lower half of the body. A combination of weak and tight muscles pulls the pelvis forward.
Tight, overactive muscles that may contribute to anterior pelvic tilt include:
quadriceps group, or the front thigh muscles hip flexors, which are the small muscles in the front groin area
Weak, underactive muscles that can cause this condition include:
gluteus group, which are the buttocks muscles
Hamstring group, the muscles at the back of the thigh
Rectus abdominis, known as the lower abdominals
Anterior pelvic tilt is often visible in a person as it gives the lower back an exaggerated arch and makes the buttocks stick out.
All of this can cause:
- lower back pain
- hip and knee pain
- incorrect posture
- forced hip and knee rotations
- Luckily, there are several exercises that you can do at home to help your pelvis return to a pain-free neutral position.
Causes of Anterior Pelvic Tilt:
- Muscles become tight as a result of certain lifestyle habits or muscular dysfunction.
- Factors that can increase the risk of developing an anterior pelvic tilt include:
- sitting for extended periods
- cycling
- wearing high heels
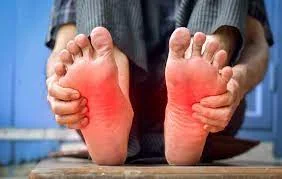
- flat feet
Symptoms of Anterior Pelvic Tilt:
- Forward tilt of the pelvis
- Pronounced lower back arch
- Glutes (your bottom) that stick out
- Protruding stomach
How will you diagnose?

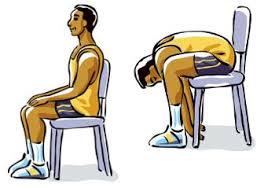
1)You can perform something called the Thomas test to see if you have an anterior pelvic tilt.
Sit on the edge of a sturdy table.
Lie back onto the table so that your legs hang off the table at the knee.
Pull one of your legs in toward you, holding it under your knee and bending your leg until it rests against your chest.
Repeat with the other leg.
If your pelvis is correctly aligned, the back of your resting leg will touch the table when you get into this position.
If you need to extend the resting leg or rotate your leg or hip in order to touch the table, your front thigh muscles are tight. This likely signals a tilted pelvis.
(2) Instructions:
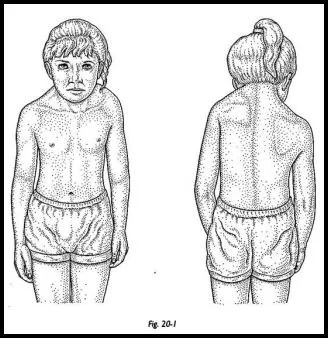
Stand up.
Locate the landmarks: (check out the picture above for the points.)
Point bone at the front (ASIS) and
Point bone at the back (PSIS).
Compare the relative heights.
Complications:
Anterior pelvic tilt increases pressure on the lower back bones. This pressure can cause muscle fatigue and other issues, such as:
- tension in the neck muscles
- lower back pain
- inward rotation of the hip and knee
- hip and knee pain
- pressure on hip flexors causing sciatica
- Even if this condition is not causing any pain, it is vital to work on lengthening tight muscles and strengthening weak muscles to correct poor posture.
Exercise to Correct Anterior Pelvic Tilt:
To fix your Anterior pelvic tilt posture, you need to:
1) Determine if you can Posterior pelvic tilt.
2) Stretch the tight/overactive muscles.
3) Strengthen/activate the weak/inhibited muscles.
4) Finding a neutral pelvis
5) Strengthening exercises with a neutral pelvis
6) Maintaining a neutral pelvis
Half-kneeling hip flexor stretch
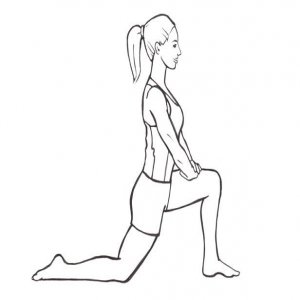
This exercise will help relax the hip flexors and increase your hip flexibility.
Step your left leg out in front of you and lunge until your right knee is resting on the ground. Place a towel under your knee if this is uncomfortable. Your left leg should make a 90-degree angle at your knee.
Bring your pelvis forward by tightening your gluteus and abdominal muscles.
Lean forward from your right leg until you feel the tension in the hip flexor and inner thigh of your right leg
Hold for 30 seconds, release, and repeat up to 5 times.
Switch legs.
NOTE: While in this stretch, you should feel no tension at the front of your thigh. The stretch shouldn’t hurt, but you should feel a slight tension in your hip flexors. Make sure to keep your pelvis slightly tilted throughout the whole stretch.
Bridge
This exercise will strengthen your hamstrings and your gluteus muscles.

Lie flat on your back with your legs bent and your feet flat on the floor and hip-width apart, arms by your sides.
Push your heels into the floor as you lift your pelvis up off the floor until your upper body and thighs form a straight line.
Hold for 2 seconds, lower down slowly, and repeat 8 to 12 times.
Make sure you tighten your gluteus and abdominal muscles while in this position to maintain a correct bridge alignment.
Kneeling leg lift with back stretch
This exercise will help tighten your abdominals and stretch your back and your gluteus muscles.
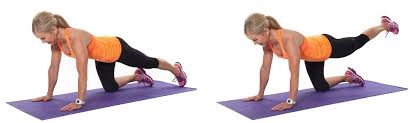
Get down on your hands and knees.
Place your hands on the floor shoulder-width apart. Align your hips with your knees.
Make sure your back is parallel to the ground so your pelvis is in a neutral position.
Pull your belly button in toward your spine and arch your back as you exhale.
Hold for 2 seconds, and then bring your spine back to the neutral position.
Extend one leg back and lift it until it reaches the same height as your body, so your lifted leg and body are in alignment. Keep your spine in a neutral position.
Hold this position for up to 5 seconds, lower the leg, and repeat up to 10 times.
Switch legs.
This exercise will strengthen your abdominal and gluteus muscles and condition your back muscles.
NOTE: Make sure to keep your extended leg in line with your body. Arching your back too much can cause back pain.
Squats
This is a full-body exercise that helps strengthen the gluteus muscles, hamstrings, and quadriceps, among others.

Place your feet shoulder-width apart, toes pointing forward.
Lower yourself to a sitting position until your thighs are parallel to the floor. Make sure you’re keeping your abs tight and your back in a neutral position.
Push up to a standing position and move your pelvis slightly forward by tightening your gluteus muscles.
Repeat 15 to 20 times.
NOTE: As you squat, don’t let your knees go over your toes or rotate inward. Keep your back in a neutral position. Do not flatten the curve of your lower back or overly arch your back. Squeeze your abdominals and gluteus muscles.
Tip: look straight ahead and visualize that you are about to sit on a chair.
Pelvic tilt
This exercise helps strengthen your abdominal muscles and stretches the muscles in your lower back.

Lie with your back on the floor in a neutral position with your legs bent and toes facing forward.
Pull your belly button in toward your spine, pushing your pelvis up toward the ceiling.
Tighten your gluteus and hip muscles as you tilt your pelvis forward. Hold for 5 seconds.
Do 5 sets of 20 repetitions.
This exercise will help your spine get in the correct neutral position, so be sure to monitor your progress.
PELVIC TILT EXERCISE VIDEO:
The plank
Doing a plank may be difficult at first, but people should hold the pose for as long as possible, eventually up to 1 minute.
The plank exercise helps to target the stomach muscles and back.
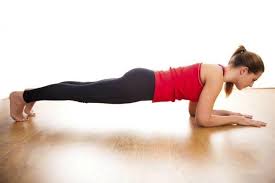
Lie face down on an exercise mat.
Place the hands on the mat, palms down. Keep the hands directly under the shoulders.
Tighten the stomach muscles and the thigh muscles.
Slowly lift the upper body and thighs off the ground, moving into a push-up position. Keep the body rigid and straight. Ensure the stomach muscles are engaged throughout the exercise.
Hold the plank pose for as long as possible, working up to 60 seconds. Gently lower the body to the floor.
Stretches and Releases
Before you can start to strengthen any of your weak muscles that are contributing to your Anterior pelvic tilt, you need to stretch the tight muscles which may be inhibiting them in the first place.
Target muscles:
- Iliopsoas
- Tensor fascia latae
- Rectus femoris (Quadriceps)
- Lower back erectors
- Longissimus, iliocostalis
- Quadratus lumborum
- Thoracolumbar fascia
- Latissimus dorsi
- Anterior fibres of the adductors
a) Hip flexor stretch
Instructions:
Assume the lunge position as above.
Perform a posterior pelvic tilt
“Tuck your tailbone underneath you”
Keep your glutes contracted.
Lean your torso away from the side you are stretching.
Aim to feel a pulling sensation at the front of your hip.
Hold for 30 seconds.
Repeat 2-3 times.
b) Quad/TFL stretch
Quad stretch
Instructions:
Whilst standing, pull your ankle behind you so as to bend your knee.
Stay upright and keep your knees in line with each other.
Perform a posterior pelvic tilt and drive your hips slightly forward.
Aim to feel a stretch at the front of your quadriceps.
Hold for 30 seconds.
Repeat 2-3 times.
c) Groin stretch
butterfly stretch
Instructions:

Sit on the floor with your back against a wall.
Assume the position as shown above.
Sit up at tall as possible.
Try to create an arch in your lower back.
Slowly push your knees down toward the ground.
Aim to feel a stretch in the groin.
Hold for 30 seconds.
Repeat 2-3 times.
d) Lower back stretch
Instructions:
Sit down on a chair.
Lean all the way forward.
Aim to feel a stretch in the lower back.
Hold for 30 seconds.
Repeat 2-3 times.
e) Side stretch
Instructions:
Whilst standing, lean your torso all the way to one side.
Aim to feel a stretch in the side of your torso.
Hold for 30 seconds.
Alternate sides.
Repeat 2-3 times.
f) Releases
If you are having difficulty feeling the stretch in any of the above muscles, use a massage ball to release the tight structures directly.
Ball QL
Key points:

Place the ball underneath the muscle you are trying to target.
Apply the appropriate amount of body weight over the ball.
If it hurts, you are likely in the right spot. Tight muscles will often be the painful ones when pressed.
A small amount of bruising can be normal after the first few times doing these self-releases.
Keep rolling over the area for a good 1-2 minutes, or until the tightness/pain goes away.
Avoid placing the ball directly in the middle of the spine.
Strengthening exercises
Now that your tight/overactive muscles have been stretched/released, you are now ready to begin the strengthening of your weak muscles.
Target muscles:
- Gluteal group
- Hamstring
- Abdominals
a) To strengthen your Gluteals: bridging
b) To strengthen your Hamstrings:
Hip lift
Instructions:
Lie on the floor.
Place your feet on the wall with your hips and knees bent at 90 degrees.
Dig your feet into the wall and lift your tailbone off the floor.
Tilt your pelvis backward.
This is to flatten your lower back onto the ground.
Feel the tension in your hamstring muscles.
Hold for 30 seconds.
Repeat 3 times.
c) To strengthen the Abdominals:
Dead bugs
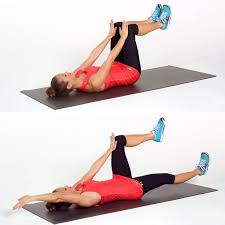
Your abdominal muscles are connected to the top portion of the pelvis at the front. They play a vital role in rotating the pelvis back into position.
Dead bug 1- dead bug 2
Instructions:
Lie on your back with both of your knees bent in the air.
Engage your core and abdominal group by gently drawing on your belly button.
Rotate your pelvis backward.
This is to flatten your lower back.
Maintain this lower back position. Keep it completely in contact with the ground throughout the movement.
Do not let your lower back arch!
Slowly lower the opposite arm/leg.
The lower the better! (… but only if you can keep the lower back FLAT!)
Progression: Add 5-10 second holds in Position 2.
Camel pose
Instructions:
Assume the 4-point kneel position.
Tuck in your tailbone to rotate your pelvis backward.
Engage your core muscles by drawing your belly button in.
Exhale all the air in the lungs as you form this position.
Hold this for 5 seconds.
(or as long as it takes to completely exhale all the air in your lungs)
Repeat 10 times.
Finding neutral pelvis
a) Pelvic tilting (4-point kneel)
Instructions:
Assume the 4-point kneel position.
Hand under shoulders.
Knees under hips.
Find the end range of pelvis movement.
Tilt your pelvis all the way forward.
Tilt your pelvis all the way backward.
The neutral pelvis will generally be the midpoint of these two positions.
PELVIC TILT VIDEO:
b) Sitting
Instructions:
To position your pelvis in neutral whilst sitting, you will need to “Sit on your SIT bones”.
To find your sit bones, place your hands (with palms up) underneath your butt whilst you are sitting on a chair.
Feel for a pointy bony prominence.
(This is your Sit bone)
Think of these bones as upside-down TRIANGLES !!.
The goal is to sit directly on the tip (aka the pointiest part) of the triangle (as opposed to the side).
This will place your pelvis in a more neutral position.
c) Standing
Instructions:
Whilst standing, place your fingers on the ASIS and PSIS. (see above)
They are the “pointy bones” that stick out the most.
To position your pelvis in neutral, you will need to tilt your pelvis until the ASIS and PSIS are approximately in line with each other.
Keep in mind, it is normal to have a slight anterior tilt of 5-10 degrees.
PELVIC TILT IN STANDING POSITION:
Strengthening with a neutral pelvis
a) Bird/Dog
Instructions:
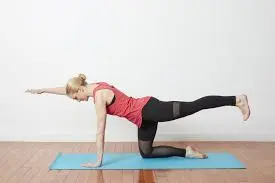
Assume the 4-point kneel position
Place your pelvis in a neutral position.
Engage your core and glute muscles to lock the pelvis in place.
Whilst maintaining this alignment, lift your arm and leg.
Do not let your lower back sink in.
Alternate between sides.
Repeat 10 times.
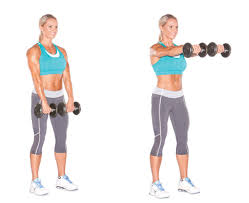
b) Overhead reaches
Instructions:
Stand upright.
Place your pelvis in a neutral position.
Activate your core and glute muscles to achieve this.
Whilst maintaining your pelvis alignment, raise your hands over your head.
NOTE: Do NOT let your ribs flare outwards.
“Keep the ribs down”
The lower back should not arch.
Repeat 10 times.
To progress: Perform shoulder presses (with weight) in the standing position.
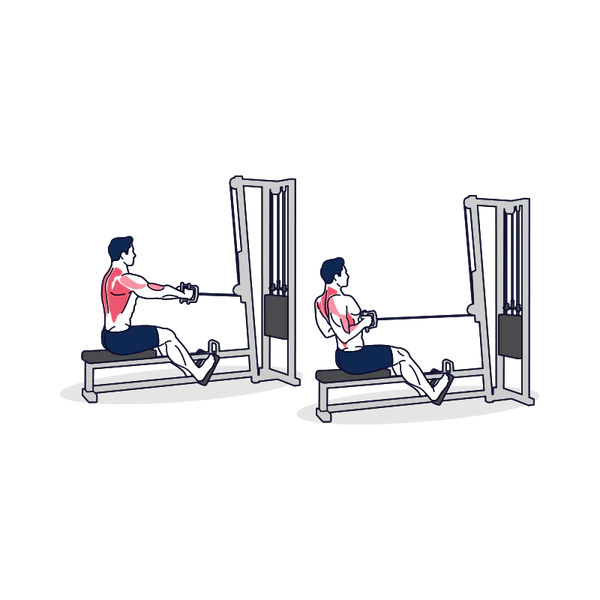
c) Pulldowns
Instructions:
Whilst standing with a slight forward lean, pull the resistance band downwards.
Lock your pelvis in a neutral position.
Activate your core muscles.
Slowly let your arms recoil to the overhead position.
Your torso and pelvis should not move during this exercise.
Do not let your lower back arch backward!
Pull the resistance band back to starting position.
Repeat 10 times.
d) Strengthen hip flexors
Whilst sitting with your pelvis in a neutral position, raise your knee as high as you can go.
Do not lean backward.
Hold this position for 5 seconds.
Repeat 10 times on each leg.
6) Maintaining a neutral pelvis
Key points:
- Maintain the neutral position of the pelvis throughout movements.
- Remember to lightly engage the gluteals and abdominals as you are performing any movement/exercise.
- Avoid quadriceps and lower back dominant exercises until you can maintain a neutral pelvis.
- Once you have good control of your pelvis, you can start to work out your hip flexors and lumbar extensors.
- Remember your body’s default setting is to go back into your Anterior pelvic tilt. MAINTAIN A NEUTRAL PELVIS.
FAQ
Can anterior pelvic tilt be corrected?
Yes, Certainly Exercise and lifestyle changes help to correct Anterior Pelvic Tilt.
You can correct an anterior tilt by using specific exercises, and stretches, with some lifestyle modifications. If your work requires sitting for a prolonged time, make sure to enough breaks and do a few simple exercises like stretches, and strengthening exercises mentioned in the post.
What causes anterior pelvic tilt?
Anterior Pelvic Tilt occurs mostly due to tight hip flexors, Back muscles, weak gluteal muscles, abdominal muscles, and poor postural lifestyle. Some may have congenital variations in their pelvis, such as acetabular retroversion, which can lead to Anterior Pelvic Tilt.
How do you straighten anterior pelvic tilt?
To straighten anterior pelvic tilt, perform exercise mainly stretching exercises of the Hip flexors, Back Extensors and Strengthening exercise of Hip Extensors, Abdominal muscles, and core muscles also make some lifestyle changes such as avoiding prolonged sitting positions and trying to alter with standing desk, reducing the use of High heel shoes.
How long does it take to fix anterior pelvic tilt?
Mostly mild to moderate deformities of anterior pelvic tilt can be improved in just four to six weeks. However, it depends upon the severity, associated symptoms, muscle tightness, and also depends upon muscle weakness. Although it may vary from person to person. While few may start to fix APT within a few days others might require more time.


21 Comments