
High Ankle Sprain
What is a High Ankle Sprain?
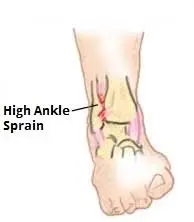
A high ankle sprain is a sprain of the ankle’s higher ligaments, which are located above the ankle. These ligaments connect the fibula and tibia, supporting the entire area during actions like running and walking.
A high ankle sprain occurs when those ligaments are damaged or torn, which is commonly caused by rotating or twisting your ankle. This form of sprain is less common than sprains in the lower ankle.
A high ankle sprain (SAS) is a sprain of the syndesmotic ligaments that connect the tibia and fibula in the lower leg, resulting in a fixing and tendon joint for the ankle. High ankle sprains are classified as such because they occur above the ankle.
They account for around 15% of all ankle sprains. High ankle sprains occur when the lower leg and foot externally rotate (twist out), as opposed to common lateral ankle sprains, which occur when ligaments around the ankle are injured through inward twisting.
Mechanism of High Ankle Sprain
The ankle joint is made up of the talus lying in the mortise formed by the tibia and fibula, as previously mentioned. Because the talus is wider anteriorly (in the front) than posteriorly (in the back), as the front of the foot is lifted (dorsiflexed), reducing the angle between the foot and lower leg to less than 90°, the mortise is confronted with an increasingly wide talus. When the foot is forced to rotate outward, the force increases.
This sequence of events can occur when the front of a hockey player’s skate strikes the boards, forcing the foot outward.
It can also happen in football when a player is on the ground with their leg behind them, the foot at right angles, and a rotational force is abruptly delivered to the heel, such as when someone lands on their foot. Overall, the most common mechanism is external rotation, which can occur with such quickly that the real mechanism is unknown.
In this sequence of events, the most vulnerable structure is the anterior inferior tibiofibular ligament, which connects the lower ends of the tibia and fibula and is critical to the mortise’s maintenance.
The injury to this ligament might range from a simple stretch to a full rupture. The medial malleolus and medial collateral ligament, which are located on the inside of the ankle, provide some protection against additional injury.
Should these tissues fail, the stress will be transmitted beyond the anterior inferior tibiofibular ligament to the strong membrane that connects the tibia and fibula for the majority of their length. This stress may then exit via the upper end of the fibula, resulting in a Maisonneuve fracture.
Epidemiology
Syndesmotic ankle sprains are common among sportsmen engaged in football and downhill skiing. Football injuries are mainly caused by forced external rotation of the foot while the participant is prone, i.e. at the bottom of the pile.
Injuries can also develop from a hit to the lateral knee when the foot is grounded and dorsiflexed, causing an eversion or external rotation moment at the talocrural joint.
In downhill ski racing, the boot does not allow dorsi- or plantar-flexion movement, which can lead to excessive talocrural external rotation and injury to the anterior or posterior tibiofibular ligaments and interosseous membranes.
Anatomy of High Ankle Sprain
As previously stated, the syndesmosis or high ankle ligaments connect the tibia and fibula, allowing some rotation. This ligament complex contains three primary components. Ligaments join bones to prevent them from moving apart and preserve normal movement between the bones, whereas tendons attach muscles to bones, allowing them to move sections of the body.
- The first ligament, the anterior inferior tibiofibular ligament (AITFL), runs in front of the two bones.
- The second is termed the posterior inferior tibiofibular ligament, or PITFL, and it runs in the back.
- The interosseous (IO) membrane runs through the midst of them, providing significant support between the two bones.
Signs and Symptoms of High Ankle Sprain
Observationally, the Syndesmotic will have substantially less edema than a lateral ankle sprain, as well as a loss of full plantar flexion and the ability to bear weight. Ecchymosis can emerge several days after a lesion to the interosseous membrane. The difficulty or inability to toe walk is frequently reported.
Chronic pain, lengthy recovery, recurring sprains, and heterotopic ossification of the interosseous membrane are all part of the history. The most common MOI occurs when the foot is in external rotation with significant dorsiflexion.
Symptoms of a high ankle sprain are:
- Some swelling.
- The inability to bear weight on the injury makes activities such as climbing stairs difficult.
- Unable to walk on your toes.
- Bruising begins days after the injury.
What causes a High Ankle Sprain?
A high ankle sprain occurs when your ankle is injured while your foot is bent upward and subsequently twisted inwards or outwards. It nearly invariably results from a collision, rather than the rolling motion that causes other ankle sprains. High ankle sprains nearly always occur while you are running or jumping.
What’s the difference between a high and a low ankle sprain?
- The distinction between a high and low ankle sprain is not just based on location.
- High ankle sprains are caused by twisting inward or outward with your foot flexed up.
- The majority of low ankle sprains occur when the ankle rolls inward; some occur when the ankle rolls outward.
- Low ankle sprains do not include the high ankle ligaments.
- When we hear that someone has a sprained ankle, we usually think of low ankle sprains.
Which ligaments are involved in a high ankle sprain?
High ankle sprains can damage or tear the following ligaments:
- The anterior inferior tibiofibular ligament-The anterior inferior tibiofibular ligament is located in front of the tibia and fibula.
- The posterior inferior tibiofibular ligament-The posterior inferior tibiofibular ligament is located in the back of the tibia and fibula.
- The interosseous membrane: The interosseous membrane, which is positioned in the central space between the tibia and fibula, serves to stabilize them.
- A high ankle sprain can cause any of these ligaments to be strained, partially torn, or fully torn.
How common are high ankle sprains?
High ankle sprains are less prevalent than low ankle sprains. High ankle sprains are common among sportsmen who play:
- Football, basketball.
- Wrestling.
- Ice hockey.
- Activities include skiing and soccer.
Diagnoses and Tests
The first thing your physician will do is ask you why you’re there and take your medical history. The following phase will be a physical examination.
To diagnose a high ankle sprain, your provider may:
- Have you ever sat with your knee bent, leg, and foot hanging down?
- They will push up on your foot and twist it slightly to the outside.
- If you’re in a lot of pain, you probably have a high ankle sprain. Your provider may wish to do this test a few days following your injury.
Perform the syndesmosis squeeze test – They will squeeze your tibia and fibula together, exerting pressure on the interosseous membrane. If you experience discomfort higher up your leg, you most likely have a high ankle sprain.
- Press on the interosseous membrane to see if you are experiencing pain.
- Check for pain by pressing on the ligament across the front of your ankle.
- Order imaging tests like X-rays, MRI scans, CT scans, and maybe ultrasounds.
- An MRI is the best diagnostic for a high ankle sprain, but your doctor may order X-rays to rule out other ailments.
Examination
Observation/Gait Analysis: Look for differences
- Palpation reveals discomfort near the anterior tibiofibular ligament and interosseous membrane.
- Palpate the medial and lateral malleoli for the presence of a fracture
- The fibula should be palpated from distal to proximal, including the proximal tibiofibular joint, to rule out Maissoneuve’s fracture.
- Check for pedal pulses and take measurements.
- Notable swelling of the ankle: take Figure 8 girth measurements.
Special Testing
Kleiger’s Test (Dorsiflexion External Rotation Stress Test)
Identifies rotator damage to the deltoid ligament or the distal tibiofibular syndesmosis.
Done by having the knee flexed by 90 degrees with the ankle in a neutral position and giving an external rotational force to the affected foot and ankle.
(+) test: Pain in the anterolateral ankle. If the talus moves away from the medial malleolus, it indicates deltoid ligament injury.
Interrater kappa= 0.75 (best)-
Squeeze Test
Separation of the tibia and fibula
Identifies a fibular fracture or syndesmosis sprain.
Done by squeezing the tibia and fibula together above the injury.
(+) test: Pain will be felt along the fibular shaft if there is a fibular fracture, and along the distal tibiofibular joint if there is a syndesmosis sprain.
interrater= 0.5 (moderate).
Cotton Test
Assess for syndesmosis instability with diastasis.
Performed: steadying the distal leg with one hand while gripping the plantar heel with the other hand and moving the heel directly from side to side.
(+) test: Any lateral translation will suggest syndesmotic instability.
Fibular Traslation Test
To carry out this test, have your patient lie sideways and stand on the side of their heel.
Then, with one hand, stabilize the tibia and use the other to make anterior and posterior fibula translations.
This test is positive for syndesmosis injury if pain develops during translations or if the affected side moves more than the unaffected side.
Imaging tests
- Imaging is still considered the standard diagnostic method, and it should be done as soon as possible to rule out any potential fractures and aid in the restoration of normal anatomy.
- A one-millimeter lateral displacement of the fibula reduces the accessible area of tibiotalar contact in weight-bearing by 42%. One can easily see how a “minor” yet misdiagnosed injury can result in a lifetime of chronic sprains.
- Plain features are the bare minimum indicated, but due to the complexity of the structures and tissues, a CT scan is recommended for bone detail.
- MRIs provide an accurate view of the ligamentous injury and are considered the imaging gold standard for this condition.
- Only arthroscopy has a higher level of precision. Images should be taken bilaterally to identify an injury from a natural joint gap or overlap.
- Syndesmotic ankle sprains with no diastasis are thought to be stable and managed symptomatically.
- These patients are instructed to weight bear as tolerated. Patients who have a sprain with latent diastasis, where the decrease of the tibiofibular joint can be verified with CT or MRI, do not always require surgery.
Treatment of High Ankle Sprain
- Patients with these results are frequently treated with a non-weight-bearing cast or walking boot for 4 to 6 weeks.
- Patients with a high syndesmotic ankle sprain who have diastasis of the syndesmosis but no fibular fracture require surgery. Surgical stabilization should begin immediately.
- Surgical repair, which involves open repair of damaged ligaments and closed treatment of ligaments with open or percutaneous insertion of a transverse syndesmosis screw, has been demonstrated to be effective.
Physical Therapy exercises
Goals:
First two weeks: Increase ROM, decrease pain and swelling, protect ligaments against further injury
Week 3 and onward: Restore normal ROM, strengthen ligaments and supporting muscles, training to increase endurance and balance
The most essential long-term goal is to avoid re-injury.
Patient Education:
- Surgeon/PT’s suggested weight-bearing protocol
- Avoid intense physical activity until complete weight-bearing and dynamic balance have returned.
- Gait training with crutches, boots, or brace
- Fall risk
Assistive Devices:
Crutches must be used until a normal, pain-free gait is established.
For unstable injuries, use a walking boot or a stirrup brace.
Modalities:
RICE (rest, ice, compression, elevation) in the beginning for 15 min 3x a day.
Nonsteroidal anti-inflammatory medications and comfrey ointment have been demonstrated to help with short-term rehabilitation after an acute ankle injury.
Therapeutic Exercise/ Neuromuscular Re-education:
First two weeks:
- AROM flexion
- ankle alphabet
- dorsiflexion/plantarflexion
- inversion/eversion with theraband.
Weeks 3-4:
- Standing Stretch
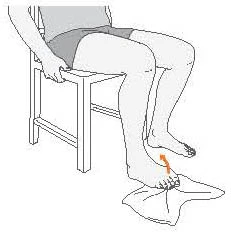
- seated dorsiflexion stretch with theraband
- double heel raise advancing to single heel raise
- dorsiflexion stretching on
- step stool
- Progressive weight-bearing and treadmill gait training can help promote a normal gait pattern.
Neuromuscular re-education: Ankle Proprioception, Postural Reflexes, and Balance
Examples: single-leg stance, disk or balancing pad training, and water therapy.
Progress to Walking, jogging, Stair Climbing, cycling, agility, jumping, and sport-specific drills.
Exercises should be modified to avoid hyper-dorsiflexion (which stresses the mortise joint), subtalar eversion, and loaded external rotation.
Exercises for high ankle sprain
Ankle range of motion exercises
These exercises are basic motions that you can repeat up to five times each day to help you maintain your ankle’s range of motion and flexibility.
The Ankle Alphabet
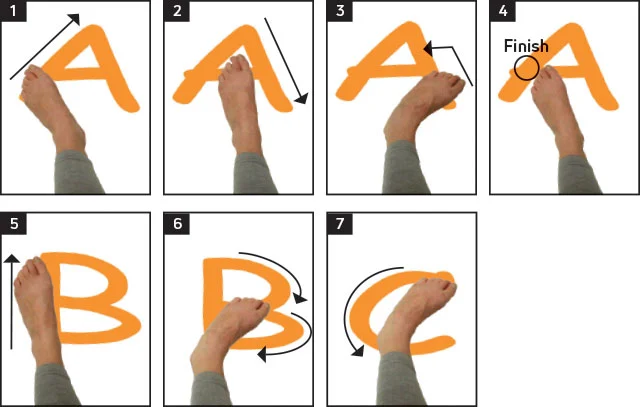
- Sit on a couch or in a comfortable chair.
- Extend your leg and use your big toe to trace the alphabet letters in the air.
- If there is no pain, you can do this twice or three times.
- This easy exercise will allow you to move your ankle in all directions.
Knee motion
- Sit in a chair and place your foot flat on the floor.
- Keep your foot on the ground and slowly move your knee from side to side for 2 to 3 minutes.
- This stretches and relaxes the ligaments surrounding your ankle.
Towel and tissue scrunches
- Place a little towel on the floor in front of you as you sit in a hard chair.
- Remove your shoes and socks, then softly grip the towel with your toes, scrunch it up, and count to 5.
- Then, release the towel and repeat.
- Do this 8 to 10 times—or less if you’re in pain.
Ankle stretching exercises
The Achilles tendon connects the muscles of your calf to the heel bone, going behind your ankle. Stretching your Achilles tendon is the next series of exercises you should start as soon as possible.
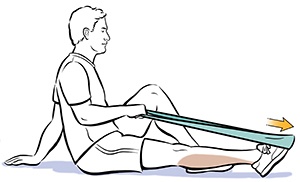
Towel Stretch
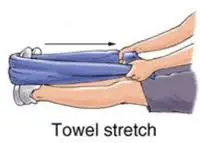
- Sit on the floor with the leg out in front of you.
- Wrap a cloth or strap around your ball of foot.
- Pull back on the towel, allowing your toes to slide toward you.
- Hold the stretch for 15–30 seconds.
- Don’t overdo it.
- You merely need a modest to moderate stretch in your calf muscle.
Standing Calf Stretch
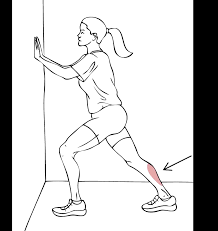
- Stand facing a wall or in front of a countertop, hands on it for support.
- Position your damaged ankle about one step back and your good foot forward.
- Keeping your back heel level on the floor, gradually bend the knee of your good leg until you feel a moderate stretch in the calf of your injured leg.
- Perform 3 times and hold for 30 seconds.
Heel lift
- Stand with your hands in front of you, resting them on a wall, countertop, or chair back for support.
- With your feet shoulder-width apart, carefully lift up on your toes and return to the ground. Start with roughly ten of these and gradually increase to twenty or more.
- Remember that you only want a modest stretch with no pain.
- When they become second, you can progress to completing them just with your affected side’s toes.
One-leg balancing
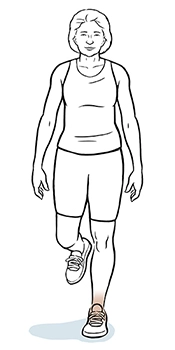
- Lift your good leg behind you with your hands on a wall, countertop, or chair back, ensuring that your weight is supported by the leg with the injured ankle.
- Try to hold this for 20-30 seconds.
- As your strength improves, try it with just one or two fingers.
- When you’re stronger, don’t hold on.
Ankle strengthening exercises
Once you have a good range of motion and can comfortably bear weight on your sprained ankle, you can move on to the next step: strengthening exercises. These exercises require a resistance band. This is a simple elastic band that may be purchased from a sports goods store, online, or at a physical therapist’s office.
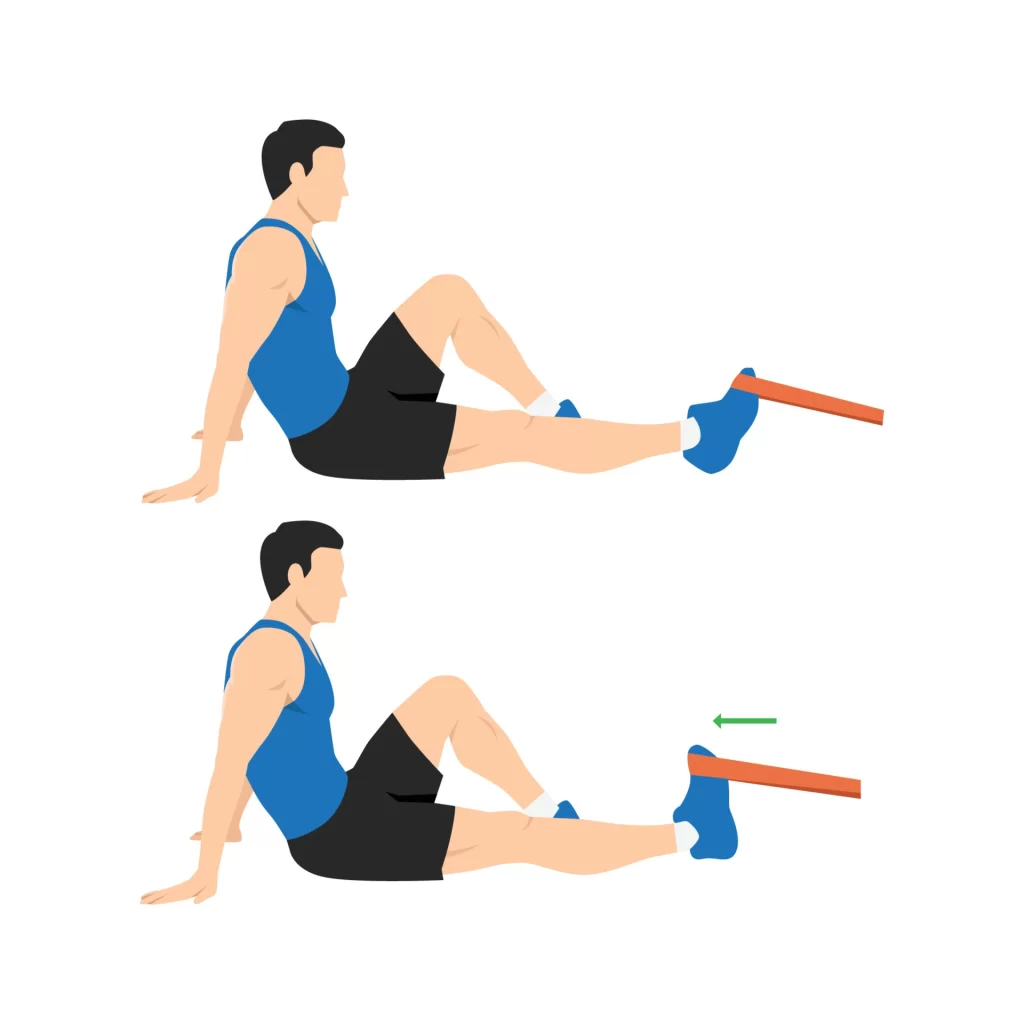
Elastic Band Push
- This is a variant on the towel stretch, but with resistance.
- Sit on the floor.
- To keep your heel from touching the floor, prop up your ankle with a rolled-up towel or swimming noodle.
- Place the elastic band around the ball of your foot and secure the two ends.
- Now, carefully push your ankle forward as if you were pointing your toe.
- Then slowly bring it back.
- Repeat this ten times.
- If you are in discomfort or your ankle feels unsteady, do not use the band.
- Tie your resistance band around a hefty item, like a desk or table leg.
- Sit on the floor and hook your toes and upper foot into the band.
- Slowly lift your foot back towards you and bring it to a vertical position.
- Repeat this ten times.
Ankles out
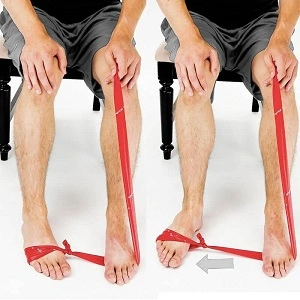
- Tie the resistance band around a hefty object.
- Sit or stand, then hook the inside of your foot into the end of the band.
- Slowly slide your foot outside and back.
- Begin with ten repetitions, gradually increasing to twenty.
- You can also perform this while sitting down, with your ankle supported by a rolled towel or noodle.
- Make a loop at the end of the resistance band and hook it around your foot.
- Now, position the band to go around your good foot.
- Your excellent foot functions as a pivot.
- Holding onto the end of the band, turn your ankle out.
- Begin with ten repetitions and then progress to twenty.
Ankle in
Hook the inside of your foot into the resistance band, which is secured around a heavy item. Now, carefully move your foot inward against the resistance band and bring it back. Repeat 10 times and increase to 20 times.
Ankle balance and control exercises
- Regaining muscle control is an important element of the rehabilitation process.
- A sprain causes nerve fibers to be destroyed.
- As you restore strength, your brain must acquire awareness of where your ankle is and how precisely to move it.
- This sense is known as proprioception.
Basic balance

- Stand on your damaged foot, elevate the other foot from the floor behind you, and try to keep your balance.
- If you feel unstable, use the back of a countertop or chair as support.
- Try holding it for a few seconds at first.
- Then, if possible, increase the time to 30 seconds or one minute.
Balance with the eyes closed
- Now perform the fundamental balance exercise with your eyes closed.
- This is far more difficult because you don’t have visual points of reference to assist you in balancing.
- Make sure you have some form of assistance.
- Try to work up to 30 seconds and 1 minute, if possible.
Pillow balance

- Repeat the fundamental balance exercise while standing on a pillow.
- This is a lot harder.
- Even if your ankle isn’t injured, your foot will wobble a lot, requiring you to constantly maintain your balance.
- See if you can make it 30 seconds to one minute.
- Stop if a person begins to experience pain in their ankle.
Pillow balance with eyes closed
- This is the most hard exercise.
- See how long you can stay balanced while standing on a pillow with your eyes closed.
- Make sure you have anything available for assistance.
- If possible, extend your time from 30 seconds to 1 minute.
- However, don’t be discouraged if you can’t.
- These exercises help to retrain and improve the connections between your ankle and your brain.
FAQ
Can you walk with a high ankle sprain?
Crutches are recommended until you can walk pain-free. To assist you in walking without crutches, your doctor may recommend a supportive brace, air stirrup, or walking boot. Physical rehabilitation should begin as soon as possible after a grade I sprain.
Which is worse: high or low ankle sprain?
A high ankle sprain results from a strain or tear in the ligaments that join the tibia and fibula. This is a rotational sprain, not an ankle roll. High ankle sprains are more dangerous than low ankle sprains. This variety usually takes twice as long to recover.
What is the fastest way to recover from a high ankle sprain?
Self-care
Rest. Avoid any actions that produce pain, edema, or discomfort.
Ice. Apply an ice pack or ice bath immediately for 15 to 20 minutes, then repeat every two to three hours while awake.
Compression. Compress the ankle with an elastic bandage until the swelling subsides.
Elevation.
How severe is a high ankle sprain?
High ankle sprains, like low ankle sprains, are characterized by noticeable bruising and swelling more up the leg. However, they often take at least twice as long to heal, ranging from three weeks to four months, or more in extreme cases.
How does one strengthen a high ankle sprain?
Cords/bands, ankle weights. Heel raises: begin with the foot flat and move to the edge of the step (unweighted to weighted), step up/step down, adding heel lifts as needed, calf press with isotonic equipment, leg press, and standing fire hydrant.
References
Gotter, A. (2019, January 8). Do I have a high ankle sprain? Healthline. https://www.healthline.com/health/high-ankle-sprain#vs-low-ankle-sprain
Wikipedia contributors. (2023a, May 17). High ankle sprain. Wikipedia. https://en.wikipedia.org/wiki/High_ankle_sprain
High ankle sprain (Syndesmotic injury) | FootCareMD. (n.d.). FootCareMD. https://www.footcaremd.org/conditions-treatments/ankle/high-ankle-sprain
Professional, C. C. M. (n.d.-f). High ankle sprain. Cleveland Clinic. https://my.clevelandclinic.org/health/diseases/22249-high-ankle-sprains
Hecht, M. (2019, February 15). 15 exercises for your sprained ankle. Healthline. https://www.healthline.com/health/sprained-ankle-exercises#range-of-motion


One Comment