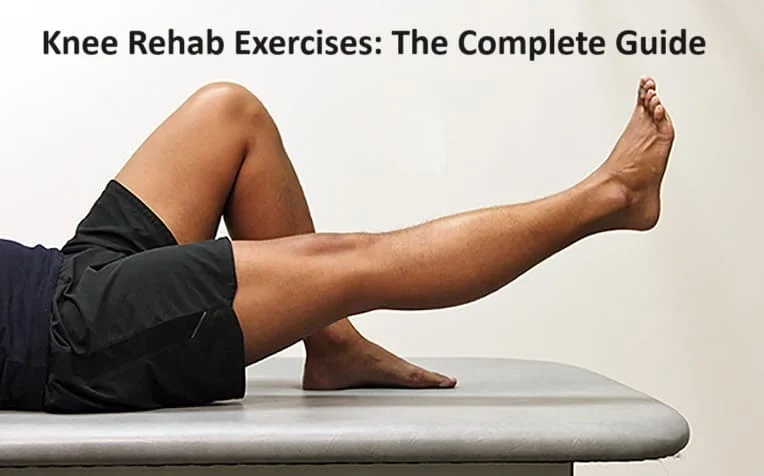
Knee Rehab Exercises: The Complete Guide
Introduction
Knee rehabilitation exercises play a crucial role in promoting recovery and restoring function following knee injuries or surgeries. Whether you’re dealing with a strained ligament, meniscus tear, or recovering from knee replacement surgery, a well-structured rehabilitation program can help improve strength, flexibility, and stability in the knee joint.
These exercises are designed to target specific muscle groups, enhance joint mobility, and gradually reintroduce weight-bearing activities. A comprehensive and tailored rehabilitation plan, often prescribed by healthcare professionals or physical therapists, aims to optimize recovery and minimize the risk of future injuries.
In this guide, we will explore a range of effective rehabilitation exercises to support the healing process and foster a return to optimal knee function. It is crucial to consult with a healthcare professional before starting any exercise program to ensure that the chosen exercises are suitable for your specific condition and stage of recovery.
Program for Knee Exercise
This regimen should be followed under your doctor’s supervision to guarantee your safety and effectiveness. To find out which exercises will assist you in reaching your rehabilitation objectives, An exercise conditioning program will assist you in getting back to your regular activities after surgery or an injury and help you lead a healthier, more active lifestyle. A carefully developed conditioning regimen might also facilitate returning to sports and other activities you enjoy.
Strength: You can lessen the strain on your knee joint by strengthening the muscles that support it. Stiff muscles aid in the knee joint’s stress absorption.
Flexibility: Restoring the range of motion and avoiding injury requires stretching the muscles you have strengthened. After performing strengthening activities, gently stretching your muscles can help keep them long and flexible and reduce pain.
Target Muscles: This conditioning program focuses on the following muscle groups:
The front of the thigh’s quadriceps
The rear of the thigh’s hamstrings
outer thigh abductors
Inner thigh adductors
The gluteus maximus and medius (buttocks)
Program length: Until your doctor or physical therapist advises differently, you should stick with this for 4–6 weeks. These exercises can be done as part of a maintenance program once you’ve recovered to keep your knees healthy and protected for the rest of your life. By doing these exercises two or three times a week, you can keep your knees strong and flexible.
Rehab. exercises for the Knee
Stretching activities for the lower body can assist in increasing your knee joint’s flexibility and range of motion. Your knee may move more easily as a result of this.
Attempt to warm up for at least five to ten minutes before stretching. Good warm-up options are low-impact exercises like walking, utilizing an elliptical machine, or riding a stationary bike. The stretches should be performed after you’ve warmed up and before the knee-strengthening exercises. Make an effort to stretch and exercise four or five times a week at the very least.
Pain should not be ignored; it should not be experienced when exercising. If you have any pain during exercising, consult your physician or physical therapist.
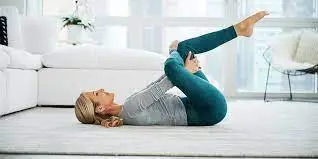
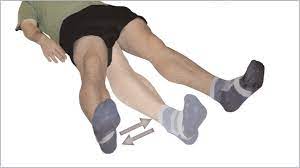
Leg raises
The muscles involved are the abdominal (stomach) and quadriceps (front of the thigh) muscles.
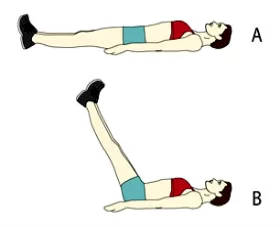
Required equipment: Add an ankle weight to progressively increase the resistance as the exercise gets easier to complete. Start with a 5 lb weight and work your way up to a 10 lb weight as you steadily increase the resistance. You can also do this exercise on a weight machine if you have access to a fitness center. You can get safety instructions on how to operate the machines from a fitness assistant at your gym.
Place your back flat on the floor and lie down. For comfort on a hard floor, use an exercise mat, yoga mat, or folded blanket.
To get the foot nearer to the body, maintain the left leg straight and narrowly bend the right leg at the knee.
Imagine your tummy button dragging down toward the floor to help you bring your abdominal muscles inward. By doing this, you should press your lower back against the floor and add additional support for the exercise. To ensure there is no space between the small of the back and the floor, put a hand underneath the lower back. Carefully press the lower back down on top of the hand if there is room for it.
Lift your left leg gradually without bending at the knee. When the leg is about 12 inches above the ground, stop, keeping the toes pointing upward. It should not be higher than the flexed knee on the right leg.
Raise your left leg for five seconds.
Return the leg to the floor gradually. Don’t drop it or set it down too soon. Using the same leg, repeat two more times.
Alternate sides and carry on.
How not to act: Throughout the workout, avoid letting your back arch.
neglect jerking, bouncing, or weight lifting the bent leg beyond the knee.
This exercise is not recommended for people who have osteoporosis or a compression fracture in their back.
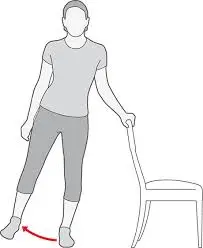
Curls of hamstrings standing
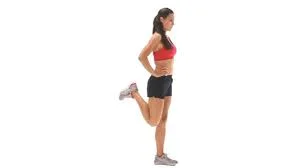
The gluteal (buttock) and hamstring (back of the leg) muscles are involved.
How to conduct: Just 1-2 inches separate your knees as you stand up. For balance, cling to a sturdy chair, the countertop, or something else.
Bend one knee slowly behind the body, maintaining the thighs parallel as you raise the heel off the ground. When the knee bends to a ninety-degree angle, keep lifting the heel smoothly. To prevent locking, maintain a small bend in the straight leg.
After five seconds of holding the bent leg elevated, carefully lower it to the ground.
Using the same leg, repeat two more times.
Alternate sides and carry on.
How not to act: Avoid flexing your foot or pointing your toes on the raised. give grant the foot to stay in a neutral, flat pose
Curls of the hamstrings on a weight bench
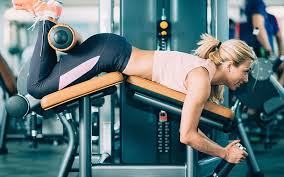
The hamstrings and gluteal muscles are the muscles involved.
A modified version of the standing hamstring curl is this exercise. If someone has access to a weight bench designed specifically for this exercise, they can try this version. Depending on how much weight is used, it could be more difficult than the standing hamstring curl.
How to conduct: On the bench, place your face down and your knees close together. For stability, hold on to the handles.
Place the feet beneath the load. Directly above the heels is where the weight should be.
Bend both knees slowly, pushing the weight up with your legs. Raise the weight steadily until the knees bend to a ninety-degree angle.
Take up the weight for 8 seconds and then gradually lower the weight back down
execute up to 12 reps,2 sessions per day, three a week
How not to act: Don’t use a big weight when you first try this workout. As they gain strength, beginners should start with the lightest weight and work their way up to heavier ones.
Static quads movement

You are seated against the wall. The main purpose of this workout is to treat knee joint issues.
Place your left leg out in front of you and take a seat on the ground or the plinth.
Just below your left knee, place a tiny roll of towels.
Raise your right knee and plant your right foot firmly on the floor. Currently, flex your left foot while tensing the muscles in your upper thighs.
Push the towel next to your right knee in the direction of the floor. Push the cloth toward you while bringing your toes towards you.
maintain your shoulders relaxed and neglect squeezing over.
For a duration of 7 to 10 seconds, maintain the knee press position. then let go of your leg.
8 to 10 times, repeat this.
complete this task three-time
not to perform: If any pain arises when exercising
your physician suggests that you rest.
whether moving around will make your pain worse.
Roll the iliotibial band
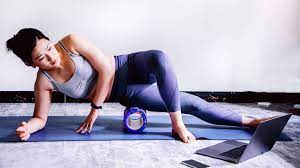
Running and cycling enthusiasts frequently complain of tightness in their IT bands. When the muscles in the upper leg are adequately warmed up and stretched before running, it is frequently avoidable. By using the foam roller both before and after your run, you may prevent this injury and continue to run pain-free.
Between the hip and the knee, roll up and down the outside of your upper leg. Increase the amount of time you work on any sore or tight spots you feel. Roll for a duration of 15 to 30 seconds, then switch to the other side.
Adductor Roll

Many times, the adductor muscles are neglected. Although the muscles are used all the time, they are sometimes overlooked when performing stretches and other strengthening activities. This muscle group can be kept supple and injury-free by applying a foam roller to it.
Place the foam roller beneath your upper right leg while lying on your stomach. To position the foam roller on the inner of your leg, turn your right foot outward. Lay your arms out in front of you on the ground to help the lower body
With the foam roller beneath the outside of your upper right leg, lie on your side. Curl your left leg above your right to help your lower body while you rest your right arm on the ground to maintain your upper body. Roll from the hip to the knee on the inside of the upper right leg. Increase the amount of time you work on any sore or tight spots you feel. Roll for a duration of 15 to 30 seconds, then switch to the other leg.
Foam Roll exercise Quadriceps
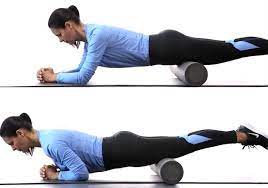
Since the quadriceps are a big, commonly used muscle group, soreness, and tightness in them are difficult to overlook. Pain in the hips and lower back may also result from the tightness. These issues can be resolved by lengthening the muscles and releasing tension with a foam roller.
Place the foam roller beneath your upper legs while lying on your stomach. To support your upper body, place your arms on the floor in front of you, and maintain the toes on the floor to aid the lower body. With just enough pressure to feel the roller’s benefits, roll up and down the upper leg between the hip and the knee. Increase the amount of time you work on any sore or tight spots you feel. Repeat on the opposite side after rolling for 15 to 30 seconds.
Step movements
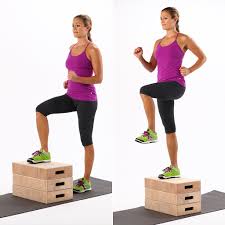
Hip flexors, gluteal muscles, hamstrings, and quadriceps are the muscles involved.
how to conduct: Make use of a big, stable stool or workout platform that is no more than 6 inches tall.
Allow the left foot to trail behind as you take the right foot up onto the stool. The left foot should dangle behind the stool rather than resting on it.
Try to maintain your weight on your right foot for a maximum of five seconds.
Step down with the left foot gradually, and then the right foot.
Change your legs and progress with your left foot once.
continue for 2 minutes then rest for a few seconds then again continue
3 sessions per day
Things not to perform: During this exercise, avoid locking your knees. The knees must be kept somewhat bent.
Make sure that no portion of the stepping foot is hanging off the platform or stool.
Individuals with balance problems should not do this workout.
One-leg dip
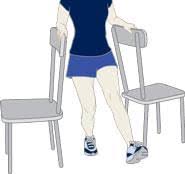
The hamstrings, gluteal muscles, and quadriceps are the muscles involved.
How to conduct: Position one high-backed, stable chair on each side of the body, with the backs of the seats close to the arms. For balance, rest a hand on the back of each chair.
elevate your right leg roughly 12 inches off the floor. The left leg should support all of the weight.
As you gently sag a few inches, shift your weight to the assisting leg’s heel.
For 3-5 seconds, maintain.
Straighten up gradually.
Continue and alter sides.
5 to 10 reps,2 times a day
Things not to perform: When elevating a leg, avoid bending backward. preserve a straight upper body and back.
Keep the supporting leg’s knee from advancing over the toes.
Wall squeezes
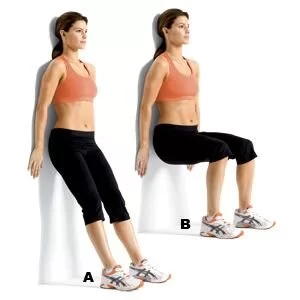
Quadriceps and gluteal muscles are implicated.
How to conduct: Place your back, hips, shoulders, and head flat on a wall.
Maintaining your back and shoulders against the wall, step out both feet about 24 inches away from it. Make sure your feet are no wider than your hips.
Gently lower the back down the wall until it is slightly higher than the sitting position.
After holding for five seconds, slide back up.
Repeat.
Points to avoid: Avoid squatting too low. It is improper for the knees to cross the toes.
Avoid making quick, snapping motions. Execute the exercise smoothly and gently.
Clamshells
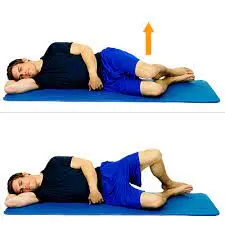
By strengthening the hip muscles, which can help to minimize knee discomfort, the clamshell exercise is an excellent technique to reduce knee pain. By increasing muscle stability and flexibility, this exercise may assist in lessening localized discomfort.
How to conduct: With the soles of your feet put on top of one another and your knees bent at a ninety-degree angle, lie on your side. For added stability, rest one arm beneath your head while the other rests comfortably on top of your hip.
Keeping your feet together, slowly raise your upper knee toward the ceiling until you feel the muscles. Keep this job for five to ten seconds before lightly getting back the knee to its original point
For each leg, perform a clamshell exercise ten to fifteen times.
For best effects, try to finish the entire set of these two to four times a day.
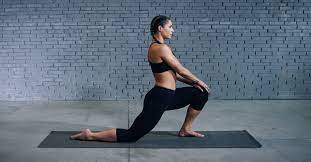
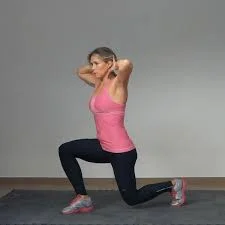
Forward Lunges
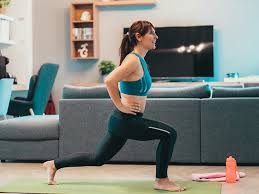
Goal: Excellent knee rehabilitation exercises to improve knee control and strength
Beginning Position: straight with feet facing forward
Action: Keeping the majority of your weight on your front leg, step forward with one leg and lower your back knee. Lift your front leg off the ground to stand again.
10–30 repetitions for each leg
Top Advice: Maintain a straight back and toes pointed forward.
If you see that your front knee is crossing your toes, take a step further forward.
Progress: As you perform the workout, grasp weights.
One-Legged Deadlift
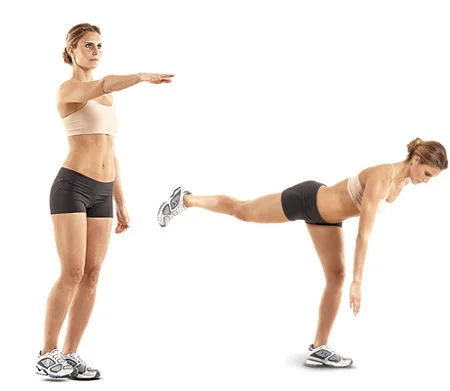
Goal: Boost knee control and balance, two crucial components of knee rehabilitation activities
Beginning Position: One-leg stand
Action: extend your second leg behind you and slowly touch the floor; then, slowly come back to your starting position.
10–30 repetitions for each leg
Progression: Arrange objects, such as cones, in a semicircle on the ground, then reach for one cone at a time.
When performing balance exercises for knee rehabilitation, keep your knee slightly bent.
Groin stretch
A groin stretch facilitates post-exercise body changing and aids in quieting your nervous system. It can also aid in reducing stiffness and loosening up the hip joints.3. Here’s how to incorporate a seated butterfly stretch into your cool-down.
The butterfly stretch primarily targets the adductor muscles in your inner thighs and the groin region. It also aids in releasing tight hips and establishing a connection with the lower back.
How to perform: Sit with your feet flat on the floor and your knees bent.
The knees should droop to the sides as you place the soles of your feet together in front of you. To keep the feet together, you need to use your hands.
With your elbows on the inner of your thighs and your back straight, bend toward your feet.
Apply gentle pressure with your elbows to increase the stretch even further.
After maintaining for twenty to thirty seconds, repeat two to four times.
Calf and heel stretch
This stretch primarily targets the muscles in your lower thigh. principal muscles used: Complex of Gastrocnemius and Solus
This stretch should be felt in your heel and calf.
How to conduct: Stretch by standing with your back to the wall.
Put your hands on the wall and step back as far as it is comfortable for you. Your knees should be slightly bent, your toes should be pointed forward, and your heels should be flat.
Take a 30-second breath hold and lean into the stretch. Your back leg should be feeling stretched.
Swap out legs and continue.
On each leg, perform this stretch twice.
Advice: Avoid moving your back.
Stretching the quadriceps standing
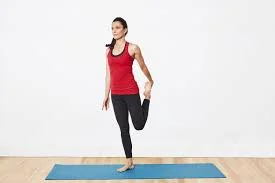
Targeted main muscles: quadriceps
standing quad stretch must be felt in the front of the thigh.
How to conduct: For balance, place one hand on a wall or hang onto the back of a chair.
Raise one foot behind the torso and place a hand over the ankle.
Maintain a straight back and close-knit knees.
Draw the heel in toward the buttocks without putting undue strain on it.
After holding for a maximum of 30 seconds, gradually drop the leg.
Alternate sides and carry on.
Advice: Avoid twisting or arching your back.
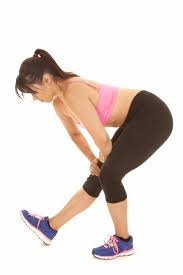
Toe contact

The rear of the legs’ hamstrings can be stretched in a variety of ways. One way is through the custom of touching toes.
How to conduct: Bending at the hips, steadily extending the arms downward while keeping the feet close together. Legs should stay straight but should not squeeze the knees.
For thirty seconds, extend your fingers to the tips of your toes and hold them there.
It might not be feasible to reach the toes at first. In this instance, aim to bring the fingers as near the toes as possible without creating any discomfort.
Points to avoid: Avoid making bouncing motions. Maintain bodily stillness.
Hamstring stretches when standing
Stretching your hamstrings while standing is a good method to loosen up the backs of your legs, and it’s less taxing on your lower back than toe touches.
How to conduct: Maintain a straight posture and place your feet shoulder-width apart.
Extend the right leg a few inches in front of the torso while bending slightly at the hips. Permit the left leg to flex a little.
Slowly lower the chest while maintaining a straight back.
As low as you can bend without hurting yourself. Take a 30-second break.
Reposition the leg slowly about the body, then stand up straight.
Continue with the opposite leg.
Buttocks bridges
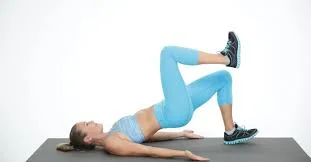
A set of muscles in the buttocks called the glutes influence how the knee moves. An excellent exercise that works them as well as other leg muscles is the glute bridge.
How to conduct: With your feet roughly shoulder-width apart and your knees bent, lie on your back. Put your palms up and your arms relaxed, far away from your body. As your body makes a straight line from your knees to your shoulders, slowly lift your hips off the floor and push them upward with your knees flexed. After a few seconds of holding the pose, gradually drop your hips to the floor.
For buttocks bridge exercise, proper form is crucial. Avoid rounding or arching your back. Maintain a line with your feet, knees, and hips.
Stretching the hamstrings supine
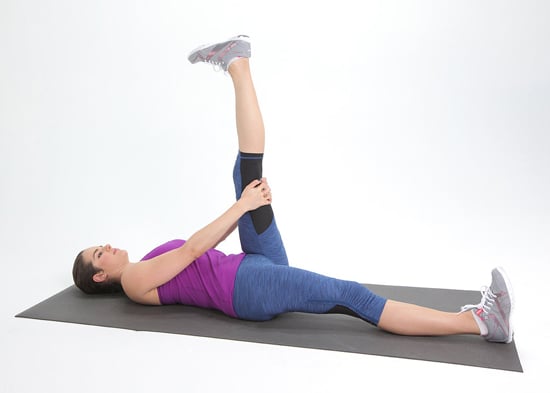
Your hamstrings, or the muscles in the rear of your thigh, are the focus of this stretch.
This stretch should be felt up to the base of your glutes and at the back of your leg. Your calves could also feel stretched if you flex your foot.
To perform this exercise: You can cushion your back during this stretch by placing a pad underneath it.
Straighten both of your legs while you lie on the mat or the floor. You can also bend both knees with your feet flat on the floor if that seems more comfortable.
Take a single leg off the ground.
Slightly lift your knee toward your chest till you feel a tiny stretch with the hands behind your thigh but below the knee.
the stretch should not be painful, preserve for 30 seconds
back down the leg and alter legs, continue two times on the individual side
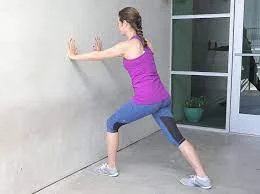
Half-kneeling stretch for hip flexors
How to conduct: Get down on your knees. If you’d like, place a towel or workout mat beneath your knee.
With your left foot outstretched, bend your left knee to a 90-degree angle. ensure that your right leg is straight behind you by placing the top of your right foot down.
Curl your pelvis under by placing your hands on your hips and squeezing your glutes. For the next section, you may either leave your hands there as well as lay the knee on your knee.
Move your weight forward till you feel a stretch at the front of your right hip while maintaining a forward look and a straight back. Maintain without jumping or shifting for one to two minutes.
Come back the knee on the left to the floor, transfer your weight back, and continue on the other side.
Dynamic floor stretch for hamstrings
How to conduct: Stretch your legs out while lying on your back.
The left knee should be bowed toward the chest. Wrap your left hand over your thigh and place both hands behind it.
With your arms straight and your upper body relaxed, bring your left leg toward you. There’s no need to pull very hard; just try to get your knee stacked over your hip.
With your foot pointed toward the ceiling, straighten your left leg. Then, slowly and deliberately bend your knee back to relax. If you are unable to straighten completely, simply as far as feels comfortable.
For one to two minutes, keep doing this bending and straightening.
Repeat on the other side after lowering the left leg to the floor and straightening it out.
Figure 4 Supine stretch
How to conduct: With your feet flat on the ground and your knees bent, lie on your back.
Overlay your right knee with your left ankle.
Grab behind your right thigh with both hands as you extend your hands around it. Till your left hip and glute are stretched, pull your leg toward your chest.
After holding for one to two minutes, go back to the beginning and repeat on the other side.
Note: Applying a little pressure with your left palm to the inside of your lifted left knee might also help to slightly expand your left palm.
Figure four standing
How to conduct: Standing with your feet shoulder-width apart, raise your right leg. Extend your left knee to the side and bring your right ankle across your left thigh. Relaise yourself as you approach a chair. It should be balanced here. Bend your foot to the right. If you’d like, you can spread your right thigh even farther by lightly pressing your hands into it. It is also necessary to perform the figure four exercise while seated. After a few breaths of holding, switch sides.3-5 repetitions, twice daily
Remember your feet: Despite being often disregarded when it comes to stretching, they too get a workout, especially during cardiovascular exercise.
Leg-Up Piriformis Stretching
As indicated, lie on your back. Try to make your left leg touch the ground with your right hand as you raise it and bring it across your torso. Maintain a level shoulder to the ground. Hold for 20 seconds, then reset your position and do the opposite leg. Perform ten iterations for every leg.
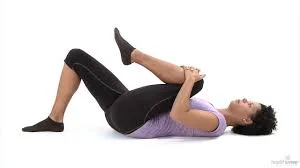
Knee stretch
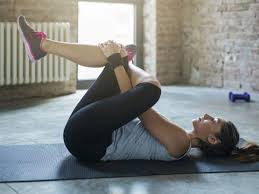
As indicated, begin by bending your right leg slightly and crossing your left leg over your right. When the right leg is straight up, but no higher, grab it at the back of the thigh and draw it toward your chest. come back to the initiating position after preserving for five seconds. Repeat with your other leg. Perform ten iterations for every leg. stop if knee stretch exercise causes more pain to the sore pain
Half Squats
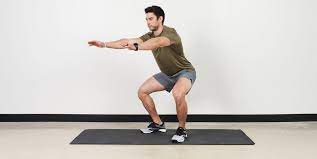
The hamstrings, gluteus, and quadriceps were the main muscles used.
This exercise should feel particularly good for your buttocks, thighs, and front and rear.
Required equipment: Holding hand weights can let you gradually increase the resistance as the activity gets easier to complete. Start with 5 lb. weights and work your way up to 10 lb. weights as a higher degree of resistance.
Reps Four to five sets of ten days each week
Step-by-step direction: Take a stance with your feet shoulder-width apart. You can reach out in front of yourself or place your hands on the front of your thighs. For balance, cling to the back of a chair or wall if necessary.
Maintain a raised chest while lowering your hips gradually by about 10 inches, as though you are sitting down in a chair
Take five seconds to hold the squat with your weight planted in your heels.
Raise your body back up to a standing position by forcing through your heels.
Advice: Avoid bending forward at the waist.
Deadlifting
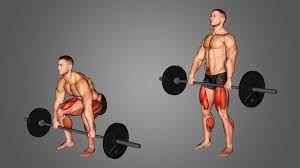
How to conduct: Place your toes slightly outward and place your feet shoulder-width apart. all over the movement, maintain your shoulders back, your body erect, and your eyes forward.
Tighten your core and turn your hips backward as if you were tapping your butt against the wall behind you while maintaining your weight against the front of your body.
Maintaining a level back, move the weight along the front of your tibia bone as you decrease it toward the floor. Keep going till your spine begins to round and/or your hamstrings feel tight. Finally, push your hips forward by tensing your glutes. It is one rep.
Do three sets of ten repetitions.
Note: You can perform deadlifting exercises with a kettlebell, dumbbell, or barbell bar in addition to without gripping any weight.
Walking Monster (Side Steps)
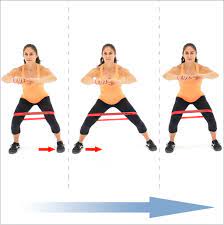
How to conduct: Place a resistance band just above your ankles, and stand with your feet hip-width apart, knees slightly bent, and toes pointed forward.
Step to the left while bending your knees slightly and maintaining a firm core and an upright upper body. Take a step that causes resistance without causing your knees to buckle. Continue moving leftward for a total of ten to fifteen steps. Once you stop, take the same number of steps to the right to get back to where you were before. That is set
Take three sets of ten to fifteen steps to each side.
Notes: You can perform more sets and fewer steps if you don’t have a lot of floor space. You would perform six sets, for instance, if you could only complete five steps.
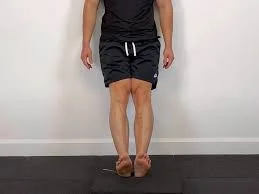
Calf Lifts
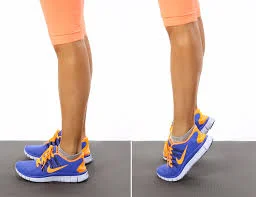
Gastrocnemius-soleus complex was the primary muscle used.
This exercise ought to feel in your calf.
Required equipment: Chair for assistance
reps 2 sets of 10 repetitions
session per week for 5 to 6 days
Step-by-step directions: As you stand, balance your weight equally on both feet. For balance, hang to the back of a chair or a wall.
To put all of your weight on your affected foot, raise your unaffected foot off the ground.
As high as you can manage, lift the affected foot’s heel, then bring it back down.
Do this ten times.
Advice: Maintain your balance on the ball of your working foot.
Wall-Leaning toe raises
How to conduct: Place your feet about hip-width apart and stand with your back flat against a wall.
Step your feet slightly forward onto your heels and press your back against the wall.
Lift both feet as high as you can while maintaining a straight knee. After a few whiles of holding, bring your toes down to the floor.
Perform 30 repetitions. two to three times per day,
Extended Legs pulses
Worked main muscles: quadriceps
Extended legs while seated exercise should make your front thigh ache.
Required equipment: Add an ankle weight to progressively increase the resistance as the exercise gets easier to complete. Start with a 5 lb weight and work your way up to a 10 lb weight as you steadily increase the resistance. You can also do this exercise on a weight machine if you have access to a fitness center. You can get safety instructions on how to operate the machines from a fitness assistant at your gym.
Repetitions 3 sets of 10 reps
session Per Week for 4 to 5 days
Step-by-step directions: Upon a chair or bench, sit up straight.
Tighten the muscles in your thighs, then slowly elevate the affected leg as high as you can.
For five seconds, clench your thigh muscles and maintain the position. Sit back grab your foot to the floor and repeat
Advice: Avoid swinging your leg or using too much power to raise it higher.
Prone straight-leg raises
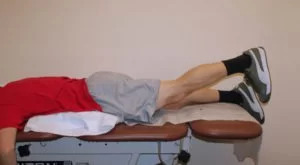
Primary muscles activated: gluteus and hamstrings
During this workout, your buttocks and rear thighs should feel worked.
Required equipment: Add an ankle weight to progressively increase the resistance as the exercise gets easier to complete. Start with a 5 lb weight and work your way up to a 10 lb weight as you steadily increase the resistance. You can also do this exercise on a weight machine if you have access to a fitness center. You can get safety instructions on how to operate the machines from a fitness assistant at your gym.
Repetitions 3 sets of 10 reps
Days Per Week 4 to 5 days
Step-by-step directions: With your legs straight, lie on your stomach on the floor. Head on your arms, please.
Raise the afflicted leg as high as possible toward the ceiling by tightening the hamstring and gluteus muscles.
Keep your posture for five seconds.
After lowering your leg, take a two-second break. Repeat.
Advice: Maintain your pelvic bones on the ground.
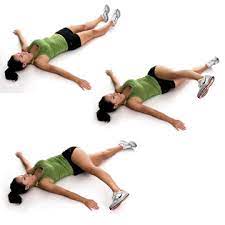
Abduction of the Hips
Primary muscles activated: gluteus and abductors
This exercise should cause your buttocks and outer thighs to ache.
Equipment needed: Add an ankle weight to gradually increase the resistance as the workout gets easier. Start with a 5 lb weight and work your way up to a 10 lb weight as you steadily increase the resistance.
3 sets of 20 reps
4 to 5 days per week
Step-by-step directions: With your wounded leg elevated and your lower leg bent for support, lie on your side.
Maintaining a straight but not locked knee, extend your upper leg slowly to a 45° angle.
Keep your posture for five seconds.
Lower your leg gradually and hold it there for two seconds. Repeat.10 reps 3 sessions per day
Advice: Avoid rotating your leg in an attempt to lift it higher.
Hip Adduction
Mainly used muscles: adductors
This exercise should cause your inner thigh to ache.
Equipment required: Add an ankle weight to gradually increase the resistance as the workout gets easier. Start with a 5 lb weight and work your way up to a 10 lb weight as you steadily increase the resistance.
three sets of 20 reps
per week 4 to 5 sessions
Step-by-step directions: With both legs straight, lie down on the side of your damaged leg on the floor.
In front of the wounded leg, cross the leg that is not damaged.
Lift the wounded limb six to eight inches off the ground.
Keep your posture for five seconds.
Lowering your leg and rest for 5 seconds and then continue
8 to 10 reps,3 times a day
Advice: For support, put your hand on the ground in front of your tummy.
The Leg Press
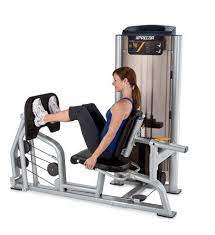
The hamstrings and quadriceps were the main muscles used.
This exercise should be felt at the front of your hip and the front and rear of your thighs.
Equipment required: An elastic stretch band with a comfortable resistance is ideal for this exercise. Raise the resistance level progressively as the workout gets easier. Ankle weights should not be used for leg press exercises. You can also do this exercise on a weight machine if you have access to a fitness center. You can get safety instructions on how to operate the machines from a fitness assistant at your gym.
3 sets of 10 reps
session 4 to 5 per week
Step-by-step directions: Grasp the ends of the elastic band in each hand and position the middle at the arch of your foot. Bend your elbows while lying on the floor.
Pulling your affected leg’s thigh muscle taut will help you raise your knee closer to your chest.
Pushing against the elastic band, flex your foot and slowly straighten your leg in front of you.
For two seconds, maintain this posture. Lean back and lower your leg to the ground. Repeat.8 to 10 reps 2 sessions per day
Advice: Maintain a taut abdominal region throughout the exercise.
Sit/Stands
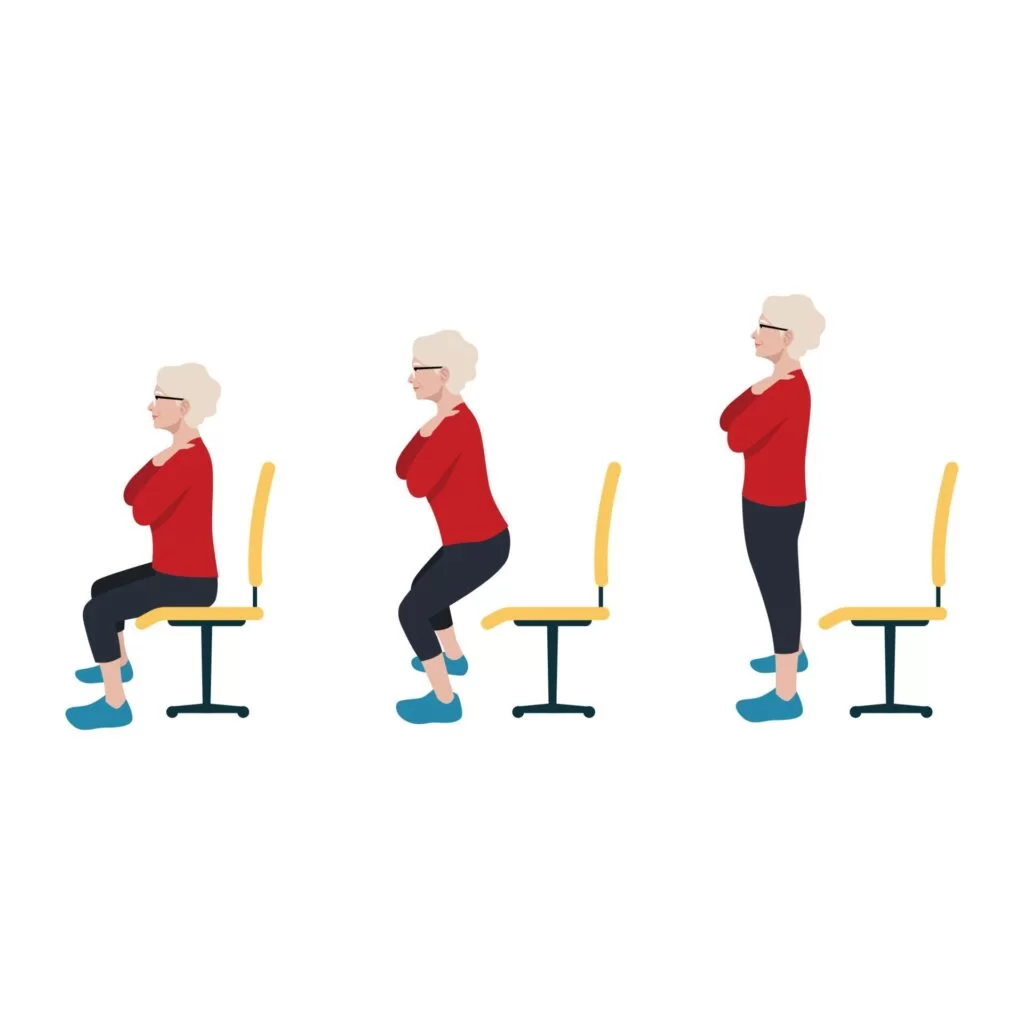
Make sure you perform this workout in a solid chair.
With your feet roughly shoulder-width apart, take a chair and lean slightly forward.
Stand up gradually and without using your hands.
Turn the motion around and take a seat.
Repetition as much time as you should
Dog Facing downward
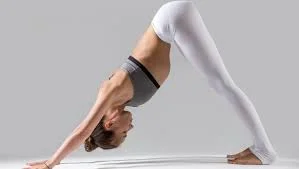
How to conduct: Put yourself on your hands and knees.
As you relax your upper back between your shoulder blades, straighten your arms.
Lengthen your knees and raise your hips while maintaining a bent knee position. Here, you want to create the outline of an inverted “V.”
Straighten your legs and let your heels fall toward the floor while keeping your spine long if your hamstring muscles are flexible.
Bend your knees enough to maintain a long spine if you notice that it begins to curl as you straighten your legs.
For five breaths, hold
Cobra

How to conduct: With the legs straight, lay on the surface of your stomach.
The tips of your toes should be pointed behind you, your feet should be hip-width apart, and your legs should be firm.
To prevent collapsing into the lower part of the spine, push down via your pubic bone.
As you raise the chest off the floor, shift your weight onto your forearms.
Look straight ahead while ensuring that your neck is long.
For five breaths, maintain.
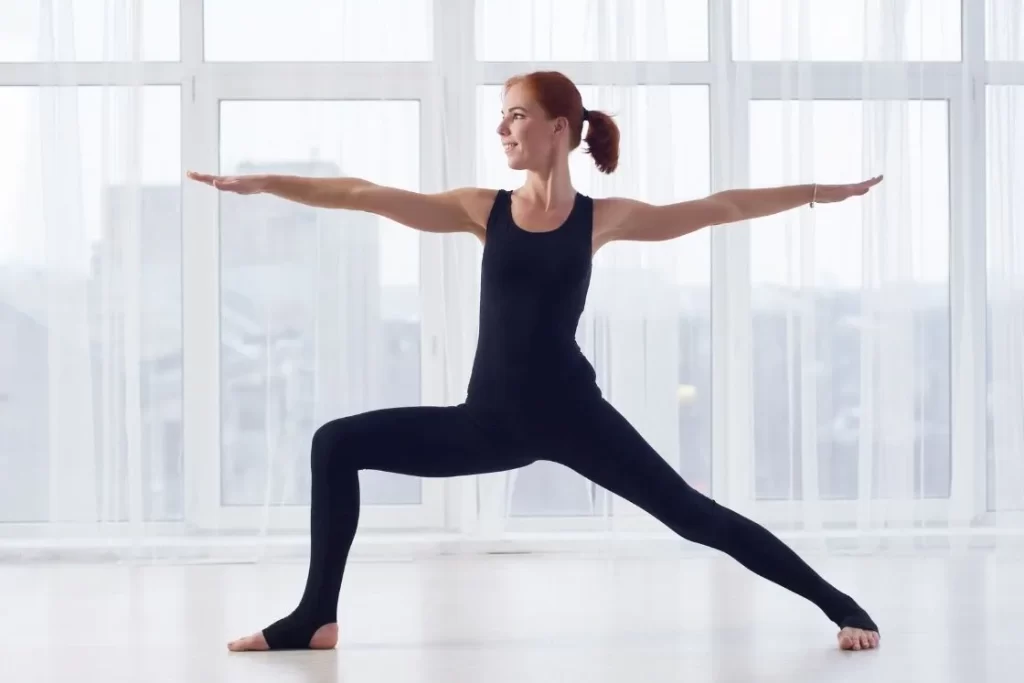
Warrior 1

How to conduct: Step your right foot forward until your toes line up with your fingertips in Adho Mukha Svanasana (Downward-Facing Dog Pose), then gently move your foot to the right.
Your front knee should be 90 degrees bent. Roughly equal to the floor should be your thigh, with your right outer hip pinned back and your knee set over your ankle.
Turn your left heel toward the floor so that your foot is angled 45 degrees toward the mat’s edge. To increase stability, put your feet slightly wider or line up your left and right heels.
To ensure that your left knee is straight, press your left thighbone back. Elevate your chest and extend your arms as you inhale, keeping your palms facing each other and your hands shoulder-distance apart. As they move farther away from your spine and toward your outer armpits, let your shoulder blades expand and rise. Tighten your triceps into your midline and rotate your biceps back. You might look up at your thumbs while bringing your palms together.
Release your tailbone toward the floor and continue pressing your left femur back. Pull your lower abdomen upward and away from your right leg.
Count to ten or so breaths.
Step back to Downward-Facing Dog, release your hands to the floor, and repeat on the opposite side.10 eps,3 sessions per week
Warrior 2
How to conduct: Position your feet wide apart and face the long side of the mat with your arms extended straight from your shoulders. Ideally, your ankles should be about below your wrists.
Face the front of the mat with your right foot and knee turned in.
Point your left toe somewhat in the direction of the mat’s upper left corner.
Your right knee should be flexed and set beyond your right ankle.
Balance your weight equally on each leg. Using the outside edge of your rear foot, apply pressure.
Maintain a balanced posture with your shoulders over your hips and your head above your pelvis.
Make a firm reach with both arms towards the front and rear of the mat, then stare past your right fingertips with your head turned.
Take five to ten breaths here.
Exhale as you press through your feet to release the stance, then inhale and straighten your legs. Put your feet back in line while facing the mat’s left long side.
Continue on the opposite side 8 to 10 reps on both sides,3 sessions per week
Warrior 3
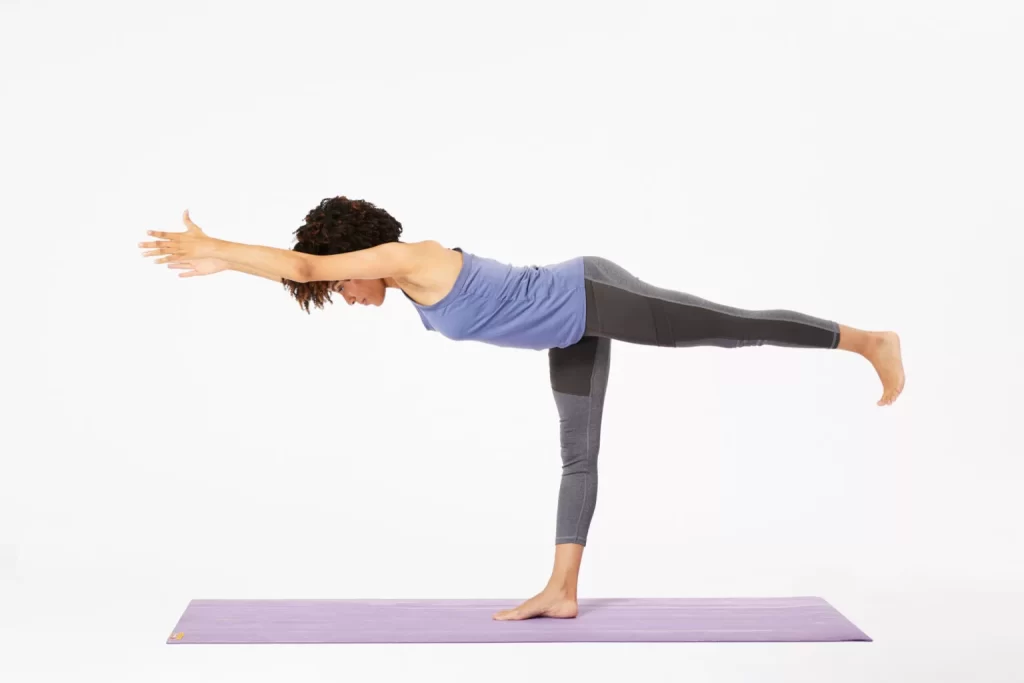
How to conduct: Step forward with your right foot to start Warrior Pose I.
Lift your lower abdomen by firmly planting your right heel on the ground. This will draw your abdominals in and up while releasing your tailbone downward. As you extend your left leg, firmly plant your right outside hip against your midline.
Draw additional length into your side by energizing your body. To bring your left outer hip forward, turn your left inner thigh toward the ceiling. Then, rotate onto your back toes to bring your back leg into a neutral posture.
Take a breath to extend your back.
Let out a breath, lean your head forward, and extend your arms forward.
Lower your left leg until it is parallel to the floor, then shift your weight into your front foot and continue forward.
keep in mind that your head, body, pelvis region, and raised leg create a straight line, and your upper arms equally your ears.
To keep your leg normal and your pelvis level, keep turning your left inner thigh toward the ceiling.
To maintain your standing leg stable, preserve your right outer hip attached.
extending your arms, your sternum, and the top of your head forward, push back with your left heel.
To help your lower back, tone your lower abdomen and point your tailbone in the direction of your left heel.
Breathe for five to ten breaths, then gently return to Warrior I by bending your right knee and taking a step back with your left foot.
Go out and do the same on the other side
.
beginning advice: During the position, if the hip bone of your raised leg rises, release it toward the floor till both hip points are perpendicular to the floor and even. As you reach as vigorously forward with your arms, strengthen your back leg and extend it powerfully toward the wall behind you.
To avoid the front knee locking or hyper-extending, try to visualize the front calf pushing against the shin as you straighten the knee.
Arc Position

How to conduct: Remain upright. While maintaining the inside of your left foot firmly planted on the ground, shift your weight to your left foot and bend your right knee.
With your toes touching the floor, raise the right foot and press the sole against the inner left thigh, inner calf muscle, or inner ankle. To check if your pelvis is parallel to the floor, place your hands parallel to the ear level.
Stretch your tailbone down toward the ground.
Apply pressure with the right foot sole to the inner thigh, calf, or ankle, and use the outer left leg to resist.
Straighten your arms above your head. Make sure your shoulders remain relaxed.
After holding for five breaths, switch to the opposite side.
Forward-seated fold

How to conduct: With your legs extended in front of you, sit on the ground. flexed the knees if the hamstrings are contracted.
Toes pointing upward should be the position of your flexed feet.
Take a lofty stance and extend your spine.
As you fold forward, maintain a long spine and lead with your chest.
Put your hands on your legs in a comfortable posture.
For five breaths, hold 8 to 10 reps,3 times a day
Pose in Bridge
How to conduct: Position yourself on your back, legs bent, and place your feet hip-distance apart on the mat. As much as you can, bring your feet up to your glutes.
Place your arms with your palms down by your sides.
Using your feet as a strong pressure point, raise your hips as you inhale, starting the movement from the pubic bone instead of the navel.
Put pressure on your upper arms. You can place your pinkie fingers against the mat and clasp your hands behind your back. Roll your shoulders under you and widen your collarbones.
Maintain a hip-distance apart posture by drawing your thighs closer to each other and applying solid pressure through your heels. To stretch your spine, reach the back of your thighs toward your knees.
Exhale as you release your hands and gently drop yourself to the mat to complete the movement.10 reps 3 times in week
beginning advice: Just keep your arms at your sides, palms down, if you have stiff shoulders or severe pain when you try to bind your hands behind your back.
An important part of the stance is to keep your neck in its natural curve. Avoid pressing your neck’s back into the mat.
When your hands are clasped, extend your chest and suck your upper arms under your shoulders. Avoid pulling your shoulders too hard away from your ears as this can cause your neck to strain.
When in this stance, avoid turning your head to one side. Maintain a straight line of sight toward the ceiling.
Supine Twist
How to conduct: rest your back. Lift your feet off the floor and give yourself a hug embracing both knees.
With your palms facing upward toward the ceiling, form a “T” with your arms.
Bend both knees in the direction of your mat’s right side.
You can either stare up at the ceiling or in the other direction from where your knees are.
After five breaths of holding, switch sides.
reps according to your capacity
Cow-Cat
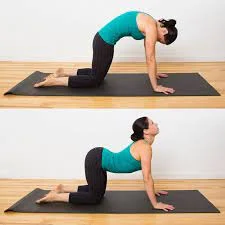
How to conduct: obtain over the palms of your hands. It is ideal to place your knees beneath your hips and your wrists beneath your shoulders.
On all four limbs, equally distribute the weight.
Take a breath, raise your head, and tilt your stomach so that it faces the mat.
After that, release the air and bring your chin up to your chest, raising your spin to the ceiling.
As you perform these exercises again, pay attention to your body and your breathing.
For five breaths, keep moving in this water-like manner.
reps according to one’s capacity
Stabilization lunge
How to conduct: Place one foot in front of the other while you stand with your legs apart.
One knee should be progressively bent to a 90-degree angle before being slowly raised.
Maintain alignment of your front knee with your foot.
For each leg, aim for three sets of ten repetitions.
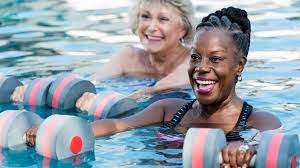
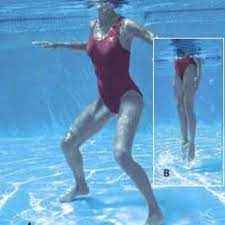
Walk in the water
An excellent place to start is walking in the water, which gives you a sense of how resistance might be created. You may work on your lower body, arms, and core by walking in the water. Utilizing hand or ankle weights will boost the intensity.
How to conduct: Step into waist-deep water to begin your stroll.
Instead of walking on your tiptoes, lengthen your spine and place pressure on your heel first, then your toes.
As you walk, maintain your arms by your sides in the water and move them.
As you walk, stand tall and use your core.
Walk for a further five to ten minutes.
Water arm lifts

Your arm muscles will become stronger as a result of this exercise. Dumbbells made of foam must be utilized to boost resistance.
How to conduct: Stand shoulder-deep in water.
With the palms facing the ceiling, grasp the dumbbells at your sides.
As you raise your forearms to the water’s surface, bring your elbows close to your body.
To make your palms facedown spin your wrists.
come back to the initial position by moving the arms downward.
For each movement, perform 1-3 sets of 10–15 reps.
Lateral arm elevations
This is another great upper-body exercise that works well with foam dumbbells.
How to conduct: Stand shoulder-deep in water.
Dumbbells should be held at your side.
Raise your arms out to the side until your shoulders and the water are level.
Return your arms to your sides by lowering them.
Perform 8–14 repetitions in 1-3 sets.
Back wall glide
This workout aids in strengthening the muscles in your lower body and core.
How to conduct: Tuck your knees against your chest, plant your feet firmly against the wall, and cling to the pool ledge.
As much as you can, push off the wall and float on your back.
Press your feet to the bottom of the water, pull your knees into your chest, and run back to the wall
continue the back wall glide exercise for 5 to 10 minutes
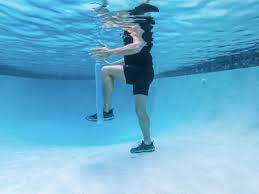
jumping jack in water
Your upper and lower body muscles are worked as you perform jumping jacks. Ankle and wrist weights must be utilized to increase resistance.
How to conduct: Take a chest-deep stand in the water.
Place your feet together and keep your arms by your sides to begin.
To jump, extend your legs and raise your arms above your head at the same moment.
With your feet together and your arms by your sides, jump once more to get back to the beginning position.
Perform 8–12 repetitions in 1-3 sets.
Leg shoots
This vigorous workout targets your legs, lower back, and core.
Throughout leg thrusts exercise, maintain your feet off the bottom of the pool.
In your chest, tuck your knees.
Floating flat on your back and rapidly thrust your legs and feet out in front of you.
Return the knees to your chest.
To make yourself appear to float on your stomach, extend your legs behind you.
It is repeated once. Perform 8–12 repetitions in 1-3 sets.
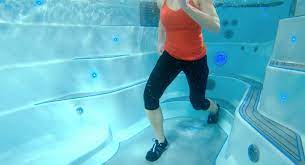
High-knee lift extensions
You can improve your lower body and core muscles with this exercise. To form it harder, include ankle weights.
Take a waist-deep stand in the water.
Lift your right leg and bend your knee till your leg is level with the water by using your core.
Take a few moments to pause with your leg elevated.
Stretch your leg straight out and stay there for a short while.
Leg down slowly, maintaining its straight position.
With the left leg, repeat the high knee lift extension motion.
maintain going for five to ten minutes.
Leg kicks
Your legs and core muscles will be worked during this exercise. To form it harder, utilize ankle weights.
Remain stabilized by the pool ledge or grasp a kickboard.
Kick and flutter your legs.
extend and flex the legs with a scissor kick.
Use your legs to kick in a breaststroke.
Then execute dolphin kicks.
Spend 1-3 minutes on each kick.
Safety advice for water aerobics of the knee
When exercising in the water, you might perspire more than you think, so make sure you stay hydrated by consuming lots of liquids both before and after.
If you’re not a confident swimmer, wear flotation gear such as a vest or buoyancy belt.
Stay away from exercising in a pool that is hotter than 90°F (32°C).
Give up working out if you feel: feeling faint or weak, experiencing lightheadedness or dizziness, difficulty breathing, nausea, and pain or pressure in your upper body or chest
Pranayama breathing workout for the knee
Practicing breath control is essential to yoga. Pranayama is the formal term for this practice. “Ayama” is the Sanskrit term meaning extension, whereas “prana” can be defined as life force, energy, or qi.
To get you started on your yoga path, below are some simple pranayama practices:
Pranayama Ujjayi
The most popular yoga styles that incorporate ujjayi pranayama are Ashtanga and Vinyasa. By compressing the leaf-shaped cartilage flap called the epiglottis, which is situated behind the tongue at the top of the voice box, one can produce an oceanic sound while using this breathing technique. During your practice, this sound seeks to ground your thoughts.
Ujjayi Approach
How to conduct: Inhale through your nose and exhale.
Four breaths in and four breaths out are counted. Finish all four rounds of this.
When you take your fifth breath, softly inhale into your mouth, closing it as though you were drinking through a straw.
Try to exhale as gently as possible, as if you were boiling up a mirror while keeping your mouth shut. Breathe in this manner throughout your entire yoga practice.
Nadi Shodhanam pranayama
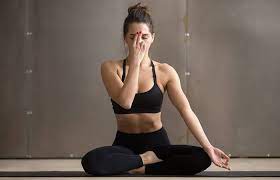
Alternate nostril respiration for slowing down inhalation and exhalation is known as Nadi Shodhanam. In addition to balancing and managing energy via the left and right sides of the body, this approach promotes a state of interior calmness, stability, and peace of mind by equally balancing the autonomic and thoracolumbar nervous systems.
The Nadi Shodhanam method: Locate a chair or spot on the ground that seems comfortable. It’s also possible to be lying down or to be motionless.
Shut your eyes and inhale and exhale deeply via your nose for a few deep breaths.
Shut your right nostril with the thumb on your right hand. After five counts of inhalation via your left nostril, take your thumb out. Close your left nostril with a different finger on your right hand, then exhale five times through your right nose.
Now alternate, taking five breaths through your right nostril and exhaling through your left.
Do this three to nine times.
Viloma Pranayama
The goal of this breathing method is to relax your nervous system and brain. You can perform it alone, at the beginning or finish of your yoga practice.
Viloma method: You can sit comfortably or lie down.
Put your other hand on your heart and your first on your belly.
Shut your eyes. breathe in and breathe out deeply via the nose a periodic times.
Take a quick breath and hold it in your abdomen, allowing a third of the breath to pass through your lips like a straw. Then, pause for a moment.
Take another sip, about one-third of it, into your side ribs and wait a second.
Take in your last third of breath and hold it in your chest.
Breathe out slowly using your nose.
Continue three to nine times.
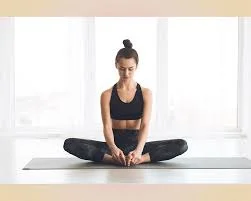
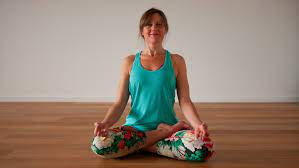
Mindfulness and meditation exercises for the knee
The yoga practice includes both mindfulness and meditation as essential components. As previously stated, the goal of physical yoga practices is to get the body and mind ready for meditation.
The two basic components of mindfulness are as follows: Recognize the bodily feelings you are experiencing and pay attention to them without passing judgment.
You can practice the easy, attentive counting meditation that’s given below at home:
Method of meditation: Locate a relaxing place to sit.
Decide on a duration of five to ten minutes for your meditation session.
Shut your eyes.
Observe the noises surrounding you. As they arrive and leave, pay attention.
Focus on your body and its physical aspects.
Concentrate on your feet with your awareness starting from your head.
Raise your consciousness to your respiration
As you breathe in, take note of how cool it is, and as you exhale, how warm it is. Count the breaths that you take. inhale in 1 count and exhale on 2 count. Proceed with the counting until you reach ten. Continue till your meditation is over.
Yoga improvement advice: Once you are comfortable with the basic yoga poses, start a home practice.
Attend workshops in your community where instructors can go into greater detail about particular facets of the yoga practice.
By paying attention to how your body feels and how relationships and interactions with others feel outside of your yoga practice, you can observe the effects that a regular yoga practice has on you.
Make a note of your feelings when you’re not practicing. This may increase your awareness of the advantages of yoga.
Tai chi
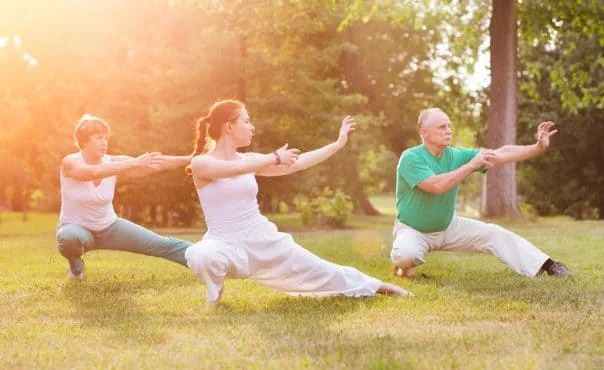
Tai chi emphasizes precise motions and good posture, which are hard to pick up on your own. If you’ve never done tai chi before, enroll in a class or hire a teacher.
How to conduct: When practicing tai chi, you place your feet firmly on the floor and alternate your weight between your right and left legs while executing a series of flowing movements. Tai chi is regarded as a mental and physical workout. Tai chi is also an exercise for the mind, body, and soul, according to some. The body is our physical well-being, the spirit is our breath, and the mind is a person’s ideas, feelings, attitudes, and beliefs. Tai chi affects each of the areas of an individual.
In tai chi, mindfulness, movement, and breath all work together. You are expected to concentrate and breathe naturally while you move your body through the physical motions (or postures) of tai chi. Your joints are soft (not fully extended), and your movements are not forced; an example of this would be keeping your knee slightly bent.
Practicing tai chi can be highly contemplative. It’s carried out carefully and gently. Some refer to it as medication in motion or mindfulness on wheels. You may focus your attention, calm your breathing, and remain attentive in class by practicing tai chi.
Tai chi is typically practiced in groups, which can increase enjoyment, foster a sense of belonging, and inspire people to engage in physical activity.
Selecting a tai chi form
Tai chi comes in five different styles, and you can alter any of them to fit your fitness level and goals. Every kind of tai chi involves flowing from one stance to the next.
The emphasis of yang-style tai chi is on relaxation and leisurely, flowing movements. For novices, the Yang style is a good place to start.
Tai chi in the Wu style emphasizes little motions. Practice this form of tai chi very gently.
Tai chi in the Chen style combines swift and gradual movements. This tai chi form could be challenging for you if you should newcomer to the practice
There are many similarities between Sun style and Chen style tai chi. Sun style is less physically taxing because it requires less crouching, kicking, and striking.
The Hao style of tai chi is a less well-known and infrequently used form. This tai chi style is characterized by an emphasis on proper form and internal power.
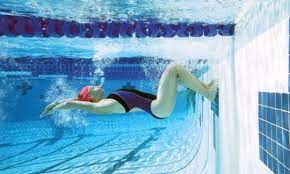
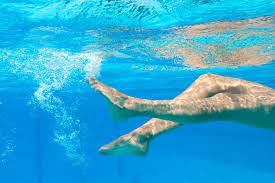
Swimming

One of the best things you can do to help your damaged knees is to swim.
The first step in learning to swim is to locate a local pool. In addition to aqua-jogging and water aerobics programs, many gyms and community centers now provide lap swimming hours. Make a list of all the places in your neighborhood that offer swimming pools, then go check which ones fit your needs both financially and lifestyle-wise.
Get your muscles ready after that, go slowly. Before you step into the water, you could even want to begin your adventure in the gym with strength training to target your muscles. Try exercises like pull-ups, both assisted and unassisted, for as many as ten reps. overhead presses, bodyweight deadlifts, and squats of one-half the body weight should also be good workouts.
If you’re struggling, think about getting form advice from a personal trainer.
Swim instruction
Private or group swimming lessons can be beneficial for people who have never been swimming before. You’ll pick up new strokes, breathing exercises, and other practical advice in classes to help you get the most out of your workout.
Observe the pool’s rules: Make sure to follow the pool rules once you’re in the water. There are usually three lanes: slow, medium, and fast. To determine your optimal pace, ask the lifeguard which lane is which.
Use the left side to pass anyone who is in front of you if necessary. Try to refrain from doing anything that could cause waves or otherwise impede other swimmers when you enter and exit the pool, such as jumping might be a good idea to keep your fingernails and nails clipped to prevent inadvertently scratching other swimmers.
The dangers of swimming: The majority of people can swim safely. Swimming carries some dangers, just like any other exercise. Make careful to see your doctor before swimming laps if you have any injuries or medical conditions. Generally speaking, it’s a good idea to see your doctor if you begin a new fitness regimen.
people who have psoriasis may find that the chlorinated pool water irritates them more. The greatest person to consult for advice specific to your health is your doctor.
Swimming protection
The following swimming safety advice can assist in lowering your risk:
- Swimming is only permitted in places that are roped off from lakes and other bodies of water, such as pools. Try to swim in places where lifeguards are on duty.
- Bring a friend if you aren’t swimming under lifeguard supervision.
- If you’re not familiar with swimming, think about taking lessons. Age-appropriate classes are available through the Red Cross and other local initiatives.
- Swimming in open air To protect your skin, use sunscreen with at least SPF 15 or higher. Also, since the sun is at its zenith during the hours of 10 a.m. and 4 p.m., you might want to steer clear of the pool during this time. Discover more about selecting sunscreen. Even if you don’t feel dehydrated, remember to drink plenty of water. The water may seem refreshing, but swimming can cause dehydration. Stay away from beverages that contain caffeine or alcohol and sip lots of water instead.
- When children are around water, they should constantly be supervised. Children should never swim alone to reduce their chance of drowning.
Walking
All you’ll need is a pair of supportive walking shoes to begin walking. Select a path that you can walk home. Alternatively, search for a beautiful walking location in your neighborhood, such as a beach or path.
Another option is to enlist a family member or friend to walk with you and provide accountability. An alternative is to incorporate walking into your everyday schedule. Here are a few concepts:
If you travel, leave the bus or train one stop early and do the remaining portion of the journey to work on foot.
You should park further away from your office and take a walk to and from it.
When running irritates you, think about walking rather than driving. You can finish your work and do some exercise at the same time.
Guidelines for walking safely
To make sure you’re safe when you walk, remember these pointers:
- Enter spaces intended for pedestrian use. If at all feasible, seek for well-lit spaces.
- Wear a reflector vest or light when you go for a leisurely walk in the evening or early morning hours so that drivers can see you.
- Put on supportive shoes with supportive arch and heel support.
- Put on comfortable, relaxed clothing.
- To stay hydrated, make sure you have a lot of water before and after your stroll.
- Apply sunscreen to avoid getting sunburned, even on overcast days.
Healing and a comfort to pain
The R.I.C.E. approach is a useful tool for treating knee discomfort. The R.I.C.E. technique entails:
Rest: Take a break from placing too much weight on the knee.
Ice: For 20 minutes at a time, place an ice pack wrapped in a towel on the knee.
Compression: To assist in reducing swelling, wrap or bandage the knee with an elastic bandage.
Elevation: Raise the leg as high above the heart as you can whenever you can.
Ibuprofen and other over-the-counter medications can assist in lessening discomfort and swelling. Mild stretches or motions assist patients in keeping their joints mobile and less tight, even though they may need to avoid exercising or performing more squats.
People should consult a doctor if they are still having knee pain from squatting or other activities after allowing the knee to recover. To get their knee better, they might need to see a physiotherapist. Surgery may be required in extreme situations. The kind of injury or ailment affecting the knee will determine how long it takes for the knee to heal.
Advantages of rehab exercises for the knees
Strong and flexible muscles can maintain knee health and avoid injury, according to the American Academy of Orthopaedic Surgeons, but knee exercises may be the most effective non-surgical treatment for osteoarthritis. While they strengthen the surrounding muscles, knee-strengthening exercises have no direct effect on the knee joint itself. Legs with strong muscles can support the knees more effectively. By reducing pressure and strain on these joints, this support may help people become more active and relieve discomfort.
The muscles that surround the knee can be strengthened with the help of these exercises. A person should cease performing these workouts and consult a doctor if they hurt while doing them. If someone has excruciating knee pain, they should see a doctor before attempting to exercise.
Before beginning any knee strengthening exercises, it is best to warm up with some gentle movement. Walking, riding, and utilizing an elliptical machine are a few examples of mild activities that are easy on the knees. The muscles will receive greater blood flow from this exercise, which will improve their flexibility.
Safety Points to Remember
For most people, these knee workouts are easy and safe. While some activities, like lunges and squats, can strengthen the knees, they can also cause injuries if performed incorrectly.
When performing knee exercises, begin with fewer repetitions and work your way up. Stop moving if any part of it hurts. Should your workout regimen leave you sore the next day it becomes difficult for you to move if, the person should be overdoing workouts. slight stretching after the workout would assist in maintaining muscle flexible
How can you assess if the level of your exercise is appropriate?
You can determine whether you’re exercising at the appropriate level with the aid of this guide. It will also enable you to determine the appropriate level of pain or discomfort.
Ranking your pain on a scale of 0 to 10, with 10 representing the worst agony you have ever experienced, can be useful. For instance: 0 to 3 indicates little pain,4 to 5 satisfactory pain, and 6 to 10: severe discomfort
Pain when working out: Try maintaining the scale of your suffering between 0 and 5. If your pain exceeds this limit, you can modify the exercises by:
cutting down on how often you do a movement
lowering a movement’s speed
extending the period of rest between moves
Pain after workout: Your knee pain shouldn’t get worse when you exercise. However, as the body modifies to new motions, attempting new exercises might periodically result in momentary muscular soreness. This type of discomfort should subside fast, and the morning following your workout, the ache shouldn’t be any worse.
Should elliptical be as good as running?
The elliptical is a fantastic substitute for running if you’re searching for something different. You can replicate a running workout by adjusting the resistance and incline, which makes it less taxing on your joints. Nevertheless, the majority of enthusiastic runners will tell you that it’s not the same as a traditional run. Your feet must leave the ground when you hit the roads or trails, forcing your body to adjust to variable conditions. You may be walking on uneven terrain or up and down hills.
This implies that to go forward, you will need to exert more force and use more lower body muscles. Pumping your arms also works important upper body muscles including the triceps, biceps, chest, and upper back while raising your heart rate and calorie expenditure.
The handlebars on many ellipticals enable you to push and pull against resistance; however, unlike the arm motions you do all the time when jogging, this motion is optional when using an elliptical. Furthermore, the machine will perform a portion of your labor. Running is a superior core workout because, while engaging your core muscles is important for any cardiovascular exercise, using an elliptical makes it easier to let these important muscles relax.
Using an elliptical machine as part of a running routine is one method to benefit from the best of both environments. For instance, swap out one day of running outside or on the treadmill for a 30- to 45-minute elliptical workout. Work on heart rate training and intervals during this period. You’ll consequently pay more attention to your cardiovascular system and less attention to the impact.
Should ellipticals good as cycling?
The elliptical machine and cycling are regarded as low-impact cardiovascular exercises.
Cycling and elliptical training are less taxing on the joints than running or other high-intensity exercises since your feet are in touch with the pedals the entire workout. You can adjust the resistance on an upright or recumbent bike to achieve a similar cardiovascular and calorie burn to that of an elliptical. It’s a little trickier to compare outside cycling to elliptical use.
When you go outside, there are additional factors like slopes, uneven ground, trails, and traffic. Instead of an elliptical workout that is steady and somewhat intense, this frequently leads to an interval-based activity. Your body must also adapt to changing conditions when cycling outdoors. So, if you’re searching for a more functional workout that mimics the movement patterns you perform more frequently, cycling might be a better option. Additionally, research based on self-reported data suggests that cycling to work instead of driving a car could eventually lead to reduced weight gain.
How should You take care of your knee after rehabilitation?
If you have suffered a knee injury, you must adhere to the ‘POLICE’ guidelines. Here are some actions to help you heal and lessen your discomfort.
P: shield. Defend your wound from getting worse. After being hurt, take a quick nap, but don’t stay long. Think about utilizing crutches or any other type of support.
Optimized loading, or OL. Act now, before it’s too late. As you increase your range of motion, begin to apply weight to your knee. Proceed cautiously, and only take action based on your intuition.
I: ice. Apply a cold compress to your knee, such as an ice bag or frozen peas covered in a towel. For the first two to three days, try doing this regularly for around 20 minutes to assist in minimizing edema.
C is for compression. Using a bandage to compress your knee will also aid in reducing swelling.
Elevation or E. Raise your knee beyond your heart to aid in the healing process. Elevate your leg with a cushion when seated or reclined in a chair.
When dealing with a knee injury, what should an individual not do?
You can lessen the chance of future injury during the initial few days following a knee injury by avoiding “HARM.” This represents the subsequent ideas.
Warmth: Steer clear of heat packs, heat rubs, saunas, and hot baths.
Beverage: Avoid drinking as it can impede your healing process and raise your risk of self-harm.
sprinting: Avoid running and other mild activities as they may exacerbate the harm already present.
Apply massage: Steer clear of massaging the region for the first day or two as this may exacerbate the bruising and swelling.
Summary
A safe, non-invasive method of treating mild knee discomfort brought on by arthritis, overuse, or other factors is exercise.
Exercises that strengthen the knees are a good method to maintain your legs strong and help prevent injuries. Maintaining muscle flexibility through stretching can also help avoid or treat discomfort.
Individuals with medical issues ought to consult a physician before starting an exercise regimen.
FAQ
Why should Knee rehab workouts be Significant?
Flexibility and strength go hand in hand; a happy, fluid muscle is a strong muscle. The best stretches and exercises for the knees are those that increase both power and flexibility since they can help you avoid injuries. Exercises that strengthen the muscles surrounding the knee might also make those muscles tight if they aren’t stretched correctly. A tight muscle will make the knee joint smaller and more vulnerable to damage. After engaging in knee strengthening exercises, stretching will help prevent pain in the muscles and maintain their length and elasticity.
How frequently must You perform knee exercises?
You may find out additional information about how often you should perform these exercises from a physiotherapist. This is because it varies based on your unique situation and knee health. However, it is advised that people engage in physical activity at least twice a week to assist in developing their muscles.
Should tai chi be safe?
In general, tai chi is regarded as a low-risk activity with little adverse consequences. If you’re new to tai chi, you could feel certain aches or pains after practice. Inappropriate tai chi practice and more intense forms are linked to a higher risk of joint injury. To lower your chance of injury, especially if you’re new to tai chi, think about taking a class or working with an instructor. Consult your healthcare physician before starting a new fitness regimen if you are pregnant.
How much time should an individual spend on the elliptical?
Your overall goals will determine how long you should spend using the elliptical machine. Aim for 150 minutes at the very least and up to 300 minutes at the most each week for cardiovascular activity.
Does belly fat improve with elliptical utilization?
Elliptical machines are meant to be used for aerobic or cardiovascular exercises. The elliptical is a popular tool for people looking to reduce body fat, burn calories, and raise their heart rate. Aerobic exercise is not a miracle treatment for belly fat, even though it can help with weight loss. Nevertheless, as part of a comprehensive weight loss program, exercising and following a low-calorie, high-protein diet can lead to both subcutaneous and intra-abdominal fat.
Which knee healing is the best?
Self-care techniques for a knee injury include:
Relax. Take a vacation from your routine to assist your knee to heal from the repetitive strain injury and to help you avoid more damage. Wear ice. Ice aids in relieving inflammation and pain.
Elevation, compression, heat, and furthermore.
How can You strengthen my knees once more?
How to make your knee stronger
Leg raises.
Hamstring curls while standing.
Curl your hamstrings on a weight bench.
Step-training activities.
Dip one leg alone.
Wall dips.
stretching after activity.
How can You naturally fix the knees?
Try swimming, cycling, and brisk walking as a starting point. Try wall squats, calf raises, hamstring curls, and leg raises to strengthen your knee joints.
How can a knee injury heal the quickest?
Put an end to your behavior right now.
First, give the joint a rest.
Ice packs should be used to treat pain, edema, and internal bleeding for 15 minutes every few hours.
Apply a tight bandage on the knee and continue covering the lower leg.
Raise the hurt leg.
Can knees heal completely?
A knee injury’s healing duration can vary depending on several factors. Common knee injuries may take two weeks to nine months to fully heal. Certain wounds are small and require little medical attention. Other injuries can require surgery, physical therapy, and a protracted rehabilitation duration.
What meal strengthens knees?
To relieve pain and strengthen joints, include a portion of almonds, walnuts, chia seeds, flax seeds, pine nuts, and other nuts that have an anti-inflammatory impact. You can add one or two ounces to salads, stir-fries, rice bowls, and other foods.
Is knee discomfort relieved by walking?
Exercise that involves walking has several advantages, especially for older persons. It relieves joint strain and enhances cardiac health, circulation, and balance. Additionally, the most prevalent type of arthritis, osteoarthritis, can be prevented and reduced in knee pain by taking a walk.
Can an injured knee heal on its own?
The ability of cartilage to heal itself is limited. Therefore, for those who arrive with joint dysfunction (knee, ankle, hip, or elbow) linked to a painful cartilage or chondral lesion, surgery might be required. A successful cartilage repair procedure minimizes discomfort and returns function.
Is it possible to fix a knee without surgery?
Your knee joint’s soft tissues and muscles can be strengthened and stretched with rehabilitation medication and exercise regimens to provide joint support and flexibility. Modifying your everyday routine can also help reduce knee discomfort by preventing your knee from being overly stressed.
Do squats improve knee function?
When done correctly, squats can strengthen the knees and be good for the knees. When opposed to half and quarter squats, deep squats that reach 90 degrees or higher shouldn’t cause any knee pain or injury to the knee joint
References
- Berry, J. (2023, October 5). How to strengthen your knee. https://www.medicalnewstoday.com/articles/325804
- Top Exercises for Knee Pain. (2020, November 12). WebMD. https://www.webmd.com/fitness-exercise/top-exercises-knee-pain
- Knee Conditioning Program – OrthoInfo – AAOS. (n.d.). https://orthoinfo.aaos.org/en/recovery/knee-conditioning-program/
- Lindberg, S. (2023, May 8). 10 Exercises to Help Relieve Knee Pain. Healthline. https://www.healthline.com/health/exercises-for-knee-pain
- Cscs, N. L. P. D. (n.d.). Stretches and Exercises to Strengthen Your Knees, from a PT. Hospital for Special Surgery. https://www.hss.edu/article_exercises-strengthen-knees.asp
- Exercises for knee muscle and joint problems | NHS inform. (2023, May 11). NHS Inform. https://www.nhsinform.scot/illnesses-and-conditions/muscle-bone-and-joints/exercises/exercises-for-knee-problems/
- 5 Great Exercises to Strengthen Your Knees. (2022, June 1). Ability Rehabilitation. https://abilityrehabilitation.com/athletic-training/5-great-exercises-strengthen-knees/
- 11 Exercises to Reduce Knee Pain | Fort Worth Bone & Joint Clinic. (n.d.). https://thcboneandjoint.com/educational-resources/knee-exercises.html
- Physio, B. (2023, August 2). 7 exercises for knee pain. Benchmark Physio. https://benchmarkphysio.com.au/7-exercises-for-knee-pain/
- Knee strengthening exercises. (2023, March 1). https://www.bupa.co.uk/newsroom/ourviews/knee-strengthening-exercises
- Advanced Knee Rehab Exercises – Knee Pain Explained. (2019, May 2). Knee-Pain-Explained.com. https://www.knee-pain-explained.com/knee-rehab-exercises.html