
Pelvic Floor Exercises: For Men, Women with Images, Exercise Benefits
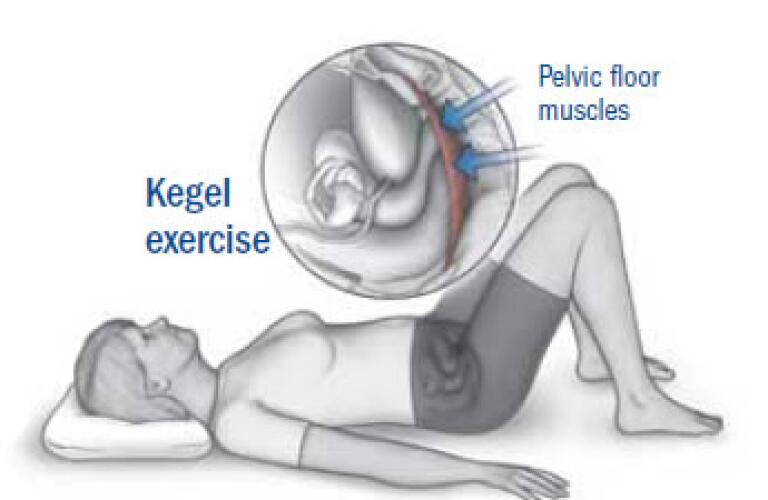
Pelvic floor exercises are a powerful way to improve your pelvic floor health and well-being. The pelvic floor is a group of muscles that helps support your bladder, uterus, and other pelvic organs. When these muscles are healthy and strong, they support your organs and keep them in place. When they aren’t healthy or strong, they can become weak and leaky, leading to issues such as incontinence, menstrual pain and dysfunction, and more.
Many of the muscles that make up the pelvic floor are internal and involuntary –meaning that they are made in the body and cannot be controlled or modified by the mind or will. This makes learning how to strengthen these muscles through exercise nearly impossible without the help of a physical therapist.
Introduction of Pelvic floor exercises:
- This muscle is found in the base of the pelvis.
- These muscles are superficial muscles & deep muscles.
- Changes in muscle function& strength contribute to Pelvic Floor Dysfunction.
- Like as urinary or fecal incontinence.
- Pelvic organ prolapse.
- Pelvic pain.
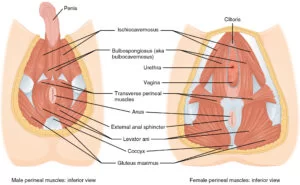
Muscles of the pelvic floor:
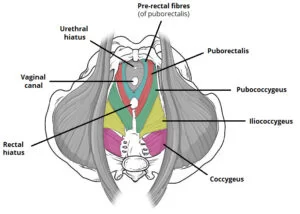
- In the pelvic floor muscle superficial & deep muscle
Superficial muscle:
- Bulbocavernosus
- Ischiocavernosus
- Transverse perinei.
Deep muscles:
- Pubococcygeus,
- Ileococcygeuys,
- Coccygeus
Puborectalis muscles:
- It is located in between the superficial & deep muscle layers.
Structure of the pelvic floor
- The muscle is a funnel-shaped structure.
- It is attached to the walls of the lesser pelvis.
- Then the separating form of the pelvic cavity is to the perineum inferiority.
- In order to allow for urination & defecation, it is a few gaps in the pelvic floor.
- There are two ‘holes’ which have significance:
- Urogenital hiatus = It is an anterior situated off to the gap, which allows the passage of the urethra into the male & vagina into the females
- Rectal hiatus = It is a central position of the gap, which allows the passage of to the anal canal.
- Between the urogenital hiatus & the anal canal lies the fibrous node which is known as the perineal body, which it joined to the pelvic floor from the perineum
Functions of the Pelvic Floor Muscles:
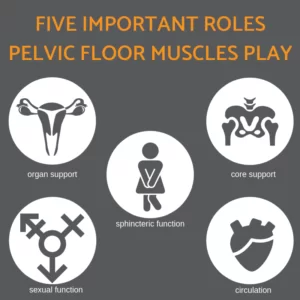
Sphincter:
- These muscles are wrapped around & controlled to the opening of the bladder & rectum.
- When the increase abdominal pressure, these muscles contract around the urethra & anus to prevent leakage.
- It is also important to relax & lengthen to allow urination & for bowel movements easily.
Support:
- These muscles act as a basket for the support of the pelvic organs like as uterus bladder & rectum against for to gravity & increased abdominal pressure.
- The excess strain on the pelvic floor mostly during pregnancy for to the weakening of the pelvic floor muscle.
- So that the pelvic organs start to protrude near the vaginal opening.
- It is referred to do to prolapse.
Stability:
- These muscles are an important part of the core.
- These muscles assist the other abdominal, hip & back muscles to the control movement of the sacroiliac & hip joints.
Sexual:
- During intercourse, these muscles help to achieve & sustain an erection & allow for penetration.
- Sufficient strength of these muscles is necessary for the orgasm, sensitivity of the pelvis & excessive tension
- This muscle also contributes to pain during or after intercourse.
Sump-pump:
- Like as to the calf muscles in the leg act to pump blood & lymphatic fluid back up towards the heart then these muscles act to the blood or lymph pump to the pelvis.
- Loss of this sump-pump action, it is contributes to swelling or pelvic congestion.
The goal of the pelvic floor muscle:
- It inhibits involuntary bladder contractions & decreases incontinence.
Exercises for the hypo tonic pelvic floor muscles:
- Quick flick Kegels
- Heel slides
- Marches
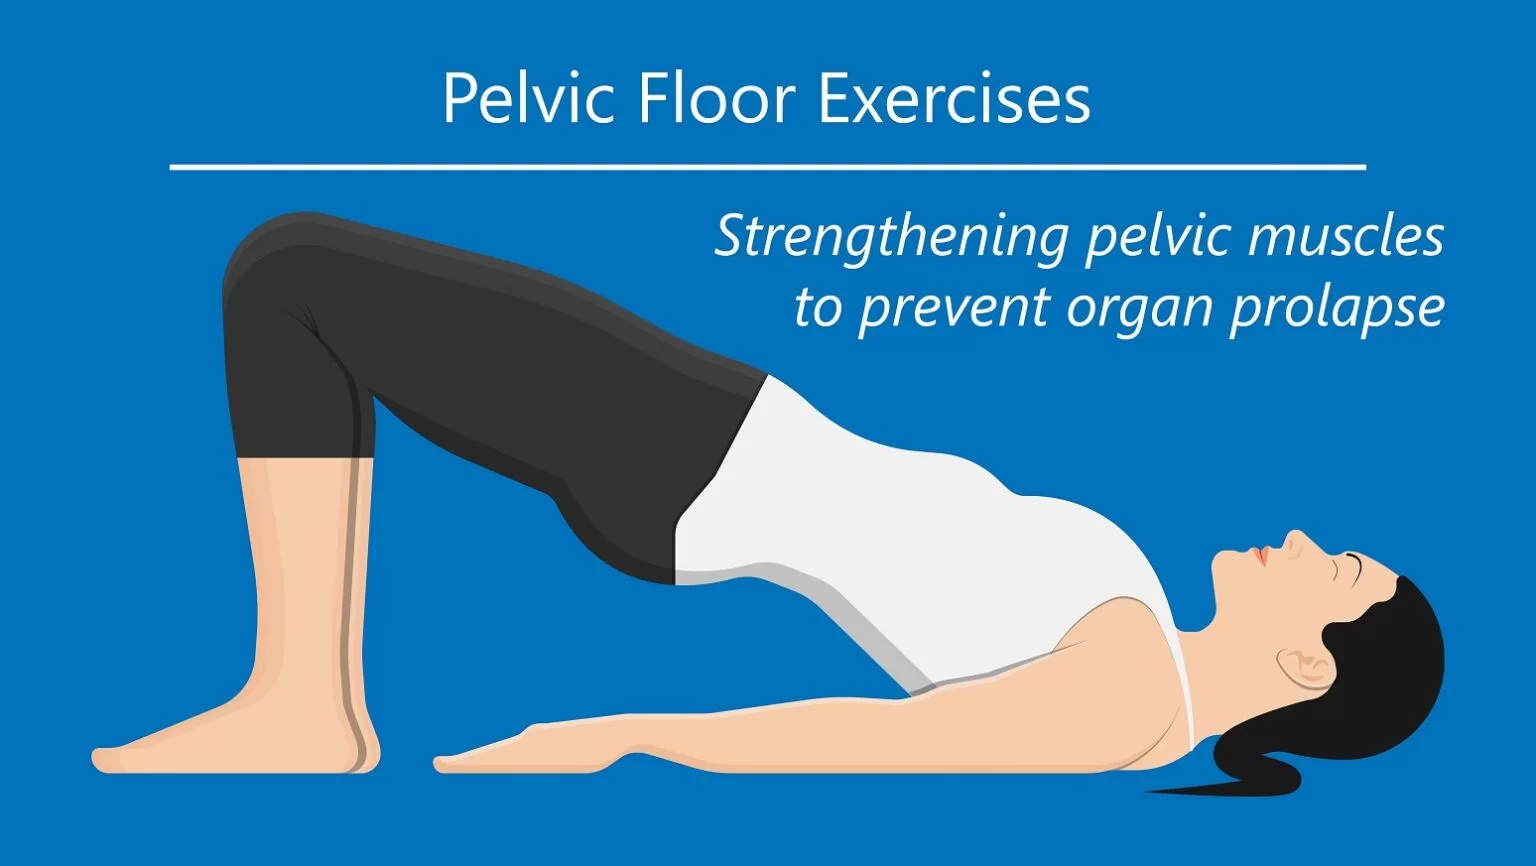
Quick flick Kegels:
- The starting position is supine.
- Lying on the floor with the knees bent & feet flat on the floor.
- For the exercise to become easier try sitting or standing while performing this exercise.
- Find the pelvic floor muscles of pelvic floor muscle.
- Then Exhale, & pull to the navel to the spine & quickly contract & release to the pelvic floor muscles.
- Contract for the 1 second then to the release.
- Repeat the quick flick 10 times, then rest for 10 seconds.
- Do this exercise in the 3 sets.
Heel slides:

- The starting position is supine.
- Begin with lying on the floor with the knees bent & pelvis is in a neutral position.
- Inhale into to rib cage, then exhale through to the mouth, letting the ribs naturally compress.
- Draw to the pelvic floor up, lock into the core & slide to the right heel away from the body.
- Only go without losing the connection to the deep core.
- Find the bottom position, then inhale & bring the leg back for to the starting position.
- Repeat this exercise up to 10 times.
Marches:
- The starting position is supine.
- Begin with lying on the floor with the knees bent & pelvis is in a neutral position.
- Inhale into the rib cage, then exhale through to the mouth, letting the ribs naturally compress.
- Draw to the pelvic floor up & lock into the core.
- Slowly lift the one leg up onto the tabletop position.
- Slowly lower the leg for the starting position.
- Repeat the movement in the alternating legs.
- Must watch that the pain is not felt in the lower back.
- Into the Alternate legs for the 12–20 times.
Exercises for hypertonic pelvic floor muscles
- Happy Baby Pose
- Diaphragmatic breathing
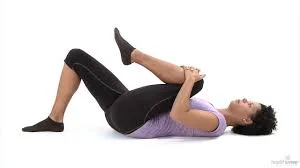
Happy Baby Pose
- The starting position is supine.
- Begin with lying on the floor with the knees bent.
- Bring to the knees toward the belly at a 90-degree angle, with the soles of the feet facing up.
- Grab & hold to the outside/ inside of the feet.
- Open to the knees until which is slightly wider than to the torso.
- Then bring the feet up toward the armpits.
- Make sure the ankles are over to the knees.
- Flex to the heels & push to the feet into the hands.
Diaphragmatic breathing:
- The starting position is supine
- Begin with lying flat on the floor on a yoga /exercise mat.
- It is also performed to the exercise in the seated position.
- Do to the few seconds of to the progressive relaxation.
- Focus on the release of the tension into the body.
- Once is relaxed, put one hand on the stomach & the other on the chest.
- Inhale through to the nose to expand to the stomach and then to the chest to stay relatively still.
- Then breathe into the for 2–3 seconds & exhale slowly.
- Repeat the exercise is for to several times while keeping one hand on the chest & one on the stomach.
Normal exercise of the pelvic floor muscle: Pelvic floor exercises
- Lunges
- Swiss ball squats
- Kegel Exercises for the men
- Kegel exercise for the women
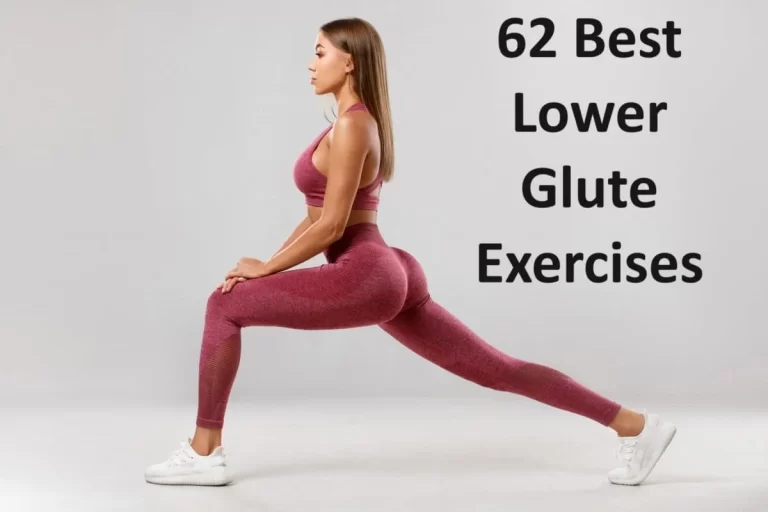
Lunges
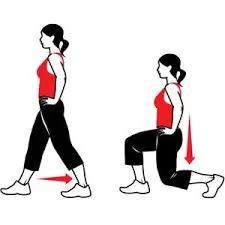
- Start into the standing position with the feet hip-width apart.
- Step to the forward longer than to the walking stride so that one leg is ahead of the torso & the other is behind.
- Foot is land to the flat & remains to the flat while it is on to the ground.
- Then the heel rises off to the ground.
- Bend to the knees for approximately 90 degrees as to the lower.
- Remember to keep the trunk upright & core to the engaged.
- After that forcefully push off to the front of the leg form to return off to the starting position.
Swiss ball squats:
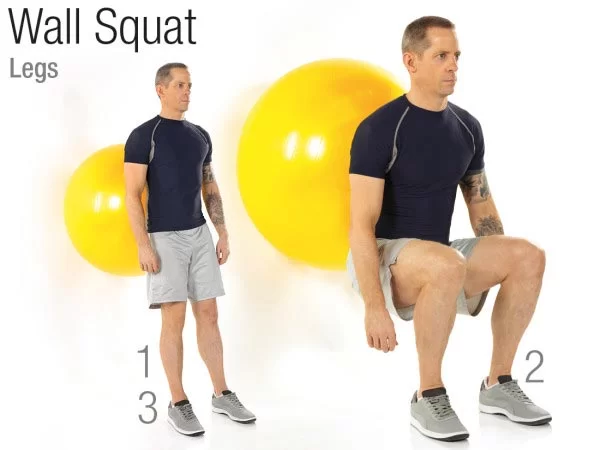
- Place the ball between the wall & lower back.
- Walking to the feet out slightly.
- Lower the body toward the floor into a squat position for the continuous pushback of the ball.
- Bend to the knees for 90 degrees & also do till the patient feels too comfortable.
- Straighten to the legs & keep the body weight over to the heels for the return to the standing position.
- Do the 15 repetitions.
Kegel Exercises for the men:
- Start with the holding of the pelvic floor muscles for 5 seconds.
- Pull into the pelvic floor, think of the pulling in & lifting to the up genitals.
- Don’t hold to breath during the exercise.
- Counting out to the loud which is stop to the from hold to the breath.
- After holding for 5 seconds, slowly & completely relax the muscles for 5 seconds.
- Repeat the process for to the 10 times.
- Do the 3 times in every day.
- During the exercise Don’t use the leg, stomach, or buttock muscles.
- It also helps in the regain of urinary control & improves sexual health.
- Mostly do this exercise supine on a bed & sitting in a chair.
- Do the exercise in the position feel comfortable in.
Prevent to the form of to urine leakage, do this exercise before the activities:
- Walking
- Laughing
- When standing up
- Sneezing or coughing
- Walking to the bathroom
Kegel exercise for the women:

- The patient is lying down.
- Then tighten to the pelvic floor muscles.
- Hold to the tight & count for 3 to 5 seconds.
- Relax to the muscles & count to the 3 to 5 seconds.
- Then Repeat to the 10 times & 3 times per day.
Yoga of to the pelvic floor muscle:
- Mountain pose
- Chair pose
- Warrior II (Virabhadrasana II)
- Locust pose (Salabhasana)
- Constructive Rest (Savasana Variation Bent Legs)
- Knees to Chest (Apanasana)
- Cat-Cow (Marjaryasana and Bitilasana)
- Wide-Legged Forward Fold (Prasarita Padottanasana )
- Wide-Legged Squat (Malasana)
- Reclining Cross Shin Position (Supta Sukasana)
- Hook Lying with Block
- Supta Baddha Konasana (Reclining Bound Angle Pose)
- Dvipada Pitham (Two-Footed Pose)
- Supta Prasarita Padangusthasana [Reclining Wide-Legged Hand-to-Big-Toe Pose] variation
- Viparita Karani (Legs-up-the-Wall Pose)
- Maalasana – The Garland Position
- Setu Bandhasana
Mountain pose:
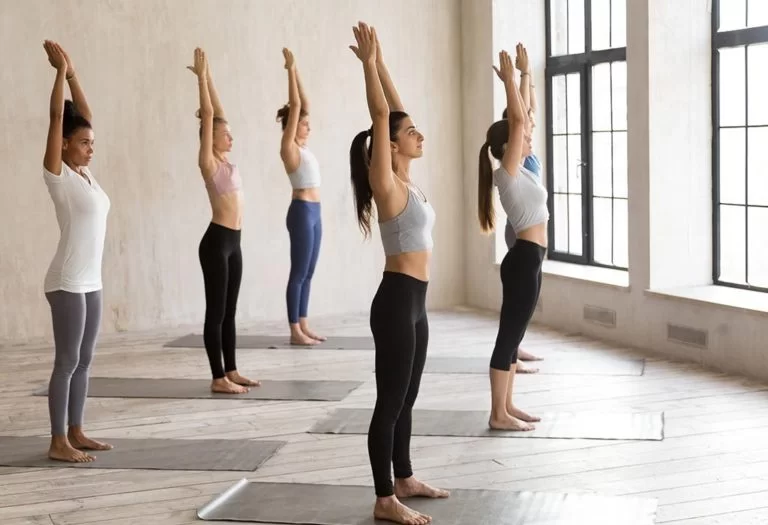
- The starting position is the standing
- Standing with the feet is to the hip distance of to the apart.
- Hands are resting on the sides.
- Place the block, pillow & thick book between the thighs.
- Then Engage to the inner thighs & try to lift off to the block upwards.
Chair pose:
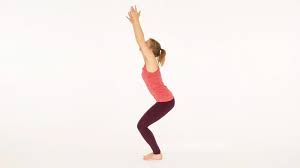
- The starting position is to the standing.
- Standing with the arms stretched upwards & the tips of the fingers lengthened towards the ceiling.
- Bend to the knees & keep the back as straight as possible & push the hips back into a squat, when sitting down into the chair.
- Keep the heels connected to the floor, without the hips dipping any lower than to the knees.
- Hold to the posture for a couple of breaths.
- Then Try to lift the pelvic floor upwards.
- Then Straighten up again slowly.
- Repeat the pose with for to the comfortable.
Warrior II (Virabhadrasana II):
- Starting into the standing.
- Step to the right foot of to the forwards with to the front &back foot about to the 1 meter to the apart.
- Lift the arms straight out of to the sides so that this is parallel to the floor.
- Keep the right foot straight & but turn the left foot out slightly so that the toes are pointing away from the body.
- Bend to the right knee over to the right ankle, then keep to the left leg straight. Tighten to the tummy as though to the pressing of to the belly button of to the spine& pull up to the pelvic floor.
- Hold for about 30 seconds, then straighten to the right leg.
Locust pose (Salabhasana):
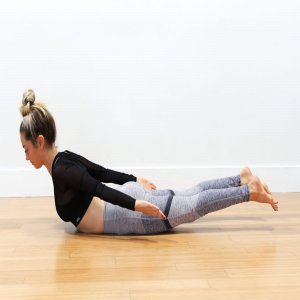
- Lie on the mat or to the towel flat on to the tummy, with the legs together & arms at the sides.
- Rest the nose & forehead gently on the mat.
- Then Inhale & lift the head, chest, arms, knees, and feet off the floor.
- Squeeze to the tummy muscles, glutes & buttocks to help lift everything up off to the floor.
- Keep the legs straight out, and hold for about 30 seconds
- Then gently release back to down.
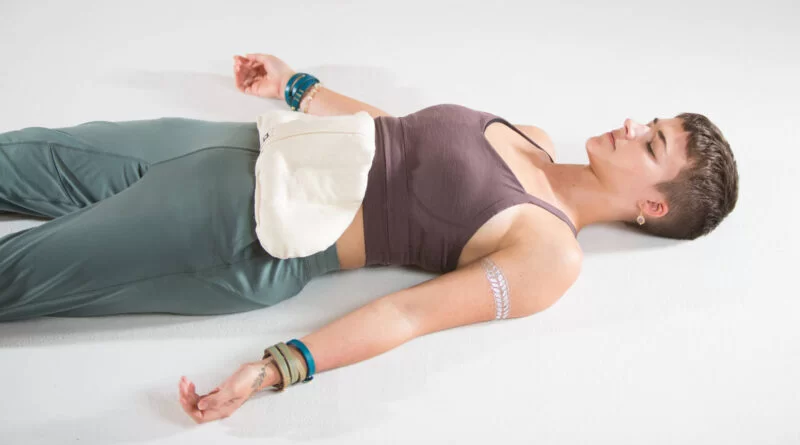
Constructive Rest (Savasana Variation Bent Legs):
- Lie down with the feet wide on to the mat & put the knees together With both hands resting on the belly.
- Close to the eyes & tune into the breath.
- Feel the stomach rise & fall.
- As to the breathing in & out then engage with the abs at the bottom of every exhale.
Knees to Chest (Apanasana):
- Draw to the knees into the chest,
- then hold on to the shins as to the exhale & engage with the abs.
- When to inhale, place the feet on the floor & stretch to the arms overhead.
- The patient feels some stretching into the belly & sides of the back of the body.
- On to the exhale then to the curl up again & repeat the sequence following of to the breath.
- The pose is great for relieving lower back pain.
Cat-Cow (Marjaryasana and Bitilasana):
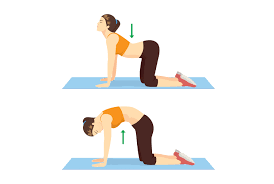
- Position the hands & knees on the mat directly underneath the shoulders & hips & inhale the Cat pose.
- By tilting the pelvis forward & bending to the spine.
- On to the exhale & transition to the Cow pose then dropping to the tailbone first & curving into the back.
- This pose is for the 10 times & 2 to 3 sessions per day.
Wide-Legged Forward Fold (Prasarita Padottanasana):
- Place the feet wide onto the mat & slowly lower to the upper body then keep to the back long & protected.
- This pose opens up the hamstrings & groin, which relieves the tension in the pelvic floor.
- Muscle but it is important to move at to own pace to avoid injury.
- If the fold of to the feels a little too intense, which is bend to the knees
- Use the prop under the head for extra support.
- Then Take time to find the breath & incorporate the small Cat-Cow movements to connect to the awareness of the pelvic muscles.
- Do this pose up to 10 times & 2 to 3 sessions per day.
Wide-Legged Squat (Malasana):

- Stand with to the feet mat & distance to the apart & squat down.
- Then Press the elbows into the knees then heavy to the tailbone & lift to the chest.
- Placing the hands together into the prayer onto the sternum which is helps to connect to the rise
- Then fall to the inhales & exhales.
- Do this pose for 10 times & 2 to 3 sessions per day.
Reclining Cross Shin Position (Supta Sukasana):
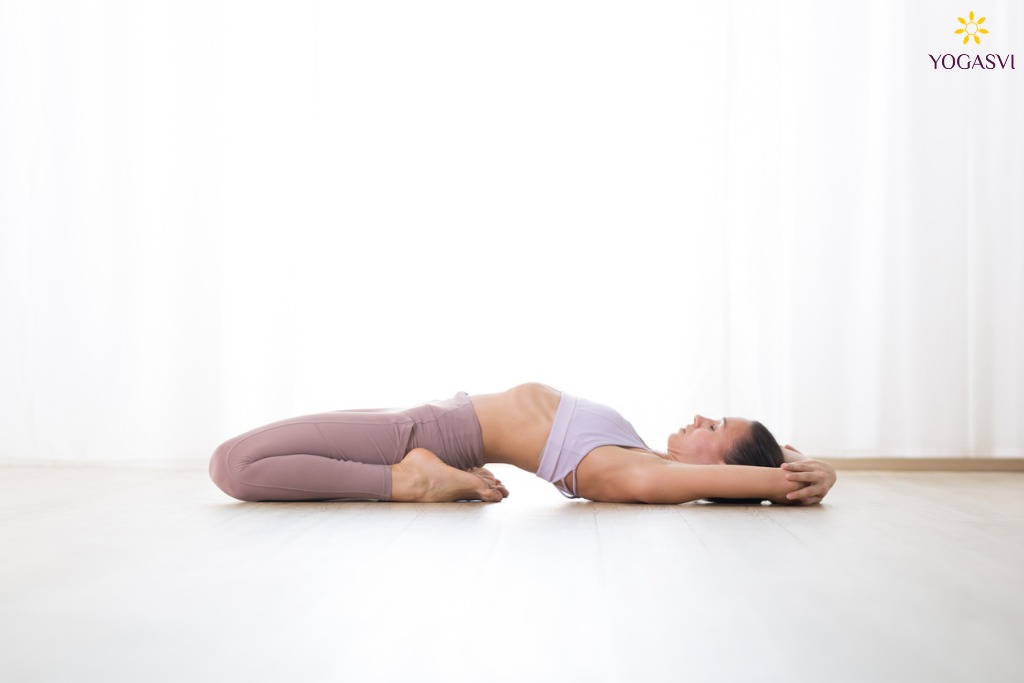
- Sit the at the top of the mat with the legs crossed to comfortably
- Then slowly lie back until resting flat on the mat.
- Then Close to eyes & rest on the arms at the sides.
- Do this pose up to 10 times & 2 to 3 sessions per day.
- For the support place the blankets or pillows under the thighs.
Hook Lying with Block:
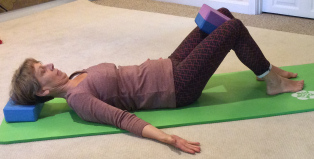
- Lie on the back with the knees bent then feet slightly apart.
- Place the yoga block between the knees & then Inhale to the deep. Exhale.
- Then begin the squeezing of the knees into the block with the hip adductors.
- Then lifting to the pelvic floor.
- Pulling to the transverse’s abdominis toward the spine.
- Keep to your feet & back onto the floor.
- Then the lumbar curve is flattening slightly.
- Do this pose 10 times & 2 to 3 sessions per day.
Supta Baddha Konasana (Reclining Bound Angle Pose):
- Start in the same position, but this time with the feet together.
- Then to the inhale, relax to the pelvic floor then to the transverses abdominis & hip adductors the knees drop open the sides.
- Then Exhale & bring to the knees up to the starting position while lifting to the pelvic floor
- Pulling to the transverses abdominis in.
- At the end of the exhalation, which is briefly accentuated to the muscular contraction.
- Do to this pose is for the 10 times & 2 to 3 sessions per day.
Dvipada Pitham (Two-Footed Pose):
- Place to the feet hip, width apart & close to the buttocks.
- As of to the inhale, then push down through to the feet & lift to the hips.
- Keep the transverse abdominis & pelvic floor relaxed & soft.
- Then Ex–exhale & slowly lower the hips back to the starting position While lifting to the pelvic floor.
- Pull the transverse’s abdominis firmly inward.
- This pose is for the 10 times & 2 to 3 sessions per day.
Supta Prasarita Padangusthasana [Reclining Wide-Legged Hand-to-Big-Toe Pose] variation:
- Lie perpendicular to the wall with the legs raised & the buttocks against the wall.
- Then Inhale & open to the legs wide as to the relaxation of the transverses abdominis & then to the pelvic floor.
- As to the exhale, then lift to the pelvic floor,
- Contract to the transverse to the sus abdominis & bring the legs together
- Squeezing of the knees is together then at the end of the breath.
- Do this pose up to 10 times & 2 to 3 sessions per day.
Viparita Karani (Legs-up-the-Wall Pose):
- On to the wall, place the bolster under the buttocks & let the upper back& shoulders drape onto the floor.
- Back from to the wall if to the knees are want to the bend.
- If the legs are rolling off to the outward.
- Then use a strap just above the knees keep to the knees stable & aligned.
- Relax to all effort & allow the transverse’s abdominis muscle to soften & the pelvic floor muscle to be released completely.
- Then Simply observe the breath & the interplay between the diaphragm & pelvic floor.
Maalasana – The Garland Position:
- The starting position is standing.
- Stand with the two feet of together
- Stretch off to the feet to the apart.
- Fold the hands into the Namaskara position,
- Sit down straight by bending to the knees.
- Pushing to the chest for to the forward.
- Breathe for 5 times & relax.
- Do to this pose is for the 10 times & 2 to 3 sessions per day.
Setu Bandhasana:
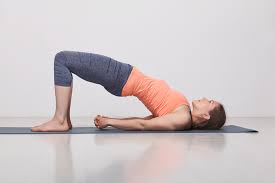
- The starting position is supine.
- Lie down to the flat on the back with the palm facing off to the down.
- Bend to the knees & bring to the feet closer to the buttocks.
- Lift to the back to bend off to the body like to the arch.
- Hold the position for 30 seconds & relax.
- Do this pose up to 10 times & 2 to 3 sessions per day.
Conclusion
One of the best ways to strengthen your pelvic floor muscles and improve your general health is to incorporate these exercises into your daily routine. Every time you perform an activity, keep in mind to engage the muscles and concentrate on form and function.
Seeking additional assistance or are new to these exercises, you might wish to speak with a pelvic floor physical therapist. They are able to advise on particular exercises and make sure you are performing them correctly.
Lastly, schedule a visit with your doctor if your symptoms are becoming worse or if they are affecting with your everyday activities.
FAQ
How can I strengthen my pelvic floor fast?
Squeeze your pelvic floor muscles ten times when standing, sitting, or lying down to strengthen them. Breathe normally and avoid tensing your muscles in your thigh, bottom, or stomach at the same time. You might attempt holding each squeeze for one second after you become more accustomed to performing pelvic floor exercises.
How to do pelvic floor exercises properly?
As firmly as you can, slowly tense and raise the pelvic floor muscles. For as long as you can, try lifting and compressing them. After four seconds of relaxation, repeat the contraction. Gain enough strength to perform ten slow contractions at a time, holding each one for 10 seconds, with 4 seconds of rest in between.
What do pelvic floor exercises help with?
Pelvic floor exercises help with:
enhance bowel and bladder control.
lower the chance of prolapse.
enhance gynecological surgery and postpartum recovery (in women)
enhance a man’s recovery following prostate surgery
enhance the orgasmic potential and sexual pleasure.
improve one’s quality of life and confidence.
What weakens pelvic floor muscles?
Pregnancy, childbirth, prostate cancer therapy, obesity, and the pressure of long-term constipation can all impair the pelvic floor. Changes in the pelvic floor muscles can result in problems and can be brought on by pregnancy, delivery, obesity, long-term constipation, or surgery for prostate cancer.
Are squats good for pelvic floor?
Squats can help develop a stronger pelvic floor and buttocks in addition to the bridge. A person should stand with their feet hip-width apart and flat on the floor in order to perform a squat. Bring your buttocks as close to the floor as comfortable by bending at the knees.
Does walking strengthen pelvic floor?
Weak muscles can be strengthened and restored to optimal function with consistent, progressive exercise. Your pelvic floor muscles can also be strengthened with regular, mild activity like walking.
When not to do pelvic floor exercises?
Don’t do pelvic floor exercises:
When you are passing urine.
If you are feeling pain.
If you have had recent pelvic surgery.
If you found a urinary tract infection (UTI).
If you have a prolapsed bladder.


4 Comments