
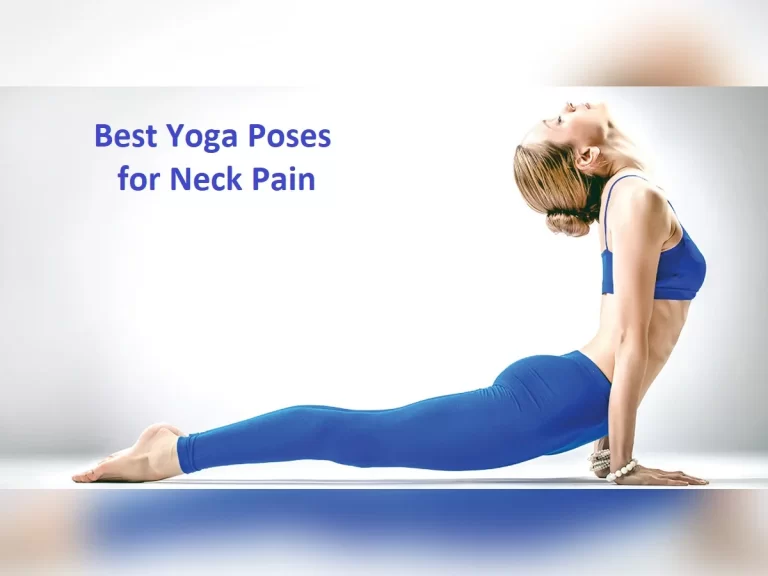
Sirsasana Yoga Pose: Health Benefits, How to do?
What is Sirsasana?
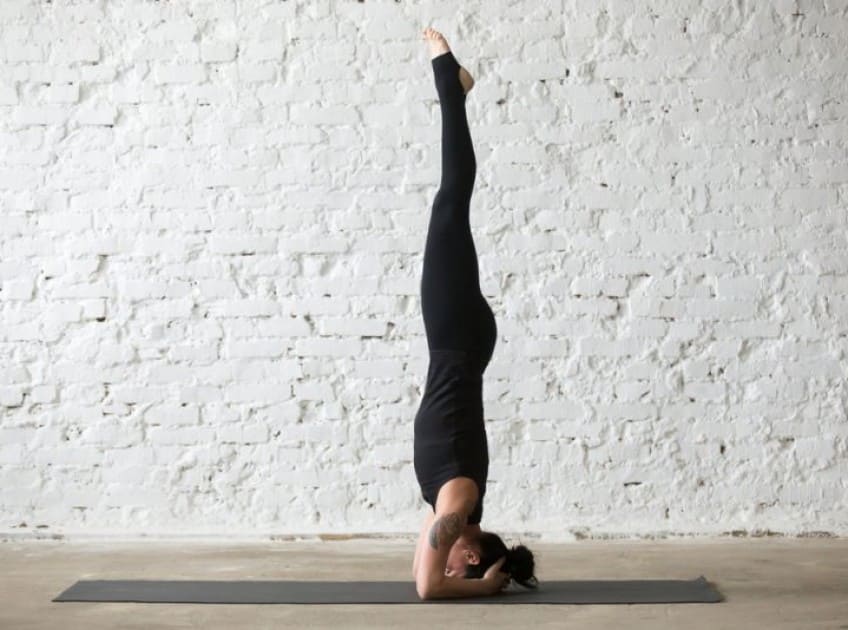
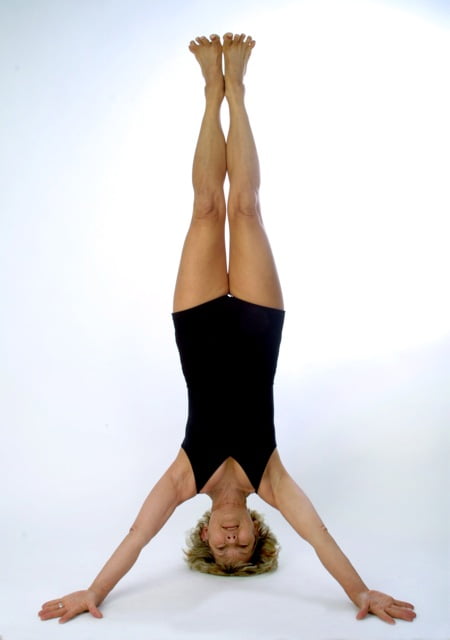
Sirsasana also called headstand, is the yoga position where you stand reversed on the top of your head on the floor and the
legs up in the air. This asana can upgrade your physical and mental health and well-being extremely. Due to its many interests, it is one of the main positions in Hatha Yoga and is also mentioned as “The King of Asanas.” It is physiological clashes can be felt in the full body.
“While doing a headstand, besides with the body actuality swing down, the blood pressure also gets introduced. There is a change in the blood pressure in the head, neck, shoulders, veins, blood vessels, lungs, and legs,” this Movement forces the body to behave to maintain balance in the various body systems. “Shirshasana is loaded with numerous benefits and exercise only in your good physical health under the advice of an experienced professional,” performing Shirshasana Headstand Position (Sirsasana) or Salamba Sirsasana is a full-body exciting advanced-level reversed yoga position that needs the strength of the core, head, neck, elbows. Many challenging Headstand Position Variations can be exercised after mastering the Headstand Position. Exercise of this position involves breath, body, and mind consciousness and is mostly comprised of Hatha Yoga Sequences. Sirsasana is considered a base position as sirsasana variations can be obtained from this position. Sirsasana assists boost energy in the body.
A correct posture and body alignment are obligatory to perform the position more safely, or else it may lead to injuries, that’s why the exercise needs to be guided by accomplished yoga teachers only. Originally, students can hold the position for 30 seconds, which may be increased moderately with regular exercise they can move up to 1-2 minutes. Persons should take time learning to balance and remain regular in the position, using the strength from the core, shoulders, chest, upper abdomen, and hips strength.
What are the Health Benefits of Sirsasana?
The yoga Headstand position is mentioned as the ‘king of asanas’ due to its wonderful advantages to the full-body strength and the mind. Some of the advantages are:
Stretches, Strengthens, Lengthens:
The headstand Position strengthens the core, upper body, back, and the legs, and lengthens the spine in the inversion position. The elbows become strong with the abrasion they experience when handling the body weight. The skull becomes strong as the full pressure falls on it. When gripping for some time, this position puts pressure on the arms and shoulders and strengthens the biceps and triceps. The insistence at the belly strengthens the abdominal muscles. With the dashing blood towards the brain, the blood vessels in the brain can be strengthened and this may help in checking migraine and any other related headaches.
Flexibility and Range of Motion:
The flexibility of the legs is upgraded, which is a key portion of this position. Mainly, the muscles of the hamstrings enhance flexible which incidentally is thoughtful to circumvent sciatica.
Chest, Diaphragm, and Breath:
The headstand Position raises the chest and rib cage allowing space for the back. The lungs volume is increased and the muscles around it are strengthened, through the pressure at the chest region and the opening of it. Therefore the function of the respiratory system is also advanced.
Awareness and Focus:
Headstand Position is an exciting inversion yoga position. Correct to the inversion, this position forces the profession to draw inside and become aware. Originally, conducting focus is not easy because of the problems of the position, although with regular exercise, the recognition can be obtained and the increasing flow of oxygenated blood in the brain improves mental function. With the recognition of the deep breathing as it may react like a reversed pranayama yoga position, a sense of spirituality may be attained and self-respect may also be obtained.
Alignment and Posture:
The Headstand Position improves the body posture by pleasing the core and strengthening the back muscles, arms and shoulders. As the spine is lengthened when one hoists the legs up in the air, the adjustment can be corrected due to the straight-line posture of the back.
Energising, De-stressing, Relaxing:
The move of oxygenated blood about the brain makes the mind cool and calm. Moving reversed the adrenal glands are compress which produce stress hormones and appropriate to which stress can be avoided with the optimal function of the adrenal glands. Also, improving mental function helps to circumvent anxiety. It is a cooling position due to the combination of moderate breathing and nature of the posture.
Stimulation, Organs, Systems, and Circulation:
The Headstand Position stimulates the lymphatic system by flinging onto the head that is conducted for the removal of toxins from the blood. Students who have to stand all over the day due to their nature job or even students who sit at a place continuously for a long time can be benefited by circumventing the edema in the legs, thanks to the altered gravitational force during the position that clears out the entirely fluids erect in the legs. The headstand Position helps in improving the digestion by using the back effects of the gravity in such a way that the thrust materials are moved, undesired gasses are rescued, and the abdominal organs are improved, Indirectly, by upgrading the digestion of the position also helps decrease weight. Since the blood attack down to the brain, the brain becomes cool, the memory becomes sharp. Altogether, nutrient and oxygen-rich blood also extend to the eyes which means the eyes function optimally arresting any oracular degeneration or any other matters related to the eyes. Stimulating the functioning of the pineal, the hypothalamus, and pituitary glands. Upgrading the functioning of the central nervous system. This helps in better operating and co-ordination of all the endocrine glands. Upgrading the body’s capacity to continue homeostasis by stimulation of the nervous system. provides to control problems related to kidneys, liver, stomach, intestine, and the reproductive system.
Others:
The Headstand Position is a great position to supply nutrient-rich blood to the head and scalp. As a result that hair-follicles sustain the required nutrients from the blood and thus, the hair condition and hair health are improved. Helps in intercepting hair loss, wasting of hair, and alopecia While holding the position upside down, the facial skin sways in alter direction guiding to raising of the flow. Also, with oxygen-rich blood flow, the face grows a natural glow. The position is thoughtful for school-going teenagers as it upgrades their memory, which normally gets abstracted due to the modern lifestyle. One can firmly become confident after exercising the position consistently. Therefore, it removes fear, stress, depression, and anxiety. Increases and calms the breath.
According to a the study, slow breathing expertise is connected with increased activity in the brain in addition to psychological benefits such as vigor, awareness, and relaxation. Upgrading digestion and eradication functions. Upgrading the body’s ability to balance blood pressure by stimulation of the so-exclaim baroreceptors. Allowing rest to the heart by altering blood pressure for the present. Upgrading body posture by operating the core. Upgrading blood and lymph circulation all through the full body.
What are the Preparatory poses for Sirsasana?
As this position is considered an Improve Level Position, the general exercise in yoga sequence for Sirsasana (Headstand Position) depends on the time of the exercise. If one wants to exercise this early in the morning, then one requires to appreciate the condition of the body through the early hours of the day. To some the body may be especially firm and tight, thus challenging for a cozier up yoga positions ahead of the exercise of Sirsasana. But if one is considering doing it at the end of a yoga session which could be about 45 minutes then the systematic way of beginning the body requires to be followed. If one review exercising this at the late evening or early night, then few Sun Obeisance (Surya Namaskar) before this asana is good sufficient as normally the body, even though overtired, opens up faster.
To warm up and produce the body for the asana, one can start with Surya Namaskar mainly when the asana is executed early mornings. Tadasana, Bharadvajasana, Adho Mukha Svanasana, Prasarita Padottanasana can be executed in a sequence before practicing Sirsasana. After executing a modern asana such as the headstand position, one can modify the body by achieving Balasana, Sarvangasana and Savasana as follow-up positions. Ensuing is a rapid look of sequences one can follow for the preparation of Sirsasana.
Tadasana Gomukhasana (Standing Cow Face Position):
In Sirsasana a lot of pressure happens on the shoulders, arms, elbows, and upper abdomen. Now exercising Tadasana with Gomukhasana, arms will teach additions and external rotation in the upper arm and appointment in your legs. These steps will help you create a hard base and a feeling of lightness as you raise weight apart from your neck and head in Sirsasana (Headstand Position).
Now stand with your feet all together in Tadasana (Mountain Position), and take a few breaths here. Lift your arms beyond your head and stretch approximately the arms can go and take few inhalations and expires here. Now conduct the right elbow after expire just beyond your head and place the right palm on your back in between your shoulder blades. With the help of the left arm by conducting it to the back from the left side of your body, carry it on to the right palm, and interconnect all the fingers beyond you. Once they are placed take grip and start to pull the arms in the opposite direction creation sure the chest and the upper abdomen are straight and lifted.
Endure here with eyes closed and conduct the much essential strength by pulling the arms as much as possible. To get a deeper stretch one can go down by twisting at the hip and make for the knees with the forehead with expire. Repeat the same for the other elbow and detain the position for a few breaths and to get an extensive stretch go forward and try and expand for the knees with the forehead.
Bharadvajasana (Torso Stretch Position):
In this yoga position, the focus here is to help open the upper body to carry you in Sirsasana.
Sit on a bed blanket or a mat in Dandasana (Staff Position), angle your knees and place them on the ground to your right and conduct the feet except for your left hip, with the left leg on top of the arch of the right leg. Keep the thighs all together here.
As you lift your chest with inspiration push the left buttock and hip descending and settling your right hand beyond you and with the left hand on the right knee, raise and turn back towards your right and expire.
Confirm the back is straight and the right arm is not twisted at the elbow. As you inspire expand the top of the chest and make a deeper twist and expire.
Gape beyond you conducting the shoulder and chest deeper into the stretch by turning towards your right. Raise from the upper back and start the kind adjust feeling the stretch at the shoulders, neck, chest, and middle back.
Carry for a few breaths and then steadily release nearing to the center and open the legs out. Modify and then construct the body and take the twist to the other side and absolute the position feeling the stretch about the left side.
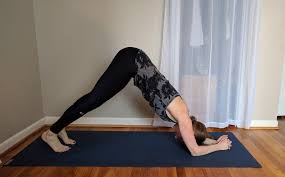
Adho Mukha Svanasana (Downward-Facing Dog Position):
This asana will produce strength, stability, and balance for Sirsasana. The legs too get both stretched thus making the hamstrings and hips muscles strong.
Seated in Vajrasana (Thunderbolt Position), conduct the arms stretched out in front of you and place them on the floor and raise the the body conducting the lower back upwards and neck rested downwards.
Conduct the hip towards the roof and push the feet firm to the ground by charming the abdominal muscles deep inside and tight.
Aim for the extensive stretch by burning the elbows and chest closer to the floor and resting the head and neck in between the shoulders thus capacity the body looks like that of a mountain.
Endure in this position with decidedness at the legs, hips, shoulders, and arms with slow breathing.
Prasarita Padottanasana (Intense Leg Stretch Pose):
This is an adjacent preparation for Sirsasana, attempting to put the body weight on the head verifying the legs are left light.
From Tadasana (Mountain Position), conduct your legs lit more than hip-distance aside and stand with feet hard on the ground keeping the spine straight with arms stretched out laterally at shoulder level.
Take a breath, expire and lift the upper body and angle forward at the hip and extend for the ground with your palms.
Now with one more breath, conduct the crown of the head to the ground gaining support with the palms which are rested on the ground. Deepen the position with an expire and strengthen the full lower body right from the hip to the tip of the toes.
Conduct the chest closer interior and the upper back stretched extensive outside in adjustment to the neck thus putting more pressure on the head. If the body generates any imbalance by trying to reach for the ground with the top of the head, one can use blocks or blankets for a brace of the head.
Remain the knees are not angled and the feet are stood with the toes pointed forward.
Ensure for a few breaths and then release the position first moderating the head, then the shoulders, chest, lower back, and then the hip. Stand straight and then conduct the feet together in Tadasana (Mountain Position) and ensure in Samasthiti for a few breaths to modify.
Above are some yoga positions you can perform in a sequence before exercising Sirsasana.
How to Perform Sirsasana?
Let us start this position in a step-by-step method making it easy and comfortable:
Spread a blanket fourfold on the ground and kneel near it. Rest the forearm on the center of the blanket to certify the distance between the elbows on the ground is not broad than the shoulder.
Interconnect the fingers right up to the fingertips so that the palms form a cup.
By moving the knees respecting the head, place the top of the head only on the blanket, so that the back of the head touches the palms which are biconcave.
After appending the head position take a few breaths here conduct the full body awareness and get the adjustment checked.
Constructing the body, now lift the knees from the ground by pulling the toes towards the head and feel the weight on the neck and shoulders. Ensure here slowly move the neck and shoulders deeper towards the ground.
After taking a few breaths, expire, take a kind swing from the ground and raise the legs off the floor with bent knees. take the change in such a way that both feet leave the ground simultaneously.
Stretch the legs and stand on the head, safe keeping the full-body square to the ground. Take care to continue balance making sure the spine, hips, and thighs are in underline.
Modify the full body as much as possible by breathing slowly and greatly and if enjoyable close the eyes and stay focused.
At the starting, the full weight would be felt at the neck and shoulders counting the elbows too, but with exercise most of the body weight will move towards the head and you will find less rigidity at the neck and shoulders.
In this final position of Salamba Sirsasana, conduct the focus to balancing the body with breathing and pulling in the tummy making the abdominal muscles are tight thus allowing strength to the spine making sure the imbalance is decreased.
After taking a few breaths in the final position for a comfortable time, come back by flexing the knees and sliding them down to the ground expires in back order and then releases the neck and shoulders and finally the head off the ground.
Go back on your back supine and compose the body for Savasana taking a few breaths and then go into Sarvangasana for a few breaths to issue any stress at the neck and shoulders while at the exercise of Sirsasana.
Salamba Sirsasana is observed as an advanced Level Asana and should be done with the guidance of a good instructor or yoga teacher.
To reclaim balance from the upturn position, sit in Shishuasana (Child Position) for some time.
Report the hand position, and sit in Vajrasana.
Repose for a few minutes in Savasana (Corpse Position).
How to perform Sirsasana by Watching a Video?
What are Follow up poses for Sirsasana?
Headstand Pose Relaxing Yoga Positions:
After the very exercise of Sirsasana which is observed as the King of all the yoga positions, the muscles at the neck and shoulders need time to modify and contract. To do this there are a few positions one must exercise right after Sirsasana. They are:
Balasana (Child Position):
Operating from Sirsasana, slowly conduct the body to rest by sitting on your heels and standing the face and forehead close to the ground and keep the body light and modify. This position works on reposing the neck muscles and helps the elongated spine at the Sirsasana. The hip is moderated in this position.
Sarvangasana (Shoulder Stand Position):
Conduct the back to supine behind modifying in Balasana (Child Position). Then stretch the legs and arms verifying the spine is close to the mat or the blanket and endure for a few breaths. Then bending your knees slowly lift the legs to 90 degrees and conduct the body upwards lifting the legs, lower back, and middle back off the mat and placing the full weight on the upper back and shoulders. Lock the neck and conduct the chest close to the neck and with the support of the arms close to the hip lift the body higher conducting the feet just above your eye level. This position will conduct balance to the spine and the neck which were put to pressure during the exercise of Sirsasana.
Savasana (Corpse Position):
Modify the full body in Savasana by slow breathing and remain the limbs, the head and the trunk are close to the mat and moderated. Conduct the breathing below control and loosen the full body. Endure here for 12 breaths.
Headstand Pose Level Up Follow-up Positions:
As Sirsasana is observed as the King of the yoga asanas, there are no positions for heavy than this, but one can have variations of this yoga position with the positions of the leg. These variations are listed under.
Wide-Legged Headstand:
Once you are in Sirsasana and found strength, start to open your legs laterally like a split and balance the body here for a few breaths.
Baddha Konasana (Bound
Angle Position) in Headstand:
Hereafter the body is stable, conduct the feet in the air in Namaste beginning with the knees out. Make sure the feet are in proper alignment as if they are not, a lot of pressure will be endured at the head.
Eagle Legs in Headstand:
Once you gain strength in Sirsasana, slowly conduct one knee over the other interlocking the thighs, and move the feet beyond the other leg and come into the Eagle Position as you would standing. Endure here for a few breaths and then constant with the other way and change the position of the thighs.
Twisting Splits in Headstand:
As contrasted to the first variation, here with the legs wide open conduct them backward and forwards. Split them anterior and posterior, but make sure you have exercised this with one leg first before moving into the split as the imbalance can make the body fall and can be rigid for the neck.
Lotus legs in Headstand:
One can go deeper into the position by conducting the legs in Lotus Position (Padmasana), interchanging them in Lotus position, but exercise of this position seated is necessary as is not easy to form in the air. The elasticity of the legs will help in moving into the Lotus position without the use of hands and therefore it is better to exercise this position seated without applying the hands to go to this level in Sirsasana.
What are the Beginner tips in Sirsasana?
If you have just started doing yoga, you must take note of these tips:
- Remain you have a leveled yoga teacher near you when you achieve the Sirsasana.
- Comparing postures is best done near a wall or support for strength. Again, the best certainty is a yoga trainer.
- Keep agreeable support for your head – a cushion or a blanket.
- After Step 5 above, raise your legs off the ground one by one. Beside, descend similarly – one leg at a time.
- Continue the position for a few seconds only at first, and slowly erect your stamina and work your way up, keeping your relief level in mind.
What is the Breath Awareness in Sirsasana?
- While conducting the body close to your palms, inspire, and as you expire conduct the top of the head close to your palms.
- With another inspiration raise the knee off the mat or blanket and expire expanding the lower back and spine upwards. Take a few breaths in this position and as you expire conduct the shoulders and neck deeper in alignment with the back of the head.
- Now inspire and walk with the toes close to your chest and as you expire harden the legs and shoulders and be ready with the body to take the position.
- Modify at this stage and focus on the pressure at the top of the head and neck and conduct consciousness of the body as you breath.
- Take a deep inspire and as you expire lift both your feet off the mat/ ground and conduct the legs at 90 degrees remaining the back is straight and the legs are in adjustment with the chest, neck, and hip.
- As you inspire enlarge the body upwards putting more pressure on the hips and taking the position as you expire. Start slow breathing at this stage of the position and stay calm and smile conducting more fresh blood to the brains.
- While rescuing from the position, expire placing the feet close to the floor one leg at a time and then inspire and conduct the full body to modify and go down in Child Position for modifying the neck, shoulders, and head.
What are Alignment tips for Sirsasana?
- Eventually, the level is to have your ears, shoulders, hips, and ankles in one unbending line. This is absolute for long holds.
- As you begin to learn the position, though, mention the alignment narrated a little additionally down in Modifications.
- Continue the maturity of your weight on the top of your head, while your arms share the weight and prepare a protective base.
- Draw away your shoulder brands from your ears, toward your middle, safe keeping your neck elongated and stable.
What are the Types of Sirsasana?
There are 4 types of sirsasana.
- Salamba Sirsasana I – Supported Headstand.
- Salamba Sirsasana II – Tripod Headstand.
- Salamba Sirsasana III – Supported Headstand.
- Niralamba Sirsasana.
Salamba Sirsasana I – Supported Headstand
What is Salamba Sirsasana I – Supported Headstand?
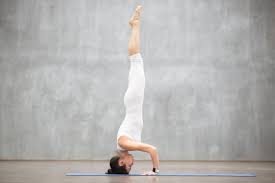
Salamba Sirsasana (Supported Headstand) is a stimulating reverse that depends on the strength of your upper body and core, while training and focusing your mind. Salamba Sirsasana Pronounced as (sah-LOM-bah shear-SHAHS-ah-nah).
Though there are many physical benefits, counting building leg, arm, and core strength, this is a challenging position that you must detain with a “safety first” comprehension. The key to this asana is to circumvent resting weight on your head and neck. Instead, let your arms and shoulders detain you up.
This is different from the traditional Headstand (Sirsasana). The reverse shows control, strength, and beauty. The name Salamba Sirsasana I appear from the Sanskrit words Salamba which mean “with support,” Sirsa which means “head,” and asana which means “posture/position”. In English, this position is also called Supported Headstand.
What are the Health Benefits of Salamba Sirsasana I – Supported Headstand?
Salamba Sirsasana I reacts as a building block about extending the complete expression of the Sirsasana inversion. The Supported Headstand has the following benefits:
- Stimulates pituitary and pineal glands, which support growth and the creation of sex hormones.
- It also has stimulating effects on your full body.
- Strengthens the spine, neck, shoulders, and arms.
- Quality of the legs and abdominals.
- Replace an increase of fluid in the legs and feet.
- Recognizes a healthy, pure blood flow to brain cells.
- Restoratives the nervous system.
- Supports in the treatment of headaches, anxiety, asthma, sinusitis, hay fever, depression, diabetes, insomnia, and symptoms of menopause.
- Grows mental awareness and clarity.
- Calms and soothes the mind.
- May overthrow the effects of lethargy, sleep loss, and memory loss.
- Stimulates and strengthens the lungs, smoothing healthy breathing.
- Upgrades posture and digestion.
- Aids in the repose of tonsillitis, persistent coughing, common cold, bad breath, and palpitations.
- It can help deflect your sexual energy to a higher spiritual application if you are doing it for faithful purposes. This can further a the positive atmosphere about you and increase wellness. This energy is called Ojas, and it can help heighten other spiritual yogic exercises.
- Just like other reverses, Salamba Sirsasana can help open your Ajna (third-eye chakra). The inversions of body position allow energy to circulate to this third eye, increasing intuition, psychic ability, and religion.
- Helps control problems of the liver, kidneys, stomach, intestines, and reproductive organs by altering the pull of gravity.
What are the Preparatory poses for Salamba Sirsasana I – Supported Headstand?
- Adho Mukha Svanasana (Downward-Facing Dog Position)
- Forearm Plank
- Dolphin Position
How to Perform Salamba Sirsasana I – Supported Headstand?
Start in the Ardha Pincha Mayurasana (also known as the Dolphin Position).
Start by cushioning your head and forearms with an adhesive mat or doubled blanket. Approach your hands and knees with your wrists under shoulder and knees under hips. Conduct your elbows to the ground and keep them shoulder-width apart. Alternate your fingers, roll your upper arms outward a bit and assiduously press your inner wrists to the ground. Then, place the top of your head on the ground. Cup the back of your head with your hands secured, safe keeping your arms in position. Conduct your hips uphill as if your lower half were in Downward Dog. Walk your feet near to your elbows, heels raised, until your hips are over your shoulders. Hard your shoulder blades opposed to your back and toward your tailbone to keep the torso extended and secure your neck and head.
Now, expire and raise both feet aside from the ground at the same time (even if you need to angle your knees a bit and hop moderately off the ground). As you straighten your spine, hard your tailbone as opposed to the back of your pelvis. Rotate the thigh bones slightly inward and gain up between the balls of your feet. Depress your forearms down strongly as opposed to holding up your weight with your neck and head. Keep the weight leveled evenly between your two arms. If you came up with a knee twist, straighten them now.
If you are just starting to exercise Salamba Sirsasana, stay in position for 10 seconds. Come down expiring, keeping your shoulder blades firm. Hold both feet to the ground at the same time. If you plan on exercising this posture often, add 5 to 10 seconds onto your continue each time you are in Supported Headstand. Once you can stay for 3 minutes, continue at that continued length for the next 7-15 times you exercise this position. Then, start your stable increase before you extend a stay to 5 minutes.
What are the Beginner tips in Salamba Sirsasana I – Supported Headstand?
- Use the support. Exercise as opposed to a wall or in a doorway (see above). Take one foot, then the other aside from the wall as you find more strength and balance in the position.
- Start small. Try to continue up for 10 seconds, then moderately add 5 to 10 seconds at a time. It’s greater to hold a solid 20-second position than a three-minute position that lacks probity.
- Exit with charm. Apply your abs to lower the legs in a smooth motion. Come down with an expire, without misplacing the raise of the shoulder blades.
What are the Precautions and Contraindications for the Salamba Sirsasana I – Supported Headstand?
- Salamba sirsasana should not be exercised by everyone standing from a back or a neck injury.
- If you stand from a cardiac affair, this yoga position can put excessive pressure on your heart. So you should avoid exercising without professional advice.
- For some grappling with blood pressure cases (High/low), it is best to oppose this asana.
- The yoga headstand should not be exercised by pregnant women. Knowledgeable supporters can still exercise it a few months into pregnancy but that should be done only with professional commands.
- This asana is not preferable for people enduring headaches or restlessness.
What are the Common Mistakes in Salamba Sirsasana I – Supported Headstand?
Here are a few common mistakes in headstands that teachers see a lot of, how they feel, what’s repairing on, and how to fix them.
Hands Too Wide:
Tripod headstand is the category that puts the most pressure on the neck, head, and upper spine. As such, it can be chill and needs a little additional love and care. If your hands are too open, it will be very demanding to come up at all and then stop up with confidence. This is because you have made your principles a lot smaller than it needs to be.
How to Fix It: Your beginning in any headstand should be a nice fat ternion. In the case of Tripod, we are thoughtful: hand, hand, head. If you find this setup demanding, it may be that you have tight shoulders and should prepare with some shoulder stretches as well as the twist-ups that fire up your shoulders and core.
Try using Eagle arms a group ahead of you to exercise the Tripod. Also, a great stretch is conducting the palms of your hands together then urgent your elbows together. Exercise raising that shape up to the sky and reverse over your head while keeping the elbows together.
Elbows Too Wide:
Besides, in the forearm version, if your forearms are too broad, you run the chance of literally upturning backward because again, your base isn’t a fat huge triangle.
How to Fix It: A good rule of thumb to fix this rumpled is to put your hands on your across from elbows as you are setting up. Then take your hands and alternate them to form a two-sided triangle with your forearms. Explode your head lightly down on the floor as if you are belonging to the hair bind part of your perfect yoga bun.
Now compress your elbows regarding each other AND down into the floor to continue this shape. If your elbows are immobile slide out, it’s time to cover a band throughout your upper arms (near the elbow) in this shape.
Prep: If this “elbow-slide” keeps affairs, it’s because you have tight shoulders. Fix that by booting up with shoulder openers ahead the headstand. Anew, Eagle arms work important here. You can also exercise moving from Dolphin Position into Forearm Plank without moving your elbows—this will prepare your core and pelvis for the headstand at the same time.
Dumping Into Head:
I know it’s called headstand, but literally, most of the weight should be in your arms and shoulders until your neck is strong sufficient to play with other arm variations. In the forearm and Tripod versions of the headstand, it is common to see people discarding into their heads rather than pressing into their arms.
You can tell as there will feel like a lot of weight in your head. If you are doing it without discarding into your head and neck, you will be able to come up opposed up a wall and even slightly raise your head off the floor.
How to Fix It: Simply depressing your hands or forearms more will repair this over time. Expand a giraffe-like neck, long and tall. In Tripod, you can dig your fingertips into the floor and compress your elbow inwards to make this action even stronger.
Collapsed Shoulders:
When we first learn to come up in a headstand, it’s quiet to forget to stay strong between our shoulders. You may hear the cue “move your shoulders aside from your ears” a lot in yoga. This inspires that giraffe-like neck raised above and advances some of the weight out of your cervical vertebrae. In headstand, it’s a conservation implement for your neck muscles, so take it seriously.
How to Fix It: Come into a headstand as opposed to a wall with a very steady cork block under each shoulder. Lean on the wall entirely and just experience start in your headstand with no weight in your head and with your shoulders far aside from your ears. Let your body memorize this drifting sensation and try to take off it in your headstand, but raise your shoulders while you rest on your hands or forearms.
The Sway Back:
Some of us have more deep spinal bends than others, and there is nothing wrong with that at all. It’s essential and that is not what we call “sway back”, “banana back” or whatever else. This occurrence mentions not the look of the spine, but the placement of the pelvis and the affiance of the core muscles. When we are upside down, we are often so focused on not dropping that we let our legs or spine recompense just to stay up straight. However, not attracting your core muscles in deeply will threaten your spine and lead to an unstable inversion.
How to Fix It: In a headstand, your pelvis should be eased below (like it is in your standing postures as opposed to your back angling postures). This turns on the anatomy of an original particular spine and pelvis, BUT if you are attracting your abdominal muscles all the way in, then your spine will be supported anyway, and your tailbone will have an ease that is natural to your anatomy, keeping you up in a stronger headstand. The only way to know if you are doing this is to play with pushing your pelvis and just see what happens. Try doing this up as opposed up a wall to begin so you can see how it feels to do it without the warning of dropping.
You can also try standing upright in Mountain Position and operating your legs and feet just like you would in a headstand. Then, exercise conducting your hip points towards your ribs (curving your spine just like in the Cat position). Keeping those abdominal muscles drawn in, try to move the ribs up and aside from the hips to straighten out the spine. As soon as you lose the core session, start again. This is how you should be attached when you are upside down in any headstand or handstand posture.
Important: Headstands are not endorsed for people with neck illness or scoliosis. Everyone is dissimilar, and dissimilar cues and preparation will speak more noisily to some than to others. Do not lose heart if a posture does not come simply to you. Talk to many promoters and teachers about what works for them and finally, you will find a cue or piece of preparation that uses your strengths and conducts you up with confidence.
Salamba Sirsasana II – Tripod Headstand
What is Salamba Salamba Sirsasana II – Tripod Headstand?
Also known as the Sirsasana B or Mukta Hasta Sirsasana in the Sanskrit, the Tripod Headstand is a variant of Sirsasana (traditional Headstand). A “grandeur” of yoga positions, just like other Headstands, Salamba Sirsasana II is an converse that shows control, strength, and appeal. It is a raising block towards extending the complete expression of Sirsasana.
Many treat the Tripod Headstand as a more modern version of Sirsasana, but that’s not always the case. Some people who can not make sense of Sirsasana I simply feel cozier with Sirsasana II. This is doubtless because it more closely parallels the Headstands they were executed as children.
Therefore, it is advocated that you master the Tripod ahead advancing to the full Headstand. If you set it up appropriately with good adjustment, you will have no reason for not trying it ahead and learning the complete version. Whatever the case, secure that you expand your strength and control when raising into the full asana.
What are the Health Benefits of Salamba Sirsasana II – Tripod Headstand?
Benefits of Headstand II (Sirsasana II)
Headstand II (Salamba Sirsasana II) has its under-structure from the base position – Headstand (Salamba Sirsasana), so the benefits can be referred to.
However, this yoga position is a more demanding modern exercise and has extra physical and mental benefits as listed under:
- Strengthens the arms, shoulders, neck, core
- Stretches the spine, back, torso, and legs
- Effects on the biceps and triceps
- De-stressed and flexible, the shoulders muscles mainly deltoid muscle
- Helps to remove the toxic gasses
- Communication between the lungs, heart, and digestive organs
- Expand the function of the lungs, heart, and digestive organs
- Considerate for self-awareness, imagination, and intuition
- Expand the blood and nutrients flow to the head, scalp, and hair follicle
- Assist in hair-growth
- Better digestive system and report the imprisoned gasses
- Assist avoid intemperance mucus, sinus problems, common cold, and cough
- Better meditation while sitting for long periods observing inner silence
- Narrow the stress
- Relieves the anxiety
- Bring to the depression and fear
What are the Preparatory poses for Salamba Sirsasana II – Tripod Headstand?
- Standing Cow Face Position
- Torso Stretch Position
- Shoulderstand Position
- Standing Forward Bend Position
- Intense Leg Stretch Position
- Headstand 1
- Adho Mukha Svanasana / Downward-Facing Dog Position
- Salabhasana / Locust Position
- Ustrasana / Camel Position
- Indudalasana / Crescent Position
- Uttanasana / Forward Fold
- Virasana / Hero’s Position
- Viparita Karani / Legs Up The Wall Position
- Prasarita Padottanasana / Wide-Leg Forward Fold
- Paschimottanasana / Seated Forward Fold
- Hanumanasana / Full Splits
Like Headstand Position, Headstand Position II is also a modern level position. Therefore, it is approved to perform some warm up position precedence to this position. Given under are some of the options of positions, acting as construction for Sisrasana II:
- Hare Position Prepare (Sasangasana Prepare) – beginning off with this position to slowly gain strength, while having a clear understanding of the body’s capability.
- Tripod Dolphin Position – begin with the arms to obtain confidence.
- One-Legged Tripod Headstand Position Toes Wheel – Use the wheel (rest the wheel opposed up the wall to circumvent it from moving) to work on one side of the body before the final position.
- Tripod Headstand Position Prepare Wall Shoulders Blocks – using support to obtain confidence and have a better understanding of the breathing process to conduct the breath-body-mind in sync.
- Tripod Headstand Prepare One Knee On Elbow – to obtain confidence by lifting one leg.
- Tripod Headstand Prepare Knees On Elbow – moving a step other into the balance and obtaining capability with confidence.
- Tripod Headstand Sequence Flow – the final task and transition to Sirsasana II.
How to Perform Salamba Sirsasana II – Tripod Headstand?
Put a four-fold blanket on the ground and kneel near it.
Place your right palm on the ground just outside your right knee and your left palm just sheath your left knee. Your palms should be collateral to each other and your fingers should be straight towards the head. The distance between your palms on the ground should not outstrip the breadth of your shoulders.
Conduct your knees towards the head and place your top in the center of the blanket.
After connecting the position of your head, let your knees off the ground and stretch your legs straight. Keep your toes still close to your head and while keeping your back straight, depress your ankles to the ground.
Stretch the dorsal area of your spine while pushing the chest forward, and stay in this position for a few seconds. Take 3 to 4 breaths.
While expiring, take a slight swing from the ground and lift your legs while bending your knees. Your both feet should leave the ground concurrently. When this position is secure, lift your legs, expire, keep your toes facing upwards, tighten your knees and balance.
In the position of balance, only the top of the head and both hands are on the ground. Among your wrist to elbow, your forearms are to be kept square to the ground and collateral to each other. From your elbows to shoulders, your upper arms should be collateral to the ground and collateral to each other.
For those who can balance, follow the relax the instructions and prompts in Headstand.
The ability of this variation of the Sirsasana is necessary for learning other advanced postures such as Bakasana (Crane Position), Urdhva Kukkutasana (Upward Rooster Posture), Galavasana (Flying Pigeon Position), and Koundinyasana (Position Dedicated to the Sage Koundinya).
What are Follow up poses for Salamba Sirsasana II – Tripod Headstand?
- Balasana / Child’s Position
- Adho Mukha Svanasana / Downward Dog Position
- Savasana / Corpse Position
What are the Beginner tips in Salamba Sirsasana II – Tripod Headstand?
- Headstand can be exercised by learners but of course the student essentials some above exercises of yoga. Also, a fair amount of confidence is needed as the headstand is after all a balancing position and the idea of reality upside down can be intimidating to some. A word of lessoning, therefore; find an equal teacher to guide you through the position. Counter exercising alone opposed up a wall as it is possible to slip and fall sideways if you do not have the needed balance and strength.
- Also, this could lead to holding on to the wall which in turn can influence your confidence and detain progress. Exit the position as you come in, with control and obtaining throughout each motion in the back. Also, exercise the dolphin position to strengthen the upper body in composition for the headstand.
What are the Modifications and Variations in Salamba Sirsasana II – Tripod Headstand?
The easiest modification is to keep your feet on the floor. Going to lengthen your hamstrings and strengthen your back can take a lot of work, so do not be in an attack to conduct your feet off the floor.
If your back rounds:
If your back rounds as you walk your feet in to construct to go up in this position, do not go up. Rather, work to strengthen your back (your erector spinae muscles especially) so that you can keep your back straight and long ahead you lift your legs.
Place yoga blocks below your feet. This will help lift your hips up and forward (closer to over your shoulders) while safe keeping your back straight, which makes acquiring the position easier.
One foot off the ground:
If you are feeling audacious you can start by conducting one foot off the floor, and operating the other foot to roll onto your tip-toes. This helps move your hips over your shoulders more, which is necessary for this position. Then switch sides.
If the top of your head hurts:
If exercising Headstand hurts the top of your head you can double your mat up, or region a yoga blanket on your mat (but do not fold the blanket too thick as this can make your head/neck unsteady).
If your elbows keep moving wide:
You can add a yoga belt to your upper arms when you are learning to hold your headstand. This has the advantage of stopping your elbows from repairing broad than your shoulders.
It is worth considering that it can be difficult to get into and out of the position with a strap around your upper arms, and it can teach you to press out into the belt, instead of charming your arms and shoulders to hold the form.
Use the wall for support:
Exercise headstand in the area of a room and use the two walls of the area to assist your shoulders and help stop immoderate rounding of your back (a common disordered when you are new to this position). Also, the assistance of the wall gives you more confidence to raise your feet and legs.
When exercising in the area of a room, or at the wall, have your head severely 2–3 inches away from the area. Any more than this will lead to immoderate rounding of the back, which can cause you to roll towards the back of your head, place unwanted pressure on the back our your cervical spine (neck).
Region a yoga bolster between you and the wall to help keep your spine straight.
Use the wall to come down:
When exercising in an area or as opposed to up a wall, you can use the support of the wall to exercise by coming down with your legs together and straight. Once you have learned how to come down with control, you can start exercising by going up with your legs together and straight.
Use props:
You can region yoga blocks under your shoulders to assist them and give you an extra place to press into. A Feet Up headstand yoga the stool is also useful for studying to do Tripod Headstand.
What are the Precautions and Contraindications for the Salamba Sirsasana II – Tripod Headstand?
Tripod Headstand should also be opposed by people with:
- high blood pressure
- heart palpitations
- glaucoma and other eye problems
- hiatus hernia
- cervical spine instability
Consult your doctor ahead of exercising Tripod Headstand if:
You have back or neck injuries.
You have a heart condition.
Proceed with attention if:
You get headaches consistently. Sirsasana II can help lessen headaches but it can also make them poor.
You are pregnant. If you have a constant exercise of headstands you can continue this position as late into your pregnancy as you feel comfortable. Hence, it is not advanced for pregnant women who are new to the position.
What are the Precautions and Contraindications for the Salamba Sirsasana II – Tripod Headstand?
The position is a moderned yoga position you should take care of while exercising Headstand II (Salamba Sirsasana II).
The precautions and contraindications to keep in mind while doing this position are explained under:
Injury and surgery:
Injuries to the shoulders, hips, pelvis, spine, wrists, neck, rib cage, head, etc. are a contraindication, and should not be exercised this position.
With more pressure placed on your head, neck, and shoulders, you must be watchful during this exercise even after the period of recapture from any injury in these parts. Since in this position, the increased pressure on them can incense neck or shoulder injury.
Apart from this, you should also take into not whether you have had any surgery and the time taken to retrieve after a specific surgery.
High blood pressure:
Headstand II (Salamba Sirsasana II) where the head is under your heart can cause an increase in blood pressure. And if you are already agonize from high blood pressure, it may manifest to be more damaging than beneficial.
When in doubt, ask your doctor before exercising and below the advice of an accomplished yoga teacher/trainer.
Insomnia:
Exercise this position close to bedtime should be opposed up, as it can over-stimulate the nervous system, spring in sleep poverty, insomnia or even disrupted sleep. Also, people agonizing from insomnia may not find Headstand II (Salamba Sirsasana II) beneficial, as alter gravity is working, which can lead to further infuriation and stiffness.
Diseases and ailments:
Avoid exercising this position if you have a history of the following diseases and diseases:
- Heart problems
- Lung problems
- Weak bones—bone density problems
- Suffering from fibromyalgia
- Weak blood vessels
- Eye disease
- Problems with the retina, infection (acute) ear-throat- or sinus
- Epilepsy
- Cervical Spondylosis
- Digestive disorders like as IBD (inflammatory bowel disease)
Women:
Women should avoid this position during pregnancy unless they are aware of its significance and have the right knowledge about yoga postures and breath-body consciousness.
It is also normally guided to avoid Headstand II (Salamba Sirsasana II) during the menstrual cycle, as this downward flow of energy (called Apana) in the yogic system is accountable and operated during the menstrual cycle. For some people, this position can conduct on more discomfort and exasperation, mainly for those not comfortable with a body-breathing awareness.
Salamba Sirsasana III – Supported Headstand
What is Salamba Sirsasana III – Supported Headstand?
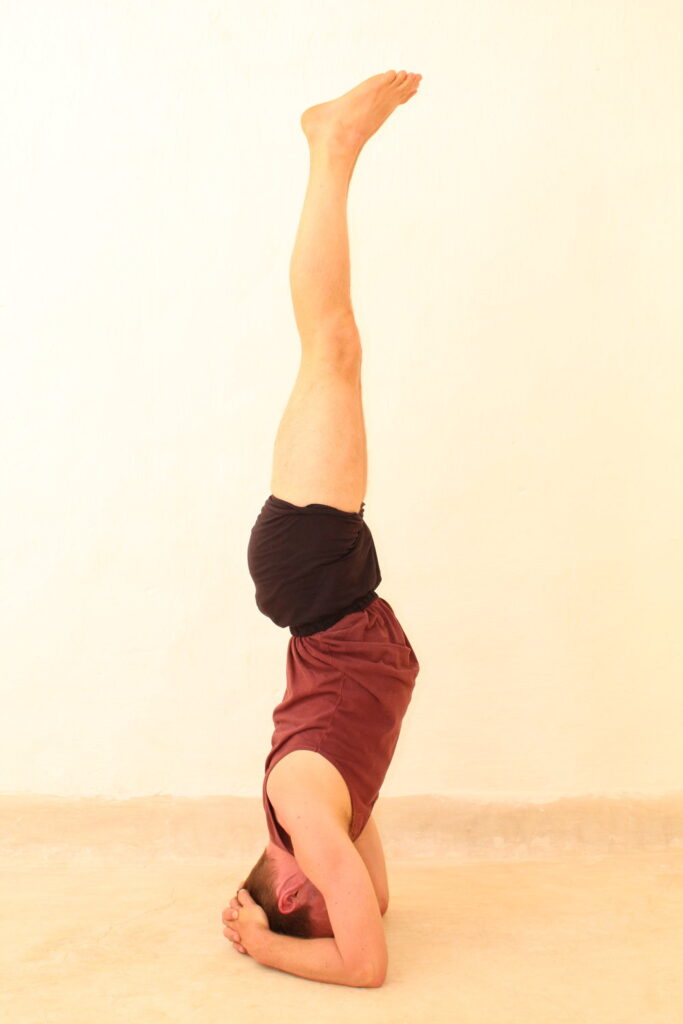
Sirsasana (Headstand Position) iii, is a variation of the base/ master yoga position Sirsasana (Headstand Position), which essentials stability with the top of the head and the strength of the shoulders. While the base position or master position Sirsasana (Headstand Position) balances the body on the top of the head while championing the head with cupped hands, Sirsasana (Headstand Position) iii uses the palms placed on the ground for support. The series and variations of Sirsasana (Headstand Position) were instituted by Sri Krishnamacharya, through the exercise of Ashtanga Yoga.
What are the Health Benefits of Salamba Sirsasana III – Supported Headstand?
This is a variation of the master Sirsasana position that essentials stability with your head’s top and shoulders’ strength. The base asana balances your body on the head’s top while assisting your head with your cupped hands. Variously, this supported headstand position uses your palms as support when you place them on the ground.
Salamba Sirsasana offers the following benefits:
- Helps to open, activate, and stability the top and third eye chakras
- Strengthens and stretches the muscles of the shoulders, arms, core, and neck
- Stimulates pituitary and pineal glands, which aid growth and the construction of sex hormones
- Strengthens the spine, neck, shoulders, and arms
- Grain the legs and abdominals
- Diminishes a buildup of fluid in the legs and feet
- Permits a healthy, pure blood flow to brain cells
- Stimulates the nervous system
- Aids in the therapy of headaches, anxiety, asthma, sinusitis, hay fever, depression, diabetes, insomnia, and symptoms of menopause
- Increases mental consciousness and simplicity
- Calms and quiet the mind
- May alter the effects of lethargy, sleep loss, and memory loss
- Stimulates and strengthens the lungs, smoothing healthy breathing
- Improves posture and digestion
- Aids in the relief of tonsillitis, constant coughing, common cold, bad breath, and palpitations
- Helps overcome issues of the liver, kidneys, stomach, intestines, and reproductive organs by backing the pull of gravity
What are the Preparatory poses for Salamba Sirsasana III – Supported Headstand?
Learning the posture of Sirsasana (Headstand Position) iii, essential strong shoulder muscles, strong neck muscles, and strong core muscles. Mouldability plays a great role but not as much as strength and balance. Therefore to make sure you get the exercise of Sirsasana (Headstand Position) iii right given under are the require preparatory yoga positions to exercise.
Arms and Shoulders:
Forearm Side Plank
Camatkarasana (Wild Thing Position)
Shoulder and Neck:
Sarvangasana (Shoulderstand Position)
Chakrasana (Wheel Position)
Core and Balance:
Dekasana (Airplane Position)
Urdhva Mukha Paschimottanasana (Upwards Facing Intense West Stretch)
Head, Neck, and Balance:
Sirsasana (Headstand Position)
How to Perform Salamba Sirsasana III – Supported Headstand?
As Sirsasana (Headstand Position) iii is a promote level yoga position, advice from a yoga teacher is required. Kindly follow the step by step directions given under building sure each step is understood well ahead of going into the next. This information should be used only by those who have occurrence in the field of yoga in general, and not by any settler to yoga.
Method 1: Step by Step Instructions for Sirsasana (Headstand Position) iii
Start to sit at the center of the mat in Adho Mukha Virasana (Downward Facing Hero Position) and take about 8 slow long and deep breaths.
Reveal and go into Sasangasana (Rabbit Position), to open the neck and shoulder muscles along with upgrade the stretchability of the head. Endure here again for about 6 breaths.
Release and come to rest in Catur Svanasana (Dolphin Position). Rest for about four breaths.
From Catur Svanasana (Dolphin Position), place the top of the head on the ground, slowly moving the hips and advancing onto your toes in Tripod Dolphin Position. Endure here for about 4 breaths admitting the head to produce for Sirsasana (Headstand Position) iii.
While in Tripod Dolphin Position, move the arms to conduct the palms on the ground while making sure the fingers are pointing towards the direction of the face, outwards. The elbows remain collateral to each other while the lower part of the body is balancing on the toes.
Now, inspire and lift the right leg, slowly resting the right knee over the right upper arm, while bending the right leg in Catur Svanasana Sirsasana Eka Janu Kurpara (Tripod Headstand Prepare One Knee On Elbow). Continue balancing with breathing for about 2 breaths.
Inspire and now conduct the right knee to rest on the right upper arm in Catur Svanasana Sirsasana Janu Kurpara (Tripod Headstand Prepare Knees On Elbow). Modify the hips and the legs to get agreeable balancing on the head, palms, shoulders and the elbows and stay for about 2 breaths.
If one is not agreeable to going deeper into the exercise, then issue and rest completely in Adho Mukha Virasana (Downward-Facing Hero Position) to rest completely. Relax here and go back to the step-by-step instructions from 2-6.
Let us resume step 6. Inspire and conduct the right leg up, going slowly with the movement while the left leg remainders down on the elbow in Tripod Headstand Prepare One Knee on Elbow One Leg Half Lifted (Catur Svanasana Sirsasana Eka Janu Kurpara Eka Pada Ardha Urdhva). Balance the full body using the strength of the core muscles to help your first lift and second to help you to endure in balance. Continue behind here for about 2 breaths.
Inspire and now lift the right leg, stretching it entirely in Catur Svanasana Sirsasana Eka Janu Kurpara Eka Pada Ardha Urdhva (Tripod Headstand Prep One Leg Half Raised). Stay behind here for 2 breaths, focusing on the breathing while using the core muscles to hold in balance.
Inspire and conduct the other leg to stretch totally in Tripod Headstand Sequence Flow. Stretching the legs upwards totally, using all the core muscles, shoulder strength, and head strength to detain the body in balance.
Stay behind here for about 2 breaths, conception the flow of breath and the body balance. Once comfortable, slowly move the right palm and turn it conducting the fingers now to face the other way.
Once done with the right palm, now move the left palm conducting the fingers to point in the other direction. Now both palms with have the fingers acuted the way the body is facing inside.
Moving the hands here should be very considerate, making sure there is no constraint on the head and the neck. For starters, now could do this opposed up the wall or even use a good thick blanket to support the head.
Modify the body slowly without affecting the head and come to Sirsasana (Headstand Position) iii. Endure here for 2 breaths or more. Take time to recognize the flow of breath and the control factor.
To deliver, first, bend the right leg and place the toes on the ground, and then conduct the left leg and place the toes on the ground, while operating the arms for comfort.
Rest and come to Savasana (Corpse Position), and then move on to Sarvangasana (Shoulderstand Position) to relax them undistinguished muscles along the neck and the shoulders. The practice of this position is a must to help regain the various overstretched muscles during the exercise of Sirsasana (Headstand Position) iii.
If the Method 1 seems heavy, one can follow the commands given under, going into Sirsasana (Headstand Position) iii across a a different set of yoga positions. Whichever method one opts, it is most important to have mastered the exercise of the base or foundation yoga position Sirsasana (Headstand Position).
Method 2: The Alternative Step by Step Commands for Sirsasana (Headstand Pose) iii
Start the exercise with Adho Mukha Virasana (Downward Facing Hero Position), and stay put for about 6 breaths.
Release and come to Adho Mukha Svanasana (Downward-Facing Dog Position), and stay put for 6 breaths.
Inspire and lower the body by placing the knees on the ground and turning the arms placing the palms on the floor with the fingers pointing inwards towards your feet and come to stability the body in Hamsasana (Swan Position).
Relax the body on the elbows, placing the belly to relax on the back of the elbows, while balancing on the toes. Stay put for about 2 breaths. Release and come to fold the shoulders and the head downwards while operating the legs to fold at the knee.
Place the top of the head on the ground anterior, a few meters away from the palms. Operating the lower body as much as is agreeable to place the top of the head on the ground is completely one choice.
Once the top of the head is on the ground, take a few rounds of breaths here to help acknowledge and rest the movement and the pressure around the neck and the shoulders.
Lifting the hips upwards, walk the feet immediately towards the chest and the hands. Go easy and do it one foot at a time, while observing the pressure at the top of the head.
Once more when comfortable, endure here with the hips lifted and the feet nearer to the hands. Stay for 2 breaths.
Inspire, slowly lift the right foot off the ground, folding it at the knee. Expire and rest. Inspire and now lift the left foot off the ground and conduct both the legs to stretch completely into Sirsasana (Headstand Position) iii.
Operating the legs up here can be difficult if there is not sufficient strength at the wrists, so make sure you have understood the influence of the weight of the body on the wrists. Even the pressure on the top of the head will be severe while lifting the legs. Therefore, go slow and easy ad take time to first appreciate the motion of the body, ahead of trying to go completely into Sirsasana (Headstand Position) iii.
Once agreeable, stretch the legs up and use the core muscles to help you hold the posture. Endure of 2-3 breaths originally and then go deeper with the duration. Use the wall and thick blanket to appreciate the flow.
To release come steadily with one leg down and then the other to relax in Savasana (Corpse Position), and then in Sarvangasana (Shoulderstand Position).
What is the Breath Awareness in Salamba Sirsasana III – Supported Headstand?
List of yoga sequences with Headstand Position:
- Dropping arm fat and building great-looking shoulders yoga sequence
- Yoga sequence for stabilizing 7 chakras in the body
- Peak position yoga sequence urdhva dhanurasana sirsasana
- Sarvangasana ashtanga vinyasa yoga sequence
- Chakra moves yoga sequence
- Ashtanga yoga primary series
- Vinyasa yoga sequence earth and space component yoga positions
- Ashtanga advanced chain a yoga sequence
- Peak position yoga sequence handstand position
- Ashtanga second chain nadhi shodhana sequence
- Bikram yoga series advanced
Niralamba Sirsasana
What is Niralamba Sirsasana?
Also known as the Unsupported Headstand, Niralamba Sirsasana is a variation of the traditional Headstand Position. Hence, it is dense to perform it than its base asana since you will be venturing to balance your full body weight only on your head in an inverted position. You only use your arms to offer an awareness of balance but not to support the load.
Niralamba Sirsasana approach from the Sanskrit’s four words. Nira known as “without,” Lamba known as “support,” Sirsa known as “head,” and asana is known as “position” or “posture.” The meaning of Niralamba Sirsasana in English is Unsupported Headstand.
Niralamba Sirsasana has many variations hanging on how you position your arms in connection to the body. Sometimes, you can keep them on the sides while at others, they are on the anterior side of your body on the floor. Overall, it is your head and neck muscles that essentially support your body weight. Again, your arms are just for accomplishing balance in the inverted posture.
It is desirable to master the Salamba Sirsasana ahead of testing to perform Niralamba Sirsasana. The steps for doing the Unsupported Headstands are related to the Supported Headstand from the starting. Hence, in the end, you will move your hands to a position where it is only the head that supports your body weight.
What are the Health Benefits of Niralamba Sirsasana?
As an inversion, niralamba sirsasana is accepted to open the Ajna (third eye) chakra, which encourages divination and inner knowledge. It is also connected with increased imagination, clairvoyance, and visualization. This asana is in addition thought to activate the Sahasrara (crown) chakra, which is connected with pure awareness.
Niralamba sirsasana has a type of physical benefits, from cleaning the blood to relieving asthma symptoms, but also offers these benefits:
- Attaches the yogi with higher religious energy
- Stimulates liveliness and health
- Calms your mind and reduces stress
- Boosts mental purity
- Clarify the blood
- Diminishes asthma symptoms
- It can help reduce headaches
- Tones the pituitary glands
- As this is an advanced asana, niralamba sirsasana should only be endeavored after understanding the supported version.
How to Perform Niralamba Sirsasana?
Those who desire to do Niralamba Sirsasana should first master the Salamba Sirsasana or the supported headstand. The steps for achieving this asana is the same as Salamba Sirsasana, besides that in the end, the hands are progressed to a position where the body weight relaxes on the head. This alteration needs a lot of attention. One way is to advance the hands steadily to the anterior side of the body on the ground so that it helps in balancing, though no weight is supported by it. Advanced supporters can even produce the hands from the ground and place them next to the legs/thighs. This necessary great skill and balance. The support of a wall can also be removed in the earliest stages. Also, get a partner to watch over you to stop any falls.
Endure in the final position for a few seconds only in the starting. Behind, it can be increased as per one’s skill and capabilities.
To deliver the position, conduct the hands back to the ground, next to the head as in Salamba Sirsasana. The hands now support part of the body weight and allows a balance to the body ahead sloping. Slowly slope and come back to the beginning Marjariasana position. One can voluntary do Tadasana to help conduct back the profusion of blood from the head to the body. Recline down in Shavasana for a few minutes as a relaxing position.
What are the Modifications and Variations in Sirsasana?
In the starting phase, when learning Headstand, make sure to keep your feet slightly anterior to your body.
Do not level for shoulders-hip-ankles alignment, because that increases the risk of overturning over.
Up until you can enter and outlet the position with control by yourself and hold for at least 1 minute, keep your feet faintly in anterior of you.
A fixed and less intense position, which still gives you the advantage of the inversion, is Half Headstand.
If heavy it for the first time, firstly use the wall support by conducting just about 2-3 inches distance between the wall and the positioning of the palms. It is better to use the corner wall as one obtains the support from both sides and the back will endure straight and not likely causing more pressure at the neck.
If one is still exercising to balance this asana, then one can work with one leg at a time. Begin with using the wall and slowly walk both legs towards your chest and then conduct just one leg up and exercise this balance for a while and then go on to the other leg.
Recurrent this exercise for a comfortable period and then when you obtain confidence go the next step further.
One can also go halfway, angle both the knees and conduct the feet off the ground, and balance here for a few times, and once the confidence is constructed to go further to the next step.
Use a partner to help you lift your legs if you are self-confident with your shoulders and neck.
Support the neck, shoulders, and elbows with sufficient cushioning from blankets and cushions or one can exercise this on a a rather hard mattress.
If after charming the legs up and once the position is extended, but the body is not ready to hold for long, then start with few seconds to hold in the exercise and then generally go a few more seconds. Always understand the body and be conscious of the transmission between the body and the brain.
Ignoring any signs of tenderness in the body mainly at the neck, shoulders or the head will only cause more harm after delivering from the position, so make sure awareness is exercised.
Headstand Pose Variations:
Under are some common variations of the yoga position Headstand Position with a base position as Headstand Position (Salamba Sirsasana).
- Half Headstand Position On Forearms
- Bowing Yoga Mudra Variation
- Headstand II
- Tripod Headstand Prepare Knees On Elbow
What are the Precautions and Contraindications for the Sirsasana?
- Precautions:
- Learn this asana below the intelligence of a trainer. Only exercise on your own when your trainer gives the go-ahead.
- Have exercise and take it slowly. Restrain this asana takes time.
- Remain that you achieve it close to a wall for strength especially if you are a learner or have just found doing it.
- Always be aware of the deployment of your neck.
- Avoid doing this through menstrual cycles.
- The full weight of your body is carried by the muscles in the hands, neck, and shoulders. If you have spondylitis, please speak to your yoga trainer ahead starting this asana.
- People with heart conditions, vertigo, and high blood pressure also need to be careful.
- Also, do not detain your breath while you achieve yoga asanas.
Headstand Pose Contraindications:
Children who are below 7 years of age are not guided to try this position. Our skull can be soft and prone to injuries.
A precise no for pregnant women. The high risk of falling out of the position is high.
Glaucoma can increase the pressure in the eyes and therefore people with glaucoma are not guided to try this position.
People who hurt from acute or massive migraines, shoulder or neck points give a second thought before venturing.
If you are standing from any significant heart conditions, or hypertension, it can worsen the issue.
The headstand Position is a very strong and advanced level position that should only be executed in anterior of a certified and knowledgeable yoga teacher to make it safe. It is necessary a lot of energy and exercise execute the position. A slight thoughtlessness may conduct injuries. To avoid these and to execute the position a safely the yoga teachers should refer the under contraindications:
Injury and Surgery:
Headstand Position should be circumvented by students with injuries connected to the joints like elbows, rib cage, arms and shoulders, in insertion, an injury connected to the muscles of the hamstrings, neck; care should be taken. Similarly, students reclaiming from a current surgery or recuperating from an old surgery connected to these mentioned areas should avoid the position. Also, any internal surgeries will not allow students to execute the position as this is an all-body-appealing yoga position.
Physical Strength and Weak Body:
Headstand Position cannot be done by those who have a very weak upper body, or have vertigo, severe headache, or migraine, sickness. Children below the age of seven years should be surely opposed to the position as their skulls are not fully combined, or not accustomed sufficient, and thus prone to injury. Pregnant women should be circumventing the position, as the position can be insecure in case they slip off or fall in the position. Students with Glaucoma cannot do the position given the unbearable pressure on the eyes. Women during the early days of menstruation should circumvent the position to avoid the cramps. Starter level students who lack reliance on Headstands, and lack balance, can try One-Legged Headstand Position Against Wall to obtain dependence first.
Lack of Breath Awareness:
During the Headstand Position, the breath enhances slower and more intensely as you hold it for a long. Hence, anybody having asthma or having zero comprehension of breath recognition should circumvent the position. They should first learn this from an accomplished yoga teachers and then only exercise the position following the raised safety guide.
- Hypertension
- Cardiovascular issues
- Neck issues
- Shoulder issues
- Present surgery or inflammation in your head (for example ears, eyes, nose, etc.)
- Arthritis or osteoporosis
- Brain injuries
- Lower-back and spinal issues (e.g. chronic pain, herniated disc, sciatica, SI-joint instability)
- Acute migraine or headache
- For asthma or other breathing disorders: belongings only for short durations and skipping altogether if it causes too much discomfort, nausea, or shortness of breath
- Practitioners younger than seven, because the skull is immobile a bit soft and it is chary not to position weight on it yet
What are the Common Mistakes in Sirsasana?
- Circumvent the backing mistakes one tends to do while conducting the headstand.
- The hips can go behind the shoulders. Or your strength ends up standing your elbows very far from each other.
- The Head might land up in the wrong posture – otherwise too far towards the forehead or too far towards the back of the head.
- Avoid exercising this asana on a hard surface.
- Breathing too rapidly or too slow.
One Comment