
Anterior Tibiofibular Ligament Sprain and Physiotherapy Treatment
- An anterior talofibular ligament sprain is the most common of the ligament injuries that can occur as part of the lateral ligament complex injuries.
- The injuries can comprise either soft tissue tears, avulsion fractures, or both. Sprain of the anterior tibiotalar ligament This is an uncommon injury, caused by pure plantarflexion stress.
- The chronic aching that results from this type of trauma may last for many years but is never severe, unless the patient is, for example, a rugby or soccer player and needs full and painless plantarflexion mobility at the ankle joint.
Pathology of Anterior Tibiofibular Ligament Sprain
- Anterior talofibular ligament injuries typically occur with an inversion injury to the ankle, either with or without plantar flexion.
- Approximately two-thirds of ankle sprains tend to be isolated injuries to the anterior talofibular ligament (ATFL), the weakest ligament in the lateral collateral complex of the ankle.
- There is a general agreement that avulsion is more common at the fibular than the talar end of the ligament.
anatomy related Anterior Tibiofibular Ligament Sprain
- The ankle joint (or talocrural joint) is a synovial joint located in the lower limb. It is formed by the bones of the leg (tibia and fibula) and the foot (talus).

- Functionally, it is a hinge type joint, permitting dorsiflexion and plantarflexion of the foot.
- In this article, we shall look at the anatomy of the ankle joint; its articulating surfaces, ligaments, movements, and clinical correlations.
Articulating Surfaces:The ankle joint is formed by three bones; the tibia and fibula of the leg, and the talus of the foot:
- The tibia and fibula are bound together by strong tibiofibular ligaments. Together, they form a bracket shaped socket, covered in hyaline cartilage. This socket is known as a mortise.
- The body of the talus fits snugly into the mortise formed by the bones of the leg. The articulating part of the talus is wedge-shaped – it is broad anteriorly, and narrow posteriorly:
- Dorsiflexion – the anterior part of the talus is held in the mortise, and the joint is more stable.
- Plantarflexion – the posterior part of the talus is held in the mortise, and the joint is less stable.
Ligaments
There are two main sets of ligaments, which originate from each malleolus.
- Medial Ligament
- The medial ligament (or deltoid ligament) is attached to the medial malleolus (a bony prominence projecting from the medial aspect of the distal tibia).
- It consists of four ligaments, which fan out from the malleolus, attaching to the talus, calcaneus, and navicular bones. The primary action of the medial ligament is to resist over-eversion of the foot.
- Lateral Ligament
- The lateral ligament originates from the lateral malleolus (a bony prominence projecting from the lateral aspect of the distal fibula).
- It resists over-inversion of the foot, and is comprised of three distinct and separate ligaments:
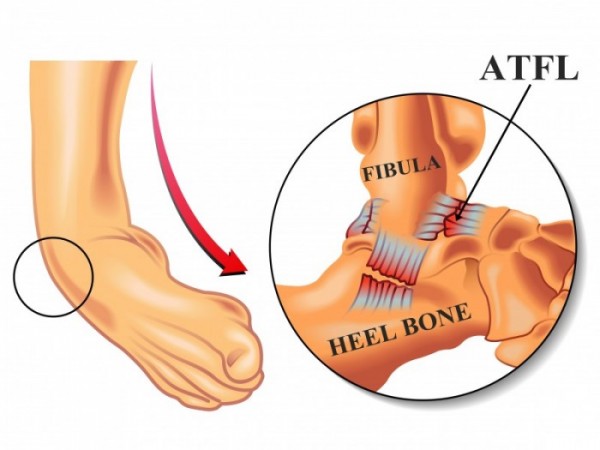
- Anterior talofibular – The anterior ligament of the lateral malleolus (anterior tibiofibular ligament or anterior inferior ligament) is a flat, trapezoidal band of fibers, broader below than above, which extends obliquely downward and lateralward between the adjacent margins of the tibia and fibula, on the front aspect of the syndesmosis.
- It is in relation, in front, with the fibularis tertius, the aponeurosis of the leg, and the integument; behind, with the interosseous ligament; and lies in contact with the cartilage covering the talus. spans between the lateral malleolus and lateral aspect of the talus.
- Posterior talofibular – spans between the lateral malleolus and the posterior aspect of the talus.
- Calcaneofibular – spans between the lateral malleolus and the calcaneus.
grade I: stable injury
- provocative maneuvres do not elicit increased upper ankle joint laxity
- no ligament in the lateral complex is completely ruptured
grade II: unstable
- ruptured anterior talofibular ligament
- increased upper ankle joint laxity
grade III: unstable
- ruptured calcaneofibular ligament (CFL)
- increased upper ankle joint laxity
- There are other grading systems, of course, such as the anatomic classification or grading by clinical presentation symptoms.
Symptoms of an anterior tibiofibular ligament sprain
- Kicking a heavy ball from underneath is especially painful.
- full passive plantarflexion hurts at the front of the ankle, but all the other movements, including resisted dorsiflexion of the toes, are painless.
- The tender spot at the front of the ankle can easily be defined if the tendons of the dorsiflexion of the toes are pushed away.
- swelling
- bruising
- unable to bear the weight
Diagnosis of Anterior Tibiofibular Ligament Sprain
Plain radiograph/CT
- Many show an associated avulsion fracture at either the fibular end or, less commonly, the talar end.
- May show ancillary features such as an ankle joint effusion and/or overlying lateral malleolar soft tissue swelling.
Ultrasound
- Has been shown to have high sensitivity and specificity rates for chronic anterior talofibular ligament tears 6.
MRI
- Both the anterior and posterior talofibular ligaments are usually seen on a single axial image obtained slightly distal to the tibiofibular ligaments 4.
- MRI may show detachment, discontinuity, thickening, thinning, contour irregularity of the ligament, a bright rim sign 5, or an associated bony avulsion. Heterogeneity with increased intraligamentous signal intensity on fat-suppressed T2-weighted or intermediate-weighted images is indicative of intrasubstance edema or hemorrhage.
Physiotherapy Management of anterior tibiofibular ligament sprain
RICE protocol :

- Rest: Rest prevents the worsening of the initial injury. By placing the injured extremity to rest the first 3-7 days after the trauma, we can prevent further retraction of the ruptured muscle stumps (the formation of a large gap within the muscle), reduce the size of the hematoma, and subsequently, the size of the connective tissue scar.
- During the first few days after the injury, a short period of immobilization accelerates the formation of granulation tissue at the site of injury, but it should be noted that the duration of reduced activity (immobilization) ought to be limited only until the scar reaches sufficient strength to bear the muscle-contraction induced pulling forces without re-rupture.
- At this point, gradual mobilization should be started followed by a progressively intensified exercise program to optimize the healing by restoring the strength of the injured muscle, preventing muscle atrophy, the loss of strength, and the extensibility, all of which can follow prolonged immobilization.
- Ice or cold application: It is thought to lower intra-muscular temperature and decrease blood flow to the injured area.
- Regarding the use of cold on injured skeletal muscle, it has been shown that early use of cryotherapy is associated with a significantly smaller hematoma between the ruptured myofiber stumps, less inflammation, and tissue necrosis, and somewhat accelerated early regeneration.
- But according to the most recent data on the topic, icing of the injured skeletal muscle should continue for an extended period of time (6 hours) to obtain a substantial effect on limiting the hemorrhaging and tissue necrosis at the site of the injury.
- Compression: This may help decrease blood flow and accompanied by elevation will serve to decrease both blood flow and excess interstitial fluid accumulation.
- The goal is to prevent hematoma formation and interstitial edema, thus decreasing tissue ischemia. However, if the immobilization phase is prolonged, it will be detrimental to muscle regeneration.
- Cryotherapy, accompanied by compression, should be applied for 15–20 min at a time with 30–60 min between applications. During this time period, the quadriceps should be kept relatively immobile to allow for appropriate healing and prevent further injury.
- Elevation: The elevation of an injured extremity above the level of heart results in a decrease in hydrostatic pressure, and subsequently, reduces the accumulation of interstitial fluid, so there is less swelling at the place of injury. But it needs to be stressed that there is not a single randomized, clinical trial to validate the effectiveness of the RICE-principle in the treatment of soft tissue injury.
Pain relieving Modalities :

- TENS: transcutaneous electrical nerve stimulation is an electrical modality that provides pain relief by providing pain modulation.TENS closes the gate mechanism at the anterior grey horn in the spinal cord. also stimulates the endogenous opioid system which prevents the release of substance p at the anterior grey horn.
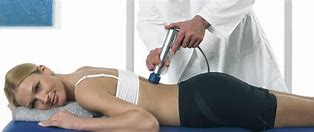
- IFT: Interferential current therapy produces a low-frequency effect at targeted tissue, it inhibits transmission of pain impulses, stimulates the endogenous opioid system, increase blood supply, relieve edema, and removes the waste products.
Range of motion exercise :

- plantarflexion
- dorsiflexion
- eversion
- inversion
Stretching Exercises
Start exercises to stretch your Achilles tendon as soon as you can do so without pain. The Achilles tendon connects the calf muscles on the back of the lower leg to the bone at the base of the heel. Try the towel stretch if you need to sit down, or try the calf stretch if you can stand.
- Towel stretch. Sit with your leg straight in front of you. Place a rolled towel under the ball of your foot, holding the towel at both ends. Gently pull the towel toward you while keeping your knee straight.
- Hold this position for 15 to 30 seconds, and repeat 2 to 4 times. In moderate to severe ankle sprains, it may be too painful at first to pull your toes far enough to feel a stretch in your calf. Use caution, and let pain be your guide.
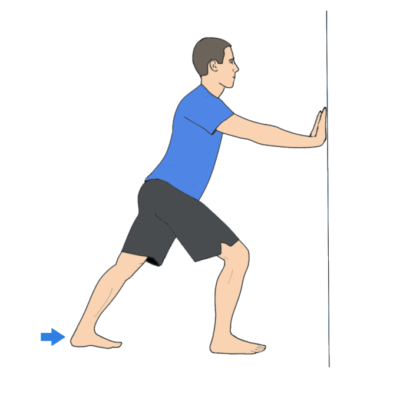
- Calf stretch. Stand facing a wall with your hands on the wall at about eye level. Put the leg you want to stretch about a step behind your other leg. Keeping your back heel on the floor, bend your front knee until you feel a stretch in the back leg. Hold the stretch for 15 to 30 seconds. Repeat 2 to 4 times. Repeat the exercise with the back knee bent a little, still keeping your back heel on the floor. This will stretch a different part of the calf muscles.
Strengthening Exercise


- Start by sitting with your foot flat on the floor and pushing it outward against an immovable object such as the wall or heavy furniture. Hold for about 6 seconds, then relax.
- After you feel comfortable with this, try using rubber tubing looped around the outside of your feet for resistance. Push your foot out to the side against the tubing, then count to 10 as you slowly bring your foot back to the middle.
- While still sitting, put your feet together flat on the floor. Press your injured foot inward against your other foot. Hold for about 6 seconds, then relax.
- Next, place the heel of your other foot on top of the injured one. Push down with the top heel while trying to push up with your injured foot. Hold for about 6 seconds, then relax.
Weight-Bearing Exercise

- toe standing
- heel standing
- one leg standing
- toe walking
- heel walking
- stair climbing
Balance Exercise :

- Stand on just your injured foot while holding your arms out to your sides with your eyes open.
- If you feel unsteady, stand in a doorway so you can put your hands on the door frame to help you.
- Balance for a long as you can, working up to 60 seconds. When you can do this for 60 seconds.
- Stand on your injured foot only and hold your arms across your chest with your eyes open. When you can do this for 60 seconds.
- Stand on your injured foot only, hold your arms out to the sides, and close your eyes. If you feel unsteady, stand in a doorway so you can put your hands on the door frame to help you. When you can do this for 60 seconds.
- Stand on your injured foot only, hold your arms across your chest, and close your eyes. Balance for a long as you can, working up to 60 seconds.
Propriocepetive Training

- proprioceptive training on balance board
- proprioceptive training on bosu.
other related topics :

4 Comments