The 51 Best Bodyweight Abdominal Exercises
Introduction
Bodyweight abdominal exercises are incredibly efficient to move your body and maintain your strength, muscular endurance, balance, and coordination no matter where you are. You can build your abdominal muscles at home with these bodyweight core workouts, whether you’re on the go or simply don’t have time to leave the house.
It only takes a little area, a few minutes, and a determined mindset to perform bodyweight core workouts; no weights, suspension trainers, stability balls, or ab wheels are required. A foam pad is the one piece of equipment you might want to have on hand so you can shield your lower back from the hard surface you’ll be performing these exercises.
Abs workouts can enhance your sports performance, prevent and lessen lower back pain, and improve your posture. If you follow a healthy diet and perform these workouts frequently enough, you may see some further waist reduction.
It’s not necessary to give up carbs and spend hours in the gym to have a stronger core. Here’s a simpler method to build and tone your stomach. Your abs serve purposes beyond just looking nice at the beach, after all. The frequently mentioned upper and lower abdominals, as well as the side, back, psoas, and glutei muscles, make up your core.
Your entire body is balanced and stable thanks to the muscular structure your core offers, which also helps with movement and safeguards your internal organs.
Bodyweight abdominal exercises
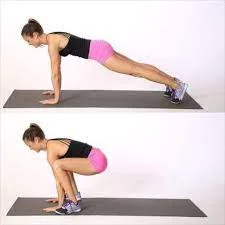
Burpees
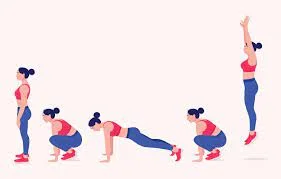
Why: By pushing your cardiovascular system to the limit, this full-body exercise increases the intensity of your workout. If you miss an obstacle in the Spartan Race, which is already crowded by people with washboard abs, you usually get this penalty.
How to assist: Arrange your arms at your sides and place your feet shoulder-width apart.
Bend your knees and extend your reach forward, placing both hands on the ground.
Then, instantly bending at the elbows, lower your entire body to the ground and kick both of your legs straight out in front of you. With the assistance of your arms, quickly raise your torso back up after bouncing your legs back under your body.
Leap vertically and raise your arms in the air. At the conclusion, the knees must be progressively bent.
Trainer Tip: Squat down and kick your legs back to perform a mobility burpee. Now, bring your right leg forward and place your foot on the outside of your right hand instead of performing a push-up.
Achieving this pose is sometimes referred to as groinering. After returning your right leg to the push-up position, raise your left foot to the outside of your left hand and repeat with your left leg.
After swiftly raising both legs back up to the low squat position, raise your left leg back to the top push-up position before standing and jumping. One mobility burpee rep is that.
muscle concluded: core muscle and the muscles of the arms, shoulders, chest, and upper back.
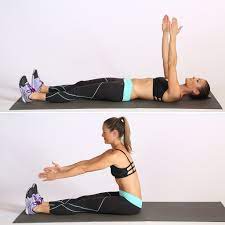
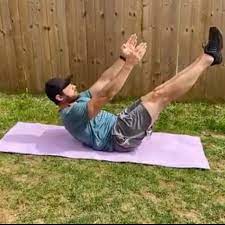
V Up
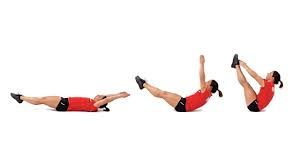
Why: It prevents you from using momentum to finish the crunch and from placing undue strain on your neck, in addition to all the abs-challenging benefits of a typical crunch. That adds to the difficulty.
How to assist: Assume a prone position, placing your hands on the floor, your arms raised over your head, and your legs straight out on the ground. This is where everything begins. Lift your torso and legs toward each other, maintaining straight legs and extended arms, to form a “V” with your body. As you raise your knees to the nearest perpendicular to the floor, lift your shoulder blades off the ground. After placing your hands on your legs, return your arms, legs, and torso to the floor. That amounts to one rep.
Targeted muscles include the rectus abdominis, internal and external obliques, and hip flexors including the sartorius, iliacus, and psoas major.
Common errors: a hunched back and a limited range of motion.
Trainer Tip: The X-Up is a tweaked version. This can be accomplished by spreading your legs and feet apart to create an “X” shape on the floor while lying on your back. Raise your left leg and right shoulder off the ground while maintaining a straight left arm. Then, bring your right hand up to the outside of your left ankle or knee. Once you’re back in the X position, repeat the motion with your left hand touching the outside of the right knee or ankle
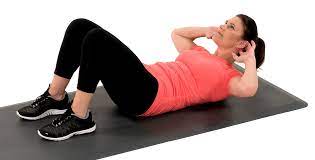
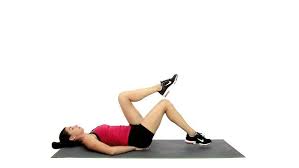
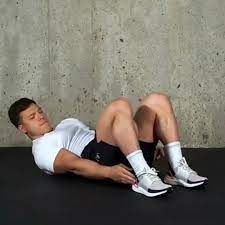
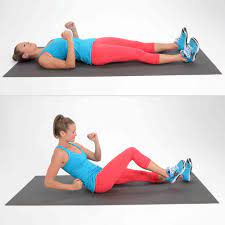
Lying oblique crunch
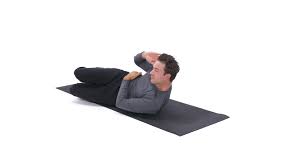
How to assist: On the floor, lie on your back. Sustain your legs at a ninety-degree angle bent in the air. With your elbows pointing out to each side, place your hands on the back of your head. This is where everything begins. Once your upper back is off the ground and your right elbow is either touching or near your left knee, twist and rotate your torso to pull your right shoulder toward your left leg.
Come back to the initial position by lowering yourself. Once more, rotate your left shoulder in the direction of your right knee. Reps on your right and left sides should be alternated.
Trainer Tip: This isn’t an air bike or bicycle crunch where you pedal with your legs always elevated above the floor. Return to the starting position after your elbow and knee make contact, then switch sides for the next repetition. Bring your elbow to the other while kicking one leg straight for a more strenuous workout.
fifteen to twenty repetitions
thrice daily, two to three times
muscle utilized: core muscles, abdominal wall, quadratus labarum, internal and external obliques, and erector spinae.
Typical errors include a limited range of motion, pushing too hard with the hands toward the head, and not using the abs enough.
Hanging leg raise
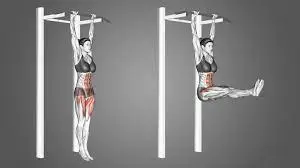
Why: Because it requires you to use your hip flexors and abdominals, two essential components of core strength, to elevate your entire lower body.This workout works your quads, lower abs, lattisimus dorsi, and forearms. For each repetition, elevate your bent knees and hold them there for five to ten seconds to change the hanging leg raise position. It is possible to turn left or right while bending your knees.
How to do it: Using an overhand grip, hang from a pull-up bar with your hands slightly wider than your shoulders.
Grip the bar firmly, bend your elbows slightly, and use your core to stabilize yourself to straighten your lower back.
Fold your quads as you raise your legs to an angle slightly above ninety degrees.
After maintaining this position for a while, progressively sag your legs.
Accomplish three sets of ten to fifteen repetitions.
Twice or thrice daily
Muscle concluded: Rectus abdominis, Psoas, Hip Flexors, External Obliques, and Rectus femoris.
Trainer Tip: Maintain a straight leg raise instead of bending your legs to intensify the exercise. As high as you can manage, keep them there for two seconds, and then lower them down to the beginning position.
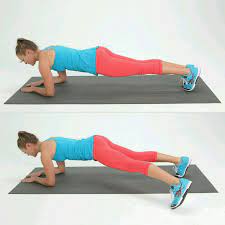
Plank
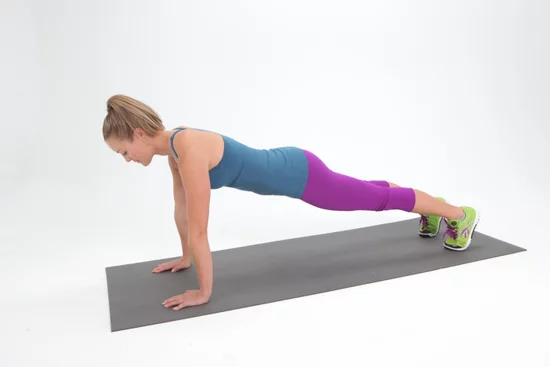
Planks are therefore essential to any regular bodybuilding and strength training regimen. Your stability, resistance to injuries, strength for other lifts, and help with keeping proper posture will all increase as a result. Choose a posture that allows you to reach your fullest length with your torso.
You can have adequate cushioning to feel comfortable on all fours if you use an exercise mat, you can perform a plank on your palms or forearms. There are numerous wrist wrap options available to support joints.
How to act: begin with your forearms and toes on the ground while facing downward in the plank position. The forearms are telling forward, and the elbows are precisely beneath the shoulders. Though your thoughts may be at ease, you must be watched on the floor. Drag your belly button in the direction of your spine with your abdominal muscles.
Avoid drooping or bowing; instead, keep your body straight from your ears to your toes. Your torso ought to stay stable and straight. The neutral spine assumes this position. Verify that you are not bent over your ears and that your shoulders are relaxed. The balls of your feet shouldn’t be higher than your heels.
For ten seconds, maintain this posture. Recline to the ground and give up.
Gradually extend the duration to thirty, forty, or sixty seconds.
most common mistakes
To get the most out of your workout and prevent strain or injury, steer clear of these mistakes. When your back is arched, you don’t fully contract your abdominal muscles and instead move extra weight to your arms. Make sure your shoulders continue to be broad and downcast.
Hanging hips: When your abs are at their strongest, your hips will begin to sag. That indicates that you ought to give up on your concept. Try putting your feet a little wider and concentrate on using your abs if it feels like your hips are sagging.
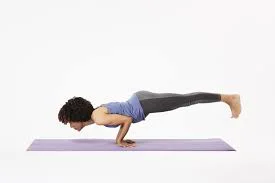
Benefits include: This is one of the best yoga poses for weight loss since it works a surprising number of body muscles. This pose also helps to balance the entire body and strengthens the muscles surrounding the spine. It is also responsible for improving posture, core strength, and stability in your body.
It’s effective in reducing belly fat using this yoga stance. It strengthens the wrists and arms and tones the abdomen. This is a hard pose that requires a lot of arm power to execute.
Trainer Tip: For oblique strength, add side planks to your workout. Turn from the plank position so that your right forearm supports you to perform a side plank. Stretch your left arm upward and place your left foot onto your right foot. For 30 to 60 seconds, preserve this posture. Roll your body such that your right arm is now pointing upward and your left forearm is supporting your body.
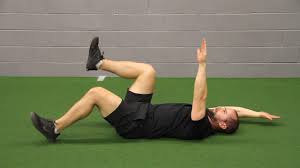
Deadbug

Lay flat on your back with your calves parallel to the floor and your knees bent at a 90-degree angle. Lift both of your arms over your head, pointing them at the ceiling. This is where everything begins. Now, extend your left leg straight without making contact with the ground.
Your back will want to arch, but resist the urge to do so by maintaining your abdominal muscles pressed firmly against the floor. Repeat the motion with your right leg after bringing your left leg back to the beginning position. Put both legs back in the beginning position. That amounts to one rep.
Trainer Tip: Extend each arm individually rather than pointing them to the ceiling. Stretch your right arm above your head until your hand reaches the floor while you straighten your left leg toward the floor. When extending one arm over the head with the hand near or touching the floor, the other arm should always be in the starting position, above the chest, and pointing toward the ceiling.
The accountable muscle: A few of the numerous core muscles include the transverse abdominis, which is the deepest muscle covering your spine and sides, the rectus abdominis, which runs vertically along the front of the abdomen, the obliques, which are the muscles on the sides of the stomach, and the pelvic floor.
Modified bent-leg dead bugs
You can adjust dead bugs by decreasing the range of motion as your arms and legs extend from your core. This will require less core strength and stability to finish the exercise. As an alternative, you can do the exercise by bending your knees and slightly dropping each heel to the floor before raising it back to the center. Take care not to stuff your thighs into your chest; instead, only tuck them into the chest, but just carry your legs to a 90-degree
How to help: Start in the tabletop position, placing your knees over your hips and your ankles at a 90-degree angle. The arms are straight up and parallel to the shoulders.
Stretch your left arm straight back above your head in the direction of the wall behind you while lowering your right leg to the ground. preserving the right knee bent at a 90-degree angle. Wipe the ground with the right heel.
Gradually return your left arm and right leg to the tabletop position. Proceed to the other side.
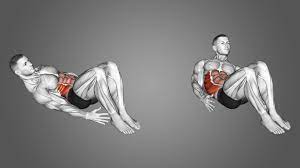
Inverted crunch
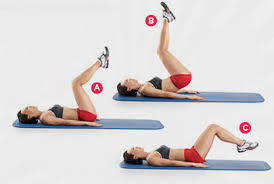
Arms by your sides, lie on your back. Lie down with your palms facing down on your yoga mat or towel to begin. Maintain a straight neck and back when looking up. Extend your arms to either side such that your body forms the letter “T” if you require additional support.
While conventional crunches target your top and middle abs, reverse crunches are ideal for targeting your lower abs. Although they are roughly the same difficulty, you might find them a little more challenging because you may not have worked your lower abs as much in the past.
To bring your knees over your hips, raise your legs. Elevate your feet off the ground and contract your abdominal muscles. Bring your knees straight over your hips while bending them to a 90-degree angle. When raising your legs, don’t forget to move them with deliberate, fluid motions. Using your arms to apply pressure to the ground can help you stay balanced and in control.
Elevate your tailbone and hips off the mat. Draw in a deep breath. Exhale and carefully lift your hips off the mat. Keep your knees bent at a ninety-degree angle and bring them closer to your head.
Hold the pose for one to two seconds after raising your tailbone off the ground. When you exercise, keep your arms, upper chest, and head firmly planted on the floor. Don’t use your arms to propel your lift; instead, press them down for balance. Aim to concentrate on allowing your core muscles to act.
Move your hips down to the floor in a deliberate manner. Breathe deeply as you return your hips to the floor with a smooth, gradual motion. Maintain a 90-degree bend in your knees and place them squarely over your hips. To complete your rep, pause in this position for a short while. If you intend to perform further repetitions, keep your legs raised, and when you’re done, lower them.
Aim for ten to twelve reverse crunches at once. Increase the rep count to 15 or 20 if that seems doable. As an alternative, for a complete core workout, try performing one set of basic crunches and one set of reverse crunches.
Trainer Tip: During this exercise, keep your arms straight by your sides.
muscle utilized: rectus abdominis
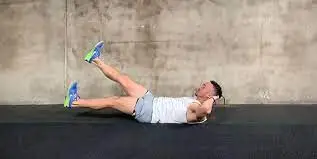
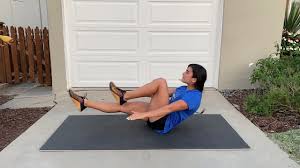
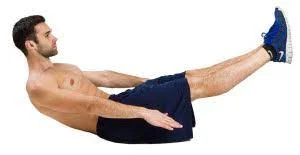
Seated scissor kick
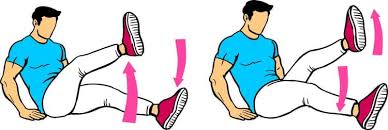
We have included this exercise in the intermediate part because it is beneficial for all skill levels. You can perform lying scissor kicks if you’re a beginner.
The proper way to perform seated scissor kicks: sit on the floor, lean back so that your back is not arched, and place your palms on the floor at the tops of your upper thighs.
How to assist: Lift your legs off the ground until they are straight up in the air, then alternately lower and raise them back up. It’ll be harder the straighter your legs are kept. Maintain a tight core as you continue to alternately raise and lower your feet. Your legs should be the best specialty moving.
This is easiest for beginners if you lie down with your back and shoulders on the floor. Additionally, bending your knees more will make it easier.
Worked muscles included the transverse abdominis, rectus abdominis, and hip flexors.
Trainer Tip: Keep your back straight. To keep your spine strong and straight, keep your abs firm. Raise your arms and move your shoulders in short, slow clockwise circles for more intensity. As you scissor-kick the legs
Work: Try to put in 30 to 45 seconds.
Crunch
Place yourself on your back on top of a yoga mat. Locate a location on the floor where you can spread out and lie comfortably. Maintain a straight back and neck. To guarantee your core stays active during crunches, tighten your abs and keep your lower back flat against the surface.
If you don’t have an exercise mat, make yourself more comfortable by crunching on a carpeted floor or spreading out a soft towel.
To make your feet flat on the ground, bend your knees. Place your feet so that your heels are about 12 and 18 inches (30 and 46 cm) apart from your coccyx. Keep your knees approximately hip-width apart and bend them to a 90-degree angle. Verify that your feet’s soles are level with the ground.
With your hands slightly below your shoulders, cross your arms in front of your chest. Maintain a downward-pointing elbow toward your feet. Immediately in front of your shoulders, place your hands flat on your chest. When performing your activity, try not to place your hands behind your head as this could unintentionally strain your neck.
During your exercise, place a 5 to 10-pound (2.3 to 4.5 kg) plate weight over your chest for increased resistance.
Exert your shoulder blades from the mat in a deliberate, fluid manner. Breathe deeply and clench your abs.
Maintaining your lower back and feet flat on the floor, use your muscles to lift your chest off the mat as you exhale. Raise your shoulders off the ground by a small amount only. Hold yourself up like this for a minute or two. When you crunch, try not to sit all the way up since your hips and back muscles will take over and you risk straining yourself. At all times, make sure your feet, tailbone, and lower back are in touch with the mat. Have someone hold onto your feet or place them below something heavy if your feet rise off the ground during a rep.
Returning your chin is not the same as keeping your neck relaxed.
Make an effort to maintain an apple-sized gap between your chin and chest. You can avoid too much neck curvature by focusing your gaze on the ceiling.
Reposition yourself so that you are at a gradual, steady height. Breathe in gently as you gradually lower your body to the floor. To strengthen your ab muscles and avoid self-harm, move in a smooth, deliberate manner. Stop for a moment to complete one rep.
You will find yourself using your body’s momentum to get up rather than your muscles if you try to push through the following rep too quickly. Furthermore, your risk of suffering a back injury is higher.
To begin strengthening your abs, attempt performing a set of 10–12 crunches. Try performing two to three sets or increasing the amount of repetitions as your core strength begins to develop.
Lying knee raised in
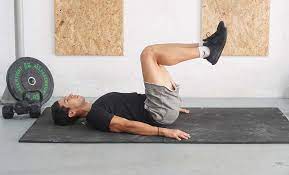
Here in the novice area, this is one of the more difficult core exercises. It may easily fit into the area below that is intermediate.
Lying knee lifts are performed by placing your hands under your butt to make the exercise simpler. Start by lying face up with your legs extended together and your arms at your side, palms down.
Your legs should be at a 90-degree angle when you pull them in till your knees are past your belly button. Then, gradually extend your legs again.
Throughout the entire set, keep your feet together and avoid letting them rest on the ground.
Repeat the given number of reps or duration.
Worked muscles included: the hip flexors, transverse abdominis, andrectus abdominis.
Perform 10–12 repetitions for 30–60 seconds. For this exercise, move slowly. At all times, concentrate on contracting and maintaining a taut core.
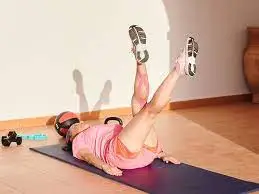
Flutter kick
Why: You should be able to use it if it’s strong enough to compete with the Navy SEALs as a basic training tool. However, you don’t have to do it in the cold, rain, or sand.
For beginners, Flutter Kicks are an excellent exercise. They target the wall of the lower abdomen specifically.
The Flutter Kick technique: lying face up, extending your legs, placing your arms at your side, palms down to make it easier, and lay your hands under your buttocks.
Maintaining your legs outstretched and spaced a few inches apart, alternately raise and lower your legs for the designated amount of time or repetitions. Make an effort to maintain your leg entirely straight and your toes pointed slightly forward.
Never allow them to come into contact with the earth. Additionally, only lift them to a maximum of one foot above the floor. It’s ideal to be 8–10 inches above and a few inches down from the ground. It will be easier if you maintain your legs up higher.
Note: You should feel more in your hip flexors if you raise your shoulder blades off the ground.
Hip flexors, transverse abdominis, and lower rectus abdominis were the muscles that worked.
Work: Set aside 30 to 60 seconds.
Typical errors: a restricted range of motion, inadequate engagement of the abs, and a hunched back.
Scissors kick
How to assist: Adopt a flat back position. Bend your elbows and place your hands beneath your head, or extend your arms so that they are against your sides and your palms are pressed into the ground. Draw your knees into your ribcage while bending them. Pulling your navel in toward your spine and firmly pressing your lower back flat on the ground will become easier as a result.
While keeping your abs tight and driving your lower back into the floor, raise both of your legs straight up toward the ceiling. Maintaining a firm core, gradually lower your right leg towards the ground until it is only a few inches above the surface.
Next, slowly scissor your legs such that your left leg is lowered toward the floor and your right leg is up again. This completes one rep.
Targeted muscles include: multifidus, longissimus, trapezius, pyramidialis, pelvic floor, diaphragm, gluteus medius, gluteus minimus, quadriceps, adductor longus, adductor brevis, adductor magnus, and gracilis; core muscles include internal and external obliques, erector spinae, transverse abdominis, quadretous lumborum, psoas minor, rectus abdominis, multifidus, longissimus, trapezius, and quadriceps.
Typical errors: a restricted range of motion, inadequate engagement of the abs, and a hunched back.
Toe-tapping while standing
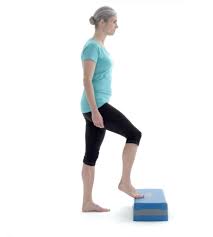
Anyone of any fitness level can perform this toe tap variation. A sturdy object that is still and roughly 10 to 12 inches tall is required. Examples of such objects include plyometric boxes, Bosu balls, and the bottom step of staircases.
How to help: Stand before a box or other substantial object.
Put one foot on the upper part of the platform. The ball of your foot will come into touch with the ball or box. You’ll maintain your other foot firmly on the ground and your arms by your sides.
To start the exercise, push off with the planted foot to raise it onto the platform and bring the lead foot back to the floor. This is going to be a mild air alteration. Land with the heavy foot on the ground and the edge of the planted foot on the platform.
Continue switching feet for the allotted duration without stopping. It will alter quickly and feel like sprinting on stairs. While standing, tap your toes for 30 to 60 seconds. Repeat for two or three sets, pausing for a 15–30-second break in between.
Increase the difficulty of this workout by pumping your arms and toe-tapping at a faster pace.
To make exercise easier, you may alternatively perform toe taps on the ground using the same movements but without the elevated step.
Supine toe tapping
The Pilates toe tap, sometimes called the supine toe tap, gets you back on the mat for an abdominal exercise. It may appear easy, but a few good repetitions will make your abs burn. The rectus and transverse abdominis are the primary muscles used in this exercise, along with other core muscles including your hips and obliques.
How to help: With your knees bent and your arms by your sides, take a seat on an exercise mat.
Lift your legs to the tabletop one leg at a time, bending your knees and keeping your thighs perpendicular to the floor. Keep your spine neutral and avoid pressing your back onto the floor or arching it. keeping the left leg extended like a tabletop.
First, place the right foot down and tap the floor.
Reposition the right leg on the table and then the left.
Ten times on each side, repeat this. On each leg, increase the number of taps from one set to two sets of 10.
This exercise can be made more challenging by simultaneously tapping both feet on the mat. Instead of tapping the tabletop, lay the stationary toe on the mat and use the opposing foot to help with the procedure.
Worked muscles included the hip flexors, transverse abdominis, and rectus abdominis.
Work: Ten repetitions on each side. If you are including a few other core exercises in your core regimen, three sets should be sufficient.
Typical errors: A limited range of motion, inadequate abdominal activation, bent lower back
Bicycle kicks
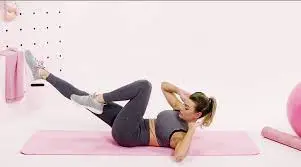
An excellent core workout that works your obliques and abs is the bicycle crunch. This one will burn you.
How to assist: With your hands behind your head, lie on your back. Elevate your shoulders off the mat, raise your legs to a 90-degree bend in the knees, and gaze down at your thighs while keeping your neck relaxed. It is the starting point.
Seizing the abdominals, extend the right leg straight and rotate the right elbow toward the left knee. Lower the abdominals as close to the floor as you can without putting your legs on the mat. Ten repetitions should be done for this first rep.
Return to the starting position and perform the other side of the bicycle crunch.
Do this ten times over. two daily sessions
Worked muscles: the transverse abdominis, rectus abdominis, internal and external obliques.
Work: Try to complete 20 repetitions (10 on each side).
Typical errors include bending the lower back, having a small range of motion, pushing too hard with the hands, and not activating the abs enough.
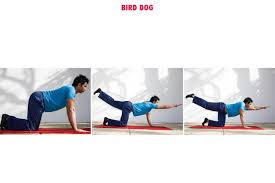
Dog bird
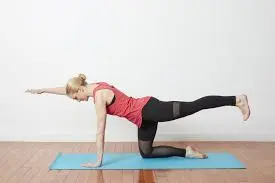
How to execute: squat on the ground or the mat. Position your feet and knees about hip-width separated.
Lean forward slowly and set your hands on the mat. Place the hands squarely beneath the shoulders. preserve your hands shoulder-width apart and your fingers pointing forward. Assume the tabletop posture, often known as the camel stance, with your knees exactly beneath your hips.
Become in an aligned posture by contracting your stomach and abdominal muscles. Try not to clench your back excessively or enormously. Stretch and straighten your left leg gradually. Preserve your hips and legs similarly to the ground. Ask the person to place a light bar across their hips, akin to the waist of their jeans, if they have a partner.
Inform the partner whether the person’s hips should spin and what adjustments they must make to be in proper alignment if this helps.
Simultaneously, raise and extend the right arm rhythmically till it comes to the floor. Keep both shoulders close to the ground. To find out if the shoulders rotate, ask a partner to place a light bar across the shoulders.
Replace the arm and leg, a little, to their initial positions.
Utilizing the contrasting limbs, execute the bird dog also.
Perform two to three daily sessions with 10 repetitions focusing on the gluteus medius and gluteus minimus.
The abdominal muscles are the rectus abdominis, internal obliques, external obliques, and transverse abdominis.
The back muscles are the rhomboids, levator scapulae, and latissimus dorsi (lats). two serratus posteriors: the superior and inferior. erector spine and transversospinalis
Frequent errors include a hunched back, erratic movements, and a limited range of motion.
Froggers
How to assist: Perform a full squat with your thighs parallel to the floor and your feet slightly apart. The chin is raised slightly, the head is centered, and the lower back is progressively bent. The arms are carried out in front of the body.
Breathe deeply, sweep the arms backward, and then rapidly forward to aid the legs release from the full squat position at a sixty-degree angle while the arms are elevated over the head. When you get to the top of the jump, be ready to land. As soon as you touch down, fully squat to get back to where you were before the workout.
Your slight forward movement will demonstrate your strength in the vertical and horizontal planes.
Get back into a good squat position and execute the jump immediately.
Perform five to ten sessions twice a day.
frogger variants for increased strength and control over one’s body
A tabletop that floats with bent legs and straight arms
Simple Frogger: This brings your legs up to your body while keeping your arms straight.
Slow-motion Toe Pull-Off: Sliding toward your hands with contracted legs and straight arms
Sumo Frogger: it has a wide stance, straight arms, and a more flexible hip.
extend leg frogger: Strong shoulders and pliable hamstrings are necessary for Arms and legs must be straight.
High frogger: Prepare for the handstand, maintain straight arms, and apply intense shoulder pressure.
Although there isn’t a single version that is superior to another, a person may benefit from concentrating on a specific version over others depending on the situation.
If you have trouble with shoulder stability, you might find it simpler to maintain your body weight when using the regular Frogger as opposed to the Slow Toe Pull or Straight Leg Frogger. If you want to work on strengthening your elbows and shoulders, you can focus on the Slow Toe Pull Frogger.
While you get stronger and more at ease with the basic Frogger, use the modifications to strengthen your upper body strength, control, and hip flexibility.
muscles in charge
Primary: vastus lateralis, vastus medialis, vastus intermedius, quadriceps, gluteus maximus, gastrocnemius, soleus, and rectus femoris.
Secondary: Hamstrings (semitendinosus, semimembranosus, biceps femoris), rectus abdominis, external and internal obliques, and deltoid.
Advantages of froggers
Basic Frogger: Scapular strength is provided via asymmetrical and unilateral retraction, coordinated and isometric protraction, and asymmetrical elevation control.
The rotator cuff must be robust to control both coordinated, isometric external rotation and asymmetric internal rotation. Strength, flexibility, and isometric flexion, rotation, and extension of the spine in the hamstrings and calves increase strength and mobility in the hips.
Elbow strength, spinal control and strength, hamstring and calf flexibility, and abdominal and spinal stability gains are the slow-toe pull-frogger’s main strengths.
Sumo Frogger: Strengthen and increase hip mobility with flexion and abduction; stability at the elbow and knee; spinal strength for isometric rotation, extension, and flexion.
Straight-leg frogging strengthens the knees, the spine, the rotator cuff, and the hips’ controlled motion.
High Frogger: Rotator cuff and vertebral strengthening, the elbow and make up the motor coordination as well as control
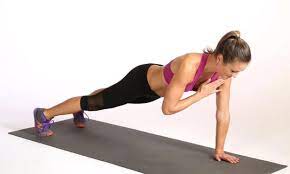
Bird dog touching knees and elbows
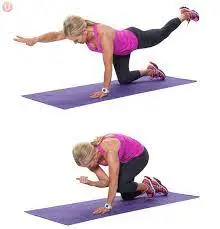
The bird dog exercise, which involves touching the knee and elbow, is a triple threat. It will improve spinal alignment, core stability, and strength. With this one, your core will constrict.
How to Perform Knee/Elbow Touches in Bird Dogs: Begin on your hands and knees on the ground, all fours. Knees should be under hips, hands under shoulders.
Extend your right arm in front of you and your left leg straight back until they are parallel to the floor by engaging your core. After a few moments of holding the pose, attempt to touch your left knee and right arm by bringing them to your center. Squeeze, then take your time.
Once you’re back where you started, stretch your left arm in front of you and your right leg back straight. After a few moments of holding the pose, aim to contact your right knee and left arm with your center of gravity. Squeeze, then take your time.
come back to the initial position and do it on the other side. For the given amount of time or repetitions, keep switching sides.
Muscle utilized: Erector Spinae, Rectus Abdominis, Transverse Abdominis, Quadratus Lumborum, Multifidus, Glutes, Hips, Upper Back, and Shoulders muscles.
reps:20 repetitions(10 each side)
Touch of the heels
Why: This exercise, which strengthens your upper abdominal and obliques, is far harder than it looks.
For beginners, heel touches are a great crunch exercise since they encourage proper form. You won’t use as much momentum and jerky movements if your hands aren’t on the back of your head. This is a beneficial abdominal exercise.
How to assist: Heel touches are performed by lying faceup on the floor.
With your heels in line with the front of your knees, your feet should be flat on the floor.
Crunch up and tap the back of your heels with your hands, maintaining a strong core and your lower back on the floor at all times.
Return down slowly and repeat.
contract the core during the whole exercise.
To lift your upper body and shoulder blades off the ground, make sure to engage your abs instead of jerky motions. This exercise can put pressure on your spine if done incorrectly, so if you can’t do it correctly, skip it and concentrate on anti-movement core exercises instead.
Muscle utilized: Rectus abdominis and transverse abdominis.
legs to come together in a hip thrust
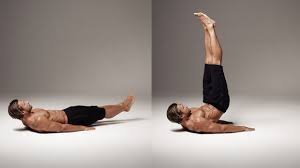
This exercise tones your more downward abs by pushing the abdominal muscles to lift your hips and legs off the floor in a straight column. To complete this task
How to help: Lie down on your back to initiate. You can use a mat for comfort. Put your hands by your sides with the palms facing down.
raising your legs off the floor and indicating them upward toward the ceiling. Create a “L” with your body.
Concentrate on utilizing the lower abs to lift the hips gently off the floor while keeping your legs straight. come back your hips to the floor following a short period of inactivity. Rather than hopping or jerking, move steadily and deliberately.
Reps: Work out for four sets of fifteen repetitions, or until the burn of nature subsides.
To bring the most out of this exercise, hold your arms raised off the ground. You can maintain the arm beyond the floor or raise it beyond your head.
the muscles engaged: The lower back, rectus abdominis, hamstrings, and hip flexors.
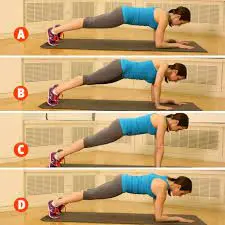
Plank with legs raise
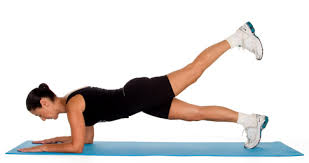
Why: Because raising and lowering your legs will require your entire core to be active over the entire 20-second task.
This workout further tests your core since it’s a more dynamic take on the plank.
The Plank method Leg raise: Place your forearms on the floor, arms parallel to your body at around shoulder width, and elbows positioned below your shoulders. Instead of using your forearms, you might also use your hands.
Place your feet hip-width apart. Maintain a neutral stance. Keep your hips raised during the hold; do not allow them to begin to drop. After raising one foot off the ground and putting it back down, raise the other foot off the ground and put it back down. For the entire allocated time, keep switching in this manner.
Always keep your legs and glutes tightly pushed in, and maintain a taut core. Keep everything tight as your priority.
The following muscles were used: the rectus abdominis, transverse abdominis, hips, erector spinae, quadratus lumborum, multifidus, glutes, and shoulders.
Perform: Target for one set lasting 45–60 seconds.
Tuck up
Initiate by sitting on the floor or an exercise mat. With both hands behind your back and your fingers pointing forward (toward your toes), you are standing with your legs outstretched in front of you.
How to assist: Put some weight on your hands, lean back a little, and contract your core. To move backward, the elbows will bend. Maintain a tall, elongated spine and relaxed shoulders. This is where everything begins. Bend your knees so they are off the ground and pressed against your chest. Raise your hands simultaneously, placing them near your thighs and buttocks.
Stretch your arms above your head as though you’re reaching for something, and extend your legs so that the hips are at a 45-degree angle behind you. Continue the movement by bringing your knees back up to your chest.
When you’re ready to finish this exercise, lower your arms and legs to the floor.
Common errors: a hunched back and a limited range of motion.
Plank on the side
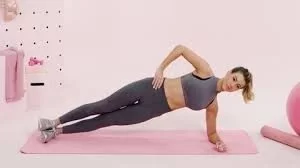
How to assist: Lay on your right side with your legs straight out from your hips to your feet. Your right arm’s elbow is situated immediately beneath your shoulder. keep in mind that your spine and head are in a straight line. You can line up your left arm with your left side of the body. drag your navel toward your spine by using your abdominal muscles.
Breathe out and raise your hips and knees off the mat. Your torso is neither bent nor sagging; it is straight. Keep the motion.
Breathe a few times, then take a breath and step back into the beginning position. It should be the aim to hold for one minute. Repeat on the other side.
Typical errors: squatted over with hips descending toward the ground.
Advantages of side plank
To support the hips, the obliques and the gluteus medius and Maximus are the main muscles involved. You are also kept in alignment by your shoulder stabilizers.
Unlike many abdominal exercises, this one does not pull your neck or lower back. The side plank is recommended during pregnancy because it eases the strain on the muscles in the middle of the abdomen.
You will improve your coordination and balance while practicing this balancing exercise. By strengthening your core and improving your balance, this exercise can help you maintain proper posture and ease of movement.
Side V-Ups
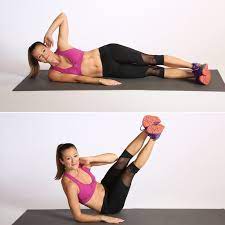
Beginning posture: Assume a side laying position. Lift your lower arm and use your upper arm to gently grasp your head. Your knees can be bent gently.
Performance: As you exhale, brace your obliques to raise your head and torso off the ground. Raise your legs simultaneously and reach your elbow behind your head to attempt to contact your knee closer to you.
Breathe back to the starting position, attempting not to lay flat on your back the entire time. Next, proceed to the subsequent rep. Just use the arm that is on the floor for support. The abs should be the primary source of the movement. Proceed to the next side after completing one set on the first.
Typical errors include a limited range of motion, inadequate abdominal engagement, and uncoordinated movement.
Plank jack
To execute a plank jack: take the following actions: With your feet together, hands beneath your shoulders, and arms extended, begin in the plank position. Your head to your heels should form a straight line in your body.
To assist in preventing injuries to your lower back, contract your abs.
Step out wide with both feet to either side, much like you would for a horizontal jumping jack.
As you swiftly bounce your feet back together, maintain the plank stance.
Keep jumping in and out again. Maintain a flat back and resist the urge to allow your hips to sag during the entire exercise. You should keep your arms stable.
Start with 10 to 20 seconds of plank jacks. To make the maneuver more difficult, you can work for up to 60 seconds or jump quicker.
Worked muscles included: the quadratus lumborum, multifidus, transverse abdominis, internal and external obliques, glutes, quads, erector spinae, and shoulders.
For an added challenge, try doing plank jacks with your forearms.
Typical errors include hunching over, lowering one’s hips to the floor, and raising the pelvis too much.
Plank of bird dog
Position at the beginning: Take a plank stance. Bring the shoulder blades together and reposition the shoulders. Raise your elbows to a 45-degree angle. Try to keep your body in a straight line while engaging your core. Avoid bending your back, particularly at the lumbar region.
Try to keep your body in a straight line while engaging your core. Avoid bending your back, particularly at the lumbar region.
Achievement: Breathe out as you raise and extend the opposing arm and leg a few centimeters above the ground. Then, while taking a breath, go back to the beginning and repeat the exercise on the opposite side. You can remain in the plank position without raising your limbs if you find this exercise to be too strenuous.
Typical errors include a hunched back, dropping the hips to the floor, uneven movement, and a limited range of motion.
Plank tap on the shoulder
To complete the plank tapping exercise adhere to the following guidelines: Assume a raised plank position on an exercise mat to begin. Hands should be straight beneath shoulders and feet should be hip-width apart.
Verify that your hips and shoulders are correctly positioned, that your back and neck are straight and that your spine is in a neutral position. To maintain your body flat and stable, contract your glutes and engage your core muscles. Raise your left hand now, and gently tap your right shoulder with it. Return your hand to its starting position. Lift your right hand and give your right shoulder a tap. Return your hand to the beginning. While tapping on both shoulders at the same time, repeat the exercise. For two rounds, try to get at least 15 taps on each side.
Worked muscles included: the quadratus lumeborum, multifidus, transverse abdominis, internal and external obliques, glutes, quads, erector spinae, and shoulders.
Work: Try to put in 30 to 60 seconds.
Workout advice for shoulder taps: Using proper form is essential when executing an advanced plank variation, such as plank shoulder taps, to ensure that the movement targets the right muscles and does not cause strains or injuries. In addition to preventing injuries, using proper form and technique will guarantee that you get the most out of this exercise for strengthening your core.
To help you with this task, consider the following advice: Breathe normally throughout the plank shoulder taps; do not hold your breath. To maintain equilibrium and stability in your body, breathe in and out regularly.
Maintaining a solid hip position and avoiding rounding the back might help you maintain proper form.
Spreading your fingers wide and applying pressure to your palms on the mat can improve your support and help you balance even more correctly.
Maintain a neutral neck posture and look down while you perform the plank with taps. To keep your body stable, keep your eyes fixated firmly on the ground.
Throughout the exercise, maintain your engagement of the core muscles, and remember to relax for 10 to 20 seconds in between sets.
Down dog abs
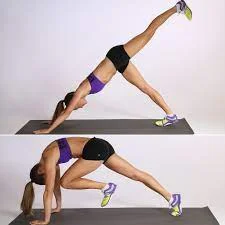
How to assist: Assume the downward dog position at first, actively driving your weight into your heels and extending your tailbone upward. Squeeze your left glute as you raise your left leg.
Take a breath out, shift your weight forward over your hands, bring your left knee up to your nose, and round your back by bringing your abdominals into your spine.
Breathe in, drive your weight back into your heels, and raise your left leg. This finishes one rep. Perform an equal quantity of reps on both sides.
Finally, pass the right leg across the body and over the left elbow. Move yourself into a down dog abs position after taking a little break.
Apply the same approach to the contrasting side.
ten to fifteen times.
twice a day.
principal muscles impacted: core and glutes
Secondary muscles: arms, shoulders, hips, quadriceps, and hamstrings
Up down plank
This one will truly make you stay still, which will increase the amount of core contraction.
The proper way to perform a Down Plank: place your forearms on the floor, elbows beneath your shoulders, and arms shoulder-width apart.
Place your feet hip-width apart.
Maintain a neutral stance. Keep your hips raised during the hold; do not allow them to begin to drop.
After raising your left forearm off the ground and placing your palm there, raise your right forearm off the ground and do the same. Now you are in a typical plank posture, which is similar to a push-up.
One arm at a time, lower yourself back down to your forearms.
Go back up and down for a certain number of repetitions.
A crucial aspect of the up-down plank involves maintaining a squared-off hip position at all times. Maintain a strong core and resist the urge to move your hips side to side as you lift and lower yourself.
The following muscles were used: the quadratus lumborum, the transverse abdominis, the hips, the erector spinae, the multifidus, the glutes, and the shoulders.
Work: Try for 15 to 20 complete reps.
Plank dips on the side

Add some movement to your side planks to make them more difficult.
How to assist: Begin on your side with your feet together and one forearm exactly beneath your shoulder. This is how to perform a side plank with hip dips. Alternatively, you might use your hand instead of your forearm.
As you lift your hips off the floor, tighten your core.
Maintain this posture so that your torso is straight from your head to your feet.
Allow your hips to slowly descend toward the floor (without touching it), then raise yourself back up such that your torso remains in a straight line. Between every dip, hold the highest position for two seconds.
Internal and external obliques, transverse abdominis, quadratus lumborum, multifidus, glutes, and hip adductors were among the muscles worked. and even your shoulders and legs.
Do 10–12 repetitions on each side.
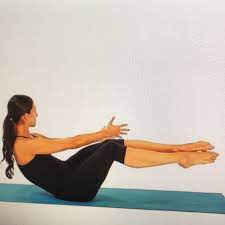
V sit-hold
You need to balance in a way that uses your lower abdominal strength to maintain and hold the V hold. The longer you hold the V hold, the more strongly it will burn. To finish this task
How to assist: Lie down on your back to initiate.
Keeping both hands at your sides, raise your torso and your legs to a height of about 45 degrees above the floor. Your body should create a “V” with your hips touching the floor. Pose with a strong, balanced stance and keep your legs straight.
Tighten your abs and use your arms for balance. Some find it much easier to balance if they extend their arms toward their legs at an angle perpendicular to the floor. If you do this, you should never, ever use your arms to support your legs.
Sustain the hold-the-abs stance. Maintain this posture for a duration of 30 to 2 minutes, or until you begin to get a burning sensation. Repeat as needed.
You can also carry out this workout while seated on a chair. Step forward to the edge of the chair and bring your legs together. As you lean back and grip onto the chair, lift your legs higher. Raising your feet to a height of 6 to 12 inches (15 to 30 cm) while keeping your legs straight. preserve v sit hold for 1 minute
Perform 10 repetitions twice a day.
Hip flexors, obliques, transverse abdominis, and rectus abdominis were the muscles that worked.
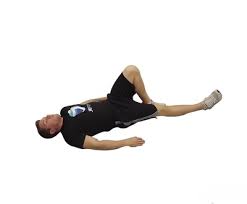
Sit-up with straight legs
How to assist: Stretch your legs straight out on the floor and lie down. As in the traditional sit-up, do not flex your legs at the knees. Maintaining your head comfortably supine, put your hands on your chest.
Tighten your abs, take a breath, and raise your upper body off the ground.
Once your torso is perpendicular to the location, gradually lower your body back to it. reaching the required number of repetitions.
Tips for Sitting Up: Breathe out as though you are blowing out candles to enhance your mind-muscle connection.
If you have lower back pain, you can opt to perform additional anti-extension or anti-rotation exercises.
Keep your hands away from behind your head to prevent straining your neck.
Tabletop to Reverse Pike
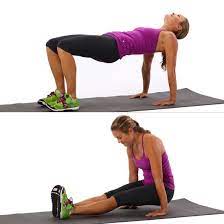
How to assist: Lie on your back with your hands eight inches behind you to begin. set your heels roughly a foot away from your hips and bend your knees. Confirm that the distance between the hips and knees is hip-width.
Bring a deep breath, and extend your hips off the floor so that the arms are straight and your body is similar to the floor. Create any little changes crucial to confirm that your hands are squarely below your shoulders and your ankles are beneath your knees. To enhance the stretch in your neck and chest, lower your head after you.
Maintain your breath for the entire duration. Then, exhale to bring your hips down and your legs straight so that your hips are hovering above the floor while maintaining a straight arm position. As you balance your hands and heels, contract your abs and try to maintain a long spine. Inhale and push yourself back into the starting posture after taking a full breath.
Erecting a cat cow
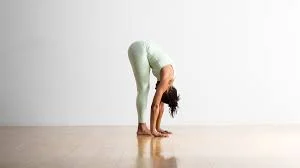
You can perform the standing cat-cow pose or any of its modifications as a fantastic warm-up before the Sun Salutation. Except for the body’s altered position, the movements of the spine and pelvis are identical to those of a cat cow. This standing variant helps improve comprehension of how the hips and pelvis move. Try this traditional yoga pose while standing to feel the strain in your abs.
In the Standing cat-cow pose, the hips and pelvis move with the breath as you gently transition into the Chair Pose. Maintain a firm and steady position throughout. When combined, they aid in maximizing the practice’s potential. Due to its nature, this technique can be taught to perform as a quick approach to relieve any tension in the shoulders, knees, neck, and back throughout their lengthy workdays spent sitting in front of a desk.
Additionally, it helps you re-establish a connection with your breathing, which is crucial for relieving stress because sitting still for extended periods can cause one’s breathing to become shallow. Long-distance travelers can also benefit from this type of routine. It can be used in yoga sequences as a warm-up for beginning students’ hip-opening poses, helping them develop strong, stable, and flexible hips. This pose serves as a warm-up as well as a transition to Chair Pose Standing Forward Bend Pose Flow.
How to Perform a standing cat-cow: As you take a breath, bend your knees, place your hands above your knees, and let your spine circle and lengthen. Perform as many iterations as you like. We’re going to do some standing cat and cow exercises, so raise your hands above your knees. Take a breath, opening your chest and heart. Curl your back, bring in your belly button, and release the breath.
Observe every motion with your head and neck. With every spinal flexion, include your tailbone. Breathing slowly and deeply Breathe in, bending your knees and slipping your hands down to your thighs. Raise your chest, arch your back, and pull your shoulders back. Exhale: press into your thighs, rotate your back, and bring your chin to your chest. Lift your belly and tuck in your tailbone.
Pull in your stomach, breathe out, and tuck it in. Reposition your feet so they are in contact, flex your knee slightly, and inhale to push your chest forward and tilt your head slightly upward. Observe the difference in sensation between this stretch and the first one.
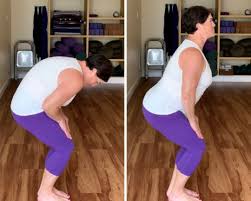
Bend over
Squats are regarded as a lower body exercise, yet they are a fundamental movement that works your core all the way.
How to: Put your hands on your hips while standing with your feet slightly wider than hip distance apart. Pull your shoulders back gently and raise your chest slightly while standing tall. To activate your deep abdominal muscles, which stabilize the spine and pelvis, try pulling your navel into your back as you exhale.
As though you were lowering yourself onto a seat behind you, bend your knees while maintaining the straightest upper body you can. When you squat, it’s acceptable to let your torso tilt naturally; just avoid collapsing your chest or rounding your shoulders forward.
An overly erect posture might cause improper hip release and excessive strain on the knees.
Lean your upper body forward no more than a few inches, and descend as far as you can. Move as far down as is convenient for you. Avoid bending your knees more than a 90-degree angle with your thighs parallel to the floor if you have knee problems. maintain your knees extending too far forward.
Furthermore, avoid bending your knees inward. To maintain their alignment with your feet during your squat, press them outward almost as if you were pushing out an invisible resistance band. When you stand up, straighten your legs and take care not to lock your knees.
When you stand up, straighten your legs and take care not to lock your knees.
As you squat, keep your heels attached to the floor. When you stand back up to the starting position, consider pressing your heels into the ground. Your glutes will be even more highlighted as a result. Repeat three sets of ten to fifteen repetitions. Stretch your arms out in front of you for extra balance during squats.
Crunch pike
How to assist: Laying on your back, raise your legs straight above your hips, then slowly descend them until you feel as though there is no more pressure between your lower back and the floor. Stretched arms should be used to lift your spine off the ground, beginning at your shoulders and upper back and extending your fingers to your toes.
Return to the beginning position while keeping your control.
four sets of ten repetitions
This is an excellent way to target the lower abs and a fantastic way to wrap out any ab training program.
The optimal way to do this is to slightly compress your obliques and abdominals to raise your upper body about an inch off the ground without creating too much friction.
This exercise works the oblique muscles by having the person rotate their torso while holding a weight or just their body weight.
The Runner’s crunch
How to assist: with your arms at your sides and your legs extended, lie face up on the floor. This is where everything begins.
Bend your shoulders gradually off the floor, then bring your left elbow up to meet your right knee as you use your abs to lift it toward your chest.
Maintain your shoulders raised off the ground and your abs tight as you lower yourself back down to the ground.
Continue by bringing your left knee to meet your right elbow on the opposite side. That amounts to one rep. Reps should be done continuously for 30 seconds.
You must use some arm motion in this crunch version to lift yourself off the ground. The secret is to regulate that momentum so that you don’t merely fly and control comes from the abs
Walk like a lizard
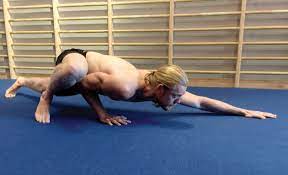
Beginning posture: Take a plank position, As though you were at the bottom of a pushup, lower yourself to the ground. As you approach your right shoulder with your right knee, Raise your elbow to the exact inside of your right knee. Use your arms to raise yourself. At the same time, move your left leg forward by your side and extend your right arm in front of you. Lower yourself toward the earth. With your left elbow back inside your left knee, you should now be in the opposite posture as when you started.
Make the same motion with your left side.
Continue for the necessary amount of steps.
Important tips: As you move from side to side, try to keep as low to the ground as you can.
Proceed cautiously and at an appropriate speed; stay away from falling onto the floor
Row the boat
How to assist: With your feet flat on the ground and your legs bent, sit up straight.
Preserving your alignment, slowly lift your legs off the ground till they are at a 45-degree angle with your body. Maintain a flat back, utilize your whole abdominals, and balance on your coccyx. For an added challenge, you can straighten your knees instead of keeping them bent.
Expand your arms straight ahead of you, maintaining them similar to the ground. Put your hands on the ground beneath your hips if you feel like you need more support. It’s High Boat. Now, make a clasp with your hands in front of you, twist at the waist to one side, and swing your arms to the same side as though you were rowing with an oar in your hands. Twist to the other side right away, then repeat the arm motion.
Keep switching sides.
This bodyweight core exercise, a more difficult version of the Russian twist, works your obliques by raising your legs and extending your arms, which puts extra focus on your side abs.
Oblique crunch to squat
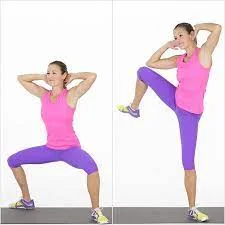
How to assist: Position your feet slightly more widely than shoulder-width apart, hold your hands up by your ears with your palms facing forward, and bend your elbows. This is where everything begins.
As you move your weight into your heels, contract your core, maintain an elevated chest, and bend your knees to lower yourself into a squat. After standing back up, crunch your left knee up against your right elbow and twist your torso to take advantage of the momentum. Return your leg to the ground, squat once more, and then perform the oblique twist on the opposite side. This is one repetition.
Go on for a certain amount of reps
This combo move which mixes a squat with a rotational oblique crunch is a significant manner to increase strength, stability, and balance while focusing on the obliques. This exercise will also work your transverse abdominis and rectus abdominis, two additional core muscles, as well as your glutes, quadriceps, and hamstrings.
Fallen triangle
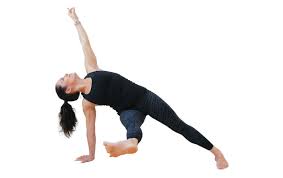
The falling triangle is a well-liked yoga pose that combines a side plank with a triangle pose to work your stomach, obliques, shoulders, and arms. It also stretches your hips and chest muscles and activates your legs and back.
Here’s one technique that yoga can program the move: the fallen triangle.
The way: Bring your right knee up to your chest while starting in a high plank position.
Remain flat on your back and keep your hips raised.
Step your right foot to the outside of your left wrist and extend your right leg to the side.
Place your foot on the outside border of the mat and then place your rear foot on it.
Move your right foot to the outside of your left wrist and extend your right leg to the side.
Place your foot on the outside edge of the mat and then place your rear foot on it.
Arrange your arms in a straight line and extend your left arm toward the ceiling.
Turn your body slightly so that your chest is facing the left side of the space.
Practice raising your left leg off the ground while bending your knee, then extending the leg away from you, for added difficulty.
Hip abduction in side lying
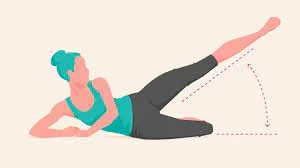
this one since hip stability and core strength are greatly influenced by them. In addition, many individuals with weak cores also have weak hips. Hips and the core work together, which is why the hips are frequently seen as a component of the entire core.
The proper way to perform side-lying hip abductions is to lie on your side and bend your lower leg 90 degrees behind you. Straight and erect, your upper leg is extended and in line with your body.
With your forearm in line with your shoulder, place it on the ground.
To lift your leg higher, contract the glute and the muscles on either side of your hip. Maintain a straight leg.
Lower it one more. And continue
When performing this exercise, try to thrust your hip slightly forward so that your glutes and outer hips are worked more than your hip flexors.
Worked muscles: Glutes, Hip Abductors
Work: 3 sets of 10 repetitions per side.
Changing the heel touch
This is an excellent obliques exercise for beginners. For any level of fitness, it’s also a terrific addition to a core circuit workout.
To perform alternating heel touches, place your face up on the floor.
With your heels in line with the front of your knees, your feet should be flat on the floor and separated by shoulder width.
Maintain a straight core, elevate your shoulders off the ground, and maintain your low back down at all times while keeping your arms by your sides.
Next, use your left hand to contact your left heel, turn around, and repeat on the other side. You should always have your shoulder blades elevated off the ground and your core tight.
Muscles Performed: Internal Obliques, External Obliques, Rectus Abdominis.
Work: 10 repetitions on each side, or around 30 to 45 seconds of work.
Mountaineer
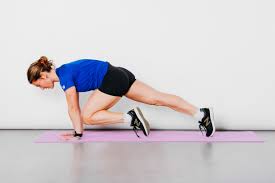
Mountain climbers are an excellent core workout since they strengthen your core muscles and raise your heart rate. It’s a twofold hit. Gain strength and burn fat in your core. They also engage a wide range of muscles, including your shoulders and quadriceps
How to Perform Mountain Climbers: Place your hands on the ground and assume a standard plank stance. Ensure that your hands and toes are bearing the same amount of your weight. Maintain your hands directly below your holders, shoulder-width apart. The back of your head and neck should be in line with your back, your abs should be contracted, and your spine should be neutral.
As close to your chest as possible, raise your right knee. Next, as you put it back the left knee should be brought up to the chest.
For the designated amount of time or reps, keep switching up your routine.
The beautiful thing about mountain climbers is that beginners can go slow, while experts can go fast to achieve the same effects of fat burning and core strengthening! So, pick up the pace to increase the intensity and do this exercise as quickly as you can! Any level of fitness can profit from mountaineer
the muscles functioning: Hip Flexors, Quadratus Lumborum, Erector Spinae, Rectus Abdominis, Multifidus, Glutes, Quads, Hamstrings, Shoulders, and Triceps.
Performance:30 seconds
Bridge pose
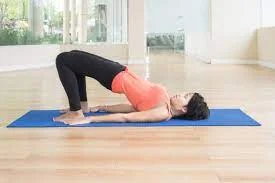
How to act: Lay on your back on the mat with your feet hip-distance apart and your legs bent. Attempt to position your feet as close to your glutes as likely.
Expand your arms to your sides, palms down.
As you inhale, lift your hips from the pubic bone rather than the navel, using your feet as a firm pressure point.
Boost the strength in your upper arms. You can clinch your fists behind your back and press your pinkie fingers against the mat. extend your collarbones and move your shoulders underneath you.
Bring your thighs closer together and firmly plant your heels to maintain a hip-distance posture.
To lengthen the spine, reach the back of the thighs and extend toward the knees.
To finish the workout, blow as you let go of your hands and firmly lower yourself to the mat. Three times a week, ten reps
The first bit of advice is to bind your hands behind your back, but if your hands pain or your shoulders are tense, just keep them at your sides.
Maintaining the natural bend in your neck is crucial for this pose. forget to press the back of your neck against the mat.
After clasping hands, raise your torso and tuck your upper arms beneath your shoulders. To reduce straining your neck, attempt not to drag your shoulders too far.
To keep your head in a straight line from the floor to the ceiling, avoid turning it to one side while in this position.
Legs that slide
Generally speaking, you should wait six to eight weeks after surgery before starting an exercise program, and you should always get your doctor’s approval beforehand. It is advised to begin with low-impact workouts like yoga, Pilates, or swimming. This easy-to-follow but effective core exercise for beginners helps to gradually activate the core muscles.
The transverse abdominis muscle supports the midsection of the body, so strengthening it is essential. It also preserves the linea alba, a fibrous tissue that extends from the xiphoid process to the pubic bone, and core stability. Active muscles: transversal abdominis
How to help: Lay on your back on the floor with your knees bent and your feet flat on the ground. Wear socks or place a towel under your feet to let them slide across the floor more easily.
Take a deep breath in. When you exhale, pull your belly button to your spine to contract your abdominal muscles, taking care not to change the natural curvature of your lower back.
Hold this contraction as you slowly extend your foot away from your body until your leg is fully extended.
Return progressively to the starting position.
Repeat ten times on each side. Perform once every day.
Serpentine form
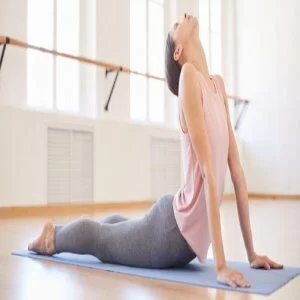
How to help: Starting on your stomach, put your feet hip-distance apart and your hands next to your ribcage.
Extend your big toes straight back and apply pressure with all ten fingernails to activate your quadriceps.
Rotate your inner thighs toward the ceiling to enlarge your lower back.
Apply light pressure with your hands as you start to elevate your head, chest, and shoulders back and forth.
Keep your neck extended and focus on elevating your sternum instead of your chin.
Keep your shoulders away from your ears and raise your arms straight. Sustain your elbows at a modest bending angle.
Release the position and head back to the mat.
Benefits include: Bhujangasana, often called Cobra posture in yoga, is a reclining backbend that tones the lungs, spine, butt, and butt muscles as well as the chest, abdomen, and shoulders. Additionally, it improves blood circulation and releases bodily tension. It helps those with hypothyroidism and enhances thyroid function because it expands the neck and throat region.
Practice this pose to help lose belly fat. This pose tones down the muscles in the shoulder, belly, and chest area, strengthens the arms and shoulders, and gradually eases the stiffness in the lower back.
Breathing nostril
Alternate nostril breathing, or nadi shodhanam, is a technique that slows down inhalation and exhalation. This technique balances the autonomic and thoracolumbar nerve systems in addition to regulating and balancing energy flow across the left and right sides of the body. This produces an atmosphere of inner peace, steadiness, and mental clarity.
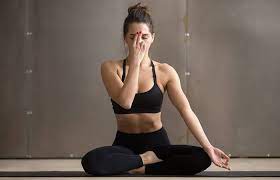
The Nadi Shodhanam method: Choose a comfortable spot on the floor or chair. It is also possible to lie down or remain motionless.
Shut your eyes and inhale deeply and slowly through your nose a few times.
Shut the right nostril using the thumb of your right hand. After taking five counts of breaths through your left nostril, remove your thumb. utilizing a different right-hand finger after closing your left nose, exhale five times through your right.
Change it up now by taking five breaths through your left nostril and exhaling through your right, respectively.
Repeat three times through nine times.
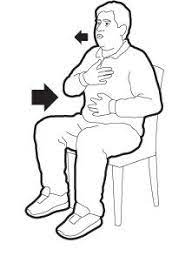
Techniques for taking deep breaths
Deep breathing exercises are another easy way to help improve your digestive system and lower the stress that may be contributing to your constipation. Deep breathing exercises are great since they only take a few minutes and can be performed practically any place.
This quick deep breathing technique is called the 4-7-8 technique:
Sit down in a chair with your back straight and your hands comfortably folded on your lap. When you have completed breathing, let out all of your air via your mouth. Shut your mouth for four seconds and inhale through your nose.
Breathe deeply for seven seconds while keeping your breath steady.
Breathe deeply for eight seconds, then exhale through your mouth.
By following these steps three more times, you will have finished four full cycles.
Breathing with the diaphragm
This is the basic diaphragmatic breathing technique. When you initially start, it might be easiest to practice while lying down on the floor or in your bed.
Choose a flat, comfortable place to sit or lie down.
Lean back and let your shoulders drop down, away from your ears.
Set one hand on your stomach and the other hand on your chest.
Breathe in through your nostrils as much as you can without pushing or straining until you run out of air. Feel the air entering your abdomen through your nose and extending the sides of your waist and stomach. Your chest shouldn’t motion all that much.
As if you were drinking through a straw, purse your lips. Feel your stomach softly contract as you take a four-second, leisurely breath out through your lips. For optimal effects, repeat these steps multiple times.
Stance of a peacock
It is also known as a mayurasana.
This peacock pose is a great way to ease digestive issues, obstructions, and constipation. Apart from enhancing digestion, mayurasana also lessens the negative consequences of eating poorly, increases intra-abdominal pressure, and decreases splenic and liver enlargements. Since Mayurasana is regarded as a more difficult asana, novice practitioners should refrain from attempting it.
Complete guidelines: Any soft surface can be used for Peacock Pose, including a yoga mat and a carpeted floor. Yoga blocks and towels are an optional addition, but they are not required.
Start by sitting up straight. Sit in the Hero Pose (Virasana), with your heels facing upward and your legs bent. If your knees are relaxed, your hips will separated. Tilt your shoulders forward and place your hands on the ground in front of you. Your elbows will flex slightly as you lean forward. Make sure the palms of your hands and elbows point in the direction of your heart.
As you press your palms into the floor, your body will apply pressure on the backs of your upper arms. Your head will turn to face the mat.
With your tiptoes down, extend your legs in front of you and straighten your knees. Your hands and feet should bear the same amount of your body weight. Contract your core as you prepare to shift the weight from your lower body to your upper body.
Squeeze your thighs together to form one cohesive leg. Utilize your toes to redirect the weight to your upper body.
Elevate each foot off the ground one at a time. As soon as your arms stabilize, raise your legs till they are perpendicular to the floor.
Lift your watch and look forward. For fifteen to thirty seconds, hold the position with your pelvis, thighs, and core engaged. To exit the posture, squat down to the floor with your feet first, then your knees. Lift off your hands and sink into your heels and knees to release the tension in your wrists.
Typical Mistakes
Maintaining proper form and preventing sprains or injuries requires avoiding these common mistakes. To avoid wrist pain, it’s crucial to use extra caution.
Do not strike this position to start your sequence: This stance should be performed in the middle or end of your sequence. Before attempting this posture, start with easier ones to develop your strength and balance. Ease your wrists into more arm-balancing poses for an advanced stretch. If needed, extend your wrists to avoid tension.
Standing at the top and swaying from side to side: You try to balance the weight of your lower body on your wrists and arms, feeling like a seesaw or teeter-totter. Bend your elbows toward each other. Place your arms shoulder-length apart
This will create a strong foundation for the position. It’s possible that you need to work on your balance more.
Excessive forward leaning: This position is known as a balancing pose for a reason. You shouldn’t lean all the way forward, even though the upper body carries the majority of the weight of the body. With your fingers pointing toward your pelvis and your wrists in a vulnerable position, bending your head toward the ground may result in bone injury. Keep your posture straight while you attempt to find a balance between bending forward and backward.
Steer clear of sharply rising your legs: It’s simple to raise oneself suddenly when shifting your body weight to your arms. However, doing so increases the risk that you could trip, fall, and perhaps suffer wrist injuries. Instead, raise each foot one at a time. Make little changes before you enter the final position so that your upper body has time to adjust.
Release the posture safely: Just as when you take off, you should descend gradually back to the ground rather than quickly. If you suddenly release the posture, you can fall to the ground. You can safely and elegantly come out of the pose by lowering one foot at a time and shifting the weight from your wrists to your lower body.
Advantages of abdominal exercises using body weight
Core exercise has numerous advantages. If we had to choose only one sort of training, it would be strength training. It’s essential to longevity and an effective body.
The following are the main advantages of core strength training:
- helps to prevent injuries. Core training is beneficial not only for lowering the risk of spinal injuries but also for the other joints in our body since it improves balance, which in turn lessens the pressure on the hips, knees, and ankles.
- facilitates the correct distribution of weight and the absorption and transfer of forces.
- enhances athletic ability. Your strength, explosiveness, and power are enhanced by core training, which also enhances your balance, coordination, agility, and speed. Your core is responsible for transferring power and energy to and from your arms and legs.
- makes you more powerful in both rotational and anti-rotational directions. Your core is the source of rotational force, therefore if your core is strong, you will be able to twist, spin, and swing as well as speed up, slow down, and move in many directions with force. Additionally, you have anti-rotation strength on the other side, which aids in injury prevention, strength, and balance, so you will be able to perform these activities safely. The ability to rotate and resist rotation go hand in hand. However, anti-rotation is more important to us.
- enhances posture in both stationary and moving postures.
- helps you reach your fitness objectives since stronger abs result in more forceful exercises like the military press, bench press, deadlift, and squat. You can overcome plateaus in your major lifts and gain more muscle in other parts of your body by engaging in core training.
- When it comes to treating persistent low back pain, core stability exercises are a useful tool.
Measures that your core needs to be strengthened
You have problems getting out of a chair or bed without using your arms.
You have bad posture.
You have trouble with your equilibrium and wobble as you walk.
You may be experiencing pain in your knees or ankles due to an imbalance in your core strength.
While working out, you may unknowingly hold your breath while performing core exercises and other workouts.
Typical errors made when performing bodyweight ab exercises
Any ab workout should focus on fully engaging your core; consider the relationship between your muscles and mind.
To make sure you’re using your muscles properly, slow down.
To avoid getting hurt, stop and reevaluate if you have any pain, especially in your lower back.
Do ab workouts aid in your lower abdominal weight loss?
Avoid spending all of your time at the gym performing sit-ups, planks, and other exercises if you’re attempting to decrease belly fat. Regretfully, despite what some articles in lifestyle magazines may claim, they are unable to burn subcutaneous fat. In this sense, we suggest taking a more complete approach. It is not possible to just shed pounds where it is most comfortable for you on your body.
The body as a whole loses fat when you lose weight. Additionally, hormones, genetics, and general lifestyle all have an impact. You might shed pounds first, particularly from your butt, tummy, and thighs a bit later. yet, there should be an alternative route.
Then, the calorie deficit becomes important, which you can attain by making changes to your food, exercise regimen, and way of life in general. Remain calm. It’s not necessary to start using strict diets or detoxes right away. Thanks to tiny adjustments that will get you there, you will permanently reduce weight. Your prize will be a toned abdomen and great physical health.
How should the body weight help to achieve a six-pack?
Here are four quick steps that can help you use bodyweight exercises to obtain a six-pack
Focus on the abs: To work on the abdominal muscles, include exercises like crunches, leg raises, planks, and mountain climbers in your program.
As you gain strength, increase the intensity of your workouts by adding weight, holding movements for longer periods, or performing more repetitions.
Keep an eye on your diet: Eat in moderation while maintaining a calorie deficit to shed excess fat and show off your abs.
Maintain coherence: Aim for at least two to three times a week of consistent, ab-focused exercise, and obtain adequate sleep to support hormone regulation and recuperation.
Summary
Exercises using only your body weight can be a handy and efficient approach to develop and tone the muscles in your abdomen. Exercises that target the abs and help you get a six-pack include crunches, leg raises, planks, and mountain climbers.
It’s crucial to give your abs time to relax and recuperate in between workouts and to avoid overworking them. Consistency in your exercise regimen and a balanced diet are also essential for achieving results.
It is advised to work on your abs two to three times a week as part of a full-body workout, with at least one day off in between. Bodyweight exercises can help you develop a strong and toned stomach with the right form and perseverance.
FAQs
Is daily ab exercise acceptable?
It is not advised to perform ab exercises every day. Similar to other muscle groups, the abdominal muscles require a period of rest and recuperation in between exercises. Perform worse and cause injury to your muscles if you overwork your abs.
How much time does it take to build core strength?
Your core muscles should strengthen and grow if you exercise them twice a week and with consistency over four to eight weeks. But it’s a different matter when your obliques and abs are visible. Low body fat is necessary for this.If your diet is out of control, you might dramatically improve your core and still not show your abs.
How Much time does abs take to develop?
everyone is searching for flat tummy exercises that offer a quick fix. Unfortunately, you probably wouldn’t get abs quickly even if you performed hundreds of crunches every day. The reason for this is that the adage Abs are made in the kitchen is 100% accurate because your abs are located deep within your torso. Because those muscles are covered in a layer of tissue and fat, losing body fat is one of the only methods to achieve the coveted six-pack abs.
Can bodyweight exercises help get abs?
Yes, bodyweight exercises are a great way to get abs. Planks, crunches, leg raises, and yoga/Pilates positions are a few workouts that work the abs and core. These exercises can help tone and build the abdominal muscles. In addition to a balanced diet, consistency, and correct form are essential for seeing results.
Remember that some people may take longer to see results than others because genetics play a part in how visible abs are.
Is this a Beginner’s Workout?
Beginners should do bodyweight ab exercises because they make you pay attention to your body’s motions. It is particularly crucial to pay attention to your body when performing core exercises like planks to ensure that every muscle is being used correctly and that your form is right. Abs exercises in general can be a great way for a newbie to get hurt because they frequently involve performing too many repetitions too quickly. This exercise program is designed to push you to the limit while being appropriate for all skill levels, from novice to expert.
What is the quickest method for building core strength?
There’s no quick fix or cheat. However, you can streamline the outcomes if you maintain consistency. In addition, selecting the appropriate workout is crucial for achieving the optimum outcomes. For example, it is now generally known that planks are superior to crunches, especially for novices who would likely employ momentum and put stress on their spine when doing crunches.
Do ab exercises every day?
You can work out your abs each day but don’t recommend it. since abs are fundamentally muscles like any other, you should work on them roughly twice a week to develop them bigger and stronger.
Which ab exercise is the best?
Crunches on an exercise ball were the greatest overall workout since they worked the abs more specifically and produced less activation in the leg muscles than some of the other ab exercises on the list. This included the rectus and obliques.
Is it possible for you to perform bodyweight abs every day?
Abs exercises should not be performed more than six times a week for most people. Your abs require a break, but more than that your entire body does as well. You aren’t giving your body a fair chance to heal from the workouts you put it through if you don’t take at least one day off each week.
How quickly do abs get back?
Healthier muscular tissue is the result of stressing a muscle beyond its prior state and allowing it two to three days to recuperate. Like most muscles used during a workout, your abs are skeletal, striated muscles. To lessen microtrauma and recuperate, these muscles require a period of healing.
What is the non-diet way to get abs?
When it comes to enhancing the definition of your abs and gaining muscle, exercise is equally as vital as diet. Running, riding, boxing and other similar exercises raise your heart rate, which is known as cardio or aerobic activity.
Which protein helps build abs?
Go beyond protein shakes to target your abs: consider foods like chicken, lean meats (such as lamb and beer), and fatty fish that are high in omega-3 fatty acids. Increase your intake of low-dairy products, eggs, beans, seeds, and nuts to help meet your protein needs. Supplementing with whey protein may also help us consume more protein.
Do Russian twists help build abs?
One of the best exercises you can do for your abs is the Russian twist. They target the transverse abdominus and obliques, two key muscles that support proper posture. Along with strengthening the muscles in your spine, increasing flexibility, and decreasing fat, they also assist tone your waist and improving balance.
Is rice beneficial to your abs?
Consuming rice by itself won’t guarantee a six-pack. You need to have strong core muscles and a low body fat percentage to see visible abdominal muscles. A diet high in veggies, healthy fats, complex carbs, and lean proteins is usually recommended to achieve this goal.
Do eggs help with abs?
Losing weight and sculpting abs is made easier when eggs are consumed for breakfast rather than a high-carb meal like whole-wheat. A few hard-boiled eggs as an afternoon snack is the best way to take advantage of the abs-sculpting properties of eggs.
Do anyone need to eat to get abs?
Most people will need to lose extra body fat and increase their abdominal muscle through diet and exercise to have well-defined abs. Foods like lean meats, tofu, and most nuts may support the definition of an ab. Food by itself cannot promote the loss of body fat. It takes a calorie deficit to lose body fat.
Are men or women better suited for these core exercises?
These fundamental exercises are inclusive. They are excellent for both genders and all age groups. For elders and others who might struggle with the beginner segment.
References
- 10 Best Bodyweight Ab Exercises at Home To Train Your Core. (2021, March 16). Bodybuilding.com. https://www.bodybuilding.com/content/10-best-bodyweight-exercises-to-train-your-core.html
- Team, G. (2015, January 26). The 21 Best Bodyweight Exercises for a Strong Core. Greatist. https://greatist.com/move/best-bodyweight-exercises-abs#the-workout
- Williams, P. (2020, May 7). The Best Bodyweight Exercises to Train Your Abs. Muscle & Fitness. https://www.muscleandfitness.com/workouts/abs-and-core-exercises/best-bodyweight-exercises-train-your-abs-and-obliques/
- Warner, J., & Harris-Fry, N. (2023, August 8). A Fitness Model’s 10-Minute Abs Workout—No Equipment Needed. Coachmaguk. https://www.coachweb.com/abs-workouts/7004/10-minute-bodyweight-abs-finisher
- Tesařová, M. (2022, January 19). 21 Best Bodyweight Ab Exercises. GymBeam Blog. https://gymbeam.com/blog/21-best-self-weight-exercises-to-strengthen-the-abdomen/
- Sugar, J. (2021, May 18). What Are the Best Bodyweight Ab Exercises? | POPSUGAR Fitness. POPSUGAR Fitness. https://www.popsugar.com/fitness/what-best-bodyweight-ab-exercises-45269434
- Smith, J. (2023, December 13). 9 Bodyweight Core Exercises You Can Do in Your Living Room. Bicycling. https://www.bicycling.com/training/a32319708/bodyweight-core-exercises/
- Try This: 24 Standing Ab Exercises to Strengthen and Define Your Core. (2020, October 23). Healthline. https://www.healthline.com/health/fitness-exercise/standing-ab-exercises
- M. (2020, July 2). The 9 Best Ab Exercises You Can Do Without Equipment – MYPROTEINTM. MYPROTEINTM. https://www.myprotein.co.in/blog/training/best-ab-exercises-you-can-do-without-equipment/
- Ali, A. (2023, January 31). 4 Effective Bodyweight Ab Workouts | SQUATWOLF. SQUATWOLF. https://blog.squatwolf.com/4-effective-bodyweight-ab-workouts/
- McCoy, J., & CPT, C. S. (2022, June 18). A Bodyweight Abs Workout That Hits Your Obliques and Every Other Part of Your Core. SELF. https://www.self.com/gallery/quick-bodyweight-abs-workout
- Morton, D. (2020, January 13). The 20-Min Bodyweight Abs Blaster You Need To Make Time For. Men’s Health. https://www.menshealth.com/uk/workouts/g30493323/bodyweight-abs-workout/
- McCoy, J., & CPT, C. S. (2023, October 12). The 16 Best Oblique Exercises to Fire Up the Sides of Your Abs. SELF. https://www.self.com/gallery/obliques-exercises
- Shiffer, E. J., & Nied, J. (2023, December 13). The Best Ab Workouts At Home From A Trainer For A Strong, Toned Core. Women’s Health. https://www.womenshealthmag.com/fitness/g30257701/at-home-abs-workout/
- Cooper, E., Davies, D., & Neudecker, K. (2022, September 20). 20 Ab Exercises and Workouts to Build a Chiselled Core. Men’s Health. https://www.menshealth.com/uk/building-muscle/a757285/best-ab-exercises/
- Hopes, S. (2023, August 8). 7 best bodyweight ab exercises to add to your core strengthening routine. Tom’s Guide. https://www.tomsguide.com/features/forget-sit-ups-7-bodyweight-ab-exercises-that-blast-your-core
- Set, S. F. (2023, August 25). 30 Best Bodyweight Core Exercises From Beginner to Advanced. SET FOR SET. https://www.setforset.com/blogs/news/30-best-core-exercises
- Rollins, A. (2022, August 22). 15 Minute Ab Workout At Home (Bodyweight Only!) | Swift Wellness. Swift. https://www.swiftfit.net/blog/15-minute-abs-workout-at-home-bodyweight-only
- Dias, A. (2023, April 29). 10 Lower Ab Exercises to Add to Your Fitness Routine. Healthline. https://www.healthline.com/health/exercise-fitness/lower-ab-workouts#lower-ab-workouts