26 Effective Gluteal Muscle Exercises You Can Do at Home
Strong gluteal muscles are important for overall health and well-being. They can aid in enhancing sports performance, reducing discomfort, and enhancing posture.
What is the Gluteal muscle?
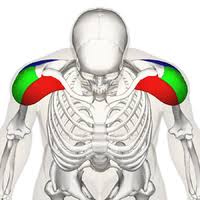
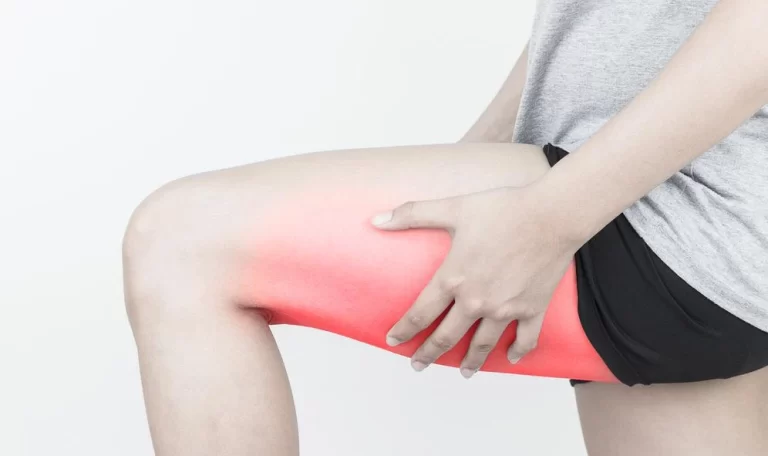
The gluteal muscles, found in the buttocks region, consist of three muscles. They play a vital role in hip joint movement and stabilization. Additionally, they assist in extending and rotating the thigh. These muscles are crucial for maintaining good posture, balance, and stability during physical activities.
The largest muscle in the gluteal group is called the gluteus maximus. It plays a crucial role in extending and rotating the thigh, as well as maintaining an upright posture. This powerful muscle, which happens to be the biggest in our entire body, is capable of producing a substantial amount of force.
The gluteus medius is part of the gluteal muscle group and is positioned on the outer surface of the pelvis. Its main functions include abducting and rotating the thigh. This muscle plays a crucial role in maintaining balance and stability while engaging in activities like walking, running, and jumping.
The gluteus minimus is a muscle that sits beneath the gluteus medius and plays a crucial role in stabilizing the hip joint during movement. By providing support to the lower back, it helps prevent injuries.
Gluteal muscle strengthening exercise
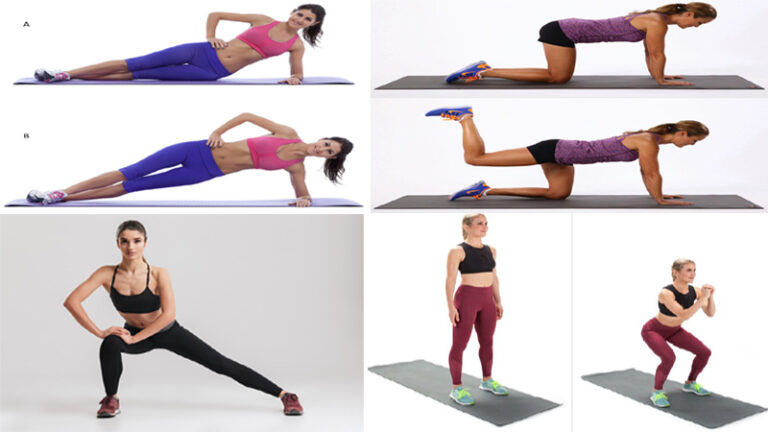
There are many different gluteal muscle exercises that you can do. Some of the most effective exercises include:
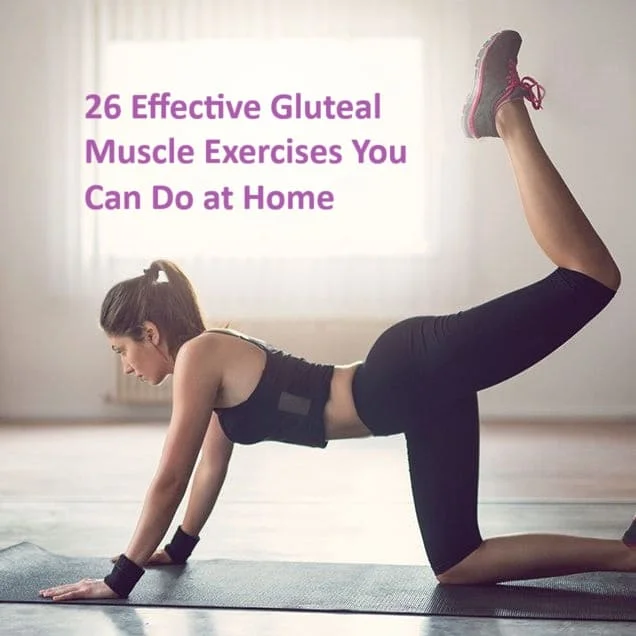
Fire hydrant exercise
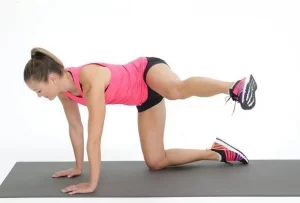
The fire hydrant workout is a famous exercise that objectives the gluteus medius muscle. To carry out this exercise, begin by means of getting down on all fours along with your palms and knees on the floor. Your fingers have to be at once under your shoulders, and your knees should be at once under your hips.
Next, raise one leg out to the side whilst keeping your knee bent at a ninety-degree attitude. Your foot should be flexed, and your thigh must be parallel to the ground. Maintain this position for a few seconds earlier than decreasing your leg and going into reverse to the provoke role.
Do again this motion for numerous repetitions earlier than switching to the opposite leg. It is important to hold the right shape at some stage in the exercising, which incorporates preserving your core engaged and your back instantly.
The fire hydrant exercise is an effective way to target the gluteus medius muscle, which is important for maintaining balance and stability during physical activity. This exercise can also help to prevent injuries by strengthening the muscles that support the hip joint.
Single leg step-ups
Single-leg step-ups are a great exercise for targeting the gluteus muscles, which are located in the buttocks. This exercise involves standing in front of a bench or step with one foot on top of the bench and the other foot on the ground.
To perform a single-leg step-up, you should start by pushing through the heel of your foot on the bench and lifting your body up onto the bench. As you lift your body, make sure to engage your core and keep your back straight.
Once you have lifted your body up onto the bench, bring your back foot up to meet your front foot. Again, make sure to keep your core engaged and your back straight throughout the movement.
Lower your body back down to the starting position and repeat for several repetitions before switching to the other leg. This exercise can be challenging, but it is very effective for building strength in the gluteus muscles and improving balance and stability.
To make the exercise more challenging, you can hold weights in your hands or increase the height of the bench or step. It is important to start with a lower height and work your way up as you become more comfortable with the exercise.
Overall, single-leg step-ups are a great exercise for targeting the gluteus muscles and improving overall lower body strength and stability.
Side squats
Side squats, also known as lateral squats, are a great exercise for targeting the muscles in the inner and outer thighs, as well as the glutes and hips. This exercise involves stepping to the side and squatting down into a lunge position.
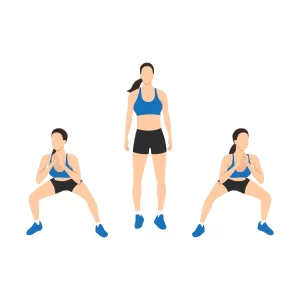
To perform a side squat, start by standing with your feet shoulder-width apart and your toes pointing forward. Take a big step to the side with your right foot, keeping your left foot planted on the ground. As you step to the side, bend your right knee and lower your body down into a squat position. Keep your left leg straight and your left foot planted on the ground.
As you squat down, make sure to keep your chest up and your back straight. Your right knee should be directly over your right foot, and your left leg should be straight. Hold this position for a few seconds before pushing through your right foot to return to the starting position.
Repeat the movement on the other side by stepping to the left and squatting down into a lunge position. Make sure to keep your core engaged throughout the movement to maintain proper form and balance.
To make the exercise more challenging, you can hold weights in your hands or increase the depth of the squat. You can also add a jump to the movement by pushing off your planted foot and jumping to the opposite side.
Overall, side squats are a great exercise for targeting the muscles in the inner and outer thighs, as well as the glutes and hips. They can help improve lower body strength, stability, and balance.
Glute bridge
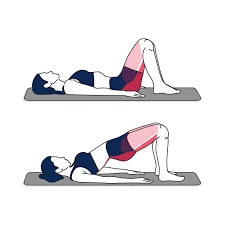
Glute bridges are a popular exercise for targeting the muscles in the glutes and lower back. This exercise involves lying on your back with your knees bent and feet flat on the ground and then lifting your hips up towards the ceiling.
To perform a glute bridge, initiate by lying on your back with your knees bent and feet flat on the surface. Your arms should be resting at your sides. Make sure to engage your core muscles by pulling your belly button in the direction of your spine.
Next, press your heels into the surface and raise your hips up towards the ceiling, squeezing your glutes at the top of the motion. Keep your shoulders and upper back on the ground, and make sure to maintain a straight line from your knees to your shoulders.
Maintain this position for a few seconds before slowly lowering your hips back down to the initiate position. Repeat the movement for several repetitions, making sure to engage your glutes and core muscles throughout the exercise.
To make the exercise more challenging, you can add resistance by placing a weight or resistance band across your hips. You can also perform single-leg glute bridges by lifting one leg off the ground while performing the movement with the other leg.
Overall, glute bridges are a great exercise for targeting the muscles in the glutes and lower back. They can help improve hip mobility, strengthen the core, and improve overall lower body strength and stability.
Bulgarian split squats
Bulgarian split squats are a challenging lower body exercise that focuses on the glutes, quads, hamstrings, and core muscles. This exercise involves standing with one foot elevated behind you while performing a squat with the other leg.
To perform a Bulgarian split squat, start by standing with your feet hip-width apart and your back facing a bench or elevated surface. Place one foot on the bench behind you, with your toes pointing down and your heel lifted off the ground.
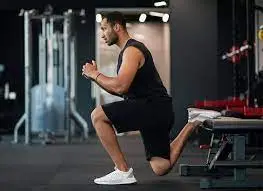
Next, take a step forward with your other foot, so that your front foot is planted firmly on the ground and your knee is directly above your ankle. Maintain your chest up and your core engaged during the whole movement.
From here, bend your front knee and lower your body down towards the ground, keeping your back straight and your weight in your front heel. Your back knee should be floating just over the surface.
Pause at the bottom of the movement before pushing through your front heel to return to the starting position. Repeat the movement for several repetitions before switching sides and performing the exercise with your other leg.
To make the exercise more challenging, you can hold a weight in each hand or place a barbell across your shoulders. You can also increase the height of the bench or elevated surface to make the movement more difficult.
Overall, Bulgarian split squats are a great exercise for targeting multiple muscle groups in the lower body and improving overall lower body strength and stability.
Lateral banded walk exercise
The lateral banded walk is a resistance band exercise that targets the muscles in the hips, glutes, and thighs. This exercise involves placing a resistance band around your legs, just above your knees, and then taking small steps to the side while maintaining tension on the band.
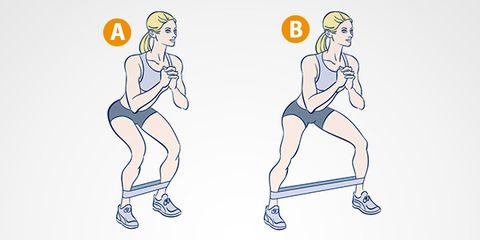
To perform a lateral banded walk, start by standing with your feet shoulder-width apart and the resistance band looped around your legs just above your knees. Keep your chest up and your core engaged during the whole movement.
Next, take a small step to the side with one foot, keeping tension on the band as you move. Then, step your other foot towards the first foot, maintaining tension on the band throughout the movement.
Continue taking small steps to the side, alternating between your left and right foot, for several repetitions before taking a short break. Then, repeat the movement for several more sets.
To make the exercise more challenging, you can use a stronger resistance band or take bigger steps to the side. You can also add other exercises to your workout routine, such as squats or lunges, to target the same muscle groups from different angles.
Overall, the lateral banded walk is a great exercise for improving hip and glute strength and stability, which can help improve overall lower body function and reduce the risk of injury.
Curtsy lunge
The curtsy lunge is a lower body exercise that primarily targets the glutes, but also engages the quads, hamstrings, and calves. It is similar to a traditional lunge but involves crossing one leg behind the other in a curtsy-like movement.
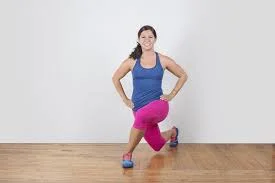
To perform a curtsy lunge, start by standing with your feet hip-width apart and your hands on your hips or holding dumbbells at your sides. Take a step back and to the side with your right foot, crossing it behind your left foot as you lower your body into a lunge position.
Make sure your left knee is directly over your left ankle and your right knee is floating just above the surface. maintain your chest up and your core engaged during the whole movement.
Push through your left heel to stand back up to the starting position, then repeat the movement on the other side by stepping back and to the side with your left foot.
To make the exercise more challenging, you can hold heavier dumbbells or add a pulse at the bottom of each lunge. You can also add a jump at the top of each lunge to increase the intensity.
Overall, the curtsy lunge is a great exercise for strengthening and toning the glutes, which can help improve overall lower body function and reduce the risk of injury.
Mini Band Kickback
The Mini Band Kickback is a glute exercise that targets the gluteus maximus, the largest muscle in the glutes. This exercise is performed using a mini resistance band, which adds extra resistance to the movement and helps to activate the glutes more effectively.
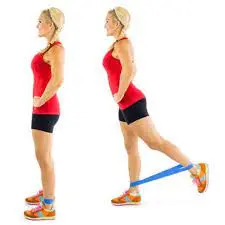
To perform a Mini Band Kickback, start by placing the mini band around your ankles and standing with your feet hip-width apart. Put your hands on your hips or hold onto a stable surface in order to support.
Shift your weight onto your left leg and lift your right leg behind you, keeping it straight and parallel to the ground. maintain your core muscles engaged and your back straight during the whole movement.
Slowly lower your right leg back down to the starting position, then repeat the movement on the other side by lifting your left leg behind you.
To make the exercise more challenging, you can increase the tension of the mini band or add a pulse at the top of each kickback. You can also perform the exercise while holding onto dumbbells for added resistance.
Overall, the Mini Band Kickback is a great exercise for strengthening and toning the glutes, which can help improve overall lower body function and reduce the risk of injury.
Alternating Reverse Lunge
The Alternating Reverse Lunge is a compound exercise that primarily targets the glutes, hamstrings, and quadriceps. This exercise is performed by stepping backward into a lunge position, which helps to activate the glutes more effectively.
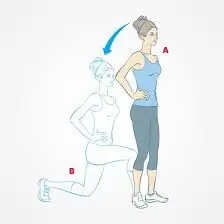
To perform an Alternating Reverse Lunge, start by standing with your feet hip-width apart and your hands on your hips or by your sides. Take a step back with your right foot, landing on the ball of your foot and keeping your heel lifted.
Bend both knees to lower your body down into a lunge position, making sure to keep your front knee directly above your ankle and your back knee hovering just above the ground.
Push through your front foot to stand back up to the starting position, then repeat the movement on the other side by stepping back with your left foot.
To make the exercise more challenging, you can hold onto dumbbells or a barbell for added resistance. You can also add a pulse at the bottom of each lunge or perform a jump lunge by jumping up from the lunge position and switching legs in mid-air.
Overall, the Alternating Reverse Lunge is a great exercise for strengthening and toning the glutes, as well as improving overall lower body strength and stability. It can also help improve balance and coordination.
Walking Lunges
Walking Lunges are a compound exercise that primarily targets the glutes, hamstrings, and quadriceps. This exercise is performed by taking a step forward into a lunge position and then stepping forward with the opposite leg to repeat the movement.
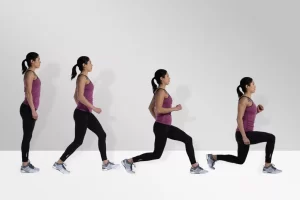
To perform Walking Lunges for glutes, start by standing with your feet hip-width apart and your hands on your hips or by your sides. Take a step forward with your right foot, landing on the ball of your foot and keeping your heel lifted.
Bend both knees to lower your body down into a lunge position, making sure to keep your front knee directly above your ankle and your back knee hovering just above the ground.
Push through your front foot to stand back up to the starting position, then repeat the movement on the other side by stepping forward with your left foot.
Continue alternating legs as you walk forward, taking long strides and keeping your torso upright. Make sure to engage your glutes as you push through your front foot to stand back up, squeezing your glutes at the top of the movement.
To make the exercise more challenging, you can hold onto dumbbells or a barbell for added resistance. You can also add a pulse at the bottom of each lunge or perform a jump lunge by jumping up from the lunge position and switching legs in mid-air.
Overall, Walking Lunges are an effective exercise for targeting the glutes, as well as improving overall lower body strength and stability. They can also help in improving balance and coordination.
Banded Glute Bridge
Banded Glute Bridge is a popular exercise that targets the glutes, hamstrings, and lower back muscles. This exercise is performed by lying on your back with your knees bent and feet flat on the ground while placing a resistance band around your thighs just above the knees.
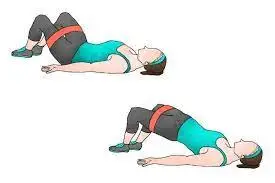
To perform the Banded Glute Bridge, start by lying on your back with your knees bent and feet flat on the ground. Place the resistance band around your thighs just above the knees and position your feet hip-width apart.
Ensure to engage your core muscles and glutes as you raise your hips off the surface, pushing through your heels. Keep your body in a manner that creates a straight line from your shoulders to your knees.
Pause at the top of the movement, squeezing your glutes as you hold for a few seconds. Then, gradually lower your hips back down to the initiate position.
Make sure to keep tension on the resistance band throughout the entire movement, pressing your knees outwards against the band as you lift your hips.
To make the exercise more challenging, you can use a heavier resistance band or place a weight on your hips. You can also perform single-leg variations by lifting one leg off the ground while keeping the other foot planted.
Overall, the Banded Glute Bridge is an effective exercise for targeting the glutes, improving hip mobility, and strengthening the lower back muscles. It can also help improve posture and prevent lower back pain.
Goblet Squat
The Goblet Squat is a popular exercise that targets the glutes, quads, hamstrings, and core muscles. This exercise is performed by holding a weight close to your chest while performing a squatting motion.
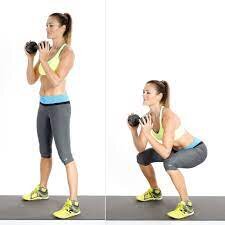
To perform Goblet Squats, start by standing with your feet shoulder-width apart and holding a weight (such as a dumbbell or kettlebell) close to your chest with both hands.
Engage your core and glutes as you lower your hips down and back, bending your knees and keeping your chest up. If possible, we want to have our thighs as low to the ground as possible.
Pause at the bottom of the movement, then push through your heels and squeeze your glutes as you stand back up to the starting position.
Make sure to keep your weight evenly distributed on both feet and avoid leaning forward or rounding your back during the movement.
To make the exercise more challenging, you can use a heavier weight or perform a single-leg variation by lifting one foot off the ground while keeping the other foot planted.
Overall, Goblet Squats are an effective exercise for targeting the glutes, improving lower body strength, and promoting proper squatting form. They can also help improve posture and prevent lower back pain.
Lateral Lunge with Reach
The Lateral Lunge with Reach is a compound exercise that targets the glutes, hamstrings, quads, and core muscles. This exercise is performed by stepping to the side and bending one knee while simultaneously reaching toward the opposite foot with both hands.
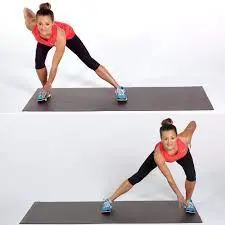
To perform the Lateral Lunge with Reach, start by standing with your feet hip-width apart and your arms at your sides.
Take a big step to the side with your right foot, maintaining your left foot planted on the surface. As you step, bend your right knee and shift your weight onto your right foot.
At the same time, reach down towards your left foot with both hands, keeping your chest up and your back straight.
Pause briefly at the bottom of the movement, then push through your right foot and return to the starting position.
Repeat the movement on the other side by stepping to the left and reaching towards your right foot.
Make sure to keep your weight evenly distributed on both feet and avoid leaning forward or rounding your back during the movement. You should feel a stretch in your inner thigh and glute of the lunging leg.
To make the exercise more challenging, you can hold a weight (such as a dumbbell or kettlebell) in one or both hands while performing the movement.
Overall, the Lateral Lunge with Reach is an effective exercise for targeting the glutes and improving lower body strength. Additionally, it can aid with flexibility, coordination, and balance.
Romanian Deadlift
The Romanian Deadlift (RDL) is a compound exercise that primarily targets the hamstrings and glutes, but also engages the lower back, core, and upper back muscles. The RDL involves a controlled hinge movement that requires good form and technique to avoid injury.
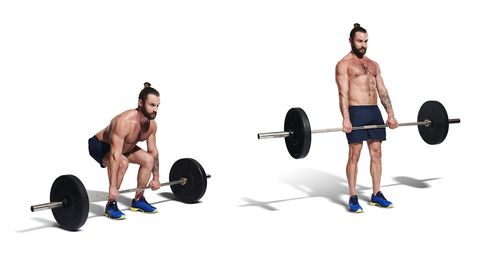
To perform the Romanian Deadlift, start by standing with your feet hip-width apart and your knees slightly bent. Maintain a barbell or dumbbell on the front side of your thighs with an overhand grip.
Keeping your back straight and your shoulders pulled back, hinge forward at the hips while keeping your knees slightly bent. Lower the weight towards the ground while maintaining a neutral spine and keeping the weight close to your body.
As you lower the weight, focus on feeling a stretch in your hamstrings. Keep your core engaged to maintain stability and avoid rounding your back.
Once you reach the bottom of the movement, pause briefly and then use your hamstrings and glutes to lift the weight back up to the starting position. Make sure to keep your back straight and your shoulders pulled back throughout the movement.
Repeat the movement for several reps, focusing on maintaining good form and control throughout.
To make the exercise more challenging, you can increase the weight or perform single-leg RDLs. However, it’s important to start with light weights and gradually increase as you build strength and improve your technique.
Overall, the Romanian Deadlift is an effective exercise for targeting the hamstrings and glutes while also engaging other muscle groups. It can help improve lower body strength, stability, and overall fitness.
Stretching of glutes muscles
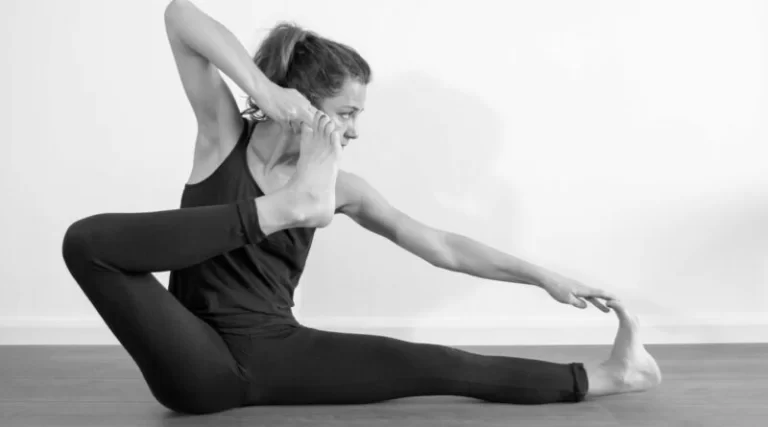
Seated figure-four stretch
The seated figure-four stretch is another popular exercise that targets the muscles in the hips, glutes, and lower back. It’s a great stretch to do if you spend a lot of time sitting down, as it can help to alleviate tension and improve flexibility in these areas.
To perform the seated figure-four stretch, follow these steps:

- Initiate by sitting on the surface with your legs straight out in front of you.
- Bend your right knee and put your right ankle on top of your left knee, so that your right leg creates a figure-four shape.
- Slowly bend forward from your hips, keeping your back straight and your chest lifted. You should experience a stretch in your right hip and glute muscle.
- Maintain the stretch for 15-30 seconds, then release and do it again on the other side.
- You can repeat this stretch several times a day to help improve flexibility and reduce tension in the hips and glutes.
It is essential to remember to breathe deeply and relax into the stretch, avoiding any sudden movements or bouncing. If you feel any discomfort, ease off the stretch. With regular practice, the seated figure-four stretch can help to improve your posture, reduce lower back pain, and increase overall mobility.
Standing figure-four stretch
The standing figure-four stretch is a popular exercise that targets the muscles in the hips, glutes, and lower back. It’s a simple yet effective stretch that can help to improve flexibility, reduce tension, and alleviate pain in the lower body.
To perform the standing figure-four stretch, follow these steps:
- Start by standing with your feet shoulder-width away and your arms at your sides.
- Lift your right foot off the ground and place your ankle on top of your left knee, so that your right leg forms a figure-four shape.
- Slowly bend your left knee and lower your body down towards the ground, keeping your back straight and your chest lifted.
- You should experience a stretch in your right hip and glute muscle. maintain the stretch for 15-30 seconds, then release and do it again on the other side.
- You can repeat this stretch several times a day to help improve flexibility and reduce tension in the hips and glutes.
It is important to remember to breathe deeply and relax into the stretch, avoiding any sudden movements or bouncing. If you experience any discomfort, ease off the stretch. With regular practice, the standing figure-four stretch can help to improve your posture, reduce lower back pain, and increase overall mobility.
Supine gluteal stretch
The Supine Gluteal Stretch is a stretching exercise that targets the gluteus muscles while lying on your back. This stretch is performed by following these steps:
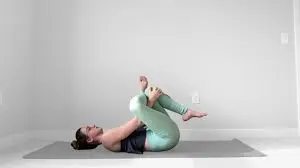
- You should lie on your back with both knees bent and feet flat on the surface.
- Cross your right ankle over your left knee, so that your right knee is pointing out to the side.
- Use your hands to gently pull your left thigh towards your chest, feeling a stretch in your right gluteal muscles.
- Maintain the stretch for 20-30 seconds, deep breathing and relaxing into the stretch.
- Release and repeat on the other side.
The Supine Gluteal Stretch is a great way to improve flexibility and mobility in the gluteus muscles while also engaging your core and lower body muscles. This stretch can also be modified by adding a twisting motion or extending one leg at a time to further target the gluteus muscles.
Like other stretching exercises, it’s important to avoid bouncing or jerking movements while stretching as this can cause injury. The Supine Gluteal Stretch is a good option to do after a workout to help reduce muscle soreness and tightness. By stretching the gluteus muscles after exercise, you can help promote recovery and reduce the risk of injury.
Seated gluteal stretch
The seated gluteal stretch is an exercise that specifically targets the muscles in your buttocks. It helps to enhance flexibility and alleviate tension, in that area. To do this stretch find a spot on the floor. You should Sit with your legs extended straight ahead.
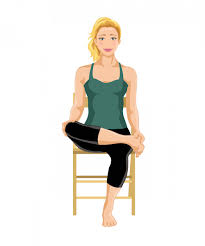
- Start by bending your knee and placing your foot firmly on the floor ensuring that your knee is pointing upwards.
- Then cross your ankle over your knee so that your left foot rests gently on top of your right thigh.
- Slowly draw your knee towards your chest while maintaining posture with a straight back and chin tucked in. You should experience a stretching sensation in your left glute muscle.
- Maintain the stretch for 15 to 30 seconds. Then release it before repeating the same steps on the opposite side.
- For results in terms of flexibility enhancement and tension reduction, in the glutes, you can perform this stretch several times throughout the day.
Downward-Facing Dog
Downward-Facing Dog, also known as Adho Mukha Svanasana in Sanskrit, is a popular yoga pose that targets the muscles in the arms, shoulders, hamstrings, calves, and back. It’s a great pose to do as part of a warm-up or cool-down sequence, as it can help to stretch and strengthen the entire body.
To perform Downward-Facing Dog, follow these steps:
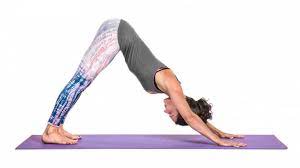
- Start on your hands and knees in a tabletop position, with your wrists directly beneath your shoulders and your knees directly beneath your hips.
- Spread your fingers wide and press firmly into your palms, engaging your core muscles.
- Exhale and lift your knees off the ground, straightening your legs and lifting your hips up towards the ceiling.
- Keep your head and neck relaxed, and gaze towards your feet or navel.
- Press your heels towards the ground and lengthen through your spine, creating a straight line from your hands to your hips.
- Hold the pose for 5-10 breaths, then release and come back down to the tabletop position.
- You can repeat this pose several times, focusing on deepening the stretch and improving your alignment each time.
Pigeon Pose
Pigeon Pose, also known as Kapotasana in Sanskrit, is a popular yoga pose that targets the hips, glutes, and lower back. It is a great pose to do after a workout or as part of a stretching routine, as it can help to release tension and improve flexibility in the lower body.
To perform Pigeon Pose, follow these steps:

- Start in a tabletop position, with your hands and knees on the surface.
- With your shin angled towards your left hip, bring your right knee forward and place it behind your right wrist.
- Extend your left leg behind you, keeping your toes pointed and your knee on the ground.
- Slowly lower your torso down towards the ground, resting your forearms on the mat in front of you.
- Keep your hips square and level, and try to relax any tension in your lower back and hips.
- Hold the pose for 5-10 breaths, then release and come back up to the tabletop position.
- Repeat the pose on the other side, bringing your left knee forward and extending your right leg behind you.
Standing Pigeon
Standing Pigeon is a variation of the traditional Pigeon Pose that can be done while standing. This pose is great for those who may have difficulty getting down to the ground or for those who want to incorporate a hip-opening stretch into their standing yoga practice.
To perform Standing Pigeon, follow these steps:
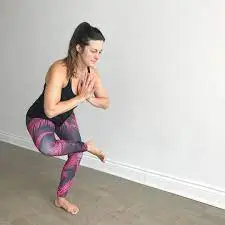
- Begin standing with your feet hip-width apart.
- Do the crossing of your right ankle over your left thigh, just above the knee.
- Flex your right foot and keep your right knee pointing out to the side.
- Slowly bend your left knee and begin to sit back into a squatting position.
- Keep your spine long and your chest lifted, and try to keep your hips level.
- Hold the pose for 5-10 breaths, then release and come back up to standing.
- Repeat the pose on the other side, crossing your left ankle over your right thigh and squatting down.
It is important to remember to breathe deeply and evenly throughout the pose, avoiding any strain or tension in the neck or shoulders. If you experience any pain or discomfort, ease off the pose and consult with a healthcare professional. With regular practice, Standing Pigeon can help to improve hip flexibility, reduce lower back pain, and increase overall relaxation and well-being.
Reclined Pigeon
Reclined Pigeon, also known as Thread the Needle, is a yoga pose that helps to stretch the hips and lower back. It’s a great pose for those who spend a lot of time sitting or standing, as it can help to alleviate tension and improve flexibility.
To perform Reclined Pigeon, follow these steps:
- Start lying on your back with your knees bent and feet flat on the surface.
- Cross your right ankle above your left thigh, just over the knee.
- Reach through the space between your legs and interlace your hands behind your left thigh.
- Use your hands to gently pull your left thigh towards your chest, keeping your right foot flexed to protect your knee.
- Keep your shoulders relaxed and your neck long, and breathe deeply into the stretch.
- Maintain the pose for 5-10 breaths, then release and do it again on the other side.
As you hold the pose, you may feel a deep stretch in your hip and glute muscles. It is essential to listen to your body and only go as far as feels comfortable for you. You can also use props such as a yoga block or bolster under your head or hips to support your body and make the pose more accessible.
The Reclined Pigeon is a great pose to practice before bed or after a long day of sitting or standing. It can help to release tension and promote relaxation, leaving you feeling refreshed and rejuvenated.
Modified Pigeon
Modified Pigeon, also known as Sleeping Pigeon, is a yoga pose that helps to stretch the hips and lower back. It’s a great pose for those who spend a lot of time sitting or standing, as it can help to alleviate tension and improve flexibility.
To perform Modified Pigeon, follow these steps:
- Start in a tabletop position on your knees and hands.
- Place your right knee forward and put it behind your right wrist.
- Extend your left leg back behind you, maintaining your toes tucked under.
- Slide your right foot towards your left hip, allowing your right shin to rest on the mat.
- Lower your upper body down onto the mat, resting on your forearms or a pillow or bolster.
- Allow your hips to sink down towards the mat, feeling a deep stretch in your right hip and glute muscles.
- Keep your shoulders relaxed and your neck long, and breathe deeply into the stretch.
- Maintain the pose for 5-10 breaths, then release and do it again on the other side.
Modified Pigeon is a great pose to practice after a long day of sitting or standing or as part of a bedtime routine. It can help to release tension and promote relaxation, leaving you feeling more comfortable and at ease in your body.
Recline Knee To Chest
Recline Knee to Chest, also known as Apanasana, is a yoga pose that helps to stretch the lower back and hips while also promoting relaxation. It’s a gentle pose that can be done by people of all levels of flexibility and fitness.
To perform Recline Knee to Chest, follow these steps:
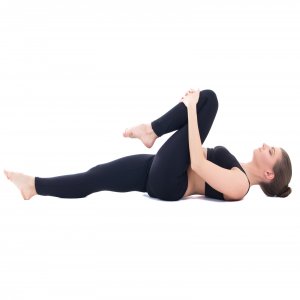
- Start by lying flat on your back and your legs should be extended.
- Take a deep breath in and as you exhale, draw your right knee towards your chest.
- Clasp your hands around your right shin or knee, using your arms to gently pull your knee closer to your chest.
- Keep your left leg extended on the mat or bend it and place your foot flat on the ground if that feels more comfortable.
- Relax your shoulders and neck, and allow your lower back to sink down onto the mat.
- Hold the pose for 5-10 breaths, feeling a gentle stretch in your lower back and hips.
- Release the pose by slowly lowering your right leg back down to the mat.
- Repeat the pose on the other side by drawing your left knee towards your chest and holding for 5-10 breaths.
Recline Knee to Chest is a great pose to practice before bed or anytime you need to release tension in your lower back and hips. It can help to calm the mind and promote relaxation, leaving you feeling more rested and rejuvenated.
Knee to the opposite shoulder
The knee to the opposite shoulder is a yoga pose that helps to stretch the hips, lower back, and outer thighs. It’s a gentle pose that can be done by people of all levels of flexibility and fitness.
To perform Knee to the opposite shoulder, follow these steps:
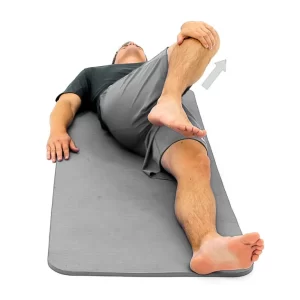
- Start by lying flat on your back and your legs should be extended.
- Take a deep breath in and as you exhale, draw your right knee towards your chest.
- Clasp your hands around your right shin or knee, using your arms to gently pull your knee closer to your chest.
- Keep your left leg extended on the mat or bend it and place your foot flat on the ground if that feels more comfortable.
- As you inhale, cross your right ankle over your left knee, creating a figure four shape with your legs.
- Use your hands to gently guide your right knee towards your left shoulder.
- Keep your shoulders and neck relaxed, allowing your lower back to sink down onto the mat.
- Hold the pose for 5-10 breaths, feeling a gentle stretch in your outer hip and lower back.
- Release the pose by slowly lowering your right leg back down to the mat and uncrossing your legs.
- Repeat the pose on the other side by drawing your left knee towards your chest and crossing your left ankle over your right knee.
Practicing the knee to opposite shoulder pose is highly beneficial for releasing tension in your hips and lower back. It’s an ideal exercise to perform before bedtime or whenever you need relaxation. This pose effectively promotes peace of mind, leaving you feeling rejuvenated and well-rested.
Seated twist
The seated twist is a yoga pose that has multiple benefits. It helps improve the flexibility and mobility of the spine, stretches the muscles in the hips and back, and even aids in digestion. One of the best parts about this pose is that it’s suitable for beginners and can be done by people of all levels of flexibility and fitness.
To perform a Seated twist, follow these steps:
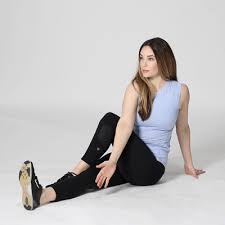
- Begin by sitting on a yoga mat with your legs extended in front of you.
- Bend your right knee and put your right foot on the outer side of your left thigh.
- Keep your left leg extended and flex your foot, pressing your heel into the mat.
- Inhale and lift your arms up to shoulder height, keeping them parallel to the floor.
- Exhale and twist your torso to the right, bringing your left elbow to the outside of your right knee.
- Place your right hand behind you on the mat for support.
- Keep your spine long and your shoulders relaxed as you deepen the twist with each exhale.
- Hold the pose for 5-10 breaths, feeling a gentle stretch in your hips, lower back, and shoulders.
- Release the pose by slowly untwisting and returning to a seated position with both legs extended.
- Repeat the pose on the other side by bending your left knee and twisting the leg
It is also important to warm up before doing any gluteal muscle exercises. This will help to prevent injuries. When choosing gluteal muscle exercises, it is important to choose exercises that are challenging but safe. You should also start with a low weight or resistance and gradually increase it as you get stronger.
After your workout, be sure to cool down. This will help to reduce muscle soreness. A good cool-down includes some static stretching.
Benefits of glute exercise
Gluteal sports are physical activities that concentrate on the gluteal muscle mass, which can be the muscles inside the buttocks. These sporting events can offer several advantages, which include:
- Improved posture: Strong gluteal muscular tissues can assist in improving posture with the aid of preserving the pelvis in a neutral role. This can help alleviate lower again aches and save you harm.
- Increased energy and speed: The gluteal muscle mass is a number of the biggest and maximum powerful muscular tissues inside the body. Strengthening these muscular tissues can assist in enhancing energy and speed in sports like walking, leaping, and sprinting.
- Better balance and stability: Strong gluteal muscle tissues can assist in improving stability and stability via supplying a strong foundation for movement.
- Reduced hazard of injury: Weak gluteal muscle groups can contribute to a whole lot of injuries, such as decreased lower back aches, knee aches, and hip aches. Strengthening those muscular tissues can assist in lessening the risk of these injuries.
- Enhanced athletic performance: Many sports require strong gluteal muscles for the most beneficial performance. Strengthening those muscle mass can assist in enhancing performance in sports like soccer, basketball, and soccer.
- Improved ordinary fitness: Gluteal sporting events can be a great addition to any health ordinary, as they could assist in improving typical strength, flexibility, and endurance.
Contraindications of the gluteal exercise
Contraindications of gluteal sporting activities confer with situations or situations in which these exercises ought to be avoided or changed to prevent injury or exacerbation of a current condition. Some common contraindications of gluteal sporting activities consist of:
- Acute accidents: If you have an acute injury, including a sprain or pressure, it is important to avoid gluteal sporting events until the harm has healed. Performing those sports can worsen the damage and put off the healing technique.
- Chronic ache: If you have persistent aches in your lower back, hips, or knees, gluteal sports may also aggravate the pain. In these cases, it is essential to consult with a healthcare expert before starting a brand-new workout routine.
- Joint troubles: If you have joint problems, such as arthritis or osteoporosis, gluteal physical games can also put an excessive amount of stress on the joints and cause further harm. In these cases, it is vital to adjust the exercises or alternative exercises that are less traumatic on the joints.
- Pregnancy: During pregnancy, gluteal sports may be contraindicated because of the risk of injury or strain on the pelvic ground muscle mass. It is crucial to visit a healthcare professional earlier than beginning any workout application during pregnancy.
- Cardiovascular troubles: If you have cardiovascular troubles, along with high blood stress or coronary heart ailment, gluteal physical activities can also increase your coronary heart charge and blood pressure. In these instances, it’s critical first of all low-intensity sports and steadily grow the depth over time.
- Herniated disc: If you have a herniated disc, gluteal sporting activities that involve bending or twisting may put an excessive amount of pressure on the spine and worsen the situation.
If you are new to exercise, it is a good idea to talk to your doctor before starting any gluteal muscle exercises. I hope this introduction to gluteal muscle exercises was helpful.
FAQ
What are gluteal muscles?
Gluteal muscles are a group of three muscles in the buttocks region, including the gluteus maximus, gluteus medius, and gluteus minimus.
Why is it important to exercise gluteal muscles?
Exercising gluteal muscles can help improve posture, reduce lower back pain, increase athletic performance, and enhance overall appearance.
What are some effective gluteal muscle exercises?
Some effective gluteal muscle exercises include squats, lunges, hip thrusts, deadlifts, and glute bridges.
How often should I do gluteal muscle exercises?
It is recommended to do gluteal muscle exercises 2-3 times per week with at least one day of rest in between.
Can I do gluteal muscle exercises at home?
Yes, there are many gluteal muscle exercises that can be done at home with little to no equipment, such as bodyweight squats, lunges, and glute bridges.
How long does it take to see results from gluteal muscle exercises?
Results may vary depending on individual factors such as genetics and diet, but typically it takes 4-6 weeks of consistent exercise to see noticeable changes in gluteal muscle strength and appearance.
Are there any precautions I should take when doing gluteal muscle exercises?
Yes, it is essential to use proper form and technique in order to avoid injury. It is also important to start with lighter weights or resistance and gradually increase as strength improves. If you have any pre-existing medical conditions or injuries, consult with a healthcare professional before starting any exercise program.

