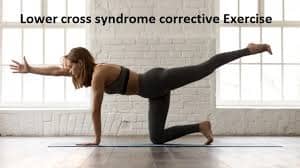
32 Best Exercises for Lower Cross Syndrome
Lower Cross Syndrome is a postural imbalance characterized by tightness and weakness in specific muscle groups, primarily in the lower back, hips, and pelvis.
To address Lower Cross Syndrome effectively, a combination of stretching and strengthening exercises is crucial. In this guide, we will explore the best exercises to help alleviate the symptoms of Lower Cross Syndrome and improve overall posture and musculoskeletal health.
Introduction:
A common postural error known as Lower Cross Syndrome is typically caused by prolonged sitting. The tendons of the hip and the lower back flexors become tight and shortened from sitting for long periods of time. The abdominal and glute muscles are often weak and need to be strengthened to restore normal posture of the lower back.
Lower crossing syndrome develops because of a muscular imbalance in the hip, lower back, and pelvis. Typically, this occurs when the hip flexors, adductor muscles of the inner thigh, upper and lower back extensor muscles, and calves are hyperactive and tight. Your deep abdominal and gluteal muscles may also be weak and underactive.
Lower cross syndrome Symptoms:
Lower back discomfort, as well as hip or pelvic joint pain, are signs of lower cross syndrome. In addition, individuals may
- Experience reduced mobility or stiffness in the pelvic, lumbar, hip, or hamstring areas.
- The hip flexor, groin, back, or gluteal muscle pain.
- A stomach that sticks out from a low back that is too arched
- Lower back and/or gluteal muscular tension
The following muscles can become weakened:
- Transversus abdominis, which is located on each side of the abdominal wall,
- Gluteus medius, which is on the outside of your pelvis,
- Gluteus maximus, which is in your buttocks
- Anterior tibialis, which is located on the outside of the tibia bone
- Internal oblique, are both located on either side of the abdominal wall.
Exercise is always crucial to maintaining good health, and active muscles, as well as correcting improper posture, which is a major attribute to Lower Cross Syndrome. In order to improve optimum muscle function and improve the postural alignment of the It’s crucial to strengthen the muscles in your lower back that have been under stress. Exercise is a fantastic approach to dealing with Lower Cross Syndrome.
Exercises for Lower cross syndrome is an important part of your overall treatment plan along with Medical treatment and Physical therapy, there are several exercises that may help alleviate pain and improve overall strength and flexibility.
Exercises are intended to increase spinal stability by strengthening the muscles in the lower back, abdomen, and hips.
Exercise advantages for lower cross syndrome include the following:
The benefits listed below are able to be attained by exercising frequently:
- Improves daily activity function
- Improve posture or balance
- Muscle relaxation
- Reduce pain
- Improve motion
- Improve flexibility
- Helps to strengthen weak muscles.
- Reduce tension or tightness.
- Exercise may help you to restore mobility.
- Improving coordination.
- Improve your balance
The Best Exercises for Lower Cross Syndrome are:
The exercises shown below are the greatest for treating the lower cross syndrome.
Quad Release With Foam Roller
- In a plank posture, place the foam roller on your thighs and support yourself with your elbows.
- Avoid flexing or rounding your lumbar spine or lower back by bracing your core.
- Rotate from the tops of the kneecaps to the bottoms of the hips.
- Look for tender areas.
- Move to another delicate location after holding the first for 10 to 20 seconds or until the discomfort subsides.
- Cross the back leg over the opposite leg or just transfer your body weight to one side to emphasize one leg more.
- Spread your legs apart and twist your feet out to target the inner quads.
- Bring your legs together, touch your toes, and twist your heels out to work on your outer quadriceps.
- Then return to your neutral position.
- Then relax.
- Repeat this exercise 5-10 times.

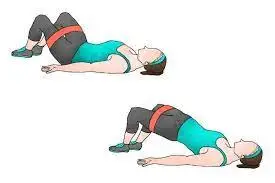
Banded Glute Bridge
- Have the elastic band just above your knees as you are lying on your back with your knees bent.
- By turning your hips or pelvis back to the point where your lower back will contact the ground, you can determine your public neutral or pelvic tilt.
- Place your fingertips inside your hip bones to check that you are performing this step correctly. You should feel some activation
- Just under your fingertips to show that your abdomen is growing tighter.
- Hold that position.
- Squeeze your glutes, push out with your knees against that elastic band, and then pull your body upward.
- Holding the pelvic tilt while pressing against the elastic band, holding at the top, and then returning gently
- Then return to your neutral position.
- Then relax.
- Repeat this exercise 5-10 times.
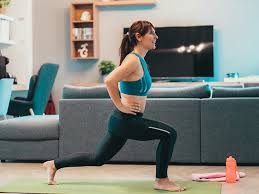
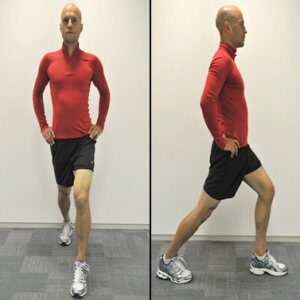
Lunges
- Begin in a comfortable standing stance with your feet hip-width apart on the floor.
- Step forward longer than you would when walking so that one leg is in front of the other foot.
- As your foot makes contact with the ground, it should stay flat.
- Then lower yourself by bending your knees to about 90 degrees.
- Remember to keep the core straightened.
- Return to the beginning posture by gradually raising your front leg.
- Then return to your neutral position slowly.
- Then relax.
- Repeat 5-10 times each side.
Clam Shell
- With your feet joined, lie on your side.
- hips at 45 degrees and knees bent 90 degrees.
- Raise your upper knee without moving your hips back.
- Repeat by lowering your legs gradually until your knees are in contact.
- Then return to your neutral position slowly.
- Then relax.
- Repeat 5-10 times each side.
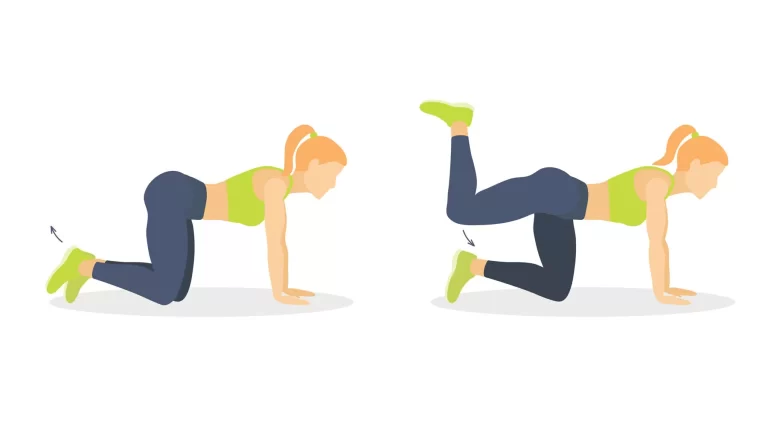
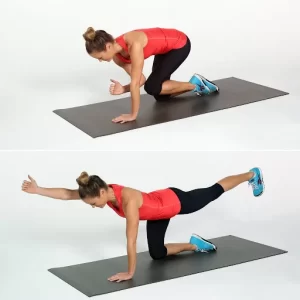
Bird Dog
- Begin by lying on all fours in the tabletop position.
- Next, lay your hands beneath your shoulders and your knees beneath your hips.
- Keep your spine neutral.
- Squeeze your shoulder blades together.
- Next, cross your right and left arms and legs.
- Ensure your hips and shoulders are in line with the ground.
- Hold this position for a few seconds.
- Then return to the starting position.
- Raise your left arm and right leg.
- Holding this position for a few seconds.
- Return to the starting position.
- At no time should your hips or back be arched.
- Repeat with your opposite limbs, slowly alternating.
- Repeat 5-10 times each side.
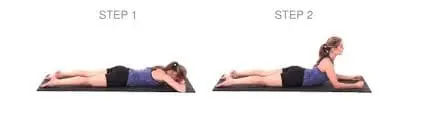
Sphinx
- Starting by lying face down on the floor with your hands squarely beneath your shoulders.
- To make sure the tops of your feet are on the ground, point your toes.
- While keeping your forearms on the mat, exhale and press through your shoulders to lift your upper body.
- Keep your abdominals contracted and breathe slowly.
- By standing up to your hands, straightening your arms, and pushing your front hips off the ground, you can advance this technique.
- Then return to your neutral position.
- Then relax.
- Repeat this exercise 5-10 times.
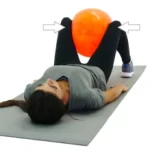
A supine ball squeezes
- In the Supine, with your spine in a neutral position.
- Trigger the abdominal core muscles.
- Hold the contraction for five seconds while exhaling, and then grasp the medicine ball or chill.
- Make sure that each adductor muscle contracts equally.
- Then relax.
- Repeat this exercise 5-10 times.
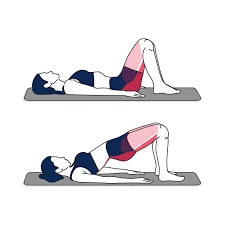
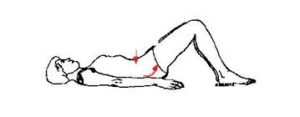
Bridges
- Lay backward while bracing yourself with a breath.
- lifting the hips and trunk off the ground while exhaling by pressing through the midfoot.
- Causing the hamstring and gluteus maximus complex to contract.
- Keep on for one count.
- To return to the surface, exhale.
- Inhale to slow down, then exhale to resume the movement for one count.
- Make sure to maintain a neutral posture and avoid overextending the lumbar spine.
- Then return to your neutral position slowly.
- Then relax.
- Repeat this exercise 5-10 times.
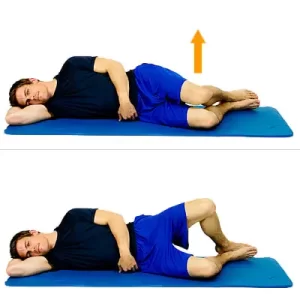
Clamshell exercise with a resistance band
- Start with the side-lying position on the floor.
- Fold the resistance band around both thighs, slightly above the knees (the band should be chosen based on strength).
- Stack your hips and legs while you lay on your right side with your knees bent at a 45-degree angle.
- To keep your heart from racing, tighten your abdominal muscles.
- Lift your left knee to the ceiling, keeping your leg locked.
- Keep your right foot from rising off the ground.
- Sustain this position for a few moments.
- Then return to your neutral position slowly.
- Then relax.
- Repeat this exercise 5-10 times.
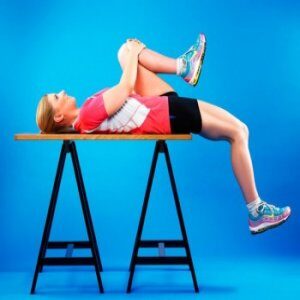
Iliopsoas Stretch
- Place your right leg closest to the edge of the bed while you lay flat on your back on the mattress.
- Allow your right leg to slowly dangle off the side of the bed.
- With your foot on the bed, your left leg can remain bent.
- Your hip flexor will feel stretched.
- Your foot should ideally not contact the ground but rather float above But if it does touch, it’s all right.
- By gradually bending your knee, you can increase the stretch.
- This should be felt throughout the front of the hip and thigh.
- Sustain this position for a few moments.
- Then return to your neutral position slowly.
- Then relax.
- Your left side should be closest to the bed’s edge as you rotate your right leg towards the bed.
- Repeat this exercise 5-10 times.
Hip flexor stretch
- Start with kneeling on both knees.
- Place one foot forward and bend the knee to 90 degrees.
- You can put your hands on the front knee if you need them for support.
- Keeping the torso upright.
- Then lean forward.
- Until you feel a stretch.
- Continue this position for a few moments.
- Then move slowly back.
- Then return to your neutral position.
- Then relax.
- Repeat 5-10 times.
- Switch legs and repeat.
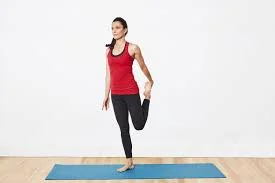
Quadricep stretch
- Cling onto a countertop or chair back while standing to help keep your balance.
- Grab your ankle with one hand and move your foot towards your buttocks to flex your knee.
- Pull on your ankle gently to bend your knee as much as it will allow.
- Hold your position for a short while.
- Then take a position that is neutral.
- Then unwind.
- Resuming your upright stance.
- Exercise should be done three to five times per leg.
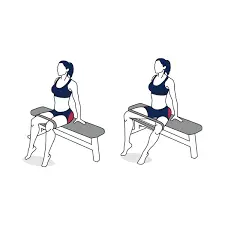
Pelvic Tilt
- Legs bent and toes pointed forward, lie on your back on the floor in a neutral position.
- Your pelvis will be raised towards the ceiling as you pull your belly button inside towards your spine.
- As you lean your pelvis forward, contract your gluteus and hip muscles.
- Hold your position for a short while.
- Then take a position that is neutral.
- Then unwind.
- Exercise should be repeated 5–10 times.
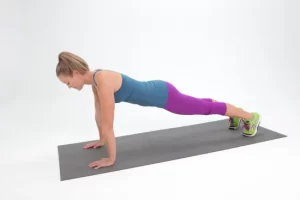
High Plank
- Get down on your knees and begin.
- The distance between your hands and knees should be around hip-width.
- Your legs should be straight and fully stretched when you lift your knees off the floor and step your feet back.
- Keep your quads, butt, and core tight to prevent arching your back.
- Think in terms of length; see yourself extending simultaneously from your heels and the top of your head.
- By looking down at the floor a few inches in front of your hands, you can keep your neck in a neutral position.
- Hold your position for a short while.
- Then take a position that is neutral.
- Then unwind.
- Exercise should be repeated 5–10 times.
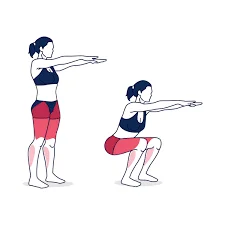
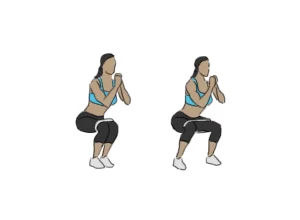
Squats
- Begin off by standing comfortably on the ground.
- Keep your core engaged.
- Breath in.
- Keep your knees straight.
- Slowly bend your both knees.
- Minimum bend your knees to 90 degrees.
- Keep your back straight.
- Hold it for a few seconds.
- Then return to your neutral position slowly.
- Then relax.
- Repeat 5-10 times.
Dead bug
- Legs and arms should be extended straight up and away from the body while you lay flat on your back.
- Inhale deeply, and as you exhale, draw your belly button close to your spine and feel your back flatten towards the floor without moving your hips.
- Together, lower your left arm and right leg until they are only a few inches above the ground.
- Then return to your neutral position slowly.
- Then relax.
- Repeat 5-10 times.
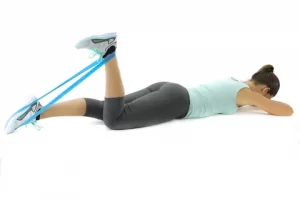
Prone hamstring curl
- Make a loop out of a resistance band and tie it to a sturdy pole or item.
- Your feet should be about a foot or two from the pole as you lay flat on your stomach.
- Loop the band around your ankle.
- To remove your buttocks from the pole, flex your knee and pull your ankle in that direction.
- Try to maintain everything else as still as you can while only moving the working leg.
- The movement should be felt along the back of the thigh.
- Then return to your neutral position slowly.
- Then relax.
- Repeat 5-10 times.
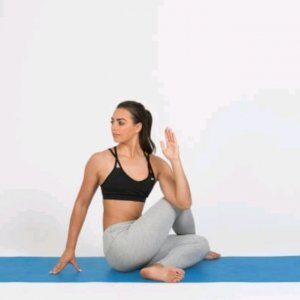
Seated spinal twist
- Start by laying back on the floor and extending both of your legs in front of you.
- Next, flex your left knee such that it is parallel to the floor and positioned on the outside of your right thigh.
- Put your right arm on the outside of your left leg at this point.
- Keep your hand behind you.
- Turn your body slowly to the left.
- Hold it for a few seconds.
- Then return to your neutral position.
- Then relax.
- Repeat the other side 5-10 times
- Repeat on the other side.
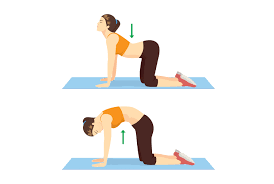
Cat-Cow
- Place your hands and knees on the ground in the tabletop position to begin.
- Keep your back straight.
- Hold both your feet and hands on the ground.
- Then take a breath, look up, and let the air fill your belly.
- Hold this position for a few seconds.
- Exhale and place your chin into your chest, arching your spine into the ceiling.
- Your lower back is being gently stretched as you say this.
- Hold this position for a few seconds.
- Then return to your neutral position.
- Then relax.
- Repeat this exercise 5-10 times.
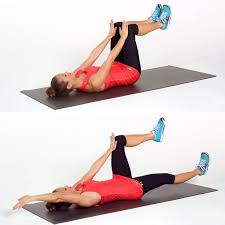
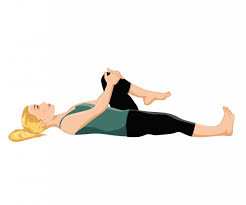
Knee to chest
- Your feet should be flat on the floor as you lay on your back with your knees bent.
- Gently lift one bent knee up till you can both hands around the lower thigh.
- Just below the knee, join your fingers together.
- Bring up one leg, then the other, if performing the two-legged variation.
- Start with one and then rapidly move to the other because taking both up at once requires a lot of abdominal power, which is probably safer, especially for backs that are more prone to injury.
- If you are doing both at once, interlace your fingers or clasp your wrists just below the knees between the lower legs, as you would while doing the single-legged variation.
- With your hands, gently pull your knee or knees towards your trunk.
- As much as you can while pulling, attempt to relax your legs, pelvis, and lower back.
- The passive knees-to-chest exercise is more effective at reaching the lower back muscles.
- Hold for a short while.
- Put your leg back on the ground.
- On the opposite side, repeat.
- Repeat this exercise 5-10 times.
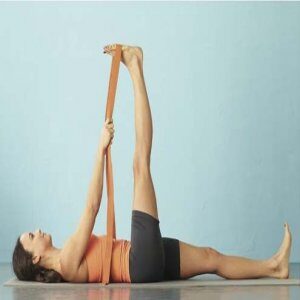
Hamstring stretches
- Lay down on the floor in a comfortable posture to start.
- Loop a towel around your toes.
- Hold the ends of the towel.
- Keep your knee straight.
- Maintain the other leg flat on the ground.
- When your leg feels stretched, you can elevate it higher.
- Hold for a few seconds.
- Then return to your neutral position.
- Then relax.
- Repeat the other side 5-10 times.
Straight leg raise
- Beginning by relaxingly reclining on your back.
- Now bend your one knee.
- Then slowly lift your entire leg.
- While keeping your other knee straight.
- Then hold for a few seconds.
- Then lower your leg.
- Return to your neutral position slowly.
- Then relax.
- Repeat on the other side.
- Repeat 5-10 times on each side.

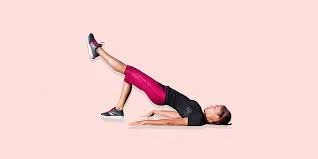
Single Leg Bridge
- Lay down with your hands flat on the ground and your arms at your sides.
- Put your feet a few inches from your buttocks on the floor with your knees bent.
- One leg should be raised with the knee bent at a comfortable degree.
- Breathe in and press through the heel of your other foot to lift your hips into the air by activating your posterior chain.
- Your hips should be parallel to your knee and shoulders when extended.
- Holding the top position for a moment, bring your buttocks to the ground while exhaling.
- Then take a position that is neutral.
- Then unwind.
- Exercise should be repeated 5–10 times.
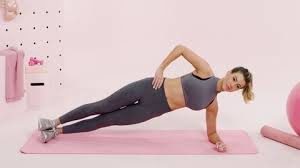
Side plank with Abduction Static Leg
- Beginning in a modified side plank posture, place your bottom leg on the mat with the knee bent and your top leg extended.
- Your top leg should be raised as high as it can go before being brought back down.
- Then take a position that is neutral.
- Then unwind.
- Continue, then switch sides.
- Exercise should be repeated 5–10 times.
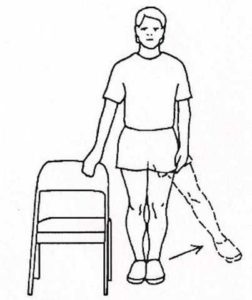
Hip Abduction standing
- To ensure stability, place a table or chair next to you as you stand with your legs shoulder-width apart.
- Draw in your abdominals to safeguard your back.
- Maintaining a straight knee and pointing toes, kick your leg out to the side of your body.
- Make sure to keep your upper body and back straight during the entire workout.
- Then adopt an impartial stance.
- Then relax.
- Continue with the other leg.
- Repeat the exercise five to ten times.
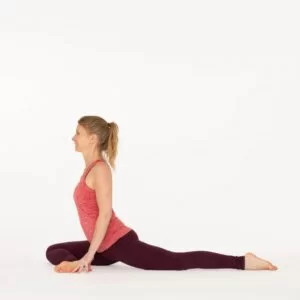
Pigeon Stretch
- Start by taking a comfortable seat and putting your hands on the floor by your knees.
- Tighten your abdominal muscles now.
- Following that, bend your left knee and extend it forward and to the side.
- Right toes should be tucked under when you slide your right leg back.
- Spread your toes on the left side.
- Maintain a straight spine and look up.
- Maintain this position for a few seconds.
- Then slowly return to your neutral stance.
- Then relax.
- Repeat 5-10 times more.
- Repeat the exercise with the other leg.
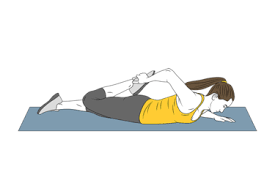
Prone Quadricep Stretch
- Lean on the stomach on the bed.
- Bend your top leg’s knee as far as you can by gently pulling with your hand.
- Hold your position for a short while.
- Then take a position that is neutral.
- Then unwind.
- Resuming your upright stance.
- With each leg, perform the exercise 5 to 10 times.
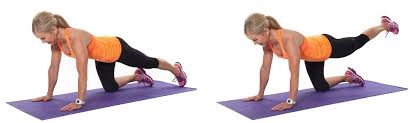
Kneeling leg raise with back stretch
- Fall on your knees and descend.
- To tighten your spine, contract your abdominal muscles.
- Raise one leg away from you while maintaining a tight core.
- For five seconds, maintain this posture.
- Then take a position that is neutral.
- Then unwind.
- Resuming your upright stance.
- Return to your neutral position by lowering your leg gradually.
- Ten times per side, repeat this.
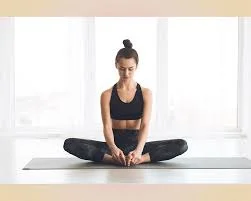
Butterfly stretch
- Begin by sitting down and crossing your legs in front of you.
- Grab your ankles and move your feet closer together.
- Next, bring your feet so that their bottoms are in contact.
- Hold your ankles with your hands.
- While using your elbows press down on your knees.
- Next, apply slight pressure on the knees to bring them closer to the floor.
- Hold it for a few seconds.
- Then return to your neutral position slowly.
- Then relax.
- Repeat 5-10 times.
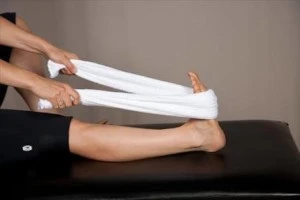
Achilles tendon seated stretch
- Sit on the ground to begin.
- Bend one knee and extend the opposing leg in front of you while keeping your heel on the ground.
- Wrap a belt, cloth, or workout band around the heel of your foot to pull your toe towards you.
- Hold this position for a short while.
- Then take a position that is neutral.
- Then relax.
- Repeat 5-10 times.
- Switch leg and repeat.
Hip abduction with band
- Start with the relaxed side-lying position on the table or bed.
- Bend your hip joint at 45-degree flexion.
- Afterward, wrap the elastic resistance band around your ankle joint.
- Then slightly lift up your upper leg.
- Hold it for a few seconds.
- Resume your neutral posture by carefully lowering your leg.
- Then relax.
- Repeat on the other side.
- Repeat 5-10 times on each side.
Side Walk with Band
- Start with a relaxing standing position.
- Now wrap a resistance band right above your knees.
- Next, kneel down and move one step to the side.
- You can take a small step to the one side and then repeat on the right side.
- Then return to your neutral position.
- Then relax.
- Repeat these 5-10 times.
What impact does lower cross syndrome exercise have?
- Exercise is the most advised kind of treatment for Lower Cross Syndrome to control any lower back discomfort.
- Exercise has a significant impact on the management of Lower Cross Syndrome discomfort and the condition overall.
- The ideal workouts are those that focus on your abdomen or hip flexor muscles because they help to strengthen any weak
- Muscles that cause lower cross syndrome or loosen and relax tight muscles.
- Release of the tight cross is the initial step in treating the lower cross syndrome.
- Your hip flexors can be relieved by using foam rollers and other floor exercises that stretch your tight muscles in this region.
- Exercises for lower cross syndrome include arm/leg extension, supine ball squeeze, bridge and hip flexor stretch, and lower back.
What safety measures are necessary when exercising?
- Stretch and warm up before exercising.
- Maintain a straight spine while working out.
- Prevent strenuous exercise
- Stop exercising if you experience sudden discomfort.
- Between exercises, rest.
- Remain hydrated.
When do you stop working out?
- Severe muscular ache
- You’re contagious.
- If there is any discomfort or numbness.
- Headache and Fever
- Exercise should be stopped if it hurts.
FAQs
In lower cross syndrome, which muscles are weak?
Sitting for extended periods of time might cause lower body cross syndrome. While the low back muscles and hip flexors (the muscles at the front of your hips that you use to move your legs) become small and tight, the abdominal and gluteal muscles lengthen and weaken.
What physical activities reduce cross syndrome?
Clam Shell
Achilles tendon seated stretch
butterfly stretch
Single Leg Bridge
cat-cow
How does lower cross syndrome get better?
Exercise has a significant impact on the management of Lower Cross Syndrome discomfort and the condition overall. The ideal workouts are those that focus on your abdomen or hip flexor muscles because they help to strengthen any weak muscles that cause LCS or loosen and relax tight muscles.
Can you improve lower cross syndrome with exercise?
Exercise is frequently used to alleviate pain and avoid additional discomfort and injury.
Exercises that strengthen the body’s supporting muscles include stretches.
Daily physical activity will assist in reducing how often you experience recurring pain.
How often should someone with lower cross syndrome exercise?
The exercises for the lower cross syndrome can be done daily for a minimum of 40-50 minutes.
A daily program of light stretching and exercise will be beneficial to you.
How may lower cross syndrome prevent it from happening?
You may stand while working with the aid of a standing desk, take a break from sitting every half-hour or hour, or get in a good workout before or after your workday. Maintain proper form and posture while regularly moving your weak muscles.
Which muscles in the lower cross are weak?
Sitting for extended periods of time might cause lower body cross syndrome. Low back muscles and hip flexors become short and tight, while the abdominal and gluteal muscles grow lengthy and weak.
What at-home workout would be most effective in treating lower cross syndrome?
Banded Glute Bridge
Pigeon Stretch
Straight leg raise
Hip Flexor Stretch Exercise
It’s a dead bug
Quadriceps Release With Foam Rolle
Bird Dog Exercise
Which advantage does cross-training have?
it comes with numerous advantages, such as total body conditioning, increased skill, agility, and balance, flexibility in training regimens, and the chance to work even while disabled.
What various postures are associated with lower cross syndrome?
This may lead to alterations in other aspects of the body’s posture, such as greater thoracic kyphosis and increased cervical lordosis. The lower cross syndrome is classified into two subtypes: A and B. The two types are comparable and share the same primary muscle imbalance characteristics.
What variables contribute to the lower cross syndrome?
The lower crossed syndrome is brought on by a sedentary lifestyle (i.e., a lifestyle marked by extended periods of inactivity), whether that lifestyle is brought on by working a desk job, binge-watching television, spending a lot of time on a computer, or partaking in another activity that requires prolonged sitting.
Is it possible to treat lower cross syndrome?
Lower cross syndrome can be diagnosed and treated by a physical therapist, who will construct a therapy plan tailored to your specific needs. You can avoid and treat lower cross syndrome with simple hobbies and exercises.
Where does the pain come from with lower cross syndrome?
LCS arises when muscular imbalances create improper posture and movement. A person may have lower back pain and significant alterations in how they stand, sit, or move.
What exactly causes cross syndrome?
Upper crossing syndrome can be caused by a variety of movements, but the majority of cases are caused by bad posture, notably sitting or standing with the head forward for extended periods of time. Computer and laptop use are examples of activities that promote this posture. driving
What are the most effective lower cross syndrome stretches?
Hamstring stretching
Knee to chest
Archilious tendon stretch
Prone quadriceps stretch
Hip abduction with band
butterfly stretch
Reference
- Exercises for Lower Cross Syndrome | Moyer Total Wellness. 2022, September 14. Moyer Total Wellness. https://moyerwellness.com/exercises-for-lower-cross-syndrome/.
- Evergreen, B. 2021, December 20 .Lower Cross Syndrome: Ways to Fix Your Posture. Evergreen Rehab and Wellness Coquitlam, Surrey, and Langley. https://evergreenclinic.ca/how-to-fix-your-posture-lower-cross-syndrome/.
- Fletcher, J. 2020, October 30. What to know about the lower cross syndrome. https://www.medicalnewstoday.com/articles/lower-cross-syndrome#treatment.
- Magazine, C. C. 2014, December 31. Moving lower cross syndrome treatment with 5 exercises. Canadian Cycling Magazine. https://cyclingmagazine.ca/sections/news/5-exercises-to-correct-lower-cross-syndrome-in-cyclists/.
- Image HEP2go – Build a HEP < Home Exercise Program> For Free. n.d. . https://www.hep2go.com/exercise_editor.php?exId=129398&userRef=19326.