Pulled Muscle in Lower Back
What is a Pulled Muscle in Lower Back?
A pulled muscle occurring in the lower back signifies an injury to the lumbar region, commonly referred to as a lumbar strain. This injury entails the impairment of tendons and muscles, which can result in spasms and soreness. The lumbar vertebrae collectively constitute the lower back portion of the spine.
Mechanical back strain is a specific subset of back pain where the underlying cause originates from factors such as the spine itself, intervertebral discs, or the soft tissues encompassing them. Notably, lumbar strain is responsible for about 70% of instances of mechanical low back pain.
This discourse will delve into the realm of muscular lumbar back sprains—instances of stretching-related injuries or tears affecting the paraspinal muscles and tendons located in the lower back. It’s worth noting that much of the comprehension surrounding lumbar strain is drawn from insights garnered through the study of peripheral muscle strains.
In cases of strains, the muscle undergoes an excessive and strenuous tensile force, ultimately leading to the overextension of the myofibers. This overextension can culminate in their rupture, often occurring in proximity to the junction connecting muscle and tendon (known as the myotendinous junction).
The onset of acute mechanical back strains may be provoked by both physical and non-physical activities, with activities involving lifting standing out as the most frequently recalled events leading to strain. Interestingly, it’s important to note that approximately one-third of individuals experiencing these strains may not distinctly recollect the specific initiating incident.
What are the lower back muscles?
The lumbar region comprises a remarkable assembly of five robust vertebrae, intricately connected by joint capsules and fortified by a network of bony structures. Interwoven amidst these structures are flexible ligaments and tendons, accompanied by substantial muscular masses. These muscles, in conjunction with highly sensitive nerves, collectively form a formidable shield, safeguarding the spinal cord and its delicate nerve roots. Simultaneously, the lumbar region exhibits remarkable flexibility, enabling a wide range of motions such as flexion, extension, lateral bending, and rotation.
The lumbar strain originates from several key muscle groups:
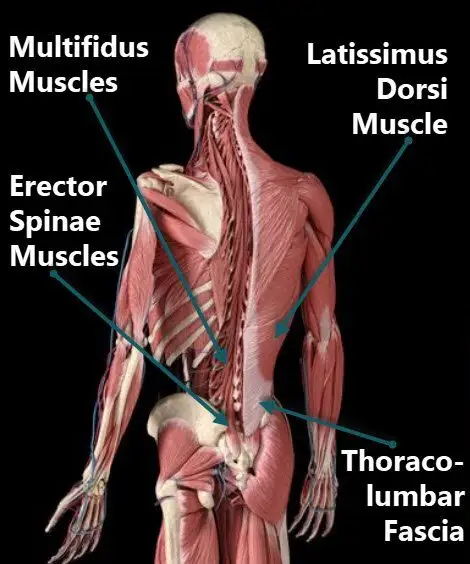
- Erector Spinae Muscles (Iliocostalis, Longissimus, Spinalis): These muscles run along the length of the spine and are responsible for maintaining upright posture, assisting in back extension, and providing stability to the lumbar region.
- Semispinalis Muscle: Situated deeper in the back, the semispinalis muscles contribute to the extension and rotation of the vertebral column, aiding in maintaining proper spinal alignment.
- Multifidus Muscles: These intricate muscles span multiple vertebrae and play a crucial role in stabilizing the spine during various movements. They provide support to maintain the spine’s natural curvature and aid in control during rotation and lateral bending.
- Rotatores Muscles: Nestled within the vertebral column, the rotatores muscles are involved in rotational movements and contribute to spinal stability by helping control the range of motion.
- Quadratus Lumborum Muscle: Positioned on each side of the lumbar spine, this muscle assists in lateral bending, extension of the lumbar spine, and stabilization during activities such as lifting and bending.
- Serratus Posterior Muscle: While not directly implicated in lumbar strain, the serratus posterior muscles are associated with respiratory movements, aiding in the expansion and contraction of the ribcage during breathing.
The intricate interplay of these muscles is essential for maintaining lumbar stability, supporting posture, and facilitating a wide range of movements. When strained due to factors like overuse, improper lifting, or sudden movements, these muscles can lead to discomfort, pain, and limited mobility in the lower back region.
Strain-induced pain predominantly manifests in the lumbar spine, situated in the lower back. This region shoulders a substantial portion of the body’s weight, particularly during movements involving twisting, bending, and overall locomotion. Back sprains materialize as a result of ligaments, which are resilient bands of tissue responsible for connecting bones, undergoing excessive stretching or tearing.
Classifications of a pulled muscle in the lower back
A lower back muscle strain, commonly referred to as a pulled muscle, can be classified into three distinct grades, each reflecting varying degrees of severity:
- Grade 1: Involves mild harm to isolated muscle fibers, affecting less than five percent of the total fibers. This results in minimal loss of strength and motion.
- Grade 2: Signifies a more extensive injury where a substantial number of muscle fibers are affected.
- Grade 3: Represents the most severe stage, characterized by a complete rupture of either the muscle itself or an associated tendon.
What are the Causes of a Pulled Muscle in the Lower Back?
Strains encompass the tearing, whether partial or complete, of the muscle-tendon unit.
Instances of muscle strains and tears primarily arise from forceful muscular contractions that occur during instances of overextended muscular stretching, often stemming from activities like lifting heavy objects or sudden twisting motions.
Any of the posterior spinal muscles, along with their corresponding tendons, can become affected, although muscles that span multiple joints are more susceptible to involvement.
Distinguishing between acute and chronic lumbar strain pain presentations: The intensity of acute pain peaks within 24 to 48 hours following the injury. In contrast, chronic strains are characterized by persistent pain attributed to ongoing muscle injury.
Aspects that contribute to this kind of damage contain:
- Excessive arching of the lower back.
- Carrying excess weight.
- Possessing underdeveloped back or abdominal muscles, as well as tight hamstrings (the muscles at the back of the thighs).
- Participation in sports that involve pushing and pulling actions, such as weightlifting and football, can elevate the risk of lower back injuries.
- Engaging in intense physical exertion.
- Experiencing a fall.
- Repeatedly bending or crouching.
- Lifting hefty objects without proper alignment or physical readiness.
Epidemiology of Pulled Muscle in the Lower Back
More than 80% of individuals will encounter episodes of low back pain at some point in their lives. On a global scale, the point prevalence of low back pain ranges from 12% to 33%. This occurrence is more pronounced among women and individuals aged between 40 and 80 years. While precise figures regarding the worldwide incidence of low back injuries remain elusive, it is evident that they are widespread.
In the United States, 7% to 13% of all sports-related injuries in collegiate athletes are attributed to the lower back. Among these injuries, muscle strains account for the majority (60%), while disc injuries constitute a smaller proportion (7%).
In France, over 50% of individuals aged between 30 and 64 have experienced at least one day of low back pain over the past 12 months. Notably, around 17% endured low back pain for more than 30 days within the same year-long period.
An insightful study conducted in an African context found that the average point prevalence of low back pain among adults was 32%. Over a span of one year, the prevalence of low back pain escalated to 50%, and throughout a lifetime, the incidence reached an average of 62%. These figures underscore the widespread impact of low back pain across various populations.
What are the Symptoms of a Pulled Muscle in the Lower Back?
The onset of acute mechanical back strains can stem from a variety of sources, including both physical and non-physical activities. While lifting is often recalled as the most prevalent triggering event, intriguingly, a notable portion of patients, approximately one-third, might not distinctly recollect the initial incident.
Clinically, these strains are characterized by the emergence of pain localized in the lumbar muscles or a more generalized nonspecific discomfort. This discomfort tends to intensify when partaking in actions that involve standing and twisting. Notably, both active muscle contractions and passive muscle stretching can serve as catalysts, exacerbating the existing pain.
The spectrum of symptoms also encompasses point tenderness, muscle spasms, and the potential occurrence of localized swelling within and around the affected musculature. In cases of heightened severity, the muscle spasms might even lead to a noticeable lateral deviation in the spine’s alignment. Moreover, a diminished range of motion frequently accompanies these strains, further contributing to the array of symptoms experienced by individuals grappling with an acute mechanical back strain.
Symptoms indicative of a pulled muscle in the lower back encompass a range of sensations and manifestations:
- Aggravating Pain with Movement: Pain that intensifies when you shift position or engage in motion.
- Muscle Cramping and Spasms: Sudden and uncontrollable muscle contractions leading to cramping sensations.
- Impaired Function and Range of Motion: Reduced capacity to perform regular activities, such as walking, bending forward or sideways, and maintaining an upright posture. This decline in function is coupled with a restricted range of motion.
- Distinct Sensations: Some instances involve a feeling akin to a pop or a tear at the moment of injury.
- General Muscle Discomfort: Pain and stiffness dispersed across the back’s muscle regions.
- Muscle Weakness and Reduced Mobility: Diminished strength and a limited ability to move comfortably.
- Excruciating Spasms: Muscle spasms can be exceptionally agonizing.
- Swelling or Bruising: Inflammation or discoloration might become evident.
- Soreness, Tightness, and Ache: Pulled muscles often result in sensations of soreness, tightness, or aching.
- Distinctive Pain Characteristics: Pain sensations that feel hot, tingly, or electric are more likely due to nerve root irritation, rather than muscle strain.
- Localized Tenderness and Inflammation: Inflamed muscles may exhibit tenderness upon touch. Swelling can accompany muscle spasms, causing intense pain and temporary mobility limitations. This swelling is typically observed in the lower back for a few days.
- Underlying Factors: Certain medical conditions like specific types of arthritis, cancers, and diseases can contribute to the occurrence of a back pull.
- Psychological Factors: Psychological conditions, such as depression and anxiety, appear to elevate the susceptibility to back pulls or pain.
- Smoking-Related Impact: Smoking, linked to increased rates of back pain, could be attributed to heightened coughing leading to herniated disks. Moreover, smoking diminishes blood flow to the spine and escalates the risk of osteoporosis.
Differential Diagnosis
- Spondylosis
- Disc herniation
- Compression fracture
- Spinal stenosis
- Spondylolisthesis
- Ankylosing spondylitis
How to Diagnose the Pulled Muscle in the Lower Back?
In the absence of evident Red Flags, there is no immediate necessity for laboratory or radiographic examinations to establish a diagnosis or manage acute mechanical back strains.
Inflammatory biomarkers, such as the erythrocyte sedimentation rate (ESR) and C-reactive protein (CRP), serve as valuable tools for risk stratification in cases where patients exhibit risk factors for infectious spinal conditions or malignancies. This becomes particularly relevant when no neurological deficits are observed during the clinical examination.
Regular imaging as a means of diagnosing mechanical back strains isn’t instructed because of the possibility for experiencing spontaneous abnormalities irrelevant to the origin of pain.
More advanced imaging becomes pertinent in instances of trauma, when conservative management yields no improvement, when symptoms worsen, or when new neurologic deficits emerge. In cases where fractures are suspected, employing plain radiographs and computed tomography can yield valuable diagnostic insights.
Diagnosing the cause of a pulled muscle in the lower back typically involves a comprehensive approach. It begins with a thorough symptom history, a physical examination, and relevant testing if necessary. The healthcare provider is likely to inquire about the characteristics of the pain and explore any underlying physical or mental health conditions that could contribute to the discomfort.
Key aspects of the pulled back muscle that may be addressed include:
- Location of the Pain
- Intensity and Sensation of Pain
- Nature of the Pain (dull, stabbing, burning, cramping)
- Pattern of Occurrence
- Triggers or Alleviating Factors
- Radiation of Pain
- Duration of the Symptoms
- Impact of Activities on Pain
- Recent Injuries and Overall Health History
- Pregnancy Status (if applicable)
Medical Intervention for a pulled muscle of the lower back
Managing mechanical back strains depends on factors such as the duration of symptoms, the patient’s underlying health conditions, and the specific cause. In 2017, the American College of Physicians issued updated guidelines that outline non-invasive strategies for addressing low back pain.
For acute low back pain, first-line nonpharmacologic therapies include spinal manipulation, acupuncture, massage, and applying superficial heat. Nonsteroidal anti-inflammatory drugs (NSAIDs) and muscle relaxants are recommended as first-line pharmacologic treatments. However, opioids are not recommended as routine pharmaceutical therapy and should be reserved for severe or uncontrolled pain cases, as per the clinical policy of the American College of Emergency Physicians.
In cases of chronic low back pain, non-pharmacologic approaches are emphasized as the primary interventions. These encompass exercise, tai-chi, yoga, multidisciplinary rehabilitation, spinal manipulation, acupuncture, psychotherapy, low-level laser therapy, and electromyogram biofeedback. Nonsteroidal anti-inflammatory drugs are again recommended as the preferred pharmacologic agents, followed by tramadol and duloxetine as secondary options. Opioid therapy should be considered only when other therapies fail, and a personalized assessment deems the potential benefits to outweigh the risks.
For individuals experiencing mechanical back strains, the following guidelines can be beneficial:
- Allow Healing: Avoid strenuous exercise to facilitate muscle healing.
- Pain-Avoidance Activities: Steer clear of activities that induce pain or muscle spasms in the back.
- Gentle Stretching: Engage in gentle stretching that doesn’t cause excessive discomfort, aiding the healing process.
- Temperature Application: Use ice in the initial 48 hours after an injury to alleviate acute pain, and apply heat before activities to relax the muscles.
- Medication Management: If necessary, take appropriate medications to alleviate pain and inflammation.
- Alternate Therapy: Utilize both ice packs and warm compresses in a cyclic manner.
- Progressive Exercise: Gradually incorporate stretching and strengthening exercises into your routine.
- NSAIDs: Consider non-steroidal anti-inflammatory drugs (NSAIDs) to manage pain and inflammation.
- Supportive Measures: Wearing an abdominal brace can lend support to stomach muscles and help reduce swelling.
Physical Therapy Management
Education plays a pivotal role in preventing injuries, and various interventions can contribute to this objective:
- Workplace Stretching Exercises: Incorporating stretching routines within the workplace can help mitigate the risk of injuries. Coupled with appropriate rest breaks, these exercises can have a positive impact.
- Ergonomic Modifications: Implementing ergonomic changes in the work environment can significantly reduce the physical strain on employees. These adaptations aim to optimize comfort and efficiency.
- Posture and Lifting Techniques: Educating patients about maintaining proper posture and employing correct lifting techniques can play a crucial role in injury prevention.
- Regular Physical Activity: Encouraging individuals to engage in regular physical activity contributes to overall musculoskeletal health and can help prevent strains and injuries.
- Smoking Cessation: Advising individuals to quit smoking is important, as smoking can have detrimental effects on healing and overall health.
- Weight Management: For obese patients, weight loss can alleviate stress on the back muscles and reduce the likelihood of strain-related injuries.
- Resuming Physical Activity: Recent studies underline the importance of resuming normal physical activities within the limits allowed by pain. This approach has been shown to foster quicker recovery compared to prolonged bed rest.
Techniques
In the acute phase of a lumbar strain, applying cold therapy for a short duration, up to 48 hours, is recommended. Cold therapy helps mitigate localized tissue inflammation and edema.
Transcutaneous Electrical Nerve Stimulation (TENS) and ultrasound are frequently utilized methods to manage pain and alleviate muscle spasms.
Incorporating gentle stretching exercises and limited activity is beneficial. Here are some specific stretching exercises:
- Single and Double Knee to Chest: Lie on your back with knees bent and heels on the floor. Gently pull one or both knees toward your chest, holding for 10 seconds. Repeat 3 to 5 times.
- Back Stretch: Supine lying position, hands beyond your head. Flex your both knees & while maintaining your foot on the ground, gently roll your knees to one side. Maintain for 10 seconds & do repeat 3-5 times.
- Press Up: Lie face down, keeping hips and legs relaxed and touching the ground. Place hands in line with shoulders. Inhale, then exhale while pressing up with your hands, maintaining the lower half of your body relaxed. Lower down on an inhale, rest, and repeat 10 times.
- Kneeling Lunge (Stretching Iliopsoas): Perform a lunge while kneeling, focusing on stretching the iliopsoas muscle.
- Stretching Piriformis: Target the piriformis muscle with gentle stretching.
- Stretching Quadratus Lumborum: Incorporate stretches to engage the quadratus lumborum muscle.
Soft tissue manipulation, including massage, has been shown to reduce pain and improve range of motion.
Strengthening exercises should be introduced once pain and spasms are manageable. Emphasize muscles like abdominals, especially obliques, trunk extensors, and gluteals. Core stability training is crucial not only for treating lumbar strains but also for preventing future low back pain.
Posture and body mechanics assessment and correction should be integrated into the overall approach, given their importance in spinal injury management. Approaches tailored to individual needs can enhance recovery and reduce the likelihood of future issues.
Stretching Exercise:
To safely and effectively stretch muscles without risking injury, consider the following precautions:
- Wear Comfortable Clothing: Opt for comfortable attire that doesn’t restrict movement.
- Avoid Painful Positions: Never force your body into uncomfortable or painful positions. Stretching should always be pain-free.
- Gentle Movement: Move into stretches gradually and avoid bouncing, which can lead to muscle strain.
- Choose a Suitable Surface: Stretch on a clean, flat, and firm surface that provides ample space for free movement.
- Hold Stretches: Maintain stretches for 15 to 30 seconds to ensure muscles are adequately lengthened and range of motion is improved.
- Repetition: Repeat each stretch between 2 and 5 times. Generally, a muscle achieves maximum elongation after about 4 repetitions.
- One Side at a Time: Focus on stretching one side of the body at a time to ensure balanced muscle engagement.
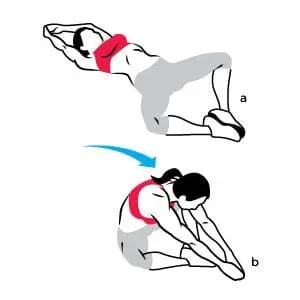
Child’s Pose:

This classic yoga posture aims to stretch the gluteus maximus, thigh muscles, and spinal extensors, effectively reducing pain and tension along the entire spine, neck, and shoulders.
To practice Child’s Pose, follow these steps:
- Start on your hands and knees, then gradually lower your hips back onto your heels.
- Hinge your hips as you fold forward, extending your arms in front of you or alongside your body.
- Allow your belly to rest on your thighs, facilitating a gentle stretch.
- Extend your arms forward or alongside the body, with palms facing upward.
- Consciously focus on deep breathing, releasing any areas of tightness or stress.
- Maintain the Child’s Pose for up to a minute, allowing your body to settle into the stretch.
- Incorporate this pose multiple times within your stretching routine.
Cat-Cow:

- Assume a tabletop position on all fours, with hands and knees resting on the floor.
- Inhale deeply, pressing through your hands and feet as you gaze upwards, letting your belly expand with each breath.
- As you exhale, gently tuck your chin towards your chest and curve your spine towards the ceiling.
- Flow seamlessly between these movements with your breath, maintaining a steady rhythm.
- Engage in this pattern for a duration of 1 to 2 minutes.
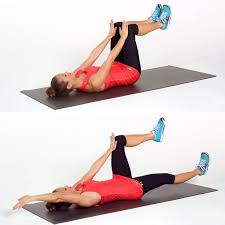
Supine Hamstring Stretch:
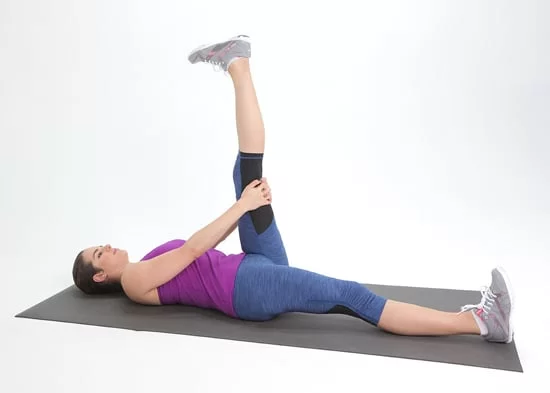
- Start with a supine lying position with both knees flexed.
- Take a rope/towel & secure it all over one feet.
- Hold both ends of the towel firmly.
- Gradually raise one leg off the floor until a subtle stretch is sensed in the back of the leg.
- Maintain this stretched position for 20 seconds, allowing the sensation to settle.
- Return to the initial lying position.
- Repeat the entire sequence three times on each side of your body.
- Aim for a balanced approach, ensuring both sides receive equal attention.
- Incorporate this routine into your schedule twice daily for optimal benefits.
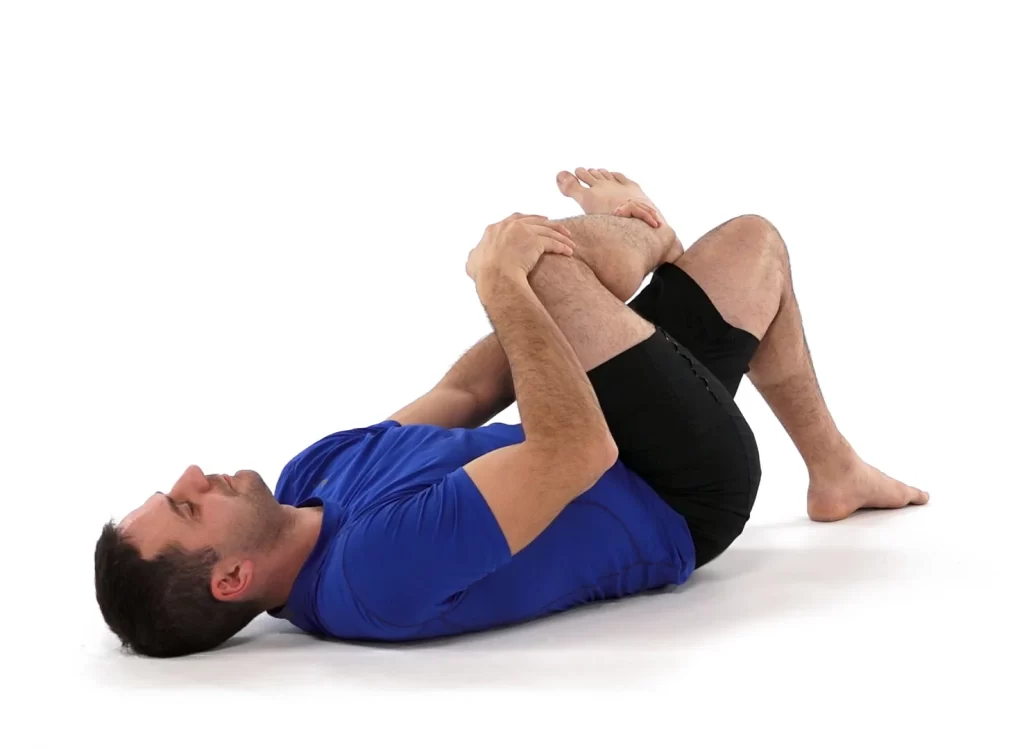
Knee to Chest:

- Lie on your back in a supine position, keeping both knees bent.
- Reach behind one knee and gently pull it toward your chest, creating a comfortable stretch in your lower back.
- Hold the Knee to chest position for 20 seconds, allowing the stretch to settle.
- Slowly release & back to the beginning pose.
- Repeat this sequence three times on each side of your body to maintain balance.
- Incorporate this routine into your daily schedule, performing it twice a day for optimal benefits.
- Lie on your back in a supine position, ensuring both knees are bent.
- Pull one knee gently across your body towards the opposite shoulder. Maintain a flat back and avoid twisting.
- Hold this position for approximately 20 seconds while feeling the stretch.
- Back to the beginning position in a calm method.
- Repeat this movement three times on each side to maintain balance.
- Incorporate this routine into your daily schedule and aim to perform it twice a day for optimal results.
Prone Quadriceps Stretch:
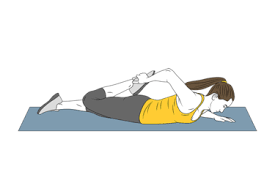
- Lie down on your stomach.
- Place a rope, sheet, or belt around one of your feet.
- Gently pull your heel towards your buttock, creating a stretch in the front of your thigh.
- Hold this position for approximately 20 seconds, allowing the stretch to be felt.
- Back to the starting place in a steady technique.
- Repeat this sequence three times on each side of your body to maintain balance.
- Aim to perform this routine twice a day for optimal results.
Calf stretch:
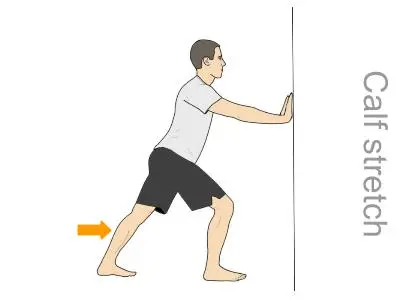
- Stand facing a wall.
- Position your back leg straight with the heel touching the surface and the foot pointing forward.
- Slightly bend the front knee and lean towards the wall until a stretch is noticeable in the calf muscle.
- Ensure the back heel remains in contact with the surface throughout the stretch.
- Maintain this stretched position for approximately 20 seconds.
- Carefully return to the starting position.
- Repeat this sequence three times on each side of your body for a well-rounded approach.
- Include this exercise routine in your daily schedule, aiming for two sessions per day to maximize benefits.
Sphinx stretch:
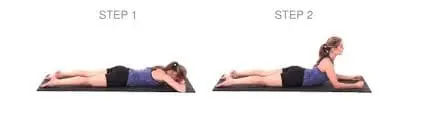
- Begin by lying on your stomach.
- Place your elbows beneath your shoulders and extend your hands forward, palms facing down.
- Position your feet slightly apart; allowing the big toes to touch is acceptable.
- Gradually engage your lower back, buttocks, and thighs as you lift your head and chest.
- Maintain strength in your lower back and abdominals while taking deep breaths.
- Press your pelvis gently into the floor for added stability.
- Keep your gaze forward or consider softly closing your eyes.
- Hold this posture for a duration of 30 seconds to 1 minute, embracing the stretch.
Seated spinal twist:

- Begin by sitting on the floor, legs extended out in front of you.
- Bend your left knee and position the foot on the outside of your right thigh.
- Put your right hand on the outside of your opposite thigh.
- Position your left hand behind you to provide support.
- Initiate the twist from the base of your spine, gently turning to the left side.
- Embrace the twist and hold this posture for a duration of up to 1 minute.
- When ready, release the twist and return to the starting position.
- Repeat the entire sequence on the other side, ensuring balance and symmetry.
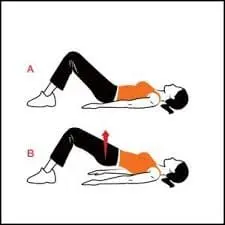
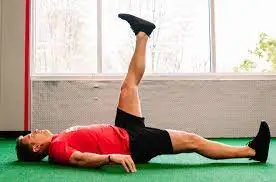
Supine Butt Lift Stretch:
- Start with a supine lying position with both knees flexed & foot flat on the ground.
- Push down through your feet gradually, raising your buttocks off the floor.
- Maintain this lifted position for a count of 10 seconds.
- Lower down yourself and return to the beginning pose in a controlled technique.
- Repeat this sequence a total of 10 times, emphasizing the movement’s controlled nature.
Strengthening exercise:
Transverse Abdominal Contraction:
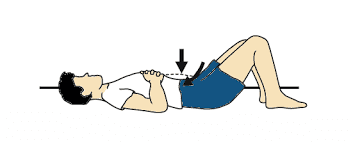
- Start with a supine lying position with both knees flexed & feet flat on the ground.
- Engage your core muscles by pulling your belly button towards your back, contracting the muscles.
- Hold this contraction for a duration of 10 seconds.
- Relax your core muscles.
- Repeat this sequence a total of 10 times, maintaining control and focus on the contraction.
- Incorporate this routine into your daily schedule, aiming for two sessions per day to maximize effectiveness.
Bridging:
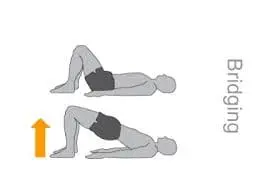
- Start in a supine lying position with both knees flexed.
- Squeeze your buttocks together and gradually lift your buttocks off the floor, while maintaining a tight stomach and contracted buttocks.
- Lower yourself back down in a controlled manner, returning to the starting position.
- Hold the Bridging position, where your buttocks are lifted, for a duration of 5 seconds.
- Repeat this bridging movement a total of 10 times, ensuring controlled motions throughout.
- Aim to include this routine into your daily schedule, aiming for two sessions each day to achieve optimal results.
Gluteal Squeeze:
- Start with a supine lying position with both knees bent.
- Squeeze your buttocks together.
- Gradually lift your buttocks off the floor, maintaining a tight stomach and contracted buttocks.
- Lower yourself back down in a controlled manner, returning to the starting position.
- Hold the Bridging position, where your buttocks are lifted, for a duration of 5 seconds.
- Repeat this bridging movement a total of 10 times, focusing on controlled and deliberate actions.
- Aim to incorporate this routine into your daily schedule, completing it twice per day for optimal results.
Transverse Abdominal March:
- Start with a supine lying position with both knees bent.
- Engage your abdominal muscles by drawing the belly button towards your spine.
- Initiate a slow “marching” motion by lifting one leg off the ground, and then alternating to the other leg.
- Throughout the entire exercise, maintain the contraction in your transverse abdominal muscles by keeping the belly button pulled toward the spine.
- Perform this transverse abdominal march exercise for a total of 10 repetitions on each side.
- Aim to incorporate this routine into your daily schedule, completing two sessions per day for optimal results.
Wall Squats:
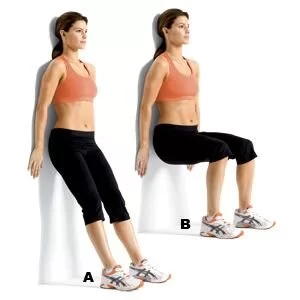
- Stand with your back against a wall, keeping your feet around 1-2 feet away from the wall.
- Position your feet shoulder-width apart.
- Begin to squat, going down about halfway while ensuring your knees do not extend beyond your toes.
- Maintain the Wall Squats position for a duration of 10 seconds.
- Repeat this wall squat motion a total of 10 times, focusing on maintaining proper form and control.
- Incorporate this routine into your daily schedule, aiming for two sessions per day to achieve the best outcomes.
Lying lateral leg lifts:
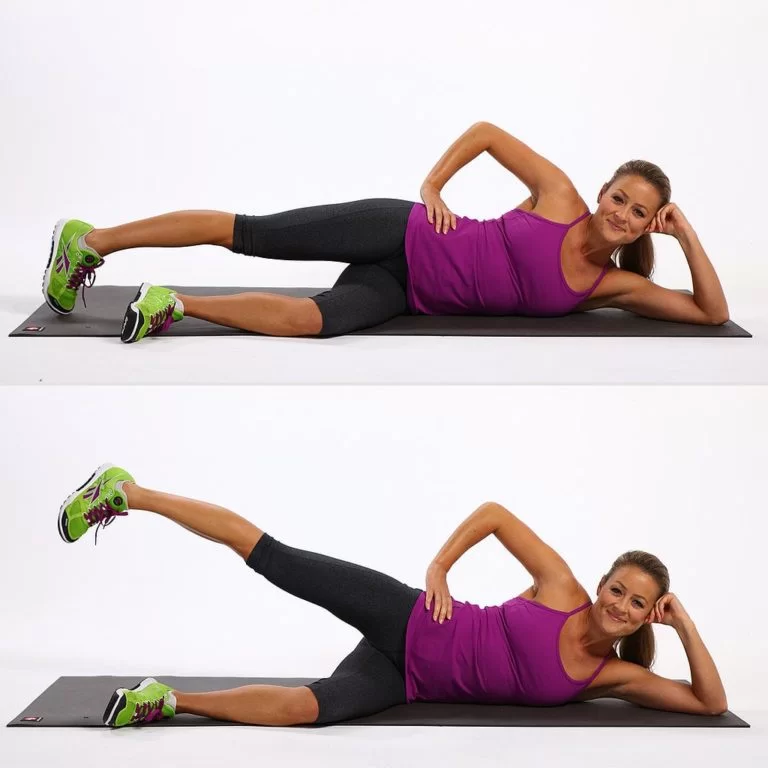
- Begin by lying on one side with both legs together.
- Keep your lower leg slightly bent.
- Engage your core muscles by drawing the belly button inward toward your stomach.
- Lift your top leg about 18 inches off the ground, ensuring it stays straight and extended in the air.
- Hold this elevated position for a span of 2 to 5 seconds.
- Repeat this leg lift motion a total of 10 times on the current side.
- Turn onto the opposite side of your body and repeat the same exercise, lifting the other leg.
- Aim to complete three sets of this exercise on each side, focusing on maintaining proper form and control.
- Lie on your back.
- Lift your shoulders off the floor and position your hands next to your hips.
- Raise your feet off the ground and maintain this lifted position.
- Confirm your back is in touch with the ground. If your back arches, lift your legs higher to achieve a rounded back.
- Keep your legs straight throughout the exercise.
- Hold this position for a duration of 10 to 20 seconds.
- Aim to incorporate this exercise into your routine, focusing on proper form and control during each repetition.
Plank:
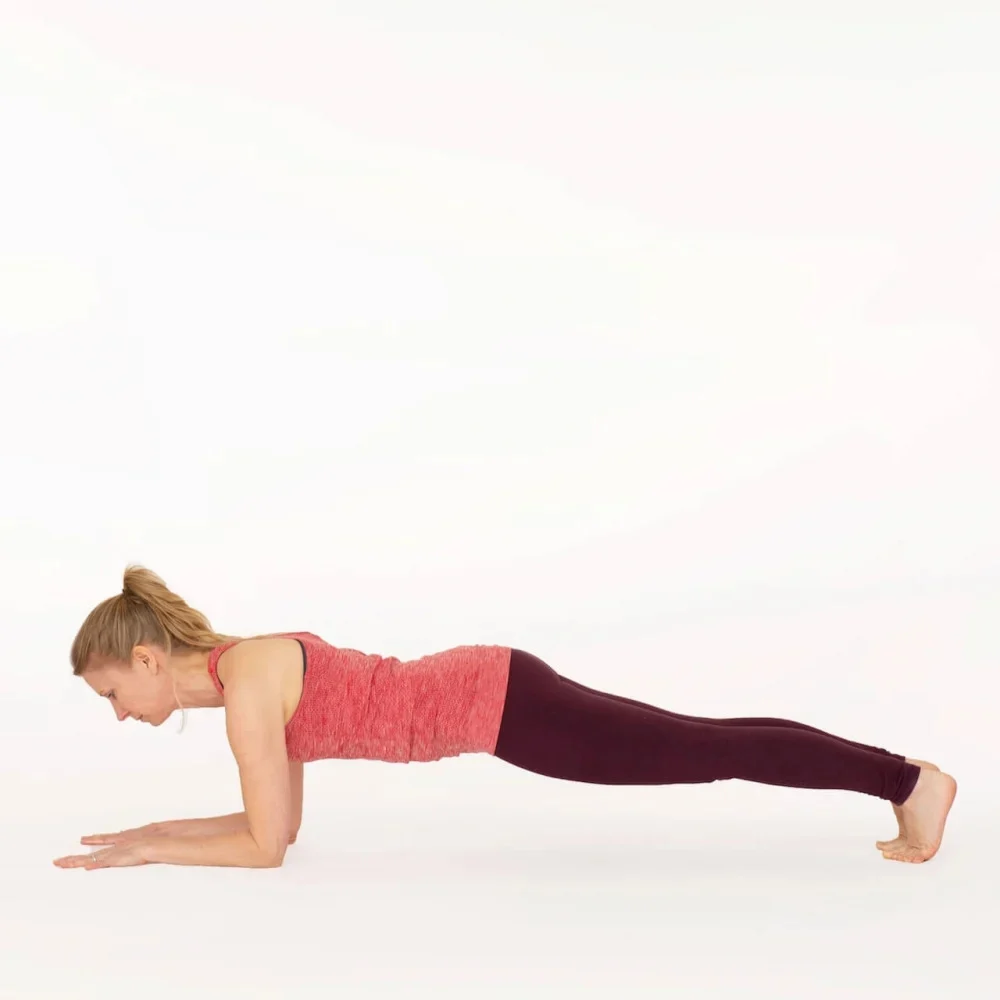
- Begin in a plank position, either on your toes and hands or on your elbows and toes.
- Maintain a straight body alignment, resembling a plank or a board.
- Ensure your feet are hip-width apart, and your hands (or elbows) are positioned shoulder-width apart.
- Hold this plank position, focusing on keeping your body in a straight line.
- Avoid allowing your hips to sink too low or rise too high.
- Maintain this plank for a duration of 20 to 30 seconds.
- Incorporate this exercise into your routine, aiming for proper form and endurance during the hold.
Leg raise:
- Lie on your back with your legs fully extended, and your hands positioned at your sides or tucked beneath your hips for added support.
- Gradually lift your legs, maintaining them together and as straight as possible. Persist the lift until the soles of your shoes are encountering the roof.
- Slowly lower your legs back down, ensuring they don’t touch the floor, and keep them hovering a few inches above it.
- Each cycle of lifting and lowering your legs constitutes 1 repetition (rep).
- Focus on maintaining a flat lower back against the floor as you perform this movement. If maintaining this position proves challenging, consider limiting how far you lower your legs.
Incorporate this exercise into your routine while paying attention to proper form and control throughout each repetition.
Bird dog:

- The bird dog exercise effectively targets both your abdominal and back muscles, making it an excellent choice for core strengthening. It even improves coordination, balance, & stability.
- Start by arranging yourself on all four limbs, assuring that your hands are under your shoulders & your knees are beneath your hips.
- Engage your core muscles by tightening them.
- Lift and extend your right leg to the level of your hip while maintaining a straight line. Simultaneously, raise and stretch your left arm to shoulder level, keeping your palm facing down. Pause in this position.
- Repeat the movement by switching sides: lift your left leg and extend your right arm.
- Initiate with a single set, performing 8 to 12 repetitions.
- Feel free to incorporate this exercise into your routine, focusing on maintaining proper form and control throughout each repetition.
Dead bug:
- Lie on your back with your arms extended toward the ceiling and your legs forming a tabletop position, where your knees are bent at 90 degrees and aligned over your hips. This marks the starting position.
- Gradually extend your right leg out straight, simultaneously lowering your left arm overhead. Maintain both leg and arm a few inches above the ground.
- Throughout the movement, focus on engaging your glutes, keeping your core contracted, and pressing your lower back into the floor for stability.
- Back your arm & leg to the beginning pose.
- Repeat the exercise on the opposite side, extending your left leg and simultaneously lowering your right arm.
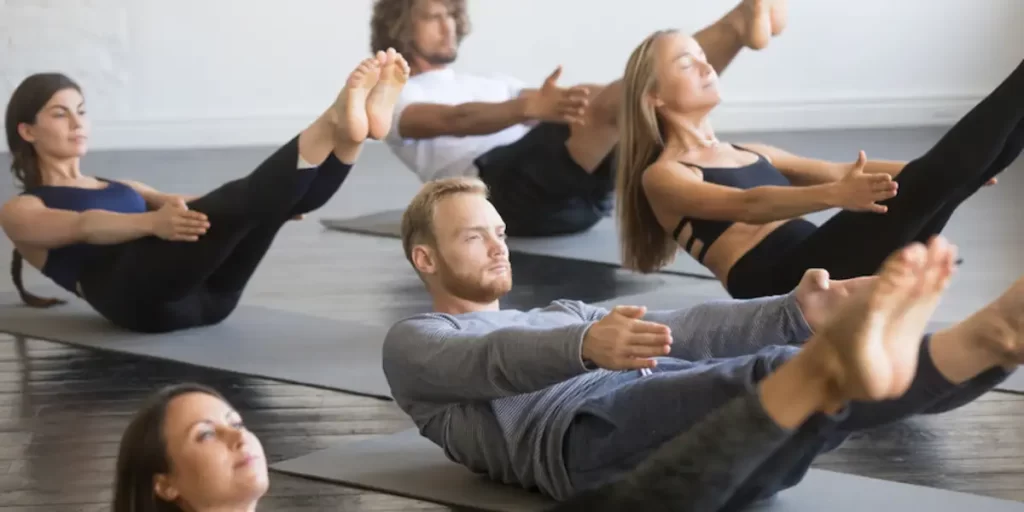
Butterfly sit up:
- Lie on your back with your legs fully extended, and your hands positioned at your sides or tucked beneath your hips for added support.
- Gradually lift your legs, maintaining them together and as straight as possible. Persist the lift until the soles of your shoes are encountering the roof.
- Slowly lower your legs back down, ensuring they don’t touch the floor; keep them hovering a few inches above it.
- Each cycle of lifting and lowering your legs constitutes 1 repetition (rep).
- Focus on maintaining a flat lower back against the floor as you perform this movement. If maintaining this position proves challenging, consider limiting how far you lower your legs.
- Incorporate this exercise into your routine while paying attention to proper form and control throughout each repetition.
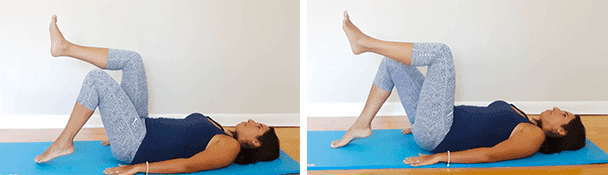
Supine Toe Tap:
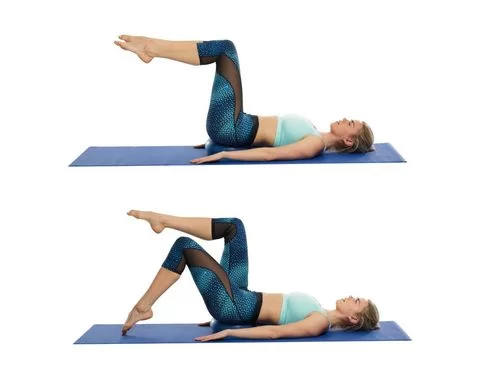
- The Supine Toe Tap exercise is an elementary pilates exercise that nearly engages the core muscles by targeting the glutes, hips, & legs.
- This exercise is gentle on your spine, making it a suitable option, especially if you experience back pain. It can serve as an alternative to traditional crunches.
- Begin by lying on your back.
- Lift your legs, bending your knees to a 90-degree angle.
- Position your hands at your sides with your palms facing down.
- Engage your core muscles by tightening them.
- Lower your right foot gently, tapping the floor while keeping your left leg steady and maintaining a flat back.
- Lift your right leg back to the beginning pose.
- Repeat the movement with your left leg.
- Initiate the exercise with a single set, completing 8 to 12 repetitions.
- Incorporate this exercise into your routine, focusing on maintaining proper form and control throughout each repetition.
Prognosis
A lumbar strain typically shows improvement within a span of 2 weeks, and individuals usually regain their normal functions within the subsequent 4 to 6 weeks.
Prevention
To evade the discomfort of back strain pain and to thwart its reoccurrence, consider enhancing your physical fitness and mastering proper body mechanics. To foster the health and strength of your back:
- Exercise Wisely: Engage in regular low-impact aerobic activities that bolster strength and endurance in the back, avoiding strain and jarring impacts. Movements such as walking & swimming are perfect options. Consult a medical expert to determine which activities suit you best.
- Cultivate Muscle Strength and Flexibility: Devote attention to exercises targeting abdominal and back muscles. These routines fortify the core, fostering the harmonious function of these muscles, akin to a natural back support corset.
- Maintain an Optimal Weight: Strain on the back muscles can result from excess weight. Shedding pounds, if necessary, might contribute to preventing back pain.
- Kick the Smoking Habit: Smoking escalates the vulnerability to low back pain. Risk amplifies with the number of cigarettes smoked daily, underscoring the value of quitting to curtail this risk.
- Steer Clear of Straining Movements: Prioritize safe body movements:
- Stand Upright: Refrain from slouching and retain a neutral pelvic position. When standing for extended durations, ease the burden on your lower back by placing one foot on a low footstool, alternating as needed. Maintaining proper posture diminishes stress on the back muscles.
- Sit Ergonomically: Opt for seats that offer adequate lower back support, along with armrests and a swivel base. Placing a pillow or towel roll in the small of your back can maintain its natural curvature. Keep your knees and hips level, and shift your position regularly, ideally every half-hour.
- Lift with Care: Whenever possible, avoid lifting heavy objects. If lifting becomes inevitable, let your legs carry the load. Maintain a straight back, abstain from twisting, and bend exclusively at the knees. Keep the load close to your body. Seek assistance from a partner if the object is cumbersome or awkward.
By embracing these practices and adopting a mindful approach to your body’s movements, you can contribute to the longevity and well-being of your back.
FAQ
How much time does it take for a pulled-back muscle to heal?
Recovery & Outcome
Back muscle strains generally recover with time, many within a few days, & most within 3-4 weeks. Most patients with mild/moderate lumbar strains make complete healing & are free of symptoms within days, weeks,& maybe months.
How do you treat a pulled lower back muscle?
Treatment may include:
Rest.
Ice packs or heat & compression are used on the back.
Training to strengthen the abdominal muscles
Stretching & strengthening exercises for the lower back as it recovers
Education about the use & wearing of suitable defensive equipment.
How do to know a pulled a muscle in the back?
Ache related to precise activities, for example standing up and leaning over, is a key indicator of a pulled-back muscle, so do not ignore these apparently insignificant pains. Many individuals with a pulled back muscle sense more pain/stiffness earlier in the day, & smaller as the muscles heat up & evolve more flexibly.
Is walking good for a pulled-back muscle?
Walking, cycling, & swimming are some suitable alternatives for remaining engaged while regaining from lower back muscle strains. After healing from a pulled back muscle, assist control future damage by rehearsing the right posture & adequately warming up before exercise.
How should I sit with lower back pain?
Sit with back support for example a rolled-up towel at the curve of your back. Maintain your hips & knees at a right angle. Use a footrest/stool if essential. Your legs shouldn’t be crossed & your feet should be flat on the ground.
Should you massage a pulled muscle?
Massaging a strained muscle assists to improve blood circulation to the muscle, which in turn permits to decrease inflammation & break up of any scar tissue/knots in the muscle; investigations have even shown that enhanced blood circulation assists to improve muscle temperature, resulting in enhanced muscle elasticity & flexibility.