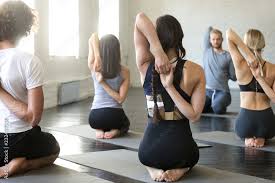
50 Best Shoulder Exercises for Dislocation
Introduction
The shoulder exercise for dislocation outlined here can help you maximize your shoulder’s functionality ease pain and progressively increase range just like any other fitness regimen. Among athletes, shoulder dislocations are prevalent, particularly in guys who play contact sports and are between the ages of 18 and 30.
Because it is the most mobile joint in the body, the shoulder joint is also the most unstable Of all shoulder dislocations, anterior dislocations occur more frequently, accounting for 80% to 90% of cases. This is the result of applying an external force to abduct the shoulder and rotate it externally. Excessive trauma frequently causes damage to the shoulder’s surrounding components, including the ligaments, cartilage, and tendons.
A Bankart lesion, which occurs when the arm bone’s ligament ruptures or is torn outside of the shoulder socket, is a common injury. When the humerus, the upper arm bone, comes out of the glenoid, the shoulder blade, a dislocation of the shoulder results. This injury frequently results in instability in the shoulder joint and can be excruciating and incapacitating.
Types of shoulder dislocation
Anterior shoulder dislocation: Approximately 95% of occurrences of shoulder dislocation are of the anterior kind. This makes it the most common type. It happens when the humerus is pushed out of the front of the shoulder joint, commonly as a result of a direct hit to the shoulder or a fall onto an outstretched arm. an anterior dislocation is brought on by the arm being held in excessive external rotation and abduction. The main barrier preventing anterior glenohumeral translation in this posture is the inferior glenohumeral complex. The glenohumeral joint is particularly prone to dislocation in the 90° abduction and 90° external rotation because of a lack of ligamentous support and dynamic stabilization.
The arm raised to the external rotation position and abducted
Loss of the acromion’s and deltoid’s typical shape is noticeable laterally and posteriorly
Anteriorly palpable humeral head
Every movement is restricted and terrible.
palpable fullness in the direction of the axilla and beneath the coracoid process
Potential harm to the bone and muscles of the rotator cuff.
Traction of the axillary blood arteries can cause vascular damage, manifesting as a drop in pulse rate or a brief feeling of coldness in the hands.
Traction of the brachial plexus frequently results in damage to the peripheral nerves.
Posterior shoulder dislocation: Shoulder dislocations in the posterior direction are less common, happening in approximately 5% of cases. It occurs when the humerus is forced out of the rear shoulder joint, typically as a result of a forceful impact to the front of the shoulder or a strong muscle contraction. A rotator cuff injury is frequently overlooked or misdiagnosed as a posterior shoulder dislocation.
The arm is abduction and internal rotation
Possible loss of deltoid contour
may be observed in the humerus’s posterior prominence head.
tear in the subscapularis muscle inability to internally rotate or weakness
Although neurovascular impairment is uncommon, related glenolabral and capsular injuries may cause posterior shoulder instability.
Luxatio erecta: limb is strongly abducted like grasping the branch of the tree with arm-wide abduction while falling from the tree
result the head of the humerus is pushed down the glenoid fossa and the arm is held fixed wide abduction elevation almost by the side of the head, when luxation erecta occurs, it is largely a better routine in men than in women
Recurrent anterior dislocation of the shoulder: repeated dislocation of the shoulder joint in a person with one episode of acute dislocation, it happens because of failure of heal of the torn avulsed capsule anteriorly, repeated dislocation needs less violence, and subsequent dislocation when the arm is externally rotated and abducted during routine movements,80 percent dislocation of the upper extremity, this type of traumatic instability of shoulder termed as TUBS
The symptoms of shoulder exercises for dislocation
- Extreme shoulder pain
- Restricted shoulder range of motion
- the shoulder’s look is square rather than spherical.
- may be capable of observing a bump or bulge beneath the skin in front of your shoulder that is the top of the humerus.
- weakness or numbness in the neck, fingers, hand, or arm
- Shoulder dislocations are the result of shoulder muscle contractions.
Cause of the shoulder exercises for Dislocation
A dislocation can be brought on by any force powerful enough to drive your shoulder joint out of alignment. The most typical reasons consist of:
- collapses.
- vehicle accidents.
- injuries sustained in sports.
- Prior dislocation: If you have previously experienced a shoulder dislocation, your chances of getting another one are increased and can even go up considerably.
- Hyperlaxity: Some people who have instability in their shoulders have never been dislocated. Shoulder ligaments are looser in the majority of these patients. Sometimes, repetitive overhead motions cause the looseness. Playing sports like tennis, volleyball, and swimming require a lot of repetitive overhead motion, which can stretch shoulder ligaments. Shoulder stability may be difficult to maintain if ligaments are more lax.
Aim of Shoulder Exercises for Dislocation
Restoring the shoulder joint’s range of motion, strength, and stability is the main goal of shoulder exercises for dislocation. Exercises are beneficial for:
- Diminish discomfort and swelling
- Boost range of motion and flexibility
- Build up the shoulder joint’s supporting muscles.
- Boost proprioception or the awareness of a joint’s position
- Avoid more displacements
Types of shoulder exercises for dislocation
Following a dislocation, a variety of shoulder exercises can be beneficial. Typical instances include the following:
Isometric exercises: involve tensing the muscles without causing the joint to move. They are an excellent method for restoring muscle strength following an injury.
Exercises for range of motion: These activities increase the shoulder joint’s range of motion. They can be carried out actively by moving the arm yourself or passively by moving the arm with assistance from another person.
Exercises for strengthening: The muscles surrounding the shoulder joint can be strengthened using these exercises. You can perform these exercises with your body weight, resistance bands, or weights.
Exercises that increase proprioception: this will assist you in becoming more aware of where your shoulder joint is located. They can be carried out with easy tasks like tossing a ball or grasping for objects.
Functional exercises: These exercises assist you in regaining the range of motion in your shoulders needed to carry out daily tasks. These could be things like picking up objects, putting on a winter coat, or brushing your hair.
When to Begin Working Out
Depending on your particular injuries and symptoms, this will vary. In the end, it’s crucial to get your doctor’s approval before beginning any activity if you have a mild to severe case. When your symptoms start to subside and your shoulder is treated conservatively, you should see results in a few days or weeks.
If your unstable shoulder requires surgery, your surgeon will prescribe a particular course of action to follow depending on the unique requirements of your shoulder. With the assistance of a physical therapist, you can begin a supported shoulder range of motion approximately three to four weeks after surgery while still wearing the sling for the majority of the day.
Protocol user manual
Acute Phase 7 days after the injury: Immobilization for the first few days to aid in shoulder joint recovery while wearing a sling.
During this phase, it is crucial to use caution when using your arm and to avoid placing your shoulder in an exposed position.
purpose: Wean off the sling, patient comprehends the duration of the healing and rehabilitation processes
Precaution: Avoid overhead weightlifting and keep an eye out for any red flags or contraindications, such as neurological symptoms or bankart lesions.
program: Instruction on the value of following a rehabilitation regimen and the use of ice therapy to relieve pain
criteria for moving on to the next stage: pain management
First Phase: Initial Rehab (Weeks 2-3)
Purpose: The patient is aware of the duration of the recovery and rehabilitation processes.
Typical temporomandibular rhythm, Realize your entire active range of motion. retraining and activation of muscles, particularly rotator cuff muscles, Keep up your fitness
Precaution: Check for red flags and contraindications, such as neurological signs and Bankart lesions. No weighted overhead movements, Keep external rotation below 0 degrees combination of external rotation and abduction motions
Program: active assisted range of motion using a stick, ice therapy for pain relief, manual therapy to address muscular tightness, discomfort, and function, rotator cuff muscle activation, and strengthening.
Exercises for closed-chain stabilization
Maintaining fitness: Upper body workouts in the gym and cycling requirements
Advance criteria to the next stage: Shoulder range of motion in its entirety Very little discomfort or swelling 4/5 deltoid and rotator cuff strength minimal scapular winging combined with wall absence of any indication of instability thorough knowledge of proper posture
Phase 2: Strength Phase (4-6 weeks)
Purpose: Faster-paced, normal scapulohumeral rhythm, Restore stability to the shoulder in the 90° and higher flexion range. Reduce discomfort and swelling, and strengthen your shoulder muscles
precaution: Exercise that causes more than moderate pain (>3/10) should be avoided. Weighted overhead movements and combinations of abduction and external rotation should also be avoided.
Program: Pilates reformer-based rehabilitation, mobility exercises, boosting the upper body stability and perturbation exercises, aerobic and endurance exercises, Using manual therapy to treat pain, tightness, and function in the muscles
Requirements for moving on to the next phase: active range of motion free of pain, normalized scapulohumeral rhythm, and no edema. Strength within 95% of the opposite side.
Phase 3: Strengthening Function (7–12 weeks)
objective: Advanced strengthening, pain-free functional weight-bearing, and starting sport-specific exercise rehabilitation
Precaution: Steer clear of activities that make pain worse than a 3 on the VAS, and proceed slowly when combining external rotation and abduction.
Program: enhanced shoulder and complete kinetic chain strengthening, advanced proprioception/perturbation exercises, Maintain your aerobic exercise, customized sport-specific drills for each client if functional taping is required for a job or activity
Requirements to move on to the next phase: 95% passing the upper extremity test compared to the opposite side complete functional proprioception, stability, and strength a movement screen customized for your sport, painless comeback to athletics Understanding how to prevent dislocations
Phase 4: The period of dynamic strength and stability (five months to one year)
objective: Keep developing your muscles’ stability and strength. Go back to your intended activities, Stopping the recurrence
Precaution: Wait six months to enter an ER above 90 degrees.
Program: manual therapy to lessen muscle tone, enhance range of motion, and alignment
Gradually increasing program: isotonic motions
Maintaining fitness: Bike stationery and trainer
Biomechanical retraining
Proprioception training and plyometrics
Requirements to move on to the next phase: After the activity- or sport-specific requirements are satisfied, usually after six months or more for contact sports, the surgeon and physiotherapist will give the all-clear.
50 best Shoulder exercises for dislocation
Exercises will start with the range of motion and work your way up to larger and more active ranges as your pain threshold increases and your tissues heal. Dynamic shoulder strengthening exercises that improve coordination and muscle mass within a functional range of motion are the next step.
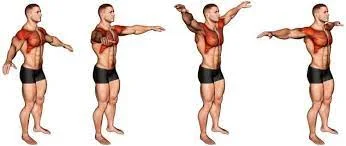
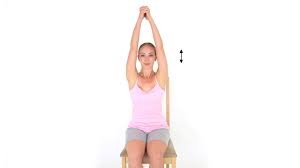
The shoulder flexion

How to assist: Utilize your opposing hand to provide your forearm further support while you continue to support your shoulder with the forearm cuff sling. You could eventually be able to take the sling off while working out if you keep up with your routines.
Place your feet shoulder-width apart and bend your knees slightly to begin this exercise. Lift your arm gradually to the front from a shoulder-neutral position till you begin to experience some pain or discomfort.
After a few moments of holding this posture, carefully bring your arm back down.
In a single session, perform at least 15 repetitions of this movement.
To prevent overdoing it, always remember to take breaks and pay attention to your body.
Shoulder adduction abduction

How to assist: Initially assuming a neutral posture, gradually Next, shift the arm away from the body and toward it.
After a few seconds of holding this posture, progressively return the arm to its neutral position.
In a single session, perform at least 15 repetitions of this movement. To prevent overdoing it, always remember to take breaks and pay attention to your body.
In a single session, give at least 10 to 15 repetitions.
External rotation of the shoulders

To begin this exercise, place your other hand on the affected side forearm, supporting it at the wrist.
Make sure your upper arm is positioned at the side of your chest and maintain a 90-degree bend in your elbow.
Now, while keeping your upper arm in its fixed posture, slowly move your wrist toward and away from your body.
In one session, perform this motion at least ten to fifteen times.
Your afflicted forearm’s range of motion and flexibility may be enhanced with this workout.
Shoulder flexion in a static position
The purpose of this exercise is to develop the muscles that are placed on the front of the shoulder, known as the shoulder flexor group. Shoulder flexion motions are made possible by these muscles.
How to assist: You must stand in front of a wall with your elbow bent at a 90-degree angle to complete this exercise.
Next, make the motion of pushing the wall away from you by pressing your fist against it.
Before releasing it, hold this position for a minimum of five seconds.
For optimal results, it is advised to repeat this technique no less than 20 times in a single session.
Static shoulder extension
You can carry out the following exercises to strengthen the shoulder extensor group of muscles, which are found in the rear of the shoulder.
How to assist: Start by facing the wall with your back to it.
Try to push the wall as hard as you can by placing your arm against it.
After five seconds, hold this position and then release it.
In a single session, perform at least 20 repetitions of this movement.
You can strengthen your shoulder muscles and straighten your posture with this practice.
Abduction of the shoulder in a static position
Exercise that targets a particular muscle group without concerning any genuine movement is termed isometric exercise. This is an ideal place to start a dislocated shoulder recovery since it allows you to maintain the activation of the local muscles while wearing a sling and giving yourself enough time to relax. In this manner, when the time comes, the switch to more active movements will be simpler.
Use these steps to execute the shoulder abduction exercise: Place your side against the wall as you stand.
Press your arm’s outside side up against the wall.
Using all of your strength, press your arm against the wall without shifting your torso.
Keep your posture for five seconds.
Relax and let go of the pressure in your arms.
In one session, perform this exercise at least 20 times.
To further improve your flexion, you can also face the wall, plant your fist on it, and push it straight forward.
Gradually advance to more dynamic shoulder mobility.
The abductor muscles, which are crucial for the stability and mobility of the shoulder, are the focus of this exercise. Regularly completing this exercise will strengthen your shoulders and lower your chance of injury.
Adduction of the shoulder in a static position

You will need a thick towel roll or a Theraband mini-ball to do this exercise. Take these actions:
How to assist: Grasp the towel roll or mini-ball in one hand while standing with your feet shoulder-width apart.
With your elbow angled 90 degrees, place the towel roll or mini-ball between your arm and chest.
Apply the ideal amount of pressure on your chest by pressing the towel roll or mini-ball. Your adductor muscles need to contract.
Maintain this posture for five seconds, making sure to contract your muscles the entire time.
For a little while, let go of the tension and let your muscles relax.
Do at least 20 repetitions of this exercise in a single session.
Rotating shoulders isometrically
Again, isometric rotation exercises are an excellent place to start when the shoulder feels weak and/or full range of motion is restricted. When you are cleared to perform more vigorous arm exercises, you can gradually raise your pressure and begin utilizing resistance bands. Some of the main rotator cuff muscles are worked on in these simple exercises.
How to assist: Take a comfortable stance or sit down.
With your elbow bent to a 90-degree angle, maintain your injured arm curled at your side.
For added comfort, you can place a tiny pillow or towel between your elbow and side as needed.
To provide resistance against external forces, bring your other hand and position the palm on the outside of your damaged hand.
Bring the injured hand with your other hand as though you were pulling it across your body toward your belly button without forcing the shoulder. Carry at a comfortable pressure for up to 5 seconds while maintaining a relaxed neck. Perform 10 times for 2-3 sessions. You may alternate paths to manage internal rotation. If you have had surgery previously, be sure to discuss any limitations on muscle use with your sports medicine doctor. For instance, surgery following anterior shoulder dislocation the most common type frequently involves eternal rotation limitations for the first 4 to 6 weeks following the procedure.
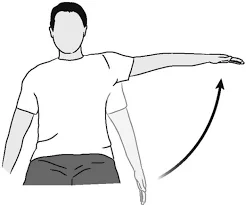
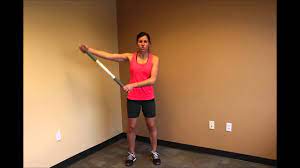
Stick shoulder elevation
You can utilize a stick or cane that you have lying around your house to complete the shoulder elevation exercise. The following instructions will walk you through the exercise safely and efficiently:
How to assist: Place your feet shoulder-width apart and stand upright.
Make sure the back of your forearm faces the front, and hold the cane in one hand.
With the cane in your hand, slowly raise your shoulder until you feel a minor pain or stiffness.
After a few seconds, hold your shoulder up high and then gradually bring it down.
At least 20 to 30 repetitions of the procedure should be done in one sitting.
Depending on the length of your arms and the width of your grasp on the stick, keep rotating the stick until it contacts your butt or the back of your thighs if you can move the bar and your arms without bending.
Pull the stick back up overhead and in front of you while keeping your arms straight to go back to the beginning position.
Stick adduction and abduction of the shoulder
The following are the detailed instructions for utilizing a cane or stick to execute shoulder abduction and adduction exercises:
First, take a straight stance, place your feet shoulder-width apart, and keep your arms by your sides.
With your arms out in front of you and your palms facing down, grasp the cane or stick in both hands.
Raise the stick or cane slowly away from your body and extend your arms out to the sides until they are parallel to the ground.
After a few seconds of holding this posture, carefully lower the cane or return it to your starting position.
Next, push the cane or stick on the contrasting side getting the arms across the body and toward the other side until they are again similar to the floor.
Move the cane or stick it back to its beginning position after holding it in this position for a short while.
To return to the beginning position, repeat this movement to the right side, holding the stick or cane in place for a little while.
Perform at least 20 repetitions of this left-to-right exercise in a single session.
If you start feeling tired or uncomfortable, take a break and return to the workout when you’re ready.
Stick shoulder internal and external rotation
Please take the following actions to complete this exercise: With your arm pointing forward, hold the stick or cane in your hand while standing erect.
Make sure the stick or cane is parallel to the ground and that your elbow is bent at a ninety-degree angle.
To start, move the cane or stick as far to the left as you can without hurting yourself.
Move the cane or stick it back to its beginning position after holding it in this position for a short while.
To return to the beginning position, repeat this movement to the right side, holding the stick or cane in place for a little while.
In a single session, perform at least 20 repetitions of this left-to-right exercise.
If you start to feel tired or uncomfortable, take a break and come back to the workout when you’re ready
The shrug of the shoulders
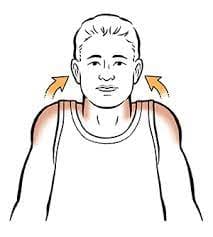
How to assist: Begin in a standing stance with your feet flat on the floor. Place your feet shoulder-width apart.
Turn your hands toward each other while keeping your arms by your sides. Now, lean over and grasp the weights if you use them for the workout.
Your knees should be slightly bent to meet your toes, not to go past them. Face forward, keep your neck straight, and keep your chin up.
Raise your shoulders as high as possible about your ears as you inhale. Take your time, and feel your muscles resisting as you go.
Breathe out and lower your shoulders to carry out the motion.
To begin, aim for two sets of ten repetitions. As your shoulder strength improves, you can raise the rep calculation.
Try increasing the number of repetitions to three sets of twenty over four weeks.
Try performing this exercise without weights at first if you’re using it to relieve neck or shoulder pain. To make sure you are not worsening an injury or pinched nerve, start cautiously by performing fewer repetitions and sets.
Circle of arms
An exercise that works the shoulders without the use of weights is the arm circle. It entails putting your arms out to the sides and using your hands to make tiny circles in the air. It is a popular warm-up for both sports and training, and it is typically done for no more than a certain number of repetitions—that is, until one feels the burn.
Advantages: prepares the shoulder joints for more demanding work
works the rotator cuffs, which are frequently damaged and ignored.
Ideal for novices
How to help: Raise your arms straight out to the sides as you stand up. The arms should be 90 degrees perpendicular to your torso and parallel to the floor. This is where you will begin. Begin slowly to extend each arm such that it forms a circle that is about one foot in diameter. Breathe regularly while you execute the motion.
Keep circularly extending your arms for approximately ten seconds. Next, proceed in the opposite direction by reversing the motion.
Advice: One set is equal to ten-second movements, and one repeat is equal to one circle.
Variations: You can employ some minor resistance as you gain strength.
Passive flexion of the shoulder
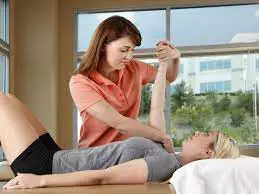
The patient’s position is supine resting; the therapist position is standing next to the patient
Technique: The therapist’s left hand restricts the wrist and carpometacarpal movement.
The patient’s lower arm should be held in the therapist’s right hand. A modest amount of lengthy axial traction is provided, and it is maintained throughout the motion.
Apply stage traction with the right hand first, and maintain 90-degree traction with the left hand of the therapist to complete the movement within the available range.
Passive extension of the shoulder
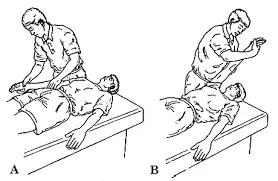
Positioning of the patient: side lying, supine; position of the therapist: standing back side of the patient facing shoulder joint; procedure: placing the therapist’s forearm and elbow over the patient’s right side forearm by flexion of the patient’s elbow, with the patient’s wrist mobility restricted by the therapist’s hand
The patient’s shoulder joint is stabilized by the therapist’s left hand, while the therapist’s right hand executes an extension action
Shoulders pendulums
When you can take off the sling from your shoulder, this is the most fundamental exercise you may perform on it. Its goal is to help your shoulder become accustomed to pain-free movement while encouraging relaxation and easing stiffness.
How to assist: stop your shoulder sling.
permit your arm to swing loosely by your side.
Move close to a counter or chair.
Assume a tiny, uneven lunge pose and bend your trunk forward to a maximum angle of 45 degrees.
Once you begin to swing and transfer your weight forwards and backward, keep your arm relaxed and passively dangled.
Your arm should passively track your complete body’s back-and-forth action as you move back and forth.
The secret is to keep your shoulder relaxed so that your trunk moves first and the movement is entirely passive.
You can also move side to side or even in a circle by widening your stance and adjusting your legs.
Repeat in every direction for one to two minutes, if you can handle it.
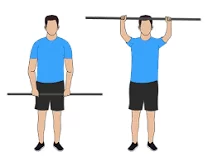
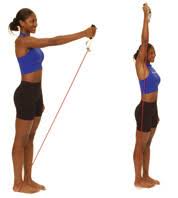
Shoulder pulley exercises
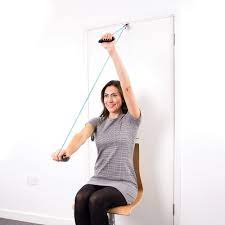
Investing in an affordable shoulder pulley is an excellent rehabilitation aid for shoulder injuries of any kind. It’s among the first methods for moving your shoulder pain-free and safely. To move the bad shoulder passively, just use the opposing hand. You can work your way up to a more active range over time.
How to assist: Close the pulley’s top into a door.
You can stand or sit precisely underneath the pulley with the back of the chair touching the door, depending on your height and the door frame.
Take hold of one handle with each hand, pointing the palms in the direction of your feet or the direction of each other, whatever seems most natural.
Maintain proper posture and a relaxed neck.
Guide the injured shoulder up above your head with your good hand. Begin at shoulder height and work your way up to a full range of motion while maintaining a calm and mostly pain-free posture.
Hold at the end range for five to ten seconds before coming back to the beginning position.
Repeat ten times over two or three sets.
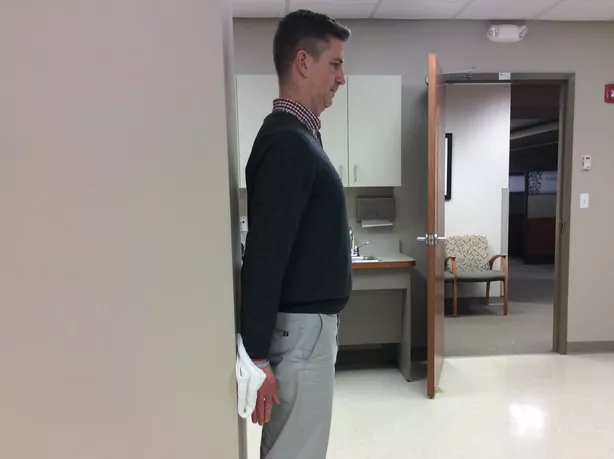
Flexion with the finger ladder
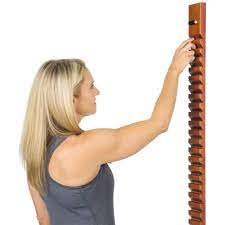
How to assist: A helpful gesture would be to extend your hand and press it up against the ladder.
As high as you can, walk your fingers up the ladder in alternating hands.
Ensure that your shoulders are facing the wall straight and that you are not hunching over.
Return your fingers to the beginning place by alternating hands.
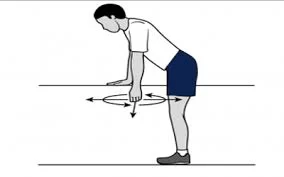
Exercise with a shoulder wheel
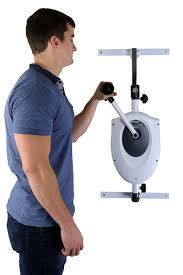
The way shoulder wheel physiotherapy works is by slowly rotating the shoulder joint, giving the surrounding muscles, tendons, and ligaments regulated training and stretching. The shoulder wheel device is made up of a wheel with spinning handles that enable movements in both directions forward and backward. In a shoulder wheel therapy period, the therapist moves the wheel while the patient hangs onto the grips. The patient then rotates the wheel using their strength, which helps to increase shoulder joint strength, flexibility, and range of motion.
The shoulder wheel helps to enhance overall joint health by increasing blood flow, reducing inflammation, and stretching and exercising the muscles and tissues of the shoulder joint as it rotates. Shoulder wheel therapy is frequently used in conjunction with other forms of comprehensive physical therapy to treat patients with medical disorders that impact the shoulder joint as well as those recuperating from operations or injuries to the shoulder.
All things considered, shoulder wheel therapy is a secure and efficient therapeutic solution that can aid in enhancing shoulder joint function and easing discomfort and stiffness.
Advantages of exercises With Shoulder Wheels
Increased range of motion: By enhancing the shoulder joint’s range of motion, shoulder wheel physiotherapy makes it simpler to carry out daily duties.
Improved flexibility: The shoulder wheel’s mild stretching and exercising can aid in improving the suppleness of the muscles and tissues that surround the shoulder joint.
Pain and stiffness in the shoulder joint can be lessened with the use of shoulder wheel therapy, which facilitates easier and more pleasant arm movement.
Enhanced muscular strength: Shoulder wheel therapy can aid in enhancing general muscle strength and function by strengthening the muscles surrounding the shoulder joint.
Quicker healing from accident or surgery: To hasten the healing process for people regaining from shoulder injuries or surgeries, shoulder wheel therapy is frequently included in comprehensive physiotherapy treatment plans.
Future injury avoidance: By preserving joint health and function, regular use of shoulder wheel therapy can aid in the prevention of future shoulder problems.
Secure and non-invasive: Shoulder wheel therapy is a safe and non-invasive treatment option, which makes it a great option for people who wish to stay away from surgery or other more invasive procedures.
Squeezes of the shoulder blades
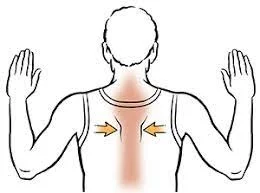
This is an activity that you may begin without any resistance and work your way up to using a band. Shoulder balance and function are significantly influenced by the scapula, or shoulder blade, muscles’ strength and coordination. This is an ideal basis upon which to grow.
How to assist: Maintain proper posture when standing or sitting, with the head resting over the shoulders rather than bending
forward.As though you were about to hold a quarter in the middle of your mid-back, squeeze your shoulder blades together.
Maintain a relaxed neck and lowered shoulders.
Hold for five seconds.
execute ten to fifteen times for two to three sets.
Wrap a band around a stable surface and hold either end at your sides with your hands to continue.
All of them are excellent activities to begin the first few weeks of your recuperation. You should eventually work your way up to more useful motions. This should involve exercises using weights or resistance, as well as the entire active shoulder range of motion.
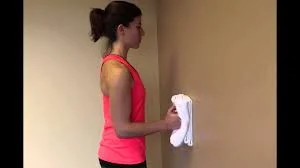
Towel stretch
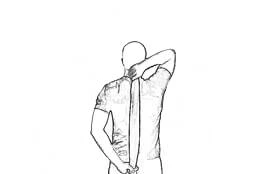
How to assist: With one hand, hold one end of the three-foot-long towel behind your back, and with the other, hold the other end.
Holding the towel horizontally is the position.
To stretch and raise the afflicted arm, use your strong arm.
In an advanced version of the exercise, the towel is draped over the shoulder which is in good condition.
Holding the towel’s bottom in the afflicted arm, move the unaffected arm’s hand toward the lower back.
Ten to twenty repetitions of this workout are made each day.
Shoulder stretches cross-body
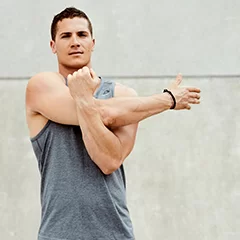
Follow the steps below to learn how to perform the Cross Body Shoulder Stretch.
How to assist: Start by standing up. Gently lay one arm over your chest. Grab the outside forearm of the arm that is across your body with your other hand. To feel more of a stretch, press that arm into your body. For 30 seconds, hold. Carry out the same action with the other arm.
Throughout the stretch, make sure your elbow stays at shoulder height.
Make sure your arm crosses your body as straight as possible when you complete the Cross Body Shoulder Stretch. This will guarantee that the targeted muscles receive the proper amount of stretching.
Benefits: Reduces shoulder tightness in the rear region
Boost your movement
can aid with posture correction
Lower the chance of shoulder injuries
relieves posterior shoulder discomfort
muscles: The Infraspinatus, Teres Minor, and Posterior Deltoid are the main muscles that the Cross Body Shoulder Stretch will work, however it will also work the following muscles: Rhomboids and Trapezius Latissimus Dorsi
Because it’s a terrific stretch to do before and after an exercise, the cross-body shoulder stretch is helpful. The Cross Body Shoulder Stretch will assist your muscles in warming up for action and lower your chance of injury if you play a shoulder-heavy sport. For people who may be seeking relief from tightness in the back of their shoulders, the Cross Body Shoulder Stretch is an excellent option.
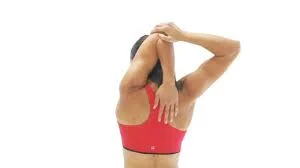
Stretching the triceps
This is a stretch that you may perform sitting or standing. It’s a fantastic exercise to perform while working at your desk.
How to assist: Bend at the elbow and extend your right arm toward the sky, then reach for your upper back. Attempt to position your right hand with the middle finger on your spine at the middle of your back.
Put your left hand over your right elbow and slowly lower your right arm such that your hand partially falls down your back.
After around 30 seconds of holding, switch to the other side. Repeat thrice, if necessary.
To make it easier, it’s acceptable if you are unable to position your hand in the middle of your back. Instead, place it on the back of your head and continue with steps two and three.
Above the head chest stretch
This is an additional stretch that you can do while seated or standing. Try experimenting with the hand placement to draw attention to the chest, shoulders, or both.
Fold your elbows and cross your fingers behind your head whether you’re sitting or standing.
Raise your elbows back and push your shoulder blades together gently.
To draw attention to your shoulders and/or chest, adjust the height of your hands and place them behind the head, on top of the head, or a few inches above the head.
Bent arm wall stretch
How to assist: Take a split stance at the base of a wall or in a doorway, with your right leg in front and your left leg behind.
Raise the left arm to shoulder level, placing the inside of the arm and palm on the wall or doorway. You should have a 90-degree bend in your elbow.
To feel the stretch, gently press your chest through the opening.
You should stretch different parts of the chest by elevating or reducing the arm.
Continue on the opposite side.
Stretching the side-lying parallel arm chest
How to assist: With this exercise, you can focus on the shoulders in particular and work on each side of the chest independently.
Assume a prone position on your stomach and form the letter T with both arms out to the sides, palms down.
Using your left hand to push yourself, begin rolling onto your right side. Raise your left leg, bend your left knee, and plant your left foot firmly on the ground behind you for balance. Lay your temple to the right on the ground.
For balance, keep your left hand on the ground. Stretch further by raising your left hand toward the ceiling.
Inner rotation of the shoulder with a theraband
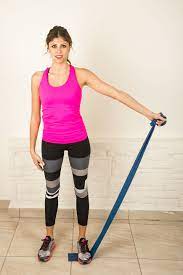
You can use a theraband or resistance band to carry out the following exercise to strengthen the internal rotators of your right hand:
How to assist: Attach one end of the band to a solid object on your right side, like a furniture piece or doorknob.
As you stand facing the item to which the band is linked, grasp the other end of the band with your right hand.
Maintain a 90-degree flexed elbow near your side and a forearm that is parallel to the floor.
Rotate your shoulder and maintain your elbow close to your body as you pull the band inward toward your chest.
After a brief moment of holding, move the band back to its initial position.
In just one session, perform 20 repetitions of this movement.
Since the resistance band is composed of latex rubber and has different resistance strengths, pick one that is difficult yet manageable for your present strength level.
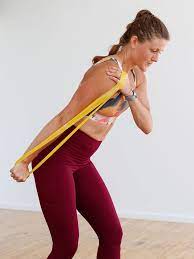
External rotation of the shoulder with a theraband
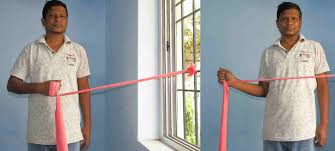
How to assist: To develop the external rotator musculature, let us consider the right shoulder joint again. Thus, you must attach one end of the resistance band to one side to accomplish this. You can use anything stable to fix it. As you stand facing the item to which the band is linked, grasp the other end of the band with your right hand.
Maintain a 90-degree bend in your elbow, away from your side, and your forearm perpendicular to the ground
By rotating your shoulder and maintaining your elbow neutral concerning your body, you may pull the band outward from the center.
After a brief moment of holding, move the band back to its initial position.
In a single session, perform 20 repetitions of this movement.
Flexing the shoulder using a theraband
To complete this exercise, take the following actions: Start by placing one foot on the resistance band and using your hand to hold the other end of the band.
Bring your arm to your side and maintain it there the entire exercise with your elbow straight.
Attach the band’s opposite end to the ground or similar sturdy surface.
Pull the band toward the ceiling as you gradually and deliberately raise your shoulder.
After a few seconds, return your shoulder to the starting position by lowering it gradually.
Ten to fifteen repetitions of this exercise should be performed before moving on to the opposite arm.
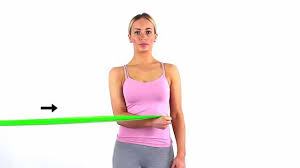
Abduct the shoulders with theraband
Here’s a more detailed, step-by-step exercise guide: Start by fastening the resistance band’s end to the ground. By applying pressure with your foot, you can maintain its position.
Place your feet shoulder-width apart and grasp the other end of the band with your hand.
As you draw the band sideways away from your body and toward the ceiling, make sure your elbow is straight.
Be sure to maintain a relaxed shoulder and an engaged core while doing this motion.
After five seconds of holding the position, gradually release the band’s tension.
Make sure you keep good form throughout the entire workout by repeating it ten to fifteen times more.
Wall push-ups

Here’s how to do the push-up workout using the least amount of your body weight: Face the wall and place yourself about a hand’s length away from it.
With both hands shoulder-width apart, place them on the wall at shoulder height.
Ensure that your feet are level with the ground and spaced shoulder-width apart.
Maintain a straight body line from your feet to your hands by using your core.
Bending your elbows while maintaining a straight body can help you lower yourself toward the wall.
At the bottom of the movement, pause, and then employ your arm and chest muscles to lift yourself back up to the starting position.
Perform ten to fifteen repetitions of the movement.
Push-ups while kneeling prone
Use a portion of your body weight to complete this push-up exercise by doing these steps: Start by assuming a quadrupedal stance on the ground. This indicates that you should be on the floor, with your knees hip-width apart and your hands shoulder-width apart.
Ensure that your knees are just behind your hips and your wrists are directly beneath your shoulders.
Maintain your back flat and bring your belly button towards your spine to activate your core muscles.
Bending your elbows will help you lower your upper body toward the ground while maintaining your hip and knee positions. When your elbows are 90 degrees, stop for a moment. Straighten your elbows to raise your upper body back into the beginning posture.
Perform 10 to 15 repetitions of the workout.
seated or standing, retract your neck
How to assist: By repositioning your head as far backward as possible often well past the neutral position. this exercise frequently lessens or eliminates pain.
To assist in pushing your head back as far as it will go, place your fingers on the front of your chin; keep your face facing front.
Once more, you’ll experience a strain in the nape of your neck and a sensation of “crowding” in your throat.
Stretch in the “retracted” position for one to two seconds, then let go to enable your head to revert to its neutral position.
Perform three to four such sessions every day, especially if you are finding that it is alleviating your discomfort. Repeat that movement eight to ten times. Your head will frequently retract farther and farther as the pain subsides. enhancing the benefits of the activity. Even if your discomfort disappears, keep up this exercise three to four times a day for two more weeks to help keep it from coming back, or resume it whenever it does.
Supine retractions
How to assist: With your head in the neutral position while you’re on your back, place your fingers on your chin and press down until your head and chin tuck into their resting surfaces.
Make sure the back of your neck stretches and the front of your neck feels congested.
Stretch that area eight to ten times, paying attention to whether your discomfort gets better or gets worse.
If the workout causes your pain to worsen, stop.
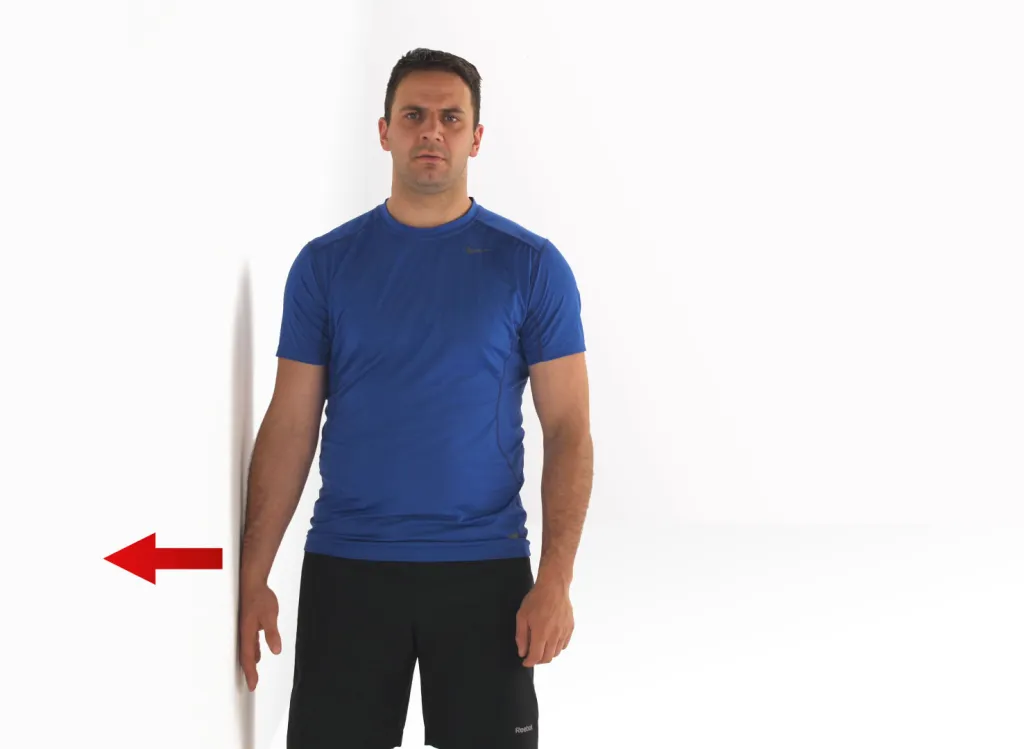
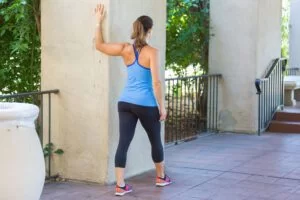
Wall walk abduction with theraband
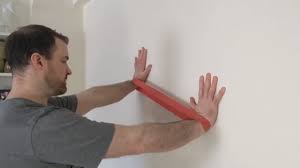
How to assist: Utilizing a resistance band with both hands, take a straight posture with your side toward the wall.
Stretch your arm out to the side and press your hand up against the wall to begin the workout.
Push against the band’s resistance by walking your fingertips as high up the wall as you can.
With your other hand, firmly grasp the other end of the band.
Check that your shoulders are not twisted and that your body does not spin.
As you walk your fingers back down to the beginning point, maintain control over the action.
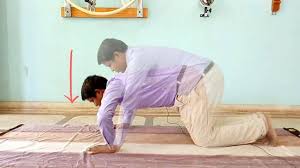
Flexing the shoulders on the hands
There are other methods you can use to extend your shoulder after you’ve been given the all-clear to expand your range of motion, aside from using a pulley. The goal of this exercise is to enhance shoulder flexion without overusing the arm muscles which may be painful.
How to assist: Place your hands directly under your shoulders while on your hands and knees.
maintains your palms firmly planted on the ground while you return your butt to your heels.
This exercise unintentionally flexes the shoulders; adjust to comfort and hold for at least ten seconds.
Repeat for two to three sets of up to ten repetitions.
By lowering your chest toward the floor, you can increase your range of motion as tolerated.
If this posture is too uncomfortable for you, you can also try lying on your back and using a wand.
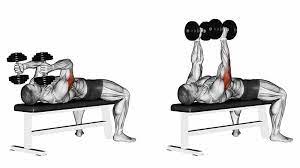
Biceps curl

Choose dumbbells with a weight you can lift ten times with proper form, making sure the final three are so difficult you couldn’t imagine lifting them again. From here, you can either perform eight repetitions with the same weight or ten repetitions with a slightly reduced weight. It is beneficial to “arm” oneself with the finest dumbbells.
When you are able, increase the weight or the number of repetitions. This normally happens by the following week if you are training regularly. Gradually increase the weight and/or repetitions to build strength and muscle.
How to assist: Start by putting your feet hip-width apart and standing tall. Maintain contraction of your abdominal muscles.
With each hand, hold a single dumbbell. With your palms pointing forward, let your arms hang loosely at your sides.
Lift the weights until the dumbbells are close to your shoulders while maintaining a steady upper torso and relaxed shoulders. Alternatively, elevate the dumbbells to your forehead or eyeballs for a complete range of motion. Keep your elbows tucked in tight to your body at all times.
Breathe out as you raise.
Reposition the weights to where they were before.
Maintaining a 3 to 5 rep range of total failure, complete the target number of reps.
Triceps curl
To start with the triceps curl, use a weight that you can manage for two to three sets of eight to twelve repetitions. Select a weight that will enable you to perform all sets and repetitions with the proper form.
How to assist: With your feet hip-width apart and your knees slightly bent, grab a dumbbell and stand.
Lift the dumbbell above your head and bring it down behind it. Keep your arm across from you. You should have a lofty stance and place your shoulders above your hips. Maintain the head and neck in a proper position. Throughout the exercise, keep your chin tucked in, as if you were supporting an egg with it.
To establish a secure foot position, evenly distribute your weight and use your feet to grab the floor.
While tensing your core, pretension your shoulders and hips. Your pelvis should be somewhat folded in, and the ribs should be down. This is where you should begin for every count.
Squeeze your triceps to start straightening your elbow while preserving alignment.
Squeeze your triceps to complete the movement, keeping your elbow slightly bent. Your elbow is the only place you should move.
To get back to the starting position, bend your elbow.
After completing the required amount of reps with the triceps curl, swap sides and continue on the other arm.
Strategies for Doing Triceps Curls: Think about these weightlifting pointers before you try triceps curls.
Maintain a small bend in your elbow. It’s crucial to avoid fully extending your arm because doing so puts undue strain on your shoulder blades and raises the possibility of damage. Upon reaching the peak of the exercise, your elbow ought to stay slightly bent.
Use smaller weights at first. Start with a lower weight when doing any weightlifting exercise for the first time. Use both hands to grab the weight during the workout if the only weight you have at home is too hefty to lift with only one arm. Gradually increase the weight after you’re comfortable performing triceps curls.
Pay attention to how your shoulders move. Stop the exercise right once if you start to feel any shoulder ache. Try less taxing triceps workouts on your shoulders triceps triceps pulldowns.
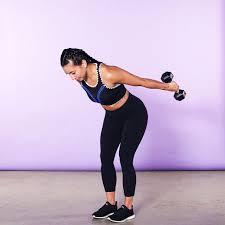
Kickback of the triceps
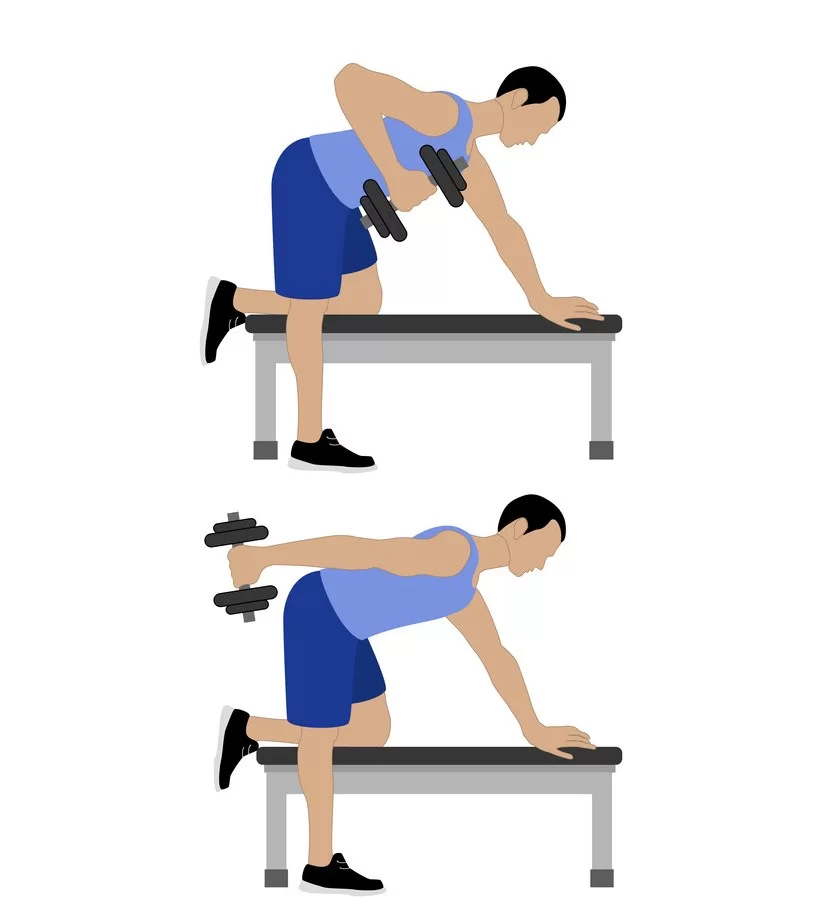
Before performing these exercises, warm up for five to ten minutes to help release tension in your muscles and increase your heart rate. This can be walking, jumping jacks, or stretches. To work the muscles safely and effectively, be sure you’re employing good form. By holding the triceps in an extended position for an additional one to two seconds, you can intensify these exercises.
As you gain strength, progressively boost the weight of the dumbbells from 5 to 10 pounds apiece. If you don’t have weights, use water bottles or soup cans as a substitute. You can also perform this exercise standing or on your knees, one arm at a time in a split stance.
To carry out this: With your knees slightly bent, hold a dumbbell in each hand with your hands facing inward toward one another.
As you bend forward at the waist to bring your body nearly parallel to the floor, contract your core and keep your spine straight.
Tuck your chin in slightly and keep your head in line with your spine. Maintain your upper arms near your body.
Straighten your elbows to contract your triceps during exhalation.
Simply move your forearms while keeping your upper arms motionless.
To bring the weights back to the beginning position, pause here and then inhale.
Conduct two to three sets of ten to fifteen repeats.
Triceps pushdown
To perform this exercise, face the tricep pushdown cable machine and use an overhand grip to grab the horizontal cable bar or rope attachment, depending on the machine in your gym. Bring the rope or bar grips up to roughly chest height.
To begin, use the pin-and-place adjustment and select a lightweight. Other weighing mechanisms might be included in different alterations of the machine.
Brace your abdominals first.
Place your feet slightly apart and tuck your elbows in at your sides.1 Take a breath. Your elbows should be fully extended but not locked or straight when you push down. During the pushdown, keep your elbows close to your body and gently bend your knees. Avoid leaning forward. As you press down, make an effort to maintain the straightest possible back.
Make a deliberate movement to get back to the beginning position as you exhale. Aim to avoid dropping the weights.
For newcomers, try to finish 4 sets of 8 repetitions. You can increase the quantity of weight you use as resistance and the number of repetitions you perform as your fitness increases.
Theraband pushdown for the triceps
The Resistance band tricep pushdown technique as you extend your arms, and turn your hands slightly outward.
After a brief moment of holding, raise your hands back to a position slightly below your chest.
With this, one repetition is finished.
Apply a resistance band on the opposite hand’s palm.
With both hands, palms facing in, grasp the resistance band slightly below chest height.
Drive your hands down toward your waist while maintaining a tight elbow stance against your side.
As you extend your arms, turn your hands slightly outward.
After a brief moment of holding, raise your hands back to a position slightly below your chest.
With this, one repetition is finished.
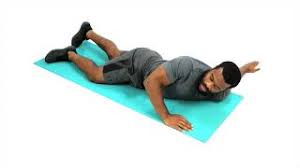
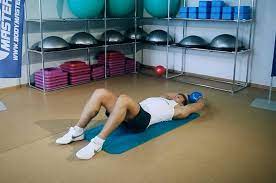
Spiderman move
How to assist: squatting on the ground or a fitness mat. Place your feet and knees about hip-width apart.
Lean forward gradually and place your hands on the mat. Place the hands squarely beneath the shoulders. Keep your hands shoulder-width apart and your fingers pointing forward. Place your knees exactly beneath your hips to form the camel stance. an additional designated tabletop place
Become in a neutral posture by contracting your stomach and core muscles. Try not to clench your back excessively or tremendously.
Stretch and straighten your right arm and left leg gradually. Keep your hands and hips parallel to the ground. Ask the person’s partner, if they have one, to place a light bar across their hips that resembles their waist.
Tell the partner whether the person’s hips should rotate and what adjustments they need to make to be in proper alignment if this helps.
Simultaneously, lift and straighten the right arm progressively until it approaches the floor. Keep both shoulders close to the ground. Ask a partner to place a light bar across the shoulders to find out if the shoulders rotate.
Return the arm and leg, a little, to their original positions.
Using the opposing limbs, perform the bird dog again.
Perform 2 to 3 sessions of 10 repetitions each day.
abdominal muscles: rectus abdominis, internal obliques, external obliques, transverse abdominis, gluteus medius, and gluteus minimus are the muscles addressed.
The rhomboids, levator scapulae, and latissimus dorsi (lats) are the back muscles. two serratus posteriors: the superior and inferior. erector spine and transversospinalis
Prone T, Y,l, W
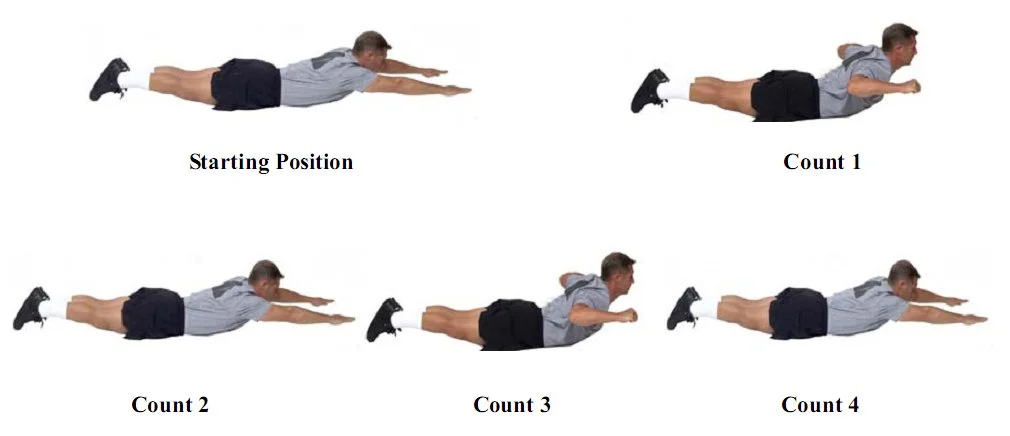
how to assist: face down on the floor with a towel under the forehead
employ the gluteal and abdominal muscles by tightening the belly button toward the spine
place the arms straight out to the side at a 90-degree angle with the body and with the thumbs up toward the ceiling.
draw the shoulder blades down and back, elevate the arms off the floor, and hold for 4 count
proceed to elevate the arms at progressive levels, resembling the letters Y and I before bending the elbow and bringing the arms to the side to make W
hold all four positions for 4 counts with your thumb pointed up toward the ceiling
reset the gluteals, abdominals, shoulder blades, and repeat.
repeat 5 to 8 times.
session: two to three times a day
frequency: 3 times per week
Catching a ball exercise
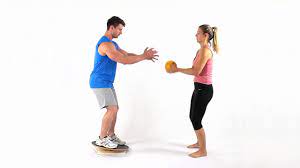
This is a partner workout that is done on your hands and knees. Enhancing core and overall scapular stabilization is the goal.
Point of instruction: For this workout, the ball must be thrown at one of the athlete’s hands by a partner.
After catching the ball, the athlete tosses it back.
The athlete’s partner catches the ball and tosses it into the opposite hand.
Toss the ball using your underarms.
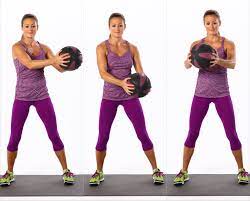
Rotating medicine ball from behind
This functional shoulder workout improves the dynamic strength of the scapular and rotator cuff muscles.
Point of instruction: The athlete sits with their back toward the therapist, their elbow bent and their arm lifted. The athlete receives a ball throw from the therapist, who controls the athlete’s shoulder rotation by catching the ball and throwing it back.
Maintain the elbow’s raised position.
Rotating medicine balls while lying
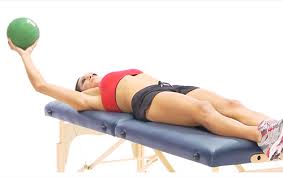
The shoulder’s rotator cuff muscles become stronger with this practical rotator cuff exercise.
Instruction point: The athlete rests their arm on the couch while lying on their back with their arm lifted to a 90-degree angle and their elbow bent.
The athlete catches the ball after the therapist drops it at shoulder height.
This can be advanced fast enough to return the ball to the therapist right away.
The medicine ball alphabet
The deltoid and rotator cuff muscles are strengthened by this Medicine Ball drawing exercise. It is a proprioception exercise for the shoulder.
Instructional point: The athlete holds a little ball in their hand with their arm straight in front of them and angled slightly to the side.
Next, they use the ball to spell out the letters.
Chest pass shoulder exercise
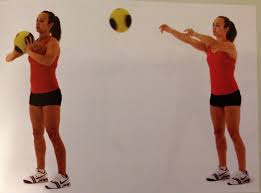
The upper body’s explosive strength, particularly that of the scapular stabilizers, pectorals, wrist flexors, and triceps is enhanced by an explosive function shoulder exercise.
Point of instruction: The athlete tosses a medicine ball with both hands powerfully from chest height while standing one meter apart from a partner or rebound net.
After that, they grab the rebound and toss it again right away.
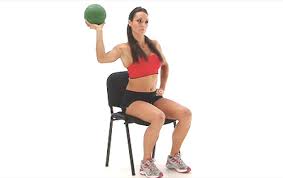
Rotating medicine ball while seated
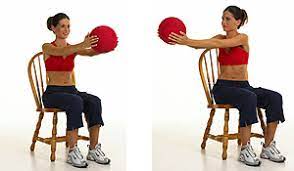
To strengthen the rotator cuff muscles, use the Medicine Ball Rotation shoulder exercise, which entails catching and throwing a ball while utilizing internal shoulder rotation.
Point of instruction: Assume a seated posture, with the elbow bent and the arm lifted to ninety degrees.
The athlete maintains the elevated arm position as they receive the ball as it is tossed by the therapist and instantly throws it back.
Tossing overhead
The arms are held straight during the push. Keep the back round and extend the shoulder blades. To repeat, flex your elbows to go back to the starting position.
This exercise improves shoulder coordination and strengthens the shoulders and trunk.
Instructional point: While lying on the floor, the athlete immediately performs a sit-up and tosses the ball overhead to the therapist.
The athlete must stretch overhead to catch the ball that the therapist tosses back behind their head.
Advantages of Movement for Shoulder Dislocation
After a shoulder dislocation, the right balance in post-injury care must be established. Because of the overstretching of the joint capsule, muscles, and local ligaments, the shoulder will first be swollen, painful, and probably unstable.
Therefore, a period of rest is necessary to enable the shoulder’s natural stability to be restored, however, it won’t be as stable as it was previously. However, sleeping too much might have the opposite effect, making you overly stiff and raising your chance of developing a frozen shoulder. Here are some of the many advantages of shoulder movement, depending on the severity and whether or not you have surgery, when the moment is perfect.
- improved blood flow to the upper arm to aid in the healing process
- reduction in shoulder edema and pain
- Lower chance of excessive stiffness
- recovery of the shoulder muscles’ strength
- Reduction of instability in the shoulders
- Enhanced self-assurance in your shoulder
- quicker to resume activity at the prior level
- enhanced life quality following a shoulder injury
Movement Limitations: Following surgery, patients will be limited in their movements for the first three to four weeks to allow their shoulder to heal. One of the restrictions is not moving the arm or shoulder.
higher than the head
All across the body
the opposite way from where the surgery is being done. For the majority of patients undergoing anterior (front) shoulder surgeries, this means that they cannot rotate or move their shoulder toward the back of the body
The Value of Consistent Exercise
Frequent exercise for fitness keeps your joints flexible and well-coordinated. You can maximize this “lubricating” effect by engaging in cardiovascular exercise for thirty minutes every day.
There are several ways to get this exercise: you can jog, walk quickly, row, climb stairs, ride a stationary or mobile bicycle, or use a cross-country skiing simulator.
See your general physician if you are unsure about your capacity to complete such an activity program.
It is not necessary to perform these exercises vigorously. It is only necessary to allocate thirty minutes of your day to aerobic activity and your stretching regimen.
A person with normal blood pressure, heart, and lungs should aim to exercise for up to half of their maximal heart rate for up to half an hour. You can estimate your maximal heart rate by deducting your age from 220. You should see your doctor before beginning this program component if you are over 35, have not been exercising regularly, or are unsure about your health.
Tell your doctor if you have any queries concerning your shoulder or the best course of action to get rid of Your Injuries apply physical therapy
To lessen swelling: As soon as possible after you hurt the region, apply an ice pack. Keep your shoulder still.
Your arm should remain near your body. With the sling on, your elbow and wrist are still moveable.
Wait until your doctor gives the all-clear to put rings on your fingers.
You can take acetaminophen (Tylenol), naproxen (Aleve, Naprosyn), or ibuprofen (Advil, Motrin) for pain.If you have high blood pressure, kidney illness, heart disease, stomach ulcers, or internal bleeding in the past, consult your doctor before using these medications. Never take more medication than what your doctor or the medicine bottle recommends.
Give aspirin to youngsters only.
Avoid exercises after dislocating your shoulder
While certain activities are best avoided, exercises do assist in strengthening the muscles surrounding the shoulder joint and increase stability. Among them are:
fitness regimens that are difficult or painful.
Things that need you to extend your arms behind your back.
heaving large things up.
lifting your arms above your head, particularly in the early stages of recuperation.
Overhead Presses: Avoid exercises like shoulder presses and military presses that require you to raise weights or push items overhead. These workouts overstress the shoulder joint, which raises the possibility of re-dislocation. but in the progression stages, you should utilize with lightweight
Pull-ups and Chin-ups: Pulling activities, like pull-ups and chin-ups, that require grabbing a bar and raising oneself, can put strain on the shoulder joint and surrounding muscles.
Bench Press: When using heavy weights, the bench press workout for shoulder dislocation puts a lot of strain on the shoulders. Early on in shoulder recovery, it can undermine stability and raise the chance of damage.
Exercises using the barbell or dumbbells behind the neck: Exercises like as pulldowns and presses behind the neck should be avoided. These motions overstress the shoulder joint, which increases the risk of instability or additional damage.
Risk factors for shoulder exercises for dislocation
Shoulder dislocations can happen to everyone, however, certain individuals are more susceptible than others, such as:
- athletes participating in contact sports.
- Men and individuals are categorized as male at birth (AMAB).
- persons in the period range of 15 to 30 years.
- Anybody with a history of shoulder dislocations.
Complications of the shoulder exercises for dislocation
The following are the most frequent side effects of shoulder dislocation: harm to the surrounding tissues and bones:
- Bone fractures.
- Sprains of tendons and ligaments.
- harm to nerves.
- blood vessels that are damaged.
- strained muscles.
- inability to move the shoulder due to injury to the inferior glenohumeral ligament.
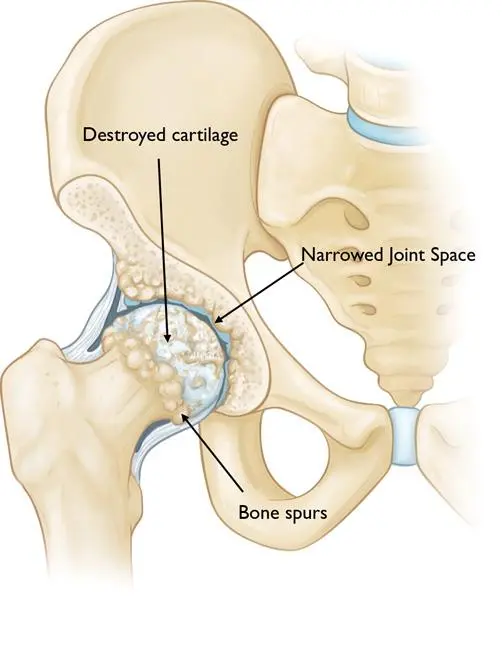
- Defect in Hill-Sachs: The Hill-Sachs lesion resembles a ding in the upper humerus ball. The ball at the top of your humerus may sustain harm if your shoulder dislocates and it presses against the lip of its socket in your scapula.
- Other anterior glenolabral injuries, such as a bankart lesion
- ruptured brachial plexus or axillary artery
The prevention
It is not always possible to avoid a dislocated shoulder. Trauma and unanticipated accidents are frequently the reason. When engaging in physical activities, such as sports: Put on the appropriate safety gear.
If your shoulder suffers during or after physical exercise, don’t play with the pain.
After a strenuous activity, provide your body time to rest and recuperate.
Before engaging in physical activity or sports, warm up and stretch.
After a workout, stretch and cool down.
To diminish your possibility of getting harmed, need this general safety advice:
Confirm that nothing could misstep you or others in your house or business.
When arriving for anything at home, constantly utilize the proper devices or equipment. Never stand on, tables, or stools.
If you have a problem walking or are more likely to fall, utilize a cane or walker.
Avoid stopping physical therapy too soon: Individuals frequently just care about receiving therapy and move on with their lives. To maintain muscle balance
it’s crucial to perform the exercises that a physical therapist and then a trainer propose.
Speak with a physical therapist
There’s a good chance you will have doubts and queries regarding what to do at each stage of the shoulder healing procedure. Here’s where physical therapy scheduling can help. To keep you on pace and provide the best pain treatment during your healing process, they can conduct a thorough assessment. Additionally, they can assist you in addressing any underlying imbalances or weaknesses that may contribute to the development of chronic dislocations or future shoulder problems. When it comes to gaining confidence for a full recovery—both conservatively and following surgery—they are your finest resource.
Summary
Exercises designed to dislocate the shoulder are a crucial component of the healing process following a dislocation. These exercises aid in strengthening the muscles surrounding the shoulder joint, increasing range of motion, and preventing recurrent dislocations. It’s crucial to begin with easy workouts and build up to more challenging ones as your shoulder heals. You ought to stay away from any painful exercises as well. See your physician or physical therapist if you are unclear about the appropriate exercises for you.
The majority of patients who dislocate their shoulder recover completely. After your shoulder heals, you should be able to resume most, if not all, of your activities and sports. This is even true if surgery is required. If you have previously dislocated your shoulder, your chances of doing so are substantially higher. More than 90% of athletes under the age of 25 who dislocate their shoulder while participating in a contact sport go on to re-injure the same shoulder.
FAQS
How long does it take to heal from a dislocated shoulder?
Usually, recovering from a shoulder dislocation takes many months. After your joint heals, you will need to undergo physical therapy for several weeks or months while your shoulder is immobilized. Find out from your doctor how long you must wait before engaging in physical activity again. You run a higher risk of reinjuring or dislocating your shoulder if you resume exercising or playing sports before it has fully healed.
How can a dislocated shoulder be healed as quickly as possible?
A dislocated shoulder can be successfully healed using physiotherapy exercises such as shoulder flexion, shoulder abduction, and shoulder flexion. Moreover, it is very advised to adhere to the RICE strategy rest, ice, compress, and elevate.
Which method works best for dislocating a shoulder?
To aid with reduction, apply direct pressure to the posterior aspect of the dislocated humeral head and direct it anteriorly. Alternatively, use modest lateral traction by looping a sheet under the axilla to loosen the glenoid rim. If it works, the arm becomes immobile in a neutral posture.
After being dislocated, would my shoulder ever be the same?
You can heal completely from a dislocated shoulder if you receive appropriate and continuous medical care. On the other hand, once this condition is experienced, the likelihood of more dislocations increases.
How much time will it take to heal from a shoulder dislocation?
A dislocated shoulder requires 12 to 16 weeks to heal completely. But in two weeks, if you try to avoid strenuous activity, you will be able to resume your usual activities.
Which workout is ideal for treating a dislocated shoulder?
To effectively manage a dislocated shoulder, our experts offer different exercises according on the severity. However, shoulder flexion, shoulder abduction, and shoulder extension are the primary workouts that have aided in a quick recovery.
What factors lead to persistent instability in the shoulder?
Once a shoulder dislocation has happened, it might happen again. A loose shoulder that dislocates frequently is called chronic shoulder instability.
Is massage beneficial for dislocated shoulders?
Massaging the tight, compensatory muscles surrounding the shoulder can also be beneficial. The muscles in the upper back and neck region are most commonly affected. Deep tissue massage, trigger point therapy, and ART can assist in loosening these areas so that the shoulder can return to its normal function.
When you had a shoulder injury, could you still do pushups?
you might begin with push-ups and work your way up to them after dislocating your shoulder. Pushing up against a wall would be the initial step, then knee-supported push-ups, and finally a full variation. Await complete clearance before participating in any contact sports.
Can you release the sling so you can go to bed?
You can place a cushion behind your elbow and between your body and your arm to shift it somewhat farther from your body. This often eases discomfort. You should wear your splint when you go to bed.
Can someone with a dislocated shoulder execute the exercise?
At first, you should take it easy and allow the swelling and inflammation in your shoulder to go down, but you should move quickly on to the mobility phase, which involves promoting mild range-of-motion activities.
Can a shoulder dislocation heal rapidly?
A dislocated shoulder typically requires up to 12 weeks to heal.
How can a dislocated shoulder be fixed forever?
closed reduction. During this process, a few mild movements may be used to realign the shoulder bones. Surgery, Medication, Immobilization, and Rehab
Does a dislocated shoulder require physical therapy?
It will take two to four weeks for your shoulder to heal before you are referred for physical therapy. You can learn shoulder-stretching exercises from a physical therapist. This will guarantee that your shoulder mobility is optimal.
Which position is ideal for treating shoulder pain?
Simple posture adjustments to enhance shoulder motion include tucking the chin slightly downward, sitting up from the hips, and rolling the shoulders up and back before allowing them to rest down. Gaining this position can occasionally be aided by standing up against a wall and applying pressure to your head, upper back, and hips.
Can a shoulder dislocation heal completely?
The majority of patients who dislocate their shoulder recover completely. After your shoulder heals, you should be able to resume most, if not all, of your activities and sports. This is even true if surgery is required. The likelihood of reinjuring a dislocated shoulder is significantly higher.
What four methods are there for treating a dislocated shoulder?
Options for Managing a Dislocated Shoulder
Sling immobilization or alteration of activity.
anti-inflammatory drugs.
supplying heat or ice therapy to the shoulder joint.
physical therapy and strengthening exercises.
Which side sleeping position is ideal for people with shoulder pain?
Hug a pillow in front of you if you sleep on your non-painting side. This will lessen the likelihood that the injured shoulder may sag too much forward and crush the shoulder’s structures. It also aids in shoulder joint stabilization.
Why does nighttime shoulder discomfort worsen?
Although the exact cause of shoulder pain is unknown, several possible causes include gravity tugging on your shoulder’s tendons or ligaments when you lie on your back, overuse during the day, and direct pressure on your shoulder when you lie on your side.
References
- Physio, S. (n.d.). Best 5 Exercises Following Shoulder Dislocation (strengthening phase) – Surrey Physio. Surrey Physio. https://www.surreyphysio.co.uk/top-5/best-5-exercises-following-shoulder-dislocation-strengthening-phase/
- Best Shoulder Dislocation Exercises for Recovery. (n.d.). Vive Health. https://www.vivehealth.com/blogs/resources/shoulder-dislocation-exercise
- P. (2022, March 21). Exercises For Shoulder Dislocation Recovery. https://www.physiotattva.com/blog/exercises-for-shoulder-dislocation-recovery
- Home Exercises for the Unstable Shoulder. (n.d.). UW Orthopaedics & Sports Medicine. https://orthop.washington.edu/patient-care/articles/shoulder/home-exercises-for-the-unstable-shoulder.html
- shoulder dislocation exercise for better recovery.https://www.pantai.com.my/health-pulse/shoulder-dislocation-exercises.2023 may 5
- Shoulder Dislocation Exercises – Tufts Medical Center Community Care. (2017, January 15). Tufts Medical Center Community Care. https://hhma.org/healthadvisor/aha-shlddis-rex/
- Shoulder Dislocation. (n.d.). Physiopedia. https://www.physio-pedia.com/Shoulder_Dislocation
- Lee, B. (n.d.). Physical Therapy and Recovery Timeline After Shoulder Dislocation Surgery. Sports-health. https://www.sports-health.com/treatment/shoulder-injury-treatment/physical-therapy-and-recovery-timeline-after-shoulder
- Professional, C. C. M. (n.d.). Dislocated Shoulder. Cleveland Clinic. https://my.clevelandclinic.org/health/diseases/17746-dislocated-shoulder
- Dislocated shoulder – aftercare. (n.d.). Mount Sinai Health System. https://www.mountsinai.org/health-library/selfcare-instructions/dislocated-shoulder-aftercare
- In-Text Citation: (Dislocated Shoulder – Aftercare, n.d.)
- Cpt, G. P. (2021, December 9). Shoulder Dislocates Exercise: How to, Benefits, Tips, Modifications. LIVESTRONG.COM. https://www.livestrong.com/article/13769529-shoulder-dislocates-exercise/
- Manchanda, Y. (2023, May 24). Exercise for Shoulder Dislocation: A Comprehensive Rehab Approach. Sportskeeda. https://www.sportskeeda.com/health-and-fitness/exercise-shoulder-dislocation-a-comprehensive-rehab-approach
- Ekka, S. S. (2023, November 8). 17 Best Shoulder Dislocation Exercises to prevent recurrence. Physiosunit. https://physiosunit.com/17-top-shoulder-dislocation-exercises-to-prevent-recurrence/
- amy roberts .(may 21 2018),https://www.mensjournal.com/health-fitness/how-train-around-dislocated-shoulder
- Top Exercises to Treat Dislocated Shoulders. (2022, November 1). Surgery Ka Naya Address – Glamyo Health Blogs. https://glamyohealth.in/blog/top-exercises-to-treat-dislocated-shoulders