
Multidirectional shoulder instability
Introduction
- Multidirectional Shoulder instability develops in 2 different ways: traumatic onset related to a sudden injury or atraumatic onset not related to a sudden injury. Understanding the differences is essential in selecting the best course of treatment. As a rule, the patient with atraumatic onset impermanence has general laxity (looseness) in the joint that eventually causes the shoulder to become unstable, whereas traumatic onset impermanence begins when an injury around the shoulder causes a shoulder to develop recurrent dislocations.
- Atraumatic shoulder instability, also called multidirectional instability (MDI), is described as the loosening of the shoulder’s glenohumeral joint in multiple directions.
What does the innermost of the shoulder look like?
The shoulder is the most moving joint in the human body with a complex arrangement of structures working together to provide the motion necessary for daily life. Unfortunately, this great portability comes at the expense of stability. Four bones & a network of soft tissues (ligaments, tendons, & muscles), work together to produce shoulder movement. They interact to keep the joint in place while it moves through extreme and full ranges of motion. Each of these structures makes an important contribution to shoulder motion & stability in the joint structure. Certain work or sports activities can put great demands upon the shoulder, & injury can occur when the limits of motion are exceeded and/or the individual structures are overloaded.
What is atraumatic shoulder instability?
- Atraumatic shoulder instability develops in patients with increased laxity of the supporting ligaments surrounding the shoulder’s glenohumeral joint. The looseness can be a natural condition present from birth or a condition that has developed over time. Many patients with multidirectional instability are active in overhead sports such as gymnastics, swimming, or throwing that constantly stretch the shoulder capsule to maximum ranges of movement.
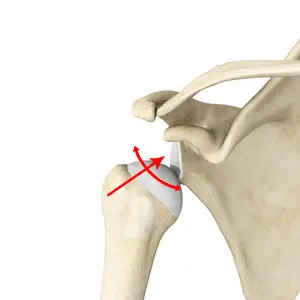
- The glenoid socket of the shoulder joints is a relatively horizontal surface that is deepened slightly by the labrum, a cartilage cup that is adjacent part of the head of the humerus. The labrum acts as a bumper to keep the humeral head rigidly in place in the glenoid. It is also the attachment point for the main ligaments that stabilize the shoulder. These ligaments often stretch out with multidirectional instability, allowing dislocation or subluxation another known as incomplete or partial dislocation). The increased movement of the joint can lead to repetitive or recurrent microtrauma of the joint (small injuries), producing tears of the labrum or rotator cuff.
Anatomy Of The Shoulder Joint
- Your shoulder is made up of 3 bones: the upper arm bone (humerus), shoulder blade (scapula), and collarbone (clavicle).
- The head, or ball, of the upper arm bone, fits into a shallow socket in the shoulder blade. This socket is called the glenoid.
- Strong connective tissue, called the shoulder capsule, is the ligament system of the shoulder & keeps the head of the upper arm bone nearest to the glenoid socket. This tissue covers the shoulder joint & attaches the upper end of the arm bone to the shoulder blade.
- Your shoulder also relies on strong tendons & muscles to keep your shoulder stable.
Shoulder Structure
Bones and Joints
The bones of the shoulder:
- The humerus is the upper arm bone. This is the ball of the shoulder’s ball & socket joint in the shoulder joint.
- The scapula is the flat horizontal, triangular bone commonly called the shoulder blade. Prominent areas of the scapula serve as attachment points for many muscles & ligaments. The glenoid is the superficial socket on the side of the scapula that receives the ball of the humerus. Together they form the ball & socket positioning of the shoulder. The scapular spine is a horizontal ridge along the back of the scapula that divides the scapula into upper & lower regions.
- The acromion process is the end of the scapular spine to the shoulder. It projects up to form the top of the shoulder joint.
- The coracoid process is a projection towards the front of the scapula and is an attachment site for several muscles & ligaments.The clavicle is the collarbone. Although it appears to be, as straight as an arrow it actually forms an S-shape when seen from above. The thorax or rib cage is an anchor for several muscles & ligaments. Although the ribs do not physically attach to the scapula, the thorax stabilizes & maintains proper positioning of the scapula so that the arm can function to its fullest capacity.
Additionally, there are 4 bone junctions or joints:
- The glenohumeral joint is the most or prime joint of the shoulder. Here, the glenoid on the scapula and the head of the humerus comes together. The fairly horizontal socket of the glenoid surrounds only 20% – 30% of the humeral head. Because of its poor fit, this joint relies clumsily on the surrounding soft tissue for support. The labrum, a ring of fibrocartilage tissue, attaches to the glenoid & deepens the socket to encircle more of the humerus.
- The acromioclavicular joint is the bony point on the top of the shoulder. It fixes the scapula to the chest, by connecting the acromion on the scapula to the clavicle, or “collarbone”. A thick disk of fibrocartilage acts as a shock absorber between the 2 bones. The surrounding capsule & ligaments give this joint exceptional stability.
- The sternoclavicular joint connects the other end of the clavicle to the sternum or “breastbone”. Like the acromioclavicular joint, this joint contains a fibrocartilage disk that helps the bones achieve a better suitable. It also gets an excellent assist from its joint capsule & surrounding ligaments.
- The scapulothoracic articulation is the area where the scapula, embedded in muscle, slides over the thoracic rib cage. The surrounding muscles & ligaments keep the scapula properly positioned so that the arm can move correctly
cartilage
There are 2 types of cartilage in the shoulder: Articular cartilage is the shiny white coating that covers the end of the humeral head & lines the inside surface of the glenoid.
It has 2 purposes:
- To provide a smooth, slick surface for easy motion
- To be a shock absorber & protect the underlying bone
- Fibrocartilage is the thick tissue that forms the disks of the acromioclavicular & sternoclavicular joints & the labrum, the ring that deepens the glenoid.
Fibrocartilage has three roles:
- To act as a cushion in shock absorption(engagement)
- To help secure the joint by improving the fit of the bones
- To act as a spacer & improve contact between the articular cartilage surfaces
Ligaments
- The shoulder relies heavily on ligaments for support. Ligaments attach bone to bone & provide static stability or firmness in a joint. Ligaments will alternately become tight & laxity with normal movement. They keep the joint within the normal limits of motion.
- The glenohumeral ligaments secure in layers from the glenoid labrum to form the joint capsule around the head of the humerus.
- The coracoacromial arch is the group of ligaments that spans the bony projections of the coracoid process & the acromion.
- The coracoclavicular ligaments & the acromioclavicular ligament provide most of the assistance for the AC joint.
Muscles & Tendons
Muscles & tendons work together in the shoulder to provide dynamic stability of the shoulder.
There are 4 muscle groups in the shoulder:
- The rotator cuff muscles are the subscapularis, the supraspinatus, the infraspinatus, & the teres minor. They are the primary stabilizers that grasp the ball of the humerus to the glenoid socket. The socket is too superficial to offer much security for the humerus. These 4 muscles form a cuff around the humeral head, securing it tightly in the socket. As its name implies, this type of muscle also rotates the arm. The rotator cuff secures the glenohumeral joint from dislocation, allowing the large muscles that control the shoulder to power the arm with large movability.
- The biceps tendon complex also helps keep the humeral head in the glenoid & helps lift the arm.
- The scapulothoracic muscles secure the scapula to the thorax. Their main function is to stabilize the scapula to allow for proper shoulder movement.
- The surface muscles of the shoulder are the massive, large, powerful outer layer of muscles that are important to the overall function of the shoulder. This group contains the deltoid muscle, which covers the rotator cuff muscles.
Bursae
- A bursa is a cushion-like sac filled with a small amount of fluid. Bursae or plural reduce friction & allow smooth gliding between two hard structures, like bone & tendon or bone & muscle. There are over 50 bursae in the human body; the greatest is the subacromial bursa under the acromion in the shoulder. The subacromial bursa & the subdeltoid bursa under the deltoid muscle are often considered as one structure. This bursa separates the rotator cuff & the deltoid muscle, from the acromion
What are the causes of MDI (Multidirectional Instability) or atraumatic shoulder instability?
- In a small minority of patients, the shoulder can become unstable or unbalanced without a history of injury or repetitious strain.
- In such patients, the shoulder may feel lax or dislocated in multiple different directions, meaning the ball may dislocate out the front, back, or bottom of the shoulder. This is called multidirectional instability.
- These patients have naturally lax ligaments throughout the body & may be “double-jointed.” which causes
What are the signs & symptoms of MDI (Multidirectional Instability) or atraumatic shoulder instability?
Signs & symptoms of multidirectional instability of the shoulder vary from person to person, but may include:
- Pain & instability with pushing, pulling, or carrying heavy objects.
- Pain & instability when performing an overhead activity.
- Pain & instability during or after exercise.
- A feeling that the shoulder joint is shifting including in bed at night.
- The sensation of the shoulder slipping out of its socket & back into it.
- Fear or panic of putting the shoulder in certain positions.
- Numbness & tingling sensations in the affected arm.
- Clicking and popping sensations with movement.
- Weakness when performing athletic movements, & especially overhead & away from the body.
- Loss of performance ability in sports activities.
- Fatigue with repetitive activity.
multidirectional instability problems are generally related to repeated episodes of dislocation.
Repetitive subluxations often cause patients to be worried about performing certain daily activities.
Vague symptoms are described, such as an unclear pain in the shoulder. Patients may sense that something is not quite right with the shoulder during activities when the arm is in a certain placement.
There may be pain caused by inflammation in the shoulder joint.
Patients may show signs of labrum & rotator cuff injuries that have resulted from increased movement in the joint.
How Does It Feel?
Symptoms of multidirectional instability of the shoulder may vary in terms of location & intensity. Although sometimes the shoulder can be dislocated, often people report their shoulder will “slip” out of its socket & go right back into it. They also may report instances where they feel like their shoulder is about to slip in & out of its socket, but they modify their activity to prevent it from happening. Some individuals will even avoid certain motions due to their fear that the shoulder will “pop out.”
Pain caused by multidirectional instability may be felt in a number of areas around the shoulder joint—in the front of the shoulder when pitching a baseball, or throughout the entire shoulder after a repeated activity like swimming. Symptoms of MDI vary widely; your healthcare professional will likely take a detailed health history and perform a thorough physical examination to make an accurate diagnosis.
Assessment
Assessment within the context of this section refers to the approach used to determine the appropriate prescription of exercise and not the definitive diagnosis of multidirectional instability.
The effect of correction
The effect of manual correction is a key component of the Program because it determines whether the physical therapy rehabilitation program is likely to be of benefit, as well as the scapula & head of the humerus (HH) position the patient will need to retrain & maintain throughout the program. The effect of manual correction involves therapist assistance of the scapula & head of the humerus(HH) when the patient performs an objective test to determine whether the assisted placement improves the result of that test. Poor scapula positioning through the range and altered muscle patterning are predominant properties of nontraumatic MDI and so an immediate improvement with manual assistance is likely to confirm the presence of these properties & indicate that the patient is suitable for treatment with exercise therapy. Although the reliability and validity of some shoulder corrective techniques have been established, to date, research on the reliability and validity and on establishing normative values for shoulder corrective tests in MDI is incomplete.
The steps for evaluating the effect of correction are as follows:
- The patient performs an objective test i.e. movement test, & strength test & the therapist notes scapula dyskinesis, symptoms onset, range of motion or strength deficits, & head of the humerus subluxation, depending on the objective test chosen. The physical therapist manually assists the scapula, then the head of the humerus, and then a combination of both into a position that corrects the faulty biomechanics e.g. correction into scapula upward rotation if the downward rotation was observed at the same time as reassessing the objective test; noting any improvements in pain levels, range of motion, strength, patient apprehension or HH subluxation.
- The correction placement that most improves the patient’s symptoms is the one that is retrained & adopted throughout the Program.
- If none of the patient’s objective tests improve with correction, the physical therapist must consider whether there are other factors contributing to the patient’s presentation, such as a structural lesion or an inflammatory component. Further investigations or medical management may be warranted prior to commencing physical therapy rehabilitation program in such cases.
- Scapula correction is performed by supporting the patient’s scapula, under the axilla through a range or during an isometric strength testing Commonly, flexion and abduction range of motion or isometric external rotation is used to assess the effect of scapula correction. The most common positions of scapula correction for patients with multidirectional instability are one of or a combination of slight upward rotation (10°), elevation (one cm to two cm), and posterior tilt
- Humeral head correction is performed by applying a gentle anterior-to-posterior or posterior-to-anterior pressure to the HH For assessing the correction of anterior translation, the assessment of active ER in varying degrees of abduction or isometric ER is commonly employed. For assessing the correction of posterior translation, flexion or horizontal flexion range of motion is commonly employed.
- Standing scapula setting into upward rotation shrug in 20 degrees to 30 degrees of abduction. Scapula setting into the upward rotation and posterior tilt, using a scapula resistance band.
- ER, internal rotation (IR), and extension control These drills are utilized primarily for scapula control with added motion; however, strengthening of the rotator cuff and scapula muscles also occurs. External rotation (ER) drills are commenced in standing at 0 degrees with a TheraBand™. If the patient has difficulty performing the ER drill, extension is utilized until more control is reached. Extension drills are usually performed to impartial only because extension past the side of the body can cause an uncontrolled anterior tilt of the scapula. IR often commences once ER control is established by 20 repetitions ER with red TheraBand™ because IR can result in an increased anterior tilt of the scapula and increased pectoralis dominance if commenced too early.
- ER strengthening This drill is performed in a side-lying position & is utilized for supraspinatus & infraspinatus strength deficits, as well as for building posterior glenohumeral muscle bulk (mass). The majority of patients need to perform this drill off support from neutral to 45° of ER because lowering the arm past neutral may cause posterior translation of the HH.
- Posterior musculature development: The aim of stage 2 is to develop more posterior musculature to act at a buttress to prevent the posterior Head of the humerus translation. Scapula drills, ER in standing, & side-lying are all progressed by a rising in load. Posterior deltoid drills, performed as a bent-over row, are usually commenced prior to other deltoid drills because the short lever extension may be easier to control & translation of the head of the humerus is limited compared to other deltoid drills. In addition, a standing extension row in 45 degrees of abduction is performed to commence control in a higher range of elevation
How is atraumatic shoulder instability diagnosed?
A thorough history & physical examination are the keys to the diagnosis & treatment of Multidirectional Instability. The classic findings are:
A history of generalized loosen. No history of a forceful dislocation event. A history of repeated episodes of instability.
The patient’s history may reveal a current injury, an obvious dislocation, or a change in sport & training that has led to instability in a formerly healthy shoulder joint.
A general examination of joint movability is very helpful. By moving the arm around in several placements, the doctor can evaluate full shoulder movement. Multidirectional laxity may be present in a couple of shoulders even though only one may be bothersome to the patient. A patient with multidirectional instability has an increase in glenohumeral translation shoulder joint movement in multiple directions, and symptoms can be recreated in one or more directions. More than two cm of motion during the sulcus test suggests the presence of multidirectional instability. The diagnosis of MDI should be based on this result combined with the evaluation of overall shoulder movement & the symptoms triggered when the doctor moves the arm in several directions.
Further evaluation may involve some form of visual study of the shoulder joint.
X-rays are always obtained, primarily to rule out any related injuries that would require treatment. Occasionally the images reveal a congenital present since-born abnormality that may be contributing to the instability.
An MRI can reveal other sources of shoulder pain that may require more than a rehabilitation program alone for successful treatment.
An arthroscopy allows the surgeon to visually assess the structures of the glenohumeral joint using a tiny fiberoptic instrument. Other related injuries may be revealed since increased motion & repeated trauma in the joint can lead to injuries of the labrum & partial thickness rotator cuff tears. With arthroscopy, these injuries can be treated at the time of the examination, & the patient may go on to realize a pain-free shoulder with a rehabilitation program.
Can This Injury or Condition Be Prevented?
- Although multidirectional instability can’t be totally prevented, rehabilitation can lessen the effects of shoulder loosening. Controlling multidirectional instability of the shoulder falls into three categories:
- Strengthening the scapular muscles & the muscles of the rotator cuff by improving shoulder mechanics, muscular imbalances, body realization & muscle control. Athletes may perform scapular & rotator cuff strengthening exercises three to four times per week.
- Monitoring the volume of activity performed. This practice is just as main as strengthening exercises. Baseball players, for example, will often use pitch counts to keep away from overuse injuries; swimmers attempt to maintain weekly yardage totals.
- Maintaining proper form and technique. Good coaching on proper form & technique by a qualified coaching professional can be a valuable asset in preventing injuries in the young athlete population.
How is MDI (Multidirectional shoulder Instability) treated?
The treatment for multidirectional instability must be individualized for each patient.
Non-Operative Treatment
- Most patients with multidirectional instability can be treated non-operatively with a rehabilitation program emphasizing muscular rehabilitation. Rehabilitation focuses on strengthening the rotator cuff muscles & periscapular muscles around the scapula. Strengthening these muscles provides dynamic stability to the joint, which is especially important when the static strength provided by the ligaments is lacking.
- The vast majority of patients (about 90%) who follow a rehabilitation program diligently for at least six months will achieve pain relief. Those who continue with a daily or weekly exercise program as outlined by the doctor are most likely to have a successful improvement.
- Athletes may also benefit from sport-specific physical therapy that includes technique evaluation & modification. Often this type of program can help eliminate faulty techniques that may have led to the development of symptoms.
- Patients who do not get relief from symptoms with a rehabilitation program are a treatment challenge. Only about 70-80% of these patients eventually achieve long-term stability, with 60-70% reaching the level of athletic participation they enjoyed prior to the instability.
Improvement from Multidirectional Instability is a prolonged process that usually requires a six-month physical therapy rehabilitation program. If this succeeds, an ongoing continuance program to prevent the return of impermanence symptoms is often necessary. If six months of rehabilitation physical therapy program has not controlled the impermanence, surgery may be indicated.
Physiotherapy management
Non-operative physical therapy management will vary in a case-by-case situation and each patient’s care should be individualized to target their specific goals. Rehabilitation management is largely impairment-based & response-driven as there is little high-level confirmation to assist decision making but commonly includes:
- Education to prevent a recurrence
- Postural re-education
- Motor control training of specific muscles during functional activities rotator cuff muscles & scapular stabilizers
- Strengthening in particular the deltoid, rotator cuff muscles, and scapular stabilizers
- Stretching in particular posterior shoulder structures, pectoralis major & minor, and any other muscles with flexibility or stretchability impairments
- Manual therapy targeting impairments of movability in the glenohumeral, acromioclavicular, sternoclavicular joints, & cervicothoracic spine
Nonsurgical rehabilitation for multidirectional shoulder instability
The program will vary in length for each individual depending on some factors:
- Severity of injury
- Acute versus chronic condition
- ROM/strength status
- Performance/activity demands
- Return to sports criteria:
- Absence of pain
- Full range of motion
- Little to no apprehension
- Imaging with magnetic resonance imaging may be considered in the patient
Phase 1: Acute Motion Phase
Goal:
- Reestablish nonpainful ROM
- Retard muscular atrophy
- Decrease pain/inflammation
- Decrease Pain and Inflammation
Therapeutic modalities:
Cryotherapy :
- Cryotherapy literally means cold therapy. When you press a bag of frozen peas on a swollen shoulder, you are treating your pain with a modern (although basic) version of cryotherapy.
- Cold therapy can be applied in various ways, including ice packs, coolant sprays, ice massages, whirlpools, & ice baths. When used to treat trauma at home, cold therapy refers to therapy with ice & gel packs that are usually kept in the freezer until needed. These remain one of the simplest, time-tested remedies for managing pain & swelling.
- Using cold therapy: Cold therapy is the I component of R.I.C.E. means rest, ice, compression, and elevation. This is a treatment recommended for the home care of injuries, particularly ones caused by sports (i.e.MDI)
Electrotherapy
Electrical stimulation may be used at different levels to treat patients who are suffering from shoulder instability. As previously stated, electrical stimulation is limited in the muscles around the muscle joint, and difficult trying to restore the synchronization of the shoulder muscle
TENS – Transcutaneous electrical nerve stimulation:
The TENS Unit can be used to treat an array of shoulder pain types, both acute and chronic, including shoulder instability The treatment works the same way as for other parts of the body. Place the electrodes near the shoulder joint area. Adjust the settings to get proper relief for the patient.
It is effective in neck pain or spasm patients who have trigger points over the trapezius muscle or are associated with myofascial pain syndrome. Ultrasound therapy inactivates the trigger points & reduces the tension of soft tissues.
Isometrics:
Isometric exercises are performed by simply shrinking your muscles without any other motion.
Isometric exercise is favorable:
In the beginning stages of therapy, when inflammation may make shoulder motion painful When trying to improve muscular function in a specific shoulder range of motion. Shoulder isometrics can be performed up to 3 times per day
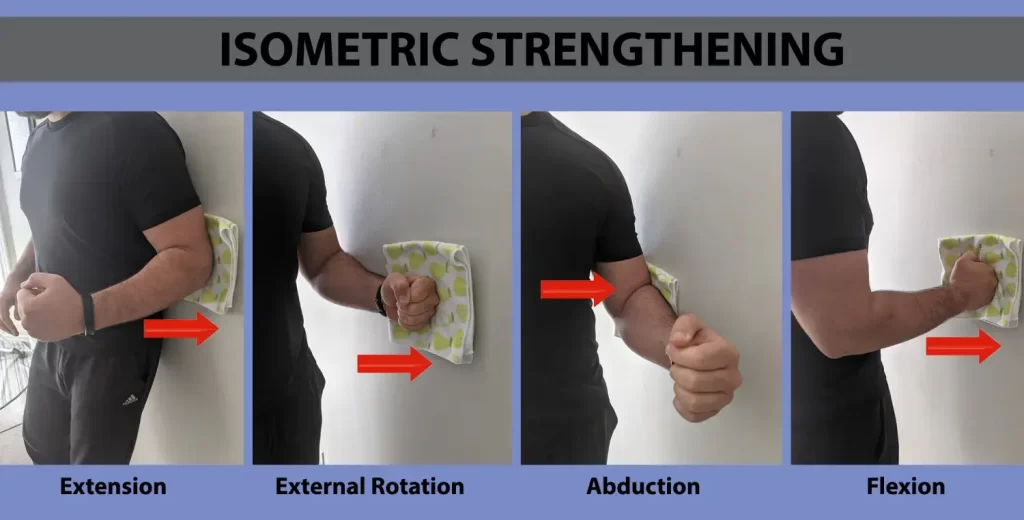
Isometric Shoulder Flexion
To perform shoulder flexion:
- Stand facing a wall.
- Bend(flex) the elbow on the side of the shoulder you want to exercise & make a fist.
- Place a folded towel or small pillow(wedge) between your fist & the wall, & gently push your hand into the wall.
- Hold on to it for 10 seconds, & then slowly release(relax).
- There is no need to try to press the wall over. Just push gently into the wall to activate your shoulder joint muscles. This is especially important if you start isometric exercise after shoulder surgery. If it causes pain, take a break for 2-3 minutes.
- Do ten to fifteen repetitions, & then turn on to the next exercise: isometric shoulder abduction.
Isometric Shoulder Abduction
To perform isometric shoulder abduction exercises:
- Stand about 6 inches from a wall, but turn your body perpendicular to the wall.
- The shoulder you wish to exercise should be near the wall.
- Make a fist & press it into the wall. You may wish to use a folded-up towel for a little extra relief.
- Gently push into the wall as if you are trying to lift your arm out to the side, and hold it there for 5 seconds.
- Slowly release pressure on the wall.
- Again, no need to push the wall over; a gentle push will do. Perform ten to fifteen repetitions, & then move on to the next exercise
Isometric Shoulder External Rotation
Isometric shoulder external rotation is an exercise that can help stronger your rotator cuff muscles, & specifically your teres minor & your infraspinatus. To perform the exercise:
- Continue standing at a right angle to a wall about 6 inches from it.
- The shoulder you are exercising shoulder be nearest to the wall.
- Bend(flex) your elbow nighty degrees, make a fist & push the back of your hand into the wall as if you were rotating your arm outwards.
- Use a small towel or pillow for a little padding, if needed.
- Gently push into the wall for about 5 seconds.
- Slowly release pressure on the wall.
- Stop the exercise if you feel any increased pain and discomfort.
- Do ten to fifteen repetitions, & then start the next isometric exercise.
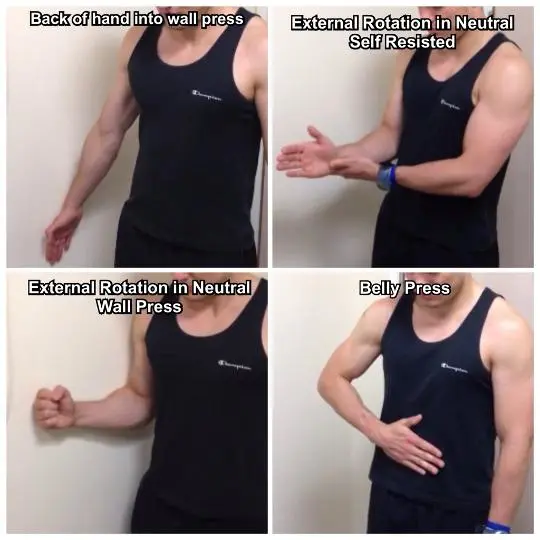
Isometric Shoulder Internal Rotation
To perform isometric shoulder internal rotation:
- Position your body so that you’re facing a door frame or an out-to-door corner of a wall.
- The shoulder joint you’re exercising should be near the door opening or corner.
- Bend(flex) your elbow nighty degrees, make a fist, & gently press into the corner wall or door jamb as if you were trying to rotate your hand inward towards your belly button.
- Remember, no movement should occur in your shoulder during the exercise.
- Use a small folded towel for padding.
- Push and hold for 5 seconds, & then slowly release.
- Perform ten to fifteen repetitions, & then move on to the final shoulder isometric exercise: isometric extension.
Isometric Shoulder Extension
To perform isometric shoulder extension:
- Stand about 6 inches away from a wall with your back facing it.
- Keep your elbow joint straight so your hand is down near your hip.
- Make a fist, & gently push it into the wall behind you.
- Remember, very little motion should occur at your shoulder joint.
- Hold the pressure against the wall for five seconds, & then release slowly.
- Do 10 to 15 repetitions.
Range of motion exercises:
Pendulum exercise
- Bend over at the waist & let the arm hang down.
- Using your body to initiate motion, swing the arm gently forward & backward, and in a circular movement.
Shoulder shrug
- Shrug shoulders upward as illustrated.
- Shoulder blade pinches
- Pinch shoulder blades backward & together, as illustrated.
Isometric internal and external rotation
Stand & face a doorjamb or the corner area of a wall. Keep the elbow tight against your side & hold the forearm at a right angle to the arm. For internal rotation, place the palm opposed to the wall with the thumb facing up. For external rotation(ER), place the back of the hand opposed to the wall with the thumb facing up. Pull or press against the wall & hold for five seconds
Ball squeeze exercises
Holding a rubber ball or tennis ball, pinch the ball & clasp it for five seconds
Supine passive arm elevation
Lie on your back. Hold on to the operated arm at the wrist with the across from hand. Using the strength of the other arm, elevate the affected arm upward, as if to bring the arms overhead,& slowly lower the arm back to the bed(normal position).
Supine Passive Forward Flexion
Lie on your back. Holding a stick in hands about shoulder width apart, elevate the involved arm with the help of the uninvolved arm up & then back as if to reach overhead. Hold for 5 to 10 seconds
Supine external rotation
Lie on your back. Keep the elbow of the operated(affected) arm as opposed to your side with the elbow bent(flex) at 90 degrees. Using a cane or long stick in the other hand, push as opposed to the hand of the affected arm so that the operated arm rotates outward. Hold for ten seconds, relax & repeat.
Behind-the-back internal rotation
Sitting in a chair or other standing, position the hand of the operated arm back(behind) your back at the waistline. Use your other hand, as illustrated, to help the other hand higher toward the shoulder blade. Hold 10 seconds, relax, and repeat.
Hand-behind-the-head stretch
Lie on your back. Clasp your hands & place your hands on the back of your head with the elbows joint facing forward. Slowly down the elbows to the side to stretch the shoulder outward. Hold for 10 seconds, & then return to the starting normal position.
Standing external rotation
Stand in a doorway facing the doorframe of a wall. With your hand as opposed to the wall or doorframe, keep the affected arm tightly against your side, & the elbow at a right (90-degree) angle. By moving your feet, rotate your body apart from the door or wall to produce outward rotation at the shoulder.
Supine cross-chest stretch
Lying on your back,& hold the elbow of the affected arm with the opposite hand. Gently stretch the elbow toward the other shoulder. Hold for 10 seconds.
Sidelying internal rotation stretch
Lie on your side with the arm placement so that the arm is at a right angle to the body & the elbow is bent(flexed) at a 90º angle. Keeping the elbow at a right-point of angle, turn the arm moving forward as if to connect the thumb to the table. Apply a gentle stretch with the other arm. Hold 10 to 15
seconds.
External rotation at 90º abduction stretch
Lie on your back. Support or carry the upper arm, if needed, with towels or a small pillow. Retain the arm at 90 degrees to the body & the elbow bent(flexed) at 90 degrees. Using a stick & the other arm, stretch(length) as if to bring the thumb to the corner of the table close to your ear. Hold for
ten seconds, & then return to the starting normal position
Corner Stretch
Standing facing a corner or open doorway & placing the arms as shown with the elbows at shoulder level. The arm should be at a nighty-degree angle to the shoulder with a nighty-degree angle at the elbow. Try to keep the forearms erect similar to the position of football goalposts. Moving your feet forward, moving your body gently forward toward the corner or doorway until a stretch(length) is felt in the front of the shoulder. Hold 10 seconds.
Wall slide stretch
Stand facing a wall and relax; place both arms on the wall. Slide the hands and arms upward. As you are able to stretch(length) the hand & arm higher, you should move your body nearest to the wall. Hold for ten seconds, lower the arm by pressing the hand into the wall & letting it slide slowly down.
Supine or Seated Forward Elevation (Overhead Elbow Lift)
During this phase, you can stand or sit in a chair and relax to normal. If it is easier, begin lying on your back until you achieve maximal movement, then use the standing or seated position. Assume an erect position with an erect posture, looking straight ahead. Place your hands on each of the two thighs with the operated thumb facing up and your elbow straight. In the starting, this length is not performed slowly with the affected arm but uses the normal hand for assistance going up & coming down. As you become stronger, you can elevate & lower your arm without assistance. The operated arm should
rise as high as possible or to your endpoint(last) of pain. Try to raise the arm by hinging at the shoulder against elevating the arm with the shoulder
blade.
Standing forward flexion
Stand facing a mirror with the hands turned so that the thumbs face forward. Elevate the arm upward keeping the elbow straight. Try to raise the arm by hinging at the shoulder against elevating the arm with the shoulder blade. Do 10 repetitions to 90 degrees. If you can do this without lifting the shoulder blade, do 10 repetitions fully overhead.
Criteria for Progression to Phase 2
- increase Full ROM
- Minimal pain or tenderness
- Good manual muscle testing of internal rotation, external rotation, flexion, and abduction.
Phase 2: Intermediate Phase
Goals
- Regain and improve muscular strength
- Normalize arthrokinematics
- Improve neuromuscular control of shoulder complex
- Initiate Isotonic Strengthening
isotonic strengthening exercise
isotonic exercise work for muscle groups through joint movement. Shoulder isotonic exercises, therefore, move the shoulder joint to function with the surrounding muscles. There are several exercises you may already bring off that can be described as isotonic exercises for the shoulder.
Six Isotonic Shoulder Exercises
All these exercises can be performed using dumbbells or weight cuffs; you can also bring off some using resistance bands, barbells or cables, and pulleys. Use a weight that allows you to work your muscles to fatigue, but does not exceed your known level of performance.
Seated Shoulder Press
- You can do shoulder pushes using dumbbells, resistance bands, or barbells. They work the anterior and medial deltoids, traps, and triceps. This exercise can be done standing or seated in a chair.
- Sit upright on a chair that has back support(assisted sitting).
- Hold the weight or weights level to your chin with your elbows bent(flex).
- Press the weight straight upward until your arms are upright, but your elbows are not locked.
- Pause briefly and lower to chin level.
- Repeat 10 times.
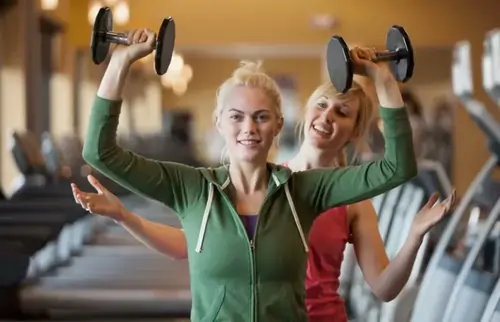
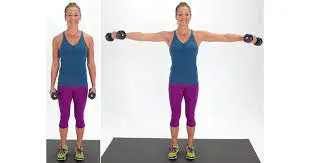
Lateral Raises
- Lateral raises are also done with either dumbbells, weight cuffs, or resistance bands. They work the lateral, or side of the deltoid muscles.
- Stand with your feet shoulder-width to the side, with your knees slightly bent(flex).
- Hold or grasp the weights at your sides with your arms straight(extend) but elbows unlocked.
- lift the weights equally to either side until they are at shoulder height.
- Pause and lower.
- Repeat 10 times.
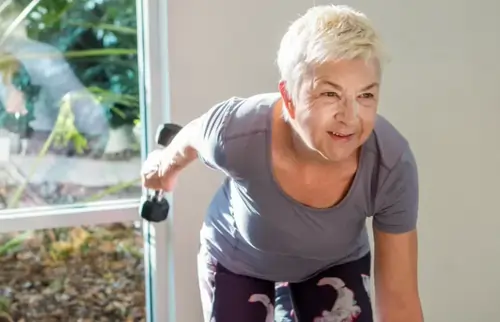
Kickbacks
- Kickbacks are performed using dumbbells. They work the posterior deltoid muscles
- Stand with your feet hip-distance apart and knees slightly bent.
- Bend(flex) over at the waist so your upper body is parallel to the ground.
- Hold the weights in each hand & elevate them with straight arms up in the back of you.
- pinch your shoulder blades together as you elevate the weights.
- Pause and lower the weights.
- Repeat 10 times.
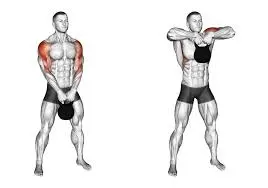
Upright Row
- Upright rows are performed using light barbells & lighter-weight cuffs, although two dumbbells, resistance bands, or a kettlebell could also be substituted. They work the anterior & lateral deltoids and your trapezius muscle.
- Stand upright with your feet hip-distance to the side & your knees slightly bent(flex).
- clasp the barbell lightly in front of you with your arms straight.
- Bend your elbows to elevate the weight up to shoulder level.
- Pause and lower.
- Repeat 10 times.
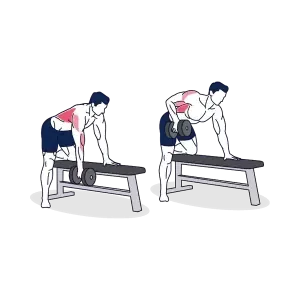
Bent Over Rows
- Bent-over rows help strengthen & lengthen the tendons of the rotator cuff as well as the rear deltoids. This move can be made with dumbbells, resistance bands, or barbells as well. Take care to breathe throughout the motion & don’t allow momentum to take over. If you jerk the barbell up instead of smoothly controlling the action, you’re taking some work out of your shoulders. Stand upright with your feet hip-distance to the side & your knees slightly bent(flex).
- If you prefer, you can place your right hand and right knee on a chair for additional stability. In this position, you’ll work your left side first before switching to working the right.
- With the weight in front of you, held with an overhand grip, hook at the hips & drop your upper torso forward without rounding your back.
- Keeping your gaze on the ground around 3 feet in front of you, & pinch your shoulder blades together as you pull your elbows back, lifting the weight up toward your ribs.
- Hold the weights at your ribs for a count or two, pinching your muscles.
- Release the weight back to the starting position, controlling & resisting the decline by pinching your shoulder & arm muscles.
- Repeat 10 times.
Normalize Arthrokinematics of the Shoulder Complex
- Continue joint mobilization.
- Patient education of mechanics & activity modifications of activity/sport.
Improve Neuromuscular Control of Shoulder Complex
- Initiation of PNF
- Rhythmic stabilization drills
- Regain and improve muscular strength
- Improve neuromuscular control of shoulder complex.
Continue Use of Modalities (As Needed)
Criteria for Progression to Phase 3
- Full nonpainful ROM.
- No palpable tenderness.
- Continued progression of resistive exercises.
Phase 3: Advanced Strengthening Phase
Goals
Capsular Stretches
Address joint imbalances as necessary
Continue Use of Modalities (As Needed)
Continue Isotonic Strengthening (Progressive Resistance Exercises)
Continue Eccentric Strengthening
Emphasize PNF
Initial Isokinetics exercise
isokinetic training of the shoulder internal and external rotators: (a) scapular plane motion performed in a sitting position with the shoulder joint in 45° of flexion and abduction, and (b) frontal plane motion performed in a supine position with the shoulder in 90° of abduction. Isokinetic resistance exercise training was performed three times per week for a period of 6 weeks. The athletes were instructed to perform the internal and external rotation motion as rapidly as possible for 30 s at a 180°/s isokinetic velocity.
Criteria for Progression to Phase 4
- Full ROM.
- No pain or palpable tenderness.
- Satisfactory isokinetic test.
- Satisfactory clinical examination.
Phase 4: Return to Activity Phase
- Improve strength, power, and endurance.
- Improve neuromuscular control.
- Prepare patient/athlete for activity.
Goals
- sustain an optimal level of strength, power & endurance.
- continuously increase activity level to prepare the patient for a fully functional return to activity/sport.
- continue All Exercises as in Phase three Continue Capsular Stretches
- Initiate Interval Program
- Continue Modalities (As Needed)
- Follow-up Isokinetic test.
- Progress interval program.
- Maintenance of exercise program.
strengthening exercises for shoulder instability
The goal of exercise for shoulder instability is to restore as much innate stability as possible in the shoulder joint. The shoulder joint becomes most dependent on muscle strength to protect the joint with daily living activities. The 2 primary areas of focus for rehab for instability include the rotator cuff muscles that directly support the shoulder & supporting muscles in the mid-back & shoulder blade area.
Rotator cuff exercises
There are 4 muscles that comprise the rotator cuff: the supraspinatus, infraspinatus, teres minor, & subscapularis. When properly coordinated & utilized, these muscles keep the ball of the joint (head of the humerus) in an optimal placement as the arm moves within the socket (glenoid). This keeps it stable & prevents unnecessary joint damage & strain.
Scapular or Core Exercises
If you’re trying to move your arm & don’t have adequate shoulder blade strength & coordination, you are putting your shoulder at risk for re-injury & aggravation. Addressing the shoulder blades & upper and mid back is a part of the shoulder rehabilitation program that is often neglected. Incorporating these little exercises will make a huge difference in your overall shoulder function.
Shoulder Blade Squeezes
This is one of almost all basic moves you can start with to strengthen the muscles between the shoulder blades, particularly the middle & lower trapezius muscles (which are often overpowered by the upper trapezius muscle along the top of the shoulder joint & neck). It might seem simple but can be strong to coordinate with an injured shoulder or chronic bad (faulty) posture. Sit or stand with very good posture (shoulder back, head above the shoulders, & chin slightly tucked) Imagine there is a quarter between your shoulder blades as you pinch the shoulder blades together (shoulder retraction) and hold for five-ten seconds Make sure you are keeping the shoulders relaxed & do not let them elevate up toward your ears. You may feel a length in the front of the chest if you tend to slump or have tight pectoralis muscles. Repeat for 10-15 repetitions for two-three sets total
Progress to resistance exercises as tolerated. However, keep this one in mind with daily activities to build your awareness of your posture & keep these muscles strong.
Rows
This traditional move is essential for shoulder blade coordination & is the next step in the progression from the exercise above. Grab a resistance band & secure it around a sturdy surface at navel height hold each end of the band in one hand with the elbows bent (flexed) to 90 degrees at your side & palms facing each other. Stand at a distance that gives you enough resistance without assessing your neck. Keep good posture as you pinch the shoulder blades together just like the exercise above & pull your elbows back behind your body. Hold for two-five seconds before returning to the starting position & repeat. Continue for 2-3 sets. Progress the band resistance as tolerated. another plus you can utilize row machines at the gym to complete this movement as well
Prone Arm Lifts
- These final 3 moves can feel quite difficult with an injured & unstable shoulder. You should not attempt these until you’re in the later stages of recovery & have better control of your shoulder motion.
- Lie on your stomach with your forehead supported by a small towel roll or pillow if needed
- Focus on optimal posture while keeping your neck as rested as possible
- Start with your arms out to the side to make a T shape
- elevate your arms up toward the ceiling as you squeeze the shoulder blades together & hold for two-five seconds
- Repeat for 10-15 repetitions
- Next, bring your arms up overhead to make a Y shape position
- elevate your arms up toward the ceiling again & squeeze the shoulder blades & hold
- Repeat for another 10-15 repetitions
- Finally, bring your arms completely overhead into a shape position
- Again, elevate your arms up toward the ceiling while still squeezing the shoulder blades this will be the hardest to coordinate & is in a position of instability- so start slowly and relax.
- Repeat for 10-15 repetitions
- Continue for 2-3 sets of each exercise
- If you’re having trouble coordinating any of these movements, they get progressively harder, go back to the other exercises & return to these later when you’re ready
- To progress, hold small weights in your hands or hold them for five-ten seconds with each repetition
Operative Treatment
- The most challenging patient to treat surgically is the athlete whose symptoms continue following a physical therapy rehabilitation program. Often athletes are successful in their sport because of increased loosen in the joint; so surgical intervention should only be considered when the patient has a thorough understanding of multidirectional therapy & is aware that stability with surgical correction is always achieved at the expense of moving. Patients who can voluntarily dislocate the shoulder are needful surgical candidates; surgery is rarely successful for them.
Traditional Approach
- The traditional surgery for multidirectional instability is designed to make the joint capsule smaller & decrease glenohumeral movement. This open surgical procedure is called an extensive inferior capsular release & imbrication.
- The lower portion of the joint capsule is cut & overlapped to tighten the ligaments & make the capsule smaller.
- During this procedure, the subscapularis muscle is detached so the surgeon can fit the joint capsule. It is reconnected at the end of the procedure. The success rate of this procedure is about 75% in a group of carefully selected individuals (those who were determined to be good surgical candidates after a careful history and examination). Since there can be a substantial loss of movement with this procedure, athletes may not be able to return to competition after surgery.
Arthroscopic Techniques
- Recently, new arthroscopic techniques have been developed to correct MDI.
- Capsular plication is a pleating & stitching technique that uses arthroscopic sutures to decrease the size of the joint capsule. Thermal therapy is a technique that uses thermal energy to shrink(contract) the capsule. This method is being evaluated & looks promising, as it is less invasive & may decrease the loss of movement. These arthroscopic techniques are very exciting, but remain experimental, especially for athletes who require stability & the preservation of movement.
Operative Recovery
Following surgery:
- For the first four to six weeks, the patient usually wears a sling (belt) to protect the repair as it heals.
- During this time of immobilization, elbow & wrist motion are maintained with a gentle range of movement exercises.
- Once the beginning healing process is complete, the patient begins a very slow & progressive physical therapy rehabilitation program to restore movement & eventually strengthen the shoulder.
- Patients who have had open surgical procedures are put on an exercise program planned to guard the subscapularis muscle from injury. This muscle was detached during the procedure to give the surgeon fit to the joint capsule & then reconnected at the end of the procedure.
- Patients who undergo an arthroscopic thermal stabilization treatment require a longer period of immobilization often up to eight weeks to allow scar tissue to replace the thermally treated tissue. This scar tissue formation is essential to the success of this procedure, as the thermally treated tissue is at risk of tensile (stretching).
- Full participation in sports is generally restricted for nine to twelve months following a repair.
Multidirectional shoulder instability surgery recovery
After operation:
Recovery from an atraumatic shoulder sprain depends on how well your shoulder joint responds to physical therapy rehabilitation program & whether you need surgery. Depending on the atraumatic shoulder dislocations, the severity of the instability can be cured within a few weeks with non-surgical treatment.
- Patients usually wear the sling for the first four to six weeks to protect the repair while it heals.
- During this immobilization period, elbow & wrist motions are maintained by a series of gentle exercise motions.
- After the initial healing process is complete, the patient begins a very slow & progressive physical therapy rehabilitation program to restore movement & ultimately strengthen the shoulder joint.
- Patients with open surgery undergo a physical therapy program to protect the subscapularis muscle from injury. This muscle has been removed during the procedure to allow surgeons access to the joint capsule & is reattached at the end of the procedure.
- Patients undergoing arthroscopy treatment for thermal stabilization require a longer immobilization period (often up to 8 weeks) so that scar tissue can replace the heat-treated tissue. This scar tissue is usually important for this procedure’s success because the heat-treated tissue is at risk of lengthening.
- Full participation in sports is usually limited to nine to twelve months after improvement.
- With repeated use of the shoulder joint for a long time, atraumatic shoulder dislocation can recurrent. Therefore, it is important to make shoulder-strengthening physical therapy exercises a priority throughout your sports career.
FAQs
What is MDI?
MDI refers to a multidirectional loosening of the shoulder joint with associated instability. The instability generally results from stretching of the shoulder’s supporting ligaments, which leads to the increased motion of the glenohumeral joint.
Will physical therapy succeed?
Research suggests that many patients (80%) will improve with physical therapy alone. The patient’s diligence & commitment to a daily maintenance physical therapy program is required for the best chance of success.
2 Comments