
Knee Pain When Kneeling Position
Introduction
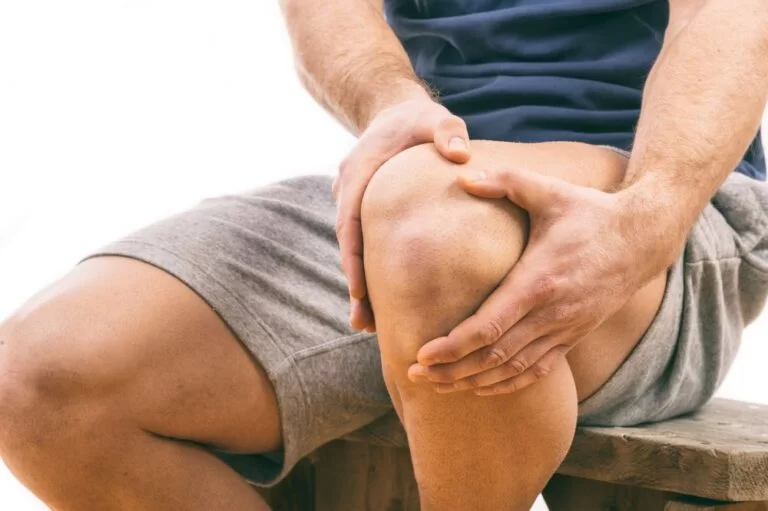
Pain in the knee Kneeling is a typical issue that can seriously interfere with day-to-day tasks. As soon as you kneel, after kneeling for a time, when you stand up after kneeling, or later after kneeling for a while, you may experience knee pain.
When one already has knee pain, kneeling can be difficult. Even though their backgrounds and religions are diverse, some customs—like kneeling—are followed by all of them. Many people would argue that kneeling is a youth activity.
Kneeling can become uncomfortable and challenging as we age. But knee discomfort does not only affect the elderly; younger people can also experience it. We have treated patients for knee discomfort at Core Concepts who were as young as 14 years old.
When kneeling, you can experience burning, stabbing, stinging, or acute pain, or your knee might just feel a little sore.
Here, we examine the most typical causes of knee pain while kneeling, assist you in determining which one is the source of your discomfort, and then discuss treatment options.
What Causes Pain When Kneeling?
While kneeling, a variety of factors can induce knee pain, which is typically brought on by inflammation or an injury.
Kneeling causes knee pain most frequently due to:
- Bursitis in the knee
One typical reason for knee pain when kneeling is knee bursitis.
The most prevalent reason for knee pain when kneeling is most likely bursitis. Bursas are tiny sacs filled with fluid that act as a cushion between soft tissues and bones. Bursitis is a condition when a bursa swells and becomes inflamed due to repeated pressure or friction applied to it.
Since an inflamed bursa will hurt under any pressure, it should come as no surprise that bursitis is one of the most common reasons that kneeling causes knee discomfort. It soon becomes a vicious cycle because extended kneeling regularly is one of the main causes of bursitis.
When kneeling with knee bursitis, you usually experience a sudden pain when the bursa gets compressed, followed by a continuous dull aching sensation. Many discover that when they stand up after kneeling, the intense pain in their knees returns when the bursa that was squashed swells and expands again.
Bursae are fluid-filled sacs that act as joint cushions. Inflammation and excess fluid buildup are the causes of bursitis. It may result in knee pain, swelling, and pressure.
Located above the patella, or knee cap, is the prepatellar bursa. Overuse, injuries, or prolonged kneeling can all cause repeated pressure on the knee, which can lead to bursitis in this area.
It may also arise from the subsequent causes:
- Infection consequences from diabetes,
- Rheumatoid arthritis,
- Metabolic disorders
- Work or interests that need repetitive motions
When kneeling, four types of knee bursitis commonly cause knee pain:
Housemaid’s knee is another name for prepatellar bursitis. People who bend forward on their knees for extended periods are more likely to develop prepatellar knee bursitis. For tradespeople who work on their knees for extended periods, such as roofers and carpet layers, housemaids’ knee is a common issue. Swelling occurs in the front of the knee and surrounding the kneecap due to inflammation of the prepatellar bursa, which is situated directly in front of the kneecap.
Infrapatellar Bursitis.
Clergyman’s Knee is another name for infrapatellar bursitis. People who spend a lot of time kneeling more upright or resting back on their heels instead of bending forward are more likely to develop infrapatellar bursitis. This is because of where the infrapatellar bursa is located on the front of the skin, beneath the kneecap.
Suprapatellar Bursitis.
Quadriceps tendon bursitis is another name for suprapatellar bursitis. The most frequent cause of a pocket of swelling in the lower leg area right above the knee is supraspinatus tendinitis. Knee discomfort is a common sign of bursa inflammation and irritation, which causes the bursa to enlarge and become highly painful when pressure is applied through it.
Semimembranosus Bursitis.
Another name for semimembranosus bursitis is a Baker’s cyst. When kneeling, the most common cause of pain in the back of the knee is semimembranosus bursitis. Between the calf and hamstring muscles at the rear of the knee is the semimembranosus bursa. Even while kneeling doesn’t usually result in the formation of a Baker’s cyst, you will be able to tell if you have one if you sit back on your heels, which will compress the bursa.
2. Arthritis of the Knee
Knee pain during kneeling is a common complaint among those with knee arthritis. When arthritis strikes, the cartilage and bones in the knee joint deteriorate, causing the bones to scrape against one another and cause severe pain.
One common reason for knee pain is osteoarthritis (OA) of the knee. Over time, structural alterations to the joints cause cartilage degradation in OA. Versus Arthritis states that while osteoarthritis (OA) can strike anyone at any age, it is more common in women 50 years of age and above.
Joint stiffness and inflammation can frequently result in discomfort when engaging in the following activities as osteoarthritis of the knee advances:
- Walking,
- Running,
- Bending, and
- Kneeling
There’s a strong possibility you have arthritis in your knee joint if you are over 60 and experience pain when you bend your knee. You can have kneecap arthritis if your knee discomfort is more in the front of your knee when you kneel.
When kneeling with arthritis, the pain usually feels achy and gnawing and can last for some time after you’re standing up. Walking around for a few minutes is the greatest technique to relieve the discomfort since it lubricates the knee.
Patellar tendinitis causes knee pain when kneeling. When you bend over and experience pain just below the kneecap, you may have a jumper knee, also known as patellar tendinitis.
An inflammation of the patellar tendon is called patellar tendonitis. It produces soreness and pain in the area between the patella and the little hump on the front of the shin bone called the tibial tuberosity, which is the dip below the kneecap.
Patellar tendonitis is not usually brought on by kneeling; instead, it usually comes on by repetitive sports activities like kicking and jumping. If the patellar tendon is inflamed, it will be very sensitive to the touch and create severe pain in the knee when kneeling. Instead of causing knee discomfort after kneeling, patella tendonitis pain during the kneeling phase usually goes away as soon as you stand up.
Jumper’s knee, commonly known as patellar tendonitis, is a painful inflammation of the tendons that attach the kneecap to the shinbone.
Due to repetitive action, symptoms may include knee pain and swelling when bending or straightening them.
The primary symptom is increasing knee pain:
- Following extended periods of sitting,
- When rising and falling from a chair,
- When going up and down stairs
- During kneeling,
- When squatting or kneeling
Meniscal tear. A knee injury may occasionally result in cartilage tear. Pain and swelling can result from these sharp borders being lodged in the joint. When exercising, people frequently experience a “catching” feeling in their joints.
Syndrome of patellofemoral pain. Leg alignment issues, tightness, and muscular imbalances are the usual causes of this illness. It results in knee pain and sporadic “buckling,” which is the inability of your knee to support your weight. It’s not because of a wound.
Pain around the patellofemoral joint, which is located between the kneecap and the thigh bone (femur), is a frequent knee condition known as patellofemoral pain syndrome or runner’s knee.
This ailment can produce pain and stiffness, which can make it challenging to:
- Climb stairs,
- Bend over, and
- Carry out other regular tasks
5. Osgood Schlatters Disease
The most common reason toddlers and teenagers experience knee pain when kneeling is Osgood Schlatters Disease.
Osgood Schlatter’s symptoms are typically associated with growth spurts, in which the muscles and tendons of the knee become extremely strained as the knee bones grow more quickly than they should. The area is extremely painful due to the injury caused by the tibial tuberosity on the front of the shin as a result.
The inflammation of the region just below the knee, where the kneecap tendon connects to the shinbone, is the cause of knee discomfort in Osgood-Schlatter disease.
Sports-related repetitive motions like running, soccer, gymnastics, and kneeling can make this problem worse.
When kneeling, people with Osgood Schlatters frequently complain of excruciating knee discomfort. Osgood Schlatters is more likely to be the cause of knee discomfort you experience when kneeling if you are between the ages of 9 and 16.
6. kneecap dislocation.
This indicates that knee discomfort and swelling are caused by your kneecap sliding out of place. Your physician may refer to this as “patellar dislocation.”
7. syndrome of the IT (iliotibial band).
A band of tough tissue called the iliotibial (IT) goes from your hip to the outside of your knee. Overeating in any activity might eventually lead to inflammation. The outside side of the knee hurts as a result. It is a regular occurrence for runners traveling downhill.
How Does an Injury to the Knee Feel?
It is painful! However, depending on the nature of the issue, the pain you experience and its location can change. You might have:
- Usually occurs with knee bending or straightening (especially as you go downstairs)
- Swelling
- Problems applying pressure to the knee
- Having trouble moving your knee
- Buckling or “locking” the knees
See your physician if you experience these symptoms. They’ll examine your knee. You could also require X-rays or an MRI for a more detailed view of the joint.
How Can the Pain Be Decreased?
Your injury will determine your strategy of action. Most of the time, mild to moderate problems resolve themselves. You can: expedite the healing process
Rest your knee. Take a couple of days off from doing anything hard.
To reduce swelling and pain, apply ice. Every three to four hours, devote 15 to 20 minutes to it. Continue for two to three days, or until the pain subsides.
Compress your knee. Wrap the joint with sleeves, straps, or an elastic bandage. It will reduce edema or provide reinforcement.
When you sit or lie down, elevate your knee and place a pillow under your heel to reduce swelling.
Take anti-inflammatory medications. Pain and swelling can be reduced using nonsteroidal anti-inflammatory medicines (NSAIDs), such as naproxen or ibuprofen. Observe the guidelines provided on the label. Unless your doctor instructs you otherwise, you should only occasionally use these medications due to the possibility of negative effects.
Exercises for strengthening and stretching should be done as recommended by your physician. You might also wish to continue with physical treatment.
Treatments
- Patellofemoral syndrome
Exercise and alterations in lifestyle are usually effective in treating patellofemoral pain syndrome.
Additional techniques include:
- The RICE approach involves
- Rest,
- Ice,
- Compression, and
- Elevation.
- NSAIDs
- Physical therapy,
- Orthopedics, and
- Some surgical techniques
2. Osgood-Schlatter disease
Some of the therapies and oversight are:
- Medications for pain relief
- Stretching,
- Monitoring vitamin D levels,
- Taking supplements, and altering one’s exercise level as needed
3. patellar tendonitis
The best course of action for treating a jumper’s knee is to avoid any activity that aggravates the ailment until it heals. Additional therapies could be:
- NSAIDs,
- Rest,
- Elevating the knee,
- Applying cold packs, and
- Strengthening and stretching
4. Arthritis
While there isn’t a cure for OA, there are a few ways to manage pain:
- Medicine, including NSAIDs and painkillers, as well as cortisone injections;
- Physical therapy;
- Assistive devices;
- Surgery;
- Lifestyle changes
5. Bursitis
If the triggering action or movement is stopped, knee bursitis may resolve on its own without the need for medical intervention.
Additional techniques include:
- Taking a knee rest to prevent overuse
- Use a heating pad or warm bath to help reduce swelling and apply an ice pack or cold compress using over-the-counter (OTC) pain medicines, such as acetaminophen to support and cushion the knee, especially during sleep
Additional actions could also consist of:
orthopedic treatment antibiotics assistive devices to reduce any stress on the joint, corticosteroid injections in rare instances, and surgery to remove a bursa if an infection is the cause
What Can Do About Pain When Kneeling?
Modify the way you knee
Pain may increase when you’re kneeling on hard surfaces like the floor. Because they put less strain on the kneecap, other surfaces can help reduce pain. These include sitting down to pray or kneeling on a softer surface.
To quickly elevate the buttocks away from the heels, position a block under the sitting bones. The pressure on your kneecaps is lessened by the extra elevation beneath your buttocks. If that is insufficient, further reduce the flexion of the knee by placing a bolster across the heels or a folded blanket right behind the knee.
Rest your knee: Steer clear of exercises like kneeling, kneeling, and stair climbing that make the discomfort worse. Give yourself a vacation from repetitive knee-bending activities.
Ice your knee: Several times a day, apply towel-wrapped ice packs to the injured area for 15 to 20 minutes at a time. Icing can aid in lowering swelling and inflammation.
Support and Elevation:
Knee brace: A knee brace can help to stabilize and support your knee joint. Pick a brace that fits well and is comfortable.
Elevation: Try to keep your knee as high as possible above your heart, particularly when you’re sleeping or relaxing. This can decrease swelling.
Which stretches are most effective for treating knee pain
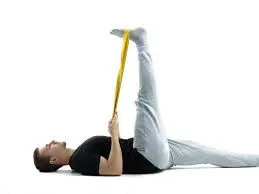
1. Straight legs Raise
Three sets of ten repetitions should be performed, four or five days a week, to feel the exercise work the front of the thigh. When one’s strength increases, one might want to switch to an ankle weight or ask a trainer how to do a comparable exercise on a weight machine.
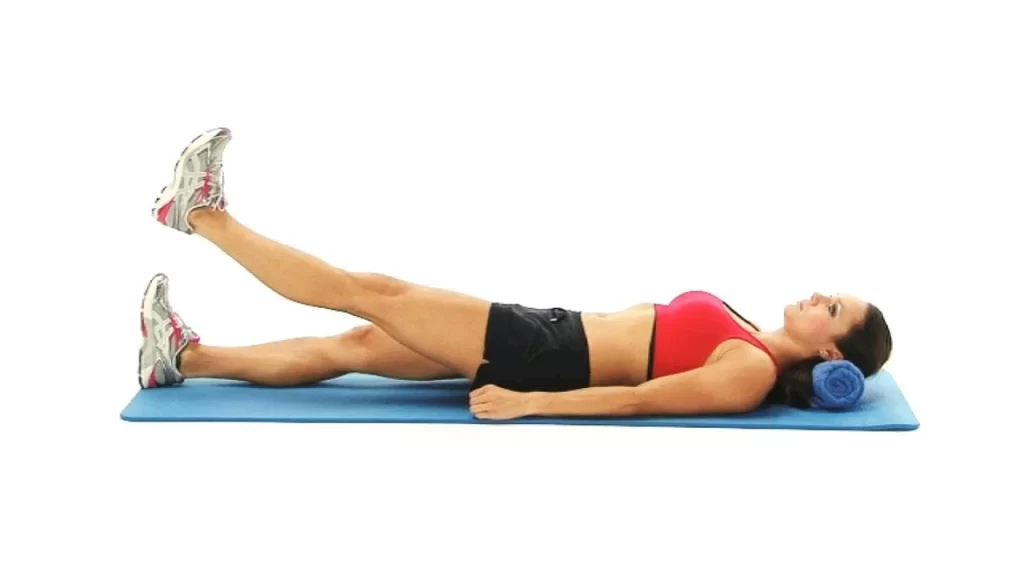
How to do it:
- While maintaining the affected leg straight, lie on your back and bend the knee of the other leg.
- Pull the afflicted leg’s thigh muscles taut and elevate it gradually, carefully, to the level of the other knee.
- Squeeze and contract your thigh muscles, then hold the pose for five seconds.
- Return the straight leg to the floor while you relax.
Straight Leg Lift: Advantages
Straight leg raises can help reduce pain and facilitate a variety of daily activities, such as kicking a soccer ball, getting in and out of a car, and lifting your leg to put on shoes. In particular, straight leg raises are beneficial for:
- strengthening the hip flexors to increase hip stability and mobility
- Strengthening and stabilizing your core can help you manage your back pain and avoid symptoms in the future.
- Improving stability around the hip joint and strengthening weaker muscles can prevent injuries to your knees and hips.
2. Calf stretches while standing
This exercise should be performed against a wall so that the calf and heel muscles are stretched. Try to do two sets of six reps six or seven days a week.
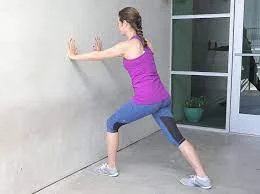
- Place the unaffected leg forward and stand with your back to the wall, your knee slightly bent.
- With the toes pointed slightly inward and the heel flat on the floor, maintain a straight rear leg.
- With your hands resting on the wall for support, hold the stretch for thirty seconds, and then take a thirty-second break. Avoid bending your back.
Why Do Calf Stretches Help?
- Make use of your calf muscles. Your calf muscles are used for a variety of daily activities, such as walking and standing, so they are prone to fatigue and stiffness.
- Boost your long-term flexibility.
- reduce tightened muscles.
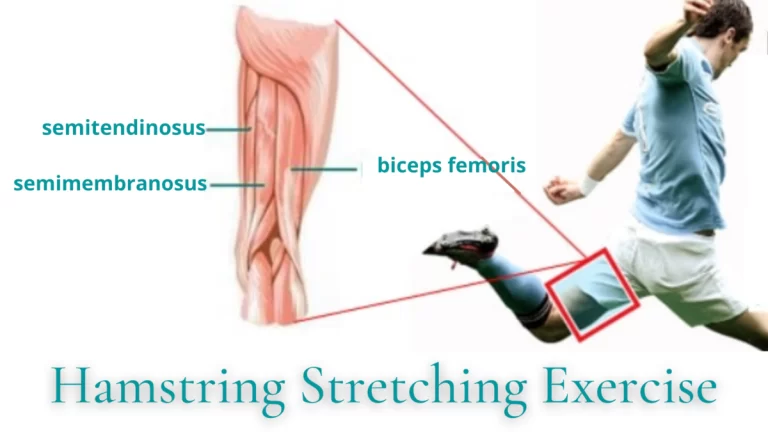
3. The hamstring stretch in the supine
This stretch should be felt behind the knees and at the back of the thighs. Repeat four or five days a week, two or three times.
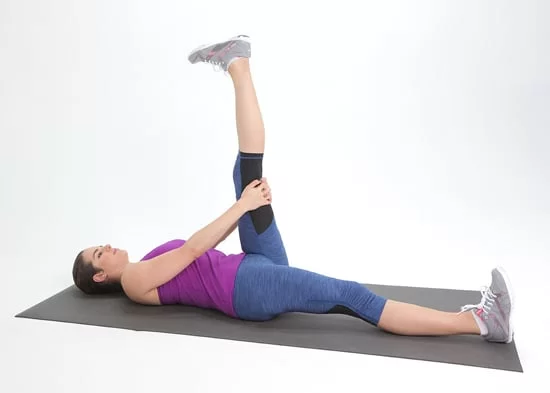
- Elevate one leg off the ground and bring it to your chest while lying on the floor with your legs bent. Hold hands at the thigh rather than the knee.
- Stretch the same leg straight and slowly bring it up to your head until you feel a stretch.
- If you are unable to hold onto the leg, wrap a band or towel around your thigh.
- After maintaining the posture for thirty to sixty seconds, switch to the other leg.
4. Calf raises
To support this workout, a person needs a chair. They should be able to feel the burn in their calf muscles. Try to do two sets of ten reps six or seven days a week.
- Grasp the rear of the chair and maintain a balanced posture.
- Elevate the opposite foot off the ground and place the weight on the foot of the injured knee.
- As much as you can, elevate the foot’s heel on the ground, and then gradually bring it back down while maintaining your weight on the ball of the foot.
The Advantages of Calf Raises Healthier Ankles and Stronger Calves:
- Specific Development of Calf.
- increased stability and strength in the ankles.
- Improved Sports Efficiency.
- Improved coordination and balance.
- A higher leaping ability.
- Decreased Risk of Trauma to the Lower Leg.
- Improved positioning of posture.
- Flexibility and Advancement.
5. Half squats
This stretch should be felt in the buttocks and rear of the thighs. Perform three ten-rep sets four or five days a week.
- Place your feet shoulder-width apart and, if needed, grasp onto a chair.
- As though sitting on a chair, maintain your chest raised and gradually drop your hips by around ten inches. Avoid bending from the waist.
- After putting your weight into your heel, squat for five seconds.
- Raise the body back up to a standing position by forcing through the heels.
Advantages of Half Squats
There are benefits to learning to squat below parallel, including increased active knee stability and a decreased risk of sports-related knee injuries. To avoid damage, however, good form is required. If you cannot squat below parallel with proper form, it is wise to work on half squats while regularly training to increase your range of motion.
You can push past strength plateaus by purposefully performing half squats. Training half squats can help you push past your plateau if you have what’s known as a “sticking point” in your squat technique, where it becomes much more difficult during the top phase of the squat.
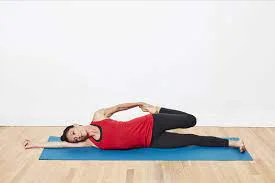
6. Abduction of the hip
The exercise should be felt in the thigh and buttocks, and three sets of twenty repetitions should be performed four or five days a week.
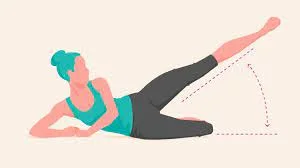
- With the wounded leg elevated and the other leg bent below, lie on the side.
- Lift the upper leg to a 45-degree angle while maintaining a straight, non-rotated knee.
- After five seconds of holding the pose, lower the leg and take a two-second break before continuing.
7. Wide Leg Stretch
One of the best stretches for opening up the muscles of the inner thighs is this one.
This stretch is more of an intermediate level though, as it does require somewhat flexible hamstrings.
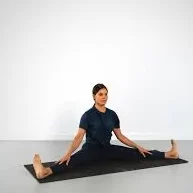
- Extend your inner thighs.
- Sit on the floor or on a mat to start.
- Form a “V” with your legs as you gradually spread them out to the sides as wide as feels comfortable for you.
- Make sure your toes are pointed up at the ceiling.
- Maintain a straight spine and sit up straight.
- Your hamstrings are most likely tight if you are unable to maintain a straight spine when bending your knees. One of the first two stretches might be a better fit for you in this situation.
Bending forward will increase the intensity of the stretch if it’s safe for your body to do so. Try to maintain your spine’s length as you bend forward.
After 30 seconds of holding the stretch, repeat three sets.
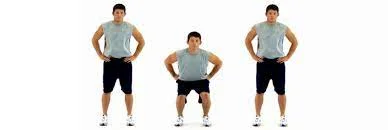
Do Exercises to Strengthen Your Knees
The muscles that surround your knee joint can be strengthened with the aid of knee-strengthening exercises. Stronger muscles ease the strain on your kneecaps, which lessens discomfort when kneeling. These are a few easy exercises that our Mobile Physiotherapy clinic team of physiotherapists recommends you do at home.
Knee circles exercise
How to carry it out
The knee circles exercise is a terrific stretch and an easy way to increase leg flexibility.
How to proceed:
- Take a straight stance and place your feet somewhat closer together than shoulder width apart.
- Move your knees in a circular motion while maintaining your arms across your chest or on your hips. Pay attention to the movement in your ankles and to keeping your feet flat on the ground.
- Continue until you start to relax.
Advantage of knee circle
Stretches lengthen and strengthen: Lower back spinal nerves are toned and knee strength is increased with reclined knee circles. The pelvic floor muscles, core, hips, and glutes are all gently affected by the circular motion of the knee, which tones the knees.
Range of Motion and Flexibility: Knee Circles While Standing When done as a warm-up, the pose gets the active joints ready for an increase in range of motion. When performing intense yoga poses like knee folding or twisting, this increased range of motion helps prevent injury.
Side Leg Raises
How to Perform Perfect Side Leg Raises
Start with two to three sets of ten to fifteen repetitions for side leg lifts. Based on your capacity to keep proper form during each set and repetition, choose your sets and reps.
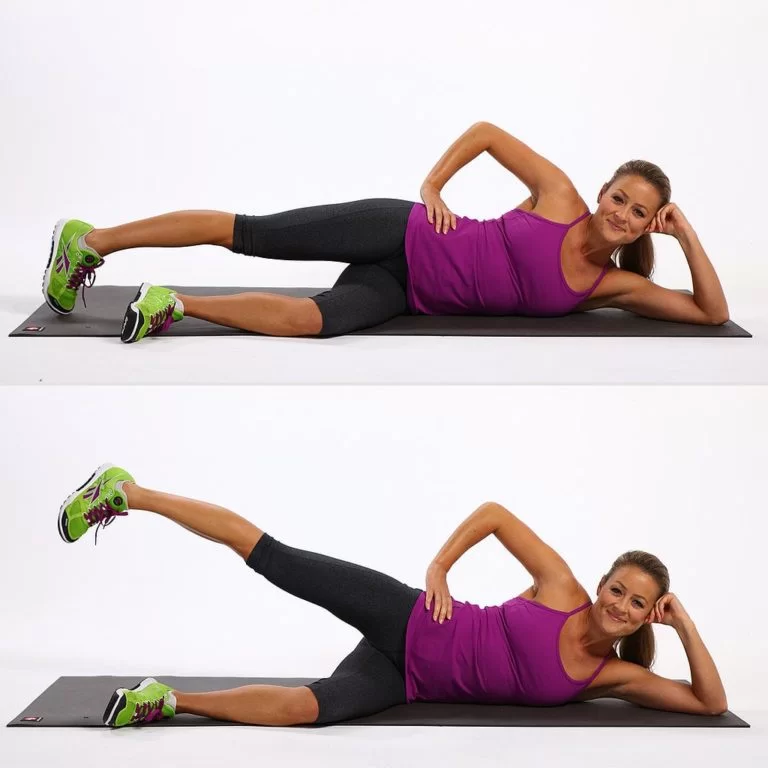
- To support your head and neck, use a little towel or your right hand under it. Maintain a neutral position for your head and neck. Keep your chin tucked in during the exercise, as if you were supporting an egg with it.
- To stabilize your upper body, place your left hand in front of your waist or on the side of your left hip. Your ribs should be down and your pelvis should be somewhat tucked in. Put your core to use. Without locking your knees, your legs should be fully extended and stacked on top of one another. Your torso needs to be in a straight line. This is where you should start for each further development.
- Lift your left leg 10 to 15 inches off your right leg to start the upward movement while keeping your alignment.
- Continue till the required number of times. Next, repeat on the other side.
Advantages of Side Leg Raises
- Side leg lifts increase hip range of motion. When performed correctly, the side leg raises to strengthen the hip abductor muscles, which are primarily the gluteus medius and minimus, which are responsible for lifting your leg away from your pelvis.
- Side leg lifts strengthen your core. The side leg raise works your cores, hip flexors, and lower back muscles, which makes it an excellent exercise for building functional strength and stability in your core.
- Leg lifts from the side are flexible. After you’ve gotten comfortable with the basic side leg raise, think about attempting a more difficult version with tension bands or ankle weights around your legs. Try the standing side leg raise variant if you’d like to engage your stabilizer muscles more.
Sit to Stands
Sit to stands’ are an excellent method for building bone strength. The exercise simultaneously strengthens the quadriceps and the gluteus maximus. To raise yourself to a standing position, you must engage these two strong muscle groups. By working these muscle groups, you can protect your spine and strengthen your back, butt, and legs. Better balance and a decreased risk of falling will result from stronger legs, back, and butt.
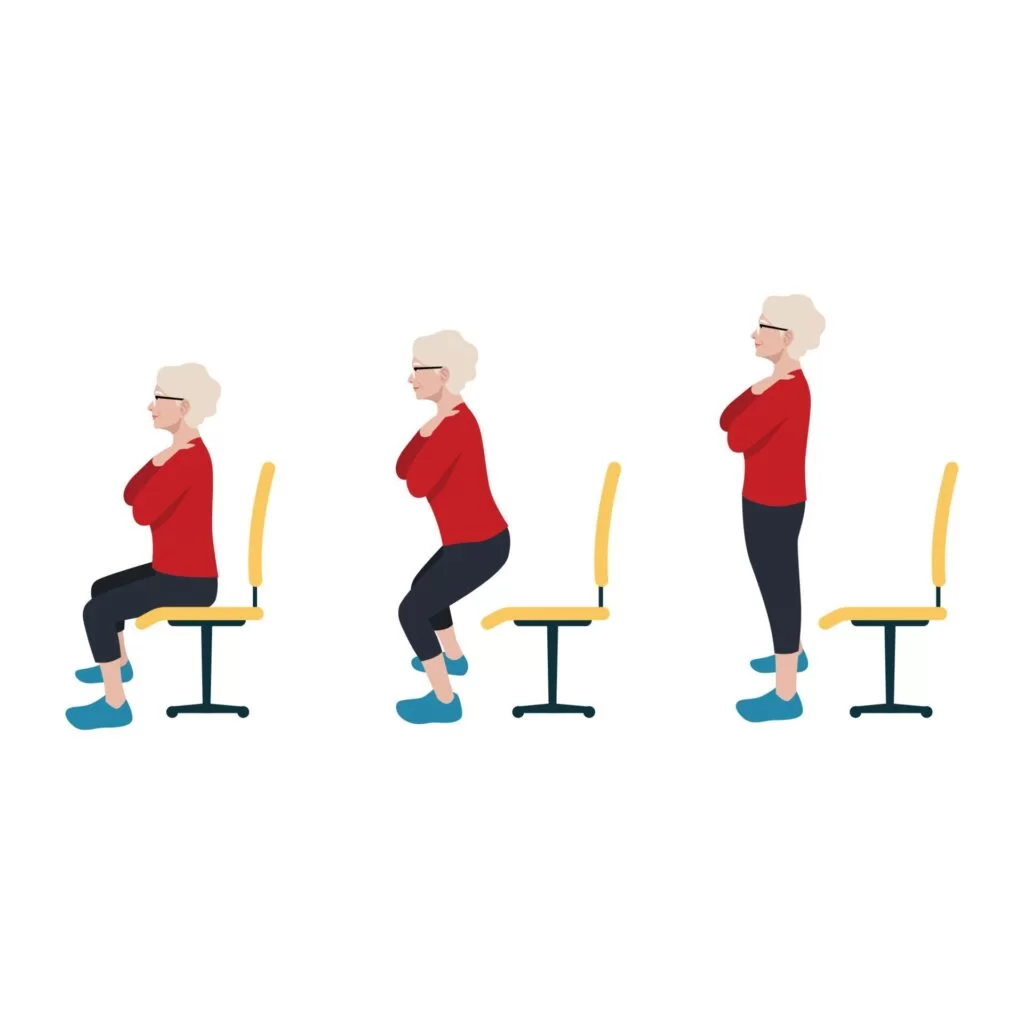
Equipment required: A chair
Performing the Exercise:
- Choose a chair and take a seat.
- Go as far ahead as you can by sliding.
- Reposition your feet such that the front edge of the chair meets your heels.
- Place feet shoulder-width apart and bend your knees 90 degrees.
- To stand up, bow your torso forward and push through your heel. If needed, gently place your hands on the chair.
- Two times a day, perform five to ten repetitions.
Tips
- Make sure your back stays as long as it can be. Don’t alter its form.
- Picture a buoyant balloon located above your eyes in the middle of your head. Think of this balloon lifting you while you work out.
- Keep your knees from collapsing inward.
- Inhale when you are in the starting posture, and exhale when you are pushing up.
- Avoid favoring one side or using your hands excessively to assist you. You should only use your hands to maintain balance when necessary.
- When standing up, make sure your knees stay inside your toes. This will increase the pressure on the knees by activating the thigh muscles.
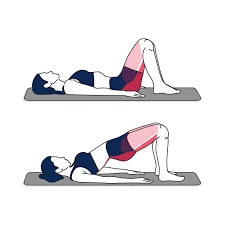
Bridging of Glute / Bridge pose
The hamstrings, gluteus maximus, and hip abductors are among the stabilizers of the posterior chain that are activated by a simple bridge. As these muscle groups gain strength, so will your total strength. In addition to helping with posture, a strong core can also reduce lower back pain.
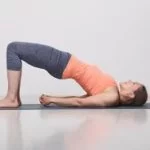
Recommended Equipment: Exercise Mat
Carrying out the exercise:
- With your hands by your sides, your knees bent, and your feet flat on the ground beneath your knees, lie on your back.
- Lean your lower back against the floor while contracting your lower abdominal muscles.
- Elevate your hips off the ground by pressing your heel into the ground. Make an effort to extend your legs straight and your shoulders straight, without using your lower back muscles.
- Pull your belly button back towards your spine while contracting your core.
- After some time of holding—five to ten seconds—return to your initial posture.
- Finish all three sets of ten reps.
Tips:
- Make sure you don’t elevate your hips too high to maintain proper form. An excessive extension of the lower back may result in back strain. By maintaining your stomach and buttock muscles contracted, you can prevent overarching your back.
- Lower your pelvis back to the floor if your hips are lowering while attempting to maintain the bridge position. Until you develop enough buttock strength, you might need to begin by holding the bridge position just a little bit off the ground for a short period.
Glute Bridge With Hamstring Curl On One Leg
This is a glute bridging version that also works your hamstrings. A fantastic low-load exercise to develop the glutes and lower abdominals is the single-leg bridge.
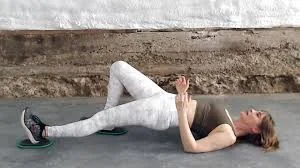
Needed Equipment: Towel and Exercise Mat
Carrying out the exercise:
- lie on your back down and Put a cloth under your right foot.
- Using your lower abdominals, gently tuck your tailbone under your body and draw your tummy under your belly button.
- Elevate your hips off the ground by pressing your heel into the ground. Make an effort to extend your legs straight and your shoulders straight, without using your lower back muscles.
- Using the towel, move your right leg forth and backward while maintaining that stance.
- Maintaining your alignment as you lower your body to the mat will allow you to return to starting posture.
A few things to watch out for
- Take care not to slouch your shoulders forward or tighten your neck. Additionally, your entire back needs to be supported by the mat.
- When lowering oneself, the lower back should come into contact with the floor before the glutes. Should it be the other way around, your lower back will be put under undue strain due to your back’s arched posture.
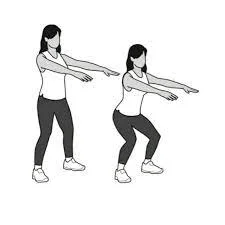
Double-Leg Squat
The thighs (hamstrings & quadriceps) and the buttock muscles are the primary objectives of the squat workout. But the squat variation we suggest will work your buttocks. When performing this exercise, your ankle mobility, back muscles, calves, and core strength and stability are all vital. The largest muscle in the human body, the buttocks, must be strengthened to increase its ability to support the knee. This will assist in reducing knee pain as well as lower limb pain in general.
Performing the exercise:
- Hold your chest out and up while standing with your head pointing front.
- Spread your feet slightly wider than shoulder-width apart. To maintain your equilibrium, hold your hands straight out in front of you. Alternatively, you can clasp your fingers or bend your elbows.
- As if you were seated on an imaginary chair, recline. As you descend, allow your upper body to bend forward, maintaining a flat or slightly rounded lower back.
- Lower yourself till your knees are over your ankles and your thighs are as parallel to the floor as you can. Regain the feeling of pressure on your heels.
- Return to standing position by pushing through your heels and raising your upper body simultaneously.
Advice:
- When squatting, avoid allowing your lower back to arch excessively.
- Make sure that at no point during the squat does your knee extend past your toes. The knee’s compressive forces will rise as a result.
VMO mini squads
This is an excellent workout for knee rehabilitation, especially if you have patella femoral pain syndrome or patella mal-tracking.
It balances the thigh muscles by bypassing the vastus medialis.
As with any strengthening exercise, only undertake it if you are not in discomfort during, after, or the next day. And you should select a resistance that allows for this.
.
step by step
- Step your feet hip-width apart and slightly release your knees; this will serve as the beginning and end of each repetition.
- Next, begin to squat down gradually by bending your knees and hips. Maintain your weight on your heels and extend your buttocks as you descend.
- Similar to a standard squat, the lowest position of this kind should only allow your knees to drop to 60 degrees. This means that your knees should never cross your toes.
- Now, carefully bring your knees back to the starting position.
- Select a resistance that is low for endurance and high for strengthening.
- For strength, do six to ten repetitions on each side, repeating for three to five sets in total.
- You should perform 15–25 repetitions on each side for three sets of repetitions to build endurance.
- For strength, rests should last three minutes, while for endurance, they should last no longer than thirty seconds.
- Once you have increased resistance, you should try to train in either session two or three times a week.
Heel slide on Wall Slides
If you need extra help with this exercise, loop your unaffected foot under your opposite foot as you slide your heel along the wall.
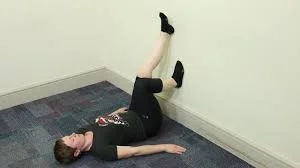
- Lie on your back, hips a few inches away from the wall.
- Bend your unaffected leg and lay your footsole on the wall.
- Extend your affected leg, heel up against the wall.
- Bend your knee slowly and slip your heel down as far as you can.
- Maintain this posture for 5 seconds.
- Then, with your unaffected foot below your opposite foot, help elevate your foot back to the starting position.
- Return your unaffected foot to its original position.
Benefits
Heel slides are typically used to rehab the body after surgery or injury. They are an easy method to keep your body active, especially if you are limited in mobility. Heel slides extend your knee’s range of motion, which improves mobility, flexion, and flexibility.
They also aid in strengthening the muscles, ligaments, and tendons in your hips and legs. Furthermore, keeping your leg moving with heel slides lowers discomfort and increases circulation, allowing you to feel better overall.
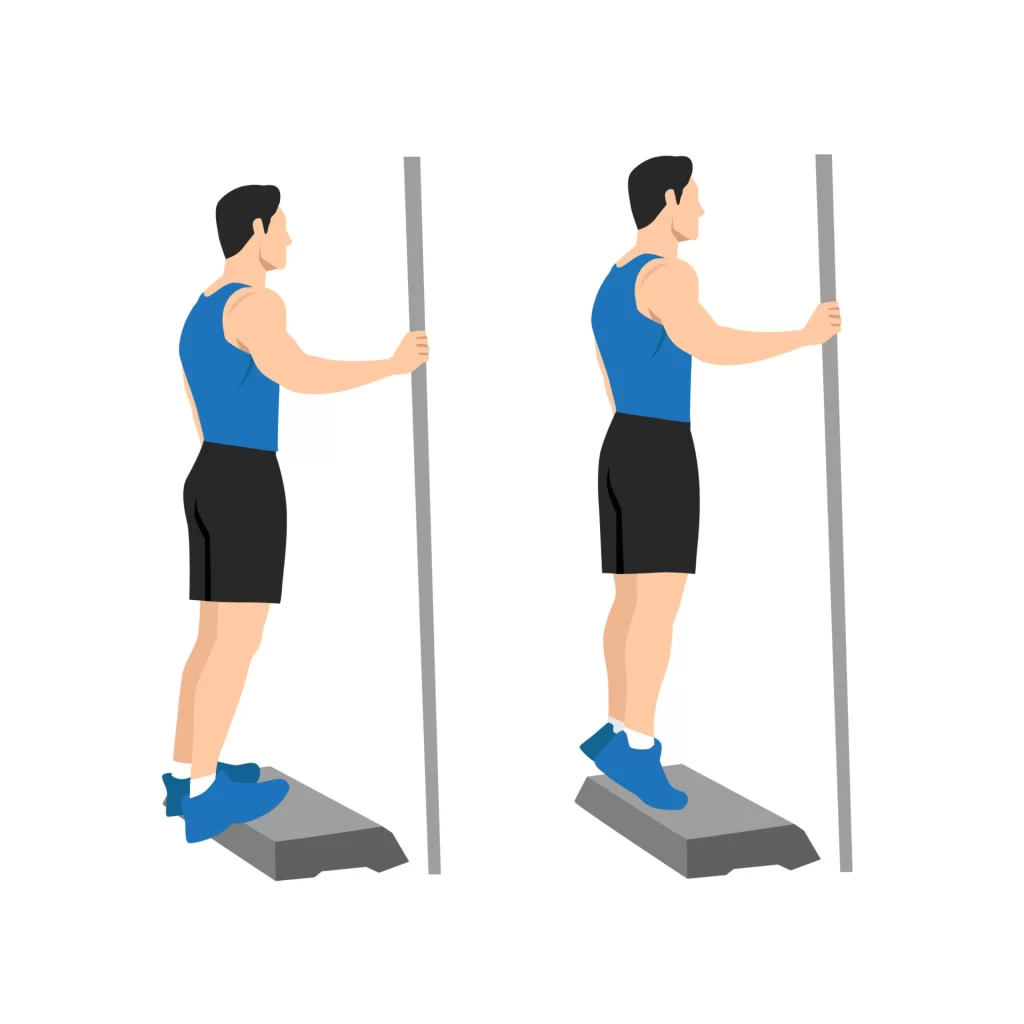
Calf raise
How to Perform Calf Raises Correctly
For calf lifts, start with a weight (if using one) that you can handle for 2-3 sets of 15-20 repetitions. Choose a weight that will allow you to keep good form throughout all sets and repetitions.

- Begin by standing shoulder-width apart, knees slightly bent. Your shoulders should be squarely above your hips, and your head and neck should be in a neutral position. Maintain your chin tucked throughout the action as if carrying an egg beneath your chin.
- Take a forward stride with your feet. Spread your weight evenly and have a steady posture by holding the floor with your feet.
- Hold dumbbells at your sides or place your hands on your hips. Hold your core while tensing your shoulders and hips. All repetitions should begin here.
- Maintain your alignment by shifting your weight to the balls of your feet, squeezing your calves, and pressing your head toward the ceiling while letting your heels leave the ground. At the apex of the movement, pause for 2-3 seconds.
- Return to the starting position slowly, allowing your heels to make contact with the floor. Before starting another repeat, take a little pause.
The Advantages of Calf Raises
Consider some of the advantages of performing calf raises regularly.
- Calf raises can aid in the development of greater calf muscles. Calf raises work the muscles on the back of your lower legs, especially the gastrocnemius muscle and the soleus muscle near your Achilles tendon.
- Calf lifts can help with ankle mobility and stability.
- Calf raises when done repeatedly, can help you build strong calf muscles that support your ankles. Calf raising can provide incredible strength.
- Calf raises can increase your performance during explosive activities like running and leaping by strengthening the muscles responsible for knee flexion and plantar flexion in your feet.
Hamstring stretches while lying down with a strap
- Stretch your legs wide apart and lie flat on the ground or on a mat.
- Bend the right leg and lay the strap across the right foot’s ball to extend the leg.
- Use both hands to hold the strap.
- Maintain your left leg extended and your foot flexed on the ground. The calf and thigh should be forced toward the ground as a result.
- Stretch your right leg slowly while keeping your foot flexed. The bottom of the right foot should face the ceiling, and the leg should be straight with a small bend in the knee.
- Pull the strap gently until your hamstrings are slightly tense.
- Stretch for ten to thirty seconds.
- Do this two or four times.
advantages of hamstring exercises
Stretches for the hamstrings can maintain their flexibility and looseness. Many advantages come with having flexible hamstrings:
Reducing injuries
When engaging in physically demanding activities like running, it is less likely that the hamstrings will be strained or torn.
Getting more adaptable
Stretches for the hamstrings can improve the hip’s range of motion and flexibility. People will find it easier to carry out daily duties like bending over and going upstairs thanks to these two advantages.
Side-Lying Quadricep Stretch
Stretching the Quadriceps Sideways
One excellent technique for giving your quads a good stretch is the sideways quad stretch. Concentrating on the stretch in your quadriceps can be facilitated by being in a supported position on the floor. To execute this quadruple stretch:
Lie on your side.
As much as you can, bend the knee of your upper leg and gently pull with your hand.
Hold your position for thirty seconds.
Go back to where you were before.
Work out each leg three to five more times.
Benefit
They support you in maintaining proper standing posture and stabilize your kneecap. They also facilitate your gait when you run or walk. You can extend your lower leg from your knee using all four muscles. And the muscle known as the rectus femoris helps you flex your thigh at the hip.
Clamshells
Although this exercise is easy, it has significant benefits. Increase the intensity of this exercise by employing a resistance band slightly above the knees as you gain strength.
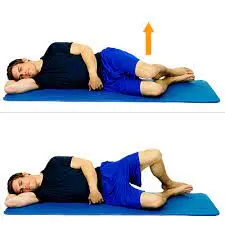
- Step 1: Lay on your side with your knees bent comfortably and your hips stacked.
- Step 2: Lift the top knee while keeping your feet together to resemble a clamshell opening.
- Step 3: Hold the posture for a short while before lowering the knee gradually back down.
- 15 to 20 repeat
Straight-Leg Lift
Instead of doing this exercise on a bed or other soft surface, do it on the floor.
- Step 1: Lay on your back with one leg straight and the other bent at a 90-degree angle.
- Step 2: Lift the straight leg about a foot off the ground and hold it while maintaining tight thigh muscles.
- Step 3: Lower the leg back to the ground gradually after a short while.
- Step 4: Work on the same leg for a few repetitions before moving to the opposite side.
- The number of repetitions you can perform will depend on your strength level. Take it slow and build your way up from a few.
Take a seat or stand
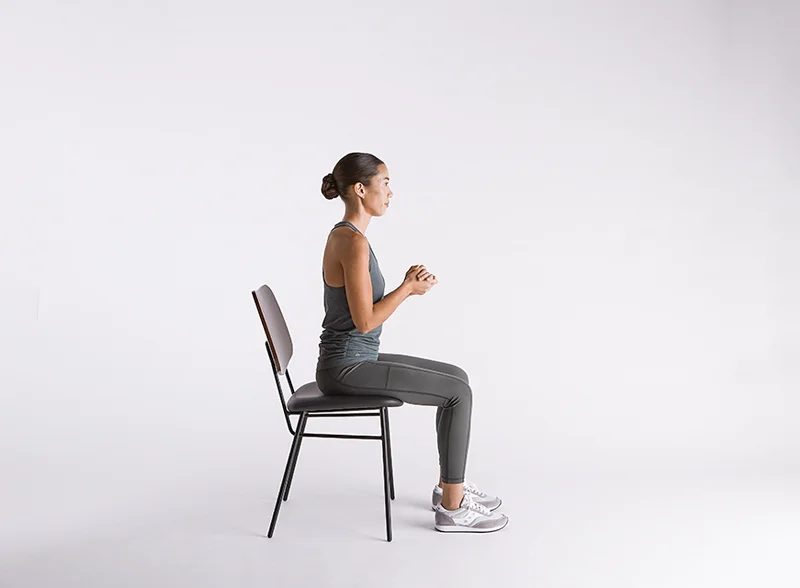
Make careful you do this workout in a solid chair.
- Step 1: Take a chair and sit slightly forward, placing your feet shoulder-width apart.
- Step 2: Without using your hands, slowly stand up.
- Step 3: Sit down and reverse the action.
- Step 4: Do this as often as you are able.
- Try to finish this workout in three sets.
Step Up with Leg Raise
You need to step up on something for this workout. Start with a step that is between 6 and 8 inches. A stair step can be used in its place if you don’t have a step platform.

- Step 1: Place one foot firmly on the platform while standing in front of it.
- Step 2: Step onto the platform and release the other foot, allowing it to hang loosely.
- Step 3: Step down and bring the hanging foot down to the floor.
- Step 4: After you’ve done the required amount of repetitions, repeat with the other foot and switch sides.
Once you can perform this exercise with ease, you can increase the difficulty by using tiny hand weights.
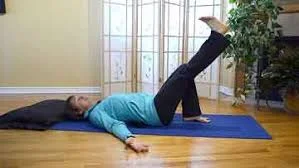
Gluteal Bridges
A set of muscles in the buttocks called the glutes affects how the knee moves.
- Step 1: Place your feet shoulder-width apart and bend your knees while lying on your back. Put your palms up and your arms relaxed, away from your body.
- Step 2: Raise your hips slowly off the ground and push them up such that your upper body is in a straight line from your knees to your shoulders.
- Step 3: Hold the pose for a short while before lowering your hips gradually to the ground.
- For this exercise, proper form is important. Avoid rounding or arching your back. Keep your feet, knees, and hips in line.
Alternative Methods:
- Swimming: Without straining your knees, this low-impact workout will help develop your leg muscles.
- Cycling: Another effective way to strengthen your legs without straining your knees is to ride a stationary bike.
- Yoga: A few specific yoga positions can assist in increasing your knees’ range of motion and flexibility. But it’s crucial to avoid painful poses and stick to ones that are suitable for your knee health.
- Tai Chi: This low-impact exercise enhances range of motion and balance by combining slow, careful motions with breathing techniques.
- Water Exercises: You can lessen the impact on your knees and get support by walking or doing light movements in a pool.
Yoga For Knee Pain When Kneeling
Warm up and gently mobilize
1. Cat-Cow Stretch (Chakravakasana)
Cat-Cow may be done on an exercise mat or a carpeted surface.
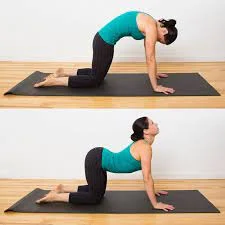
For good reason, the Cat-Cow Stretch (Chakravakasana) is a must-do yoga practice. It entails shifting the spine from a rounded to an arched posture (flexion to extension). Each movement is performed in tandem with an inhale or exhalation of the breath, resulting in a basic vinyasa (connecting breath to movement).
The spine and abdominals are the primary targets.
Level: Beginner
This posture can be done as part of a warming sequence, a relaxation sequence, or as a back pain prevention practice.
Benefits
Flexing and stretching your spine might assist in improving circulation in your back’s discs. It’s a simple move, but it may be quite effective in supporting the back, relieving discomfort, and keeping a healthy spine, especially if you sit a lot.
The Cat-Cow Stretch can assist you in improving your posture and balance. Because you combine the motions with your breathing, it is also said to be an excellent stress reliever and soothing position.
2. Adho Mukha Svanasana (Downward Dog Pose)

Step by step
- Begin on all fours, with your hips above your knees and your shoulders over your wrists.
- Spread your fingers and bring your hands slightly in front of your shoulders, with your middle finger pointing forward.
- Consider making a suction cup in the middle of your palm by squeezing through the palm’s outer borders, the base of the fingers, and the fingertips. This is known as Hasta Bandha.
- Roll your upper arms away from you and your forearms inwards to create a spiral movement in your arms (for more extensive directions, see Beginners’ advice).
- Tuck your toes under and engage your lower belly on an exhale, pulling the navel back to the spine. To get into an upside-down V posture, press your hands together and pull your hips back and up.
- As you find length in your spine, keep your knees bent at first.
- Spread your collarbones and slide your shoulder blades down your spine. The muscles at the base of the neck loosened.
Maintaining spine length, ‘walk your dog’ by bending and straightening your legs alternately. Eventually bringing both heels to the ground. They do not need to contact the ground.
Stay for 5 deep breaths.
Stay for 5 deep breaths.
To exit the posture, return your knees to the floor and transition into a Child’s pose or a lunge by stepping one foot toward your hands.
Downward Dog Pose Advantages
- Strengthens the whole body, including the upper body, arms, shoulders, belly, and legs.
- Stretches the rear of the body, including the ankles, calves, hamstrings, and spine.
- Relaxes the mind.
- Increases blood circulation.
- Downward Dog is an excellent position for relieving tension in the spine between hard backbends and forward bends.
- Downward Dog can ultimately become a resting posture to help you reconnect with your breath during powerful Vinyasa or Ashtanga yoga courses with practice.
Knee friendly poses
1. Virabhadrasana II (Warrior 2)
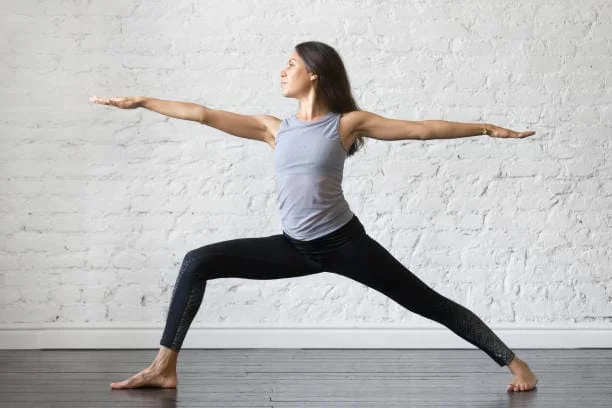
Step by step
- Start in Tadasana / Mountain pose at the front of your mat and take a large step back with your left leg, toes pointed slightly in.
- Firm your legs up and press the four corners of your feet down.
- Raise your arms parallel to the floor as you inhale, keeping your shoulders low and your neck long.
- Bend your right knee as you exhale, keeping your knee over your ankle. Adjust the position of your feet and legs as needed to gain stability in the stance.
- Roll the top of your right leg down towards the floor. To counteract that action, press down through your big toe.
- Draw in your lower abdomen and stretch your spine. Extend your fingers through your collarbones. Bring your chin in and back slightly to align your neck with your spine. Examine your right hand.
- Hold this stance for 5 breaths. As you exhale, press onto your feet and straighten your legs to exit the posture. Repeat on the opposite side, switching the alignment of your feet.
Warrior 2’s advantages
It stretches the hips and shoulders.
This stretch stretches the inner thighs, groin, and chest.
Legs, abs, and arms are strengthened.
2. Vrksasana – Tree Pose
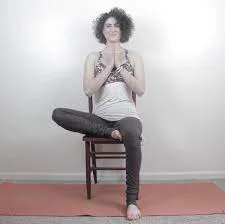
Step by step
Mountain stance.
- To assist you in maintaining your equilibrium, look at a spot at eye level.
- Transfer your weight to your left leg. Ground using your left foot’s four corners.
- Bend your right knee and reach down to grab your ankle with your right hand.
- Bend your right knee and position your right foot either above or below your knee joint on the inside of your left leg. Your knee is angled to the side.
- Press your foot into your inner thigh, then your inner thigh into your foot.
- Maintain core muscular engagement.
- Tuck your chin slightly in and back, extend your spine, relax your shoulders, and firm your left hip.
- Bring your hands to your heart in the Anjali Mudra (praying pose), or raise your arms to the ceiling. Hands should be shoulder-width apart.
Exhale and lower your leg and arms into Tadasana for a second.
Rep on the opposite side.
Benefits
- Balance is improved.
- Hips are opened.
- It helps to strengthen the ankles, legs, and spine.
- Increases spine length.
- Improves attention and concentration
- Inhale the arms up over the head and elevate and extend through the fingers and crown of the head from Staff posture.
- Exhale and progressively drop the chest towards the legs, hinged at the hips. Extend your hands to your toes, feet, or ankles.
- To deepen the stretch, do the following: A) Gently move the head and chest closer to the legs with your arms. B) Extend your heels and softly drag your toes towards you.
- Take 3-8 deep breaths and hold them.
- To be released: A) Return to Staff stance by slowly rolling up the spine. B) Inhale the arms back above your head as you return to Staff posture.
3. Seated Forward Bend Paschimottanasana
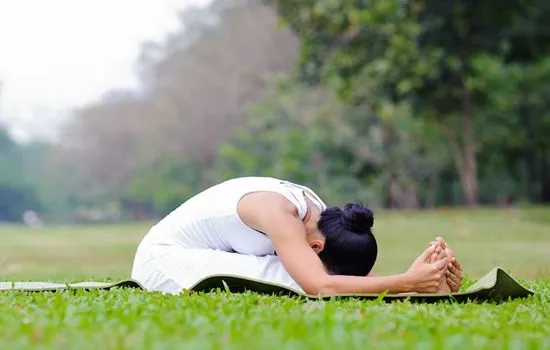
step by step
- Draw your lower belly up and inward from Dandasana, gently pressing your sitting bones into the floor or your prop.
When you inhale, extend your back.
Exhale and bend forward, hinged from the hips. Avoid folding down more than you can while maintaining a straight back. - Maintain length in the front of your body by starting at your belly, going through your ribs, chest, and forehead before finishing at your legs.
- Allow your arms to glide across the ground. Put your thumbs and first two fingers around your big toes if your hands are extended to your feet. Keep your elbows bent, extending them outward from the floor, and keep your shoulders away from your ears. If you are unable to hold your feet, keep your arms straight, grasp a strap with both hands and loop it around your feet’s soles.
- To extend the pose further, raise your head slightly and lengthen through the front of your torso with each inhale. Try to fold further into the pose with each exhale, keeping your spine long and your hips supported. As you descend further, if you are holding a strap, move your hands slowly down it. Maintain a straight arm position.
Advantages and disadvantages
Benefits: The seated forward fold stretches the whole rear side of the body from the heels to the neck. The forward fold relaxes the neurological and emotional systems while stimulating the reproductive and urine systems.
Contraindications: Recent or chronic arm, hip, ankle, or shoulder injury
What the diagnosis is and when to visit a doctor
If a person encounters any of the following, they should get medical advice:
- A fresh, major trauma inside the last seven days the knee is deformed or swollen right away after an injury incapacity to bear weight on the leg the knee becomes immediately swollen knee locks or gives way to sore knee
- In addition to performing a physical examination, a doctor can frequently identify a knee issue based only on the patient’s symptoms.
To help verify a diagnosis, they might also request one of the following tests or scans:
- MRI and
- X-ray scan
- Bone scan,
- Arthroscopy, and
- CT scan
How can you assess if the level of your exercise is suitable?
You can determine whether you’re exercising at the right intensity with the aid of this guide. It will also allow you to assess the right amount of pain or discomfort.
It might be helpful to rate your pain on a scale of 0 to 10, with 10 reflecting the greatest pain you have ever encountered. As an example:
- 0 to 3 indicates little pain
- Pain threshold: 4 to 5.
- 6 to 10: severe discomfort
- Discomfort when exercising
- Try to keep your level of pain between 0 and 5. If your pain exceeds this threshold, you can modify the exercises by:
Decreasing the speed of a movement or the number of times you perform it.
lengthening the intervals between movements for rest.
Pain after exercise:
When you exercise, your knee discomfort should not increase. However, because the body responds to new motions, attempting new activities may result in temporary physical discomfort. This sort of pain should go away quickly, and the aching shouldn’t be any greater the next morning.
How much and how often
To aid with your knee pain, you should progressively add workouts to your program.
You can do each exercise in order or start with one or two and work your way up to more as you get more comfortable.
Mobility and strength exercises:
- Repetition is the number of times you perform a single movement. Beginning new workouts with two to three repetitions at a time might be advantageous.
- Increase the amount of repetitions you accomplish by one or two every few days as this becomes simpler.
As you increase the capacity to execute more repetitions, it may be beneficial to break the exercises into sets. This means that while you won’t perform them regularly over the day, you could perform more repetitions at once. As an example:
- Perform eight sets.
- Take a moment to relax.
- In a fresh set, do eight more repetitions.
- You might try to increase the amount of repetitions you do over time. By repeating these activities, you may strengthen the tendons and muscles. Limit yourself to no more than two sets of fifteen.
Stretching exercises:
- A stretch’s objective is to hold a position for an extended period of time. This may eventually help you to increase your range of motion.
- During the activity, you should feel a little stretch.
- Stretches should be held for 20 to 30 seconds if at all possible.
- Concentrate on completing training sets. Stretch for two or three sets, for example. Ideally, do this twice or three times every day.
- Your range of motion should increase as you stretch more, allowing you to stretch longer.
When to Give Up
If these exercises aggravate your symptoms or create new pain, stop doing them. Getting medical attention from a specialist is a good option if your knee pain gets worse as you follow this advice.
How can keep kneeling even when it hurts?
It may be necessary to kneel despite knee pain due to religious practices and tradition. Despite already having knee pain, here are some suggestions from our physiotherapist to help you kneel more comfortably.
Why does discomfort increase when kneeling?
Because kneeling increases the mechanical compression on the knee joint, kneeling increases knee discomfort. This indicates a powerful pressing of the kneecap against the thigh bone. A few factors affect the compression force. For example, a person with a high body weight or one who kneels more frequently on one side than the other will feel more intense, frequent, and different types of pain. These aches include dull discomfort, pulling, and acute sensations.
A person’s knee gets more sensitive if they continue to kneel if they already have knee pain because more compression increases the discomfort. It does not, however, result in more harm to the individual.
Risk Factors
Anatomical factors:
- Past injuries to the knee: Meniscus tears, torn ligaments, or cartilage loss can weaken the joint and increase its sensitivity to pain when kneeling.
- Muscle weakness or tightness: Improper alignment and tracking of the kneecap can result in pressure and discomfort due to weak or taut muscles, especially in the quadriceps and hamstrings.
- Patellofemoral malalignment: This is a condition in which, particularly when kneeling, the kneecap rubs against the femur, causing pain.
Other factors:
- Age: As we get older, the cartilage in our knees naturally decreases, increasing the risk to pain and inflammation from activities such as kneeling.
- Weight: Being overweight puts more strain on the knee joints, which raises the possibility of pain, especially when bending over a long period of time.
- Activity or occupation: Activities or occupations that involve a lot of kneeling, like construction, gardening, or some sports, can cause repetitive strain injuries and knee pain.
- Kneeling technique: Bending your knees inward or on hard surfaces puts additional strain on the joint, which can exacerbate pain. Choose cushioning that is softer and maintain a hip-width apart stance with your toes pointed forward.
Prevention
Before you kneel:
- Before kneeling for an extended amount of time, warm up your muscles and joints with a few quick cardio and dynamic stretches.
- Strengthen your muscles: The quadriceps, hamstrings, and calves—which support your knee joint—should be regularly worked out. Leg extensions, lunges, and squats are a few beneficial exercises.
- Increase your flexibility by stretching the muscles that surround your knees and hips. This will help you avoid becoming too tight, which can aggravate existing pain. For gentle stretches, try foam rolling or yoga.
- Put on supportive footwear: To reduce impact and shock on your knees, look for shoes with strong arch support and cushioning.
While on knees.
- To reduce pressure on your knees, use padding by kneeling on a soft pad or cushion. Think about thick blankets, gel pads, or even kneeling mats.
- Keep your posture straight: Maintain your knees at a 90-degree bend, your back straight, and your core active. Refrain from bending your knees inward or slouching.
- Change your weight: Avoid spending too much time kneeling in one spot. To give your knees a rest, occasionally shift your weight.
- Take rest periods: To avoid pain and stiffness, get up every ten to fifteen minutes and move around. If you begin to experience discomfort, extend your breaks.
- Pay attention to your body: Immediately stop kneeling and elevate your knees if you feel any pain. Avoid pushing past discomfort as this could make the problem worse.
Extra advice
- Reduce your weight: If you are obese or overweight, doing so will lessen the strain on your knee joints and may help with knee pain.
- Think of other roles: Look for alternate positions, like squatting or sitting on a stool, that don’t require kneeling, depending on the activity.
- Consult a healthcare professional: If, in spite of taking precautions, your knee pain doesn’t go away, see a physician or physical therapist. They are able to identify the source of your discomfort and suggest suitable courses of action.
Complication
Short-term complications:
- Increased discomfort and swelling: Kneeling can exacerbate pre-existing knee conditions or induce inflammation in healthy joints.
- Consistent kneeling can cause the muscles surrounding the knee to become strained, which can cause soreness and tightness.
- Bursitis or bruises: Kneeling on hard surfaces can lead to bursitis, which is an inflammation of the fluid-filled sacs called bursae that cushion the joint and produce pain and soreness.
Long-term issues:
- Exacerbation of pre-existing conditions: Kneeling can accelerate the progression and pain of pre-existing knee issues such as arthritis, ligament damage, and cartilage tears.
Frequent kneeling can cause or aggravate patellofemoral pain syndrome (PFPS), a common condition characterized by pain around the kneecap. - Osteoarthritis: This degenerative joint disease, which causes persistent pain and stiffness, can occasionally be accelerated or increased by prolonged kneeling stress.
Here are some guidance for lowering the possibility of complications:
- Pay attention to your body. If you experience any pain or discomfort, stop kneeling. Avoid pushing through it as this could make the problem worse.
- Make appropriate use of padding: To ease the strain on your knees, kneel on supple surfaces such as thick blankets, cushions, or matting.
- Keep your posture straight: To distribute weight evenly and prevent straining the joint, maintain a straight back, a tight core, and a 90-degree bend in your knees.
- Take pauses: Steer clear of prolonged kneeling. Every ten to fifteen minutes, get up and move around to avoid becoming stiff or in pain.
- Become more muscular: Robust leg muscles, especially the hamstrings and quadriceps, can stabilize the knee joint and guard against damage. Think about movements such as lunges, squats, and leg extensions.
Get Medical Help
It is advisable to consult a physiotherapist if you already have chronic pain to stop the pain from growing worse and negatively impacting your quality of life. Through exercises and treatment, our team of physiotherapists will provide appropriate assistance to correct poor knee biomechanics. To lessen the strain on the knee, these seek to strengthen weak muscles, move stiff knee joints, and release tight and tense muscles.
Our physiotherapists can assist in addition to providing direction by suggesting ways to lessen the compressive tension on the knee when kneeling, such as praying on softer surfaces.
Additionally, we support long-term strategies to guarantee knee healing and lower the likelihood of recurrent injuries. Understanding the possibility of reasons for knee pain, such as increased knee load from frequent kneeling, standing, and walking, requires patient education. By dividing lengthy and physically demanding tasks into smaller, more manageable ones, proper activity planning and pacing can reduce the strain placed on the knees. Pacing and planning can be demonstrated by splitting up house cleaning into two rooms each day or performing it in periods of 45 to 60 minutes.
Summary
Arthritis and bursitis are two disorders that might cause knee pain when kneeling. Kneecap pain can come from repetitive motion or pressure from kneeling.
Any knee pain-causing problem can be treated at home by using NSAIDs, physical therapy, and stretches and strengthening exercises. Resting and putting the knee up will work just fine sometimes.
A physician who can assist in determining the cause of knee pain should be consulted about any problems regarding the knee.
FAQs
What risk does kneeling pose?
Prolonged kneeling or squatting can lead to pain, irritation, and inflammation. When you pivot your foot to turn and walk, your knee may give out if the ligaments in your knee become too unstable. Overdoing it: Overuse or overexertion of the knee joint frequently results in tendinitis or inflammation of the tendon.
Why does squatting or kneeling pain my knee?
Wear and tear on the cartilage on the rear of the kneecap is the cause of knee pain during squats. Redness, soreness, and clicking sensations are typical signs of a runner’s knee. When one squat, the amount of pressure exerted on the joint and a decrease of synovial fluid leads to a rise in inflammation and knee pain.
Does bending cause meniscus damage?
Mayo Clinic: Torn meniscus: Symptoms and Causes
Any activity that causes you to forcefully twist or rotate your knee, including vigorous pivoting or abrupt stops and turns, might result in a torn meniscus. There are situations when even deep squatting, kneeling, or lifting something heavy might cause a meniscus tear
Can cartilage be harmed by kneeling?
Individuals with an underlying patella alta, or high-riding patella, may be particularly prone to cartilage degradation caused by prolonged kneeling activity.
When I kneel, how can I keep my knees safe?
How to Avoid Workplace Knee Injuries and Select the Best…
If you must kneel, do so with knee pads and take short, 10- to 20-second breaks to extend your leg and let your knee return to its resting position.
When I kneel, why does my knee hurt?
Although knee bursitis is a frequent complaint, there are a few factors that can raise your risk of getting this painful condition: extended knelt. Long-term kneeling workers, such as carpet installers, plumbers, and gardeners, are more likely to get knee bursitis.
How much knee discomfort from kneeling be relieved?
Kneeling-related knee pain may be relieved by the following:
changing the way you kneel, doing exercises to strengthen your knees, and getting medical attention if you have discomfort that is related to a knee issue
What Could Be Causing My Sharp Knee Pain or Kneecap When I Kneel?
There are several possible causes of sharp discomfort in and around the knee during kneeling, including:
If you are older than sixty, arthritis could be the cause.
Under 20 years old, Osgood Schlatters is probably the cause.
It’s most likely a meniscus tear if you twisted awkwardly and damaged your knee.
Knee bursitis is most likely the cause if there is a small, localized pocket of swelling resembling a water balloon.
If you feel a sudden, intense pain in your kneecap, it might be a runner’s knee or an underlying injury to your kneecap.
Which Knee Pads Are Ideal for Kneeling?
Knee pads can be very helpful if you frequently need to be on your knees yet have knee pain when doing so. Which knee pads are ideal for kneeling truly relies on your intended use for them.
For gardening, you might only need a lightweight pair, but if you work in construction, you’ll need knee pads that are quite durable. For assistance selecting the ideal knee pads for you, go to the knee pads section
When I kneel on my knee, why does it burn?
When you kneel and experience scorching agony in your knee, something is likely being compressed inside or around the joint. The most likely cause is bursitis in the knee.
Another option is gout knee, which produces searing pain in the knee that is typically unrelated to kneeling. If the searing pain doesn’t go away after bending over, nerve injury in the thigh, lower back, or knee may be the cause.
How Can Knee Pain Be Prevented?
Even while you can’t stop all injuries, you can reduce their likelihood by following these guidelines.
If you get knee pain while exercising, stop.
Always increase your workout intensity gradually if you wish to.
Before and after physical exertion, stretch your legs.
To avoid bursitis, use kneepads, particularly if you must kneel frequently.
Put on shoes that are supportive enough and fit properly.
Regular stretching and strengthening will maintain the strength of your thigh muscles.
Try to lose weight if you’re overweight so that your knees and other joints won’t be as stressed
References
- Cat Pose benefits, tips, and variations – Ekhart Yoga. (2023, June 29). Ekhart Yoga. https://www.ekhartyoga.com/resources/yoga-poses/cat-pose
- Lamoreux, K. (2023, January 27). Yoga for knee pain: Benefits and more. https://www.medicalnewstoday.com/articles/yoga-for-knee-pain
- Nunez, K. (2019, May 23). How to Do Fire Hydrant Exercises. Healthline. https://www.healthline.com/health/exercise-fitness/fire-hydrant-exercise
- Lindberg, S. (2023, May 8). 10 Exercises to Help Relieve Knee Pain. Healthline. https://www.healthline.com/health/exercises-for-knee-pain
- What’s Causing My Knee Pain? (2016, December 22). WebMD. https://www.webmd.com/pain-management/knee-pain/knee-pain-causes
- Kneeling Pain: What can I do about it? (2023, April 16). Core Concepts Physiotherapy. https://www.coreconceptsphysio.sg/article/kneeling-pain/
- Wilson, C. (2019, September 24). Knee Pain Kneeling. Knee-Pain-Explained.com. https://www.knee-pain-explained.com/knee-pain-kneeling.html
- Warner, D. (2023, March 22). What to know about knee pain when kneeling. https://www.medicalnewstoday.com/articles/knee-pain-when-kneeling
4 Comments